Table of Contents
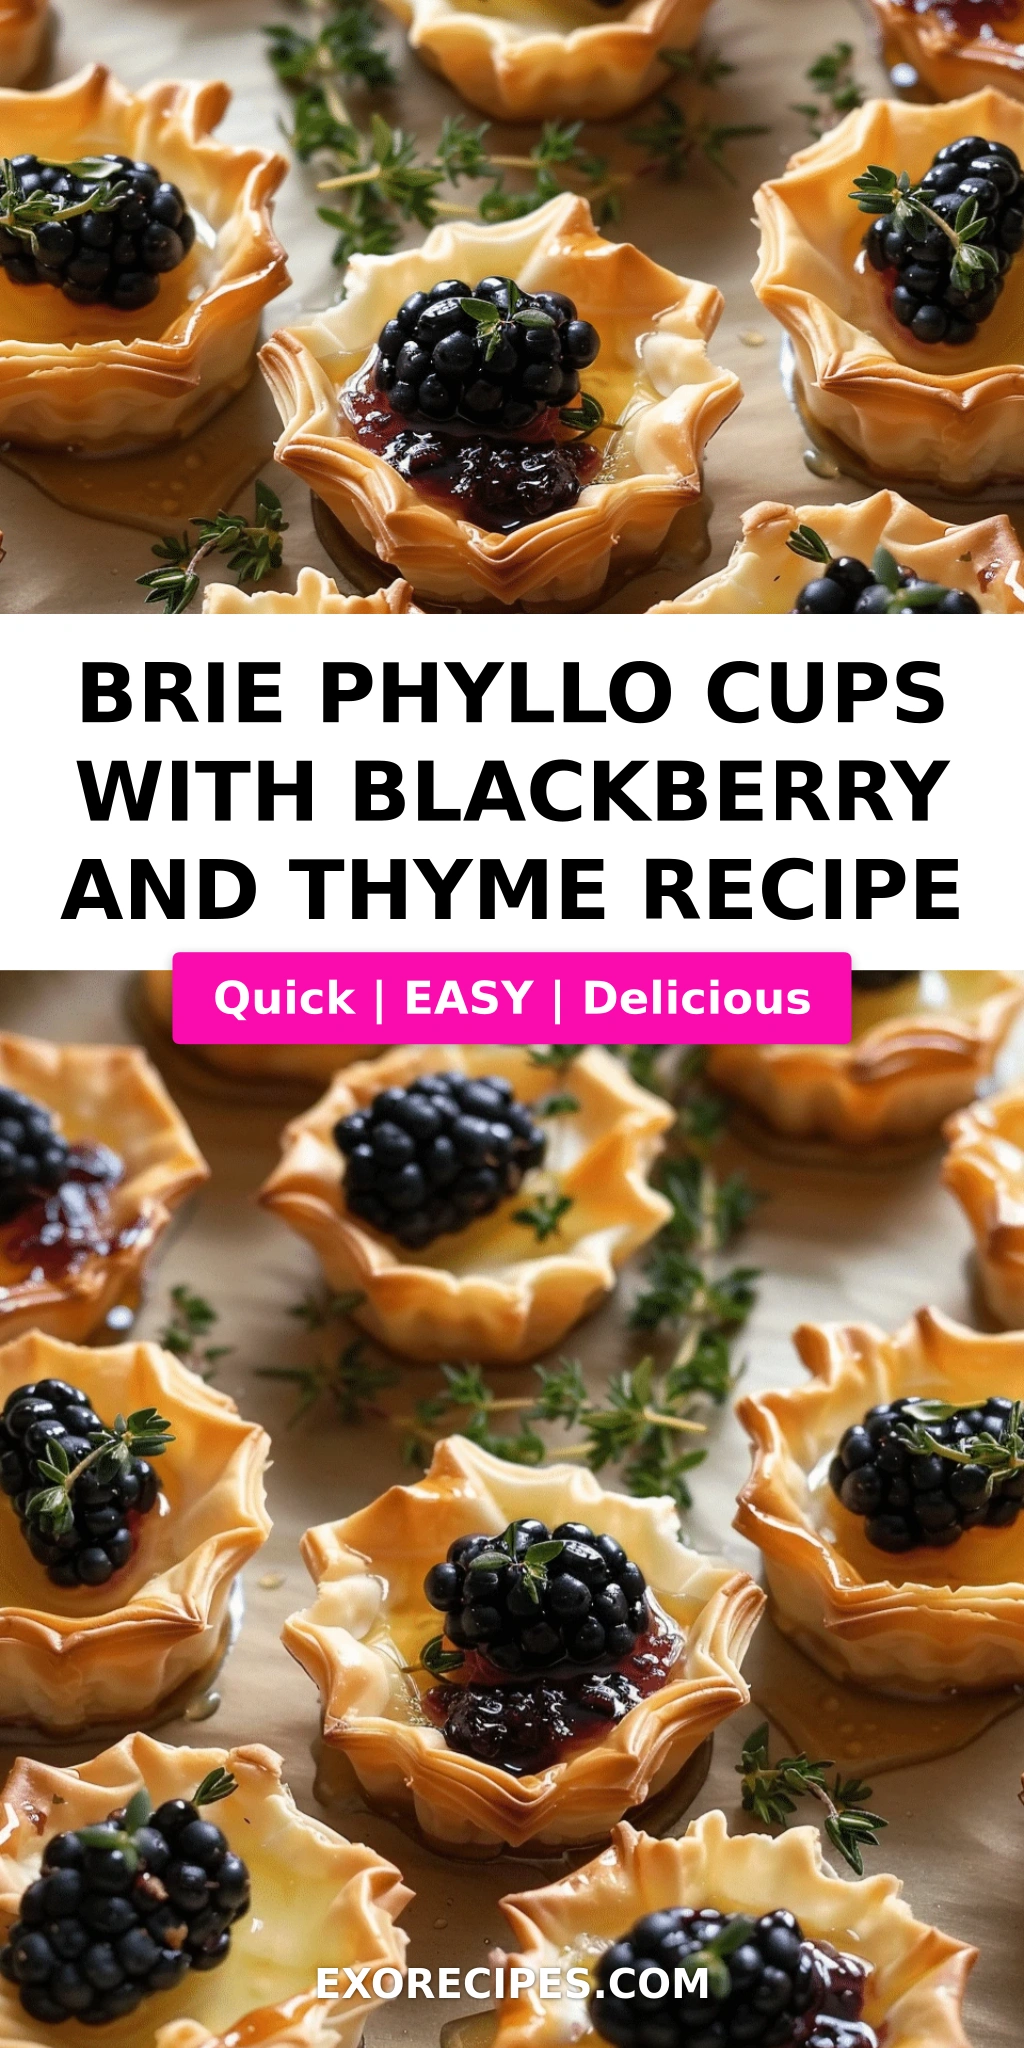
Brie Phyllo Cups with Blackberry and Thyme – Easy Elegant Appetizer
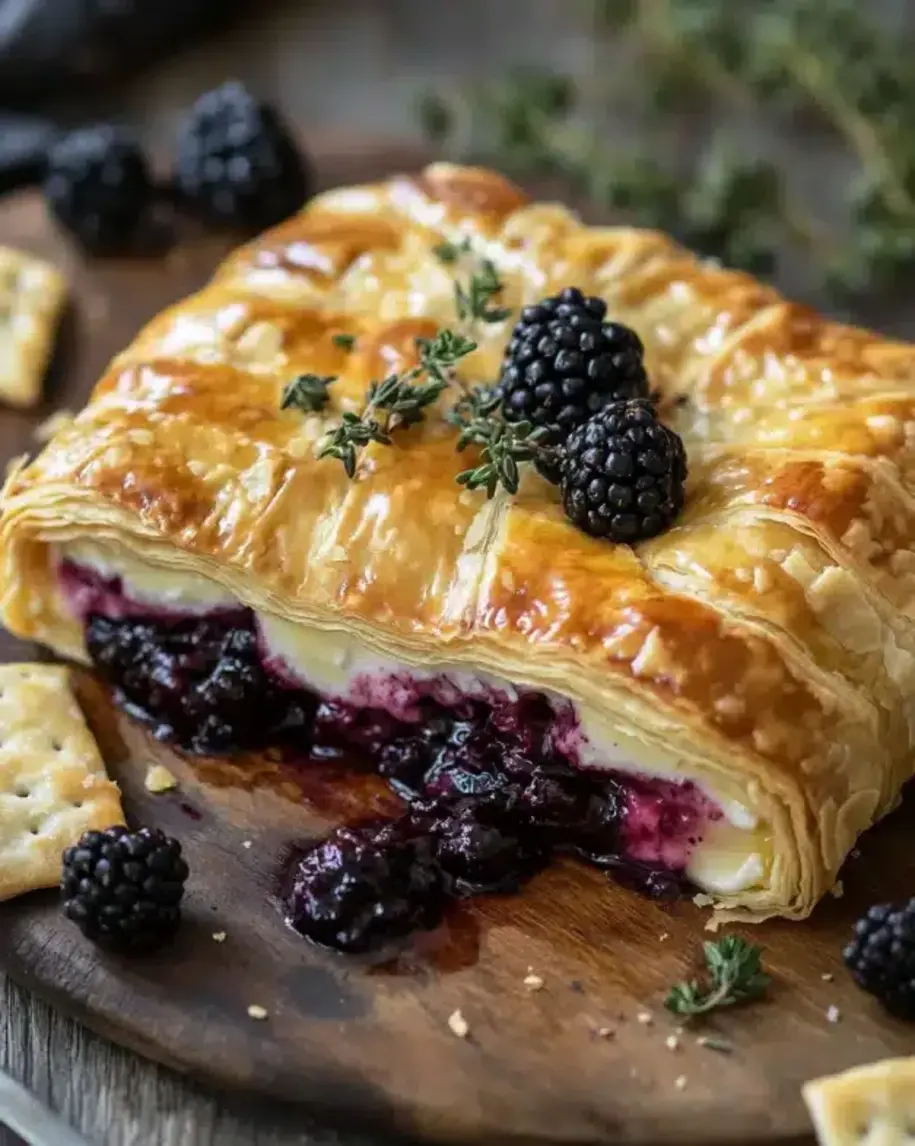
When I first moved from my mother’s kitchen in Morocco to a pastry school in Paris, I never imagined that a tiny phyllo cup would become one of my most-requested party bites. These brie phyllo cups with blackberry and thyme are everything I love about cooking: the crisp, buttery layers remind me of Moroccan briouats, the creamy brie echoes the velvety French cheeses I learned to love, and the sweet-tart blackberry compote with fresh thyme nods to the bold flavors of my baked brie cups recipe. This elegant appetizer with brie comes together in just 20 minutes, yet tastes like you spent an hour. The secret? Frozen phyllo cups and a quick stovetop compote—anyone can pull this off.
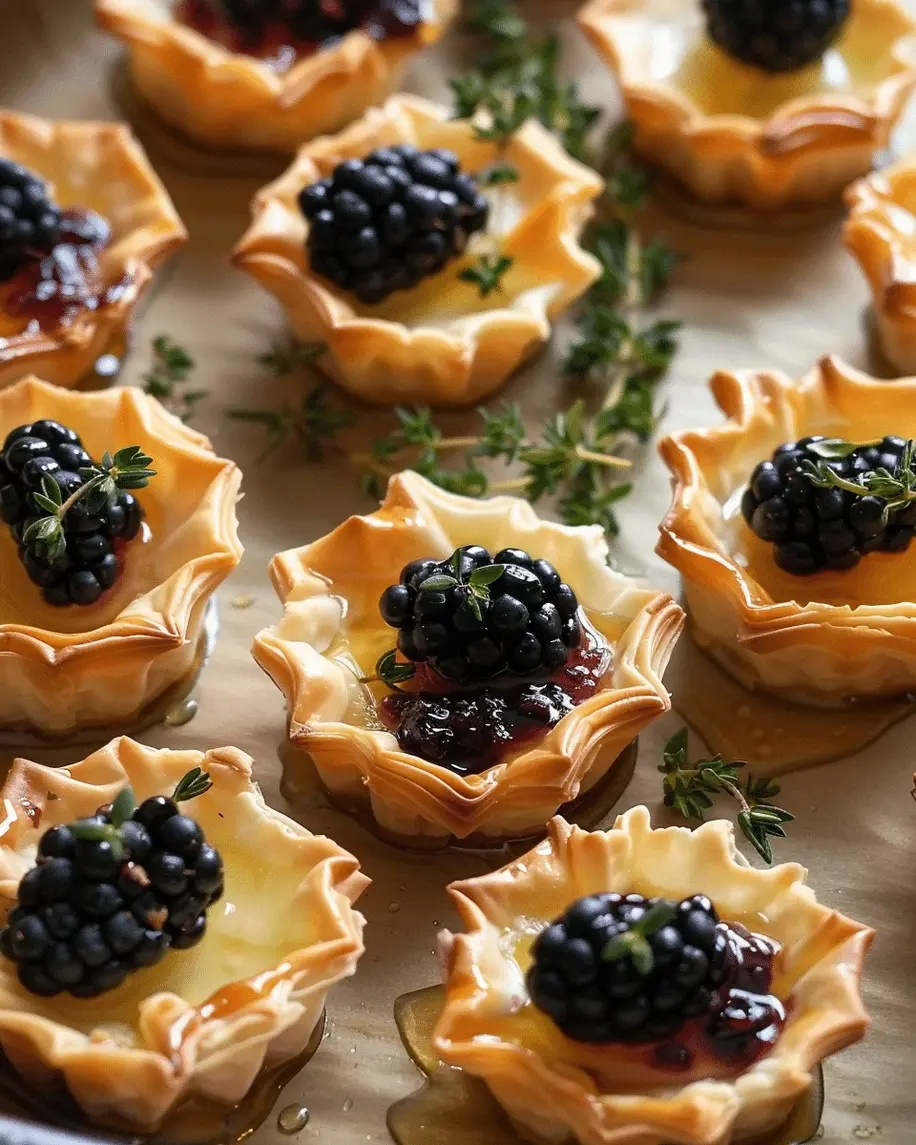
Picture this: a golden, flaky shell cradling molten brie that stretches ever so slightly when you lift the cup. On top, a jewel-toned blackberry compote—deep purple, speckled with tiny seeds, sweetened just enough with honey and brightened with lemon. Fresh thyme leaves add an herbal, almost piney finish, while a pinch of flaky sea salt makes every flavor pop. The contrast of temperatures—warm, gooey cheese against room-temperature compote—and the mix of creamy, crunchy, and fruity textures is pure magic. It’s the kind of bite that makes guests close their eyes and say “wow.”
Over the years, I’ve made these blackberry thyme appetizers for everything from rooftop parties in Brooklyn to intimate dinners in my tiny Upper West Side kitchen. They’re my go-to when I need a easy party finger food that looks fancy but doesn’t require a second oven. In this post, I’ll share my tested tips for keeping the phyllo cups crisp, the best way to remove brie rind without wasting a speck, and one common mistake that can turn your cups soggy. Trust me—after one bite, you’ll be making these on repeat.
Why This Brie Phyllo Cups Recipe Is the Best
The Flavor Secret: This recipe isn’t just about brie and blackberries—it’s about balance. I learned in Paris that great cooking is about layering flavors: the mild, buttery brie needs the acidity of lemon and the floral sweetness of honey. The thyme adds an unexpected savory note that cuts through the richness. It’s the same instinct I learned from my mother, who always added a pinch of cinnamon to her tagines—a small touch that makes everything sing.
Perfected Texture: Most baked brie recipes end up with a soggy bottom. Not here. By using pre-made mini phyllo cups and baking them just long enough to melt the cheese (5–7 minutes at 350°F), the cups stay crisp and flaky. I also arrange the compote after baking, so the moisture never touches the phyllo until serving. It’s a simple chef’s trick that makes all the difference.
Foolproof & Fast: Twenty minutes, six ingredients, zero stress. Whether you’re a seasoned cook or hosting your first dinner party, these cups come together without a fuss. No tempering, no blind baking—just thaw, fill, bake, top, serve. I’ve tested this version dozens of times to make sure every bite is as perfect as the last.
Brie Phyllo Cups with Blackberry and Thyme – Ingredients
I pick up my brie from a little cheese shop in Chelsea Market, but any good supermarket will do. For blackberries, I love the ones from the Union Square Greenmarket in summer; in winter, frozen organic berries work beautifully. The thyme comes from a pot on my fire escape—a tiny herb garden that survives NYC winters by miracle.
Ingredients List
- For the phyllo cups:
- 1 package (15 count) frozen mini phyllo cups (such as Athens or Pepperidge Farm), thawed
- 4 oz Brie cheese, rind removed and cut into 15 small pieces
- For the blackberry compote:
- 1 cup fresh or frozen blackberries
- 2 tablespoons honey
- 1 teaspoon fresh lemon juice
- For garnish:
- Fresh thyme leaves
- Flaky sea salt (optional)
Ingredient Spotlight
Brie: Look for a double-cream brie with a white, bloomy rind—the creamier the better. I always buy from a refrigerated case and let it come to room temperature for easier rind removal. Substitution: Camembert works beautifully, though it’s slightly more pungent. Avoid inexpensive “brie-style” wedges that can be waxy.
Phyllo Cups: Store-bought mini cups are a lifesaver. I recommend Athens or Pepperidge Farm—they hold their shape perfectly. You can also use frozen phyllo sheets and cut your own circles, but that adds 20 minutes. For a gluten-free option, use mini won ton wrappers (they crisp up even more).
Blackberries: Fresh in season are plump and juicy; frozen work anytime. If using frozen, don’t thaw first—just add them straight to the pan. Substitution: Raspberries, cherries, or sliced figs all make wonderful swaps. See the table below for more ideas.
| Original Ingredient | Best Substitution | Flavor / Texture Impact |
|---|---|---|
| Brie cheese | Camembert, triple-cream brie, or goat cheese | Goat cheese will be tangier; triple-cream is even richer. |
| Mini phyllo cups | Puff pastry mini shells, wonton wrappers, or homemade phyllo | Puff pastry will be puffier and richer; wontons become extra crispy. |
| Blackberries | Raspberries, blueberries, diced figs, or cherries | Raspberries are tarter; figs add sweetness and a jammy texture. |
| Honey | Maple syrup, agave, or brown sugar | Maple adds a woodsy note; brown sugar deepens caramel flavor. |
| Fresh thyme | Rosemary (finely chopped), oregano, or lemon zest | Rosemary is stronger; lemon zest brightens without herbal notes. |
How to Make Brie Phyllo Cups with Blackberry and Thyme – Step-by-Step
This recipe moves fast, so I like to have everything ready before I start. Thaw the phyllo cups on the counter for about 15 minutes, cube the brie, and measure the berries. Let’s go!
Step 1: Preheat and Prep
Preheat your oven to 350°F (175°C). Place the mini phyllo cups on a baking sheet—no need to grease. If you’re using frozen cups straight from the freezer, let them sit at room temperature for 10 minutes first so they don’t crack.
💡 mia’s Pro Tip: To prevent the phyllo cups from sticking, you can brush the baking sheet with a tiny bit of melted butter, but I find they release easily without it.
Step 2: Fill with Brie
Remove the rind from the brie by cutting it off with a sharp knife. I like to slice the brie into 15 equal cubes—about ¼ ounce each. Place one cube into each phyllo cup, pressing it gently into the bottom.
⚠️ Common Mistake to Avoid: Don’t overfill! Too much brie will overflow and make the cups soggy. Stick to a ¼-ounce piece per cup.
Step 3: Bake the Cups
Bake for 5–7 minutes, until the brie is melted and bubbly. Watch closely—oven temperatures vary. The edges of the phyllo should be golden brown and the cheese should look molten but not browned.
💡 mia’s Pro Tip: If the phyllo edges start browning before the cheese melts, tent the tray loosely with foil. This protects the delicate pastry.
Step 4: Make the Compote
While the cups bake, make the blackberry compote. In a small saucepan over medium heat, combine blackberries, honey, and lemon juice. Cook, stirring occasionally, for 3–5 minutes until the berries release their juices and the mixture thickens slightly. You want it syrupy but not jammy—it should still have some whole berries visible.
⚠️ Common Mistake to Avoid: Overcooking the compote will turn it into a stiff jam. Remove from heat as soon as the mixture coats the back of a spoon.
Step 5: Assemble and Garnish
Remove the phyllo cups from the oven. Immediately top each with a small spoonful of the blackberry compote (about 1 teaspoon per cup). Garnish with fresh thyme leaves and a pinch of flaky sea salt if desired. Serve warm—the contrast between hot brie and warm compote is divine.
💡 mia’s Pro Tip: For the prettiest presentation, arrange the cups on a platter and sprinkle a few extra thyme leaves and blackberries around the board. It makes a stunning serving idea for brunch or cocktail hour.
| Step | Action | Duration | Key Visual Cue |
|---|---|---|---|
| 1 | Preheat oven, thaw phyllo cups | 10 min | Phyllo cups are pliable, not frozen |
| 2 | Fill cups with brie cubes | 2 min | Each cup has a neat cube of cheese |
| 3 | Bake cups | 5–7 min | Edges golden, cheese bubbly and melted |
| 4 | Cook blackberry compote | 3–5 min | Berries soften, juices thicken slightly |
| 5 | Top cups with compote and garnish | 2 min | Shiny compote on melted brie, fresh thyme leaves |
Serving & Presentation
These brie phyllo cups are wonderful as a passed appetizer during a cocktail party, or arranged on a platter for a brunch table. I love serving them on a rustic wooden board scattered with fresh blackberries, a few sprigs of thyme, and a small bowl of extra flaky sea salt. For a Moroccan touch, sometimes I add a drizzle of orange flower water to the compote—a trick from my mother.
In NYC, I often pair these cups with a crisp Sauvignon Blanc or a dry sparkling wine. The acidity cuts through the richness of the brie. For a non-alcoholic option, try a tart hibiscus iced tea. They also work beautifully alongside a salad of bitter greens and a simple lemon vinaigrette.
| Pairing Type | Suggestions | Why It Works |
|---|---|---|
| Side Dish | Mixed greens with lemon vinaigrette, roasted asparagus, or a fruit salad | Light sides balance the richness of the brie. |
| Sauce / Dip | Extra compote, honey drizzle, or a balsamic reduction | Adds moisture and another layer of sweet-savory flavor. |
| Beverage | Sauvignon Blanc, dry rosé, or a sparkling water with lemon | Acid and bubbles cut through the creamy cheese. |
| Garnish | Thyme sprigs, extra blackberries, edible flowers, flaky salt | Makes the dish look restaurant-worthy and adds freshness. |
Make-Ahead, Storage & Reheating
Life in New York is fast, so I often prep the compote a day in advance and keep it in the fridge. The phyllo cups are best served immediately after baking, but you can assemble them up to an hour before and store them at room temperature. Here’s my tested storage guide:
| Method | Container | Duration | Reheating Tip |
|---|---|---|---|
| Refrigerator | Airtight container (cups separated) | Up to 2 days | Reheat on a baking sheet at 350°F for 3–4 minutes until warm. |
| Freezer | Freezer-safe bag, cups arranged in a single layer | Up to 1 month | Bake from frozen at 350°F for 8–10 minutes. Do not thaw first or they’ll become soggy. |
| Make-Ahead (Compote) | Jar or bowl, covered | Up to 5 days in advance | Reheat compote gently in a pan or microwave before topping cups. |
If you have leftover baked cups, reheat them in the oven (not microwave) to revive the crispness. The compote can be made up to a week ahead and stored in the fridge. I often double the compote recipe and use it over yogurt or ice cream the next day.
Variations & Easy Swaps
One of the things I love most about this recipe is how versatile it is. Over the years, I’ve played with different fruits, cheeses, and herbs. Here are my three favorite variations:
| Variation | Key Change | Best For | Difficulty Impact |
|---|---|---|---|
| Fig & Rosemary | Substitute blackberries with dried figs (soaked) + honey; use rosemary instead of thyme | Fall entertaining, holiday parties | Same difficulty |
| Goat Cheese & Cherry | Replace brie with soft goat cheese; use cherry compote | Lighter, tangier appetizer | Same difficulty |
| Savory Sundried Tomato & Basil | Skip fruit compote; top with sundried tomato pesto and basil | Savory lovers, bruschetta fans | Same difficulty |
Fig & Rosemary Variation
In autumn, I swap blackberries for dried Mission figs. Soak them in warm water for 20 minutes, then dice and simmer with honey, a splash of balsamic, and fresh rosemary. The deep sweetness pairs beautifully with the brie. It reminds me of the fig trees I climbed as a girl in Morocco.
Gluten-Free / Dairy-Free Variation
For gluten-free friends, use mini wonton wrappers (most are rice-based) and bake them in a mini muffin tin. For dairy-free, substitute the brie with a cashew-based soft cheese or a vegan brie alternative. The compote remains the same—just be sure to check the labels on your phyllo cups, as some contain wheat.
Seasonal Flavor Twist
When I find perfect raspberries at the Union Square market, I use them instead of blackberries. Add a pinch of cracked black pepper to the compote—it sounds odd but the heat really wakes up the fruit and cheese. In winter, try a cranberry-orange compote with a dash of cinnamon. Every season brings a new excuse to make these cups.
Can I use frozen phyllo cups instead of making them from scratch for this recipe?
Yes, absolutely! In fact, I recommend frozen mini phyllo cups for this recipe. They save so much time and deliver consistently crisp, flaky results. I use Athens or Pepperidge Farm brand—each package contains 15 pre-formed cups that are ready to fill after a quick thaw (about 15 minutes at room temperature). Making your own phyllo cups from scratch is possible, but it requires thawing whole phyllo sheets, brushing with butter, cutting rounds, and pressing them into mini muffin tins. That process easily adds 20–30 minutes. For a quick party appetizer, frozen cups are the way to go. Just be sure not to overbake them; 5–7 minutes at 350°F is perfect.
How do I prevent the phyllo cups from getting soggy when adding the brie and blackberry topping?
The best way to prevent soggy phyllo cups is to add the blackberry compote only after the cups have baked and the cheese is melted. The compote contains moisture from the berries, and if you add it before baking, the liquid will seep into the phyllo and turn it soft. I always bake the cups with just the brie, then spoon the compote on top immediately before serving. Another tip: don’t overfill the cups with compote—about 1 teaspoon per cup is enough. If you want to make ahead, store the compote separately and assemble just before serving. Also, avoid using overly watery berries; if using frozen blackberries, don’t thaw them first, as they release extra liquid when cooked.
What can I substitute for blackberries in these brie phyllo cups if they are out of season?
You have plenty of delicious options! Frozen blackberries work wonderfully year-round—just use them straight from the freezer without thawing. If you want a different flavor, try raspberries (they’re tarter), blueberries (milder and sweeter), or diced strawberries. For a more autumnal twist, use sliced figs or a cherry compote. I’ve also made this with diced mango and a touch of lime for a tropical version. The key is to adjust the sweetness: if your fruit is very tart, add an extra teaspoon of honey; if it’s very sweet, reduce the honey slightly. The cooking time stays the same—3–5 minutes on the stove until the fruit softens and the juices thicken.
Can I prepare these brie phyllo cups with blackberry and thyme ahead of time for a party?
Yes, with a few smart strategies. The blackberry compote can be made up to 5 days ahead and stored in the fridge—just reheat it gently before serving. You can also assemble the cups completely (with brie and compote) up to 2 hours before your party, but keep them at room temperature and don’t bake until just before serving. If you need to bake them earlier, the cups can be baked, topped with compote, and held at room temperature for up to 1 hour. After that, the phyllo may start to soften. For a larger party, I recommend baking the cups in batches so guests always get warm, crispy cups. Freezing is also an option: assemble unbaked cups (with brie only, no compote) on a tray, freeze until solid, then transfer to a freezer bag. Bake from frozen at 350°F for 8–10 minutes, then add the compote.
What is the best way to remove the rind from brie cheese?
Removing the rind from brie is easy if you use the right technique. First, make sure the cheese is slightly chilled—it’s much easier to cut when firm. Place the wedge of brie on a cutting board and use a sharp knife to slice off the top and bottom rind layers, then trim the sides. Alternatively, you can slice the brie into cubes first, then cut the rind off each cube individually. I find this method faster and less wasteful. Don’t throw away the rind—it’s edible and can be added to soups or sauces for flavor. For this recipe, the rind needs to be removed because it won’t melt smoothly inside the phyllo cups. The creamy interior is what you want for that oozy, molten texture.
Can I use a different type of cheese instead of brie?
Absolutely! Camembert is the closest substitute—it has a similar creamy texture and mild flavor, though it’s slightly earthier. For a tangier twist, try soft goat cheese (chèvre) or a triple-cream cheese like Brillat-Savarin. If you want something a bit sharper, a young gouda or fontina will melt well, though they have a different flavor profile. Vegan alternatives exist too, like cashew-based soft cheeses that melt nicely. Just keep in mind that cheeses with lower fat content may not become as oozy. Whichever cheese you choose, cut it into small cubes so it melts evenly within the 5–7 minute baking time. Avoid hard cheeses like cheddar or parmesan—they won’t melt to the same luscious consistency.
Is there a way to make this recipe vegan?
Yes, you can easily veganize these brie phyllo cups. Start with mini phyllo cups—most are accidentally vegan (just check the label for butter or eggs). For the cheese, use a vegan brie-style cheese made from cashews or coconut oil; brands like Miyoko’s Creamery make a wonderful cultured nut cheese that melts beautifully. The blackberry compote is already vegan as written (blackberries, honey, lemon juice)—but to keep it fully vegan, swap the honey for maple syrup or agave. The garnish remains the same: fresh thyme and flaky salt. Everything else in the recipe—baking time, assembly—works exactly the same way. These vegan versions are always a hit at my holiday parties!
Can I make these brie phyllo cups in an air fryer?
Yes, an air fryer works beautifully for this recipe. Preheat your air fryer to 320°F (160°C). Place the filled phyllo cups in the air fryer basket in a single layer—don’t overcrowd. Cook for 4–5 minutes, checking at the 4-minute mark. The cheese should be melted and bubbly, and the edges of the phyllo will be golden. Air fryers circulate heat more intensely, so the cups may brown a bit faster than in a conventional oven. I like to add the compote after air-frying, same as the oven method. This is a great option for small batches or when you don’t want to heat up your whole kitchen. Just work in batches if you’re making all 15 cups at once.
What wine pairs best with brie phyllo cups and blackberry compote?
I love pairing these brie phyllo cups with a crisp, acidic white wine that can cut through the richness of the cheese and complement the sweet-tart compote. A Sauvignon Blanc from the Loire Valley or New Zealand is a top choice—its herbaceous notes echo the thyme beautifully. A dry rosé works wonderfully too, especially for summer parties. If you prefer red, choose a light-bodied, fruit-forward option like a Beaujolais or a Pinot Noir. For sparkling fans, a dry Prosecco or Champagne is always a winner—the bubbles refresh the palate between bites. Non-alcoholic: try a sparkling water with a splash of elderflower cordial or a tart lemonade. The acidity in any of these drinks balances the creamy brie perfectly.
How many phyllo cups come in a standard package, and can I easily double this recipe?
Most standard packages of frozen mini phyllo cups contain 15 cups per box (brands like Athens and Pepperidge Farm both follow this count). This recipe uses exactly one package, making 15 individual appetizers. To double the recipe, simply buy two boxes and double all ingredient quantities. You may need to use two baking sheets or work in batches depending on your oven size. The baking time won’t change if you bake both sheets at once—just rotate the pans halfway through for even browning. For the compote, double the berries, honey, and lemon juice; the cooking time might increase slightly (5–7 minutes instead of 3–5) because of the larger volume. Leftover compote keeps well in the fridge for a week and is delicious on yogurt or pancakes.
Share Your Version!
I hope you fall in love with these brie phyllo cups with blackberry and thyme as much as I have. They’ve become a staple in my New York kitchen—whether I’m hosting a book club, a holiday gathering, or just treating myself to something special on a rainy Sunday. I’d love to see how yours turn out! Leave a star rating and a comment below to let me know if you tried any substitutions. Tag me on Instagram or Pinterest @exorecipes when you share your photos—I personally love seeing your creative touches.
From my NYC kitchen to yours — I hope this recipe brings as much warmth to your table as it does to mine. — mia 🧡
Love This Recipe? Save It to Pinterest!
If you enjoyed this Brie Phyllo Cups with Blackberry and Thyme recipe, don’t let it get lost in your browser tabs! 😄 Pin it now so you can find it again anytime — and explore hundreds more tried-and-tested recipes waiting for you on my Pinterest boards.
👉 Follow mia on Pinterest @chefrecipes2
📌 Pin this recipe · 🔁 Re-pin your favorites · 💬 Tag me when you make it — I love seeing your creations!
Did you make these Brie Phyllo Cups with Blackberry and Thyme? I’d love to know! Leave a comment below, rate the recipe, and tell me which variation you tried. Your feedback helps me create better recipes for you! 💬

Brie Phyllo Cups with Blackberry and Thyme
- Prep Time: 10 minutes
- Cook Time: 10 minutes
- Total Time: 20 minutes
- Yield: 15 cups (5 servings) 1x
- Method: Appetizer
- Cuisine: American
Description
These elegant and easy appetizers feature creamy brie baked in crispy phyllo cups, topped with a sweet-tart blackberry compote and fresh thyme. Perfect for parties or a sophisticated snack.
Ingredients
- For the phyllo cups:
- 1 package (15 count) frozen mini phyllo cups (such as Athens or Pepperidge Farm), thawed
- 4 oz Brie cheese, rind removed and cut into 15 small pieces
- For the blackberry compote:
- 1 cup fresh or frozen blackberries
- 2 tablespoons honey
- 1 teaspoon fresh lemon juice
- For garnish:
- Fresh thyme leaves
- Flaky sea salt (optional)
Instructions
- Preheat oven to 350°F (175°C).
- Place the mini phyllo cups on a baking sheet.
- Place one piece of Brie cheese into each phyllo cup.
- Bake for 5-7 minutes, until the Brie is melted and bubbly.
- While the cups bake, make the compote: In a small saucepan over medium heat, combine blackberries, honey, and lemon juice. Cook, stirring occasionally, for 3-5 minutes until the berries release their juices and the mixture thickens slightly.
- Remove the phyllo cups from the oven. Top each with a small spoonful of the blackberry compote.
- Garnish with fresh thyme leaves and a pinch of flaky sea salt if desired. Serve warm.
Notes
You can also use frozen phyllo sheets and cut them into rounds, but mini phyllo cups save time. For a less sweet compote, reduce honey to 1 tablespoon. The compote can be made ahead and refrigerated.
Nutrition
- Calories: 98
- Sugar: 6g
- Fat: 5g
- Carbohydrates: 12g
- Protein: 2g
Tried This Recipe? Leave a Comment!
Did you make this recipe? I’d love to hear how it turned out! Please leave a comment and a rating below. Your feedback helps other home cooks and supports cheerychop.com!