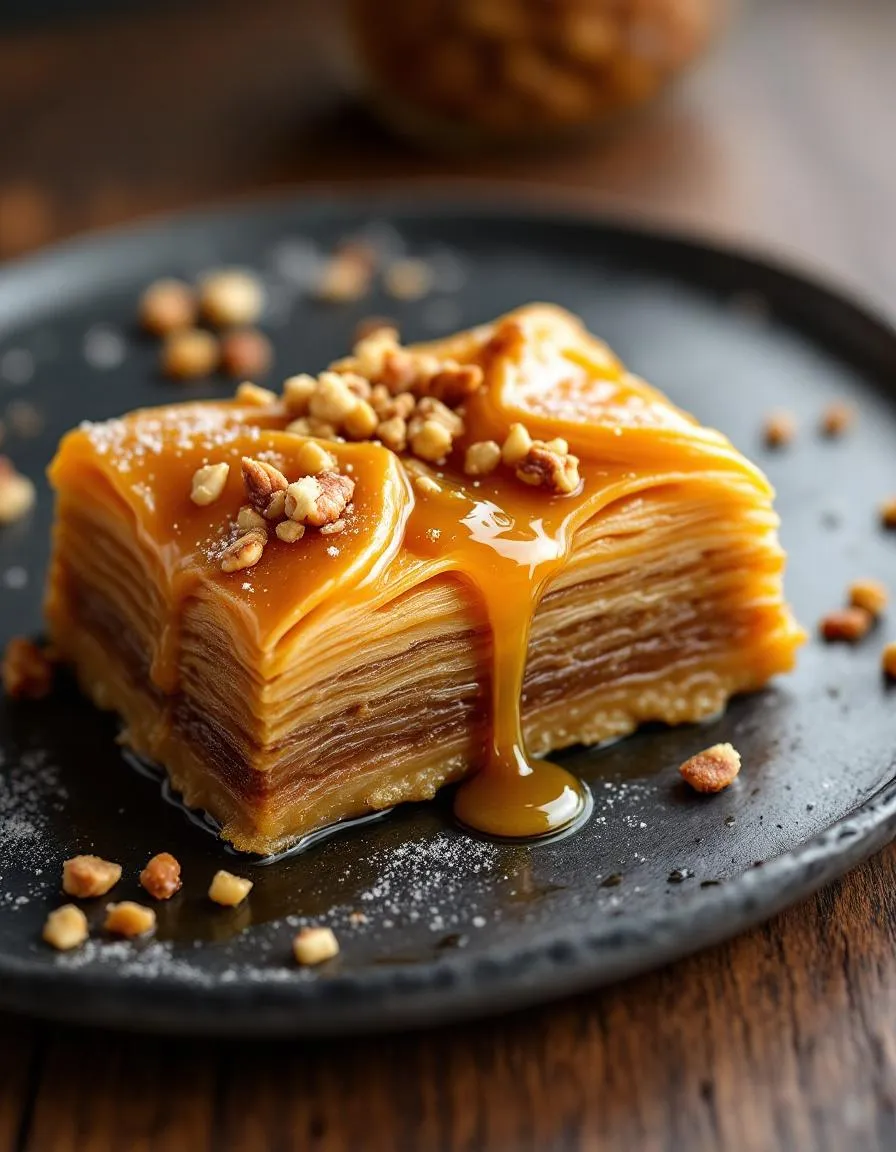
There’s something magical about biting into a piece of baklava—the crisp layers of phyllo, the nutty sweetness, and that irresistible drizzle of honey. Whether you grew up with this dessert or discovered it later in life, an Irresistible Baklava Recipe has a way of transporting you to cozy gatherings and cherished memories. If you’ve ever wanted to recreate that perfect balance of crunch and syrup at home, you’re in the right place. This recipe delivers all the warmth and flavor of the classic treat, with clear steps to guide you from start to finish.
Baklava isn’t just a dessert. It’s a celebration of textures and traditions, with roots stretching across cultures and centuries. Our Irresistible Baklava Recipe stays true to the essence of this beloved pastry while keeping the process approachable for home cooks. You’ll layer buttery phyllo dough with a spiced nut filling, then soak everything in a fragrant honey syrup. The result? A dessert that’s crisp yet tender, rich yet balanced. For anyone who loves baking or exploring global flavors, this recipe fits perfectly into your culinary adventures. If you enjoy working with phyllo, you might also love our flaky spanakopita, another Mediterranean favorite. And if you’re new to handling delicate dough, don’t worry. With patience and our tips, you’ll master the technique in no time.
Why I Love This Recipe
Baklava holds a special place in my heart because it reminds me of my grandmother’s kitchen. She taught me how to handle phyllo with care, brushing each layer just enough to crisp without drowning it. Every time I make this Irresistible Baklava Recipe, I think of her laughter and the way she’d sneak extra nuts into the filling. It’s more than a dessert to me. It’s a connection to family, to shared stories, and to the joy of creating something beautiful from simple ingredients. I hope this recipe brings you the same warmth and satisfaction it’s brought me over the years. For more inspiration, check out our golden honey cake, another sweet tribute to timeless flavors.
Health and Nutrition
Why it’s good for your body
Irresistible Baklava Recipe packs a surprising nutritional punch while satisfying your sweet tooth. First, the walnuts and pistachios provide heart-healthy fats, protein, and fiber, which keep you full longer. Additionally, these nuts deliver antioxidants that combat inflammation, making this dessert a smarter indulgence. Meanwhile, honey, a natural sweetener in Irresistible Baklava Recipe, offers trace minerals and a gentler impact on blood sugar compared to refined sugar.
Moreover, phyllo dough keeps the dessert lighter than many pastries, especially when brushed lightly with butter or oil. The layers crisp beautifully without weighing you down. Finally, cinnamon and cloves in Irresistible Baklava Recipe add more than warmth—they support digestion and blood sugar regulation. While it’s still a treat, this version balances flavor and nourishment better than most desserts.
How it fits in a healthy lifestyle
Enjoy Irresistible Baklava Recipe as part of a mindful eating plan. Pair a small piece with protein-rich Greek yogurt or fresh fruit to balance macros and curb sugar spikes. For gluten-free diets, swap phyllo with gluten-free alternatives like almond flour layers—similar to techniques in our gluten-free dessert swaps guide.
If you prioritize heart health, focus on the nuts’ unsaturated fats and portion control. One square satisfies cravings without derailing goals. For more smart dessert strategies, explore our balanced indulgences roundup. Remember, treats like this belong in moderation, celebrating flavor without guilt.
Preheat oven to 350°F (175°C). Grease a 9×13-inch baking dish.
Mix chopped nuts with cinnamon and cloves in a bowl.
Layer 8 sheets of phyllo dough in the dish, brushing each with melted butter.
Sprinkle 1/3 of the nut mixture over the phyllo.
Repeat layering phyllo and nuts twice more, ending with a top layer of 8 phyllo sheets.
Cut baklava into diamond or square shapes before baking.
Bake for 50 minutes or until golden brown.
While baking, make syrup by boiling sugar, water, honey, vanilla, and lemon juice for 10 minutes. Let cool slightly.
Pour syrup over hot baklava immediately after removing from oven. Let soak for several hours before serving.
Notes
You can customize the seasonings to taste.
“`html
="how-to-prepare-this-dish">How to Prepare This Dish
Steps and time-saving tips
Start by preheating your oven to 350°F so it’s ready when you need it. While the oven heats, grab a large bowl and whisk together the melted butter, sugar, and vanilla until smooth. Next, gently fold in the finely chopped nuts—walnuts or pistachios work best—and a pinch of cinnamon for warmth. Unroll your phyllo dough carefully, keeping it covered with a damp towel to prevent drying. Brush a 9×13-inch baking dish with butter, then layer half the phyllo sheets one at a time, buttering each lightly. Spread the nut mixture evenly over the phyllo, then top with the remaining sheets, buttering every layer. Use a sharp knife to cut the baklava into diamonds or squares before baking—this prevents crumbling later. Bake for 40-45 minutes until golden and crisp. Meanwhile, simmer honey, lemon juice, and water for the syrup. Once the baklava comes out of the oven, drizzle the warm syrup over the hot pastry. Let it soak for at least 4 hours, though overnight is ideal for maximum flavor. For a time-saving hack, prepare the syrup ahead and store it in the fridge.
Mistakes I’ve made and learned from
My first attempt at this Irresistible Baklava Recipe was a mess—I rushed the phyllo layering and ended up with dry, brittle sheets. Now I keep a damp towel over the stack and work quickly but carefully. Another blunder? Pouring cold syrup over cooled baklava, which made it soggy instead of crisp. The fix is simple: always pour warm syrup over hot baklava. If you’re new to working with phyllo, check out my phyllo dough guide for foolproof handling. And if your nuts turn bitter, you might be over-toasting them—learn the perfect roast with my toasting nuts tutorial. Trust me, these small adjustments make all the difference.
The Irresistible Baklava Recipe we know today weaves together centuries of history, crossing borders from the Ottoman Empire to modern-day kitchens. Originally, baklava graced the tables of sultans and nobles, its layers of flaky phyllo and spiced nuts symbolizing wealth and celebration. Over time, families across Greece, Turkey, and the Middle East made it their own, swapping walnuts for pistachios or drizzling honey instead of syrup.
In my family, the Irres
istible Baklava Recipe always marked special occasions—weddings, holidays, or even just a Sunday gathering. My aunt insisted on hand-stretching the phyllo, a technique she learned from her grandmother in Istanbul. Meanwhile, in Lebanon, friends add orange blossom water to their syrup, giving it a floral twist. No matter the variation, the magic lies in those crisp, buttery layers.
Travel further east, and you’ll find baklava stuffed with dates in Saudi Arabia or lightly spiced with cardamom in Iran. Some versions even skip the nuts altogether, using semolina for a unique texture. Yet, no matter how you slice it, this dessert always brings people together, one sweet bite at a time.
How it fits in today’s cooking
Today, the Irresistible Baklava Recipe holds its own as a timeless treat, bridging tradition and modern convenience. Busy home cooks often use store-bought phyllo, saving time without sacrificing flavor. Others, like those who love our easy dessert recipes, experiment with gluten-free or vegan versions, proving baklava can adapt to any diet.
Holidays still shine as
the perfect excuse to bake a tray, but why wait? Many now enjoy baklava as an everyday indulgence, pairing it with coffee for a midday pick-me-up. It’s also a star at potlucks, where it effortlessly steals the spotlight. For those craving a twist, our modern baking tips offer creative ways to reinvent this classic, like adding chocolate or swapping in seasonal fruits. No matter how you serve it, baklava’s rich history and irresistible flavor keep it forever in style.
Taste and Texture
What makes it delicious
Every bite of Irresistible Baklava Recipe delivers a symphony of textures and flavors. Crisp, golden layers of flaky phyllo dough shatter delicately, giving way to a sticky-sweet filling of chopped nuts and honey. The walnuts or pistachios add a satisfying crunch, while the syrup infuses each layer with fragrant warmth from cinnamon and cloves. Meanwhile, the buttery richness balances the floral sweetness, creating a melt-in-your-mouth experience. The aroma alone—toasted nuts, caramelized sugar, and spice—will have you reaching for another piece of Irresistible Baklava Recipe before you finish the first.
Boosting the flavor
Elevate your baklava by experimenting with bold twists. For a deeper nutty flavor, try swapping walnuts for pecans or hazelnuts. A drizzle of orange blossom syrup adds a floral brightness, while a pinch of cardamom amplifies the spice profile. Serve it warm with a scoop of vanilla ice cream to contrast the baklava’s crispness. Alternatively, a sprinkle of sea salt on top heightens the honey’s sweetness, making each bite even more irresistible.
First, always thaw phyllo dough properly to prevent tearing when layering your Irresistible Baklava Recipe. Meanwhile, brush each sheet generously with melted butter for a crisp, golden finish. Additionally, finely chop the nuts to ensure even distribution and a balanced texture. For best results, let the baked baklava cool completely before adding the syrup so it absorbs perfectly. Finally, use a sharp knife to cut clean slices before baking to avoid crumbling later.
Mistakes to avoid
Avoid rushing the syrup step—pouring it over hot baklava can make the layers soggy. Instead, let both the syrup and baked pastry cool slightly for ideal absorption. Many bakers also skip weighing the phyllo sheets, which leads to uneven layers. For consistent results, follow our guide on handling phyllo dough to master the technique. Another common mistake is overbaking the nuts, which creates a bitter taste. For a foolproof approach, check out our nut roasting guide to lock in their natural sweetness.
g-suggestions">Serving and Pairing Suggestions
How to serve this dish
For a stunning presentation, arrange your Irresistible Baklava Recipe on a decorative platter and drizzle extra honey or syrup over the top. Meanwhile, sprinkle crushed pistachios or edible rose petals for a pop of color. Serve it warm to let the layers of flaky pastry and nutty filling shine. Additionally, this dish makes a perfect centerpiece for holiday gatherings or afternoon tea parties. Finally, pair it with small dessert forks or elegant napkins for a touch of sophistication.
What goes well with it
Elevate your Irresistible Baklava Recipe experience with a cup of strong Turkish coffee, as its bold flavor balances the sweetness perfectly. Alternatively, try a scoop of vanilla ice cream for a delightful contrast in textures. If you prefer something lighter, our refreshing Mint Lemonade complements the rich flavors beautifully. For a savory twist, serve it alongside our Spiced Chai Latte to create a cozy, aromatic pairing.
math-faq-block">
What makes baklava irresistible?
An Irresistible Baklava Recipe combines flaky phyllo dough, rich butter, and a nutty filling with the perfect balance of honey syrup. The contrast of crispy layers and sweet, sticky syrup creates a texture and flavor that’s hard to resist.
How do you keep baklava crispy?
To keep your Irresistible Baklava Recipe crispy, cool it completely before covering and store it in an airtight container at room temperature. Avoid refrigeration, as moisture softens the layers—reheat briefly in the oven if needed.
Can I use walnuts instead of pistachios in baklava?
Yes! Walnuts work beautifully in an Irresistible Baklava Recipe, offering a deeper, earthier flavor. Combine them with cinnamon for a classic variation, or mix with pistachios for extra color and texture.
ank-math-faq-item">
Why is my baklava soggy?
Soggy baklava usually happens when syrup is poured over hot pastry—always cool your Irresistible Baklava Recipe slightly before adding syrup. Also, ensure your phyllo layers are thoroughly brushed with butter to create a moisture barrier.
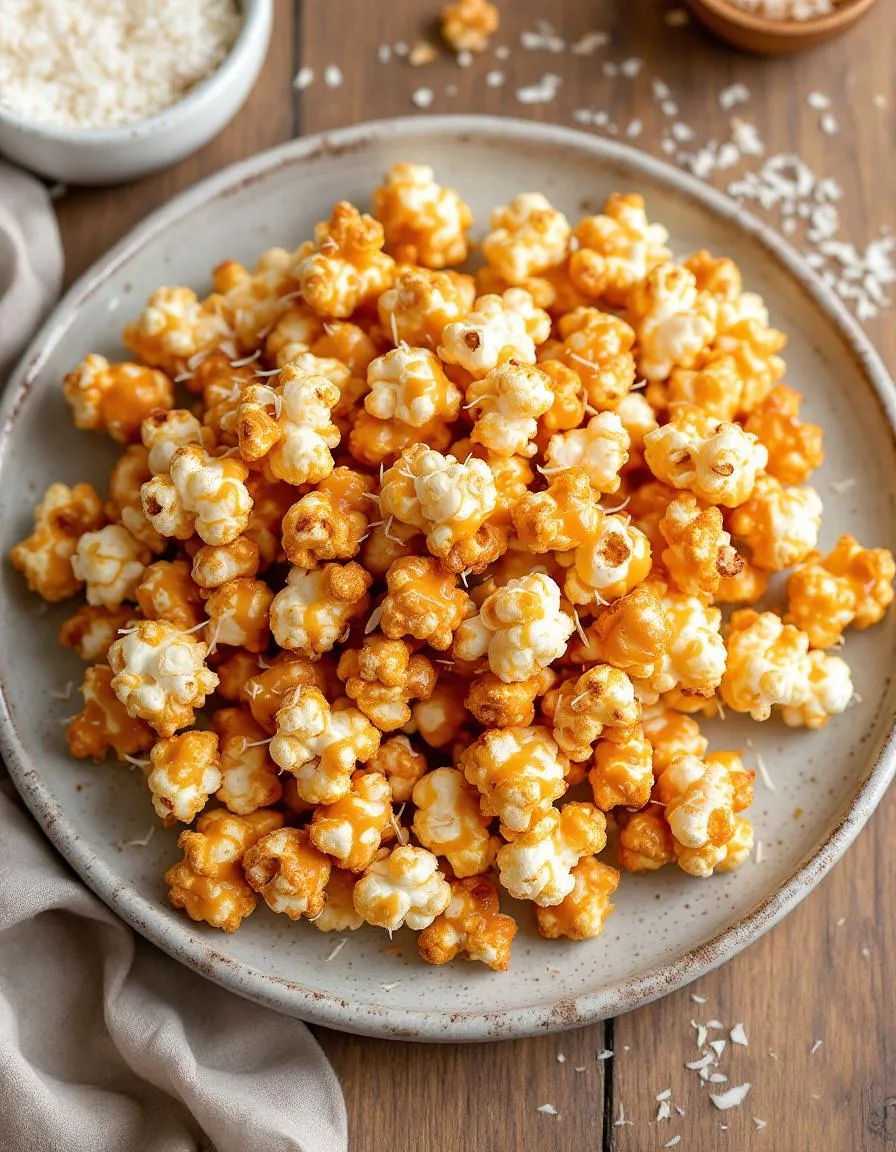
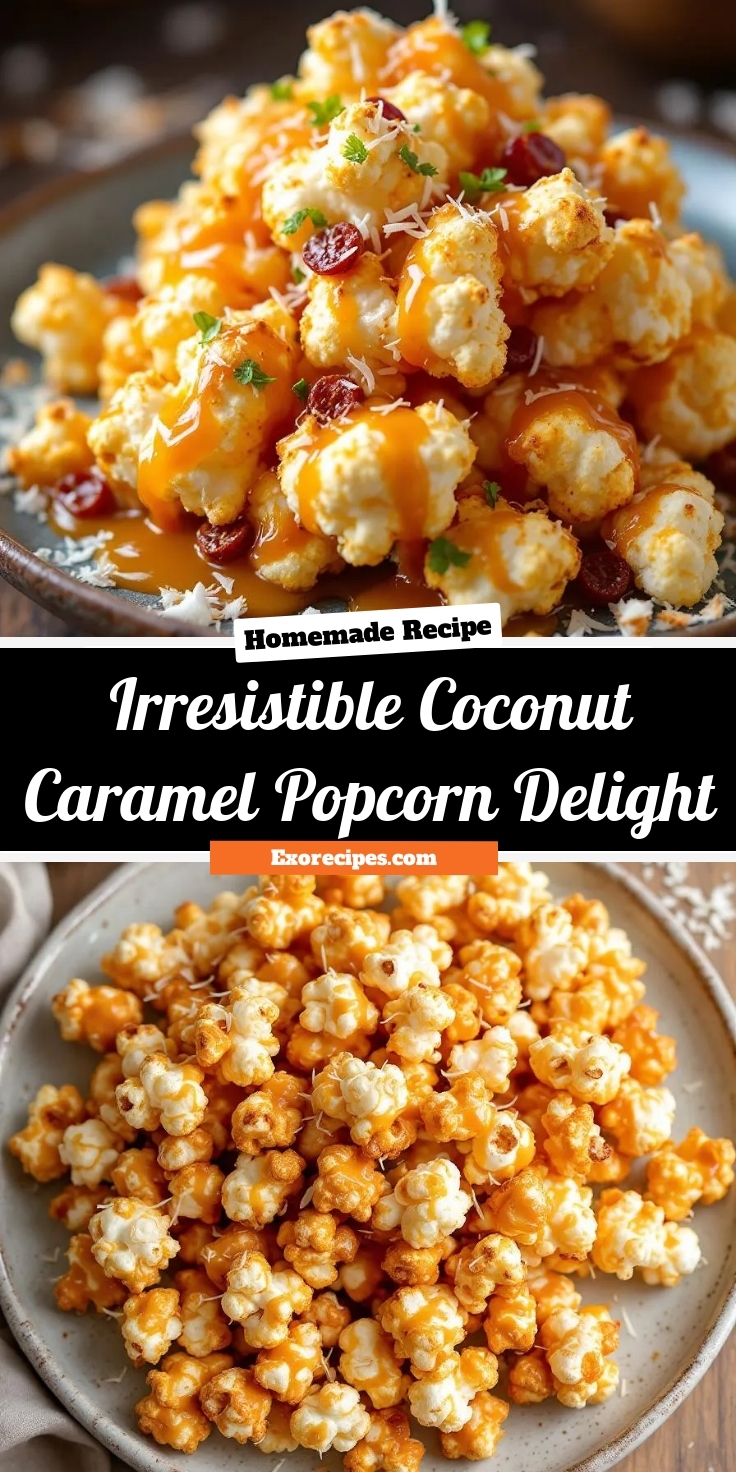
Best Coconut Caramel Popcorn – Irresistible Sweet Treat
Introduction
Do you ever crave a snack that’s sweet, crunchy, and downright addictive? Imagine biting into a handful of caramel-coated popcorn with toasted coconut flakes that melt in your mouth—each bite delivering the perfect balance of buttery richness and tropical flavor. That’s exactly what you’ll get with this Irresistible Coconut Caramel Popcorn Delight. Whether you’re hosting a movie night, packing a lunchbox treat, or simply indulging in a solo snack session, this recipe promises to hit all the right notes.
Irresistible Coconut Caramel Popcorn Delight combines the classic comfort of caramel popcorn with the exotic twist of coconut, creating a snack that’s both familiar and exciting. The caramel coats each kernel with a glossy, crackly sweetness, while the toasted coconut adds a nutty depth and satisfying crunch. What makes this recipe stand out is its versatility. You can serve it as a party snack, package it as a homemade gift, or even sprinkle it over ice cream for an extra-decadent dessert. Plus, it’s surprisingly easy to make with just a handful of pantry staples. If you love simple yet impressive recipes, you’ll also enjoy our Easy Honey Glazed Nuts or Chocolate-Dipped Strawberries for more sweet inspiration.
This recipe fits perfectly with our blog’s mission to deliver approachable, crowd-pleasing dishes that anyone can master. Whether you’re a seasoned baker or a kitchen newbie, Irresistible Coconut Caramel Popcorn Delight guarantees success—and smiles. The combination of textures and flavors makes it a standout, and the aroma alone will have everyone asking for seconds. Best of all, it’s customizable. Prefer a darker caramel? Cook it a minute longer. Want extra coconut? Toast an additional handful. This snack adapts to your taste, making it a must-try for any occasion.
Why I Love This Recipe
I’ll never forget the first time I made Irresistible Coconut Caramel Popcorn Delight. It was for a family game night, and within minutes, the entire batch disappeared. My kids begged me to make it again the next day, and my husband sneaked handfuls straight from the storage jar. There’s something magical about how the caramel and coconut come together—it feels like a vacation in every bite. Now, it’s my go-to treat for potlucks, road trips, and even quiet evenings when I deserve a little sweetness. Once you try it, I bet it’ll become your favorite too.
Health and Nutrition
Why it’s good for your body
Irresistible Coconut Caramel Popcorn Delight packs a surprising nutritional punch while satisfying your sweet tooth. First, coconut adds healthy fats that support brain function and energy levels. These medium-chain triglycerides (MCTs) may even boost metabolism. Meanwhile, popcorn provides whole-grain fiber to aid digestion and keep you full longer.
Additionally, this treat contains less refined sugar than many desserts, especially if you opt for natural sweeteners. The caramel coating offers a quick energy lift without the crash of processed snacks. Plus, Irresistible Coconut Caramel Popcorn Delight delivers antioxidants from coconut, which combat inflammation and promote skin health.
Finally, the combination of fiber, healthy fats, and moderate sweetness helps curb cravings. Unlike empty-calorie snacks, Irresistible Coconut Caramel Popcorn Delight balances indulgence with nutrients. For a smarter dessert choice, it’s hard to beat.
How it fits in a healthy lifestyle
Irresistible Coconut Caramel Popcorn Delight fits seamlessly into balanced eating habits. Enjoy it as an occasional treat that aligns with gluten-free or dairy-free diets, since it skips common allergens. The fiber-rich popcorn and coconut also make it a heart-friendly option when paired with other wholesome snacks.
For active lifestyles, this recipe provides quick energy before workouts or a satisfying post-exercise reward. Portion control is easy—just pack small bags for on-the-go nutrition. If you’re exploring guilt-free desserts, Irresistible Coconut Caramel Popcorn Delight offers a lighter alternative to heavy cakes or ice cream. Savor mindfully, and it becomes part of a joyful, health-conscious routine.
A sweet and crunchy treat combining caramel-coated popcorn with toasted coconut for an irresistible snack.
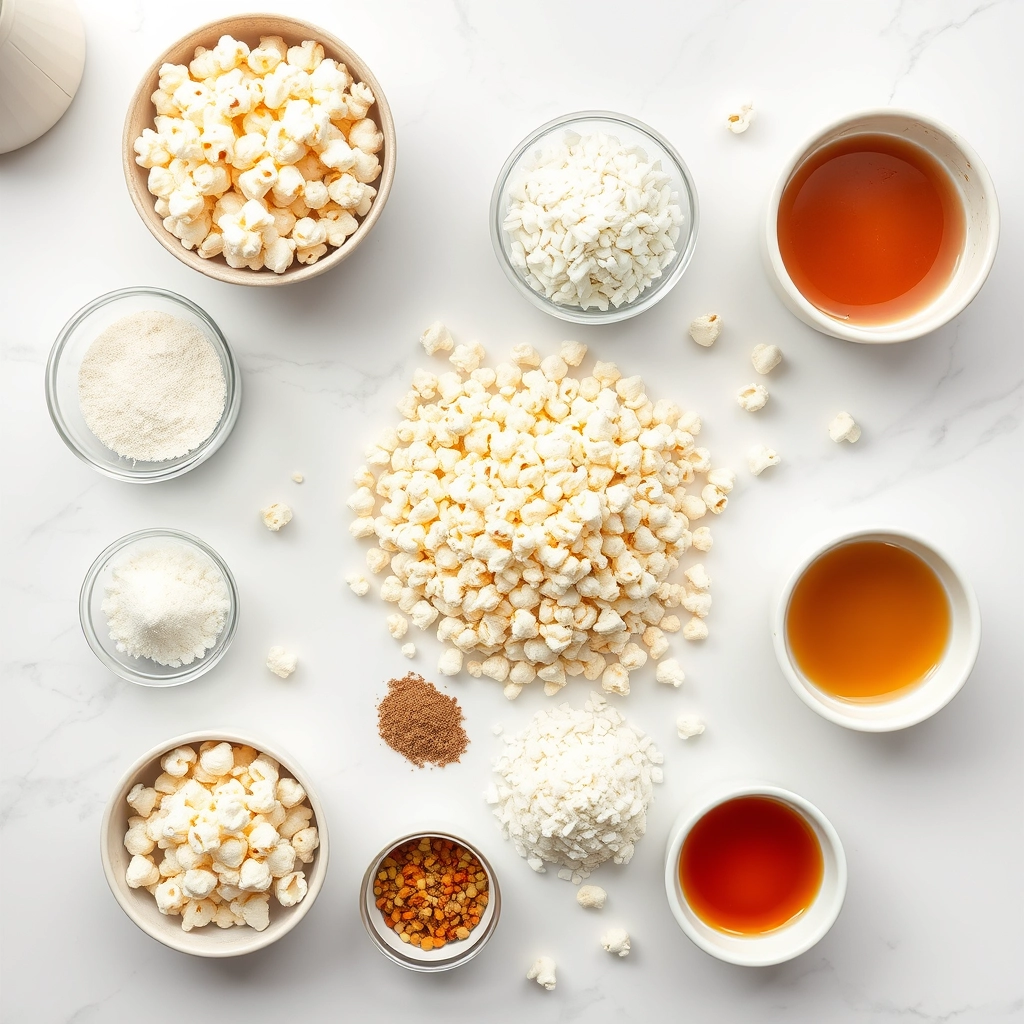
Ingredients
Scale
For the Crust:
8 cups popped popcorn
1 cup shredded coconut
1 cup brown sugar
1/2 cup unsalted butter
1/4 cup light corn syrup
1/2 tsp baking soda
1/2 tsp vanilla extract
1/4 tsp salt
Instructions
1. Prepare the Crust:
Preheat oven to 250°F (120°C). Line a baking sheet with parchment paper.
Spread popcorn on the prepared baking sheet. Toast coconut in a dry skillet over medium heat until golden, then sprinkle over popcorn.
In a saucepan, combine brown sugar, butter, corn syrup, and salt. Bring to a boil over medium heat, stirring constantly. Boil for 4 minutes without stirring.
Remove from heat and stir in baking soda and vanilla (mixture will foam). Immediately pour over popcorn mixture, tossing to coat evenly.
Bake for 45 minutes, stirring every 15 minutes. Let cool completely before breaking into clusters.
Notes
You can customize the seasonings to taste.
How to Prepare This Dish
Steps and time-saving tips
Start by preheating your oven to 250°F and lining a large baking sheet with parchment paper. Spread the popcorn evenly on the sheet, removing any unpopped kernels. In a medium saucepan, combine sugar, butter, and corn syrup over medium heat, stirring constantly until the mixture bubbles. Let it simmer for two minutes without stirring, then remove from heat and whisk in vanilla, baking soda, and a pinch of salt. The caramel will foam slightly—that’s normal! Quickly pour the hot caramel over the popcorn, using a spatula to fold and coat every piece. Bake for 45 minutes, stirring every 15 minutes to ensure even crispiness. Meanwhile, toast shredded coconut in a dry skillet until golden, then set aside. Once the caramel popcorn cools, drizzle melted chocolate over the top and sprinkle with toasted coconut. For a time-saving hack, use pre-popped popcorn and store-bought caramel sauce, but warm the sauce slightly for easier mixing. Let the Irresistible Coconut Caramel Popcorn Delight set for 30 minutes before breaking it into clusters.
and-learned-from">Mistakes I’ve made and learned from
I once rushed the caramel step and ended up with a grainy texture because the sugar didn’t fully dissolve. Now, I patiently stir until the mixture is completely smooth before letting it simmer. Another time, I skipped toasting the coconut, and the flavor fell flat—lesson learned! Toasting unlocks its nutty sweetness, so don’t skip it. If your caramel seizes up, add a splash of warm cream and stir gently to salvage it. For more troubleshooting tips, check out my guide on fixing caramel mishaps. And if you love coconut desserts, my coconut baking secrets post has extra tricks to elevate your treats.
Cultural Connection and Variations
Where this recipe comes from
Irresistible Coconut Caramel Popcorn Delight has roots that stretch across continents, blending tropical flavors with classic snack traditions. Originally inspired by Hawaiian-style caramel popcorn, which often features coconut as a nod to the islands’ abundant palms, this recipe adds a modern twist with its creamy, indulgent texture. In the Caribbean, cooks might swap shredded coconut for toasted coconut flakes, giving it a deeper, nuttier flavor. Meanwhile, in Southeast Asia, some versions include pandan leaves or a drizzle of condensed milk for extra richness.
My family’s take
on Irresistible Coconut Caramel Popcorn Delight came from a happy accident during a holiday potluck. We ran out of pecans for our usual caramel corn, so we tossed in coconut flakes instead. The result was so addictive that it became a staple at every gathering. Now, friends request it year-round, whether for movie nights or summer barbecues. No matter where you enjoy it, this treat bridges cultures with its universal appeal.
How it fits in today’s cooking
Today, Irresistible Coconut Caramel Popcorn Delight fits perfectly into our love for easy yet impressive desserts. Busy home cooks appreciate how quickly it comes together, making it ideal for last-minute parties or weekend baking projects. Health-conscious versions even use coconut sugar or dark chocolate drizzles, proving how adaptable the recipe is.
Seasonally, it shines during the holidays as a festive gift or cozy snack. But it’s just as welcome in summer, paired with tropical cocktails or picnic desserts. Social media has also given it a boost, with food bloggers adding matcha powder or spicy chili for a trendy twist. Whether you stick to tradition or experiment, this dish keeps delighting taste buds in every era.
>Taste and Texture
What makes it delicious
Irresistible Coconut Caramel Popcorn Delight delivers a symphony of flavors and textures that captivate your senses from the first bite. The caramel coats each piece with a rich, buttery sweetness, while toasted coconut flakes add a nutty, fragrant crunch. As you chew, the popcorn stays crisp yet slightly chewy, creating a satisfying contrast. Meanwhile, a hint of sea salt balances the sweetness, making every handful impossible to resist. The aroma alone—warm caramel mingling with toasted coconut—will have you reaching for more. Whether you savor it slowly or devour it by the handful, Irresistible Coconut Caramel Popcorn Delight is a treat that delights with every bite.
Boosting the flavor
Elevate your Irresistible Coconut Caramel Popcorn Delight with a few creative tweaks. For extra depth, drizzle melted dark chocolate over the top or sprinkle a pinch of cinnamon for a warm, spicy note. If you love texture, toss in chopped toasted pecans or almonds for a buttery crunch. Craving more coconut? Try swapping regular flakes for toasted coconut chips for an intensified flavor. For a tropical twist, a light sprinkle of lime zest adds a bright, zesty contrast. If you’re a fan of caramel treats, explore our caramel dessert collection for more decadent inspiration. With these simple upgrades, your snack becomes even more unforgettable.
Tips for Success
Best practices for results
Always use fresh popcorn for the best crunch in your Irresistible Coconut Caramel Popcorn Delight. Meanwhile, stir the caramel sauce constantly to prevent burning, and work quickly once it reaches the right consistency. For even coating, drizzle the caramel in thin streams while gently tossing the popcorn. Additionally, let the mixture cool slightly before adding coconut to avoid clumping. Finally, spread the popcorn on a lined baking sheet to set properly for that perfect sweet-and-crispy texture.
Mistakes to avoid
Avoid overcooking the caramel, as it can turn bitter and ruin the flavor of your Irresistible Coconut Caramel Popcorn Delight. Instead, remove it from heat when it turns a light amber color. Also, don’t skip the parchment paper—sticky caramel will harden onto bare pans, making cleanup a nightmare. For more caramel tips, check out our caramel sauce guide. Another common mistake is adding shredded coconut too early, which makes it soggy. If you’re unsure about coconut textures, our coconut baking tricks explain how to keep it light and crispy.
Serving and Pairing Suggestions
How to serve this dish
For a stunning presentation, serve Irresistible Coconut Caramel Popcorn Delight in rustic wooden bowls or mason jars tied with twine. Alternatively, layer it in clear dessert cups to showcase the golden caramel and toasted coconut flakes. This treat shines at holiday gatherings, movie nights, or even as a sweet addition to brunch buffets. To elevate the visual appeal, sprinkle extra coconut flakes on top or drizzle with melted chocolate just before serving. Whether you’re hosting friends or treating yourself, Irresistible Coconut Caramel Popcorn Delight always feels special.
h-it">What goes well with it
Pair Irresistible Coconut Caramel Popcorn Delight with a creamy vanilla latte for a cozy afternoon snack—the warm coffee balances the sweetness perfectly. If you prefer something cooler, try it alongside a scoop of homemade vanilla ice cream for a delightful contrast of textures. For a festive twist, serve it with a tropical fruit platter featuring pineapple and mango, which echo the coconut’s tropical vibe. You can also complement it with our salted caramel brownies for an indulgent dessert spread.
What makes Irresistible Coconut Caramel Popcorn Delight so special?
Irresistible Coconut Caramel Popcorn Delight stands out with its perfect blend of sweet caramel, toasted coconut flakes, and crunchy popcorn. The combination creates a unique texture and tropical flavor that keeps people coming back for more. It’s a crowd-pleaser for parties or cozy nights in.
ank-math-faq-item">
How do you store Irresistible Coconut Caramel Popcorn Delight to keep it fresh?
Store Irresistible Coconut Caramel Popcorn Delight in an airtight container at room temperature for up to a week. Avoid humidity to prevent the caramel from becoming sticky. For longer freshness, you can refrigerate it for up to two weeks.
Can I make Irresistible Coconut Caramel Popcorn Delight without dairy?
Yes! Substitute butter with coconut oil or vegan butter to make Irresistible Coconut Caramel Popcorn Delight dairy-free. The caramel will still coat the popcorn perfectly, and the toasted coconut adds extra richness. Just ensure all ingredients are plant-based for a vegan version.
What’s the best way to serve Irresistible Coconut Caramel Popcorn Delight at a party?
Serve Irresistible Coconut Caramel Popcorn Delight in decorative bowls or individual treat bags for easy sharing. Pair it with other sweet and salty snacks for variety. Guests will love the tropical twist on classic caramel popcorn.
div>
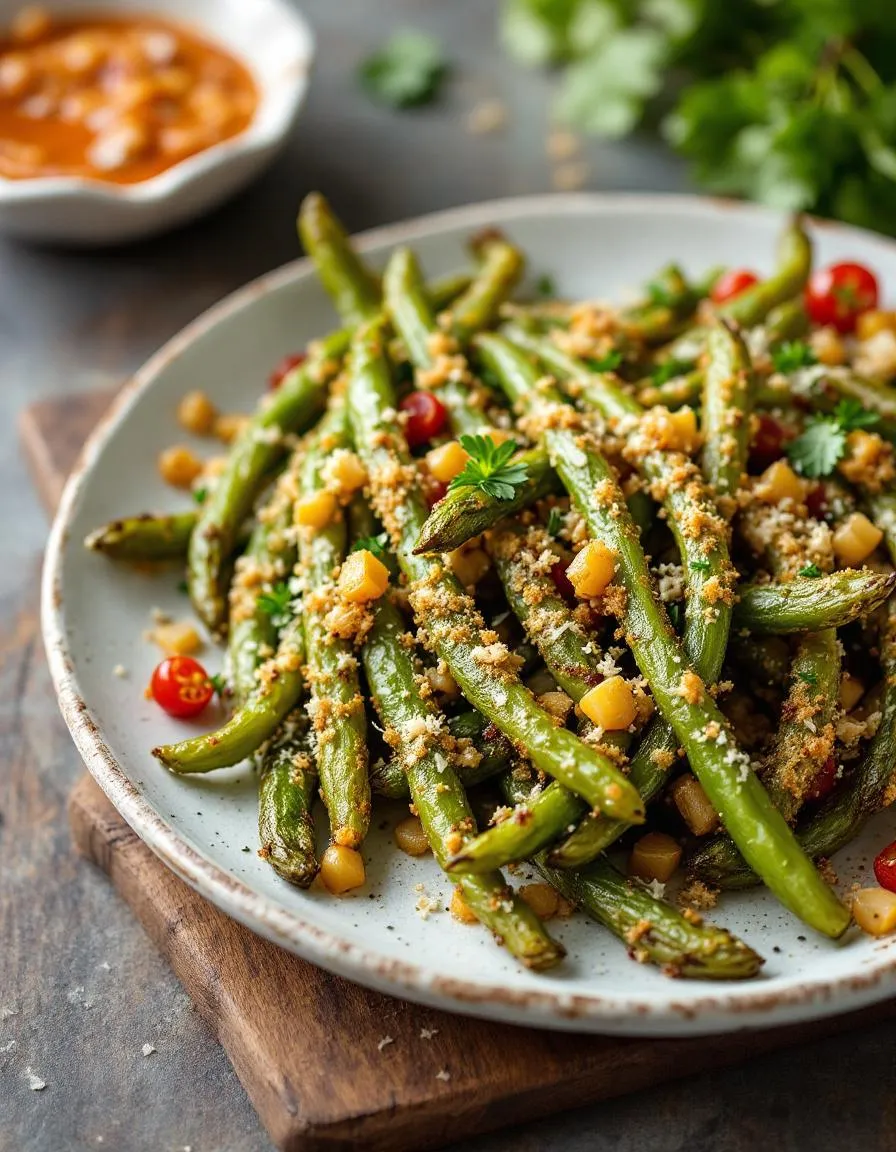
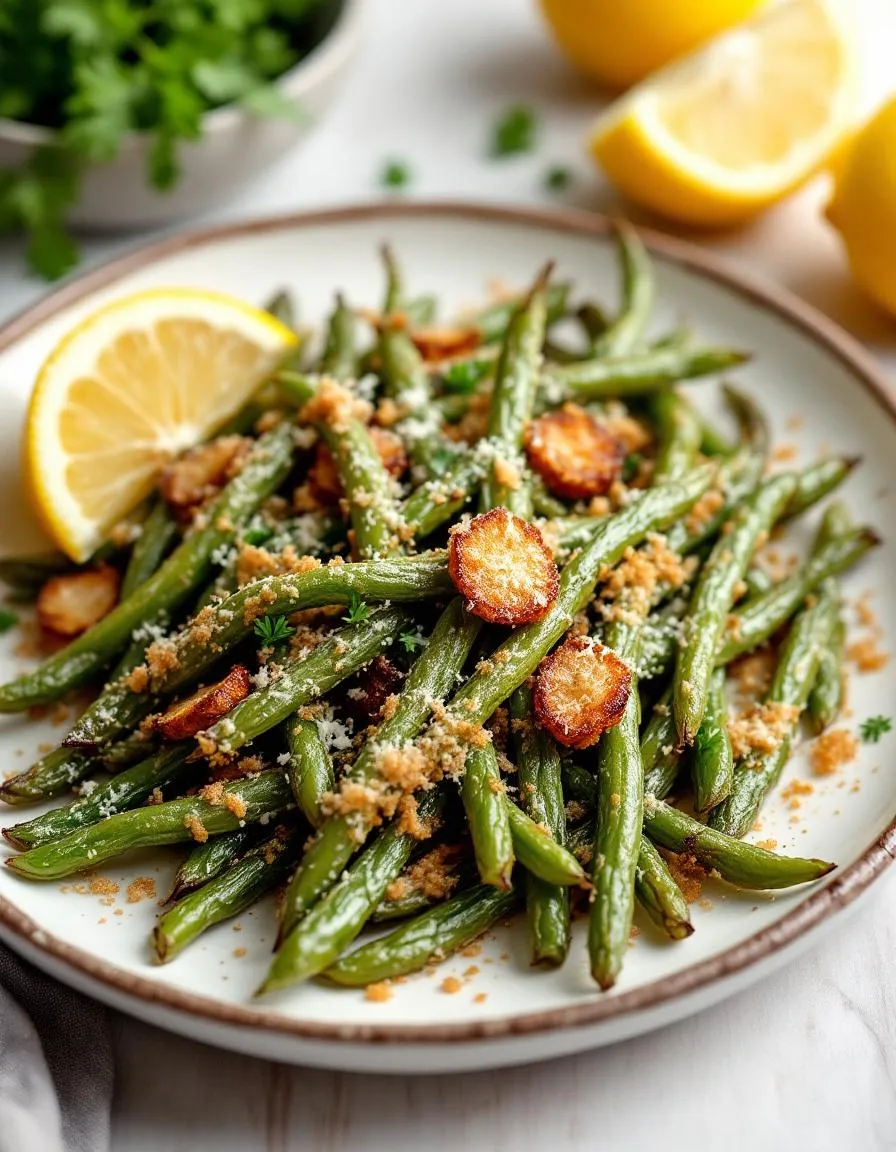
Best Crispy Parmesan Green Beans in Air Fryer
Introduction
If you crave a snack that’s crispy, cheesy, and downright addictive, you’re in the right place. Crispy Parmesan Green Beans in Air Fryer deliver that perfect crunch with a savory kick, making them irresistible for both kids and adults. Whether you need a quick side dish or a guilt-free snack, this recipe transforms simple green beans into something extraordinary. Plus, the air fryer does all the heavy lifting, so you get golden perfection without the hassle of deep frying. Trust me, once you try these, you’ll never look at green beans the same way again.
Crispy Parmesan Green Beans in Air Fryer are exactly what they sound like—fresh green beans coated in a crispy, cheesy crust, cooked to perfection in minutes. Unlike soggy steamed beans or greasy fried versions, the air fryer gives them an unbeatable texture with minimal oil. This dish matters because it’s a game-changer for busy home cooks who want flavor and nutrition without sacrificing time. Green beans pack vitamins and fiber, while the Parmesan adds a rich, umami depth. It’s a win-win for anyone seeking healthier comfort food.
This recipe fits perfectly with our blog’s mission to make cooking effortless and exciting. If you love easy air fryer recipes, you’ll adore our Air Fryer Garlic Butter Shrimp or crave more veggie-forward dishes like our Roasted Balsamic Brussels Sprouts. The best part? You can customize the seasoning to match your mood, whether you prefer a spicy kick or extra garlic. Crispy Parmesan Green Beans in Air Fryer aren’t just a side dish—they’re a versatile staple that belongs in your weekly rotation.
Why I Love This Recipe
I’ll admit it: I’m obsessed with Crispy Parmesan Green Beans in Air Fryer. They remind me of the green bean casserole my mom made during holidays, but with a modern, crispy twist. The first time I tested this recipe, my family devoured the entire batch before I could even snap a photo. Now, we make them weekly—sometimes as a side, sometimes as a snack. There’s something magical about how the Parmesan melts into golden crispiness while the beans stay tender inside. It’s the kind of dish that makes healthy eating feel indulgent, and that’s why I keep coming back to it.
Health and Nutrition
Why it’s good for your body
Crispy Parmesan Green Beans in Air Fryer pack a nutritious punch while satisfying your craving for something crunchy. First, green beans deliver fiber, which supports digestion and keeps you feeling full longer. Additionally, they provide vitamins A and C, which boost immunity and promote healthy skin. Unlike deep-fried snacks, this air-fried version cuts excess oil without sacrificing texture.
Moreover, Parmesan cheese adds a savory kick while contributing calcium and protein. These nutrients help maintain strong bones and muscles. Because you cook Crispy Parmesan Green Beans in Air Fryer with minimal oil, you also reduce unhealthy fats. The air fryer locks in nutrients better than boiling, so you get more vitamins in every bite.
Finally, this dish offers a smart way to enjoy veggies without guilt. The crispy coating makes green beans irresistible, even for picky eaters. Whether you need a side dish or a snack, Crispy Parmesan Green Beans in Air Fryer balance flavor and nutrition effortlessly.
How it fits in a healthy lifestyle
Crispy Parmesan Green Beans in Air Fryer fit seamlessly into a balanced diet. If you follow a gluten-free lifestyle, this recipe naturally avoids grains while delivering crunch. For heart-healthy eaters, the air fryer method slashes saturated fat compared to traditional frying. Pair it with a lean protein like grilled chicken for a complete meal.
Busy weeknights call for quick, wholesome options, and this dish delivers. It takes minutes to prepare, making it easier to avoid processed snacks. If you love meal prepping, try pairing it with our easy meal prep ideas for a week of nutritious lunches. For more veggie-packed inspiration, explore our healthy air fryer recipes to keep your meals exciting and light.
Whether you’re managing weight or just want smarter snacks, Crispy Parmesan Green Beans in Air Fryer help you stay on track without sacrificing taste.
A quick and easy side dish featuring crispy green beans coated in Parmesan cheese and seasonings, made effortlessly in the air fryer.
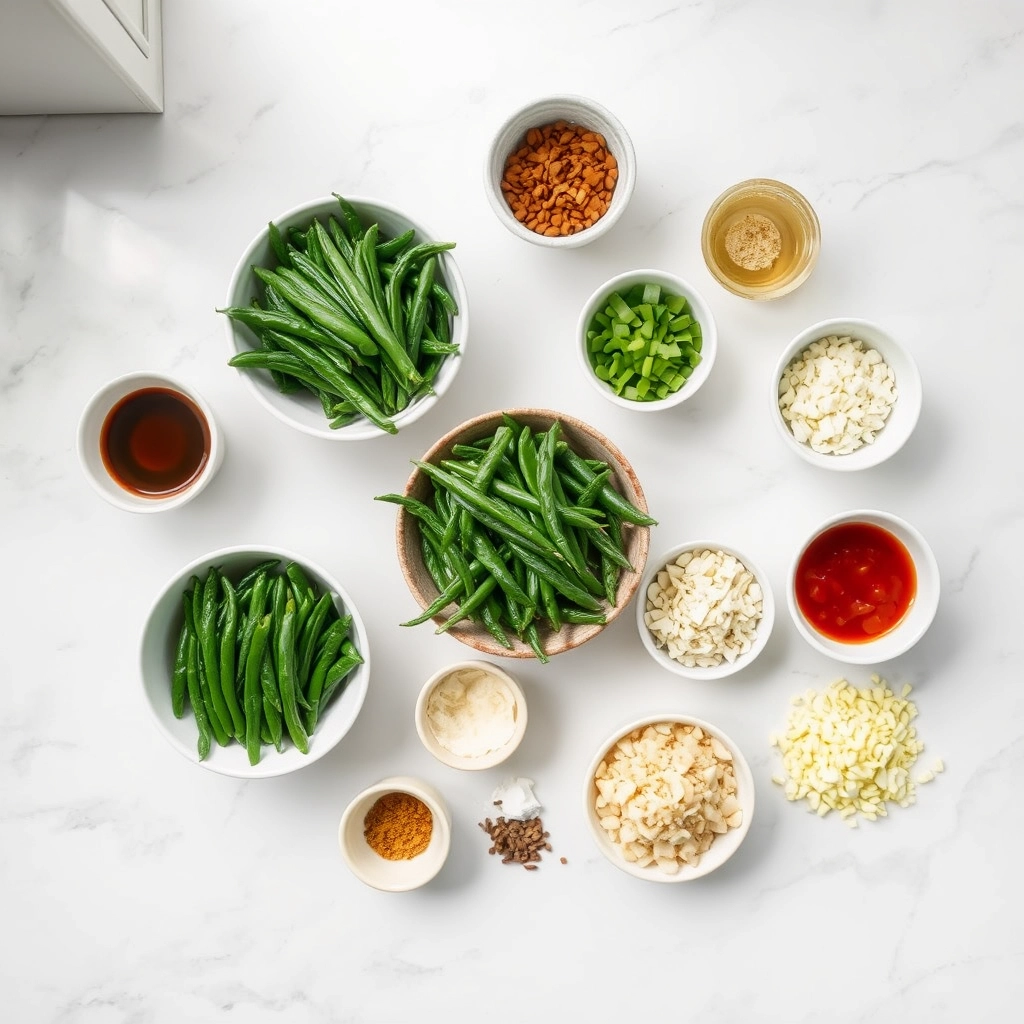
Ingredients
Scale
For the Crust:
1 pound fresh green beans, trimmed
2 tablespoons olive oil
1/4 cup grated Parmesan cheese
1/2 teaspoon garlic powder
1/2 teaspoon onion powder
1/4 teaspoon salt
1/4 teaspoon black pepper
Instructions
1. Prepare the Crust:
Preheat air fryer to 375°F (190°C).
In a large bowl, toss green beans with olive oil until evenly coated.
Add Parmesan cheese, garlic powder, onion powder, salt, and black pepper. Toss to coat the green beans evenly.
Place green beans in the air fryer basket in a single layer, ensuring they are not overcrowded.
Air fry for 8-10 minutes, shaking the basket halfway through, until green beans are crispy and golden.
Serve immediately.
Notes
You can customize the seasonings to taste.
s-dish">How to Prepare This Dish
Steps and time-saving tips
Start by rinsing and thoroughly drying your green beans to ensure maximum crispiness in the air fryer. Next, toss them in a bowl with a light drizzle of olive oil, making sure each bean gets a thin, even coating. Sprinkle grated Parmesan cheese, garlic powder, and a pinch of salt over the beans, then gently mix everything until the seasoning clings evenly. Meanwhile, preheat your air fryer to 375°F for about 3 minutes—this helps the Crispy Parmesan Green Beans in Air Fryer cook more evenly. Arrange the beans in a single layer in the air fryer basket, leaving space between them so the hot air circulates properly. Cook for 8-10 minutes, shaking the basket halfway through to prevent sticking. For extra crunch, spritz the beans with a bit more oil before the final 2 minutes. Serve immediately while they’re hot and crispy. If you’re short on time, prep the green beans ahead and store them in the fridge until ready to cook. Just give them a quick toss before air frying to refresh the coating.
Mistakes I’ve made and learned from
I’ve definitely overcrowded the air fryer basket before, thinking I could fit more green beans in one go. The result? Soggy, unevenly cooked beans that stuck together. Now I always cook in batches—it’s worth the extra few minutes for perfect crispiness. Another lesson? Skipping the preheating step. Without it, the Crispy Parmesan Green Beans in Air Fryer took longer to cook, and the cheese didn’t melt as evenly. If you’re new to air frying, check out my guide on air fryer temperature adjustments to avoid similar pitfalls. Oh, and don’t forget to dry the beans thoroughly! I once rushed this step, and the excess moisture made the coating slide right off. For more troubleshooting, my post on common recipe fixes has saved me more than once.
n-and-variations">Cultural Connection and Variations
Where this recipe comes from
Green beans have long been a staple in kitchens worldwide, but Crispy Parmesan Green Beans in Air Fryer give this humble veggie a modern twist. Originally, green beans starred in Southern U.S. cooking, often simmered for hours with bacon or ham hocks. Meanwhile, in France, chefs blanched them for crisp-tender haricots verts. Today, the air fryer transforms them into a crunchy, cheesy delight that bridges traditions.
In Italy, cooks might toss green beans with olive oil and breadcrumbs before roasting. Similarly, Crispy Parmesan Green Beans in Air Fryer borrows that Mediterranean flair but speeds up the process. Some families add garlic powder or swap Parmesan for Pecorino Romano. Others, like mine, sprinkle red pepper flakes for heat. No matter the variation, the dish always delivers that irresistible crunch.
Seasonally, this recipe shines during holiday feasts when we crave lighter sides. Yet it’s versatile enough for weeknights too. Whether you serve it alongside Sunday roast or as a snack, Crispy Parmesan Green Beans in Air Fryer adapt to any table. That’s the beauty of it—simple ingredients, global inspiration, and endless possibilities.
ays-cooking">How it fits in today’s cooking
Today’s cooks love Crispy Parmesan Green Beans in Air Fryer because it fits busy lifestyles without sacrificing flavor. Air fryers cut cooking time in half, making it perfect for meal prep or last-minute dinners. Plus, it’s a healthier alternative to fried apps, which aligns with modern wellness trends. For inspiration, check out our air fryer hacks to elevate other veggies too.
This dish also thrives in seasonal rotations. During summer, fresh green beans from the farmers’ market taste incredible with lemon zest. Come winter, it pairs beautifully with hearty mains like our comfort food classics. Whether you’re hosting a crowd or cooking solo, Crispy Parmesan Green Beans in Air Fryer proves that great food doesn’t need to be complicated. It’s a timeless recipe with a contemporary twist.
Taste and Texture
What makes it delicious
Crispy Parmesan Green Beans in Air Fryer deliver a mouthwatering contrast of textures and flavors. The green beans turn tender yet crisp, with a satisfying snap when you bite into them. Meanwhile, the golden Parmesan coating adds a rich, savory crunch that melts slightly in your mouth. Garlic powder and a hint of lemon zest brighten the dish, while the nutty aroma of toasted cheese fills the air. Every bite of Crispy Parmesan Green Beans in Air Fryer balances earthy freshness with indulgent umami, making it irresistible.
r">Boosting the flavor
For extra depth, try tossing the green beans with a sprinkle of smoked paprika or a dash of grated Asiago before air frying. A drizzle of garlic aioli or a squeeze of fresh lemon juice right before serving elevates the tangy notes. If you love heat, a pinch of red pepper flakes adds a spicy kick. Pair these Crispy Parmesan Green Beans in Air Fryer with a creamy dip like homemade ranch for a crowd-pleasing side. Experiment with fresh herbs like thyme or rosemary to layer even more flavor.
Tips for Success
Best practices for results
First, pat the green beans completely dry before tossing them in oil—this ensures maximum crispiness. Next, spread them in a single layer in the air fryer basket to promote even cooking. For extra flavor, sprinkle the parmesan cheese halfway through cooking so it melts perfectly without burning. Finally, shake the basket every few minutes to help your Crispy Parmesan Green Beans in Air Fryer turn golden and crunchy all over.
>Mistakes to avoid
Avoid overcrowding the air fryer, as this traps steam and leads to soggy green beans. Instead, cook in batches if needed for the crispiest results. Also, skip pre-shredded parmesan if possible—it often contains anti-caking agents that prevent proper melting. For a smoother cheese texture, try grating fresh parmesan like we recommend in our Perfect Cheese Grating Guide. Lastly, don’t forget to preheat the air fryer; otherwise, your Crispy Parmesan Green Beans in Air Fryer may cook unevenly. For more air fryer troubleshooting, check out our Air Fryer Tips for Beginners.
Serving and Pairing Suggestions
How to serve this dish
Elevate your Crispy Parmesan Green Beans in Air Fryer with simple yet stunning presentation tricks. For a casual gathering, pile them high on a rustic wooden board with a side of lemon wedges for a bright finish. Alternatively, arrange them neatly on a white platter and sprinkle extra Parmesan for a restaurant-worthy look. These green beans shine at holiday dinners, but they also make a quick weeknight side feel special. To add color, garnish with chopped fresh parsley or a light drizzle of balsamic glaze.
What goes well with it
Pair your Crispy Parmesan Green Beans in Air Fryer with a creamy garlic aioli for dipping—the richness balances the dish’s crunch perfectly. For a heartier meal, serve them alongside lemon herb grilled chicken, as the zesty flavors complement the savory Parmesan coating. Meanwhile, a crisp white wine like Sauvignon Blanc cuts through the cheesiness beautifully. If you’re craving more veggie sides, try pairing them with roasted garlic mashed potatoes for a comforting, well-rounded plate.
How long do you cook green beans in an air fryer for crispy parmesan green beans?
For perfectly crispy Parmesan green beans in an air fryer, cook at 375°F for 8–10 minutes, shaking the basket halfway. The beans should be tender-crisp with a golden parmesan crust. Adjust time slightly based on your air fryer model and desired crispiness.
What’s the best way to get parmesan to stick to air fryer green beans?
Lightly coat green beans with olive oil or cooking spray before adding parmesan—this helps the cheese adhere. For extra crispiness, toss the beans with grated parmesan halfway through cooking. The air fryer’s heat will melt the cheese into a delicious crust.
ank-math-faq-item">
Can I use frozen green beans for crispy parmesan green beans in the air fryer?
Yes! Thaw frozen green beans and pat them dry thoroughly before air frying. Frozen beans may need 1–2 extra minutes to achieve the same crispiness as fresh. The parmesan coating still works beautifully for a quick, flavorful side dish.
What dipping sauces go well with air fryer parmesan green beans?
Crispy Parmesan green beans pair perfectly with garlic aioli, ranch, or marinara for dipping. For a lighter option, try lemon yogurt sauce or balsamic glaze. The air fryer’s crispy texture holds up well to both creamy and tangy sauces.
Best Peach Pie Cruffins – Irresistible Homemade Recipe
Introduction
There’s something magical about the aroma of warm peaches and buttery pastry wafting through the kitchen. Whether you’re craving a cozy weekend treat or a showstopping dessert for guests, this Irresistible Peach Pie Cruffins Recipe delivers. Imagine flaky, golden layers hugging sweet, juicy peaches—each bite is pure comfort. Best of all, you don’t need to be a pastry pro to master these hybrid delights. Let’s dive into why these cruffins deserve a spot in your baking repertoire.
Irresistible Peach Pie Cruffins Recipe combines the best of croissants, muffins, and peach pie into one unforgettable pastry. The dough rolls out light and airy, while the peach filling bursts with summer flavor. Unlike traditional pies, these handheld treats bake faster and offer a playful twist on classic flavors. They’re perfect for brunch spreads, dessert tables, or even a sweet afternoon pick-me-up. If you love our flaky pie crust, you’ll adore how it transforms here. Plus, the recipe scales easily, whether you’re baking for two or a crowd. For more fruity inspiration, check out our berry-stuffed French toast. This blog celebrates approachable yet impressive recipes, and these cruffins fit right in—simple enough for beginners but dazzling enough to impress.
Why I Love This Recipe
I’ll never forget the first time I tested this Irresistible Peach Pie Cruffins Recipe. My kitchen smelled like my grandma’s farmhouse during peach season, and the first bite took me right back to her porch swings. What I love most is how forgiving the dough is—even if your layers aren’t perfect, the result still tastes heavenly. It’s the kind of recipe that turns a regular Tuesday into something special, and that’s exactly why I keep coming back to it.
Health and Nutrition
Why it’s good for your body
Irresistible Peach Pie Cruffins Recipe combines wholesome ingredients to deliver both flavor and nutrition. First, fresh peaches pack vitamins A and C, which support immune health and skin vitality. Additionally, the natural sweetness of peaches reduces the need for excessive added sugars. Meanwhile, the whole wheat or enriched flour in the dough provides fiber, aiding digestion and keeping you full longer.
Moreover, this recipe includes healthy fats from butter or plant-based alternatives, which help absorb fat-soluble vitamins. The protein in eggs or dairy-free substitutes also contributes to muscle repair and energy. Furthermore, cinnamon, a key spice in Irresistible Peach Pie Cruffins Recipe, offers anti-inflammatory benefits and may help regulate blood sugar levels.
Finally, enjoying Irresistible Peach Pie Cruffins Recipe in moderation satisfies cravings without derailing your health goals. The balance of carbs, fats, and natural sugars makes it a smarter indulgence. Whether you serve it warm or at room temperature, each bite delivers both comfort and nourishment.
How it fits in a healthy lifestyle
Irresistible Peach Pie Cruffins Recipe fits seamlessly into a balanced diet when enjoyed mindfully. Pair it with a protein-rich breakfast like Greek yogurt or a handful of nuts to stabilize energy levels. For those watching sugar intake, reducing the syrup drizzle or opting for a sugar substitute keeps it guilt-free.
If you follow a gluten-free diet, swap traditional flour for a gluten-free blend to recreate this treat. Heart-healthy eaters can use olive oil instead of butter for a monounsaturated fat boost. Craving more wholesome dessert ideas? Explore our healthy dessert swaps for lighter alternatives. For tips on balancing treats with nutrition, check out our guide to mindful eating habits.
Ultimately, Irresistible Peach Pie Cruffins Recipe proves that delicious food can align with wellness. Enjoy it as an occasional delight, and savor every bite without compromise.
A delightful fusion of croissants and muffins filled with sweet peach pie filling.
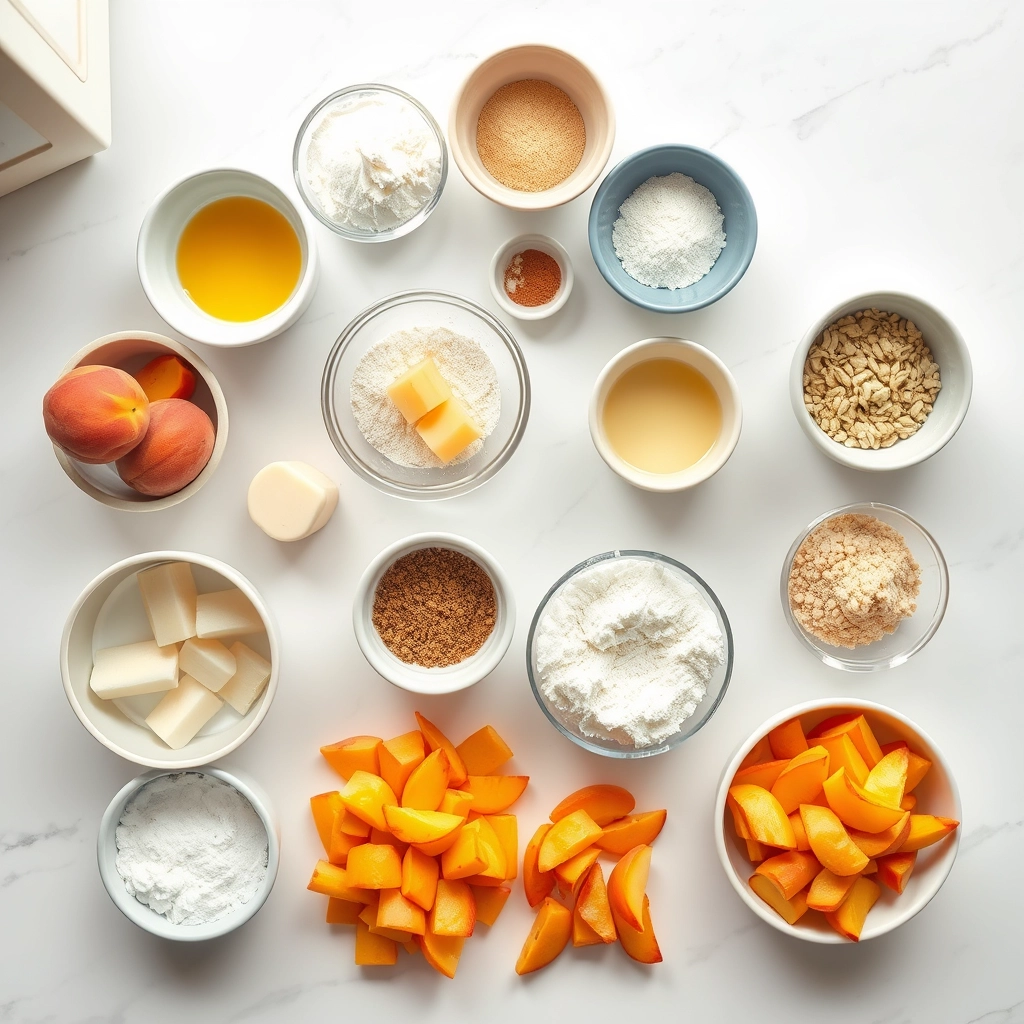
Ingredients
Scale
For the Crust:
2 cups all-purpose flour
1/4 cup granulated sugar
1 tsp salt
1 tbsp active dry yeast
1/2 cup warm milk
1 large egg
1/4 cup unsalted butter, melted
1 cup peach pie filling
1/4 cup powdered sugar (for dusting)
Instructions
1. Prepare the Crust:
In a bowl, mix flour, sugar, salt, and yeast. Add warm milk, egg, and melted butter. Knead until smooth.
Cover the dough and let it rise for 1 hour or until doubled in size.
Roll out the dough into a rectangle. Spread peach pie filling evenly over the dough.
Roll the dough tightly into a log and cut into 8 equal pieces. Place each piece in a muffin tin.
Bake at 375°F for 20-25 minutes or until golden brown. Let cool slightly before dusting with powdered sugar.
Notes
You can customize the seasonings to taste.
s-dish">How to Prepare This Dish
Steps and time-saving tips
First, preheat your oven to 375°F and lightly grease a muffin tin to ensure your Irresistible Peach Pie Cruffins Recipe releases easily after baking. Next, roll out store-bought puff pastry sheets on a floured surface, then cut them into long strips about 2 inches wide. Spread a thin layer of peach pie filling evenly over each strip, leaving a small border to prevent messy spills. Gently roll each strip into a spiral, tucking the end underneath to secure it. Place each spiral into the muffin tin, pressing lightly to help them hold their shape.
While the cruffins bake for 18-22 minutes, whisk together powdered sugar, vanilla extract, and a splash of milk to create a simple glaze. Once the cruffins turn golden brown, let them cool for 5 minutes before drizzling the glaze over the top. For a time-saving shortcut, use pre-made pie filling or substitute fresh peaches tossed in cinnamon and sugar. If you’re short on time, prepare the dough the night before and refrigerate it—just bring it to room temperature before rolling.
Mistakes I’ve made and learned from
I once overfilled my Irresistible Peach Pie Cruffins Recipe, thinking more filling meant more flavor. Instead, the filling leaked out, creating a sticky mess in the oven. Now, I stick to a thin, even layer—just enough to taste the peaches without sacrificing texture. Another lesson? Skipping the cooling time before glazing. The first time, my glaze melted right off, leaving a sad, soggy top. Letting them rest for a few minutes makes all the difference. If you’re new to working with puff pastry, check out my guide on puff pastry tips to avoid common pitfalls. And if you love peach desserts, my easy peach cobbler is another crowd-pleaser with similar flavors but even simpler prep.
The Irresistible Peach Pie Cruffins Recipe blends two beloved traditions: Southern peach pie and French-inspired cruffins. Picture ripe peaches, sticky with summer sweetness, tucked into flaky, buttery layers of croissant dough. This fusion dish nods to the American South, where peach pies star at picnics and potlucks, while the cruffin’s spiral shape borrows from European pastry techniques. In Georgia, bakers might swap in local pecans or drizzle bourbon glaze, while in California, chefs could add a hint of lavender for a floral twist.
Families often put their own spin on the Irresistible Peach Pie Cruffins Recipe too. Some fold in cinnamon for warmth, while others layer cream cheese between the peach filling for extra richness. Across the Atlantic, Italian cooks might use amaretti crumbs for crunch, and in Australia, they might pair it with a dollop of vanilla mascarpone. No matter the variation, this recipe always carries the joy of sharing something homemade—whether it’s a weekend brunch centerpiece or a lunchbox surprise.
ays-cooking">How it fits in today’s cooking
Today, the Irresistible Peach Pie Cruffins Recipe fits perfectly into our love for hybrid desserts and easy indulgence. Busy bakers appreciate its make-ahead potential, while foodies adore its Instagram-worthy layers. It’s a star at summer gatherings, especially when peaches hit their peak, but frozen fruit lets you enjoy it year-round. For a quicker version, many use store-bought croissant dough or even air-fry individual portions for a crispier texture.
This recipe also shines in modern meal prep. Pair it with a streusel-topped coffee cake muffin for a brunch spread, or serve it alongside salted caramel banana bread for a cozy dessert board. Whether you’re honoring family traditions or experimenting with new flavors, the Irresistible Peach Pie Cruffins Recipe bridges nostalgia and novelty in every bite.
Taste and Texture
What makes it delicious
The Irresistible Peach Pie Cruffins Recipe delivers a symphony of flavors and textures that will leave you craving more. Imagine biting into a golden, flaky exterior that shatters delicately, giving way to a tender, buttery interior. Juicy peaches, caramelized with a hint of cinnamon, burst with sweet-tart brightness, while a drizzle of vanilla glaze adds a creamy, fragrant finish. Each bite balances crisp layers with soft, pillowy dough, creating a mouthwatering contrast. The aroma alone—warm peaches mingling with toasted pastry—will draw everyone to the kitchen. Truly, the Irresistible Peach Pie Cruffins Recipe is a masterpiece of comfort and indulgence.
r">Boosting the flavor
Elevate your Irresistible Peach Pie Cruffins Recipe with a few creative tweaks. For a deeper flavor, toss the peaches in a splash of bourbon or almond extract before baking. Alternatively, sprinkle a pinch of cardamom into the filling for a warm, floral note. A dollop of homemade whipped cream or a scoop of vanilla bean ice cream adds a luxurious, cooling contrast. If you love crunch, top the cruffins with toasted pecans or a sprinkle of turbinado sugar before baking. Small changes make a big impact, so don’t hesitate to experiment!
Tips for Success
Best practices for results
Always chill the dough for at least 30 minutes before rolling it out to prevent sticking and ensure flaky layers in your Irresistible Peach Pie Cruffins Recipe. Meanwhile, use ripe but firm peaches for the filling so they hold their shape during baking. For even browning, brush the cruffins with an egg wash right before they go into the oven. Additionally, let them cool slightly on a wire rack after baking to maintain their crisp texture. These small steps guarantee bakery-quality results every time.
>Mistakes to avoid
One common error is overfilling the cruffins, which causes the peach filling to leak during baking. To avoid this, stick to a heaping tablespoon of filling per cruffin. Another mistake is skipping the proofing step, leading to dense pastries. Instead, let the dough rise properly as outlined in our Perfect Dough Rising Guide. Finally, avoid using cold butter for the laminated dough, as it won’t incorporate evenly. For more troubleshooting tips, check our Laminated Dough Secrets post.
Serving and Pairing Suggestions
How to serve this dish
Elevate your Irresistible Peach Pie Cruffins Recipe by serving them warm with a dusting of powdered sugar for a cozy, rustic look. Alternatively, drizzle them with vanilla glaze and top with fresh peach slices for a vibrant, Instagram-worthy presentation. These cruffins shine at brunch gatherings, holiday breakfasts, or as a sweet afternoon treat with friends. For special occasions, arrange them on a tiered stand alongside fresh flowers to create a charming centerpiece.
What goes well with it
Pair your Irresistible Peach Pie Cruffins Recipe with a creamy vanilla latte or a refreshing iced tea to balance the rich, flaky layers. If you love fruity combinations, try serving them with a scoop of homemade vanilla bean ice cream for an indulgent dessert. For a lighter option, pair them with a tangy mixed berry salad to contrast the sweetness. Each pairing enhances the peach flavors while adding delightful texture and freshness.
What are the key ingredients for Irresistible Peach Pie Cruffins?
To make Irresistible Peach Pie Cruffins, you’ll need puff pastry, fresh peaches, sugar, cinnamon, and cream cheese. The combination of flaky pastry and juicy peaches creates the perfect texture and flavor. Don’t forget a dusting of powdered sugar for the finishing touch!
Can I use canned peaches instead of fresh for Peach Pie Cruffins?
Yes, canned peaches work well in Irresistible Peach Pie Cruffins if fresh ones aren’t available. Just drain and pat them dry to avoid excess moisture. The recipe still delivers that delicious peach flavor, though fresh peaches add a brighter taste.
ank-math-faq-item">
How do I store leftover Peach Pie Cruffins to keep them fresh?
Store Irresistible Peach Pie Cruffins in an airtight container at room temperature for up to 2 days. For longer freshness, refrigerate them for up to 5 days and reheat in the oven for a few minutes. They taste best when slightly warmed!
Can I freeze Irresistible Peach Pie Cruffins before baking?
Absolutely! Assemble the Irresistible Peach Pie Cruffins, then freeze them unbaked on a tray before transferring to a freezer bag. When ready to bake, add a few extra minutes to the cooking time. This makes them a great make-ahead treat.
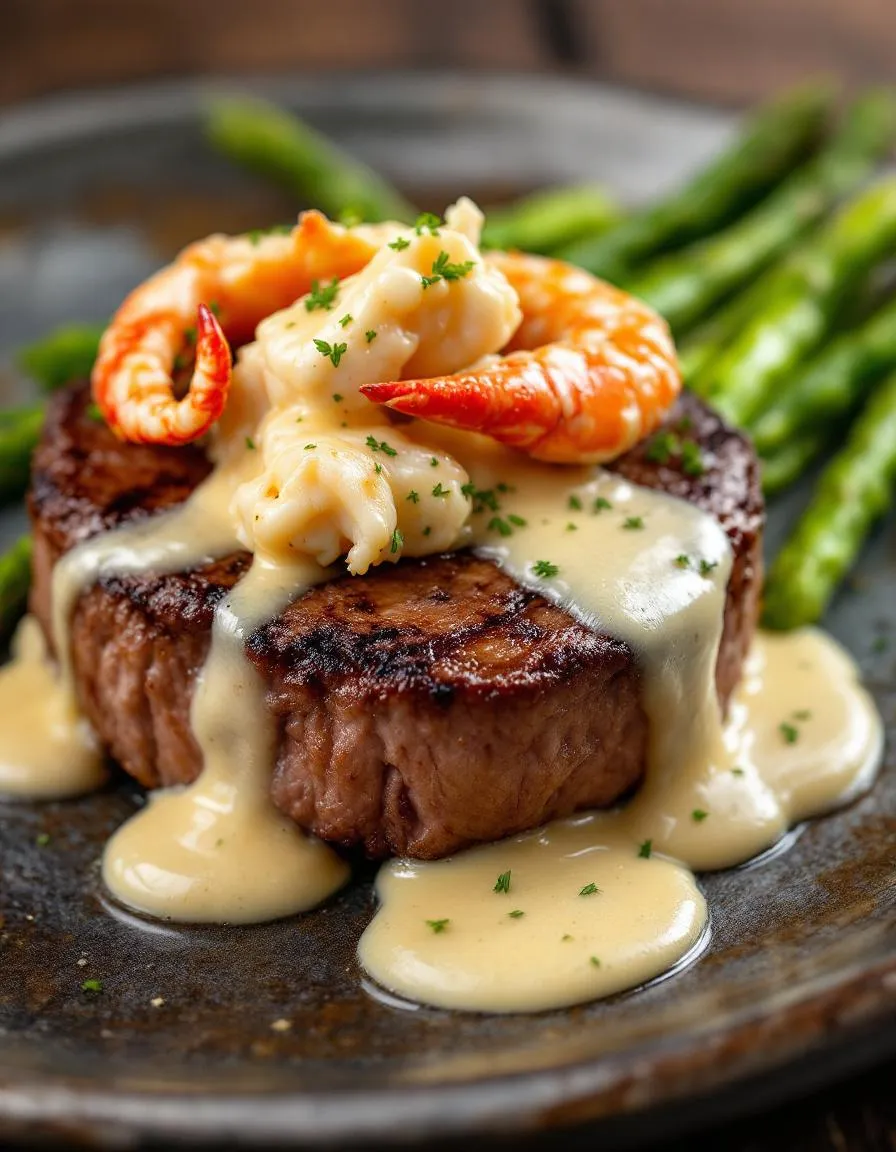
Ultimate Oscar Style Steak with Crab & Asparagus
Introduction
There’s something undeniably magical about a dish that feels like a celebration on a plate. If you’ve ever craved a meal that combines luxury with comfort, the Luxe Oscar Style Steak with Crab & Asparagus delivers exactly that. Picture tender, juicy steak crowned with succulent crab meat, crisp asparagus, and a velvety sauce—each bite feels like a special occasion. Whether you’re impressing guests or treating yourself, this recipe transforms an ordinary night into something extraordinary. Let’s dive into why this dish deserves a spot in your culinary repertoire.
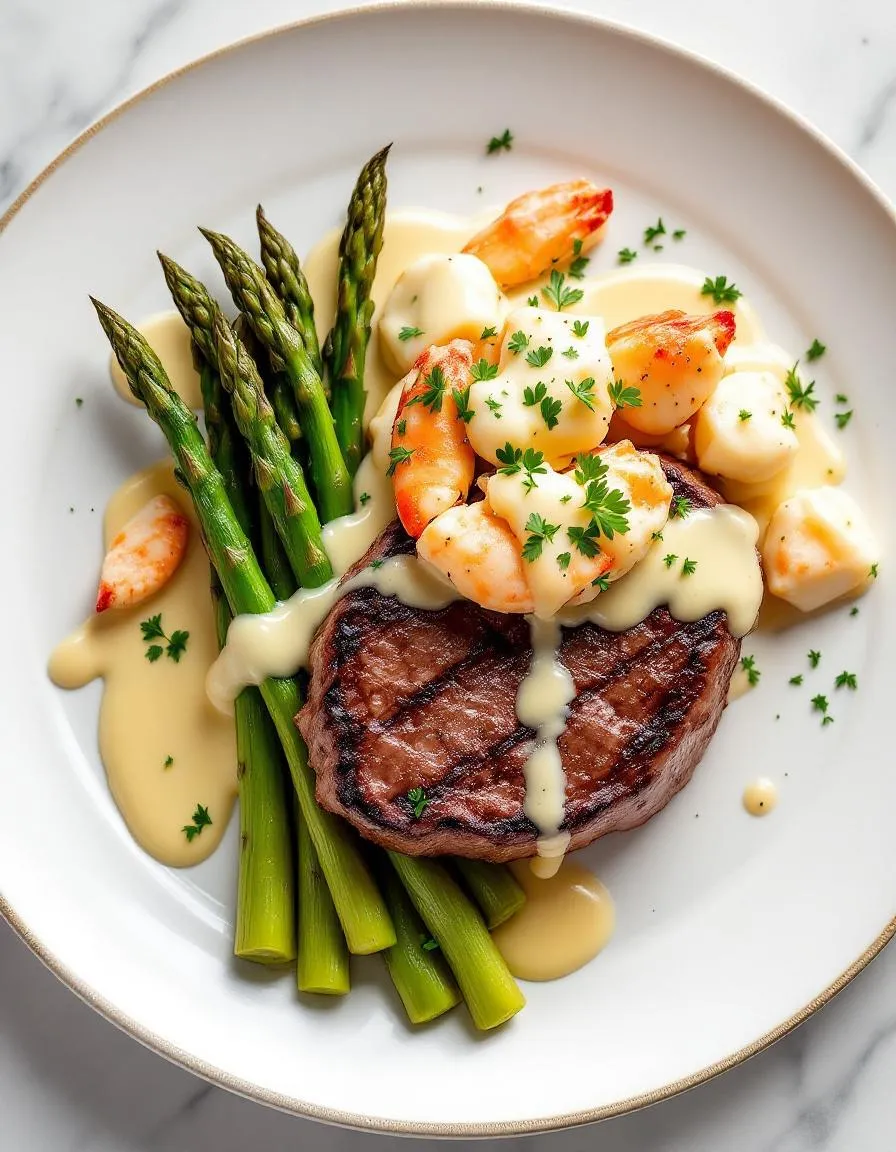
The Luxe Oscar Style Steak with Crab & Asparagus isn’t just a meal. It’s a masterpiece that blends rich flavors and elegant presentation. Traditionally, Oscar-style dishes feature steak topped with crab and asparagus, often paired with a decadent sauce like béarnaise or hollandaise. This version elevates the classic with premium ingredients and straightforward techniques, making it accessible for home cooks while still feeling restaurant-worthy. For those who love indulgent yet balanced dishes, this recipe strikes the perfect harmony between hearty steak and delicate seafood. Plus, asparagus adds a fresh, vibrant contrast that cuts through the richness.
On Exorecipes, we celebrate dishes that marry simplicity with sophistication, and the Luxe Oscar Style Steak with Crab & Asparagus fits that ethos perfectly. If you’re new to cooking steak, our guide to perfect steak temperatures will help you nail the doneness every time. Meanwhile, if you’re looking for more ways to enjoy asparagus, check out our asparagus recipe roundup for inspiration. This dish isn’t just about taste—it’s about creating an experience, one that feels as rewarding to make as it is to eat.
Why I Love This Recipe
I’ll never forget the first time I made Luxe Oscar Style Steak with Crab & Asparagus for a dinner party. The way my guests’ eyes lit up when I brought it to the table made all the effort worth it. There’s a quiet pride in serving something so beautifully composed, yet so deeply satisfying. To me, this dish represents the joy of cooking—taking simple, quality ingredients and turning them into something unforgettable. Every time I make it, I’m reminded why I fell in love with food in the first place.
Health and Nutrition
Why it’s good for your body
Luxe Oscar Style Steak with Crab & Asparagus packs a powerhouse of nutrients in every bite. First, the lean steak delivers high-quality protein, which helps build and repair muscles. Additionally, crab provides omega-3 fatty acids, supporting heart health and reducing inflammation. Meanwhile, asparagus adds fiber and folate, promoting digestion and cell growth.
Moreover, this dish balances richness with wholesome ingredients. The steak offers iron and zinc, essential for energy and immunity. At the same time, crab contributes selenium, a mineral that boosts antioxidant defenses. Asparagus rounds out the meal with vitamins A, C, and K, enhancing skin health and bone strength.
Furthermore, Luxe Oscar Style Steak with Crab & Asparagus avoids heavy sauces or excessive carbs. Instead, it relies on natural flavors and fresh components. For instance, the crab’s delicate sweetness complements the savory steak without added sugars. Similarly, asparagus brings a crisp texture and earthy taste, reducing the need for extra salt or fat.
Finally, this meal fits into various dietary preferences. Whether you prioritize protein, healthy fats, or low-carb eating, Luxe Oscar Style Steak with Crab & Asparagus delivers. Its combination of nutrients supports sustained energy, making it a smart choice for active lifestyles.
How it fits in a healthy lifestyle
Luxe Oscar Style Steak with Crab & Asparagus aligns perfectly with balanced eating habits. If you follow a high-protein diet, the steak and crab provide ample fuel for workouts and recovery. For gluten-free eaters, this dish naturally avoids grains, focusing on whole, unprocessed ingredients.
Heart-healthy eaters will appreciate the lean protein and omega-3s from crab, which support cardiovascular wellness. Pair it with a light salad or roasted vegetables for a complete, nutrient-dense meal. If you’re exploring gourmet yet wholesome recipes, check out our guide to elevating weeknight dinners for more inspiration.
Planning meals ahead? Luxe Oscar Style Steak with Crab & Asparagus works well for special occasions or mindful weekday dining. Its versatility makes it easy to pair with sides like quinoa or steamed greens. For tips on balancing indulgence with nutrition, explore our article on healthy eating without sacrifice.
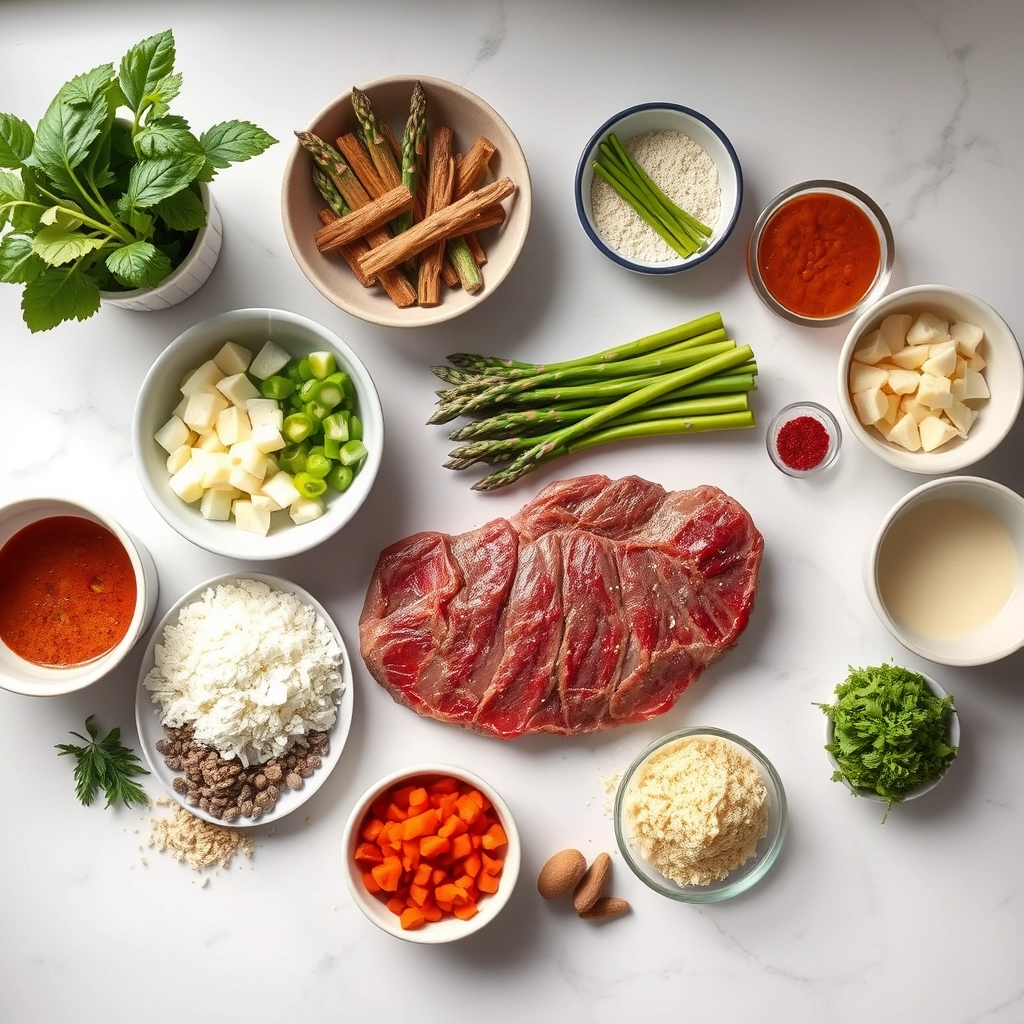
A decadent steak dish topped with succulent crab meat and tender asparagus, finished with a rich béarnaise sauce.
Ingredients
Scale
For the Crust:
2 (8 oz) filet mignon steaks
1/2 lb lump crab meat
8 asparagus spears, trimmed
1/2 cup béarnaise sauce
1 tbsp olive oil
1 tbsp butter
Salt and pepper to taste
1 tsp fresh lemon juice
1/4 tsp paprika
Instructions
1. Prepare the Crust:
Preheat oven to 400°F (200°C). Season steaks with salt, pepper, and paprika.
Heat olive oil in an oven-safe skillet over medium-high heat. Sear steaks for 2-3 minutes per side.
Transfer skillet to the oven and cook steaks to desired doneness (about 5-7 minutes for medium-rare). Remove and let rest.
While steaks cook, blanch asparagus in boiling water for 2 minutes, then shock in ice water. Drain and set aside.
In a small pan, melt butter over medium heat. Add crab meat and lemon juice, gently warming for 2 minutes.
Plate steaks, top with crab meat, arrange asparagus alongside, and drizzle with béarnaise sauce.
Notes
You can customize the seasonings to taste.
s-dish">How to Prepare This Dish
Steps and time-saving tips
Start by preheating your oven to 400°F and seasoning your Luxe Oscar Style Steak with Crab & Asparagus generously with salt and pepper. While the oven heats, sear the steak in a hot cast-iron skillet for 3-4 minutes per side to lock in juices. Meanwhile, steam the asparagus until tender-crisp, about 4 minutes, and set aside. For the crab topping, gently fold lump crabmeat with melted butter, lemon juice, and a pinch of cayenne—avoid overmixing to keep the texture delicate. Transfer the seared steak to the oven and roast for 6-8 minutes for medium-rare. While it cooks, quickly sauté the crab mixture just until warmed through. Pull the steak from the oven, let it rest for 5 minutes, then layer the crab over the top and arrange the asparagus alongside. Drizzle with béarnaise sauce right before serving for that signature Luxe Oscar Style Steak with Crab & Asparagus finish. To save time, prep the béarnaise ahead using my quick blender method or multitask by steaming the asparagus while the steak sears.
Mistakes I’ve made and learned from
Early on, I rushed searing the steak, which meant my Luxe Oscar Style Steak with Crab & Asparagus lacked that perfect crust. Now I pat the steak dry first and wait until the skillet smokes slightly. Another blunder? Overcooking the crab until it turned rubbery—turns out, a gentle 2-minute warm-up is plenty. If your béarnaise breaks (we’ve all been there), my sauce rescue guide walks you through fixing it without starting over. Lastly, resting the steak seemed optional until I saw juices pooling on the plate; those extra minutes make every bite juicier.
n-and-variations">Cultural Connection and Variations
Where this recipe comes from
The Luxe Oscar Style Steak with Crab & Asparagus carries a rich history, blending elegance and indulgence. Originally inspired by the classic Steak Oscar, which honors Sweden’s King Oscar II, this dish evolved into a luxurious favorite in American steakhouses. Chefs often top tender filet mignon with lump crab, asparagus, and béarnaise sauce, creating a symphony of flavors. However, regional twists pop up everywhere. In coastal areas, cooks might swap crab for lobster or shrimp, while others add truffle oil for extra decadence.
In my family, we serve Luxe Oscar Style Steak with Crab & Asparagus during celebrations, pairing it with buttery mashed potatoes. Some cultures skip the asparagus for seasonal veggies like roasted Brussels sprouts or grilled zucchini. No matter the variation, the dish always feels special. Whether you enjoy it at a high-end restaurant or recreate it at home, this recipe bridges tradition and personal taste effortlessly.
How it fits in today’s cooking
Today, Luxe Oscar Style Steak with Crab & Asparagus remains a showstopper for date nights, holidays, or even a fancy weeknight dinner. Modern cooks streamline the recipe with pre-made béarnaise or air-fry the asparagus for convenience. Others lighten it up by using Greek yogurt-based sauces or plant-based crab alternatives. Seasonal menus often feature it in spring when asparagus peaks, but hearty winter versions with roasted roots work too.
This dish also fits bea
utifully into themed dinners, like pairing it with a garlic butter shrimp pasta for surf-and-turf night. For dessert, a slice of classic New York cheesecake completes the experience. Whether you stick to tradition or experiment, Luxe Oscar Style Steak with Crab & Asparagus adapts to any table, proving timeless appeal never goes out of style.
Taste and Texture
What makes it delicious
Luxe Oscar Style Steak with Crab & Asparagus delivers a symphony of rich, indulgent flavors and luxurious textures. The juicy, buttery steak melts in your mouth, while the sweet, tender crabmeat adds a delicate brininess. Crisp-tender asparagus brings a fresh, earthy contrast, and the velvety béarnaise sauce ties everything together with its creamy, tangy finish. Each bite offers a perfect balance of savory, sweet, and umami notes, with fragrant herbs like tarragon elevating the aroma. Whether you savor the tender chew of the steak or the luscious crab topping, Luxe Oscar Style Steak with Crab & Asparagus turns every meal into a decadent experience.
Boosting the flavor
Enhance your Luxe Oscar Style Steak with Crab & Asparagus by experimenting with bold flavors. For a smoky twist, try adding a pinch of paprika or a drizzle of chimichurri sauce to brighten the dish. Swap the béarnaise for a lemon-garlic aioli to add zesty depth. If you love heat, a sprinkle of red pepper flakes or a dash of harissa paste will give it a spicy kick. Finally, top with extra lump crab or a squeeze of fresh lemon to amplify the seafood’s natural sweetness. Small tweaks can transform this classic into your signature masterpiece.
Always let your Luxe Oscar Style Steak with Crab & Asparagus rest for at least 5 minutes after cooking to lock in juices. Meanwhile, sear the steak over high heat for a perfect crust, but reduce the temperature slightly to avoid burning. For the crab topping, gently fold in fresh herbs at the last minute to preserve their brightness. Additionally, blanch the asparagus just until tender-crisp to maintain its vibrant color and snap. Finally, use a meat thermometer to ensure your steak reaches the ideal internal temperature for your preference.
Mistakes to avoid
One common error is overcooking the steak, which can make it tough. Instead, pull it off the heat a few degrees below your target temp, as it will continue cooking while resting. Another mistake is overcrowding the pan when searing, which steams the meat instead of browning it. For more tips on perfect searing, check out our guide on how to sear steak like a pro. Also, avoid overmixing the crab topping, as it can break apart and lose its delicate texture. If you need help with balancing flavors, our seasoning secrets for seafood will ensure your Luxe Oscar Style Steak with Crab & Asparagus tastes restaurant-quality every time.
g-suggestions">Serving and Pairing Suggestions
How to serve this dish
Elevate your dining experience by serving Luxe Oscar Style Steak with Crab & Asparagus on a warm, white platter for a sleek contrast. Arrange the asparagus in a neat row beside the steak, then crown it with the crab topping for a luxurious touch. For special occasions like anniversaries or holidays, add a drizzle of clarified butter and a sprinkle of fresh chives to enhance both flavor and presentation. Meanwhile, a simple weeknight dinner becomes extraordinary when you plate this dish with roasted cherry tomatoes for a pop of color. No matter the setting, Luxe Oscar Style Steak with Crab & Asparagus always impresses.
What goes well with it
Pair Luxe Oscar Style Steak with Crab & Asparagus with a buttery Chardonnay to highlight the richness of the crab and steak. Alternatively, a crisp gin martini balances the dish’s decadence with its clean finish. For sides, try our Garlic Herb Potatoes for a hearty complement or a light Citrus Avocado Salad to refresh the palate. Each pairing enhances the dish without overpowering its bold flavors.
math-faq-block">
What cut of steak is best for Luxe Oscar Style Steak with Crab & Asparagus?
Filet mignon is the ideal cut for Luxe Oscar Style Steak with Crab & Asparagus due to its tenderness and mild flavor, which pairs perfectly with the rich crab and asparagus topping. Ribeye or New York strip can also work if you prefer a more marbled, flavorful steak.
Can I substitute imitation crab in Luxe Oscar Style Steak?
While fresh lump crabmeat is traditional for Luxe Oscar Style Steak with Crab & Asparagus, high-quality imitation crab can work in a pinch. For the best results, mix it with real butter and lemon juice to mimic the luxurious texture and flavor.
How do I prevent the asparagus from getting soggy in this dish?
To keep asparagus crisp in Luxe Oscar Style Steak with Crab & Asparagus, blanch it for 1-2 minutes in boiling water, then shock it in ice water. Pat dry before arranging it over the steak—this preserves the vibrant color and texture.
ank-math-faq-item">
What wine pairs well with Luxe Oscar Style Steak with Crab & Asparagus?
A buttery Chardonnay or crisp Sauvignon Blanc complements the richness of Luxe Oscar Style Steak with Crab & Asparagus. For red wine lovers, a light Pinot Noir balances the dish without overpowering the delicate crab.