“`html

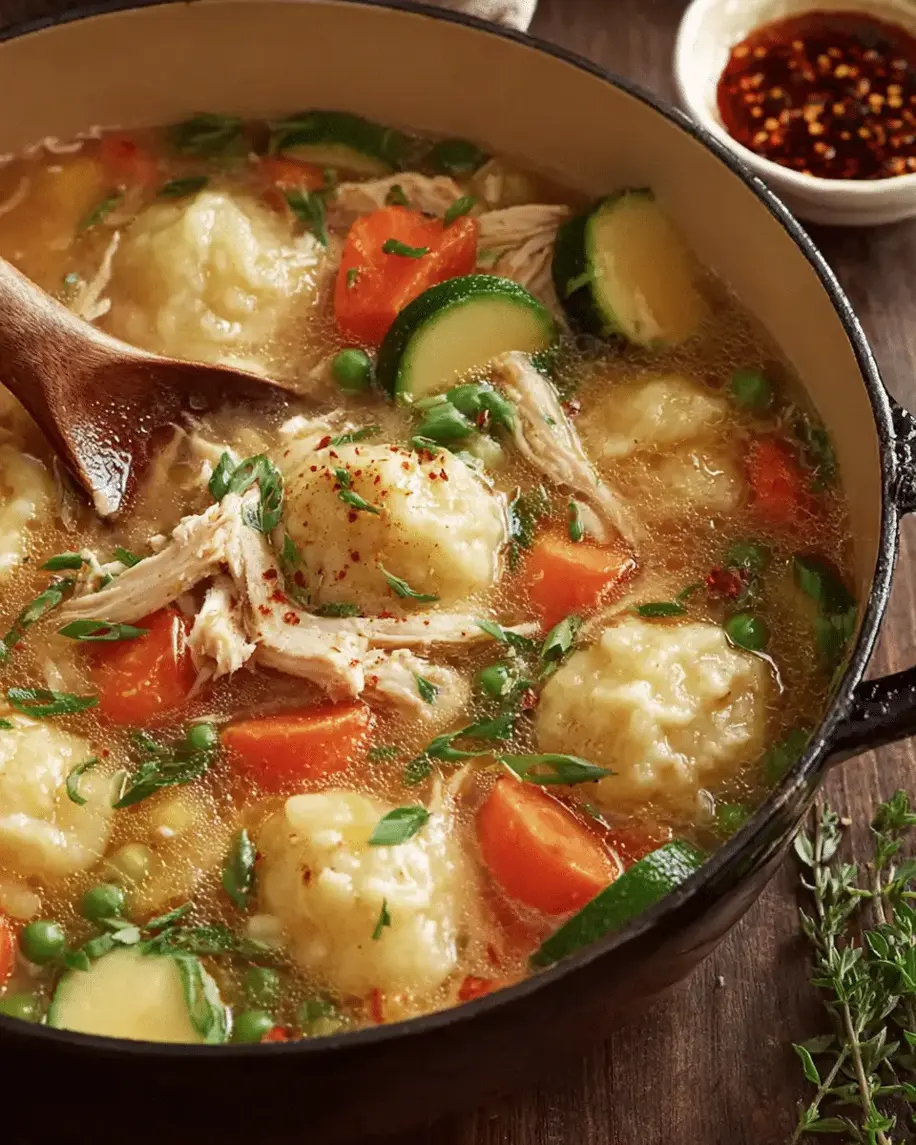
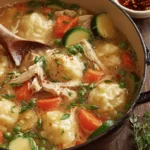
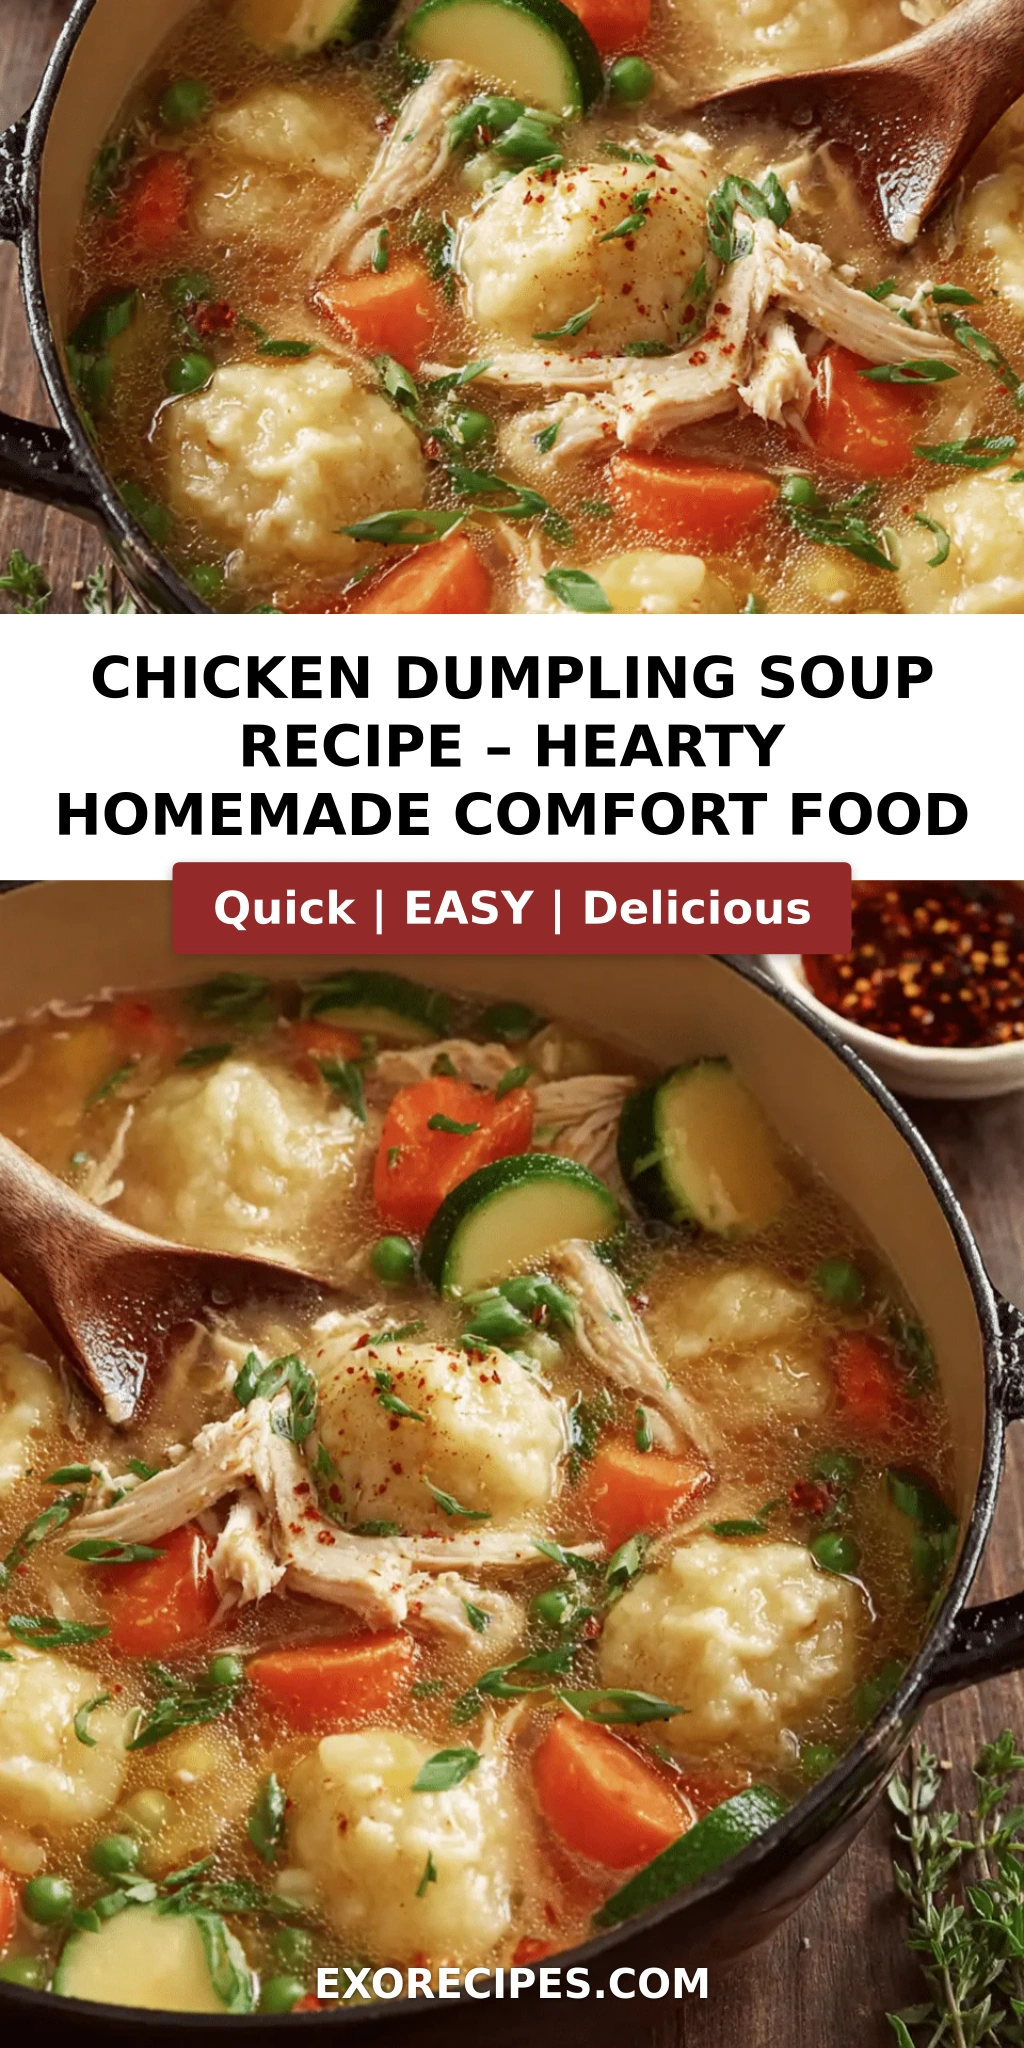
Chicken Dumpling Soup: Comforting Homemade Classic – Fluffy From-Scratch Dumplings Made Easy

⚖️
Difficulty
Easy
⏲️
Prep Time
15 mins
🕒
Cook Time
30 mins
⏱️
Total Time
45 mins
🍽️
Servings
6

I still remember the first time I made a真正从零开始的鸡汤面团汤在我纽约的小厨房里。我妈妈在摩洛哥做的汤总是那么浓郁、芳香四溢,带着藏红花和姜黄的味道。但当我搬到纽约并在巴黎接受培训后,我意识到经典的美式鸡汤面团汤有一种完全不同的魔力——它更简单、更质朴,却能带来同样深沉的慰藉。我花了多年时间在巴黎的厨房里完善面团技艺,学习如何让黄油和面粉在指尖完美融合,制作出轻盈如云的面团。今天我要分享的这个版本,正是那种让你从内到外都感到温暖的汤品。

想象一下:一勺浓稠的鸡汤,里面漂浮着嫩滑的鸡肉块、柔软的胡萝卜和芹菜,还有那些 fluffy 的、从内部吸收汤汁的面团。每一口都有层次分明的口感——蔬菜的清甜、鸡肉的鲜美、香草的芬芳,以及面团那种介于松软和浓郁之间的完美质地。汤面上浮着一点金色的油脂,那是慢炖带来的慷慨馈赠。当你在寒冷的日子里端上这碗汤,整个房间都会充满家禽和香草的温暖气息。

我这个版本的不同之处在于,我用一种经典的法式技巧来制作面团——用冷黄油切入面粉中,就像做司康一样。这听起来简单,但正是这个细节让面团变得格外蓬松,而不是像面疙瘩那样沉重。我还会分享一个避免面团变得湿软的独家技巧,以及如何在不使用罐头饼干的情况下,用日常食材做出餐厅级别的鸡汤面团汤。相信我,一旦你试过这个 homemade 版本,就再也回不去了。

Why This Chicken Dumpling Soup Recipe Is the Best

The Flavor Secret

风味的关键在于汤底。我不用盒装高汤,而是用鸡骨、蔬菜和香草慢慢熬制。在纽约的联合广场农夫市场,我每周都会买新鲜的胡萝卜和芹菜。这些蔬菜在汤中慢慢释放甜味,与干百里香和欧芹的泥土气息完美融合。我在巴黎学到的技巧是:先用橄榄油把蔬菜炒到边缘微微焦黄,再加水,这样能释放出更深层的风味。最后加入提前煮熟的鸡肉丝——我通常用烤鸡的肉,这样既节省时间,又能增加一种烤制的香气。

Perfected Texture

面团是这道汤的核心。我的配方用冷黄油和牛奶,通过法式司康技法做出轻盈蓬松的面团。关键在于不要过度搅拌——混合到刚好成团即可。另一个诀窍是:在面团入锅后,绝对不要打开锅盖。蒸汽是让面团膨胀的关键。我在巴黎的厨房里多次测试过这个步骤,发现 12-15 分钟的密闭蒸煮能让面团达到完美的蓬松度,内部完全熟透,同时保持绵软的口感。

Foolproof & Fast

这道汤从开始到上桌只需要 45 分钟。对于纽约的忙碌夜晚来说,这简直是救星。我用预先煮好的鸡肉(比如周末烤的鸡或者商店买的烤鸡)来缩短时间。面团部分只需要一个碗和一把叉子,不需要搅拌机或特殊的设备。即使你是一个厨房新手,只要按照步骤来做,就一定能成功。我会在每一步都告诉你需要注意的细节,让你避开常见的陷阱。

Chicken Dumpling Soup Ingredients

每次我去纽约的 Whole Foods 采购这些食材时,总会想起我妈妈在摩洛哥市场里挑选蔬菜的样子——她总是用手捏一下胡萝卜,看它是否结实。好的食材是这道汤的灵魂。以下是你需要的一切。

Ingredients List

  • 1 tablespoon olive oil
  • 1 medium onion, diced
  • 2 carrots, peeled and sliced
  • 2 celery stalks, sliced
  • 3 cloves garlic, minced
  • 8 cups chicken broth
  • 2 cups cooked shredded chicken
  • 1 teaspoon dried thyme
  • 1 teaspoon dried parsley
  • Salt and pepper to taste
  • For the dumplings:
  • 1 1/2 cups all-purpose flour
  • 2 teaspoons baking powder
  • 1/2 teaspoon salt
  • 1/2 teaspoon garlic powder
  • 1/4 cup cold butter, cubed
  • 3/4 cup milk

Ingredient Spotlight

鸡高汤:这是汤的基底。我建议用低钠的盒装高汤,这样你可以自己控制咸度。如果你有时间,自制高汤会让味道更浓郁。在纽约的冬天,我会一次熬一大锅高汤,分装冷冻备用。

鸡肉:我用的是烤鸡的肉,因为它已经有烤制的香气。你也可以用鸡胸肉或鸡腿肉,提前水煮或烤熟后撕成丝。鸡腿肉更嫩、更多汁,而鸡胸肉更瘦、更清爽。

黄油:做面团时,黄油必须是冷的。这是巴黎的糕点师教我的——冷的黄油在烤箱(或蒸汽)中融化时会产生蒸汽,从而形成蓬松的层次。不要用微波炉软化黄油,直接切成小丁使用。

Original IngredientBest SubstitutionFlavor / Texture Impact
Olive oilButter or avocado oilButter adds richness; avocado oil is neutral
All-purpose flourGluten-free 1:1 blendSlightly denser dumplings; still fluffy
Chicken brothVegetable broth + 1 tsp poultry seasoningLighter flavor; still savory
MilkButtermilk or unsweetened almond milkButtermilk adds tang; almond milk is lighter

How to Make Chicken Dumpling Soup — Step-by-Step

别紧张,这道汤做起来比你想的要简单。只要按部就班,你很快就能享受到一碗 homemade 的 comfort food。

Step 1: Sauté the Aromatics

在一个大汤锅中,用中火加热橄榄油。加入切好的洋葱、胡萝卜和芹菜,炒大约 5 分钟,直到蔬菜变软,边缘微微透明。然后加入蒜末,继续炒 1 分钟,直到香味散发出来。这个过程叫做“sweating”,目的是让蔬菜释放水分和甜味,而不是上色。

💡 mia’s Pro Tip: 把蔬菜切成差不多的大小,这样它们能均匀受热和煮熟。我通常切成 1/2 英寸的小丁,这样每一口都能吃到所有食材。

Step 2: Build the Broth

倒入 8 杯鸡高汤,调大火力煮沸。然后转小火,加入撕好的鸡肉、干百里香、干欧芹、盐和黑胡椒。让汤保持微微沸腾的状态,炖煮 10 分钟。如果你想要更浓稠的汤底,可以在这一步中加入玉米淀粉浆(2 汤匙玉米淀粉加 2 汤匙冷水混合)。

⚠️ Common Mistake to Avoid: 不要把汤煮得太滚!剧烈沸腾会让汤汁蒸发太快,而且会让蔬菜变得过于软烂。只要看到汤面有轻微的冒泡就可以了。

Step 3: Make the Dumpling Dough

在汤炖煮的同时,开始制作面团。在一个大碗中,混合 1 1/2 杯面粉、2 茶匙泡打粉、1/2 茶匙盐和 1/2 茶匙蒜粉。加入 1/4 杯冷黄油丁,用叉子或 pastry cutter 把黄油切入面粉中,直到混合物看起来像粗砂粒一样。然后倒入 3/4 杯牛奶,用叉子轻轻搅拌,直到混合成团。注意不要过度搅拌——面团应该是湿润的、稍微黏手的,但不要揉捏。

💡 mia’s Pro Tip: 黄油保持冷是关键。如果你觉得厨房太热,可以把面粉和黄油混合物放入冰箱冷藏 5 分钟再继续。这能确保面团在蒸煮时形成蓬松的层次。

Step 4: Drop and Cook Dumplings

用两个汤匙或一个饼干勺,把面团分成约 12 个等份,轻轻放入 simmering 的汤中。注意不要把面团压扁。放入所有面团后,立刻盖上锅盖,调小火,煮 12-15 分钟。在煮的过程中千万不要打开锅盖——蒸汽是让面团膨胀的关键。时间到后,打开锅盖,用牙签插入面团中心,如果拔出来是干净的,说明面团已经熟透。

⚠️ Common Mistake to Avoid: 忍不住打开锅盖偷看是最大的禁忌!每次打开锅盖,蒸汽都会散失,导致面团变得扁平、湿软。相信我,15 分钟的等待是值得的。

StepActionDurationKey Visual Cue
1Sauté aromatics5 minOnions translucent, edges soft
2Add broth and simmer10 minGentle bubbles, aromatic steam
3Make dumpling dough5 minCrumbly texture, just combined
4Drop & steam dumplings12-15 minDumplings doubled in size, toothpick clean

Serving & Presentation

这道鸡汤面团汤最好趁热享用。用一个大汤勺把汤和面团盛到深碗中,确保每个碗里都有 2-3 个面团和一些蔬菜鸡肉。我喜欢在上面撒一点新鲜欧芹碎和现磨黑胡椒。在巴黎的厨房里,我们会在汤上淋一点高质量的特级初榨橄榄油,增加果香和光泽。

搭配方面,我最喜欢的是外皮酥脆的酸面包或一块简单的玉米面包。在纽约的冬天,我会配上一小碟泡菜,它的酸度能完美平衡汤的浓郁。你也可以搭配一份简单的芝麻菜沙拉,用柠檬汁和帕玛森奶酪调味。如果想更丰盛,可以加上烤芝士三明治,蘸着汤吃——简直是完美的 comfort 组合。

Pairing TypeSuggestionsWhy It Works
Side DishSourdough bread, cornbread, grilled cheeseAbsorbs broth; adds crunch and texture
Sauce / DipDrizzle of olive oil, pesto, hot sauceAdds brightness or heat; cuts richness
BeverageDry white wine (Sauvignon Blanc), apple cider, iced teaCrisp acidity balances savory broth
GarnishFresh parsley, chives, grated ParmesanAdds color, freshness, and umami depth

Make-Ahead, Storage & Reheating

作为一个在纽约忙碌的厨师,我经常提前准备这道汤的组件。我的方法是:提前做好汤底和鸡肉,但面团最好现做现吃。不过如果真的有剩余,保存和回热也是有技巧的。让我分享一下我最擅长的方法。

MethodContainerDurationReheating Tip
RefrigeratorAirtight container3-4 daysReheat gently on stovetop over medium-low; add splash of broth if thick
FreezerFreezer-safe bag or container2-3 monthsThaw overnight in fridge; reheat on stovetop; dumplings will be softer
Make-AheadSoup base only (no dumplings)Up to 2 days in advanceMake and cool soup; refrigerate; make fresh dumplings right before serving

如果你要冷冻,我建议把汤和面团分开保存。面团在冷冻后会失去蓬松感,变得有点湿软。所以最好的方法是:冷冻汤底,然后在回热时现做面团。这样你就能始终享受到 fluffy 的面团。如果你不介意面团口感变化,也可以一起冷冻,但回热时要用小火慢煮,避免面团散开。

Variations & Easy Swaps

VariationKey ChangeBest ForDifficulty Impact
Moroccan Spiced VersionAdd 1 tsp cumin, 1/2 tsp turmeric, 1/4 tsp cinnamonWarming, aromatic twist; cold-weather comfortEasy (just add spices)
Gluten-Free DumplingsUse 1:1 gluten-free flour blend + 1/2 tsp xanthan gumGluten-sensitive guestsMedium (texture differs slightly)
Creamy Chicken & Dumpling SoupStir in 1/2 cup heavy cream at the endExtra richness; special occasionEasy (adds 2 min)

Moroccan-Spiced Version

我妈妈在摩洛哥做的汤总是带着温暖的香料气息。在这个版本中,我加入了 1 茶匙孜然、1/2 茶匙姜黄和 1/4 茶匙肉桂。孜然带来 earthy 的香气,姜黄赋予金黄的色泽和 earthy 的复杂度,肉桂则添加了一丝微甜和温暖。这种组合让汤变得非常特别,在纽约的冬天,它是我最喜欢的变奏版本。

Gluten-Free Dumplings

我测试过多种无麸质面粉,发现用 1:1 的无麸质面粉混合(比如 Bob’s Red Mill 的蓝袋款)效果最好。额外加入 1/2 茶匙黄原胶可以帮助面团更好地粘合,避免散开。无麸质面团会比普通面团稍微软一些,但蓬松度依然很好。无麸质版本的煮制时间可能需要减少 1-2 分钟,所以可以在 12 分钟时检查一下熟度。

Creamy Chicken & Dumpling Soup

如果你想更放纵一点,可以在汤煮好关火后,慢慢搅拌入 1/2 杯重奶油。这个灵感来自巴黎的 velouté 技法——奶油让汤体变得更丝滑、更浓郁。这是我周末版本的选择,搭配一块 crusty bread 和一杯干白葡萄酒,简直是完美的冬日午餐。如果你担心热量,可以用 half-and-half 替代,效果也不错。

How do you make chicken dumpling soup from scratch without canned biscuits?

Making chicken dumpling soup from scratch without canned biscuits is easier than you think. The key is to prepare a simple drop dumpling batter using flour, baking powder, salt, garlic powder, cold butter, and milk. The technique is similar to making scones — you cut cold butter into the dry ingredients until the mixture looks like coarse crumbs, then stir in milk just until combined. Drop spoonfuls of this batter directly into your simmering soup, cover the pot, and let them steam for 12-15 minutes. The result is fluffy, tender dumplings that are far superior to any canned biscuit version. The cold butter creates steam pockets as it melts, giving the dumplings their signature lightness. This from-scratch method also lets you control the seasoning and avoid the preservatives and artificial flavors found in canned products.

What is the best way to keep dumplings from getting soggy in chicken soup?

The best way to keep dumplings from getting soggy in chicken soup is to manage their cooking environment carefully. First, make sure your soup is at a gentle simmer — not a rolling boil — when you drop in the dumplings. A vigorous boil can break them apart and make them waterlogged. Second, always cover the pot tightly while the dumplings cook. The trapped steam is what makes them puff up and cook through evenly, rather than absorbing too much liquid from the broth. Third, don’t overcrowd the pot. Leave enough space between dumplings so they can expand without touching. Fourth, remove the dumplings from the soup if you plan to store leftovers — store them separately from the broth to prevent them from absorbing liquid and becoming mushy. Finally, using the right ratio of fat to flour in your dumpling batter (cold butter is key) creates a tender but sturdy structure that holds up better in liquid.

Can I use chicken thighs instead of chicken breast for chicken dumpling soup?

Absolutely — chicken thighs are actually my preferred choice for chicken dumpling soup. Thighs contain more fat than breast meat, which means they stay juicier and more flavorful during cooking. They also have a richer, more savory taste that stands up well to the hearty broth and dumplings. If you’re using bone-in, skin-on thighs, you can brown them first in the pot before adding the vegetables, then simmer them in the broth until tender. This adds an extra layer of flavor from the browning and from the bones. Once cooked, remove the thighs, let them cool slightly, then shred or chop the meat and return it to the soup. If you’re short on time, boneless skinless thighs work perfectly too — just cut them into bite-sized pieces and cook them directly in the simmering broth for about 15-20 minutes before adding the dumplings.

How long should you cook the dumplings in chicken soup to ensure they are fully cooked?

Dumplings in chicken soup should cook for 12 to 15 minutes after being dropped into the simmering broth. The cooking time depends on the size of your dumplings — smaller teaspoon-sized dumplings may be done in 12 minutes, while larger tablespoon-sized dumplings may need the full 15 minutes. The most reliable way to check for doneness is to insert a toothpick or a thin skewer into the center of a dumpling; if it comes out clean with no raw batter clinging to it, the dumplings are ready. Another visual cue is that the dumplings will have doubled in size and look puffy and firm to the touch. It’s crucial to keep the pot covered during the entire cooking time — opening the lid releases steam and can cause the dumplings to collapse or cook unevenly. If you’re making gluten-free dumplings, start checking at the 12-minute mark as they may cook slightly faster.

Can I freeze chicken dumpling soup with the dumplings already in it?

You can freeze chicken dumpling soup with the dumplings already in it, but the texture of the dumplings will change. When frozen and thawed, dumplings tend to become softer and more porous, absorbing excess liquid from the broth and losing their fluffy, cloud-like texture. For the best results, I recommend freezing only the soup base — the broth, vegetables, and chicken — without the dumplings. When you’re ready to enjoy it, thaw the soup in the refrigerator overnight, reheat it on the stovetop until simmering, and then prepare a fresh batch of dumpling batter to drop in. This takes only about 15 minutes and ensures you get perfectly light and tender dumplings every time. If you do choose to freeze the complete soup, be aware that the dumplings will be denser and softer after reheating, but the flavor will still be delicious.

What can I add to chicken dumpling soup for more flavor?

There are many ways to boost the flavor of chicken dumpling soup. Start by browning the chicken pieces (if using raw chicken) in the pot before adding the vegetables — this creates fond (browned bits) that add deep, savory notes. Deglaze the pot with a splash of dry white wine or a tablespoon of apple cider vinegar before adding the broth. Fresh herbs like thyme, rosemary, and bay leaves add aromatic complexity. A Parmesan rind simmered in the broth adds umami richness. For a touch of brightness, stir in a squeeze of lemon juice and some fresh parsley just before serving. For heat, add a pinch of red pepper flakes or a dash of hot sauce. If you want an earthy, warming flavor, try adding a teaspoon of turmeric and a pinch of cinnamon — a tip I picked up from my mother’s Moroccan kitchen. A teaspoon of miso paste or a splash of fish sauce can also deepen the savory character without making the soup taste Asian.

Is chicken dumpling soup healthy?

Chicken dumpling soup can be a healthy meal, especially when made from scratch with wholesome ingredients. This homemade version provides a good balance of protein from the chicken, carbohydrates from the dumplings, and fiber and vitamins from the carrots and celery. One serving of this recipe contains approximately 380 calories, 22 grams of protein, and 5 grams of sugar. The broth-based soup is naturally lower in fat than cream-based soups, especially if you use lean chicken breast and skim the excess fat from the top of the broth. The dumplings do contain butter and all-purpose flour, which add some saturated fat and refined carbohydrates, but you can make them lighter by using whole wheat pastry flour or a gluten-free blend and reducing the butter to 2 tablespoons. For a lower-carb version, you can replace the dumplings with extra vegetables like cauliflower florets or zucchini chunks. Overall, this soup is a nutrient-dense meal that provides comfort and nourishment in every bowl.

What is the difference between chicken and dumplings and chicken dumpling soup?

The main difference between chicken and dumplings and chicken dumpling soup lies in the consistency and the ratio of ingredients. Chicken and dumplings is a classic Southern American dish that is thick and stew-like, with a creamy or gravy-like base that coats the chicken and dumplings. It often starts with a roux (butter and flour) to create a thick, velvety texture, and the dumplings are typically larger and cook directly in the thick sauce. Chicken dumpling soup, on the other hand, has a thinner, broth-based consistency — it’s a soup first and foremost, with a clear or lightly seasoned chicken broth as the base. The dumplings in soup are usually smaller and fluffier, and the dish includes more liquid, making it lighter and more brothy. Both dishes are deeply comforting, but chicken and dumplings is heartier and more filling, while chicken dumpling soup is lighter and can be eaten as a starter or a lighter main course.

Can I make chicken dumpling soup in a slow cooker or Instant Pot?

Yes, you can adapt this chicken dumpling soup recipe for both a slow cooker and an Instant Pot. For the slow cooker: Sauté the aromatics on the stovetop first, then transfer them to the slow cooker along with the broth, chicken, and seasonings. Cook on low for 6-8 hours or on high for 3-4 hours. About 30 minutes before serving, prepare the dumpling batter and drop it into the slow cooker. Cover and cook on high for another 25-30 minutes without lifting the lid. For the Instant Pot: Use the Sauté function to cook the aromatics, then add the broth and chicken. Pressure cook on high for 10 minutes, then do a quick release. Switch to Sauté mode (Low), drop in the dumplings, cover with the glass lid (not the pressure lid), and simmer for 12-15 minutes until cooked through. The dumplings will be slightly different in texture — slightly denser in the slow cooker and more tender in the Instant Pot — but both methods work well.

What is the best flour to use for dumplings in chicken soup?

The best flour for dumplings in chicken soup is all-purpose flour. It has a moderate protein content (about 10-12%), which gives the dumplings enough structure to hold their shape in the simmering broth while still remaining tender and fluffy. All-purpose flour strikes the perfect balance between cake flour (which would make dumplings too delicate and prone to falling apart) and bread flour (which would make them tough and dense). For the lightest, fluffiest dumplings, use unbleached all-purpose flour — the slightly higher protein content compared to bleached flour provides better structure without sacrificing tenderness. If you want to experiment, you can replace up to half of the all-purpose flour with cake flour for even lighter dumplings, or use whole wheat pastry flour for a nuttier flavor and more fiber. For gluten-free dumplings, use a 1:1 gluten-free all-purpose baking flour blend that contains xanthan gum, which helps replicate the structure that gluten provides.

Share Your Version!

I hope you love this Chicken Dumpling Soup as much as I do! It’s one of those recipes that feels like a warm hug on a cold day — and I think it’s about to become a staple in your kitchen too. I’d love to hear how it turned out for you. Did you try the Moroccan-spiced version? Or did you go classic with the fluffy from-scratch dumplings? Drop a star rating and a comment below — your feedback means the world to me and helps other readers discover this recipe too.

Tag me in your photos on Instagram or Pinterest @exorecipes — I absolutely love scrolling through your creations and seeing how you make this recipe your own. Nothing makes me happier than knowing one of my recipes brought comfort to your table. From my NYC kitchen to yours — I hope this recipe brings as much warmth to your table as it does to mine. — mia 🧡

📌

Love This Recipe? Save It to Pinterest!

If you enjoyed this Chicken Dumpling Soup recipe, don’t let it get lost in your browser tabs! 😄 Pin it now so you can find it again anytime — and explore hundreds more tried-and-tested recipes waiting for you on my Pinterest boards.

👉 Follow mia on Pinterest @exorecipe

📌 Pin this recipe · 🔁 Re-pin your favorites · 💬 Tag me when you make it — I love seeing your creations!

“`

Print

clock clock iconcutlery cutlery iconflag flag iconfolder folder iconinstagram instagram iconpinterest pinterest iconfacebook facebook iconprint print iconsquares squares iconheart heart iconheart solid heart solid icon

Chicken Dumpling Soup: Comforting Homemade Classic

  • Author: Chef Mia
  • Prep Time: 15 mins
  • Cook Time: 30 mins
  • Total Time: 45 mins
  • Yield: 6 1x
  • Method: Main Course
  • Cuisine: American

Description

A hearty and comforting homemade chicken dumpling soup, perfect for cold days.


Ingredients

Scale
  • 1 tablespoon olive oil
  • 1 medium onion, diced
  • 2 carrots, peeled and sliced
  • 2 celery stalks, sliced
  • 3 cloves garlic, minced
  • 8 cups chicken broth
  • 2 cups cooked shredded chicken
  • 1 teaspoon dried thyme
  • 1 teaspoon dried parsley
  • Salt and pepper to taste
  • For the dumplings:
  • 1 1/2 cups all-purpose flour
  • 2 teaspoons baking powder
  • 1/2 teaspoon salt
  • 1/2 teaspoon garlic powder
  • 1/4 cup cold butter, cubed
  • 3/4 cup milk

Instructions

  1. In a large pot, heat olive oil over medium heat. Add onion, carrots, and celery; cook until softened, about 5 minutes.
  2. Add garlic and cook for 1 minute more.
  3. Pour in chicken broth, bring to a boil. Reduce heat and stir in shredded chicken, thyme, parsley, salt, and pepper. Simmer for 10 minutes.
  4. While soup simmers, make the dumplings: In a bowl, whisk flour, baking powder, salt, and garlic powder. Cut in butter until mixture resembles coarse crumbs. Stir in milk just until combined.
  5. Drop spoonfuls of dumpling batter into the simmering soup. Cover and cook for 12-15 minutes, until dumplings are cooked through.
  6. Serve hot.

Notes

For a thicker soup, mix 2 tablespoons cornstarch with 2 tablespoons cold water and stir into soup before adding dumplings.


Nutrition

  • Calories: 380 kcal
  • Sugar: 5 g
  • Fat: 18 g
  • Carbohydrates: 35 g
  • Protein: 22 g


Chicken Dumpling Soup: Comforting Homemade Classic

k">

Tried This Recipe? Leave a Comment!

Did you make this recipe? I’d love to hear how it turned out! Please leave a comment and a rating below. Your feedback helps other home cooks and supports cheerychop.com!

For more delicious inspiration, follow me on Pinterest!

Chicken Curry Vegetable Puff Pastry Pies – Flaky, Golden Pockets of Curried Comfort

⚖️
Difficulty
Medium
⏲️
Prep Time
20 mins
🕒
Cook Time
25 mins
⏱️
Total Time
45 mins
🍽️
Servings
4

I still remember the first time I made these chicken curry puff pastry pies. It was a chilly autumn evening in my tiny NYC apartment, and I was craving the warm, aromatic flavors of my mother’s Moroccan kitchen — but something faster, easier, and with that irresistible French puff pastry I learned to laminate in Paris. In under an hour, I had a golden, flaky pie filled with tender chicken and vegetables in a lightly spiced curry sauce. That first bite took me straight back to the souk spice stalls of Marrakech, but the crunch was pure Parisian patisserie. This chicken vegetable curry pie recipe is everything I love about fusion cooking: it’s comforting, clever, and surprisingly simple.

When you cut into one of these pies, the steam carries the scent of toasted cumin, turmeric, and curry powder — earthy and bright. The puff pastry shatters delicately, giving way to a creamy, chunky filling that’s neither too dry nor too wet. The peas pop with sweetness, the carrots add a tender bite, and every piece of chicken is coated in that silky, golden sauce. I use mixed vegetables (peas, carrots, corn) because they add color and texture without extra work. The heavy cream—or coconut milk, if you want a dairy-free twist — ties everything together into a lush, satisfying bite. It’s the kind of meal that feels like a hug on a plate.

What sets this easy chicken curry pie recipe apart is the technique. I studied classic French sauce work in Paris, and I apply that here by simmering the filling until just thick enough to hold its shape — no flour or roux needed. The curry powder gets bloomed in oil with the aromatics, which deepens its flavor without bitterness. And the puff pastry? It’s store-bought (yes, absolutely!), but I show you how to handle it so the bottom stays crisp and never soggy. 💡 mia’s Pro Tip: Let the filling cool slightly before spooning it onto the pastry — a hot filling will melt the butter layers before they puff in the oven.

Why This Chicken Curry Vegetable Puff Pastry Pies Recipe Is the Best

The Flavor Secret – Growing up in Morocco, I watched my mother layer spices with patience and intuition. For this chicken curry puff pastry pies recipe, I bloom the curry powder, cumin, and turmeric in olive oil right at the start. That extra minute unlocks the spices’ essential oils, making the filling aromatic and deep — not raw or dusty. It’s a simple French technique (blooming spices in fat) that elevates a weeknight dinner into something special.

Perfected Texture – The biggest challenge with puff pastry pot pie is the dreaded soggy bottom. My solution: have the filling thick and cool before assembly, and bake the pies on a preheated sheet pan if you can. The initial blast of heat sets the pastry fast, creating steam that lifts the layers without soaking into the filling. Plus, I use a simple egg wash that gives a deep golden sheen — that bakery-finished look is pure Paris.

Foolproof & Fast – I’ve tested this curry puff pastry appetizer (or main dish!) for my busy New York life. It uses rotisserie chicken to save time, frozen mixed vegetables that cook in minutes, and one sheet of puff pastry. From start to finish, you’re just 45 minutes away from four beautiful, individually portioned pies. Even if you’ve never worked with puff pastry, I walk you through every step — no stress, just delicious results.

Chicken Curry Puff Pastry Pies Ingredients

I love how humble this list is. Most items are pantry staples — spices, onion, garlic — plus a pack of puff pastry from the freezer section. On my way home from the Union Square farmers market, I grab a rotisserie chicken from the store and a bag of frozen peas and carrots. This is NYC convenience meets global flavor.

Ingredients List

  • 1 tablespoon olive oil
  • 1 onion, diced
  • 2 cloves garlic, minced
  • 1 tablespoon curry powder
  • 1 teaspoon ground cumin
  • ½ teaspoon ground turmeric
  • ½ teaspoon salt
  • ¼ teaspoon black pepper
  • 1½ cups cooked chicken, shredded or diced
  • 1 cup mixed vegetables (peas, carrots, corn), cooked
  • ½ cup chicken broth
  • ¼ cup heavy cream or coconut milk
  • 1 sheet puff pastry (about 9×9 inches), thawed
  • 1 egg, beaten (for egg wash)

Ingredient Spotlight

Curry powder: The soul of this dish. I use a medium-heat Madras curry powder for depth without overpowering heat. If you prefer less spice, try a mild yellow curry. Look for a brand with fenugreek and cumin — it makes a difference. Substitution: Garam masala works in a pinch, but add an extra pinch of turmeric for color.

Puff pastry: Store-bought frozen puff pastry is a time-saver I fully embrace. I like Pepperidge Farm or Dufour for their butter content. Thaw it in the fridge overnight, not at room temperature — cold pastry puffs better. Substitution: If you’re gluten-free, use a certified gf puff pastry; it’s a bit more delicate but works.

Chicken: Rotisserie chicken is my go-to — it’s already seasoned and tender. Remove the skin and shred or dice. If you have leftover roasted chicken or even turkey, use that. Substitution: For a vegetarian version, swap equal amount of canned chickpeas (rinsed).

Mixed vegetables: Frozen peas, carrots, and corn are perfect. No chopping, and they cook in minutes. Fresh works too — just dice carrots small and blanch first. Substitution: Swap in green beans or diced bell peppers for a twist.

Heavy cream / coconut milk: Both give luxurious richness. Cream makes it silky; coconut milk adds a subtle tropical note that complements the curry beautifully. Substitution: Use full-fat unsweetened oat milk or cashew cream for a lighter option.

Original IngredientBest SubstitutionFlavor / Texture Impact
Curry powder (Madras)Garam masala + extra turmericLess heat, more floral notes
Puff pastry (wheat)Gluten-free puff pastrySlightly less flaky, more delicate
Cooked chickenCanned chickpeas (rinsed)Firm, hearty texture; flavor changes
Heavy creamCoconut milk (full-fat)Adds tropical sweetness
Mixed frozen vegetablesFresh peas + diced carrots + chopped green beansBrighter color, slightly firmer

How to Make Chicken Curry Vegetable Puff Pastry Pies — Step-by-Step

Let me walk you through each step. I’ve included visual cues and chef’s tricks to make sure your pies come out perfectly golden and crisp.

Step 1: Preheat and Prep

Preheat your oven to 400°F (200°C). Line a baking sheet with parchment paper. If you have a heavy baking sheet, place it in the oven while it preheats. A hot sheet gives the pastry an immediate blast of heat, boosting the rise.

💡 mia’s Pro Tip: If you don’t have a heavy sheet, use a regular one — just don’t skip the parchment. It prevents sticking and makes clean-up a breeze.

Step 2: Sauté Aromatics

In a large skillet, heat the olive oil over medium heat. Add the diced onion and minced garlic. Cook, stirring, until the onion is translucent and fragrant — about 3 minutes. Don’t let the garlic brown; it can turn bitter.

⚠️ Common Mistake to Avoid: Crowding the pan or turning the heat too high. The onions should sizzle gently, not scorch. Patience here builds a sweet, mellow base.

Step 3: Toast Spices

Stir in the curry powder, cumin, turmeric, salt, and pepper. Cook for 1 minute, stirring constantly, until the spices are fragrant and slightly darker. This “blooming” step is crucial — it deepens flavor and removes any raw taste.

💡 mia’s Pro Tip: If your pan seems dry, add a splash of oil or a spoonful of the chicken broth before adding the spices. This helps them toast evenly without burning.

Step 4: Build the Filling

Add the cooked chicken, mixed vegetables, chicken broth, and heavy cream (or coconut milk). Stir to combine. Simmer for 2–3 minutes, until the sauce thickens slightly and coats the back of a spoon. Remove from heat and allow to cool for about 10 minutes — warm filling is fine, but hot filling will melt the pastry.

⚠️ Common Mistake to Avoid: Over-simmering can dry out the chicken. The sauce should be thick but still saucy. If it thickens too much, add a splash of broth.

Step 5: Roll and Cut Pastry

Lightly flour your work surface. Roll out the puff pastry sheet to about ⅛-inch thickness. Using a sharp knife or pastry wheel, cut into 4 equal squares (about 4.5 inches each). You can also cut circles with a large cookie cutter for a more traditional pie shape.

💡 mia’s Pro Tip: Work quickly — puff pastry softens fast. If it becomes sticky, chill it for 5 minutes in the freezer.

Step 6: Assemble the Pies

Place a heaping tablespoon of the cooled filling in the center of each pastry square. Fold the pastry over to form a half-moon or triangle. Press the edges firmly with your fingers to seal, then crimp with a fork to create a decorative edge and ensure the filling stays inside.

⚠️ Common Mistake to Avoid: Overfilling! Too much filling makes it impossible to seal properly, and the pies will burst open in the oven. Use about 2–3 tablespoons per pie.

Step 7: Egg Wash and Vent

Place the pies on the prepared baking sheet. Brush the tops with beaten egg for a shiny, golden finish. Use a sharp knife to cut two small slits in the top of each pie — this allows steam to escape and prevents the pastry from tearing.

💡 mia’s Pro Tip: For extra gloss, brush the pies a second time halfway through baking.

Step 8: Bake to Perfection

Bake for 18–22 minutes, until the pastry is puffed and deep golden brown. Rotate the pan halfway through for even browning. Let cool on the sheet for 2 minutes before serving — the filling will be piping hot.

⚠️ Common Mistake to Avoid: Don’t open the oven door during the first 15 minutes. The sudden drop in temperature can deflate the pastry.

StepActionDurationKey Visual Cue
1Preheat oven and line sheetOven reaches 400°F
2Sauté onion and garlic3 minOnion translucent, garlic fragrant
3Toast spices1 minSpices darken slightly, strong aroma
4Add chicken, veggies, broth, cream; simmer2-3 minSauce thickens, coats spoon
5Roll and cut pastry5 min4 even squares or circles
6Fill and seal pies5 minEdges firmly sealed, fork-crimped
7Egg wash and vent slits2 minGolden sheen, small slits cut
8Bake18-22 minDeep golden, puffed, filling bubbles

Serving & Presentation

I like to serve these pies hot from the oven, placed on a small plate with a side of fresh cilantro or mint chutney. The bright herbiness cuts through the rich curry and makes every bite pop. In NYC, I often pair them with a simple cucumber raita (yogurt with grated cucumber and a pinch of cumin) — it’s cooling and creamy. For a heartier meal, add a handful of arugula dressed with lemon juice and olive oil.

If I’m feeling nostalgic for my mom’s table in Morocco, I’ll sprinkle the pies with a little smoked paprika and serve them with a side of harissa-spiked yogurt. The heat and smokiness complement the curry beautifully. For a French touch, a drizzle of honey over the pastry after baking adds a sweet-savory contrast that surprises everyone.

Pairing TypeSuggestionsWhy It Works
Side DishSimple arugula salad, lemon rice, or roasted potatoesFreshness balances richness; starch fills out the meal
Sauce / DipMint chutney, cucumber raita, or sweet chili sauceCool, tangy, or sweet contrasts the warm curry
BeverageMango lassi, crisp white wine (Sauvignon Blanc), or iced teaAcidity and fruitiness cut through spices
GarnishFresh cilantro, chopped scallions, or a squeeze of limeAdds color, brightness, and a fresh finish

Make-Ahead, Storage & Reheating

In my NYC schedule, I live by make-ahead meals. These pies are a dream for meal prep — you can assemble them a day in advance and bake when needed. The filling itself can be made up to 2 days ahead and kept in the fridge. If you want to prep the whole pie, arrange them on the baking sheet, cover with plastic wrap, and refrigerate. Bake straight from the fridge, adding a couple of extra minutes.

MethodContainerDurationReheating Tip
RefrigeratorAirtight container with lid ajar to keep pastry crispUp to 3 daysReheat in 350°F oven for 8-10 minutes; pastry re-crisps
Freezer (baked)Freeze in single layer, then transfer to freezer bagUp to 2 monthsThaw in fridge overnight; reheat at 350°F for 10-12 minutes
Freezer (unbaked)Assemble on parchment-lined tray, freeze solid, then bagUp to 2 monthsBake from frozen at 400°F for 22-25 minutes; no thaw needed

💡 mia’s Pro Tip: If reheating in the microwave, the pastry will soften. I recommend the oven or air fryer at 350°F for 5-6 minutes to restore crispness.

Variations & Easy Swaps

VariationKey ChangeBest ForDifficulty Impact
Vegetarian (Chickpea Curry)Replace chicken with canned chickpeas; use veg brothMeatless Monday, vegan optionSame
Gluten-Free / Dairy-FreeUse GF puff pastry and coconut milkAllergies, dietary restrictionsSlightly harder (pastry delicate)
Spicy Thai-InspiredAdd 1 tbsp red curry paste, use coconut milk, add limeMore heat, Southeast Asian flavorSame

Vegetarian Version (Chickpea Curry Pies)

In my mother’s kitchen, we often used chickpeas instead of meat — they’re a staple of Moroccan cooking. For a vegetarian spin, swap the chicken with one can of chickpeas (rinsed and drained) and use vegetable broth. The chickpeas hold their shape and soak up the curry creaminess beautifully. I like to add a handful of fresh spinach at the end, letting it wilt into the filling for extra color. This version is just as satisfying and freezes perfectly.

Gluten-Free / Dairy-Free Version

I’ve made this for friends with celiac disease, and it works — you just need a little patience. Use a certified gluten-free puff pastry (I like Schar or GeeFree). Handle it gently because it’s more fragile. For dairy-free, swap heavy cream with full-fat coconut milk; the coconut pairs wonderfully with curry, adding a subtle tropical sweetness. The flavor is actually more complex than the original! Bake time is the same; just keep an eye on the pastry — GF puff pastry can brown faster.

Spicy Thai-Inspired Version

When I want a change of pace, I transform these into Thai curry pies. Replace the curry powder and cumin with 1 tablespoon of Thai red curry paste, and use coconut milk exclusively. Add a squeeze of lime and a teaspoon of fish sauce (or soy sauce for vegetarian) to the filling. Garnish with fresh basil and a slice of lime. The result is a bold, aromatic pie that’s more fragrant and a little spicy — perfect with a cold beer.

Frequently Asked Questions

Can I use store-bought puff pastry for chicken curry vegetable pies?

Absolutely — and I encourage it! Store-bought puff pastry is the secret to making this recipe quick and accessible. Look for a brand that uses real butter (like Dufour or Pepperidge Farm) for the best flavor and rise. Just make sure to thaw it in the refrigerator overnight, not on the counter, so the butter stays cold and creates those beautiful flaky layers in the oven.

How do you prevent the bottom of puff pastry pies from getting soggy?

The number one trick is to avoid a watery filling. In this recipe, we simmer the chicken and vegetables with broth and cream until the sauce thickens and coats the spoon. Let the filling cool for at least 10 minutes before assembling — hot filling will melt the butter in the pastry before it hits the oven. Also, bake on a preheated sheet pan if possible. The immediate heat jumpstarts the puff and seals the bottom. And never skip the parchment paper.

What vegetables go best in a chicken curry puff pastry pie?

I love using frozen peas, diced carrots, and corn because they’re colorful, sweet, and cook quickly without releasing too much water. You can also add finely chopped green beans, diced bell peppers, or even small florets of cauliflower (blanch them first). Avoid high-water vegetables like zucchini or mushrooms unless you sauté them separately to remove excess moisture. The key is to keep the filling thick enough to hold its shape when scooped.

How long should I bake chicken curry puff pastry pies and at what temperature?

Bake the pies at 400°F (200°C) for 18 to 22 minutes. The exact time depends on your oven and how thick your pastry is. You’re looking for a deep golden-brown color and a puffed, shatteringly crisp exterior. If the pies are browning too quickly on top but not cooked through, tent them loosely with foil for the last 5 minutes. Let rest for 2 minutes before serving — the filling stays hot long after baking.

Can I make these pies ahead of time?

Yes! You have two great options: assemble the pies completely (unbaked) and refrigerate them up to 24 hours in advance. Brush with egg wash just before baking. Or prepare the filling up to 2 days ahead and keep it in the fridge. When you’re ready, bring the filling to room temperature, assemble, and bake. You can also freeze unbaked pies — just assemble on a tray, freeze solid, then transfer to a freezer bag. Bake from frozen at 400°F for 22-25 minutes.

What is the best way to reheat these pies?

To restore that fresh-from-the-oven crispness, reheat in a 350°F oven for 8-10 minutes (if refrigerated) or 10-12 minutes (if frozen and thawed). An air fryer at 350°F for 5 minutes works beautifully too. The microwave will soften the pastry, so use it only if you’re in a rush — the pastry will be chewier but still tasty. I always recommend the oven for the best texture.

Can I freeze the unbaked pies?

Absolutely! Assemble the pies, place them on a parchment-lined tray, and freeze until solid (about 2 hours). Then transfer them to a zip-top freezer bag, removing as much air as possible. They’ll keep for up to 2 months. When you want to bake, no need to thaw — just place frozen pies on a baking sheet, add a couple of minutes to the baking time (start checking at 22 minutes), and enjoy fresh pies anytime.

What dipping sauce goes well with these pies?

I love a cooling yogurt-based sauce to balance the warm curry spices. My go-to is a quick raita: combine plain Greek yogurt with grated cucumber, a pinch of salt, and a sprinkle of cumin. For a Moroccan twist, mix yogurt with a little harissa paste. If you want something sweet and spicy, sweet chili sauce is fantastic. And for a fresh herb kick, mint chutney (store-bought or homemade) is always a winner.

Can I use a different type of pastry?

Yes, you have options. Shortcrust pastry will give a sturdier, more traditional pie crust — but you won’t get the same flaky, airy texture. Phyllo dough can be used if you brush each layer with butter, but it’s more delicate and requires a different assembly technique (multiple layers). Puff pastry remains my top recommendation because it’s forgiving, readily available, and delivers that gorgeous golden puff every time.

Is this recipe spicy?

This recipe is mildly spiced — it’s aromatic and warm rather than fiery. The curry powder, cumin, and turmeric bring flavor without much heat. If you want more spice, add a pinch of cayenne pepper or a chopped fresh chili with the garlic. For a milder version, use a “mild” curry powder and skip the black pepper. You can always serve extra chili flakes or sriracha at the table so everyone can adjust to their liking.

Share Your Version!

I’d love to see how these chicken curry vegetable puff pastry pies turn out in your kitchen! Did you add extra spice? Swap the chicken for chickpeas? Or maybe you served them with a tangy mango chutney? Drop a star rating and a comment below — your feedback helps other home cooks and makes my day. 📸 Tag your photos on Instagram or Pinterest with @exorecipes — I love scrolling through your creations and sometimes share my favorites on my stories.

One question for you: which element of this pie surprised you the most — the flaky crust, the silky filling, or how fast it came together? I’m always curious what makes people fall in love with a recipe. From my NYC kitchen to yours — I hope this recipe brings as much warmth to your table as it does to mine. — mia 🧡

📌

Love This Recipe? Save It to Pinterest!

If you enjoyed this Chicken Curry Vegetable Puff Pastry Pies recipe, don’t let it get lost in your browser tabs! 😄 Pin it now so you can find it again anytime — and explore hundreds more tried-and-tested recipes waiting for you on my Pinterest boards.

👉 Follow mia on Pinterest @exorecipes

📌 Pin this recipe · 🔁 Re-pin your favorites · 💬 Tag me when you make it — I love seeing your creations!

Print

clock clock iconcutlery cutlery iconflag flag iconfolder folder iconinstagram instagram iconpinterest pinterest iconfacebook facebook iconprint print iconsquares squares iconheart heart iconheart solid heart solid icon

Chicken Curry Vegetable Puff Pastry Pies

  • Author: Chef Mia
  • Prep Time: 20 minutes
  • Cook Time: 25 minutes
  • Total Time: 45 minutes
  • Yield: 4 1x
  • Method: Main Course
  • Cuisine: Indian

Description

These individual chicken curry vegetable puff pastry pies are flaky, golden, and filled with a savory curried chicken and vegetable filling. Perfect for a cozy dinner or packed lunch.


Ingredients

Scale
  • 1 tablespoon olive oil
  • 1 onion, diced
  • 2 cloves garlic, minced
  • 1 tablespoon curry powder
  • 1 teaspoon ground cumin
  • 1/2 teaspoon ground turmeric
  • 1/2 teaspoon salt
  • 1/4 teaspoon black pepper
  • 1 1/2 cups cooked chicken, shredded or diced
  • 1 cup mixed vegetables (e.g., peas, carrots, corn), cooked
  • 1/2 cup chicken broth
  • 1/4 cup heavy cream or coconut milk
  • 1 sheet puff pastry (about 9x9 inches), thawed
  • 1 egg, beaten (for egg wash)

Instructions

  1. Preheat oven to 400°F (200°C). Line a baking sheet with parchment paper.
  2. In a large skillet, heat olive oil over medium heat. Add onion and garlic, cook until softened, about 3 minutes.
  3. Stir in curry powder, cumin, turmeric, salt, and pepper; cook for 1 minute until fragrant.
  4. Add cooked chicken, mixed vegetables, chicken broth, and cream. Simmer for 2-3 minutes until slightly thickened. Remove from heat and let cool slightly.
  5. On a lightly floured surface, roll out puff pastry to about 1/8-inch thickness. Cut into 4 squares or circles (or use a large cookie cutter).
  6. Place a heaping tablespoon of filling in the center of each pastry piece. Fold over to create a half-moon or triangle, pressing edges to seal. Use a fork to crimp edges.
  7. Place pies on prepared baking sheet. Brush tops with beaten egg. Cut a small slit in each for steam to escape.
  8. Bake for 18-22 minutes until golden brown and puffed. Serve warm.

Notes

You can use store-bought rotisserie chicken for convenience. For a vegetarian version, substitute chickpeas for chicken and use vegetable broth. These pies freeze well; reheat in a 350°F oven for 10 minutes.


Nutrition

  • Calories: 420 kcal
  • Sugar: 4 g
  • Fat: 26 g
  • Carbohydrates: 28 g
  • Protein: 22 g


Chicken Curry Vegetable Puff Pastry Pies

k">

Tried This Recipe? Leave a Comment!

Did you make this recipe? I’d love to hear how it turned out! Please leave a comment and a rating below. Your feedback helps other home cooks and supports cheerychop.com!

For more delicious inspiration, follow me on Pinterest!

Chicken Cranberry Pinwheels: A Quick, Delicious Snack Recipe for Any Occasion

⚖️
Difficulty
Easy
⏲️
Prep Time
15 mins
🕒
Cook Time
0 mins
⏱️
Total Time
75 mins
🍽️
Servings
24 pinwheels

Growing up in my mother’s kitchen in Morocco, I learned that the best appetizers are often the simplest. She would fill delicate pastry with spiced chicken and dried fruits, a tradition that sparks joy in every bite. Now, as a professional cook in New York City, I’ve reimagined that comfort into this chicken cranberry pinwheels recipe — a quick, no-cook snack that’s perfect for holiday gatherings, game day, or a lunchbox surprise. The combination of creamy cheese, tender chicken, and sweet-tart cranberries wrapped in a soft tortilla is pure magic.

Let me paint the picture: you spread a luscious cream cheese mixture across a warm flour tortilla — it’s thick, studded with ruby-red cranberries and toasted pecans. The scent of green onion and black pepper mingles with the fruity tartness. When you roll and chill, the flavors meld; the tortilla softens just slightly, hugging the filling. Slice into pinwheels and you’ll see the beautiful spiral: creamy white, specks of pink and green, a golden edge. The first bite is creamy, then you get the pop of cranberry, the nutty crunch, and the savory chicken. It’s addictive.

I’ve tested this version countless times for my NYC supper club, and it’s become a staple. My secret? Using full-fat block cream cheese at room temperature. It spreads like a dream and never makes the tortilla soggy. Plus, I insist on chilling the rolls for at least an hour — that’s the key to clean, neat slices. A common mistake is overstuffing the tortilla; leave that half-inch border and roll gently but firmly. Today I’ll show you how to make these easy chicken pinwheels for any occasion, from a quick snack to a party platter.

Why This Chicken Cranberry Pinwheels Recipe Is the Best

The Flavor Secret. This isn’t just a cream cheese spread — it’s a carefully balanced mixture. I spent time in Paris perfecting sauce work, and that attention to balance shows here: the tangy cream cheese, the sweet-tart dried cranberries, savory shredded chicken, and a touch of black pepper. The optional pecans add a toasty crunch that reminds me of Moroccan briouats but without the deep-frying.

Perfected Texture. From my pastry training, I know that moisture control is everything. By softening the cream cheese fully and using dried cranberries (not fresh), you avoid excess liquid. The tortilla stays intact, and the chilled roll slices into perfect pinwheels every time. No sogginess, no falling apart.

Foolproof & Fast. This recipe requires zero cooking — perfect for busy New Yorkers or anyone hosting a last-minute party. With just 15 minutes of active prep and a chill in the fridge, you have 24 bite-sized wonders ready to impress. It’s a no-fuss way to serve a crowd, and the make-ahead ability makes it a lifesaver for holiday appetizer recipes.

Chicken Cranberry Pinwheels Ingredients

I source my ingredients from the Union Square Greenmarket and a good local deli. A block of Philadelphia cream cheese (the real deal, not the whipped tub) is key. Look for dried cranberries that are plump and not rock-hard — the Ocean Spray brand works perfectly. For the chicken, I often use a rotisserie chicken from the market; it saves time and adds great flavor. The flour tortillas should be 10-inch “burrito size” — they roll beautifully without breaking.

Ingredients List

  • 4 large flour tortillas (10-inch)
  • 8 oz cream cheese, softened to room temperature
  • ½ cup dried cranberries, chopped (optional: pulse in a food processor for finer texture)
  • ½ cup cooked chicken breast, shredded or finely chopped (about one small breast)
  • ¼ cup finely chopped pecans (optional, but recommended)
  • 2 green onions, thinly sliced (white and light green parts)
  • ¼ teaspoon salt
  • ⅛ teaspoon black pepper

Ingredient Spotlight

Cream cheese: The backbone of the spread. Full-fat block cream cheese is essential — low-fat or tub cream cheese contains more water and can make the mixture runny. Let it sit on the counter for 30 minutes before mixing.

Dried cranberries: They provide the sweet-tart punch and chewy texture. Avoid fresh or frozen cranberries as they release too much liquid. If you only have fresh, cook them down with a bit of sugar first, then drain well.

Cooked chicken: Rotisserie chicken is my cheat code — it’s flavorful and moist. You can also use poached or leftover grilled chicken. Shred or chop finely so it distributes evenly.

Tortillas: Large flour tortillas are the most forgiving to roll. Corn tortillas are too small and brittle. For gluten-free, use large gluten-free wraps (like Siete almond flour tortillas) — they work but require gentle handling.

Original IngredientBest SubstitutionFlavor / Texture Impact
Cream cheeseNeufchâtel cheese (⅓ less fat)Slightly tangier, not as creamy; chill longer for firmness.
Dried cranberriesChopped dried cherries or golden raisinsCherries are tarter, raisins are sweeter; both work well.
Cooked chickenShredded turkey or canned chickpeas (for vegetarian)Turkey = same texture; chickpeas = hearty but different flavor.
PecansToasted walnuts or slivered almondsWalnuts are milder, almonds bring crunch; all nutty.
Flour tortillasLarge gluten-free wrapsMore delicate; need careful rolling and shorter chill.

How to Make Chicken Cranberry Pinwheels — Step-by-Step

Follow these simple steps, and you’ll have perfect pinwheels every time. Remember: the chill is non-negotiable for clean slices.

Step 1: Prepare the Filling

In a medium bowl, combine 8 oz softened cream cheese, ½ cup chopped dried cranberries, ½ cup shredded chicken, ¼ cup chopped pecans (if using), 2 sliced green onions, ¼ teaspoon salt, and ⅛ teaspoon pepper. Mix with a spatula until everything is evenly incorporated. Taste and adjust seasoning — it should be creamy, tangy, and subtly savory.

💡 mia’s Pro Tip: For even distribution, chop the cranberries and pecans to roughly the same size as the shredded chicken. This ensures every bite has a bit of everything.

Step 2: Spread the Filling

Lay one tortilla flat on a clean cutting board. Spoon about ¼ of the cream cheese mixture onto the center. Using an offset spatula or the back of a spoon, spread it evenly from the center outward, leaving a ½-inch border around the edges. The border prevents filling from squeezing out during rolling.

⚠️ Common Mistake to Avoid: Don’t spread too thick — about ¼-inch layer is ideal. Too much filling makes rolling messy and the pinwheels won’t hold together.

Step 3: Roll Tightly

Starting at the edge closest to you, roll the tortilla into a tight log, tucking the filling in as you go. Use gentle but firm pressure. Roll until you reach the other end. Place seam-side down on the board. Repeat with remaining tortillas.

💡 mia’s Pro Tip: If your tortilla seems dry or cracks when rolling, warm it in the microwave for 10 seconds to make it more pliable. This is especially helpful with larger tortillas.

Step 4: Chill to Set

Wrap each roll individually in plastic wrap, twisting the ends to seal tightly. Refrigerate for at least 1 hour, and up to 4 hours. Chilling firms the cream cheese, making slicing clean. Don’t skip this — warm rolls will squish.

⚠️ Common Mistake to Avoid: If you slice too soon, the pinwheels will be messy. The mixture needs time to set. For best results, chill the full 1 hour.

Step 5: Slice and Serve

Remove from fridge. Unwrap each roll and place on a cutting board. Using a sharp serrated knife, slice into 1-inch pinwheels (you should get 6 per roll = 24 total). Wipe the knife clean between cuts for neat slices. Arrange on a platter and serve cold.

💡 mia’s Pro Tip: For party presentation, trim the very ends (they’re often uneven) and discard or snack on them. Then arrange the best pinwheels in a concentric circle.

StepActionDurationKey Visual Cue
1Mix filling5 minUniform pink-speckled cream cheese
2Spread on tortilla2 min eachEven ¼-inch layer, ½-inch border
3Roll tightly1 min eachNeat log, no gaps
4Chill wrapped rolls1 hour minFirm to the touch
5Slice into pinwheels2 min per rollClean spiral, no oozing

Serving & Presentation

These cranberry chicken wraps shine on any occasion. For holiday parties, I arrange them on a large wooden board with fresh rosemary sprigs and extra dried cranberries scattered around — it’s festive and effortlessly elegant. In my NYC apartment, I serve them alongside a bowl of balsamic dip or honey mustard. For a casual snack, pair with a crisp apple and a handful of mixed nuts.

If you’re hosting a brunch or baby shower, try cutting the pinwheels into bites and stacking them in a pyramid. The contrast of the creamy filling and the golden tortilla edge is beautiful. I always get asked, “Did you buy these?” — and that’s the best compliment.

These quick snack ideas also work as lunchbox fillers. Pack them with a few grapes and a cheese stick for a balanced meal that kids and adults love. No reheating needed!

Pairing TypeSuggestionsWhy It Works
Side DishMixed greens with vinaigrette, roasted veggiesLight contrast to rich pinwheels
Sauce / DipBalsamic glaze, honey mustard, yogurt dill dipTangy dips cut the creaminess
BeverageSparkling water with lemon, dry Riesling, iced teaClean palate cleansers
GarnishFresh parsley, pomegranate arils, candied pecansAdds color and crunch

Make-Ahead, Storage & Reheating

One of the best things about this recipe is how well it fits into a busy schedule. I often prep the rolls on Sunday night, slice them Tuesday for a meeting. The cream cheese actually deepens in flavor overnight. Keep them chilled, and they stay fresh for days.

MethodContainerDurationReheating Tip
RefrigeratorAirtight container, layers separated by wax paperUp to 4 daysServe cold – no reheating needed.
FreezerUnslid rolls tightly wrapped in plastic + foilUp to 2 monthsThaw overnight in fridge, then slice.
Make-AheadRolls wrapped in plastic (unslid)1 day in advanceSlice just before serving for freshest look.

If you freeze the rolls, don’t slice them first. Thaw the whole log in the refrigerator, then slice. This prevents the pinwheels from becoming waterlogged. I’ve done this for holiday prep, and they tasted just as good as fresh.

💡 mia’s Pro Tip: If you’re bringing these to a party, transport the rolls whole (unsliced) and slice them at the venue. They’ll look pristine and professional.

Variations & Easy Swaps

VariationKey ChangeBest ForDifficulty Impact
Herb & GarlicAdd 2 tbsp fresh chopped parsley and 1 minced garlic cloveExtra savory noteSame
Gluten-Free / Dairy-FreeUse gluten-free tortillas, dairy-free cream cheese substituteDietary restrictionsEasier (swap ingredient)
Spicy SouthwestAdd 2 tbsp diced jalapeño and 1 tsp cumin, use pepper jackCrowd with spicy cravingsSame

Herb & Garlic Variation

This twist brings me back to Paris, where my instructor taught us to always balance creaminess with fresh herbs. Add 2 tablespoons of finely chopped fresh parsley and one minced garlic clove to the cream cheese mixture. The garlic gives a slight pungent warmth, and the parsley keeps it bright. This version pairs beautifully with roasted red peppers.

Gluten-Free / Dairy-Free Variation

For my friends with dietary restrictions, I’ve tested this thoroughly. Use large gluten-free tortillas (Siete almond flour or Cassava work best). For dairy-free, substitute cream cheese with a soft vegan cream cheese like Kite Hill. Note that vegan cream cheese is less firm; chill the rolls for at least 2 hours, and handle carefully when slicing. The flavor is still delightful.

Spicy Southwest Variation

At my NYC taco pop-up, I learned to love heat. Dice a fresh jalapeño (remove seeds for less heat) and add it along with 1 teaspoon ground cumin and ¼ cup shredded pepper jack cheese. The smoky cumin and spicy pepper transform these into a bold, crowd-pleasing appetizer. Serve with a side of salsa verde.

Frequently Asked Questions

What type of cream cheese works best for making chicken cranberry pinwheels not soggy?

I always recommend using full-fat block cream cheese (like Philadelphia brand) at room temperature. The block form has the least water content and the highest fat content, which means it stays firm and doesn’t release moisture into the tortilla. Avoid whipped cream cheese or low-fat versions as they contain more air and liquid, which can lead to soggy pinwheels. Soften the block cream cheese by letting it sit on the counter for 30 minutes before mixing — never microwave it, as melting can change the texture.

Can I use rotisserie chicken for chicken cranberry pinwheels?

Absolutely! Rotisserie chicken is actually my go-to shortcut for this recipe. It’s perfectly cooked, seasoned, and incredibly moist. Simply remove the skin and shred or finely chop the breast and thigh meat. Using rotisserie chicken saves you the step of cooking chicken from scratch and adds a subtle savory depth from the rotisserie seasonings. Just make sure to pick the meat into small pieces so it distributes evenly in the cream cheese mixture. Leftover grilled or poached chicken works just as well.

How far in advance can I make chicken cranberry pinwheels for a party?

You can assemble the rolls up to 24 hours ahead of time and keep them wrapped tightly in plastic wrap in the refrigerator. I actually find the flavor improves overnight as the ingredients meld together. For best results, slice the pinwheels no more than 2 hours before serving to keep them looking fresh — if you slice too early, the edges may dry out slightly. If you need to prep further ahead, freeze the whole rolls (unsliced) for up to 2 months, then thaw in the fridge overnight and slice before serving.

What can I substitute for dried cranberries in chicken cranberry pinwheels?

If you don’t have dried cranberries, there are several delicious alternatives. Dried cherries are the closest match — they offer a similar tart-sweet profile and chewy texture. Golden raisins or chopped dried apricots bring a milder sweetness. For a tangier twist, try chopped dried sour cherries. You can also use fresh cranberries in a pinch, but cook them first with a little sugar until they soften and release liquid, then drain well before using. Avoid jellied cranberry sauce as it’s too moist and will make the filling runny.

How do I keep chicken cranberry pinwheels from falling apart?

The key to pinwheels that hold together is threefold: 1) Don’t overstuff — leave a ½-inch border on the tortilla and use just enough filling to cover the surface thinly. 2) Roll tightly but gently, tucking the filling in as you go. 3) Chill the rolled tortillas for at least one hour before slicing. The cream cheese needs time to firm up so the slices stay intact. If your pinwheels still fall apart, the filling may be too wet — try draining your chicken well or using less liquid from other ingredients.

Are chicken cranberry pinwheels gluten-free?

The standard recipe uses flour tortillas, which contain gluten. To make these gluten-free, swap the tortillas for large gluten-free wraps, such as those made from almond flour, cassava flour, or a gluten-free blend. Be aware that gluten-free tortillas can be more delicate and prone to cracking when rolling. Warm them very slightly (about 10 seconds in the microwave) to improve flexibility. Also, ensure all other ingredients — like the cream cheese and chicken — are certified gluten-free if needed. The rest of the ingredients are naturally gluten-free.

Can I make chicken cranberry pinwheels without cream cheese?

If you need a cream cheese substitute, there are a few good options. For a tangy-savory spread, you can use goat cheese or a soft herbed cheese like Boursin. Goat cheese will give a sharper, more crumbly texture — let it soften to room temperature and mix well. For a dairy-free alternative, use a thick cashew-based cream cheese or a blended silken tofu with lemon juice and salt. The flavor will change, but the pinwheels will still be delicious. Just note that the texture may be slightly different; extra chilling time helps.

What should I serve with chicken cranberry pinwheels?

These pinwheels are incredibly versatile and pair well with many sides and dips. For a light meal, serve them with a mixed green salad tossed in a lemon vinaigrette. As an appetizer, offer a trio of dips: balsamic glaze, honey mustard, and a cool yogurt dill sauce. For a holiday party, arrange them on a platter with fresh fruit like grapes, apple slices, and pomegranate seeds. They also go nicely with a bowl of roasted nuts or a cheese board. For drinks, iced tea, dry Riesling, or sparkling water with lemon work beautifully.

Can I use fresh cranberries instead of dried in pinwheels?

I generally recommend dried cranberries for this recipe because they provide concentrated sweetness and chewy texture without excess moisture. Fresh cranberries are very tart and release juice as they sit, which could make your cream cheese mixture watery. If you want to use fresh cranberries, you must cook them first: simmer 1 cup fresh cranberries with 2 tablespoons sugar and a splash of water until they soften and pop, about 5 minutes. Drain well, let cool completely, then chop and use. The result will be softer and less sweet than dried, but still tasty.

How many pinwheels does this recipe make?

This recipe makes exactly 24 pinwheels when using 4 large (10-inch) flour tortillas and slicing each roll into 6 pieces. The nutrition information provided (105 calories per pinwheel) is based on this yield. If you use smaller tortillas or slice thinner or thicker, the count will vary. For a crowd, you can easily double the recipe — just use two batches of filling and 8 tortillas. The pinwheels are bite-sized, so plan for about 3-4 per person for an appetizer portion.

📌

Love This Recipe? Save It to Pinterest!

If you enjoyed this Chicken Cranberry Pinwheels recipe, don’t let it get lost in your browser tabs! 😄 Pin it now so you can find it again anytime — and explore hundreds more tried-and-tested recipes waiting for you on my Pinterest boards.

👉 Follow mia on Pinterest @chefrecipes2

📌 Pin this recipe · 🔁 Re-pin your favorites · 💬 Tag me when you make it — I love seeing your creations!

Print

clock clock iconcutlery cutlery iconflag flag iconfolder folder iconinstagram instagram iconpinterest pinterest iconfacebook facebook iconprint print iconsquares squares iconheart heart iconheart solid heart solid icon

Chicken Cranberry Pinwheels

  • Author: Chef Mia
  • Prep Time: 15 minutes
  • Cook Time: 0 minutes
  • Total Time: 1 hour 15 minutes (includes chilling)
  • Yield: 24 pinwheels 1x
  • Method: Appetizer, Snack
  • Cuisine: American

Description

These quick and delicious chicken cranberry pinwheels are perfect for any occasion, from parties to snacks. They combine creamy cheese, savory chicken, and sweet-tart cranberries in a convenient bite-sized roll.


Ingredients

Scale
  • 4 large flour tortillas (10-inch)
  • 8 oz cream cheese, softened
  • 1/2 cup dried cranberries, chopped
  • 1/2 cup cooked chicken breast, shredded or finely chopped
  • 1/4 cup finely chopped pecans (optional)
  • 2 green onions, thinly sliced
  • 1/4 teaspoon salt
  • 1/8 teaspoon black pepper

Instructions

  1. In a medium bowl, combine softened cream cheese, chopped dried cranberries, shredded chicken, pecans (if using), green onions, salt, and pepper. Mix until well blended.
  2. Lay a tortilla flat on a clean surface. Spread about 1/4 of the cream cheese mixture evenly over the tortilla, leaving a 1/2-inch border around the edges.
  3. Starting at one end, tightly roll the tortilla into a log. Repeat with remaining tortillas and filling.
  4. Wrap each roll tightly in plastic wrap. Refrigerate for at least 1 hour (or up to 4 hours) to firm up.
  5. When ready to serve, unwrap rolls and slice each into 1-inch pinwheels using a sharp knife. Arrange on a platter and serve cold.

Notes

For best results, use room temperature cream cheese to ensure easy spreading. Rolls can be made a day ahead and stored in the refrigerator. Omit nuts for a nut-free version.


Nutrition

  • Calories: 105
  • Sugar: 3g
  • Fat: 6g
  • Carbohydrates: 9g
  • Protein: 4g


Chicken Cranberry Pinwheels: A Quick, Delicious Snack Recipe for Any Occasion

Chicken Coleslaw Salad with Ginger Sesame Dressing – The Ultimate 15-Minute Meal

⚖️
Difficulty
Easy
⏲️
Prep Time
15 mins
🕒
Cook Time
0 mins
⏱️
Total Time
15 mins
🍽️
Servings
4

I still remember the vibrant salads my mother would toss together in our kitchen in Morocco—crisp vegetables shining under simple, bold dressings. Years later, after training in Paris and settling down in New York City, I find myself chasing that same bright, effortless energy. This Chicken Coleslaw Salad with Ginger Sesame Dressing is my love letter to those flavors. It’s the kind of recipe that feels both completely familiar and wonderfully fresh, a crunchy, tangy, and savory dish that comes together in the time it takes to decide what to watch for dinner. The unique angle? An emulsified ginger sesame dressing, a trick I picked up in a Parisian kitchen, that clings perfectly to every shred of cabbage and chicken.

Imagine a bowl full of contrasting textures: the sharp, clean crunch of green and red cabbage, the juicy tenderness of shredded chicken, and the nutty pop of toasted sesame seeds. The aroma alone is intoxicating—freshly grated ginger and garlic sizzle in your mind as you whisk them with nutty toasted sesame oil and tangy rice vinegar. A touch of honey rounds out the sharp edges, creating a dressing that’s both zippy and deeply savory. It’s a cold salad that feels substantial, a healthy chicken salad that doesn’t sacrifice an ounce of flavor for convenience.

What makes this Asian chicken coleslaw recipe stand out isn’t just the list of ingredients, but the technique behind it. My years perfecting sauce work in Michelin-starred kitchens taught me the power of a proper emulsion, even for a simple vinaigrette. Here, I’m sharing my secrets to ensuring your dressing doesn’t just pool at the bottom of the bowl but coats every single strand of cabbage. I’ll also show you a key step to avoid a watery dressing. This is the easy coleslaw salad you’ll turn to again and again—a perfect, fuss-free meal for your busiest weeknights.

Why This Chicken Coleslaw Salad Recipe Is the Best

The Flavor Secret: This ginger sesame dressing salad is all about balance. The floral heat of fresh ginger meets the deep, roasted notes of toasted sesame oil, all cut through by the clean acidity of rice vinegar. It’s a technique I refined while learning to balance vinaigrettes in France—every element has a role, creating a symphony of flavor that makes this healthy chicken salad anything but boring.

Perfected Texture: Nobody wants a soggy coleslaw. I insist on shredding the cabbage and carrots fresh. The combination of sturdy green cabbage and slightly more tender red cabbage gives a dynamic crunch that holds up beautifully against the dressing. Plus, a simple trick—salting the cabbage slightly and letting it sit—draws out excess water, ensuring every bite stays crisp and refreshing.

Foolproof & Fast: With just 15 minutes of prep and zero cooking required (if you have pre-cooked chicken), this recipe is the definition of accessible. It’s an easy coleslaw salad that proves you don’t need a stove or a lot of time to create a restaurant-quality dish. This is the kind of smart, delicious cooking I love teaching from my little NYC kitchen.

Chicken Coleslaw Salad with Ginger Sesame Dressing Ingredients

I source most of my produce from the Union Square Greenmarket, where the crisp cabbages and aromatic roots make this salad sing. But whether you’re shopping at a farmer’s market or your local grocery store, the key is to pick ingredients at their peak. Here is everything you need for the perfect Asian chicken coleslaw recipe.

Ingredients List

  • For the Dressing:
  • 1/4 cup rice vinegar
  • 2 tablespoons soy sauce
  • 1 tablespoon toasted sesame oil
  • 1 tablespoon honey
  • 1 tablespoon grated fresh ginger
  • 1 clove garlic, minced
  • For the Salad:
  • 2 cups cooked shredded chicken (rotisserie works great!)
  • 3 cups shredded green cabbage
  • 1 cup shredded red cabbage
  • 1 cup shredded carrots
  • 1/2 cup sliced scallions
  • 1/4 cup chopped fresh cilantro
  • 2 tablespoons toasted sesame seeds

Ingredient Spotlight

Fresh Ginger: This is the heart of the salad. The spicy, citrusy zing of fresh ginger is non-negotiable. Dried ginger or the stuff from a tube will give you a completely different, somewhat musty flavor. Look for smooth, firm knobs. A quick peel with a spoon and a fine grate is all it takes.

Toasted Sesame Oil: Unlike regular sesame oil, the toasted variety is dark, deeply aromatic, and packed with nutty flavor. It provides the rich backbone to the dressing. Because its flavor is so pronounced, a little goes a long way. I always buy it in smaller bottles to ensure freshness.

Rice Vinegar: This is milder and slightly sweeter than white or apple cider vinegar, which makes it perfect for this delicate Asian-inspired dressing. It brings tang without harshness. If you only have apple cider vinegar, use a little less and add a pinch of sugar to mimic the mildness.

Green & Red Cabbage: The duo provides both color and texture. Green cabbage is sturdy and crisp, while red cabbage is slightly more tender and peppery. Together, they create a coleslaw base that’s structurally sound and visually stunning.

Original IngredientBest SubstitutionFlavor / Texture Impact
Soy SauceTamari (gluten-free) or Coconut AminosTamari is very similar. Coconut aminos are slightly sweeter and less salty.
HoneyMaple Syrup or Agave NectarMaple adds a slightly woody sweetness. Agave is neutral.
Shredded ChickenExtra-Firm Tofu (pressed & crumbled) or ChickpeasTofu soaks up the dressing wonderfully. Chickpeas add a creamy, hearty element.

How to Make Chicken Coleslaw Salad with Ginger Sesame Dressing — Step-by-Step

Making this salad is a breeze. Follow these simple steps, and you’ll have the most incredible Chicken Coleslaw Salad with Ginger Sesame Dressing ready in no time. I’ll guide you through each step, sharing the little tricks that make all the difference.

Step 1: Make the Dressing

In a small bowl, whisk together the rice vinegar, soy sauce, toasted sesame oil, honey, grated ginger, and minced garlic until the honey is fully dissolved and the dressing is well combined. I like to whisk it vigorously to create a temporary emulsion.

💡 mia’s Pro Tip: For a perfectly emulsified dressing that comes together in seconds, add all the ingredients to a small mason jar, screw the lid on tight, and shake it like crazy! It’s a classic French bistro trick that makes cleanup a breeze.

Step 2: Prep the Salad Base

In a very large bowl, combine the shredded green cabbage, red cabbage, and carrots. Toss them together so the colors are evenly distributed. For the best texture, make sure your vegetables are as dry as possible after washing.

⚠️ Common Mistake to Avoid: Wet vegetables are the enemy of a great coleslaw! Any excess water will dilute your delicious ginger sesame dressing and make the salad soggy. Use a salad spinner or pat the shredded veggies dry with a clean kitchen towel before assembling.

Step 3: Combine and Toss

Add the shredded chicken, sliced scallions, and most of the cilantro (save a bit for garnish) to the bowl with the cabbage. Pour the prepared dressing over the top. Using tongs or your hands, toss everything together until every single strand is lightly coated in the dressing.

💡 mia’s Pro Tip: Use your hands to toss! It’s the gentlest and most effective way to coat everything evenly without crushing the vegetables. Plus, you can feel exactly when everything is perfectly combined.

Step 4: Finish and Serve

Transfer the salad to a serving platter or individual bowls. Sprinkle generously with the toasted sesame seeds and the remaining fresh cilantro. Serve immediately for the maximum crunch, or let it chill in the refrigerator for about 15 minutes to allow the flavors to meld beautifully.

⚠️ Common Mistake to Avoid: Don’t add the sesame seeds too early! If they sit in the dressing for a long time, they will lose their delightful crunch. Always add them right before serving for that perfect nutty pop.

StepActionDurationKey Visual Cue
1Whisk or shake dressing ingredients.2 minutesHoney is fully dissolved; dressing looks slightly cloudy.
2Toss dry cabbage and carrots in a bowl.3 minutesVibrant mix of purple, green, and orange. No water pooled at the bottom.
3Add chicken, scallions, and dressing; toss well.5 minutesAll ingredients are evenly coated and glistening.
4Garnish and serve.1 minuteSesame seeds and cilantro brighten the top.

Serving & Presentation

This healthy chicken salad is incredibly versatile. For a light lunch, I pile it high on a bed of mixed greens or stuff it into a warm pita. For dinner, it makes a phenomenal side dish alongside grilled salmon or teriyaki chicken skewers. I especially love serving it at my rooftop get-togethers here in NYC—it holds up beautifully on a buffet table and always gets rave reviews.

For a stunning presentation, mound the salad on a large, shallow platter, creating height. Garnish with a generous sprinkle of toasted sesame seeds, extra sliced scallions, and a few sprigs of fresh cilantro. A light drizzle of extra dressing right before serving makes it look incredibly appetizing.

Pairing TypeSuggestionsWhy It Works
Main Course (Protein)Grilled Chicken Skewers, Seared Salmon, Pan-Fried TofuThe bright, tangy salad cuts through the richness of grilled proteins.
Side DishWonton Soup, Asian Lettuce Wraps, Soba NoodlesProvides a fresh, crunchy contrast to warm, savory dishes.
BeverageIced Green Tea, Sparkling Water with Lime, Sauvignon BlancLight, crisp, and refreshing drinks that mirror the salad’s zestiness.
GarnishToasted Sesame Seeds, Sliced Scallions, Fried Shallots, MicrogreensAdds layers of texture, color, and flavor.

Make-Ahead, Storage & Reheating

This is my ultimate meal-prep salad, a staple for my busy NYC weekdays. The key to keeping it perfect for days is simple: store the dressing and the salad base separately. This way, the cabbage stays incredibly crunchy, and the flavors remain bright.

MethodContainerDurationReheating Tip
Refrigerator (Undressed)Airtight plastic or glass container3-4 daysNot applicable. Add dressing only when ready to eat.
Refrigerator (Dressed)Airtight container1-2 days (will soften)Serve cold or at room temperature. No reheating needed.
FreezerNot recommendedN/AThe texture of the cabbage and dressing will break down completely.

The dressing itself is a star player that can be made up to a week in advance. Just give it a good shake or whisk before using. If I’m meal-prepping for the week, I portion out the dry salad ingredients into containers and keep a jar of dressing ready to go. It makes throwing together a healthy lunch as easy as opening two containers and tossing them together.

Variations & Easy Swaps

VariationKey ChangeBest ForDifficulty Impact
Spicy Thai ColeslawAdd 1 tbsp sriracha or sambal oelek to the dressing.Kicking up the heat for a spicy lunch.Easy
Mango & Avocado TwistAdd 1 cup diced mango and 1 diced avocado.A creamy, tropical spin perfect for summer.Easy
Crunchy Ramen NoodleAdd 1 cup crushed dry ramen noodles or crispy wonton strips.Extra crunch and a fun, retro potluck feel.Easy

Spicy Thai Coleslaw

This is my go-to when I need an extra kick. Simply whisk in a tablespoon of sriracha or sambal oelek into the ginger sesame dressing. The heat perfectly balances the sweetness of the honey and the nuttiness of the sesame oil. Top with chopped roasted peanuts for an authentic Thai-inspired crunch that transports me straight to a bustling Bangkok market.

Mango & Avocado Twist

For a taste of summer, gently fold in one cup of diced ripe mango and one diced creamy avocado just before serving. The sweetness of the mango and the buttery texture of the avocado add a luxurious dimension to the crunchy coleslaw. It’s a fantastic way to use up slightly overripe fruit, and the colors are absolutely gorgeous.

Crunchy Ramen Noodle

My husband, a classic New Yorker, loves this playful twist. Just before serving, toss in a handful of crushed dry ramen noodles or crispy wonton strips. They provide an incredible, satisfying crunch that makes this salad feel like a party in your mouth. It’s a fun, nostalgic addition that never fails to bring a smile to the table.

How do you make a ginger sesame dressing from scratch for chicken coleslaw salad?

To make this ginger sesame dressing from scratch, you will need rice vinegar, soy sauce, toasted sesame oil, honey, fresh ginger, and garlic. Simply whisk or shake all the ingredients together in a bowl or jar until the honey is dissolved. The key is using fresh ginger for its bright, pungent kick and high-quality toasted sesame oil for its deep, nutty aroma. This dressing comes together in under 2 minutes and can be stored in the fridge for up to a week.

Can I use a different protein instead of chicken in this coleslaw salad?

Absolutely! This salad is incredibly versatile when it comes to protein. For a vegetarian version, I highly recommend using extra-firm tofu that has been pressed and crumbled, or a can of drained and rinsed chickpeas for a hearty, plant-based meal. You can also swap the chicken for cooked shrimp, flaked salmon, or even leftover steak. The tangy ginger sesame dressing pairs beautifully with a wide variety of proteins.

How long should you let the chicken coleslaw salad sit before serving?

This salad is delicious both immediately and after a short rest. For the ultimate crisp texture, serve it right after tossing. However, if you let it sit in the refrigerator for 15 to 20 minutes, the flavors will meld together more harmoniously. The cabbage will soften slightly while still retaining a pleasant crunch. Just be sure to add the sesame seeds right before serving to keep them from getting soggy.

What type of cabbage works best for the coleslaw in this salad?

For the best texture and visual appeal, I recommend using a mix of green and red cabbage. Green cabbage is sturdy, crisp, and has a mild flavor that provides the perfect base. Red cabbage adds a beautiful pop of color and a slightly more peppery, earthy flavor. Together, they create a coleslaw that is both structurally sound and far more interesting than a single variety. Savoy cabbage can also be used for a more tender texture.

Is this chicken coleslaw salad gluten-free?

The primary ingredient to check is the soy sauce. Standard soy sauce contains wheat, which is not gluten-free. However, this recipe is very easy to adapt. Simply use tamari or coconut aminos in place of the soy sauce. Tamari is a gluten-free soy sauce that tastes almost identical, while coconut aminos offer a slightly sweeter, milder flavor. All other ingredients in this recipe are naturally gluten-free.

Can I add fruit to this Asian chicken coleslaw?

Yes, adding fruit is a wonderful way to introduce natural sweetness and a new textural element. Diced mango, fresh orange segments, or sliced Asian pear are fantastic choices that pair perfectly with the ginger sesame dressing. If you want to try a slightly savory twist, add some pomegranate arils for a tart, juicy pop. If using fruit, fold it in gently just before serving so it doesn’t get bruised.

What is the best way to shred cabbage for coleslaw?

There are three excellent ways to shred cabbage, depending on your preference. For the classic, feathery texture, a sharp chef’s knife is perfect—just cut the cabbage into wedges and slice thinly crosswise. A mandoline slicer will give you the most uniform shreds, which is great for even coating. For the fastest method, use the shredding disk on a food processor. Regardless of the method, ensure the shreds are about 1/8-inch thick for the best crunch.

Can I make this chicken coleslaw vegan?

Yes, this recipe is very easy to make completely vegan. First, replace the shredded chicken with a plant-based protein like chickpeas, edamame, or crumbled extra-firm tofu. Second, ensure the honey is substituted with a plant-based sweetener like maple syrup or agave nectar. The rest of the ingredients are already plant-based. The result is a hearty, flavorful vegan salad that even non-vegans will love.

Share Your Version!

I absolutely love hearing from you! If you make this Chicken Coleslaw Salad with Ginger Sesame Dressing, please leave a star rating and a comment below to let me know how it turned out. Your feedback not only helps me but also helps other readers who are looking for their new favorite recipe.

Don’t forget to snap a photo and share it on Instagram or Pinterest! Tag me @exorecipes so I can see your beautiful creations. I love seeing how you make this recipe your own. Did you try the Spicy Thai version? Or maybe the Mango & Avocado twist? I want to hear all about it!

From my NYC kitchen to yours — I hope this recipe brings as much warmth to your table as it does to mine. — mia 🧡

📌

Love This Recipe? Save It to Pinterest!

If you enjoyed this Chicken Coleslaw Salad with Ginger Sesame Dressing recipe, don’t let it get lost in your browser tabs! 😄 Pin it now so you can find it again anytime — and explore hundreds more tried-and-tested recipes waiting for you on my Pinterest boards.

👉 Follow mia on Pinterest @exorecipe

📌 Pin this recipe · 🔁 Re-pin your favorites · 💬 Tag me when you make it — I love seeing your creations!

Print

clock clock iconcutlery cutlery iconflag flag iconfolder folder iconinstagram instagram iconpinterest pinterest iconfacebook facebook iconprint print iconsquares squares iconheart heart iconheart solid heart solid icon

Chicken Coleslaw Salad with Ginger Sesame Dressing

  • Author: Chef Mia
  • Prep Time: 15 minutes
  • Cook Time: 0 minutes
  • Total Time: 15 minutes
  • Yield: 4 1x
  • Method: Salad
  • Cuisine: Asian-inspired

Description

A crunchy and refreshing chicken coleslaw salad tossed in a tangy ginger sesame dressing, perfect for a light lunch or dinner.


Ingredients

Scale
  • For the Dressing:
  • 1/4 cup rice vinegar
  • 2 tablespoons soy sauce
  • 1 tablespoon toasted sesame oil
  • 1 tablespoon honey
  • 1 tablespoon grated fresh ginger
  • 1 clove garlic, minced
  • For the Salad:
  • 2 cups cooked shredded chicken
  • 3 cups shredded green cabbage
  • 1 cup shredded red cabbage
  • 1 cup shredded carrots
  • 1/2 cup sliced scallions
  • 1/4 cup chopped fresh cilantro
  • 2 tablespoons toasted sesame seeds

Instructions

  1. Make the dressing: In a small bowl, whisk together rice vinegar, soy sauce, sesame oil, honey, ginger, and garlic until well combined.
  2. In a large bowl, combine shredded chicken, green cabbage, red cabbage, carrots, scallions, and cilantro.
  3. Pour the dressing over the salad and toss to coat evenly.
  4. Sprinkle with toasted sesame seeds and serve immediately or chilled.

Notes

For a vegetarian version, substitute chicken with extra firm tofu or chickpeas. Dressing can be made ahead and refrigerated for up to a week.


Nutrition

  • Calories: 295
  • Sugar: 8
  • Fat: 14
  • Carbohydrates: 14
  • Protein: 28


Chicken Coleslaw Salad with Ginger Sesame Dressing

Chicken Caesar Pasta Salad: The Ultimate Creamy Twist on a Classic

⚖️
Difficulty
Easy
⏲️
Prep Time
15 mins
🕒
Cook Time
10 mins
⏱️
Total Time
25 mins
🍽️
Servings
4

Growing up in Morocco, my mother’s kitchen was a symphony of bold flavors — smoky cumin, bright lemon, and fresh herbs. When I later trained in Paris, I fell in love with the simple elegance of a perfect Caesar salad. Now in New York City, I’m always looking for ways to make a satisfying meal from what’s in my pantry. This Chicken Caesar Pasta Salad is the best of both worlds: the creamy, tangy Caesar dressing you crave, paired with tender pasta and juicy chicken for a heartier bite. It’s my go-to easy chicken Caesar salad recipe for busy weeknights or backyard barbecues.

Imagine al dente rotini cradling every drop of luscious, garlicky dressing — each forkful also brings crisp romaine, salty Parmesan, and a pop of crunchy croutons. The chicken is shredded or diced, soaking up the dressing and adding protein that keeps you full. I love the contrast of temperatures: cool lettuce, room-temperature pasta, and warm chicken if you’ve just grilled it. That’s the magic of this dish — it’s a salad, but it feels like a complete meal.

I’ve tested this Caesar pasta salad with chicken in my tiny NYC kitchen more times than I can count. My secret? A simple trick to keep the pasta from getting mushy — rinse it under cold water immediately after draining. I also use a high-quality store-bought Caesar dressing (or make my own with Greek yogurt for a lighter version). In this post, I’ll share my pro tip for the perfect texture, plus the one mistake most people make when adding croutons. Let’s make the best homemade Caesar pasta salad you’ve ever tasted.

Why This Chicken Caesar Pasta Salad Recipe Is the Best

The Flavor Secret

The key is layering flavors. I start with a creamy Caesar pasta salad dressing that’s punchy with anchovy (or Worcestershire) and lemon. The pasta absorbs that flavor while still retaining its shape. The romaine adds freshness, and the Parmesan brings a nutty, salty finish. I learned in Paris that every component must earn its place — here, everything does.

Perfected Texture

Texture is everything in a salad. I cook the pasta al dente — never soft — then shock it under cold water to stop cooking instantly. That step, straight from my French training, ensures the pasta stays firm even after being tossed with dressing. The romaine is chopped just before serving so it stays crunchy. And the croutons go on top at the last minute to stay crisp.

Foolproof & Fast

This recipe is designed for real life. You can use rotisserie chicken, leftover grilled chicken, or even canned chicken in a pinch. The dressing can be homemade or store-bought — I’ll give you my favorite brand below. From start to finish, you’re 25 minutes away from a delicious meal. No complicated techniques, no fancy equipment. Just pure, crowd-pleasing comfort food.

Creamy Caesar Pasta Salad Ingredients

I usually pick up these ingredients at my local NYC farmers market or any well-stocked grocery store. The romaine from the market is always crisper, and I love supporting local farms. My Moroccan roots also remind me to always have good olive oil on hand — it makes the dressing sing.

Ingredients List

  • 8 oz pasta (rotini or penne works best)
  • 2 cups cooked chicken, shredded or diced
  • 3 cups romaine lettuce, chopped
  • 1/2 cup shredded Parmesan cheese
  • 1/2 cup Caesar dressing (homemade or store-bought like Cardini’s)
  • 1/4 cup croutons (plain or garlic)
  • Salt and black pepper to taste

Ingredient Spotlight

Pasta: Rotini and penne are my top choices because their ridges and hollows capture the dressing beautifully. Look for a brand that says “bronze die” on the label — that means a rougher surface for better sauce adhesion. Substitution: gluten-free pasta works, but cook it one minute less than the package says to keep it al dente.

Chicken: I prefer using leftover rotisserie chicken because it’s already seasoned and juicy. If you’re cooking fresh chicken breasts, season them with salt, pepper, and a little garlic powder, then pan-sear until golden. For shredded chicken, simmer boneless skinless breasts in salted water for 15 minutes, then shred with two forks.

Caesar dressing: The soul of the dish. I use a high-quality store-bought like Cardini’s or a homemade version with Greek yogurt for fewer calories (see FAQs). Avoid thick, mayonnaise-heavy dressings — they make the salad gluey. Look for one with anchovy paste and real Parmesan.

Original IngredientBest SubstitutionFlavor / Texture Impact
Pasta (rotini)Penne, farfalle, or gluten-free pastaSlightly different shape but same dressing retention; gluten-free may be softer
Shredded ParmesanParmesan Reggiano grated fresh or Pecorino RomanoMore sharp/salty flavor; Ricotta salata for milder option
Caesar dressingGreek yogurt + lemon + garlic + anchovy pasteTangier, lighter, fewer calories; still creamy
CroutonsToasted pita chips, crispy chickpeas, or nutsCrunch factor; chickpeas add protein, nuts add healthy fat

How to Make Chicken Caesar Pasta Salad — Step-by-Step

Don’t worry — this is one of the easiest salads you’ll ever make. Follow these simple steps, and you’ll have a restaurant-quality dish in under half an hour.

Step 1: Cook and Cool the Pasta

Bring a large pot of salted water to a rolling boil (use about 1 tablespoon salt per 4 quarts water). Add 8 oz pasta and cook according to package directions until al dente — usually 8–10 minutes. Drain in a colander, then immediately rinse under cold running water for 30 seconds to stop the cooking. Shake off excess water and set aside.

💡 mia’s Pro Tip: Don’t overcook the pasta! Al dente means ‘to the tooth’ — it should have a slight resistance when you bite it. Overcooked pasta will turn mushy in the salad.

Step 2: Combine Salad Base

In a large mixing bowl, combine the cooled pasta, 2 cups cooked shredded chicken, and 3 cups chopped romaine lettuce. Sprinkle with 1/4 cup of the shredded Parmesan (reserve the rest for garnish). Toss gently with your hands or two large spoons to distribute everything evenly.

⚠️ Common Mistake to Avoid: Adding the lettuce too early if you’re not serving immediately — it will wilt. If you’re making ahead, keep the lettuce separate until just before serving.

Step 3: Dress and Toss

Pour 1/2 cup Caesar dressing over the salad. Use a rubber spatula to fold the dressing through the mixture until every piece of pasta and chicken is coated. Start with 1/3 cup and add more if needed — you want a creamy sheen, not a puddle.

💡 mia’s Pro Tip: Let the dressed salad sit for 5 minutes before serving. The pasta absorbs some dressing, which enhances the flavor. It’s like a quick marinate!

Step 4: Season and Top

Taste the salad and add salt and black pepper as needed. (Remember that Parmesan and Caesar dressing are already salty, so go easy on the salt.) Sprinkle the remaining Parmesan and 1/4 cup croutons on top. Serve immediately or refrigerate.

⚠️ Common Mistake to Avoid: Adding croutons too early will make them soggy. Always add them at the very last minute — even if you’re serving the salad later, keep croutons in a separate bag.

StepActionDurationKey Visual Cue
1Cook and cool pasta10 minPasta is tender but still firm when bitten
2Combine salad base2 minEven distribution of pasta, chicken, and lettuce
3Dress and toss2 minEverything has a light, creamy coating
4Season and top1 minCroutons and Parmesan visible on top

Serving & Presentation

I love serving this salad in a large wooden bowl — it reminds me of the communal platters my mother used in Morocco, where everyone digs in with warm bread. For a more refined look, you can plate individual portions on chilled plates. Garnish with a lemon wedge and an extra sprinkle of Parmesan. The bright yellow against the green romaine and creamy white dressing is gorgeous.

In NYC, I often pair this with a simple baguette or garlic bread for a casual dinner. It also travels beautifully for picnics or potlucks — just keep the croutons and extra dressing on the side until you’re ready to eat. For a summer twist, add grilled cherry tomatoes or avocado slices.

Pairing TypeSuggestionsWhy It Works
Side DishGarlic bread, roasted vegetables, or a crusty baguetteAdds crunch and soaks up extra dressing; vegetables add color
Sauce / DipExtra Caesar dressing, balsamic glaze, or hot sauceEnhances creaminess or adds heat; balsamic gives sweet tang
BeverageIced tea with lemon, crisp Sauvignon Blanc, or a light IPAAcidity cuts through richness; citrus flavors complement Caesar dressing
GarnishExtra Parmesan, toasted pine nuts, fresh parsley, or lemon zestAdds texture, color, and fresh flavor; lemon zest brightens everything

Make-Ahead, Storage & Reheating

As a busy food blogger in NYC, I love prepping this salad in advance for quick lunches. The key is to store components separately and combine just before eating. Here’s my meal-prep method: cook the pasta and chicken, chop the lettuce, and make (or buy) the dressing. Keep everything in airtight containers in the fridge. When hunger strikes, toss together with croutons on top.

MethodContainerDurationReheating Tip
RefrigeratorAirtight container (store dressing separately)3–4 daysNot recommended to reheat — enjoy cold or at room temperature
FreezerNot recommended — lettuce and dressing will separateN/AFreeze cooked pasta and chicken only; add fresh lettuce and dressing after thawing
Make-AheadSeparate containers for pasta, chicken, lettuce, dressing, croutonsUp to 2 days in advanceCombine and add croutons just before serving; add a splash of dressing if needed

If you have leftover dressed salad, it will keep for a day in the fridge, but the lettuce may wilt and the croutons will soften. That’s fine — I actually enjoy it as a “next-day” bowl, kind of like a pasta salad. If you want to revive it, add a handful of fresh lettuce and a few extra croutons. For a warm version (which is not traditional but delicious), you can briefly microwave the pasta and chicken before adding the lettuce.

Variations & Easy Swaps

VariationKey ChangeBest ForDifficulty Impact
Greek Keto CaesarReplace pasta with cauliflower florets; use Greek yogurt dressingKeto, low-carb, Mediterranean dietEasy
Gluten-Free / Dairy-FreeGluten-free pasta; dairy-free Parmesan substitute + dairy-free dressingGluten-free, dairy-free, allergy-friendlyEasy (check labels)
NYC Bagel TwistAdd everything bagel seasoning, chopped capers, and diced smoked salmonBrunch, special occasion, impressive guestsEasy

Variation 1: Greek Keto Caesar

For a low-carb version, swap the pasta for roasted cauliflower florets. Toss about 3 cups of small florets with olive oil, salt, and pepper, then roast at 400°F for 20 minutes until tender and golden. Let them cool, then proceed with the recipe. I love adding a sprinkle of dried oregano — a nod to my Moroccan spice rack — and using a Greek yogurt-based dressing. This version is just as creamy and satisfying, with even more vegetable goodness.

Variation 2: Gluten-Free / Dairy-Free

This is a breeze! Use your favorite gluten-free pasta (I recommend brown rice pasta or chickpea pasta for extra protein). For dairy-free, use a vegan Parmesan alternative like Follow Your Heart, and make your dressing with tahini, lemon, garlic, and a splash of unsweetened oat milk. The tahini gives an unexpected nutty richness that pairs beautifully with the lemon. My Parisian chef friends would approve of this creative twist.

Variation 3: NYC Bagel Twist

This one is inspired by my favorite New York City breakfast — a lox bagel. Replace chicken with 6 ounces of smoked salmon, chopped. Add 2 tablespoons of capers and a sprinkle of everything bagel seasoning (sesame, poppy, garlic, onion, salt). Use a creamy lemon-dill dressing instead of traditional Caesar. It’s a showstopper for brunch or a light supper. Serve with a side of sliced cucumber for extra freshness.

How do you keep chicken Caesar pasta salad from getting soggy?

The secret is to cool the pasta completely before assembling, and to add dressing just before serving. After cooking, rinse the pasta under cold water to stop cooking and remove excess starch. Then let it drain well and even spread it on a baking sheet to dry for a few minutes. Also, keep the lettuce and croutons separate until you’re ready to eat. If you’re making ahead, store all components separately — pasta, chicken, lettuce, dressing, and croutons — and combine only when serving.

Can I use Greek yogurt instead of mayonnaise in chicken Caesar pasta salad?

Absolutely! Greek yogurt makes an excellent substitute for mayonnaise in Caesar dressing. It adds a tangy, creamy consistency while reducing fat and calories. I often use full-fat Greek yogurt for the best texture — it’s thick enough to coat the pasta without being runny. Simply blend 1/2 cup Greek yogurt with 1 tablespoon lemon juice, 1 teaspoon Dijon mustard, 1 minced garlic clove, 2 tablespoons grated Parmesan, and a pinch of salt and pepper. This homemade dressing works beautifully in this salad.

What type of pasta is best for chicken Caesar pasta salad?

I recommend short, sturdy pasta shapes with ridges or hollows that can hold the creamy dressing. Rotini, penne, fusilli, and farfalle are all excellent choices. Rotini is my top pick because its corkscrew shape traps dressing and bits of Parmesan in every bite. Avoid long pasta like spaghetti or linguine — they tend to clump and don’t mix as easily with the other ingredients. If you’re using gluten-free pasta, look for shapes like penne or fusilli, and cook one minute less than the package says to keep them al dente.

How long does chicken Caesar pasta salad last in the fridge?

If stored properly in an airtight container with the dressing and croutons kept separate, the components will last 3–4 days in the refrigerator. Once the dressing is mixed in and the salad is fully assembled, it’s best eaten within 24 hours — the lettuce will start to wilt and the croutons will lose their crunch. I don’t recommend freezing the assembled salad because the lettuce and dressing will separate and become watery. You can freeze just the cooked pasta and chicken for up to 2 months, then add fresh lettuce and dressing when you’re ready to eat.

Can I make this chicken Caesar pasta salad vegetarian?

Yes, simply omit the chicken and add more protein-rich ingredients like chickpeas, white beans, or hard-boiled eggs. For a heartier vegetarian version, I love adding roasted chickpeas for crunch and protein. Another option is to use grilled halloumi cheese — it’s salty and holds its shape. Keep the Caesar dressing as is (or use a vegetarian-friendly brand that doesn’t contain anchovies — many store-bought versions are already vegetarian).

What can I use instead of croutons in this salad?

If you’re out of croutons or want a healthier alternative, there are plenty of options. Toasted pita chips or breadsticks broken into pieces work wonderfully. For a low-carb crunch, try roasted chickpeas, pumpkin seeds, or slivered almonds. Even crushed pork rinds can add a savory crunch. I sometimes use toasted pine nuts — they bring a delicate nuttiness that complements the Parmesan beautifully.

Is there a way to make the Caesar dressing lighter without losing flavor?

Definitely! My favorite lighter version replaces half the mayonnaise with plain Greek yogurt. You can also use all Greek yogurt and add a bit of buttermilk or milk to thin it. Another trick is to use a lower-fat Caesar dressing and boost the flavor with extra lemon zest, minced garlic, and a dash of Worcestershire sauce. Anchovy paste (or a few mashed anchovies) adds huge savory depth without many calories. The key is to balance the tanginess with the umami.

Can I add extra vegetables to this salad?

Absolutely! This salad is a great base for extra vegetables. Cherry tomatoes, sliced cucumbers, roasted red peppers, and avocado are all excellent additions. For a Moroccan-inspired twist, I sometimes add a handful of fresh mint and chopped dates — the sweetness contrasts beautifully with the savory dressing. Just be careful not to add too many watery vegetables (like cucumber) if you plan to store the salad, as they can make the dressing runny.

Share Your Version!

📌

Love This Recipe? Save It to Pinterest!

If you enjoyed this Chicken Caesar Pasta Salad recipe, don’t let it get lost in your browser tabs! 😄 Pin it now so you can find it again anytime — and explore hundreds more tried-and-tested recipes waiting for you on my Pinterest boards.

👉 Follow mia on Pinterest @chefrecipes2

📌 Pin this recipe · 🔁 Re-pin your favorites · 💬 Tag me when you make it — I love seeing your creations!

Print

clock clock iconcutlery cutlery iconflag flag iconfolder folder iconinstagram instagram iconpinterest pinterest iconfacebook facebook iconprint print iconsquares squares iconheart heart iconheart solid heart solid icon

Chicken Caesar Pasta Salad

  • Author: Chef Mia
  • Prep Time: 15 minutes
  • Cook Time: 10 minutes
  • Total Time: 25 minutes
  • Yield: 4 1x
  • Method: Main Course
  • Cuisine: American

Description

A delicious twist on the classic Caesar salad, this chicken Caesar pasta salad combines tender chicken, al dente pasta, crisp romaine lettuce, and a creamy Caesar dressing for a satisfying meal.


Ingredients

Scale
  • 8 oz pasta (such as rotini or penne)
  • 2 cups cooked chicken, shredded or diced
  • 3 cups romaine lettuce, chopped
  • 1/2 cup shredded Parmesan cheese
  • 1/2 cup Caesar dressing
  • 1/4 cup croutons
  • Salt and black pepper to taste

Instructions

  1. Cook the pasta according to package directions until al dente. Drain and rinse under cold water to cool.
  2. In a large bowl, combine the cooled pasta, cooked chicken, romaine lettuce, and Parmesan cheese.
  3. Pour the Caesar dressing over the salad and toss until well coated.
  4. Season with salt and pepper to taste.
  5. Top with croutons and serve immediately or refrigerate until ready to serve.

Notes

For a lighter version, use Greek yogurt-based Caesar dressing. Add cherry tomatoes or bacon bits for extra flavor.


Nutrition

  • Calories: 450
  • Sugar: 3g
  • Fat: 22g
  • Carbohydrates: 35g
  • Protein: 28g


Chicken Caesar Pasta Salad