“`html

Bacon and Red Pepper Egg Muffins – The Ultimate Low-Carb Meal-Prep Breakfast

⚖️
Difficulty
Easy
⏲️
Prep Time
10 mins
🕒
Cook Time
18 mins
⏱️
Total Time
28 mins
🍽️
Servings
6

Growing up in Morocco, my mother would wake before dawn to prepare eggs for our family — usually scrambled with tomatoes, onions, and a whisper of cumin, served with warm khobz bread. Those mornings shaped my understanding of what a breakfast could be: nourishing, flavorful, and made with love. Now, living in New York City with a fast-paced schedule and a French culinary diploma under my belt, I’ve taken that same soulful approach and translated it into something perfectly portable. These Bacon and Red Pepper Egg Muffins are my love letter to busy mornings — a low-carb, high-protein breakfast that captures the warmth of my childhood and the efficiency of my NYC life. They’re the kind of recipe that makes you feel put-together even when you’re racing out the door.

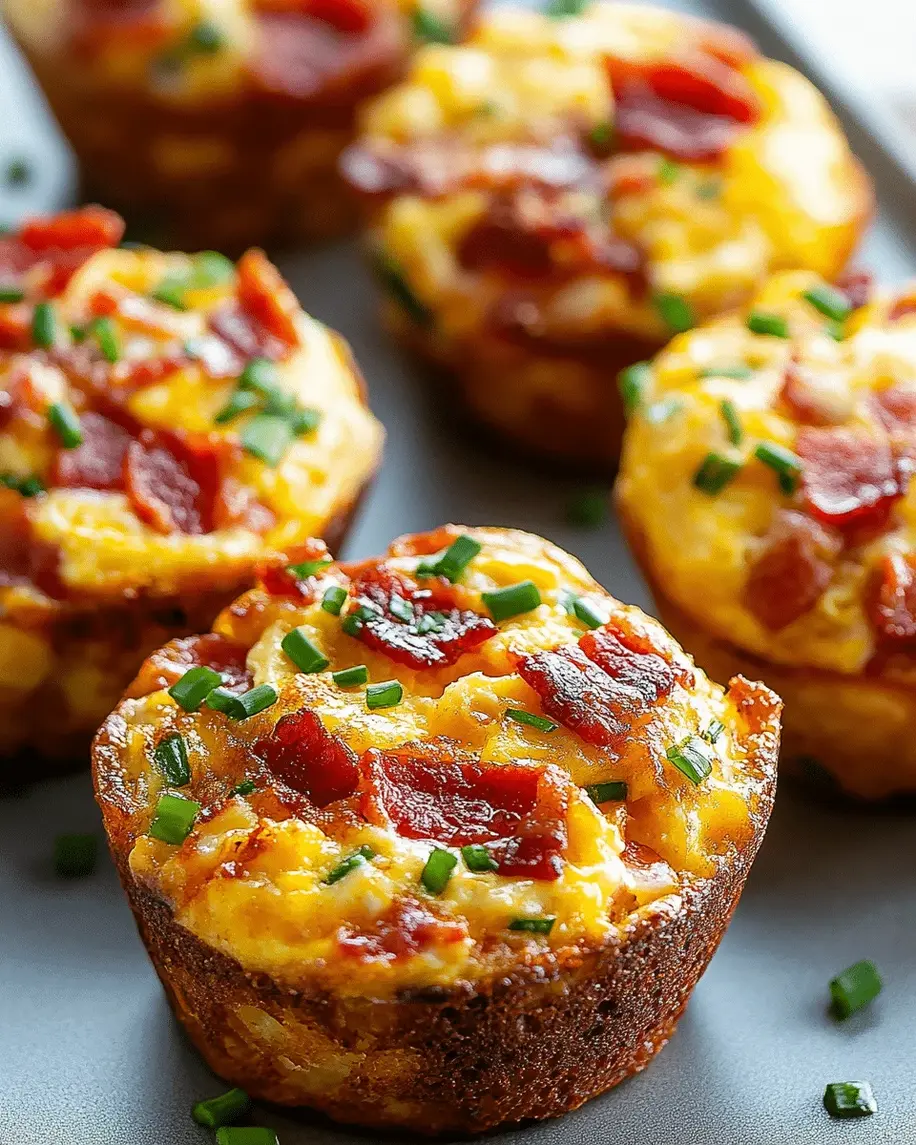
Let me paint you a picture: golden, fluffy eggs with ribbons of crispy bacon, tender bits of sweet red bell pepper, and pockets of melted cheddar that stretch with every bite. The aroma that fills your kitchen as these bake is absolutely intoxicating — smoky, savory, with a subtle sweetness from the peppers that balances the richness of the cheese. Each muffin is perfectly domed on top, lightly golden at the edges, and tender enough to eat with one hand while you sip your coffee. The texture is what sets them apart from other egg muffin cups recipes: they’re never rubbery or dry, thanks to a splash of milk and a precise baking time that I learned from my patisserie training in Paris, where precision is everything.

These keto egg muffins have become a staple in my weekly meal-prep rotation, and I’m so excited to share my version with you. What makes mine different? First, I cook the bacon until it’s just shy of fully crisp — it finishes cooking in the oven, staying perfectly chewy. Second, I whisk the eggs and milk together using a French technique called “emulsifying” — it creates a silky, uniform texture that prevents the eggs from weeping water as they bake. And third, I add the cheese in two stages: half stirred into the batter, half sprinkled on top for that irresistible golden crust. In this post, I’ll show you exactly how to make these easy breakfast egg muffins, including my best tips for keeping them from sticking, how to customize them for your taste, and the one mistake most people make that leads to dry, dense muffins (hint: it has to do with overmixing). Let’s get started!

Why This Bacon and Red Pepper Egg Muffins Recipe Is the Best

The Flavor Secret — The magic here lies in the balance of smoky, sweet, and salty. I render the bacon slowly until it’s deeply caramelized, then crumble it into the egg base along with the diced red peppers, which soften beautifully in the oven and release their natural sweetness. The cheddar adds a sharp, nutty note that ties everything together. This isn’t just a low-carb egg muffins recipe — it’s a flavor experience shaped by my Moroccan palate and French technique. I like to say these taste like a farmers market scramble, but way more convenient.

Perfected Texture — The secret to tender, never-rubbery egg muffins is threefold: using a little milk to dilute the protein structure of the eggs, whisking gently but thoroughly to incorporate air without over-beating, and baking at a moderate temperature (375°F) that cooks the eggs through without drying them out. I learned the importance of temperature control in Paris — even a few degrees can make or break a custard or an egg dish. These muffins come out light, fluffy, and moist every single time.

Foolproof & Fast — This is truly one of the easiest breakfast egg muffins recipes you’ll ever make. From start to finish, you’re looking at about 28 minutes, with only 10 minutes of active prep. The ingredients are straightforward — eggs, milk, bacon, red pepper, cheddar, salt, and pepper — and the method is nearly impossible to mess up if you follow my timing and visual cues. I’ve tested this recipe with home cooks of all skill levels, and it consistently delivers. Whether you’re a seasoned meal-prepper or a beginner looking for a first recipe to master, these low carb egg muffins are your new best friend.

Bacon and Red Pepper Egg Muffins Ingredients

I love shopping for these ingredients at my local farmers market in Union Square, especially on Saturday mornings in the fall when the peppers are at their peak and the farm-fresh eggs have those deep orange yolks that tell you they’re truly pasture-raised. It takes me right back to the souk in Marrakech, where every ingredient felt alive and bursting with flavor. Here’s what you’ll need — most of these are pantry staples, and I’ll share my best substitutions below.

Ingredients List

  • 6 large eggs (preferably at room temperature for easier whisking)
  • 1/4 cup milk (whole milk works best, but 2% or unsweetened almond milk are fine)
  • 1/2 cup diced red bell pepper (about 1/2 a medium pepper, seeds removed)
  • 4 slices bacon, cooked and crumbled (about 1/2 cup crumbled)
  • 1/2 cup shredded cheddar cheese (sharp or mild — both work beautifully)
  • 1/4 teaspoon salt (I use fine sea salt)
  • 1/8 teaspoon black pepper (freshly ground if possible)

Ingredient Spotlight

Eggs are the heart of this dish. They provide structure, richness, and protein. For the best results, choose large eggs — not extra-large or jumbo — because the recipe is calibrated for standard large eggs. If you use a different size, the liquid-to-solid ratio will shift and the texture may turn out dense or watery. Pasture-raised eggs give the most vibrant color and flavor, but conventional eggs work perfectly fine. A good test: if the yolk stands tall and doesn’t break immediately, your eggs are fresh.

Bacon brings a deep smokiness and salty crunch that makes these muffins sing. I prefer thick-cut, applewood-smoked bacon for its robust flavor. Cook it until it’s golden and crispy but still pliable — not brittle — because it will continue cooking in the oven. Turkey bacon or beef bacon can be substituted, but the flavor profile will change. If you’re vegetarian, omit the bacon and add 1/4 cup of sautéed mushrooms for an umami boost.

Red Bell Pepper adds sweetness, color, and a tender bite. I like to dice it into small 1/4-inch cubes so it distributes evenly throughout the batter. You can substitute orange or yellow bell peppers for a similar sweetness, or use green bell peppers for a slightly more grassy, savory note. For an even sweeter twist, roasted red peppers (from a jar, well-drained) work beautifully and add a subtle smokiness.

Cheddar Cheese melts into creamy pockets that elevate every bite. Sharp cheddar gives a more pronounced flavor, while mild cheddar keeps the muffins kid-friendly. For a healthier twist, you can use reduced-fat cheddar, but the texture will be slightly less creamy. Pre-shredded cheese is fine, but freshly shredded melts more smoothly because it doesn’t contain anti-caking powders. If you’re dairy-free, see my variation below.

Original IngredientBest SubstitutionFlavor / Texture Impact
6 large eggs12 large egg whites (or 4 whole eggs + 4 egg whites)Lower fat & cholesterol; muffins will be slightly less rich and a bit more spongy
1/4 cup whole milk1/4 cup unsweetened almond milk, oat milk, or half-and-halfAlmond milk: slightly nuttier, less creamy. Half-and-half: richer, more custard-like texture
4 slices bacon4 slices turkey bacon, 1/2 cup cooked chorizo, or 1/2 cup sautéed mushroomsTurkey bacon: leaner, less smoky. Chorizo: spicier, more complex. Mushrooms: earthy, vegetarian
1/2 cup shredded cheddar1/2 cup crumbled feta, shredded mozzarella, or dairy-free shredded cheeseFeta: tangier, saltier. Mozzarella: milder, more stretchy. Dairy-free: less melt, but still good

How to Make Bacon and Red Pepper Egg Muffins — Step-by-Step

Making these easy breakfast egg muffins is almost as fun as eating them. I’ve broken down every step with my chef-level details so you get perfect results on your first try. Let’s go!

Step 1: Preheat and Prep

Preheat your oven to 375°F (190°C). While it heats, generously grease a 12-cup muffin tin with butter, cooking spray, or a light coating of oil. Alternatively, use silicone muffin liners — they’re non-stick and make cleanup a breeze. If using paper liners, spray them lightly with non-stick spray, as eggs tend to stick to paper more than standard muffin batters. Place the tin on the center rack of the oven once preheated.

💡 mia’s Pro Tip: For the most non-stick surface, use a good-quality silicone muffin pan or brush each cup generously with melted butter. The butter adds flavor and creates a golden, crisp edge on the muffins.

Step 2: Whisk the Eggs

In a medium bowl, crack the 6 large eggs and add the 1/4 cup milk, 1/4 teaspoon salt, and 1/8 teaspoon black pepper. Whisk vigorously in a circular motion for about 30 seconds, until the mixture is uniform, pale yellow, and slightly frothy on top. This emulsifies the eggs and milk, creating a silky texture. Don’t over-whip — you don’t want stiff peaks, just a smooth, homogenous base.

⚠️ Common Mistake to Avoid: Whisking too vigorously or for too long incorporates too much air, making the muffins puff up in the oven and then collapse into a dense, rubbery texture. Whisk just until combined — about 30 seconds is perfect.

Step 3: Add the Mix-Ins

Fold in the 1/2 cup diced red bell pepper, the crumbled bacon, and half of the shredded cheddar cheese (about 1/4 cup). Stir gently with a spatula or spoon until evenly distributed. Reserve the remaining 1/4 cup of cheese for topping. This two-stage approach ensures you get melty cheese pockets inside the muffins and a golden, crispy cheese crust on top.

💡 mia’s Pro Tip: Let the cooked bacon cool for 2-3 minutes before adding it to the egg mixture. If the bacon is too hot, it can start to cook the eggs on contact, creating unwanted streaks of cooked egg in your batter.

Step 4: Fill the Muffin Cups

Divide the egg mixture evenly among the 12 muffin cups. Use a 1/4-cup measuring cup or a large cookie scoop for even portions — each cup should be filled about 2/3 full. The mixture should reach just below the rim of the cup, leaving room for the muffins to rise slightly as they bake. Sprinkle the reserved cheddar cheese evenly over the top of each muffin.

⚠️ Common Mistake to Avoid: Overfilling the cups leads to muffins that overflow and create a messy, unevenly baked product. Stick to the 2/3 full rule — you’ll get perfectly domed, tidy muffins every time.

Step 5: Bake to Perfection

Place the muffin tin in the preheated oven and bake for 15-18 minutes. At the 15-minute mark, check for doneness: the muffins should be set in the center (a toothpick inserted into the middle of one should come out clean or with just a few moist crumbs) and lightly golden on top. If they jiggle when you gently shake the pan, bake for 2-3 more minutes. The cheese on top should be melted and starting to brown in spots.

💡 mia’s Pro Tip: Every oven is different. If your oven runs hot, start checking at 14 minutes. If it runs cool, you may need the full 18 minutes. The visual cue is key: the edges should pull away slightly from the sides of the cups, and the top should be golden with no wet spots.

Step 6: Cool and Serve

Remove the muffin tin from the oven and let it cool in the pan for exactly 2 minutes. This resting time allows the eggs to finish setting and makes the muffins easier to remove. After 2 minutes, run a thin knife or silicone spatula around the edges of each muffin to loosen them, then gently lift them out. Transfer to a wire rack if serving later, or serve immediately while warm and fluffy.

⚠️ Common Mistake to Avoid: Letting the muffins cool completely in the pan traps steam, which makes the bottoms soggy. Always remove them after 2 minutes of resting. If any stick, gently use a small offset spatula to coax them out.

StepActionDurationKey Visual Cue
1Preheat & grease muffin tin10 minutes (oven preheat)Oven reaches 375°F; tin is evenly coated
2Whisk eggs & milk30 secondsPale yellow, slightly frothy, no streaks of white
3Fold in mix-ins1 minuteEvenly distributed bacon, pepper, and cheese
4Fill muffin cups2 minutesCups filled 2/3 full; cheese sprinkled on top
5Bake15-18 minutesGolden top, set center, edges pull away from cup
6Cool & remove2 minutes in panMuffins release easily; bottoms are dry, not soggy

Serving & Presentation

These Bacon and Red Pepper Egg Muffins are wonderfully versatile when it comes to serving. I love arranging them on a large wooden board with a side of sliced avocado, a handful of cherry tomatoes, and a drizzle of hot sauce for a casual weekend brunch that feels special but takes almost no effort. For a more substantial meal, serve them alongside a simple green salad dressed with lemon and olive oil — the bright acidity cuts through the richness of the eggs and cheese beautifully. My mother would serve these with a side of warm flatbread and a small bowl of olives, a nod to our Moroccan table.

For a quick weekday breakfast, I grab two muffins, wrap them in a paper towel, and eat them on my way out the door with a cup of black coffee. They’re perfectly handheld and not at all greasy. If you’re serving them to guests, garnish the platter with fresh parsley or chives — the green pop against the golden muffins and red pepper flecks is gorgeous. A dollop of sour cream or Greek yogurt on the side adds a cool, tangy contrast that I absolutely love.

Pairing TypeSuggestionsWhy It Works
Side DishAvocado slices, cherry tomato salad, roasted potatoes, fresh fruitAdds freshness, texture, and color; balances the savory richness of the muffins
Sauce / DipSour cream, Greek yogurt, salsa roja, sriracha mayo, chimichurriAdds creaminess, tang, or heat; a little drizzle elevates every bite
BeverageBlack coffee, iced latte, fresh orange juice, mint tea (Moroccan style!)Coffee cuts richness; juice adds sweetness; mint tea is a nod to my heritage
GarnishFresh chives, parsley, cilantro, flaky sea salt, smoked paprika dustAdds color, freshness, and a professional finish

Make-Ahead, Storage & Reheating

One of the reasons I make a batch of these egg muffins every Sunday is how incredibly well they keep. In my busy NYC life, having a protein-packed breakfast ready to grab from the fridge is a total game-changer. Here’s exactly how to store them so they stay fresh and delicious all week long.

MethodContainerDurationReheating Tip
RefrigeratorAirtight container, layered with parchment between stacksUp to 3 daysMicrowave 20-30 seconds on a paper towel-lined plate
FreezerFreezer-safe zip-top bag or airtight container, individually wrappedUp to 2 monthsThaw overnight in fridge, then microwave 30-40 seconds; or reheat from frozen for 60-70 seconds
Make-AheadAssemble batter in a bowl, cover, refrigerateUp to 1 day in advanceStir gently before filling cups; bake as directed, adding 1-2 minutes if batter is cold

For the best texture when reheating, I always place the muffins on a plate lined with a paper towel — it absorbs any excess moisture from condensation, keeping the bottoms from getting soggy. If you have a toaster oven, reheating at 350°F for 5-6 minutes gives the outside a slightly crisper edge while keeping the inside tender. I often freeze a batch and take one out the night before — it thaws in the fridge and reheats in 30 seconds the next morning. These muffins are truly designed for real-life, busy mornings.

Variations & Easy Swaps

One of the things I love most about this easy breakfast egg muffins recipe is how customizable it is. Over the years, I’ve developed several variations that keep my breakfast rotation exciting. Whether you’re craving Mediterranean flavors, need a dairy-free option, or want something with a Southwestern kick, there’s a version here for you.

VariationKey ChangeBest ForDifficulty Impact
Mediterranean TwistReplace bacon with crumbled feta + kalamata olives; add oreganoVegetarian, bright & tangy flavorSame — just swap ingredients
Dairy-Free / KetoUse unsweetened almond milk + dairy-free cheddar or omit cheeseLow-carb, lactose-free, paleo-friendlySame — cheese-free version is even easier
Southwestern StyleAdd 1/4 cup corn kernels + 2 tbsp chopped cilantro + 1/2 tsp cuminTex-Mex lovers, weekend brunchSame — just add extra mix-ins

Mediterranean Twist

This variation is inspired by the flavors of the Mediterranean coast — think Greek salad meets egg muffin. Omit the bacon and cheddar, and instead add 1/3 cup crumbled feta cheese, 1/4 cup chopped kalamata olives, and 1 teaspoon dried oregano to the egg base. The feta adds a tangy, salty punch that pairs beautifully with the sweet red peppers. I love serving these with a side of tzatziki sauce for dipping. It’s a vegetarian option that’s so flavorful, you won’t miss the meat at all. A sprinkle of fresh dill on top before serving takes it over the top.

Dairy-Free / Keto

For those following a dairy-free or keto lifestyle, this adaptation is incredibly simple. Replace the milk with unsweetened almond milk or cashew milk, and use a dairy-free shredded cheddar alternative (I like the ones from Miyoko’s or Violife). If you want to keep it even cleaner, simply omit the cheese altogether — the bacon and peppers provide so much flavor that you truly won’t miss it. The texture will be slightly less creamy but still tender and satisfying. With only about 1.5g net carbs per muffin (without cheese), these are an excellent choice for anyone watching their carb intake. This is my go-to version when I’m in a strict keto phase.

Southwestern Style

For a bold, fiesta-inspired twist, add 1/4 cup frozen corn kernels (thawed and drained), 2 tablespoons chopped fresh cilantro, and 1/2 teaspoon ground cumin to the egg mixture along with the bacon and cheddar. The corn adds a pop of sweetness, the cilantro brings freshness, and the cumin adds an earthy warmth that reminds me of the spice markets in Marrakech. If you like heat, stir in 1 tablespoon of diced pickled jalapeños or a pinch of cayenne pepper. Serve these with a spoonful of salsa verde or pico de gallo for a breakfast that feels like a celebration. I often make this version when I’m hosting weekend brunch — it’s always the first platter to empty.

Share Your Version!

I absolutely love hearing how these Bacon and Red Pepper Egg Muffins turn out in your kitchen. Did you try one of my variations — or invent your own? Maybe you added a pinch of smoked paprika or swapped in goat cheese for the cheddar? Drop a comment below and let me know! Your feedback helps other readers discover new flavor combinations and gives me so much joy as a creator. If you found this recipe helpful, I’d be so grateful if you left a 5-star rating — it helps more people find these easy breakfast egg muffins when they’re searching for the perfect meal-prep breakfast.

And please, tag me in your photos on Instagram or Pinterest when you make these! Use the hashtag #exorecipes and tag @exorecipes so I can see your beautiful creations. I share my favorites in my Stories every week. Here’s a question for you: what’s your favorite add-in that I haven’t mentioned? I’m always looking for new ideas to test in my NYC kitchen! From my NYC kitchen to yours — I hope this recipe brings as much warmth to your table as it does to mine. — mia 🧡

How do you keep bacon and red pepper egg muffins from sticking to the pan?

The best way to prevent sticking is to grease your muffin tin generously and thoroughly. I recommend using a silicone pastry brush to coat each cup with melted butter or a neutral oil like avocado oil, making sure to get into the crevices at the bottom. Silicone muffin liners are another excellent option — they release beautifully without any greasing needed. If you’re using paper liners, spray them lightly with non-stick cooking spray, because eggs have a tendency to cling to paper more than standard muffin batters. Letting the muffins cool for exactly 2 minutes in the pan before removing them also helps create a natural release as they contract slightly.

Can you use egg whites instead of whole eggs in bacon and red pepper egg muffins?

Yes, you can absolutely use egg whites instead of whole eggs, and it works quite well for a lower-fat, higher-protein version. To substitute, replace the 6 large eggs with 12 large egg whites (about 1.5 cups of liquid egg whites). I also recommend adding an extra tablespoon of milk to compensate for the moisture that the yolks would normally provide. The texture will be slightly less rich and a bit more spongy than the original, but the muffins will still be tender and flavorful. If you’re using liquid egg whites from a carton, give it a good shake before measuring, as the proteins can settle at the bottom.

How long do bacon and red pepper egg muffins last in the fridge?

These egg muffins will stay fresh in the refrigerator for up to 3 days when stored properly. The key is to let them cool completely — about 20 minutes on a wire rack — before transferring them to an airtight container. If you stack them, place a piece of parchment paper between layers to prevent them from sticking together. I don’t recommend leaving them at room temperature for longer than 2 hours total. For best quality, enjoy them within 2-3 days, though they’re technically safe to eat for up to 4 days if your fridge is at or below 40°F. When reheating, a 20-30 second zap in the microwave on a paper towel-lined plate brings them back to life perfectly.

Can you add cheese to bacon and red pepper egg muffins?

Absolutely — cheese is a fantastic addition to these egg muffins, and I actually include 1/2 cup of shredded cheddar in the original recipe. You can use any melting cheese you like: sharp cheddar, Monterey Jack, pepper jack for heat, Gouda for a smoky note, or even crumbled goat cheese for tanginess. I recommend adding half the cheese directly into the egg mixture and sprinkling the remaining half on top before baking. This two-step method gives you melty pockets of cheese throughout the muffins plus a golden, slightly crispy cheese crust on top. If you’re watching calories, you can reduce the cheese or omit it entirely — the muffins will still be delicious, just less rich.

Are these bacon and red pepper egg muffins keto-friendly?

Yes, these egg muffins are an excellent choice for a keto diet. With only about 2g of carbohydrates per serving (from the red bell pepper and a negligible amount from the milk and cheese), they fit perfectly within a standard ketogenic macro range. Each muffin is high in protein (about 15g) and fat (about 13g), which helps keep you full and satisfied. To make them even more keto-optimized, you can replace the milk with unsweetened almond milk or heavy cream, and use full-fat cheese. The bacon adds both flavor and healthy fats. These are one of my most popular keto egg muffins recipes for meal prep precisely because they’re so low in carbs yet incredibly satisfying.

Can I make these egg muffins dairy-free?

Yes, making these egg muffins dairy-free is straightforward. Simply replace the milk with unsweetened almond milk, oat milk, or cashew milk — use the same 1/4 cup measurement. For the cheese, you have two options: either omit it entirely (the muffins will still be flavorful from the bacon and peppers) or use a dairy-free shredded cheese alternative. Brands like Miyoko’s, Violife, and Daiya all melt reasonably well in egg muffins. If you’re using dairy-free cheese, I recommend adding a small pinch of salt and a teaspoon of nutritional yeast to the egg mixture to boost the savory, cheesy flavor. The texture will be slightly less creamy than the original, but still tender and delicious.

Can I add other vegetables to these egg muffins?

Absolutely — one of the best things about this egg muffin cups recipe is how versatile it is. You can add up to 1/2 cup of additional vegetables without affecting the texture. Some of my favorite additions include finely chopped spinach (squeeze out excess moisture first), sautéed mushrooms, diced zucchini (also squeezed dry), roasted broccoli florets, or chopped green onions. If you’re adding watery vegetables like tomatoes or zucchini, it’s important to sauté them first or pat them dry with paper towels to remove excess moisture — otherwise, the muffins can become soggy and weep water as they bake. I also love adding a handful of fresh herbs like parsley, basil, or chives for an extra layer of freshness.

Can I freeze bacon and red pepper egg muffins?

Yes, these egg muffins freeze beautifully for up to 2 months. To freeze, let the muffins cool completely on a wire rack, then wrap each one individually in plastic wrap or place them in a single layer on a baking sheet and freeze until solid (about 1-2 hours). Once frozen, transfer them to a freezer-safe zip-top bag or airtight container, pressing out as much air as possible. Label with the date so you know when you froze them. To reheat, you can microwave directly from frozen for 60-70 seconds, or thaw overnight in the refrigerator and then microwave for 30-40 seconds. I like to freeze individual muffins so I can grab exactly what I need — perfect for busy mornings when I’m heading out the door to explore my beloved NYC.

📌

Love This Recipe? Save It to Pinterest!

If you enjoyed this Bacon and Red Pepper Egg Muffins recipe, don’t let it get lost in your browser tabs! 😄 Pin it now so you can find it again anytime — and explore hundreds more tried-and-tested recipes waiting for you on my Pinterest boards.

👉 Follow mia on Pinterest @exorecipe

📌 Pin this recipe · 🔁 Re-pin your favorites · 💬 Tag me when you make it — I love seeing your creations!

“`

Print

clock clock iconcutlery cutlery iconflag flag iconfolder folder iconinstagram instagram iconpinterest pinterest iconfacebook facebook iconprint print iconsquares squares iconheart heart iconheart solid heart solid icon

Bacon and Red Pepper Egg Muffins

  • Author: Chef Mia
  • Prep Time: 10 minutes
  • Cook Time: 18 minutes
  • Total Time: 28 minutes
  • Yield: 6 1x
  • Method: Breakfast
  • Cuisine: American

Description

These savory egg muffins are packed with crispy bacon, sweet red peppers, and melted cheese, making them a perfect grab-and-go breakfast or snack.


Ingredients

Scale
  • 6 large eggs
  • 1/4 cup milk
  • 1/2 cup diced red bell pepper
  • 4 slices bacon, cooked and crumbled
  • 1/2 cup shredded cheddar cheese
  • 1/4 teaspoon salt
  • 1/8 teaspoon black pepper

Instructions

  1. Preheat oven to 375°F (190°C). Grease a 12-cup muffin tin or line with silicone liners.
  2. In a medium bowl, whisk together eggs, milk, salt, and black pepper until well combined.
  3. Stir in diced red bell pepper, crumbled bacon, and shredded cheddar cheese.
  4. Divide the egg mixture evenly among the muffin cups, filling each about 2/3 full.
  5. Bake for 15-18 minutes, or until the muffins are set and lightly golden on top.
  6. Let cool in the pan for 2 minutes, then remove and serve warm.

Notes

These muffins can be stored in an airtight container in the refrigerator for up to 3 days. Reheat in the microwave for 20-30 seconds.


Nutrition

  • Calories: 185
  • Sugar: 1g
  • Fat: 13g
  • Carbohydrates: 2g
  • Protein: 15g


Bacon and Red Pepper Egg Muffins

Bacon and Mushroom Cheesecake with Feta and Parmesan Crust – A Savory Stunner from My NYC Kitchen

⚖️
Difficulty
Medium
⏲️
Prep Time
20 mins
🕒
Cook Time
70 mins
⏱️
Total Time
5 hrs 30 mins
🍽️
Servings
10

I remember the first time I made a savory cheesecake—it was in a tiny Parisian kitchen, under the watchful eye of a pastry chef who insisted that cheesecake didn’t always have to be sweet. That moment changed everything for me. Back in my New York City apartment, I started experimenting with bold, umami-packed combinations, and this Bacon and Mushroom Cheesecake with Feta and Parmesan Crust was born. It’s the kind of dish that stops people mid-conversation at a party: “Wait, this is cheesecake?” Yes, it is—creamy, rich, and packed with smoky bacon and earthy mushrooms, all anchored by a salty, crunchy feta-and-Parmesan crust.

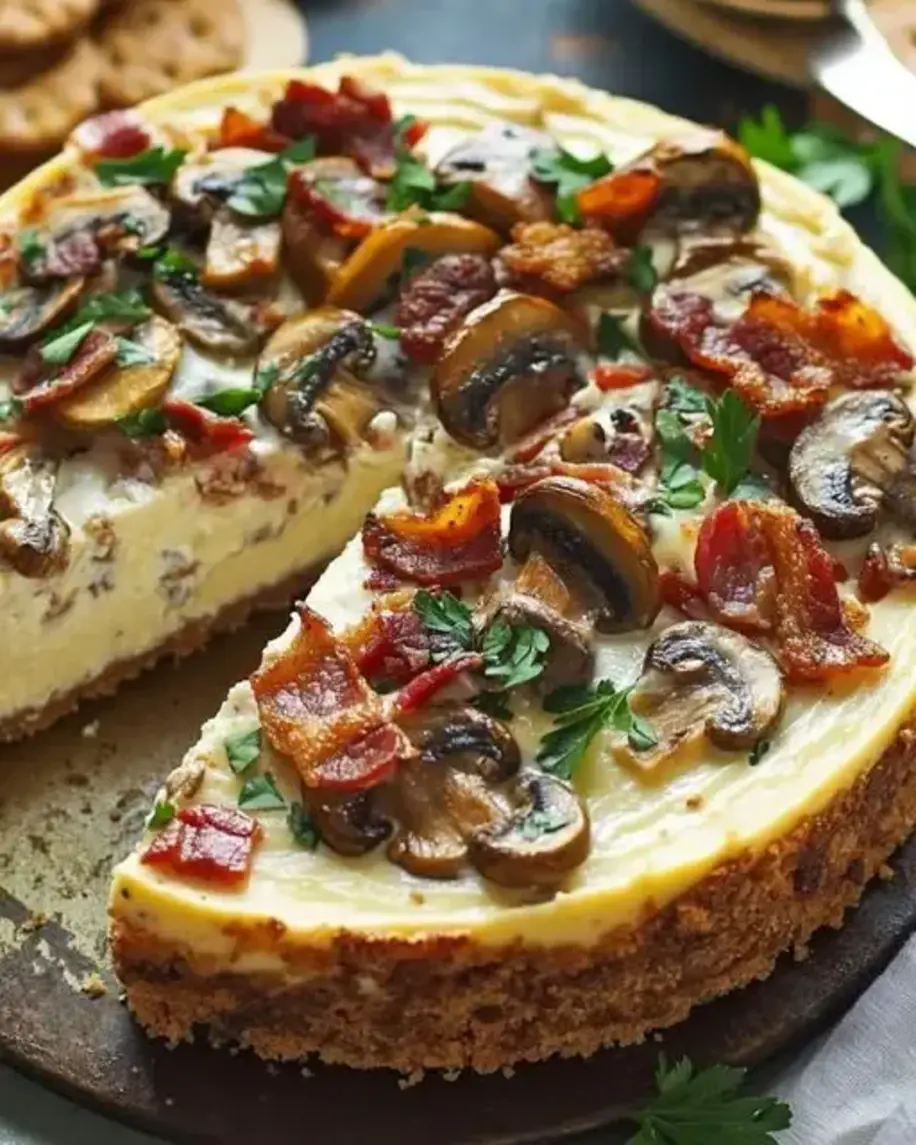
Imagine slicing into a silky, velvety filling that tastes like the most indulgent quiche, but with the luscious texture of cheesecake. The crust—made from buttery crackers, feta, and Parmesan—adds a sharp, tangy contrast that makes every bite crave-worthy. A hint of garlic and black pepper weaves through, while the bacon brings a subtle smokiness that feels both familiar and exciting. It’s the kind of appetizer that doubles as a conversation starter, and it never fails to impress guests at my seasonal dinner parties here in Brooklyn.

As a professionally trained chef who grew up in Morocco and later studied in France, I’ve learned that the best recipes honor tradition while daring to break rules. This savory cheesecake does exactly that. I’ll show you my cheffy trick for a crack-free surface (hint: the water bath is non-negotiable) and how to get that crust perfectly crisp every time. Whether you’re hosting a holiday gathering or just want a showstopper for a weekend brunch, this is the recipe you’ll return to again and again.

Why This Bacon and Mushroom Cheesecake Recipe Is the Best

The Flavor Secret: Most savory cheesecakes rely on heavy cream or extra cheese for flavor, but I bring in a touch of North African inspiration by using a double dose of feta—both in the crust and the filling. This creates a tangy depth that cuts through the richness, while the mushrooms (sautéed in bacon drippings) add an almost meaty, savory note you won’t find in any other recipe.

Perfected Texture: After years of pastry work in Paris, I learned that a water bath is the only foolproof way to avoid cracks and ensure a silky-smooth center. But I also use a small amount of flour in the batter—a trick from classic New York–style cheesecake—to give it structure without making it heavy. The result: a slice that holds its shape, yet melts on your tongue.

Foolproof & Fast: Even if you’ve never baked a cheesecake before, this recipe is forgiving. The crust is a simple press-in style (no rolling), the filling comes together in one bowl, and the water bath is easy to set up. Plus, you can make it a full day ahead—the flavor actually improves overnight. I’ve tested this on nervous beginner bakers, and every single one walked away feeling like a pro.

Bacon and Mushroom Cheesecake Recipe Ingredients

I source the best ingredients for this bacon mushroom cheesecake right from my local farmers market in Union Square: thick-cut bacon from a smokehouse in Vermont, cremini mushrooms with a deep earthy scent, and blocks of Parmesan from a small dairy upstate. When I want a taste of the Mediterranean, I swap in a sprinkle of za’atar—a reminder of my mother’s kitchen in Marrakech. Here’s exactly what you’ll need.

Ingredients List

  • For the Crust: 1½ cups finely crushed buttery crackers (like Ritz) · ½ cup grated Parmesan cheese · ½ cup crumbled feta cheese · ¼ cup unsalted butter, melted
  • For the Filling: 8 slices bacon, chopped · 8 ounces cremini mushrooms, sliced · 2 cloves garlic, minced · 16 ounces cream cheese, softened · ½ cup sour cream · 2 large eggs · ¼ cup all-purpose flour · ¼ cup grated Parmesan cheese · ¼ cup crumbled feta cheese · ½ teaspoon black pepper · ¼ teaspoon salt

Ingredient Spotlight

Cream Cheese: Use full-fat block cream cheese (not the spreadable kind) for the richest texture and stable structure. Philadelphia is my go-to brand. If you’re dairy-sensitive, a high-quality vegan cream cheese (like Miyoko’s) works, but expect a slightly softer set.

Feta Cheese: I prefer a Greek feta in brine for its creamy, salty tang. Avoid pre-crumbled feta—it’s drier and less flavorful. For a milder taste, try a French feta; it’s creamier and less salty.

Cremini Mushrooms: Also called baby bellas, these add more flavor than white mushrooms. If you can’t find them, substitute shiitake or oyster mushrooms—they’ll bring an even deeper umami. Always pat them dry after washing as mia’s Pro Tip: moisture is the enemy of a creamy filling.

Bacon: Choose a good-quality thick-cut bacon. Thinner slices can become overly crispy and lose their meaty texture in the filling. Applewood-smoked bacon adds a lovely sweet-savory note.

Buttery Crackers (Ritz): These provide the perfect salty crunch for the crust. If you’re gluten-free, use crushed gluten-free buttery crackers (like Glutino) with a touch more butter to hold them together.

Original IngredientBest SubstitutionFlavor / Texture Impact
Cream cheeseFull-fat vegan cream cheeseSlightly less dense; still creamy.
Feta (crumbled)Crumbled ricotta salataMilder, less tangy; texture similar.
Cremini mushroomsShiitake or oyster mushroomsMore intense umami; slightly chewier.
Buttery crackers (Ritz)Gluten-free buttery crackersCrunchy; may need extra butter to bind.
BaconTurkey bacon (crisp cooked)Less smoky, leaner; still adds crunch.

How to Make Bacon and Mushroom Cheesecake — Step-by-Step

This savory bacon cheesecake comes together with just a few simple steps. I promise—even the water bath is easier than you think. Let’s get started.

Step 1: Prepare the Crust

Preheat your oven to 350°F (175°C). Wrap the bottom of a 9-inch springform pan tightly with foil—this prevents any water from seeping in during the water bath. In a medium bowl, combine the crushed crackers, Parmesan, feta, and melted butter. Stir until every crumb is moistened. Press the mixture firmly into the bottom of the pan, using the bottom of a measuring cup to make it even. Bake for 10 minutes, then set aside to cool while you make the filling.

💡 mia’s Pro Tip: For a super-sharp crust flavor, toast the feta crumbles in a dry skillet for 2 minutes before mixing them in. It intensifies their saltiness beautifully.

Step 2: Cook Bacon and Mushrooms

In a large skillet (preferably cast iron), cook the chopped bacon over medium heat until crisp, about 6–8 minutes. Use a slotted spoon to transfer the bacon to a paper towel–lined plate, leaving about 1 tablespoon of drippings in the skillet. Add the sliced mushrooms and minced garlic to the hot drippings; cook, stirring occasionally, until the mushrooms are tender and all their liquid has evaporated—about 5 minutes. Remove from the heat and stir in the reserved bacon. Let this mixture cool slightly while you prepare the batter.

⚠️ Common Mistake to Avoid: Don’t overcrowd the skillet! Mushrooms release water as they cook. Cook them in a single layer so they brown instead of steam. If they’re swimming in liquid, they won’t develop that deep savory flavor.

Step 3: Make the Batter

In a large mixing bowl, beat the softened cream cheese and sour cream together on medium speed until smooth and completely lump-free. Add the eggs one at a time, beating well after each addition. Then beat in the flour, remaining Parmesan, remaining feta, black pepper, and salt until everything is fully incorporated. The batter should be thick, smooth, and glossy.

💡 mia’s Pro Tip: Make sure your cream cheese is at room temperature—if it’s too cold, the batter will be lumpy and you’ll overmix trying to fix it. Let it sit on the counter for at least 30 minutes before starting.

Step 4: Fold and Bake

Use a rubber spatula to gently fold the cooled bacon-mushroom mixture into the cream cheese batter. Pour the filling over the cooled crust and spread it evenly. Place the springform pan inside a large roasting pan or baking dish. Transfer to the oven, then carefully pour hot water into the larger pan until it reaches about halfway up the sides of the springform pan—this is your water bath.

⚠️ Common Mistake to Avoid: Pour the water into the outer pan after placing it in the oven, not before! Trying to move a water bath can be disastrous. Fill the kettle with hot water and pour carefully.

Step 5: Bake and Cool

Bake for 45–55 minutes, until the center is almost set but still slightly jiggly when gently shaken, and the edges are lightly golden. Turn off the oven, crack the door open, and let the cheesecake sit inside for 1 hour. This gradual cooling prevents cracking. Remove from the water bath and cool completely on a wire rack. Then refrigerate uncovered for at least 4 hours (overnight is best) before serving. To release, run a thin knife around the edge of the pan before unclasping the springform.

💡 mia’s Pro Tip: For ultra-clean slices, chill the cheesecake for a full 8 hours, then dip your knife in hot water and wipe it dry between cuts. You’ll get picture-perfect slices.

StepActionDurationKey Visual Cue
1Crust prep & blind bake10 min bakeCrust is fragrant and lightly golden around edges.
2Cook bacon & mushrooms~10 minMushrooms are tender and no liquid remains in pan.
3Make filling5 minBatter is smooth, thick, and no lumps remain.
4Assemble & water bath5 minWater reaches halfway up springform sides.
5Bake & cool in oven45-55 min + 1 hourCenter jiggly but not liquid, edges set.

Serving & Presentation

This bacon mushroom appetizer is incredibly versatile. For a light main course, I like to serve a slice alongside a crisp green salad dressed with lemon vinaigrette—it cuts through the richness beautifully. If you’re bringing it to a party, let it come to room temperature for about 20 minutes before serving for the creamiest texture. In my house, we often enjoy it as a brunch centerpiece, paired with a dollop of crème fraîche and a sprinkle of fresh chives.

For an elevated presentation, try garnishing with sautéed mushroom caps and a crispy bacon curl on top. A drizzle of aged balsamic glaze adds a sweet-tart contrast that I find utterly addictive. And if you’re feeling nostalgic for my Moroccan roots, a dusting of smoked paprika or a tiny pinch of harissa powder on the plate brings a subtle warmth that surprises and delights.

Pairing TypeSuggestionsWhy It Works
Side DishMixed greens with lemon vinaigrette, roasted asparagus, or a simple arugula saladAcidity cuts richness; greens add freshness.
Sauce / DipCrème fraîche, balsamic glaze, or a roasted red pepper puréeAdds creaminess or tang; pepper purée complements smoky bacon.
BeverageCrisp Sauvignon Blanc, dry rosé, or a light Belgian aleThe wine’s acidity balances the fat; ale’s bubbles lift flavors.
GarnishFresh chives, chopped parsley, crispy onion straws, or edible flowersAdds visual appeal and a fresh, herbal note.

Make-Ahead, Storage & Reheating

I’m a big fan of make-ahead recipes—especially when I’m juggling a busy week of cooking for clients here in Manhattan. This savory feta cheesecake actually tastes better after an overnight chill, so it’s a perfect candidate for prepping a day ahead. Here’s how to store it properly.

MethodContainerDurationReheating Tip
RefrigeratorCovered airtight container (or keep in springform pan wrapped in plastic)Up to 5 daysServe chilled or let sit at room temp 20 min. Do not microwave.
FreezerSlice and wrap individually in plastic, then foilUp to 2 monthsThaw overnight in fridge. Reheat slices at 300°F for 10 min if desired.
Make-AheadAssemble and bake as directed, cool, then refrigerate uncovered1–2 days before servingCover after 4 hours of chilling. Run knife around pan before unclasping.

If you’re like me and love a slightly warm cheesecake, you can gently reheat individual slices in a 300°F oven for 8–10 minutes. The texture will soften without becoming runny. I never recommend microwaving—it can create a rubbery texture and separate the fats. Stick with the oven or simply let the slices come to room temperature.

Variations & Easy Swaps

One of the reasons I love this mushroom parmesan cheesecake is how flexible it is. Over the years, I’ve tested dozens of twists—some inspired by my travels, others by what I find at the Union Square Greenmarket. Here are my favorite variations.

VariationKey ChangeBest ForDifficulty Impact
Spinach & ArtichokeReplace bacon with 1 cup chopped spinach (squeezed dry) + ½ cup chopped artichoke heartsVegetarian option, brunch or light dinnerSame
Gluten-Free CrustUse gluten-free buttery crackers (e.g., Glutino) + 1 extra tbsp melted butterGluten-sensitivity; same great flavorSame
Harissa-SpicedAdd 1 tsp harissa paste to the mushroom-bacon mixture; top with harissa oil drizzleMoroccan-inspired heat, spice loversSame

Spinach & Artichoke (Vegetarian)

This is my go-to when I want a meatless version that still feels indulgent. Swap the bacon for a cup of thawed frozen spinach (squeezed bone-dry) and half a cup of chopped canned artichoke hearts (rinsed and patted dry). The result is creamy, tangy, and utterly satisfying. I often add a pinch of nutmeg—a classic French touch—to deepen the flavor.

Gluten-Free Crust

I’ve had many guests request a gluten-free option, and this adaptation is a crowd-pleaser. Simply swap the Ritz-style crackers for gluten-free buttery crackers. Because they’re often a little drier, I add an extra tablespoon of melted butter to help the crust hold together. Blind-bake the same way, and you won’t miss the gluten at all.

Harissa-Spiced (Moroccan Twist)

This variation is close to my heart—a nod to my childhood in Marrakech. Stir 1 teaspoon of harissa paste into the cooked mushroom-bacon mixture before folding it into the batter. The heat is gentle but builds beautifully. For an extra pop, swirl a little extra harissa oil on top before baking, or drizzle it over the finished cheesecake. Serve with a side of honeyed dates for a sweet-spicy contrast.

Can I use a different type of cheese in the crust instead of feta and Parmesan?

Absolutely! The feta and Parmesan are what give this crust its savory, salty kick, but you can experiment. For a milder taste, try crumbled ricotta salata or aged pecorino. If you want a nuttier flavor, use grated Gruyère or a sharp white cheddar mixed with a tablespoon of nutritional yeast. Keep in mind that softer cheeses like mozzarella won’t provide the same crunch, so stick with firm, aged cheeses. The key is to use about 1 cup total of cheese for the crust—half grated, half crumbled—and adjust the butter if the mixture feels too dry.

How do I prevent the bacon and mushroom cheesecake from cracking during baking?

Cracking is the most common worry with any cheesecake, but there are a few foolproof ways to avoid it. First, always use a water bath—place the springform pan inside a larger pan and pour in hot water until it reaches halfway up the sides. This creates a humid environment that prevents the top from drying out. Second, don’t overbake; the center should still jiggle slightly when you take it out. Finally, let the cheesecake cool slowly in the turned-off oven with the door ajar for an hour. This gradual temperature change stops cracks from forming.

Is it better to cook the mushrooms and bacon before adding them to the cheesecake filling?

Yes, absolutely. Raw mushrooms release a lot of liquid as they cook, which would make your cheesecake filling watery and prevent it from setting properly. By sautéing them with garlic in the bacon drippings, you not only evaporate the moisture but also concentrate their umami flavor. The bacon crisps up and adds a pleasant texture throughout the creamy filling. Cooking them beforehand also ensures they are evenly distributed and fully cooked, so you don’t end up with any raw spots in your finished cheesecake.

Can I make this bacon and mushroom cheesecake ahead of time and refrigerate it?

Definitely! In fact, this savory cheesecake tastes even better after a day or two in the fridge. The flavors meld and the texture becomes perfectly creamy. After baking and cooling, cover the springform pan tightly with plastic wrap and refrigerate for at least 4 hours, but overnight (up to 24–48 hours) is ideal. If you’re making it more than 2 days ahead, you can freeze it. Just slice and wrap each piece individually, then thaw overnight in the fridge when you’re ready to serve. Always run a knife around the edge before releasing the pan.

Can I serve this cheesecake warm or does it need to be served cold?

This cheesecake is delicious both ways! I love it straight from the fridge for a dense, spreadable texture that feels almost like a cold terrine. But if you prefer a softer, more quiche-like texture, let slices sit at room temperature for about 20 minutes, or gently warm them in a 300°F oven for 8–10 minutes. Just be careful not to overheat it, or the cream cheese can separate. Personally, I think it’s at its best chilled—the flavors are sharper and the crust stays crunchier.

What can I substitute for cream cheese in this recipe?

If you need a dairy-free or lower-fat option, try using a full-fat vegan cream cheese (like Miyoko’s or Tofutti) for a similar tangy richness. For a lighter version, you can mix equal parts Greek yogurt and part-skim ricotta, but be aware the texture will be slightly less dense and more crumbly. Another option is to use mascarpone—it’s even richer and creamier than cream cheese, but it will yield a softer, more delicate slice. Whichever substitute you choose, make sure it’s at room temperature to avoid lumps.

How do I know when the cheesecake is done baking?

The best doneness test is a gentle jiggle. After 45–55 minutes of baking, carefully shake the pan (use oven mitts). The cheesecake should be set around the edges—about 1 inch in—while the very center still wobbles like soft Jell-O. It will continue to cook from residual heat as it cools in the oven. Do not insert a knife or toothpick into the center; it will create a crack. Also, the surface should look dry and lightly golden at the edges, not wet or glossy. If you use a thermometer, the internal temperature should be around 150°F.

Can I freeze this bacon and mushroom cheesecake?

Yes, it freezes beautifully! After the cheesecake has chilled completely, slice it into individual portions. Wrap each slice tightly in plastic wrap, then again in aluminum foil, and place in a freezer-safe bag or container. It will keep for up to 2 months. To thaw, transfer slices to the refrigerator overnight. If you want to serve warm, unwrap and reheat at 300°F for 10 minutes. Avoid thawing at room temperature, as condensation can make the crust soggy. For best results, freeze without any toppings—add fresh garnishes after thawing.

What kind of mushrooms work best in this recipe?

I prefer cremini (baby bella) mushrooms for their earthy flavor and firm texture that holds up well after cooking. You can also use white mushrooms, but they are milder and release more water. For a more intense, woodsy taste, mix in some shiitake or oyster mushrooms. If you use dried mushrooms (like porcini), rehydrate them first and save the soaking liquid to add a teaspoon of liquid instead of extra salt. Whatever mushroom you choose, be sure to slice them evenly and cook until all their moisture has evaporated—this is crucial for a creamy filling.

Can I omit the bacon to make this recipe vegetarian?

Absolutely! To keep the savory, umami punch, simply replace the bacon with a combination of chopped sun-dried tomatoes (oil-packed, drained) and a teaspoon of smoked paprika. The sun-dried tomatoes add a tangy sweetness, while smoked paprika mimics the smokiness of bacon. You’ll also want to cook the mushrooms in a little olive oil instead of bacon drippings. Another great vegetarian addition is finely chopped walnuts or pecans, toasted, for a crunchy contrast. The cheesecake will still be rich and satisfying.

Share Your Version!

I love hearing how you put your own spin on my recipes! If you make this Bacon and Mushroom Cheesecake with Feta and Parmesan Crust, please leave a star rating and a comment below. Tell me: did you try one of the variations, or invent your own? Did you serve it at a holiday party or a quiet Sunday brunch?

Snap a photo of your creation and tag me on Instagram or Pinterest at @exorecipes—I might just feature your version on my feed! And if there’s a savory ingredient you’ve been dyeing to turn into a cheesecake, drop that in the comments too. Your question might inspire my next recipe.

From my NYC kitchen to yours — I hope this recipe brings as much warmth to your table as it does to mine. — mia 🧡

📌

Love This Recipe? Save It to Pinterest!

If you enjoyed this Bacon and Mushroom Cheesecake with Feta and Parmesan Crust recipe, don’t let it get lost in your browser tabs! 😄 Pin it now so you can find it again anytime — and explore hundreds more tried-and-tested recipes waiting for you on my Pinterest boards.

👉 Follow mia on Pinterest @exorecipe

📌 Pin this recipe · 🔁 Re-pin your favorites · 💬 Tag me when you make it — I love seeing your creations!

Print

clock clock iconcutlery cutlery iconflag flag iconfolder folder iconinstagram instagram iconpinterest pinterest iconfacebook facebook iconprint print iconsquares squares iconheart heart iconheart solid heart solid icon

Bacon and Mushroom Cheesecake with Feta and Parmesan Crust

  • Author: Chef Mia
  • Prep Time: 20 minutes
  • Cook Time: 1 hour 10 minutes
  • Total Time: 5 hours 30 minutes (includes cooling and chilling)
  • Yield: 10 1x
  • Method: Appetizer
  • Cuisine: American

Description

A savory cheesecake with a crispy feta and parmesan crust, filled with bacon and mushrooms, perfect as an appetizer or light main.


Ingredients

Scale
  • For the Crust:
  • 1 1/2 cups finely crushed buttery crackers (like Ritz)
  • 1/2 cup grated Parmesan cheese
  • 1/2 cup crumbled feta cheese
  • 1/4 cup unsalted butter, melted
  • For the Filling:
  • 8 slices bacon, chopped
  • 8 ounces cremini mushrooms, sliced
  • 2 cloves garlic, minced
  • 16 ounces cream cheese, softened
  • 1/2 cup sour cream
  • 2 large eggs
  • 1/4 cup all-purpose flour
  • 1/4 cup grated Parmesan cheese
  • 1/4 cup crumbled feta cheese
  • 1/2 teaspoon black pepper
  • 1/4 teaspoon salt

Instructions

  1. Preheat oven to 350°F (175°C). Wrap the bottom of a 9-inch springform pan with foil.
  2. In a medium bowl, mix crushed crackers, 1/2 cup Parmesan, 1/2 cup feta, and melted butter until combined. Press into the bottom of the prepared pan. Bake for 10 minutes, then set aside to cool.
  3. In a large skillet, cook bacon over medium heat until crisp. Remove bacon with a slotted spoon to a paper towel-lined plate; drain all but 1 tablespoon drippings from skillet.
  4. Add mushrooms and garlic to the skillet; cook over medium heat until mushrooms are tender and liquid evaporates, about 5 minutes. Remove from heat and stir in cooked bacon.
  5. In a large bowl, beat cream cheese and sour cream until smooth. Beat in eggs one at a time, then beat in flour, 1/4 cup Parmesan, 1/4 cup feta, black pepper, and salt until well combined.
  6. Gently fold in mushroom-bacon mixture. Pour filling over crust. Place springform pan in a larger baking dish; add hot water to baking dish until it reaches halfway up the sides of the springform pan.
  7. Bake in the preheated oven for 45-55 minutes, until center is almost set and edges are lightly golden. Turn off oven, leave cheesecake in oven with door ajar for 1 hour.
  8. Remove cheesecake from water bath; cool completely on a wire rack. Refrigerate for at least 4 hours or overnight before serving. Run a knife around the edge before releasing springform pan.

Notes

This savory cheesecake can be served warm or chilled. Garnish with fresh parsley or chives if desired. Thoroughly dry mushrooms after slicing to avoid a watery filling.


Nutrition

  • Calories: 420
  • Sugar: 3 g
  • Fat: 32 g
  • Carbohydrates: 18 g
  • Protein: 14 g


Bacon and Mushroom Cheesecake with Feta and Parmesan Crust

k">

Tried This Recipe? Leave a Comment!

Did you make this recipe? I’d love to hear how it turned out! Please leave a comment and a rating below. Your feedback helps other home cooks and supports cheerychop.com!

For more delicious inspiration, follow me on Pinterest!
Avocado Toast with Feta and Fresh Basil – A Flavorful Twist on Your Favorite Breakfast

⚖️
Difficulty
Easy
⏲️
Prep Time
5 mins
🕒
Cook Time
5 mins
⏱️
Total Time
10 mins
🍽️
Servings
2

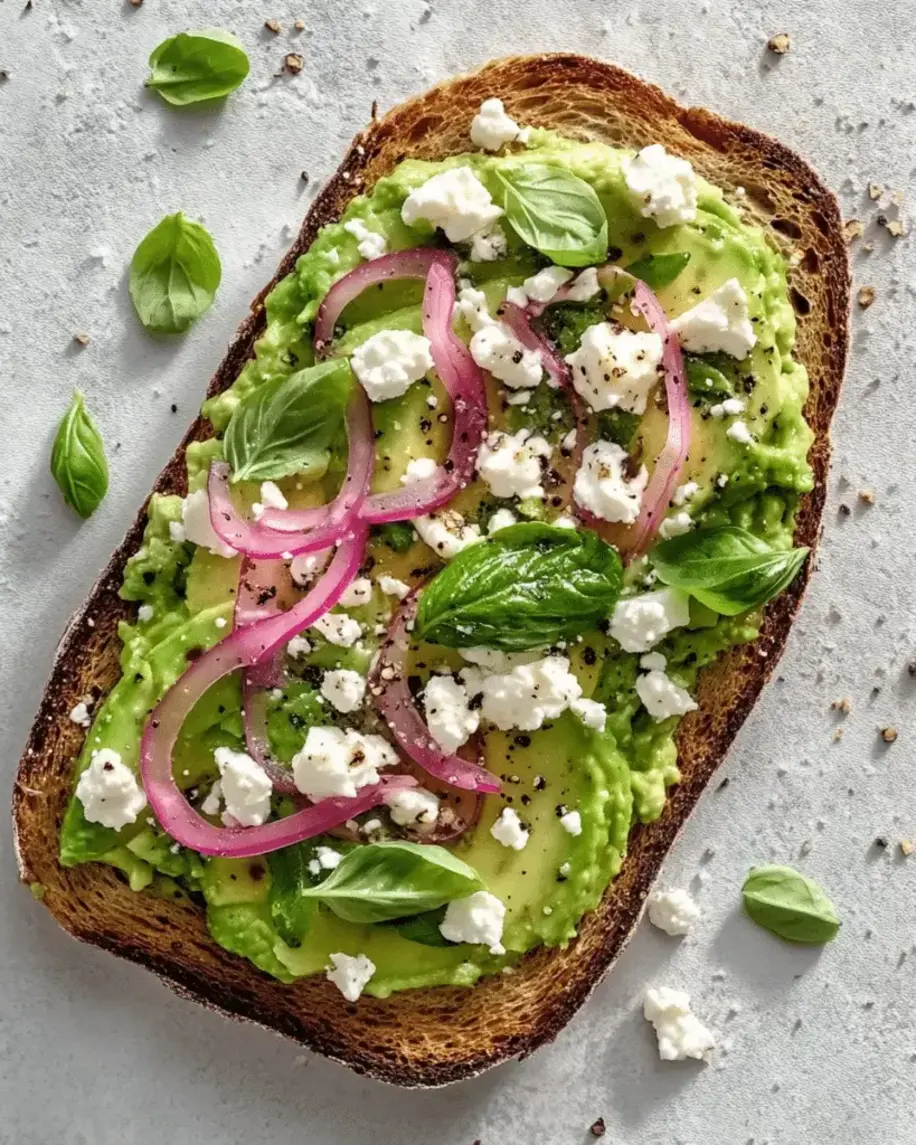
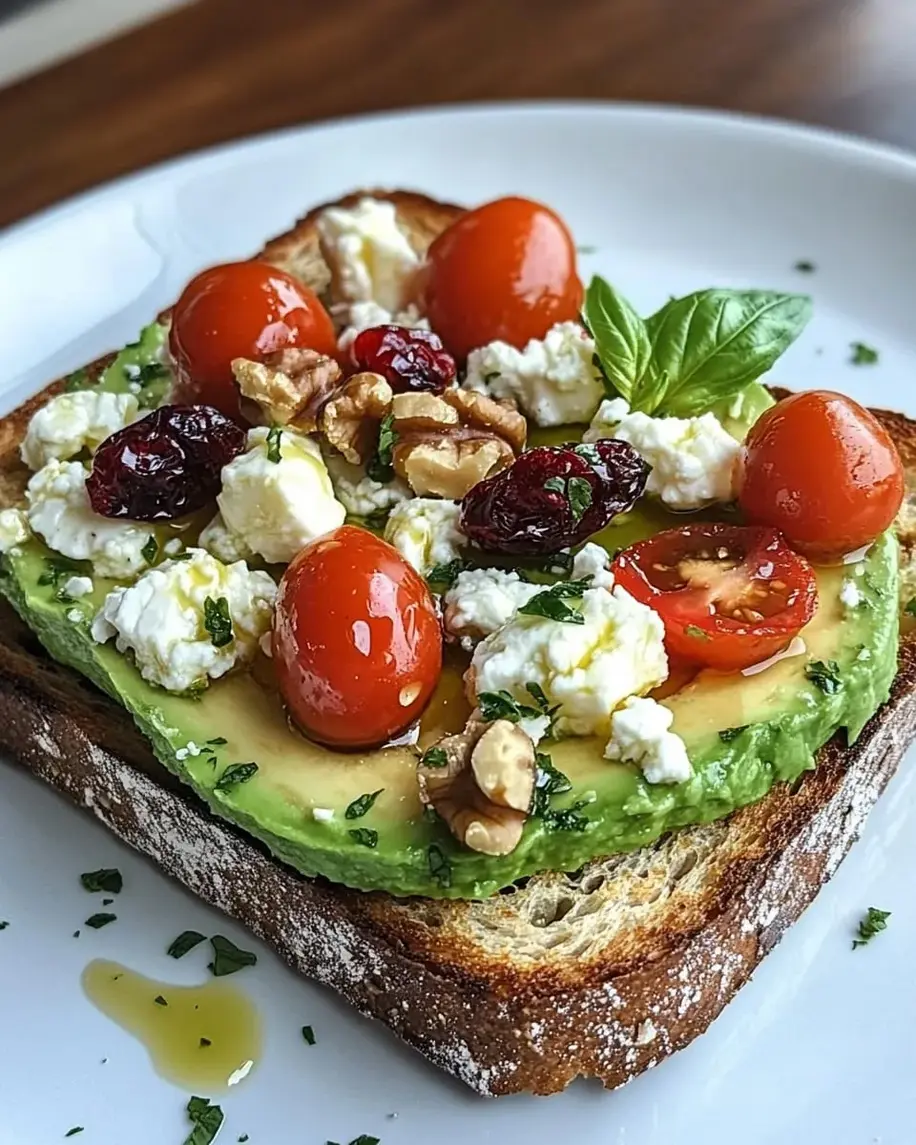
Growing up in my mother’s kitchen in Morocco, I learned that the simplest ingredients, treated with love, can create something truly unforgettable. That philosophy follows me everywhere — from the bustling spice markets of Marrakech to the farmers markets here in New York City. Today, I’m sharing my take on a classic: avocado toast with feta and basil. It’s more than just toast; it’s a bright, creamy, herbaceous bite that feels like sunshine on a plate. This avocado toast recipe is quick enough for a rushed weekday morning but elegant enough for a lazy Sunday brunch. The secret? A pinch of flaky sea salt and a drizzle of the best extra-virgin olive oil you can find — trust me, it makes all the difference.

Imagine biting into a slice of perfectly toasted whole-grain bread, the top still warm and crisp. Then comes the layer of cool, velvety avocado mashed with a squeeze of lemon. The feta crumbles add a salty, tangy punch, while the fresh basil — sliced into delicate ribbons — brings a subtle peppery sweetness that cuts through the richness. Every texture and flavor is balanced: crispy bread, creamy avocado, crumbly cheese, and soft herbs. It’s a breakfast that feels both indulgent and light. I love to finish it with a pinch of red pepper flakes for a tiny kick — a little nod to the Moroccan love for a gentle heat.

Over the years, I’ve made hundreds of versions of avocado toast — at my Paris culinary school, in tiny NYC kitchens, and now in my own home. What sets this one apart is how the feta and basil work together: the briny cheese contrasts beautifully with the mild avocado, and the basil adds a fresh, aromatic lift that makes each bite feel new. In this post, I’ll share my pro tips for choosing the perfect avocado, keeping your toast from getting soggy, and customizing it to your taste. Whether you’re a seasoned cook or just starting out, this healthy breakfast avocado toast will become your new go-to. Let’s get started.

Why This Avocado Toast Recipe Is the Best

The Flavor Secret: The combination of creamy feta and fresh basil isn’t just pretty — it’s a flavor powerhouse. The tangy, salty feta provides a counterpoint to the buttery avocado, while the basil adds an almost floral freshness. This trio (avocado, feta, basil) is as classic as tomato, mozzarella, and basil, but quicker and more breakfast-friendly. I first tasted this pairing at a tiny café in the West Village, and I knew I had to recreate it with my own twist: a splash of lemon juice to brighten everything and a hint of red pepper for warmth.

Perfected Texture: The hallmark of great avocado toast is the contrast between a crunchy, golden crust and a soft, almost pudding-like avocado layer. The trick? Toast your bread until it’s deeply golden — just shy of burnt. Then spread the avocado generously, but leave a few chunks for texture. The feta adds crumbly bits that cling to the avocado, and the basil ribbons offer a tender, leafy bite. No sogginess, no mushiness — just a symphony of textures that makes every mouthful satisfying.

Foolproof & Fast: This recipe is designed for real life. It takes 10 minutes from start to finish, uses just a handful of ingredients you can find at any grocery store, and requires no special equipment. Yet the result is so flavorful that guests will think you spent ages on it. The key is using the ripest avocado and the freshest basil you can find — and following my simple assembly order. Even on my busiest mornings in NYC, I can whip this up without breaking a sweat.

Avocado Toast with Feta and Basil Ingredients

When I shop for these ingredients, I like to hit the Union Square Greenmarket — the basil there is incredibly fragrant, and the avocados come from a vendor who knows exactly when they’re ready. But any well-stocked supermarket will do. Here’s what you’ll need to make this basil avocado toast sing.

Ingredients List

  • 2 slices whole-grain bread (or sourdough, or your favorite sturdy bread)
  • 1 ripe avocado
  • 2 tablespoons crumbled feta cheese
  • 4 fresh basil leaves, thinly sliced (chiffonade)
  • 1 teaspoon lemon juice (freshly squeezed is best)
  • Salt and pepper to taste
  • Optional: red pepper flakes or a drizzle of balsamic glaze

Ingredient Spotlight

Avocado: The star of the show. Look for an avocado that yields slightly to gentle pressure — not too soft, not rock‑hard. A Hass avocado is ideal for its creamy texture. If yours is still firm, place it in a brown paper bag with a banana overnight to speed up ripening.

Feta Cheese: I prefer a block of feta packed in brine rather than pre‑crumbled — it stays creamier and saltier. You can substitute with goat cheese (milder) or cotija (saltier). For a dairy‑free version, try a vegan feta made from almonds or tofu — it won’t brown the same way but still adds a tangy note.

Fresh Basil: The smaller, more tender leaves are best. Avoid wilted or browning basil. If you can’t find fresh basil, fresh mint or a handful of microgreens would work in a pinch — but the basil’s anise‑like sweetness is key to this avocado toast with feta and basil.

Bread: Whole‑grain holds up well and adds fiber, but sourdough, rye, or a good ciabatta are all excellent. Avoid thin, flimsy bread that will turn soggy. I always toast it until deep golden — about 3–4 minutes in a 375°F oven or 2–3 minutes in a toaster on the highest setting.

Lemon juice: A small squeeze does wonders: it prevents the avocado from browning too quickly and brightens the whole flavor. Use fresh lemon or lime; bottled juice won’t give the same zing.

Original IngredientBest SubstitutionFlavor / Texture Impact
Feta cheeseGoat cheeseCreamier, milder, less salty
Fresh basilFresh mint or cilantroMint adds coolness; cilantro adds citrusy notes
Whole-grain breadSourdough or gluten-free breadSourdough: tangier, crispier; GF: lighter, may need extra toasting

How to Make Avocado Toast with Feta and Basil — Step-by-Step

You’re just a few simple steps away from a truly memorable breakfast. Follow these instructions, and you’ll have perfect toast every time.

Step 1: Toast the Bread

Place your bread slices in a toaster or toaster oven and toast until deep golden brown — about 2–3 minutes on a high setting in a toaster, or 4–5 minutes in a 375°F oven. The bread should feel firm and sound hollow when tapped. This gives you a sturdy base that won’t get soggy.

💡 mia’s Pro Tip: For extra crunch, brush the bread lightly with olive oil before toasting. It creates a golden, almost fried crust that’s irresistible.

Step 2: Mash the Avocado

Cut the avocado in half lengthwise, remove the pit, and scoop the flesh into a medium bowl. Using a fork, mash it to your preferred consistency — I like it mostly smooth with a few small chunks. Stir in the lemon juice, a pinch of salt, and a few grinds of black pepper.

⚠️ Common Mistake to Avoid: Don’t over-mash! A little texture helps the avocado stay interesting and prevents it from feeling gluey.

Step 3: Assemble the Toast

Spread the mashed avocado generously over each toast slice. Sprinkle the crumbled feta evenly on top. Scatter the fresh basil ribbons over the feta. If desired, add a pinch of red pepper flakes or a thin drizzle of balsamic glaze. Serve immediately, while the toast is still warm and the basil is vibrant.

💡 mia’s Pro Tip: For the prettiest presentation, use a vegetable peeler to shave thin pieces of Parmesan alongside the feta — it adds another layer of savory umami.

StepActionDurationKey Visual Cue
1Toast bread2–3 min (toaster) or 4–5 min (oven)Deep golden color, crisp sound when tapped
2Mash avocado with lemon1 minuteCreamy but still with small chunks
3Assemble and top1 minuteEven layer of avocado, visible feta crumbles, bright green basil

Serving & Presentation

This avocado toast is a meal in itself, but it loves company. For a full brunch table, serve it alongside a simple arugula salad dressed with lemon and olive oil, or a bowl of fresh fruit. In my home — whether in my tiny NYC apartment or back in Morocco for a visit — I often pair it with a soft‑boiled egg or some smoked salmon for extra protein.

For the most photogenic plate, arrange the toast on a wooden board or a white plate. Drizzle a little balsamic glaze in a zigzag pattern across the top, then finish with a sprinkle of flaky sea salt. A few extra basil leaves on the side add a pop of green. This dish is as beautiful as it is delicious — perfect for sharing on social media (tag me! @exorecipes).

Pairing TypeSuggestionsWhy It Works
Side DishMixed greens, tomato salad, roasted potatoesAdds freshness or heartiness without overpowering
Sauce / DipBalsamic glaze, hot honey, toum (garlic sauce)Adds a contrasting sweet, spicy, or savory kick
BeverageIced matcha latte, fresh orange juice, black coffeeCleanses the palate and complements richness
GarnishFlaky sea salt, red pepper flakes, edible flowersVisual pop and final flavor boost

Make-Ahead, Storage & Reheating

In my busy NYC life, I often prep components ahead of time. The mashed avocado can be stored in an airtight container with plastic wrap pressed directly onto the surface — that lemon juice helps prevent browning for up to 24 hours. But I highly recommend assembling the toast just before eating for the best texture. Here’s how to manage leftovers (if you have any!).

MethodContainerDurationReheating Tip
RefrigeratorAirtight container (avocado only)Up to 1 dayNot recommended to reheat assembled toast; refresh avocado with a squeeze of lemon
FreezerFreezer bag (bread only)Up to 3 monthsToast bread straight from freezer; do not freeze avocado
Make-AheadMash avocado, store with pit in bowl, cover tightlyUp to 24 hours in advanceAssemble on fresh toast just before serving; add feta and basil last

If you’ve made the full toast and want to save it, the best approach is to remove the toppings and store them separately. The bread can be re‑crisped in a toaster, but the avocado will brown. So I always recommend making just what you’ll eat — and if you’re meal‑prepping, keep the components separate and assemble fresh. It only takes two minutes!

Variations & Easy Swaps

VariationKey ChangeBest ForDifficulty Impact
Moroccan SpicedAdd ½ tsp harissa paste or cumin to avocado mashA warm, smoky twistSame
VeganOmit feta or use vegan feta; add nutritional yeast for cheesy flavorDairy‑free eatersSame
Summer TomatoTop with sliced cherry tomatoes and balsamic glazeFresh, juicy summer breakfastSame

Moroccan Spiced Variation

For a nod to my roots, I sometimes stir a teaspoon of harissa (the smoked, not the fiery kind) into the mashed avocado. Or a pinch of cumin and smoked paprika. The warm spices play beautifully with the cool feta and fresh basil. This version is a hit at weekend brunches — it feels like a journey to Marrakech without leaving your kitchen.

Vegan Variation

Making this plant‑based is simple: swap the feta for a good vegan feta (I like the one from Violife or a homemade almond‑based version). To add a umami punch, sprinkle a little nutritional yeast over the avocado — it mimics the savory richness of cheese. The basil and lemon still shine, and the toast stays incredibly satisfying.

Summer Tomato Variation

During peak tomato season at the NYC farmers markets, I layer halved cherry tomatoes on top of the avocado before adding the feta and basil. A generous drizzle of balsamic glaze ties everything together. The acidity of the tomatoes cuts the richness, and each bite bursts with juiciness. It’s a gorgeous, colorful plate.

What is the best way to ripen avocados quickly for avocado toast?

The quickest method is to place your firm avocado in a brown paper bag with a banana or an apple. These fruits release ethylene gas, which speeds up ripening naturally. Leave the bag at room temperature (not in the fridge) and check after 12–24 hours — most avocados will be soft and ready. For an even faster trick, you can microwave a halved avocado for 30 seconds (remove the pit first), but this can affect texture slightly. My preferred method is patience: buy avocados a day or two ahead and let them sit on the counter. The paper‑bag trick works in a pinch, and it’s what I rely on when I suddenly crave this avocado toast with feta and basil.

Can I substitute feta cheese with another type of cheese in this recipe?

Absolutely! Feta’s briny, tangy character is special, but you can achieve a similar effect with other cheeses. Goat cheese is the closest in texture and tang — it’s creamier and slightly milder. Cotija cheese, a crumbly Mexican cheese, is saltier and firmer, so use a little less. For a soft, buttery swap, try fresh mozzarella pearls (though they’re less salty). If you’re avoiding dairy, a vegan feta made from cashews or tofu works nicely. Just keep in mind that each swap changes the flavor profile: goat cheese adds richness, while cotija brings more salt. I love experimenting with all of them — each version becomes its own delicious twist on classic avocado toast with feta and basil.

How do you keep avocado toast from getting soggy?

Nobody wants a sad, soggy toast! The secret starts with the bread: choose a thick, sturdy slice — sourdough or whole‑grain works best — and toast it until deeply golden. A quick brush of olive oil before toasting adds a moisture‑repelling barrier. When spreading the avocado, don’t go overboard; a generous but even layer is enough. If you’re adding tomatoes or other juicy toppings, pat them dry with a paper towel first. Finally, serve immediately — avocado toast waits for no one. As soon as the toast is assembled, the sandwich is ready to shine. Follow these tips, and your basil avocado toast will stay crisp and delicious right down to the last bite.

What are some good toppings to add to avocado toast with feta and basil?

This avocado toast is a wonderful canvas for extra flavors and textures. I love adding a perfectly poached egg — the runny yolk creates a luxurious sauce. Smoked salmon or crispy bacon add savory depth. For a fresh crunch, try radish slices, pickled red onions, or cucumber ribbons. A drizzle of balsamic glaze or hot honey brings sweetness and acidity. If you’re after more greens, a handful of arugula or microgreens on top adds pepperiness. And for a nutty finish, sprinkle toasted sesame seeds or pine nuts. Each addition complements the creamy avocado, tangy feta, and aromatic basil in a different way — feel free to make it your own! This is one of those recipes where you can truly get creative and discover your favorite combination.

Can I make this avocado toast recipe ahead of time?

I recommend assembling the toast just before serving for the best texture and appearance. However, you can prep the components in advance: mash the avocado with lemon juice and store it in an airtight container with plastic wrap pressed directly onto the surface — this prevents browning for up to 24 hours. Store the feta crumbled separately, and wash and dry the basil leaves (slice them just before using). The bread can be toasted on demand. When you’re ready to eat, simply spread the avocado, add toppings, and enjoy. This make‑ahead strategy is perfect for busy mornings — you get the fresh taste of homemade avocado toast with feta and basil without the last‑minute rush.

Is avocado toast with feta and basil healthy?

Absolutely! This dish is packed with nutritious ingredients. Avocados are rich in heart‑healthy monounsaturated fats, fiber, and potassium. Whole‑grain bread adds complex carbs and more fiber to keep you full. Feta cheese provides calcium and protein in a moderate amount — just 2 tablespoons per serving. Fresh basil is rich in antioxidants and adds flavor with virtually no calories. With roughly 350 calories per serving, this is a balanced, satisfying breakfast that supports energy and satiety. You can easily adjust it to fit dietary needs: use gluten‑free bread, reduce the cheese for lower sodium, or add an extra veggie like spinach. It’s a delicious way to start your day with a healthy breakfast avocado toast that feels indulgent but is truly good for you.

What other herbs can I use instead of basil?

Basil’s sweet, slightly peppery flavor is a classic match, but you can certainly mix it up. Fresh mint adds a cool, refreshing note that pairs surprisingly well with feta — it’s a combination I’ve seen in Greek cuisine. Cilantro brings a bright, citrusy punch that works nicely if you’re adding a squeeze of lime. Dill offers a delicate, grassy taste that complements feta beautifully (great with smoked salmon). For a more robust herb, try thyme leaves or finely chopped chives. Each herb changes the character of the dish, but they all honor the spirit of this fresh, simple avocado toast recipe. Experiment and find your favorite!

How do I choose a ripe avocado for avocado toast?

A perfectly ripe avocado is the foundation of great avocado toast. Look for an avocado that yields gently to firm pressure — if it feels mushy, it’s overripe. The color should be dark green to nearly black for Hass avocados. Underneath the stem nub at the top, you should see green; brown means it’s past its prime. Avoid avocados with sunken spots or bruises. If you buy them firm, let them ripen at room temperature for 1–3 days. Once ripe, store them in the refrigerator to slow further ripening. For this basil avocado toast, you want an avocado that’s creamy and easy to mash but not watery — the perfect texture for spreading.

Share Your Version!

I hope you love this avocado toast with feta and basil as much as I do. It’s one of those recipes that feels simple but special — the kind of breakfast that makes you slow down and savor the morning. If you give it a try, I’d be so grateful if you left a star rating and a comment below. Tell me: did you add any extra toppings? Did you try the Moroccan spice twist? Your feedback helps other readers and inspires me to keep sharing.

Don’t forget to snap a photo and tag @exorecipes on Instagram or Pinterest — I love seeing your creations! And if you have a question I didn’t answer here, just drop it in the comments. I read every one. From my NYC kitchen to yours — I hope this recipe brings as much warmth to your table as it does to mine. — mia 🧡

📌

Love This Recipe? Save It to Pinterest!

If you enjoyed this Avocado Toast with Feta and Basil recipe, don’t let it get lost in your browser tabs! 😄 Pin it now so you can find it again anytime — and explore hundreds more tried-and-tested recipes waiting for you on my Pinterest boards.

👉 Follow mia on Pinterest @chefrecipes2

📌 Pin this recipe · 🔁 Re-pin your favorites · 💬 Tag me when you make it — I love seeing your creations!

Print

clock clock iconcutlery cutlery iconflag flag iconfolder folder iconinstagram instagram iconpinterest pinterest iconfacebook facebook iconprint print iconsquares squares iconheart heart iconheart solid heart solid icon

Avocado Toast with Feta and Fresh Basil A Flavorful Twist on Your Favorite Breakfast

  • Author: Chef Mia
  • Prep Time: 5 minutes
  • Cook Time: 5 minutes
  • Total Time: 10 minutes
  • Yield: 2 1x
  • Method: Breakfast
  • Cuisine: American

Description

A delicious and easy avocado toast topped with creamy feta cheese and fresh basil, perfect for a quick breakfast or brunch.


Ingredients

Scale
  • 2 slices whole-grain bread
  • 1 ripe avocado
  • 2 tablespoons crumbled feta cheese
  • 4 fresh basil leaves, thinly sliced
  • 1 teaspoon lemon juice
  • Salt and pepper to taste
  • Optional: red pepper flakes or drizzle of balsamic glaze

Instructions

  1. Toast the bread slices until golden and crisp.
  2. Cut the avocado in half, remove the pit, and scoop the flesh into a bowl. Mash with a fork to desired consistency, then stir in lemon juice, salt, and pepper.
  3. Spread the mashed avocado evenly over each toast slice.
  4. Top with crumbled feta cheese and fresh basil.
  5. Add optional red pepper flakes or balsamic glaze if desired. Serve immediately.

Notes

For a vegan version, omit feta or use vegan feta. You can also add cherry tomatoes or a poached egg for extra flavor.


Nutrition

  • Calories: 350
  • Sugar: 3g
  • Fat: 22g
  • Carbohydrates: 30g
  • Protein: 8g


Avocado Toast with Feta and Fresh Basil A Flavorful Twist on Your Favorite Breakfast

k">

Tried This Recipe? Leave a Comment!

Did you make this recipe? I’d love to hear how it turned out! Please leave a comment and a rating below. Your feedback helps other home cooks and supports cheerychop.com!

For more delicious inspiration, follow me on Pinterest!
“`html

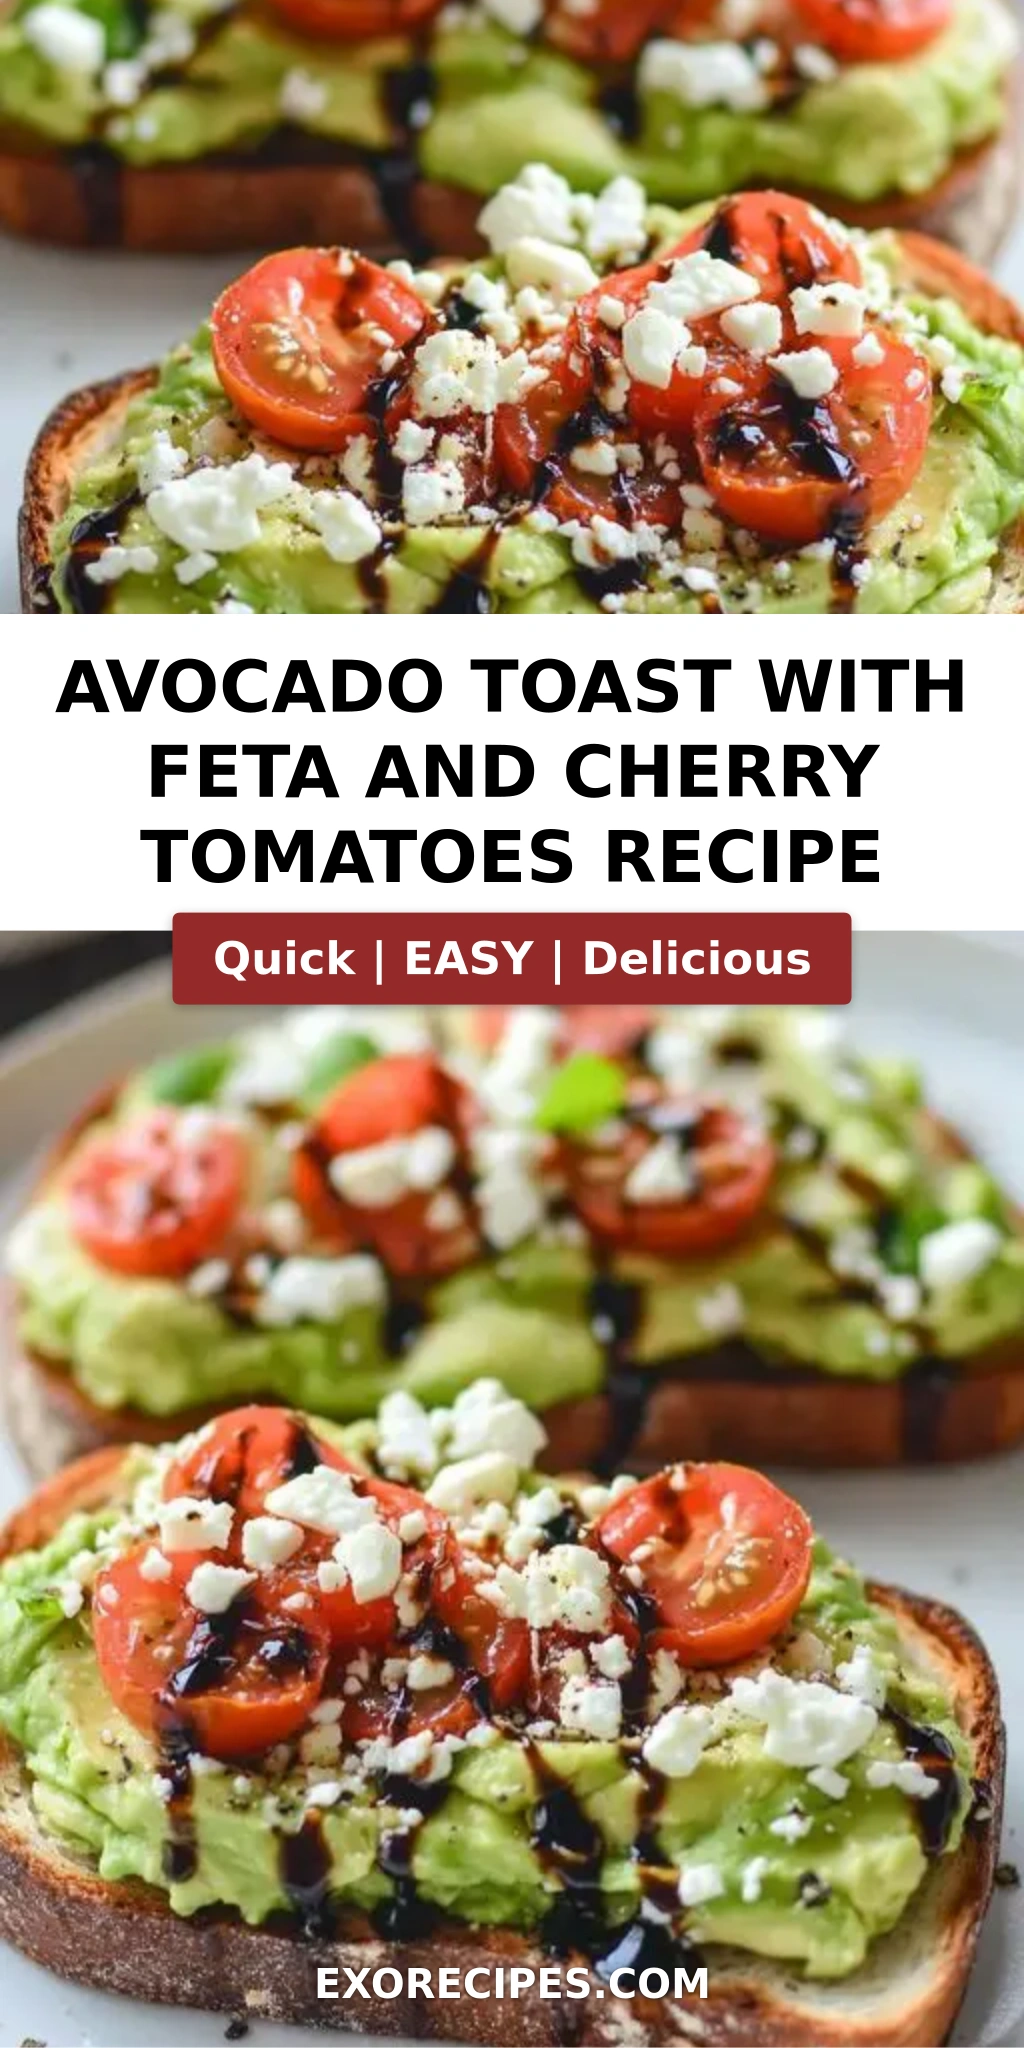
Avocado Toast with Feta and Cherry Tomatoes – A 10-Minute Breakfast with a Chef’s Touch

⚖️
Difficulty
Easy
⏲️
Prep Time
5 mins
🕒
Cook Time
5 mins
⏱️
Total Time
10 mins
🍽️
Servings
2

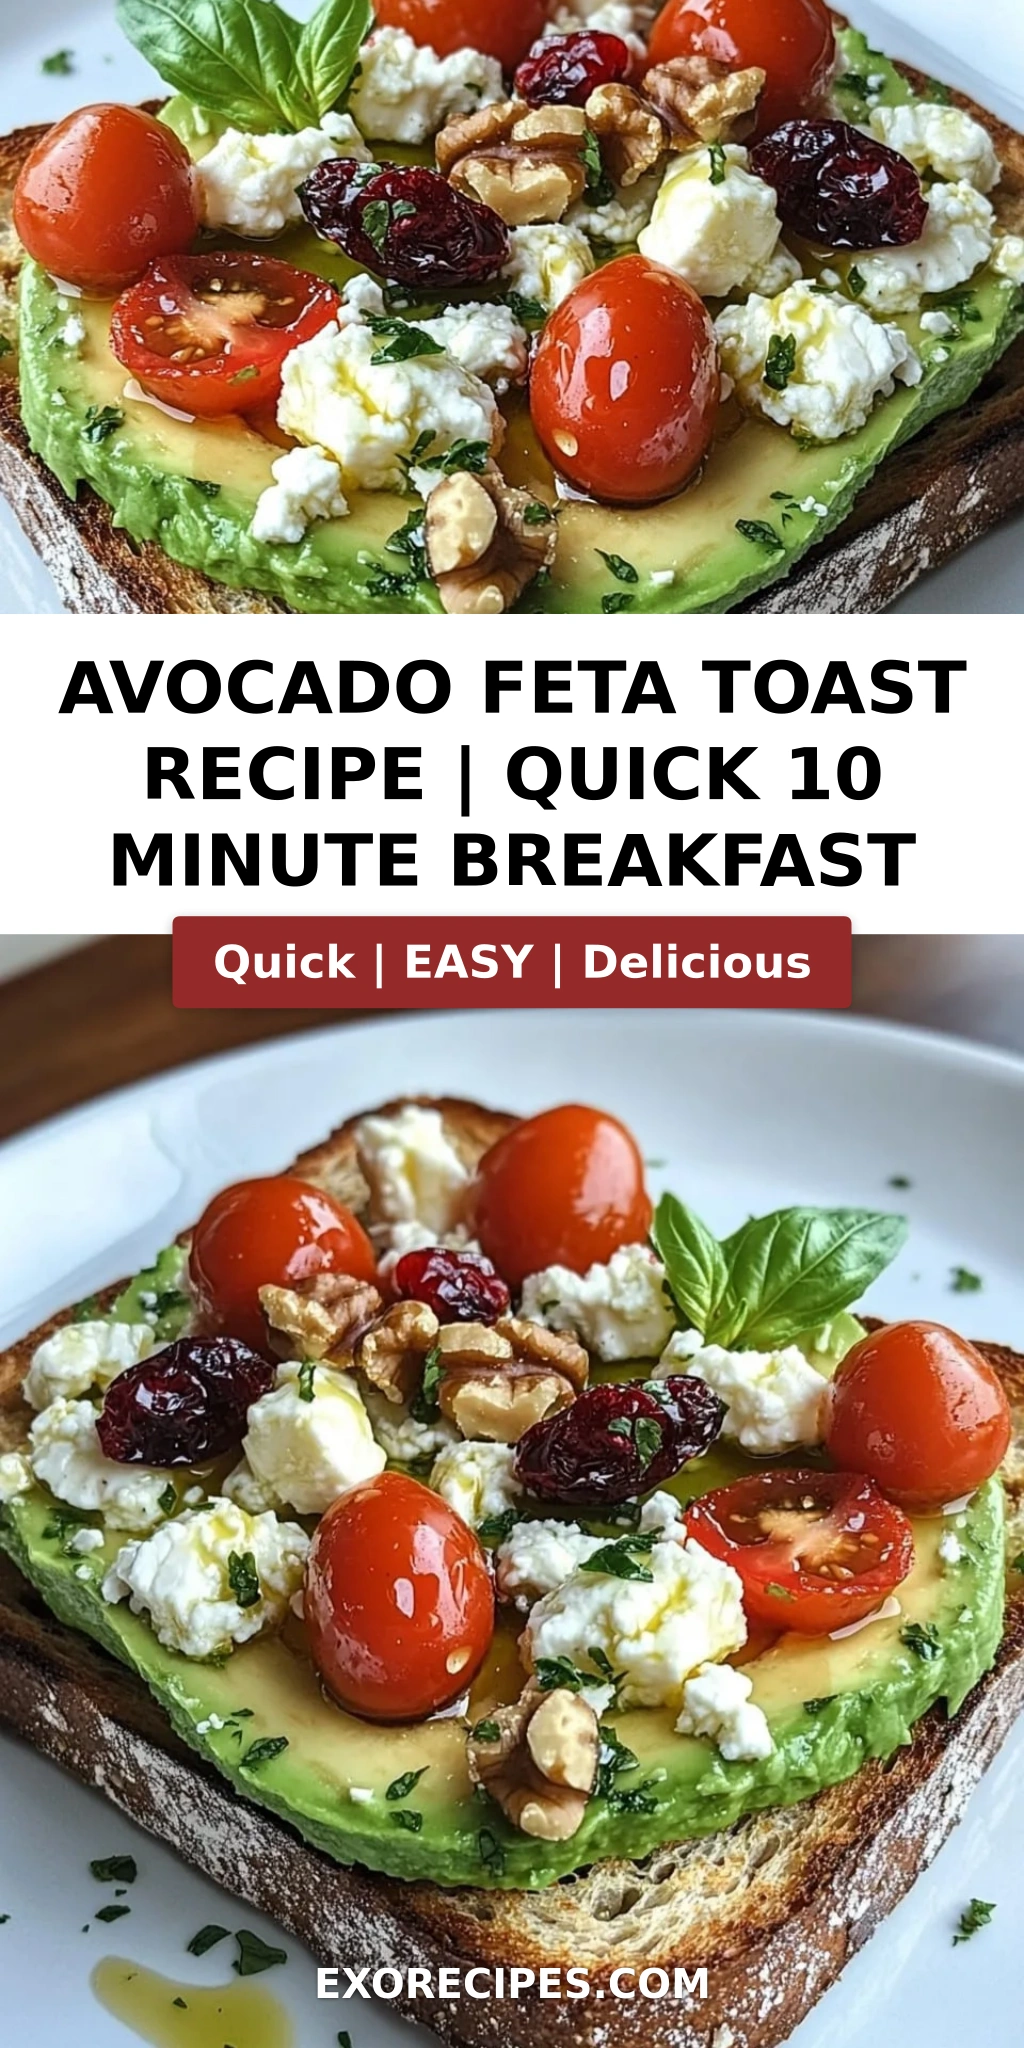
Growing up in Morocco, my mother would make the simplest breakfasts that somehow tasted extraordinary — warm bread, a drizzle of olive oil, and whatever fresh produce the market had that morning. That philosophy of letting quality ingredients shine is exactly what drives this avocado toast recipe. When I moved to New York City after my culinary training in Paris, I discovered that this quick, nourishing meal had become a universal canvas for creativity. My version, topped with creamy feta and juicy cherry tomatoes, bridges my North African roots with the bright, fresh energy of a NYC morning. It’s the avocado toast with feta that I make on busy days when I want something beautiful, satisfying, and ready in under ten minutes.

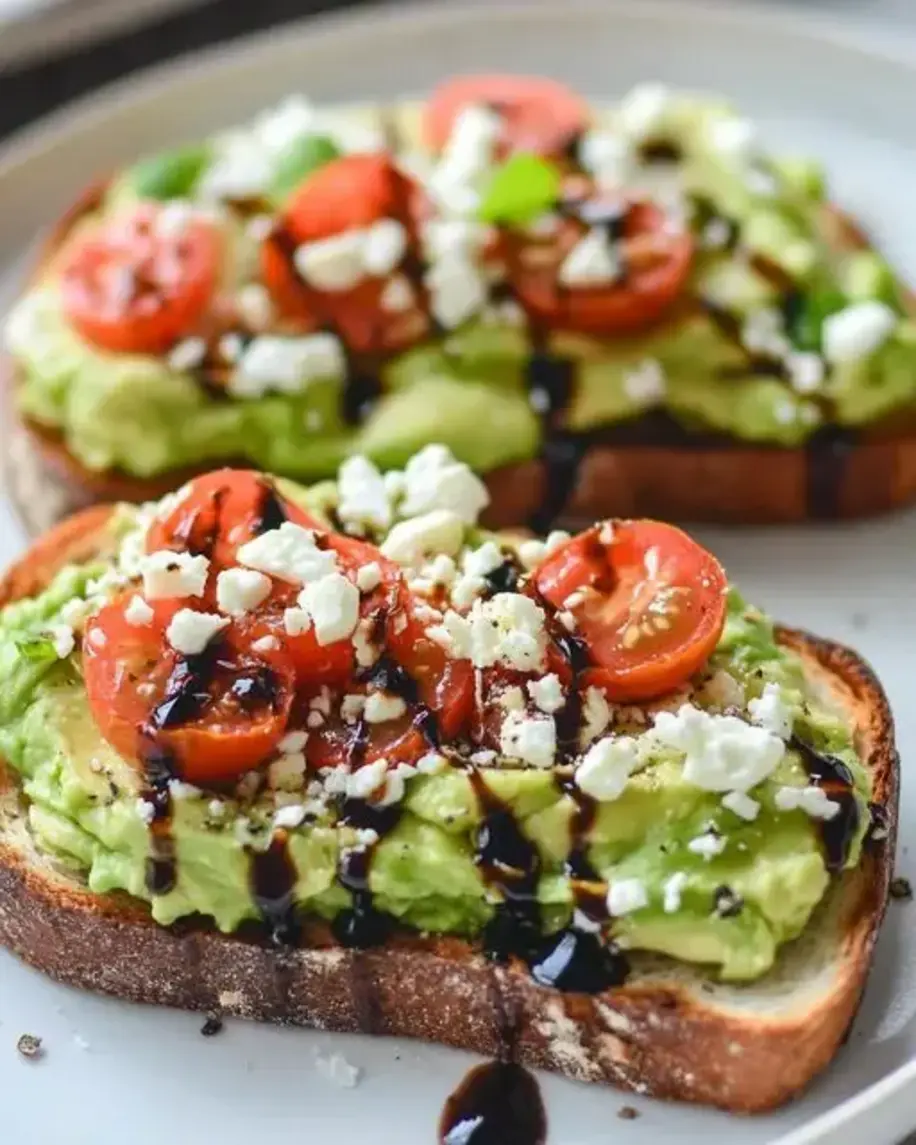
The first bite is pure harmony: the crispy, golden toast gives way to a velvety layer of mashed avocado that’s been kissed with lemon and sea salt. Then comes the burst of sweetness from halved cherry tomatoes, followed by the tangy, salty crumble of feta cheese that melts ever so slightly against the warm toast. A final drizzle of good olive oil ties everything together, adding a peppery, fruity note that elevates this from a simple snack to a memorable meal. The textures alone — crunchy, creamy, juicy, crumbly — make every mouthful interesting. It’s a dish that feels both rustic and refined, exactly the kind of cooking I learned in Paris: simple ingredients, impeccable technique, and a whole lot of heart.

What sets my cherry tomato avocado toast apart is the attention to detail that comes from years of professional cooking. I’m not just mashing an avocado and calling it done — I’m showing you how to choose the perfect avocado, how to season it so it sings, and how to layer the toppings so every bite has balance. I also tackle the most common complaints I hear: soggy toast, bland avocado, and toppings that slide off. This is an easy avocado toast idea that actually works, with a pro tip or two that will change the way you make it forever. Whether you’re a seasoned home cook or someone who’s never mashed an avocado before, I promise this recipe will become a staple in your kitchen.

Why This Avocado Toast Recipe Is the Best

The flavor secret lies in the feta. Most avocado toast recipes stop at salt and pepper, but adding a quality feta — preferably one packed in brine — introduces a salty, tangy complexity that cuts through the richness of the avocado. This is a trick I picked up from my French training: using a bold, brined cheese to create contrast on the palate. The feta also adds a creamy crumble that softens slightly from the warmth of the toast, creating a texture that’s both distinct and cohesive. It’s a small upgrade that makes this feta avocado toast taste exponentially more polished than the standard version.

Perfected texture is non-negotiable for me. The biggest mistake I see is people over-mashing their avocado into a paste, which turns the toast into a slippery mess. I teach a methodical approach: mash just enough to create a spreadable consistency while leaving small chunks for texture. The bread matters too — I use sourdough or hearty whole grain that can support the toppings without getting soggy. Toasting it until deeply golden creates a structural barrier that keeps the bread crisp. Every element is engineered for the perfect bite, from the thickness of the avocado layer to the distribution of the tomatoes and feta.

Foolproof and fast — this avocado toast with feta comes together in exactly ten minutes, but it tastes like something you’d order at a chic NYC café. I’ve tested it with every type of bread, every ripeness level of avocado, and every brand of feta I could find at the Union Square Greenmarket. The recipe is forgiving enough for a beginner but nuanced enough to impress someone who knows their way around a kitchen. If you can toast bread and mash an avocado, you can make this. And once you do, I guarantee you’ll never go back to plain avocado toast again.

Avocado Toast Recipe Ingredients

I source my avocados from the stands at the Union Square market when I can, but any good grocery store will do. There’s something about the ritual of picking out the perfect one — gently pressing near the stem to check for give — that reminds me of choosing produce with my mother in the medina. Here’s everything you’ll need for this cherry tomato avocado toast.

Ingredients List

  • 2 slices of bread (sourdough or whole grain)
  • 1 ripe avocado
  • 1/2 cup cherry tomatoes, halved
  • 1/4 cup crumbled feta cheese
  • 1 tablespoon olive oil
  • 1/2 teaspoon salt
  • 1/4 teaspoon black pepper
  • 1 teaspoon lemon juice (optional)

Ingredient Spotlight

Avocado: Look for an avocado that yields slightly to firm pressure near the stem — not mushy, but with a gentle give. A Hass avocado is ideal for its creamy, buttery texture. If it’s still hard, place it in a paper bag with a banana or apple overnight to speed up ripening.

Feta Cheese: Buy feta in brine blocks rather than pre-crumbled if you can. The brine keeps it moist and tangy, and crumbling it yourself gives you larger, more satisfying pieces. Sheep’s milk feta is my preference for its creamy, slightly grassy flavor, but cow’s milk feta works well too.

Cherry Tomatoes: Look for firm, bright-colored tomatoes that feel heavy for their size. In summer, I use Sun Gold or Sweet 100s from the farmers market — they’re candy-sweet and burst beautifully on the toast. In winter, standard cherry tomatoes from the grocery store are perfectly fine; just let them come to room temperature for the best flavor.

Original IngredientBest SubstitutionFlavor / Texture Impact
Sourdough breadWhole grain or ryeDenser, nuttier base; holds up well
Feta cheeseGoat cheese or queso frescoGoat cheese is tangier; queso fresco is milder
Cherry tomatoesGrape tomatoes or roasted red peppersGrape tomatoes are firmer; roasted peppers add sweetness
Olive oilAvocado oil or walnut oilAvocado oil is neutral; walnut oil adds nutty richness

How to Make Avocado Toast with Feta – Step-by-Step

This avocado toast with feta comes together in just a few minutes, but each step is designed to maximize flavor and texture. Follow along and you’ll have a restaurant-worthy breakfast on your plate before you know it.

Step 1: Toast the Bread

Place your bread slices in a toaster or under the broiler and toast until deep golden brown and crisp. Don’t rush this — pale toast will turn soggy the moment you add the avocado. I like my sourdough toasted for about 3-4 minutes on a medium setting, until the edges are just starting to darken.

💡 mia’s Pro Tip: For an extra-crispy base, brush the bread lightly with olive oil before toasting. This creates a waterproof barrier that keeps the toast crunchy even after adding the avocado.

Step 2: Prepare the Avocado

Cut the avocado in half lengthwise, twist to separate, and remove the pit. Scoop the flesh into a medium bowl. Add the salt, pepper, and lemon juice if using. Mash with a fork until mostly smooth but with some small chunks remaining — this texture is key. Taste and adjust seasoning. The avocado should be well-seasoned on its own before it ever touches the bread.

⚠️ Common Mistake to Avoid: Don’t over-mash! A puréed avocado spreads like paste and makes the toast feel heavy and monotonous. Leave some pea-sized pieces for contrast.

Step 3: Assemble the Toast

Divide the mashed avocado evenly between the two toast slices, spreading it all the way to the edges. Top with the halved cherry tomatoes, distributing them evenly so every bite gets a burst of sweetness. Sprinkle the crumbled feta over the top, letting some fall naturally onto the plate for a rustic look.

💡 mia’s Pro Tip: Warm your feta slightly by letting it sit at room temperature for 10 minutes before using. It crumbles more easily and its flavor becomes creamier and more pronounced.

Step 4: Garnish and Serve

Drizzle the olive oil over the top with a steady hand — you want a gentle ribbon, not a puddle. Finish with a final crack of black pepper and, if you like, a sprinkle of red pepper flakes or a tiny dash of balsamic glaze. Serve immediately while the toast is still warm and the tomatoes are bright and fresh.

⚠️ Common Mistake to Avoid: Don’t add the olive oil too early — it’ll soak into the bread and make it soggy. Drizzle it on just before serving for the best texture and flavor.

StepActionDurationKey Visual Cue
1Toast the bread3–4 minutesDeep golden brown edges
2Mash the avocado2 minutesMostly smooth with small chunks
3Assemble with tomatoes and feta2 minutesEven distribution of toppings
4Drizzle and serve1 minuteOil glistens, feta visible

Serving & Presentation

I love serving this avocado toast with feta on a wide, flat plate — the kind that lets the colors pop. The green of the avocado, the red of the cherry tomatoes, the white of the feta, and the golden-brown of the toast create a gorgeous palette that looks as good as it tastes. For a finishing touch, I sometimes add a few microgreens or a sprinkle of fresh mint, which reminds me of the herb-filled salads my mother made in Morocco.

This cherry tomato avocado toast pairs beautifully with a simple side salad of arugula tossed in lemon vinaigrette, or a handful of mixed berries for a sweet contrast. For a heartier meal, serve it alongside a soft-boiled egg or a bowl of Greek yogurt with honey. In my NYC kitchen, I often enjoy it with a strong pour-over coffee and the morning light streaming through the window — it’s my version of a perfect start to the day.

Pairing TypeSuggestionsWhy It Works
Side DishArugula salad, mixed berries, roasted potatoesFresh, bright flavors balance the richness
Sauce / DipBalsamic glaze, harissa yogurt, lemon tahiniAdds tangy, spicy, or nutty contrast
BeverageCold brew, matcha latte, fresh orange juiceCaffeine or citrus cuts the creaminess
GarnishMicrogreens, fresh mint, red pepper flakesAdds color, freshness, and a touch of heat

Make-Ahead, Storage & Reheating

Let me be honest: avocado toast is best enjoyed fresh, the moment it’s made. But I know life gets busy — I’m a New Yorker, after all. If you want to prep ahead for busy mornings, here’s how I handle it. I prepare the components separately and assemble just before eating. The key is to keep the avocado from browning and the bread from getting soggy.

MethodContainerDurationReheating Tip
RefrigeratorAirtight container with plastic wrap pressed onto avocado1 dayToast bread fresh; add avocado and toppings cold
FreezerNot recommended for assembled toastN/AAvocado texture degrades significantly when frozen
Make-AheadStore components separately1 day in advanceMash avocado with lemon juice; slice tomatoes; crumble feta

If you’re meal-prepping for the week, here’s my best advice: mash your avocado with extra lemon juice (the acid helps prevent browning), press plastic wrap directly onto the surface, and store in the fridge. Halve your cherry tomatoes and crumble your feta into separate containers. Each morning, toast your bread, give the avocado a quick stir, and assemble. It takes two minutes and tastes almost as good as fresh-made. I do this every Sunday for my busiest workdays.

Variations & Easy Swaps

VariationKey ChangeBest ForDifficulty Impact
Moroccan SpicedAdd cumin, paprika, and fresh cilantroA warm, aromatic twistEasy
Gluten-Free / Dairy-FreeUse gluten-free bread and omit feta or use vegan fetaDietary restrictionsEasy
Summer BerrySwap tomatoes for sliced strawberries and add balsamicA sweet-savory summer breakfastEasy

Moroccan Spiced Variation

This variation is closest to my heart. Add 1/4 teaspoon ground cumin and 1/4 teaspoon smoked paprika to the mashed avocado, and top with a sprinkle of fresh cilantro instead of (or alongside) the feta. The cumin adds an earthy warmth that pairs beautifully with the creamy avocado, while the paprika brings a subtle smokiness. It’s the avocado toast recipe I make when I’m homesick for my mother’s kitchen, and it never fails to transport me back to Marrakech.

Gluten-Free / Dairy-Free Variation

For a gluten-free version, use a sturdy gluten-free bread — I like the ones made with whole grains and seeds for extra texture. For dairy-free, simply omit the feta or substitute with a vegan feta made from almonds or tofu. I’ve tested several brands and find that the tangy, crumbly style works best. The flavor profile shifts slightly but remains delicious. This cherry tomato avocado toast adapts beautifully to dietary needs without losing its soul.

Summer Berry Variation

In peak summer, when berries are at their best at the NYC farmers markets, I swap the cherry tomatoes for sliced strawberries and add a drizzle of balsamic glaze. The combination of sweet berries, creamy avocado, salty feta, and tangy balsamic is absolutely stunning. It’s a brunch showstopper that feels both indulgent and fresh. This variation reminds me of the French dessert plates I used to prepare in Paris — sweet, savory, and perfectly balanced.

What is the best way to ripen an avocado quickly for avocado toast?

If you need a ripe avocado fast, the most reliable method is to place it in a brown paper bag with a banana or apple. Both fruits release ethylene gas, which naturally speeds up ripening. Seal the bag loosely and check every 8–12 hours — it usually takes 24 hours to go from hard to perfectly ripe. For an even quicker fix, you can microwave the avocado for 30 seconds, but this softens the texture unevenly and I don’t recommend it for this avocado toast recipe. The paper bag method yields the best flavor and texture for your feta avocado toast.

Can I use a different type of cheese instead of feta on avocado toast?

Absolutely. Goat cheese is my top substitute — it has a similar tangy, creamy profile that pairs beautifully with avocado. Queso fresco is another excellent option; it’s milder and less salty than feta, with a soft crumble that works well. For a richer flavor, try crumbled blue cheese or shred some sharp cheddar. Each cheese changes the character of your avocado toast with feta, so choose based on your mood. If you’re making a dairy-free version, a good-quality vegan feta made from almonds or cashews does the job nicely.

How do I keep my avocado toast from getting soggy?

The number one trick is to toast your bread until it’s deeply golden — not just lightly browned. This creates a crispy crust that acts as a barrier against moisture. I also recommend brushing the toast with a thin layer of olive oil before adding the avocado; this adds a waterproof seal. Another smart tip is to season your avocado separately before spreading it on the bread, rather than seasoning the assembled toast. This prevents excess liquid from soaking into the toast. Finally, serve immediately — avocado toast waits for no one. This easy avocado toast idea stays perfectly crisp when you follow these steps.

What other toppings go well with avocado toast besides cherry tomatoes and feta?

The possibilities are endless! I love adding a poached or fried egg for extra protein and richness. Smoked salmon with a drizzle of lemon is a luxurious option that works beautifully. For a crunch factor, try toasted pumpkin seeds, pine nuts, or crushed pistachios. Fresh herbs like cilantro, mint, or basil add brightness. If you want heat, a drizzle of sriracha or a sprinkle of red pepper flakes does the trick. For a sweet-savory combination, add sliced figs or pomegranate seeds. This avocado toast with feta is a canvas — feel free to make it your own.

Is avocado toast with feta healthy?

Yes, this avocado toast with feta is a nutritious and balanced meal. Avocados are packed with heart-healthy monounsaturated fats, fiber, potassium, and vitamins C, E, and K. Feta cheese provides calcium and protein, while cherry tomatoes add lycopene, vitamin C, and antioxidants. Whole grain bread contributes complex carbohydrates and additional fiber. At around 320 calories per serving with 8g of protein and 4g of sugar, it’s a satisfying option that keeps you full and energized. This cherry tomato avocado toast is a smart choice for breakfast or a light lunch.

Can I make avocado toast ahead of time for meal prep?

You can prep the components ahead, but I recommend assembling just before eating for the best texture. Mash the avocado with extra lemon juice, press plastic wrap directly onto the surface, and refrigerate for up to one day. Halve the cherry tomatoes and crumble the feta into separate containers. Each morning, toast your bread fresh and assemble. The lemon juice helps prevent the avocado from browning, though a slight color change is normal. This make-ahead approach saves time while still delivering a fresh-tasting avocado toast recipe every day of the week.

What type of bread is best for avocado toast with feta?

Sourdough is my top choice — its tangy flavor complements the creamy avocado and salty feta perfectly, and its sturdy crumb holds up well to the toppings. Whole grain bread is another excellent option, offering a nutty flavor and extra fiber. Rye bread works wonderfully too, especially with the Moroccan spiced variation. Avoid soft, fluffy breads like white sandwich bread — they’ll get soggy quickly and lack the structural integrity needed for this feta avocado toast. Whatever bread you choose, toast it until deep golden brown for the best results.

How many calories are in avocado toast with feta and cherry tomatoes?

This avocado toast with feta and cherry tomatoes contains approximately 320 calories per serving (one slice of toast with toppings). The breakdown includes 28g of carbohydrates, 20g of healthy fats, 8g of protein, and just 4g of sugar. The exact calorie count may vary slightly depending on the type of bread you use and how much olive oil you drizzle. It’s a well-balanced meal that provides sustained energy without weighing you down. This cherry tomato avocado toast is a satisfying option that fits into most dietary plans.

Can I use frozen avocado for avocado toast?

I don’t recommend using frozen avocado for this avocado toast recipe. Freezing significantly alters the texture of avocado — it becomes watery and mushy when thawed, which leads to soggy toast and a less pleasant mouthfeel. Fresh avocado is essential for the creamy, smooth texture that makes this feta avocado toast so satisfying. If you have a frozen avocado, it’s better to use it in smoothies or blended sauces where the texture change won’t be as noticeable. For the best results, always start with a fresh, ripe avocado.

What can I use instead of cherry tomatoes on avocado toast?

If you don’t have cherry tomatoes, there are plenty of delicious alternatives. Sliced grape tomatoes or Roma tomatoes work well — just remove the seeds to prevent excess moisture. Roasted red peppers add a sweet, smoky flavor that pairs beautifully with the feta. For a different direction, try sliced strawberries or figs for a sweet-savory combination. Sun-dried tomatoes (rehydrated if needed) offer an intense, concentrated tomato flavor. Each substitute brings its own character to this avocado toast with feta, so feel free to experiment based on what’s in season or in your pantry.

📌

Love This Recipe? Save It to Pinterest!

If you enjoyed this Avocado Toast with Feta and Cherry Tomatoes recipe, don’t let it get lost in your browser tabs! 😄 Pin it now so you can find it again anytime — and explore hundreds more tried-and-tested recipes waiting for you on my Pinterest boards.

👉 Follow mia on Pinterest @exorecipe

📌 Pin this recipe · 🔁 Re-pin your favorites · 💬 Tag me when you make it — I love seeing your creations!

“`

Print

clock clock iconcutlery cutlery iconflag flag iconfolder folder iconinstagram instagram iconpinterest pinterest iconfacebook facebook iconprint print iconsquares squares iconheart heart iconheart solid heart solid icon

Avocado Toast with Feta and Cherry Tomatoes

  • Author: Chef Mia
  • Prep Time: 5 minutes
  • Cook Time: 5 minutes
  • Total Time: 10 minutes
  • Yield: 2 1x
  • Method: Breakfast
  • Cuisine: American

Description

A quick and delicious avocado toast topped with creamy feta cheese and juicy cherry tomatoes, perfect for breakfast or a light lunch.


Ingredients

Scale
  • 2 slices of bread (sourdough or whole grain)
  • 1 ripe avocado
  • 1/2 cup cherry tomatoes, halved
  • 1/4 cup crumbled feta cheese
  • 1 tablespoon olive oil
  • 1/2 teaspoon salt
  • 1/4 teaspoon black pepper
  • 1 teaspoon lemon juice (optional)

Instructions

  1. Toast the bread slices until golden and crispy.
  2. Cut the avocado in half, remove the pit, and scoop the flesh into a bowl. Mash with a fork to desired consistency. Season with salt, pepper, and lemon juice if using.
  3. Spread the mashed avocado evenly onto each toast slice.
  4. Top with halved cherry tomatoes and crumbled feta cheese.
  5. Drizzle with olive oil and serve immediately.

Notes

For extra flavor, add a sprinkle of red pepper flakes or a dash of balsamic glaze.


Nutrition

  • Calories: 320
  • Sugar: 4g
  • Fat: 20g
  • Carbohydrates: 28g
  • Protein: 8g


Avocado Toast with Feta and Cherry Tomatoes

k">

Tried This Recipe? Leave a Comment!

Did you make this recipe? I’d love to hear how it turned out! Please leave a comment and a rating below. Your feedback helps other home cooks and supports cheerychop.com!

For more delicious inspiration, follow me on Pinterest!
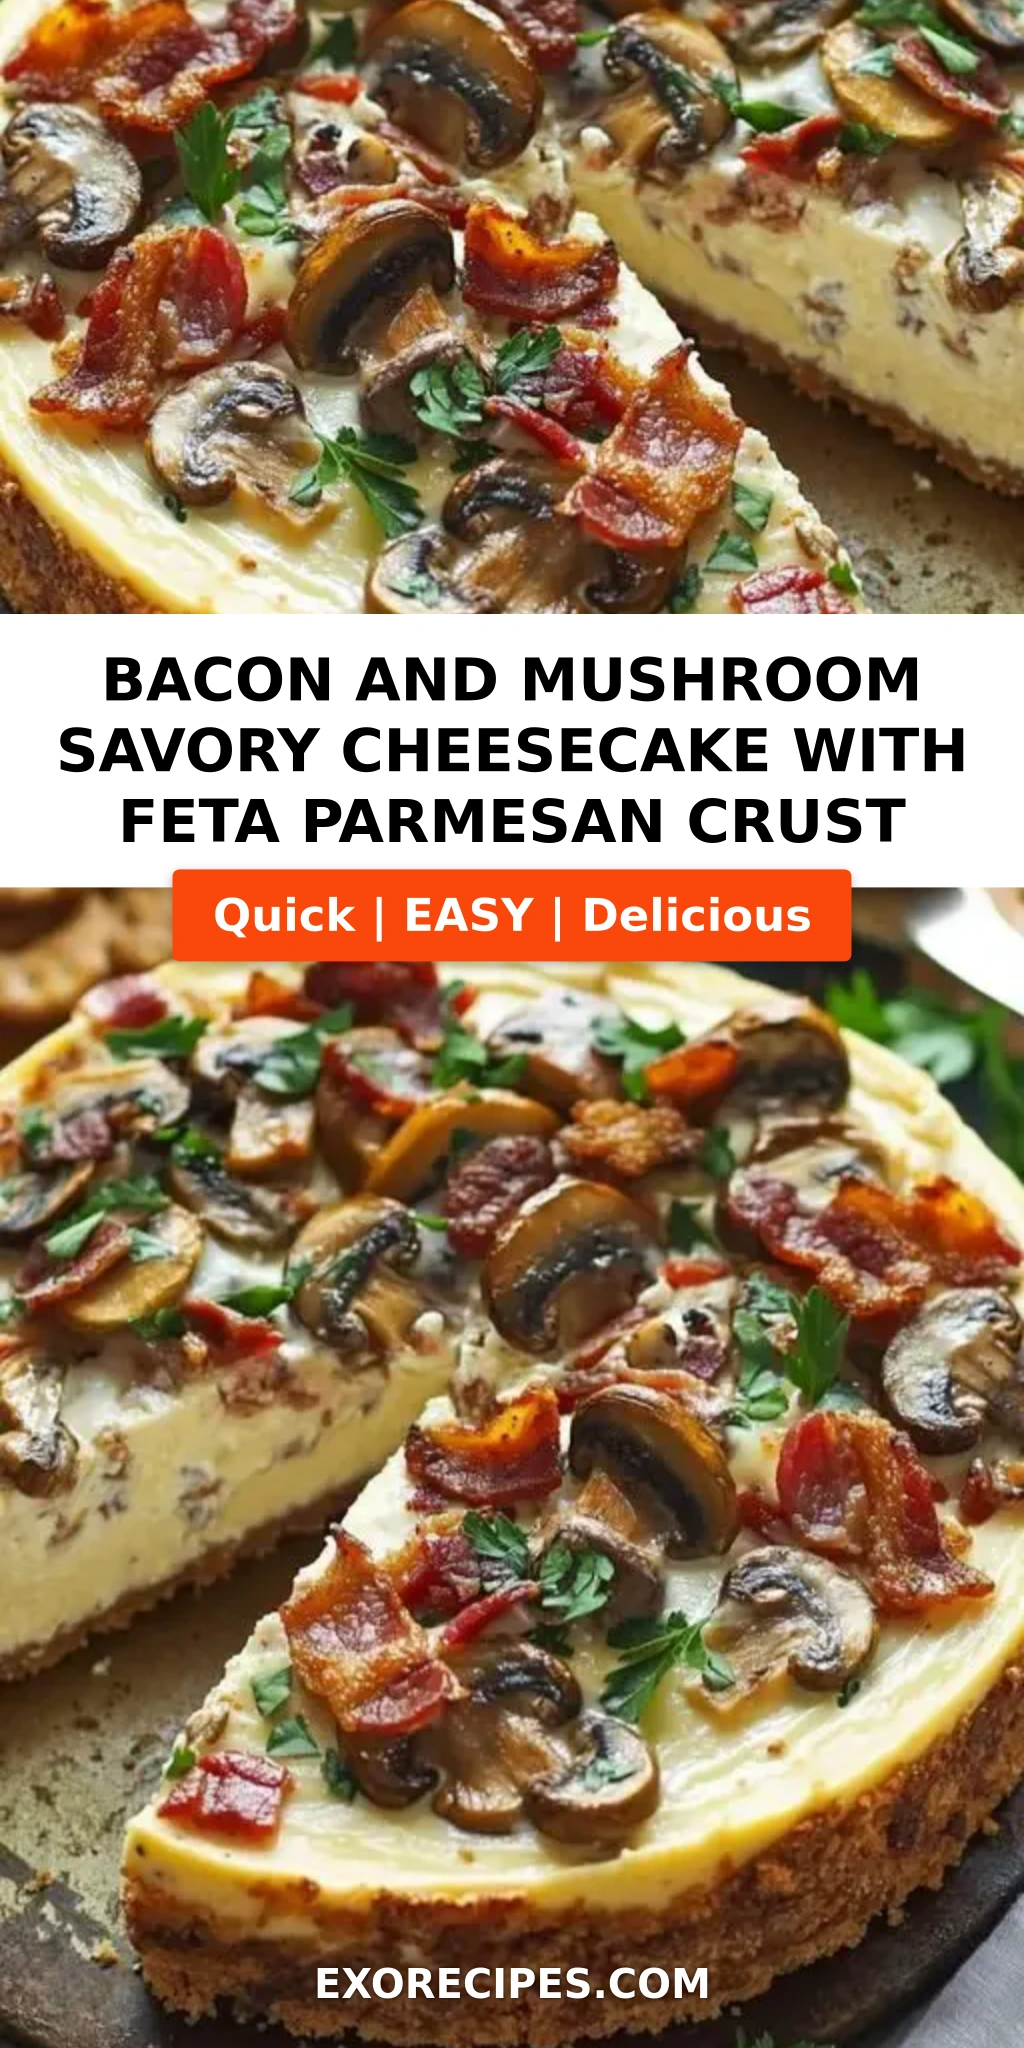
Avocado Feta Toast Delight: A Nutritious and Flavorful Twist – Quick & Zesty Breakfast

⚖️
Difficulty
Easy
⏲️
Prep Time
5 mins
🕒
Cook Time
5 mins
⏱️
Total Time
10 mins
🍽️
Servings
2

I still remember the first time I made avocado feta toast – it was a lazy Sunday morning in my tiny Paris kitchen, fresh from the market with a perfectly ripe avocado and a block of creamy feta I’d picked up from the fromagerie down the street. That combination of buttery avocado and salty, tangy feta was pure magic. This avocado feta toast recipe is my go-to for a quick, nutritious breakfast that feels like a treat. The zesty twist of lemon and a pinch of red pepper flakes elevates it from simple to sensational, and it comes together in just 10 minutes.

Picture this: a slice of whole grain toast, golden and crisp, topped with velvety avocado mashed to your preferred consistency. Then comes a generous shower of crumbled feta, its briny creaminess cutting through the richness of the avocado. A squeeze of lemon adds brightness, while red pepper flakes bring a gentle warmth that lingers. If you add halved cherry tomatoes, they burst with sweetness – a little pop of summer on your plate. The textures and flavors dance together: crunchy toast, smooth avocado, crumbly cheese, and that subtle heat.

Growing up in Morocco, my mother always taught me to balance flavors – salty, sour, spicy, and sweet. That philosophy is at the heart of this avocado feta toast recipe. I’ve tested it dozens of times to get the proportions just right. My secret is to mash the avocado with a fork, leaving some chunks for texture, and to always add the lemon juice right away to keep the avocado from browning. One common mistake? Over-mashing the avocado until it’s a paste – you want some body. Trust me, this version will become your new favorite healthy avocado toast.

Why This Avocado Feta Toast Delight Recipe Is the Best

The Flavor Secret – This isn’t just any avocado toast. The combination of creamy feta and bright lemon is inspired by the Mediterranean flavors I fell in love with during my culinary training in Paris. Red pepper flakes add a Moroccan touch, a nod to the harissa I grew up with. The balance of tangy, salty, and spicy makes every bite exciting.

Perfected Texture – I’ve honed the exact mashing technique to give you a spread that’s creamy yet still has small avocado chunks. This ensures you get that satisfying mouthfeel without it sliding off the toast. Toasting the bread until deep golden creates a barrier that keeps the toast crisp.

Foolproof & Fast – With only 10 minutes total and minimal ingredients, this easy avocado toast is perfect for busy mornings. Even if you’re a beginner, you can nail it. The recipe is forgiving – you can swap feta for goat cheese or add a fried egg, and it still works beautifully.

Avocado Feta Toast Recipe Ingredients

I love sourcing my avocados from the farmers market near Union Square – they’re always perfectly ripened. But any good grocery store will do. Here’s what you need for this nutritious breakfast toast.

Ingredients List

  • 2 slices of whole grain bread
  • 1 ripe avocado
  • 1/4 cup crumbled feta cheese
  • 1 tablespoon lemon juice (freshly squeezed preferred)
  • 1/2 teaspoon red pepper flakes
  • Salt and pepper to taste
  • Optional: cherry tomatoes, sliced

Ingredient Spotlight

Avocado – The star of the show. Look for avocados that yield slightly to gentle pressure, especially near the stem. If they’re rock hard, place them in a paper bag with an apple for a day to speed ripening. A ripe avocado will give you that creamy, spreadable texture. For this healthy avocado toast, Hass avocados are ideal because of their rich, nutty flavor.

Feta Cheese – I use authentic Greek feta from a block, crumbled by hand. It has a creamier, less dry texture than pre-crumbled varieties. If you can’t find feta, goat cheese or cotija make excellent substitutes. The saltiness of feta is what makes this avocado feta toast recipe pop.

Lemon Juice – Freshly squeezed is non-negotiable for me. It prevents the avocado from browning and adds a zesty brightness that cuts through the fat. Bottled juice contains preservatives that can make the avocado taste bitter. One lemon gives you enough for two slices.

Red Pepper Flakes – This tiny ingredient delivers a big flavor boost. It’s my Moroccan-inspired signature. For less heat, use just a pinch; for more, add up to a teaspoon. You can also substitute Aleppo pepper for a fruitier warmth.

Original IngredientBest SubstitutionFlavor / Texture Impact
Feta cheeseGoat cheese or cotijaGoat cheese is tangier and creamier; cotija is saltier and crumblier.
Red pepper flakesAleppo pepper or cayenne (use less)Aleppo is milder with a fruity undertone; cayenne is hotter.
Whole grain breadSourdough or gluten-free breadSourdough adds tangy crunch; gluten-free works, but toast until very crispy.
Lemon juiceLime juice or white wine vinegarLime gives a different citrus note; vinegar adds acidity but no citrus aroma.

How to Make Avocado Feta Toast Delight — Step-by-Step

Don’t overthink it – this easy avocado toast comes together in minutes. Follow these steps and you’ll have a restaurant-quality breakfast at home.

Step 1: Toast the Bread

Place your bread slices in a toaster or in a skillet over medium heat. Toast until deep golden brown and crisp on the outside but still slightly chewy inside. For extra flavor, rub a cut garlic clove on the hot toast.

💡 mia’s Pro Tip: Use a toaster oven if you have one – it gives a more even toast than a pop-up toaster. Watch closely to avoid burning, especially if using whole grain bread, which can darken quickly.

Step 2: Mash the Avocado

Halve the avocado, remove the pit, and scoop the flesh into a medium bowl. Using a fork, mash it to your desired consistency – I prefer leaving some chunks for texture. Add the lemon juice immediately to prevent oxidation.

⚠️ Common Mistake to Avoid: Don’t over-mash the avocado into a smooth paste. You want a few small pieces to create a rustic, hearty spread.

Step 3: Season and Mix

Stir in the red pepper flakes, salt, and pepper. Taste and adjust – the feta will add saltiness, so go easy on the salt. The lemon should be bright but not overpowering.

💡 mia’s Pro Tip: For a creamier finish, add a tiny drizzle of extra-virgin olive oil when mixing the avocado. It adds richness and helps the spread glide onto the toast.

Step 4: Assemble the Toast

Divide the mashed avocado mixture evenly between the two toast slices. Use the back of a spoon to spread it in an even layer, leaving a slight border around the edges so it doesn’t drip off.

⚠️ Common Mistake to Avoid: Piling on too much avocado – it can make the toast soggy. A generous but even layer (about 1/4 inch thick) is perfect.

Step 5: Top and Serve

Sprinkle the crumbled feta cheese over the avocado. Add red pepper flakes for extra kick if desired. If using cherry tomatoes, arrange the slices on top. Serve immediately – this toast waits for no one!

💡 mia’s Pro Tip: For a finishing touch, drizzle a little balsamic glaze over the top. It adds an unexpected sweet-sour brightness that pairs beautifully with the feta.

StepActionDurationKey Visual Cue
1Toast bread3-4 minutesDeep golden brown, crisp edges
2Mash avocado with lemon1 minuteCreamy but still chunky; bright green color
3Season and spread1 minuteEven layer covering toast
4Add toppings1 minuteFeta crumbled evenly; red pepper flakes scattered
5ServeImmediatelyToast is still warm and crisp

Serving & Presentation

This avocado feta toast is gorgeous on its own, but a little plating goes a long way. I like to serve each slice on a wooden board or a ceramic plate, garnished with a few extra red pepper flakes and a sprig of fresh parsley or basil. A thin lemon wedge on the side allows guests to add more acidity if they wish.

For a complete breakfast, pair it with a simple green salad dressed with lemon and olive oil, or a bowl of fresh fruit. In my NYC kitchen, I often enjoy it alongside a latte or a Moroccan mint tea – the sweetness of the tea balances the spicy notes. If you’re making this as a snack, consider a side of marinated olives or roasted red peppers.

Pairing TypeSuggestionsWhy It Works
Side DishMixed greens salad, roasted cherry tomatoes, olivesAdds freshness and contrasts creamy toast.
Sauce / DipBalsamic glaze, tahini drizzle, harissaExtra flavor layers without overwhelming.
BeverageLatte, Moroccan mint tea, iced green teaThe mild bitterness or sweetness complements the toast.
GarnishFresh basil, parsley, chopped chives, lemon wedgeAdds color, freshness, and a visual pop.

Make-Ahead, Storage & Reheating

As a busy New Yorker, I’ve learned a few tricks to streamline this avocado feta toast recipe. While it’s best fresh, you can prep components in advance. Here’s how I store leftovers and manage busy mornings.

MethodContainerDurationReheating Tip
RefrigeratorAirtight container with plastic wrap pressed onto avocado1 day (avocado will brown)Not recommended to reheat; scrape off top layer if browned, but best to eat fresh.
FreezerNot suitable for assembled toastN/ADo not freeze – avocado becomes watery and unappetizing.
Make-AheadMashed avocado (with extra lemon juice) in a sealed containerUp to 1 dayStir before spreading; toast bread fresh and assemble just before eating.

The avocado mixture will brown slightly even with lemon juice, but it’s perfectly fine to eat. To minimize browning, press plastic wrap directly onto the surface before sealing. For best results, mash the avocado fresh and keep the feta and tomatoes separate until you’re ready to serve. This is my weekday hack – I toast the bread and mash the avocado while my coffee brews.

Variations & Easy Swaps

One of the things I love about this avocado feta toast recipe is how versatile it is. Whether you want to add protein, go dairy-free, or simply switch things up with seasonal produce, there’s a variation for you.

VariationKey ChangeBest ForDifficulty Impact
Protein-PackedAdd a fried egg or grilled chicken stripsHearty breakfast or lunchEasy (egg) / Medium (chicken)
Dairy-FreeOmit feta, add nutritional yeast or vegan fetaVegan dietEasy
Seasonal TwistUse roasted beets or pickled onionsFall/Winter variationEasy

Protein-Packed Avocado Toast

If you want a heartier meal, a sunny-side-up egg on top is my favorite addition. The runny yolk mixes with the avocado and feta to create an even richer sauce. For a non-egg option, add grilled chicken slices seasoned with cumin and paprika – a nod to my Moroccan roots. This variation turns your easy avocado toast into a complete lunch that will keep you full for hours.

Dairy-Free / Vegan Version

To make this avocado toast with feta dairy-free, simply swap the feta for a vegan alternative. I recommend a crumbled almond-based feta, which has a similar texture. Alternatively, sprinkle nutritional yeast for a cheesy, umami flavor. The lemon and red pepper flakes still provide plenty of zest. The texture changes slightly – it’s less creamy but still delicious.

Seasonal Summer Tomato Version

When cherry tomatoes are at their peak at the Union Square market, I double the amount and even add a drizzle of balsamic reduction. The sweetness of ripe tomatoes against the salty feta and spicy flakes is pure summer. You can also use heirloom tomato slices instead. This version is incredibly refreshing and perfect for a hot day.

How do you make avocado feta toast without the avocado turning brown?

The key is to use fresh lemon or lime juice mixed into the mashed avocado immediately after mashing. The citric acid slows down oxidation. I also press plastic wrap directly onto the surface of any leftover avocado mixture before refrigerating. For the toast itself, serve it right after assembling – don’t let it sit out. If you need to prep ahead, keep the avocado pit in the bowl with the mash (it helps a little), but the best prevention is a generous squeeze of citrus and eating it fresh.

What can I substitute for feta cheese in an avocado toast recipe?

You have several great options depending on what you have on hand. Goat cheese is my number one substitute – it’s tangy, creamy, and crumbles beautifully. Cotija cheese, often used in Mexican cooking, is saltier and crumblier, so use a bit less. For a dairy-free version, try crumbled silken tofu seasoned with salt and lemon juice, or a store-bought vegan feta. You can also skip the cheese altogether and add a sprinkle of toasted hemp seeds for a nutty, protein-rich crunch.

How do you ripen an avocado quickly for avocado feta toast?

If you need a ripe avocado in a hurry, place it in a paper bag with an apple or a banana. These fruits release ethylene gas, which accelerates ripening. Close the bag loosely and leave it at room temperature for 12–24 hours – check after 12 hours. For an even faster method (about 10 minutes), you can try the oven trick: wrap the avocado in foil and bake at 200°F (95°C) for 10 minutes, but be aware this can slightly alter the texture. The paper bag method is more reliable for that perfect creamy consistency.

Can I add protein like eggs or chicken to avocado feta toast for a heartier meal?

Absolutely! Adding protein is one of my favorite ways to turn this into a satisfying lunch or dinner. A fried or poached egg sits perfectly on top – the yolk adds richness that blends with the feta. For chicken, I recommend grilling thin chicken breast strips seasoned with cumin, smoked paprika, and garlic powder. Slice them and arrange on the avocado before adding the feta. You can also add smoked salmon for a luxurious twist. The added protein makes this healthy avocado toast a complete meal.

Is avocado feta toast good for weight loss?

Yes, this avocado feta toast recipe can be part of a weight-loss diet when eaten in moderation. Avocados are calorie-dense but packed with healthy monounsaturated fats and fiber, which keep you full and satisfied. Feta adds protein and calcium without too many calories. Using whole grain bread provides complex carbohydrates and additional fiber. The total is around 320 calories per serving – perfect for a balanced breakfast. To lighten it further, use half the avocado and add more vegetables like sliced cucumber or radish.

What is the best bread for avocado feta toast?

I recommend a hearty whole grain bread or sourdough for the best texture and flavor. Whole grain gives you fiber and a nutty taste that complements the avocado and feta. Sourdough has a tang that cuts through the richness and stays crisp longer. If you’re gluten-free, look for a sturdy gluten-free bread – I like those made with brown rice and oat flour. Avoid very soft white bread; it will become soggy quickly. Always toast the bread until deep golden to create a barrier against moisture.

Can I make avocado feta toast ahead of time for meal prep?

You can prepare components ahead, but I don’t recommend assembling the toast more than a few minutes before eating. However, you can mash the avocado (with extra lemon juice) and store it in a sealed container with plastic wrap pressed on top for up to one day. Keep the feta crumbled in a separate container. Toast your bread fresh each morning. In the morning, simply stir the avocado mixture, spread on hot toast, and add toppings. It takes just two minutes and tastes almost as good as fresh.

What can I use instead of red pepper flakes?

If you don’t have red pepper flakes or want a different kind of heat, try these swaps: Aleppo pepper flakes have a milder, fruitier warmth and are lovely sprinkled on top. For a smoky flavor, use a pinch of smoked paprika or chipotle powder. If you like fresh heat, finely mince a small serrano or jalapeño pepper and stir it into the avocado. Remember that fresh peppers will add more moisture, so use sparingly. You can also simply omit the heat – the lemon and feta are still delicious.

Share Your Version!

I’d love to see how you make this avocado feta toast recipe your own! Did you add a fried egg? Swap in goat cheese? Or maybe you discovered a new favorite seasoning? Leave a star rating below and tell me about your twist in the comments. Your feedback helps other readers and inspires me to keep creating.

Snap a photo of your creation and share it on Instagram or Pinterest – tag @exorecipes so I can see. I always repost my favorites on my stories. And if you have a question about any variation, just ask in the comments. I answer every single one! From my NYC kitchen to yours — I hope this recipe brings as much warmth to your table as it does to mine. — mia 🧡

📌

Love This Recipe? Save It to Pinterest!

If you enjoyed this Avocado Feta Toast Delight recipe, don’t let it get lost in your browser tabs! 😄 Pin it now so you can find it again anytime — and explore hundreds more tried-and-tested recipes waiting for you on my Pinterest boards.

👉 Follow mia on Pinterest @exorecipe

📌 Pin this recipe · 🔁 Re-pin your favorites · 💬 Tag me when you make it — I love seeing your creations!

Print

clock clock iconcutlery cutlery iconflag flag iconfolder folder iconinstagram instagram iconpinterest pinterest iconfacebook facebook iconprint print iconsquares squares iconheart heart iconheart solid heart solid icon

Avocado Feta Toast Delight: A Nutritious and Flavorful Twist

  • Author: Chef Mia
  • Prep Time: 5 minutes
  • Cook Time: 5 minutes
  • Total Time: 10 minutes
  • Yield: 2 1x
  • Method: Breakfast, Snack
  • Cuisine: Mediterranean-inspired

Description

A quick and delicious avocado toast topped with creamy feta cheese and a zesty twist, perfect for a nutritious breakfast or snack.


Ingredients

Scale
  • 2 slices of whole grain bread
  • 1 ripe avocado
  • 1/4 cup crumbled feta cheese
  • 1 tablespoon lemon juice
  • 1/2 teaspoon red pepper flakes
  • Salt and pepper to taste
  • Optional: cherry tomatoes, sliced

Instructions

  1. Toast the bread slices until golden and crisp.
  2. Halve the avocado, remove the pit, and scoop the flesh into a bowl. Mash with a fork to desired consistency.
  3. Stir in lemon juice, salt, and pepper.
  4. Spread the mashed avocado evenly over the toasted bread.
  5. Top with crumbled feta cheese and red pepper flakes.
  6. Add sliced cherry tomatoes if desired. Serve immediately.

Notes

For extra flavor, drizzle with balsamic glaze or add a sprinkle of fresh herbs like parsley or basil.


Nutrition

  • Calories: 320
  • Sugar: 3g
  • Fat: 20g
  • Carbohydrates: 30g
  • Protein: 10g


Avocado Feta Toast Delight: A Nutritious and Flavorful Twist

ph">For more delicious inspiration, follow me on Pinterest!