“`html
Table of Contents
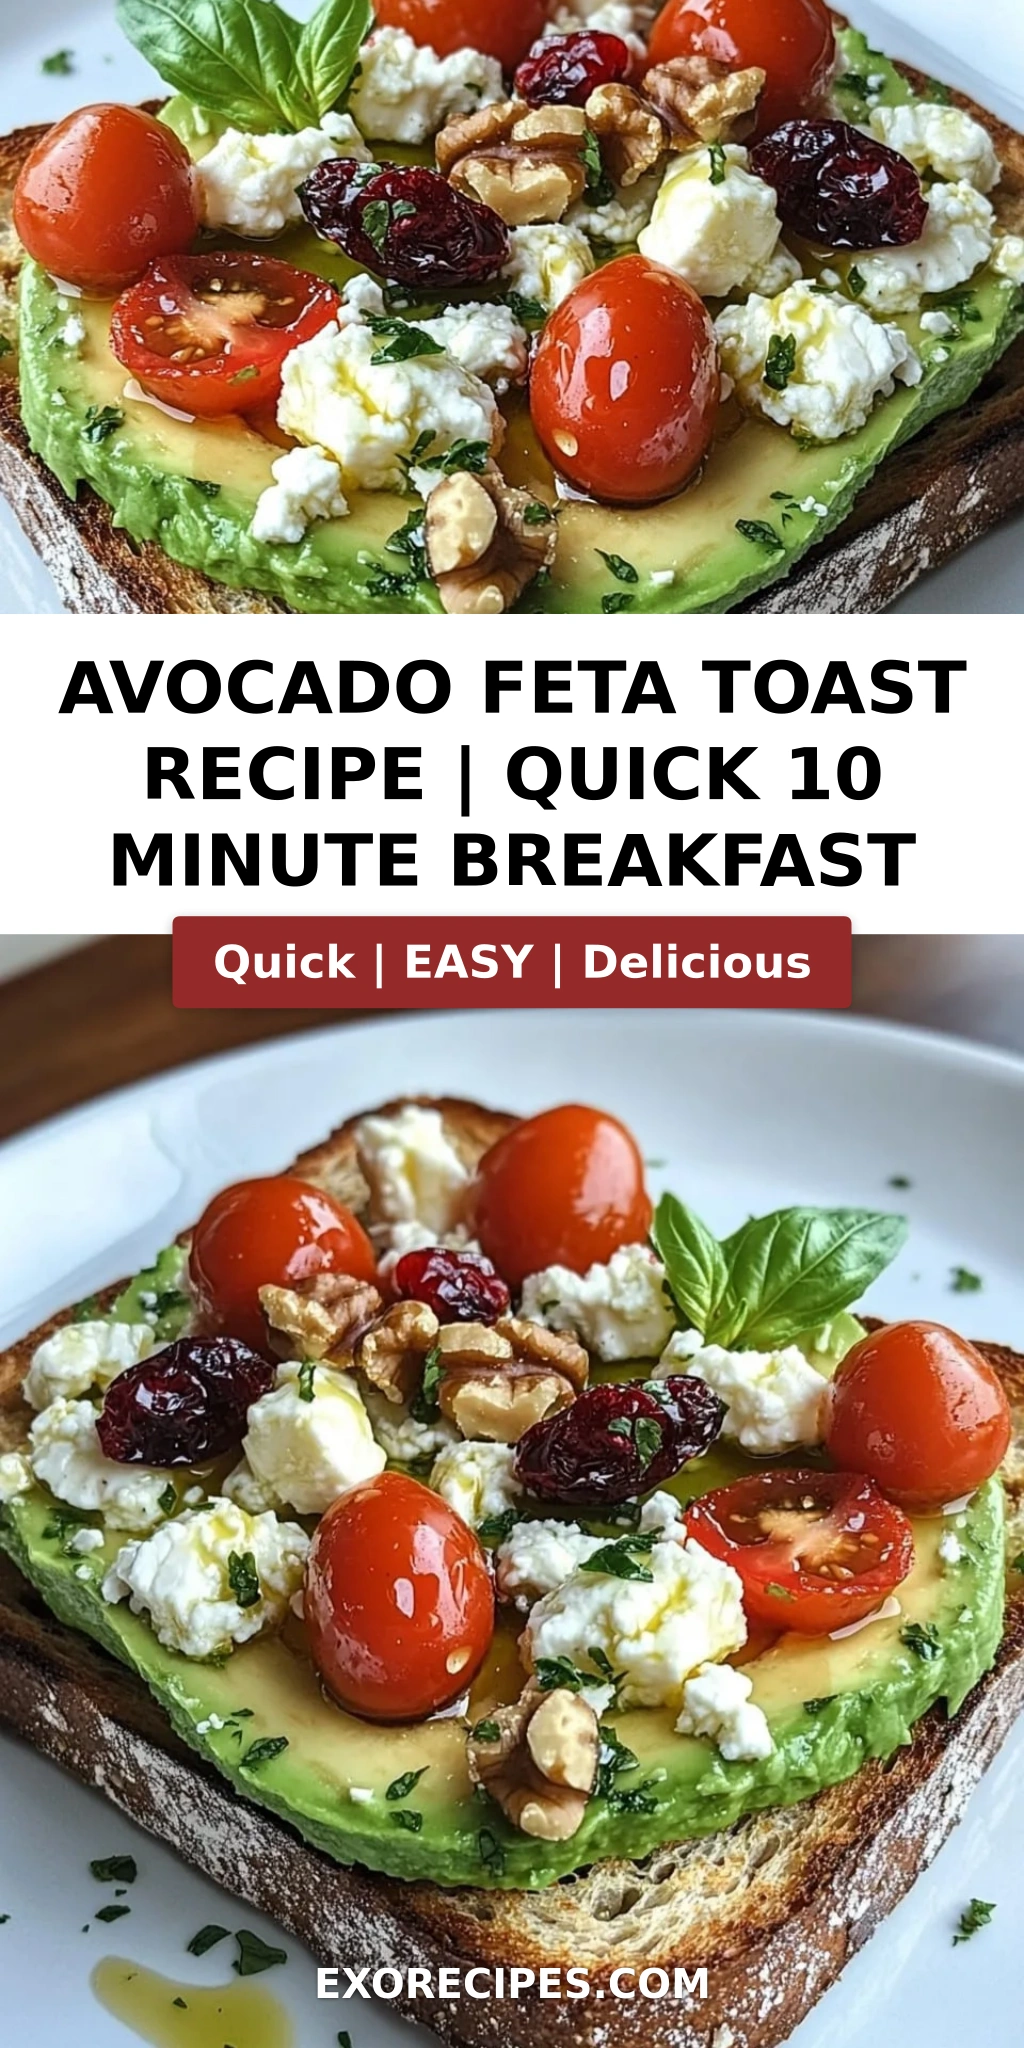
Avocado Toast with Feta and Cherry Tomatoes – A 10-Minute Breakfast with a Chef’s Touch
Growing up in Morocco, my mother would make the simplest breakfasts that somehow tasted extraordinary — warm bread, a drizzle of olive oil, and whatever fresh produce the market had that morning. That philosophy of letting quality ingredients shine is exactly what drives this avocado toast recipe. When I moved to New York City after my culinary training in Paris, I discovered that this quick, nourishing meal had become a universal canvas for creativity. My version, topped with creamy feta and juicy cherry tomatoes, bridges my North African roots with the bright, fresh energy of a NYC morning. It’s the avocado toast with feta that I make on busy days when I want something beautiful, satisfying, and ready in under ten minutes.
The first bite is pure harmony: the crispy, golden toast gives way to a velvety layer of mashed avocado that’s been kissed with lemon and sea salt. Then comes the burst of sweetness from halved cherry tomatoes, followed by the tangy, salty crumble of feta cheese that melts ever so slightly against the warm toast. A final drizzle of good olive oil ties everything together, adding a peppery, fruity note that elevates this from a simple snack to a memorable meal. The textures alone — crunchy, creamy, juicy, crumbly — make every mouthful interesting. It’s a dish that feels both rustic and refined, exactly the kind of cooking I learned in Paris: simple ingredients, impeccable technique, and a whole lot of heart.
What sets my cherry tomato avocado toast apart is the attention to detail that comes from years of professional cooking. I’m not just mashing an avocado and calling it done — I’m showing you how to choose the perfect avocado, how to season it so it sings, and how to layer the toppings so every bite has balance. I also tackle the most common complaints I hear: soggy toast, bland avocado, and toppings that slide off. This is an easy avocado toast idea that actually works, with a pro tip or two that will change the way you make it forever. Whether you’re a seasoned home cook or someone who’s never mashed an avocado before, I promise this recipe will become a staple in your kitchen.
Why This Avocado Toast Recipe Is the Best
The flavor secret lies in the feta. Most avocado toast recipes stop at salt and pepper, but adding a quality feta — preferably one packed in brine — introduces a salty, tangy complexity that cuts through the richness of the avocado. This is a trick I picked up from my French training: using a bold, brined cheese to create contrast on the palate. The feta also adds a creamy crumble that softens slightly from the warmth of the toast, creating a texture that’s both distinct and cohesive. It’s a small upgrade that makes this feta avocado toast taste exponentially more polished than the standard version.
Perfected texture is non-negotiable for me. The biggest mistake I see is people over-mashing their avocado into a paste, which turns the toast into a slippery mess. I teach a methodical approach: mash just enough to create a spreadable consistency while leaving small chunks for texture. The bread matters too — I use sourdough or hearty whole grain that can support the toppings without getting soggy. Toasting it until deeply golden creates a structural barrier that keeps the bread crisp. Every element is engineered for the perfect bite, from the thickness of the avocado layer to the distribution of the tomatoes and feta.
Foolproof and fast — this avocado toast with feta comes together in exactly ten minutes, but it tastes like something you’d order at a chic NYC café. I’ve tested it with every type of bread, every ripeness level of avocado, and every brand of feta I could find at the Union Square Greenmarket. The recipe is forgiving enough for a beginner but nuanced enough to impress someone who knows their way around a kitchen. If you can toast bread and mash an avocado, you can make this. And once you do, I guarantee you’ll never go back to plain avocado toast again.
Avocado Toast Recipe Ingredients
I source my avocados from the stands at the Union Square market when I can, but any good grocery store will do. There’s something about the ritual of picking out the perfect one — gently pressing near the stem to check for give — that reminds me of choosing produce with my mother in the medina. Here’s everything you’ll need for this cherry tomato avocado toast.
Ingredients List
- 2 slices of bread (sourdough or whole grain)
- 1 ripe avocado
- 1/2 cup cherry tomatoes, halved
- 1/4 cup crumbled feta cheese
- 1 tablespoon olive oil
- 1/2 teaspoon salt
- 1/4 teaspoon black pepper
- 1 teaspoon lemon juice (optional)
Ingredient Spotlight
Avocado: Look for an avocado that yields slightly to firm pressure near the stem — not mushy, but with a gentle give. A Hass avocado is ideal for its creamy, buttery texture. If it’s still hard, place it in a paper bag with a banana or apple overnight to speed up ripening.
Feta Cheese: Buy feta in brine blocks rather than pre-crumbled if you can. The brine keeps it moist and tangy, and crumbling it yourself gives you larger, more satisfying pieces. Sheep’s milk feta is my preference for its creamy, slightly grassy flavor, but cow’s milk feta works well too.
Cherry Tomatoes: Look for firm, bright-colored tomatoes that feel heavy for their size. In summer, I use Sun Gold or Sweet 100s from the farmers market — they’re candy-sweet and burst beautifully on the toast. In winter, standard cherry tomatoes from the grocery store are perfectly fine; just let them come to room temperature for the best flavor.
| Original Ingredient | Best Substitution | Flavor / Texture Impact |
|---|---|---|
| Sourdough bread | Whole grain or rye | Denser, nuttier base; holds up well |
| Feta cheese | Goat cheese or queso fresco | Goat cheese is tangier; queso fresco is milder |
| Cherry tomatoes | Grape tomatoes or roasted red peppers | Grape tomatoes are firmer; roasted peppers add sweetness |
| Olive oil | Avocado oil or walnut oil | Avocado oil is neutral; walnut oil adds nutty richness |
How to Make Avocado Toast with Feta – Step-by-Step
This avocado toast with feta comes together in just a few minutes, but each step is designed to maximize flavor and texture. Follow along and you’ll have a restaurant-worthy breakfast on your plate before you know it.
Step 1: Toast the Bread
Place your bread slices in a toaster or under the broiler and toast until deep golden brown and crisp. Don’t rush this — pale toast will turn soggy the moment you add the avocado. I like my sourdough toasted for about 3-4 minutes on a medium setting, until the edges are just starting to darken.
💡 mia’s Pro Tip: For an extra-crispy base, brush the bread lightly with olive oil before toasting. This creates a waterproof barrier that keeps the toast crunchy even after adding the avocado.
Step 2: Prepare the Avocado
Cut the avocado in half lengthwise, twist to separate, and remove the pit. Scoop the flesh into a medium bowl. Add the salt, pepper, and lemon juice if using. Mash with a fork until mostly smooth but with some small chunks remaining — this texture is key. Taste and adjust seasoning. The avocado should be well-seasoned on its own before it ever touches the bread.
⚠️ Common Mistake to Avoid: Don’t over-mash! A puréed avocado spreads like paste and makes the toast feel heavy and monotonous. Leave some pea-sized pieces for contrast.
Step 3: Assemble the Toast
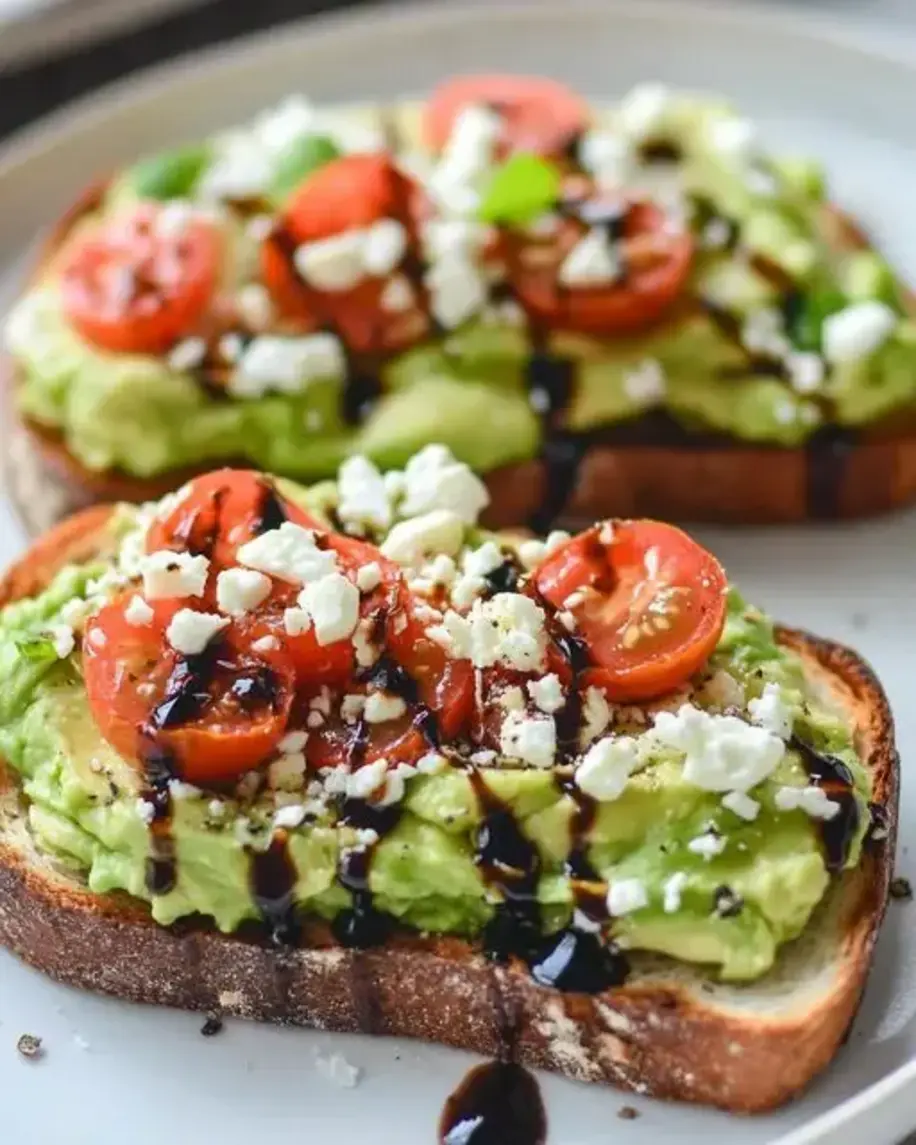
Divide the mashed avocado evenly between the two toast slices, spreading it all the way to the edges. Top with the halved cherry tomatoes, distributing them evenly so every bite gets a burst of sweetness. Sprinkle the crumbled feta over the top, letting some fall naturally onto the plate for a rustic look.
💡 mia’s Pro Tip: Warm your feta slightly by letting it sit at room temperature for 10 minutes before using. It crumbles more easily and its flavor becomes creamier and more pronounced.
Step 4: Garnish and Serve
Drizzle the olive oil over the top with a steady hand — you want a gentle ribbon, not a puddle. Finish with a final crack of black pepper and, if you like, a sprinkle of red pepper flakes or a tiny dash of balsamic glaze. Serve immediately while the toast is still warm and the tomatoes are bright and fresh.
⚠️ Common Mistake to Avoid: Don’t add the olive oil too early — it’ll soak into the bread and make it soggy. Drizzle it on just before serving for the best texture and flavor.
| Step | Action | Duration | Key Visual Cue |
|---|---|---|---|
| 1 | Toast the bread | 3–4 minutes | Deep golden brown edges |
| 2 | Mash the avocado | 2 minutes | Mostly smooth with small chunks |
| 3 | Assemble with tomatoes and feta | 2 minutes | Even distribution of toppings |
| 4 | Drizzle and serve | 1 minute | Oil glistens, feta visible |
Serving & Presentation
I love serving this avocado toast with feta on a wide, flat plate — the kind that lets the colors pop. The green of the avocado, the red of the cherry tomatoes, the white of the feta, and the golden-brown of the toast create a gorgeous palette that looks as good as it tastes. For a finishing touch, I sometimes add a few microgreens or a sprinkle of fresh mint, which reminds me of the herb-filled salads my mother made in Morocco.
This cherry tomato avocado toast pairs beautifully with a simple side salad of arugula tossed in lemon vinaigrette, or a handful of mixed berries for a sweet contrast. For a heartier meal, serve it alongside a soft-boiled egg or a bowl of Greek yogurt with honey. In my NYC kitchen, I often enjoy it with a strong pour-over coffee and the morning light streaming through the window — it’s my version of a perfect start to the day.
| Pairing Type | Suggestions | Why It Works |
|---|---|---|
| Side Dish | Arugula salad, mixed berries, roasted potatoes | Fresh, bright flavors balance the richness |
| Sauce / Dip | Balsamic glaze, harissa yogurt, lemon tahini | Adds tangy, spicy, or nutty contrast |
| Beverage | Cold brew, matcha latte, fresh orange juice | Caffeine or citrus cuts the creaminess |
| Garnish | Microgreens, fresh mint, red pepper flakes | Adds color, freshness, and a touch of heat |
Make-Ahead, Storage & Reheating
Let me be honest: avocado toast is best enjoyed fresh, the moment it’s made. But I know life gets busy — I’m a New Yorker, after all. If you want to prep ahead for busy mornings, here’s how I handle it. I prepare the components separately and assemble just before eating. The key is to keep the avocado from browning and the bread from getting soggy.
| Method | Container | Duration | Reheating Tip |
|---|---|---|---|
| Refrigerator | Airtight container with plastic wrap pressed onto avocado | 1 day | Toast bread fresh; add avocado and toppings cold |
| Freezer | Not recommended for assembled toast | N/A | Avocado texture degrades significantly when frozen |
| Make-Ahead | Store components separately | 1 day in advance | Mash avocado with lemon juice; slice tomatoes; crumble feta |
If you’re meal-prepping for the week, here’s my best advice: mash your avocado with extra lemon juice (the acid helps prevent browning), press plastic wrap directly onto the surface, and store in the fridge. Halve your cherry tomatoes and crumble your feta into separate containers. Each morning, toast your bread, give the avocado a quick stir, and assemble. It takes two minutes and tastes almost as good as fresh-made. I do this every Sunday for my busiest workdays.
Variations & Easy Swaps
| Variation | Key Change | Best For | Difficulty Impact |
|---|---|---|---|
| Moroccan Spiced | Add cumin, paprika, and fresh cilantro | A warm, aromatic twist | Easy |
| Gluten-Free / Dairy-Free | Use gluten-free bread and omit feta or use vegan feta | Dietary restrictions | Easy |
| Summer Berry | Swap tomatoes for sliced strawberries and add balsamic | A sweet-savory summer breakfast | Easy |
Moroccan Spiced Variation
This variation is closest to my heart. Add 1/4 teaspoon ground cumin and 1/4 teaspoon smoked paprika to the mashed avocado, and top with a sprinkle of fresh cilantro instead of (or alongside) the feta. The cumin adds an earthy warmth that pairs beautifully with the creamy avocado, while the paprika brings a subtle smokiness. It’s the avocado toast recipe I make when I’m homesick for my mother’s kitchen, and it never fails to transport me back to Marrakech.
Gluten-Free / Dairy-Free Variation
For a gluten-free version, use a sturdy gluten-free bread — I like the ones made with whole grains and seeds for extra texture. For dairy-free, simply omit the feta or substitute with a vegan feta made from almonds or tofu. I’ve tested several brands and find that the tangy, crumbly style works best. The flavor profile shifts slightly but remains delicious. This cherry tomato avocado toast adapts beautifully to dietary needs without losing its soul.
Summer Berry Variation
In peak summer, when berries are at their best at the NYC farmers markets, I swap the cherry tomatoes for sliced strawberries and add a drizzle of balsamic glaze. The combination of sweet berries, creamy avocado, salty feta, and tangy balsamic is absolutely stunning. It’s a brunch showstopper that feels both indulgent and fresh. This variation reminds me of the French dessert plates I used to prepare in Paris — sweet, savory, and perfectly balanced.
What is the best way to ripen an avocado quickly for avocado toast?
If you need a ripe avocado fast, the most reliable method is to place it in a brown paper bag with a banana or apple. Both fruits release ethylene gas, which naturally speeds up ripening. Seal the bag loosely and check every 8–12 hours — it usually takes 24 hours to go from hard to perfectly ripe. For an even quicker fix, you can microwave the avocado for 30 seconds, but this softens the texture unevenly and I don’t recommend it for this avocado toast recipe. The paper bag method yields the best flavor and texture for your feta avocado toast.
Can I use a different type of cheese instead of feta on avocado toast?
Absolutely. Goat cheese is my top substitute — it has a similar tangy, creamy profile that pairs beautifully with avocado. Queso fresco is another excellent option; it’s milder and less salty than feta, with a soft crumble that works well. For a richer flavor, try crumbled blue cheese or shred some sharp cheddar. Each cheese changes the character of your avocado toast with feta, so choose based on your mood. If you’re making a dairy-free version, a good-quality vegan feta made from almonds or cashews does the job nicely.
How do I keep my avocado toast from getting soggy?
The number one trick is to toast your bread until it’s deeply golden — not just lightly browned. This creates a crispy crust that acts as a barrier against moisture. I also recommend brushing the toast with a thin layer of olive oil before adding the avocado; this adds a waterproof seal. Another smart tip is to season your avocado separately before spreading it on the bread, rather than seasoning the assembled toast. This prevents excess liquid from soaking into the toast. Finally, serve immediately — avocado toast waits for no one. This easy avocado toast idea stays perfectly crisp when you follow these steps.
What other toppings go well with avocado toast besides cherry tomatoes and feta?
The possibilities are endless! I love adding a poached or fried egg for extra protein and richness. Smoked salmon with a drizzle of lemon is a luxurious option that works beautifully. For a crunch factor, try toasted pumpkin seeds, pine nuts, or crushed pistachios. Fresh herbs like cilantro, mint, or basil add brightness. If you want heat, a drizzle of sriracha or a sprinkle of red pepper flakes does the trick. For a sweet-savory combination, add sliced figs or pomegranate seeds. This avocado toast with feta is a canvas — feel free to make it your own.
Is avocado toast with feta healthy?
Yes, this avocado toast with feta is a nutritious and balanced meal. Avocados are packed with heart-healthy monounsaturated fats, fiber, potassium, and vitamins C, E, and K. Feta cheese provides calcium and protein, while cherry tomatoes add lycopene, vitamin C, and antioxidants. Whole grain bread contributes complex carbohydrates and additional fiber. At around 320 calories per serving with 8g of protein and 4g of sugar, it’s a satisfying option that keeps you full and energized. This cherry tomato avocado toast is a smart choice for breakfast or a light lunch.
Can I make avocado toast ahead of time for meal prep?
You can prep the components ahead, but I recommend assembling just before eating for the best texture. Mash the avocado with extra lemon juice, press plastic wrap directly onto the surface, and refrigerate for up to one day. Halve the cherry tomatoes and crumble the feta into separate containers. Each morning, toast your bread fresh and assemble. The lemon juice helps prevent the avocado from browning, though a slight color change is normal. This make-ahead approach saves time while still delivering a fresh-tasting avocado toast recipe every day of the week.
What type of bread is best for avocado toast with feta?
Sourdough is my top choice — its tangy flavor complements the creamy avocado and salty feta perfectly, and its sturdy crumb holds up well to the toppings. Whole grain bread is another excellent option, offering a nutty flavor and extra fiber. Rye bread works wonderfully too, especially with the Moroccan spiced variation. Avoid soft, fluffy breads like white sandwich bread — they’ll get soggy quickly and lack the structural integrity needed for this feta avocado toast. Whatever bread you choose, toast it until deep golden brown for the best results.
How many calories are in avocado toast with feta and cherry tomatoes?
This avocado toast with feta and cherry tomatoes contains approximately 320 calories per serving (one slice of toast with toppings). The breakdown includes 28g of carbohydrates, 20g of healthy fats, 8g of protein, and just 4g of sugar. The exact calorie count may vary slightly depending on the type of bread you use and how much olive oil you drizzle. It’s a well-balanced meal that provides sustained energy without weighing you down. This cherry tomato avocado toast is a satisfying option that fits into most dietary plans.
Can I use frozen avocado for avocado toast?
I don’t recommend using frozen avocado for this avocado toast recipe. Freezing significantly alters the texture of avocado — it becomes watery and mushy when thawed, which leads to soggy toast and a less pleasant mouthfeel. Fresh avocado is essential for the creamy, smooth texture that makes this feta avocado toast so satisfying. If you have a frozen avocado, it’s better to use it in smoothies or blended sauces where the texture change won’t be as noticeable. For the best results, always start with a fresh, ripe avocado.
What can I use instead of cherry tomatoes on avocado toast?
If you don’t have cherry tomatoes, there are plenty of delicious alternatives. Sliced grape tomatoes or Roma tomatoes work well — just remove the seeds to prevent excess moisture. Roasted red peppers add a sweet, smoky flavor that pairs beautifully with the feta. For a different direction, try sliced strawberries or figs for a sweet-savory combination. Sun-dried tomatoes (rehydrated if needed) offer an intense, concentrated tomato flavor. Each substitute brings its own character to this avocado toast with feta, so feel free to experiment based on what’s in season or in your pantry.
Share Your Version!
Now it’s your turn to bring this avocado toast with feta to life! I’d love to see how you make it your own — whether you add a poached egg, a sprinkle of za’atar, or a drizzle of hot honey. Leave a star rating and a comment below to let me know how it turned out, and share a photo on Instagram or Pinterest tagging @exorecipes. What’s your favorite twist on this cherry tomato avocado toast? I read every comment and can’t wait to hear from you.
From my NYC kitchen to yours — I hope this recipe brings as much warmth to your table as it does to mine. — mia 🧡
Love This Recipe? Save It to Pinterest!
If you enjoyed this Avocado Toast with Feta and Cherry Tomatoes recipe, don’t let it get lost in your browser tabs! 😄 Pin it now so you can find it again anytime — and explore hundreds more tried-and-tested recipes waiting for you on my Pinterest boards.
👉 Follow mia on Pinterest @exorecipe
📌 Pin this recipe · 🔁 Re-pin your favorites · 💬 Tag me when you make it — I love seeing your creations!
“`
Print

Avocado Toast with Feta and Cherry Tomatoes
- Prep Time: 5 minutes
- Cook Time: 5 minutes
- Total Time: 10 minutes
- Yield: 2 1x
- Method: Breakfast
- Cuisine: American
Description
A quick and delicious avocado toast topped with creamy feta cheese and juicy cherry tomatoes, perfect for breakfast or a light lunch.
Ingredients
- 2 slices of bread (sourdough or whole grain)
- 1 ripe avocado
- 1/2 cup cherry tomatoes, halved
- 1/4 cup crumbled feta cheese
- 1 tablespoon olive oil
- 1/2 teaspoon salt
- 1/4 teaspoon black pepper
- 1 teaspoon lemon juice (optional)
Instructions
- Toast the bread slices until golden and crispy.
- Cut the avocado in half, remove the pit, and scoop the flesh into a bowl. Mash with a fork to desired consistency. Season with salt, pepper, and lemon juice if using.
- Spread the mashed avocado evenly onto each toast slice.
- Top with halved cherry tomatoes and crumbled feta cheese.
- Drizzle with olive oil and serve immediately.
Notes
For extra flavor, add a sprinkle of red pepper flakes or a dash of balsamic glaze.
Nutrition
- Calories: 320
- Sugar: 4g
- Fat: 20g
- Carbohydrates: 28g
- Protein: 8g

k">
Tried This Recipe? Leave a Comment!
Did you make this recipe? I’d love to hear how it turned out! Please leave a comment and a rating below. Your feedback helps other home cooks and supports cheerychop.com!
For more delicious inspiration, follow me on Pinterest!