Table of Contents
Baked Chicken Breasts with Creamy Cheddar and Broccoli Topping – The Perfect Weeknight Comfort
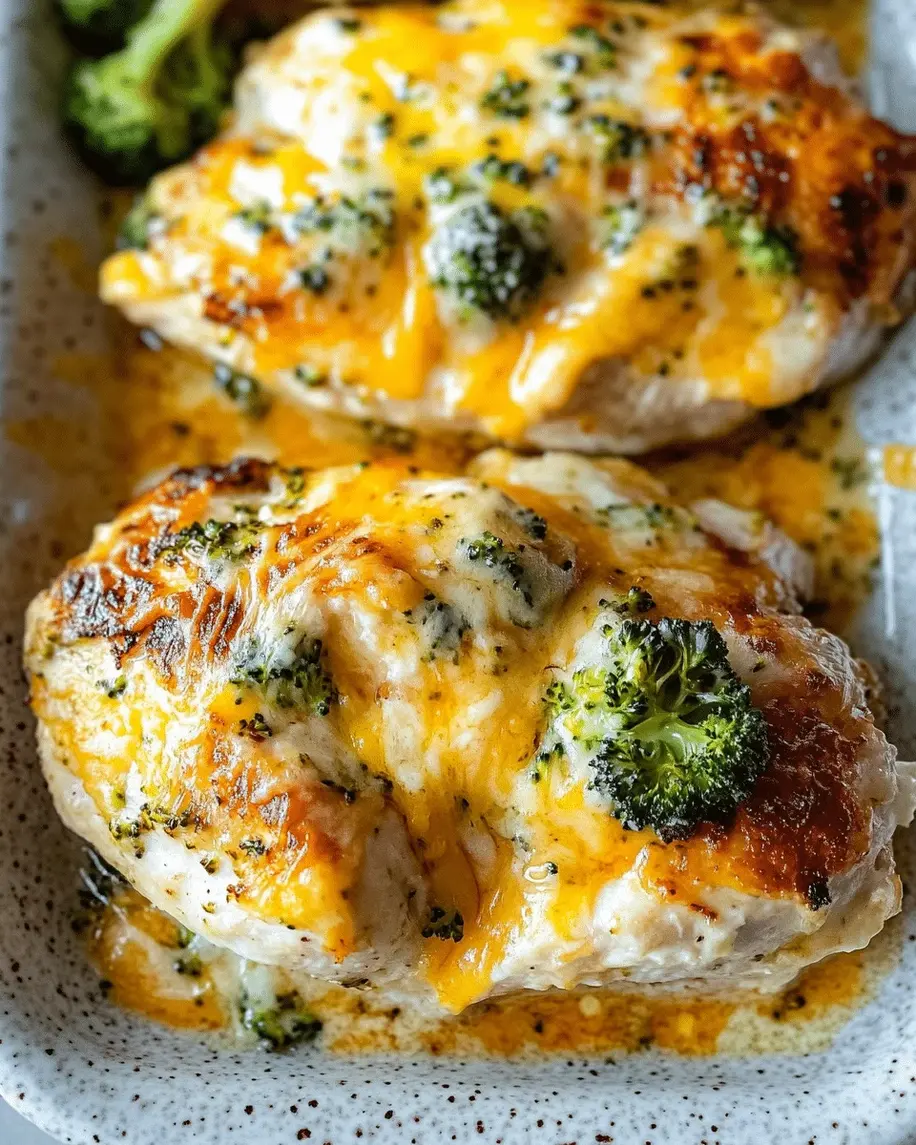
I still remember the first time I made this baked chicken breasts with cheddar and broccoli dish. It was a rainy Tuesday in my tiny Brooklyn apartment, and I was craving something that felt like a hug on a plate. Growing up in Morocco, my mother would stuff chicken with preserved lemons and olives, but here in New York, I wanted to create something equally comforting but faster for a busy weeknight. This creamy cheddar chicken bake was born from that craving — juicy chicken breasts topped with a luscious, cheesy broccoli mixture that turns golden and bubbly in the oven. It’s the kind of easy baked chicken dinner that makes you feel like you’ve spent hours in the kitchen, even though it’s ready in under 40 minutes.
Imagine this: tender, perfectly cooked chicken hidden under a blanket of sharp cheddar, sour cream, and tiny broccoli florets that soften as they bake. The topping gets slightly crispy at the edges while staying creamy underneath, and every bite gives you that satisfying cheese pull. I love using sharp cheddar because it holds its own against the broccoli, and a touch of paprika adds a warm, earthy note that reminds me of the spice markets in Marrakech. The smell that fills your kitchen — garlic, melted cheese, roasted broccoli — is absolutely intoxicating. It’s a dish that brings people together, whether it’s a family dinner or a solo meal with leftovers for lunch the next day.
What makes my version of this chicken broccoli casserole recipe stand out is the balance of creamy and sharp, plus a few chef tricks I picked up in Paris. I always pound my chicken breasts to an even thickness so they cook uniformly — no dry ends here. And I don’t just dump the topping on; I gently mix the broccoli with the cheese mixture first so every floret gets coated. A quick tip: let the chicken rest after baking for at least 5 minutes — this keeps the juices locked in. And one common mistake? Overbaking. Even with the topping, chicken can go from juicy to dry fast. Trust the internal temperature of 165°F and you’ll be golden. Let’s dive into the recipe!
Why This Baked Chicken Breasts with Creamy Cheddar and Broccoli Topping Recipe Is the Best
The flavor secret here lies in the combination of sharp cheddar and a touch of Parmesan, which gives the topping a nutty depth that plain cheddar alone can’t deliver. Growing up, my mother taught me that cheese should never be an afterthought — it should be the star. In Paris, I learned how to build a sauce that clings to every ingredient. Here, the sour cream and mayonnaise create a tangy, velvety base that melts into the chicken as it bakes, keeping every bite moist and flavorful.
Texture perfection is achieved through a simple technique: I don’t pre-cook the broccoli. By adding it raw to the topping, the florets steam inside the creamy mixture and emerge tender but not mushy. The edges of the topping get a slight caramelization while the center stays luscious. It’s a contrast that makes every forkful interesting. Plus, the paprika adds a subtle smokiness that ties everything together — a trick I picked up from a spice vendor at the Union Square Greenmarket.
This recipe is foolproof and fast. Even if you’re new to cooking chicken breasts, the creamy cheddar topping acts as a protective layer, preventing the meat from drying out. You don’t need any advanced skills — just a baking dish and an oven. And because it all comes together in one dish, cleanup is a breeze. That’s why this has become my go-to easy baked chicken dinner for busy weeknights or when I need to impress without stress.
Baked Chicken Breasts with Cheddar and Broccoli Ingredients
I source my ingredients from the farmers market in Union Square whenever I can. The broccoli there is always vibrant green, and the sharp cheddar from a local dairy has the perfect tang. But you can find everything at any well-stocked grocery store. Here’s what you’ll need.
Ingredients List
- 4 boneless, skinless chicken breasts (6–8 oz each)
- 1 tablespoon olive oil
- Salt and pepper to taste
- 1 cup broccoli florets, finely chopped
- 1 cup shredded sharp cheddar cheese
- ½ cup sour cream
- ¼ cup mayonnaise
- ¼ cup grated Parmesan cheese
- ½ teaspoon garlic powder
- ¼ teaspoon paprika
Ingredient Spotlight
Sharp cheddar cheese: This is the backbone of the flavor. Sharp cheddar has a higher fat content and a pronounced tang that stands up to the broccoli. For a milder version, use medium cheddar, but you’ll lose some punch. If you want to go all out, extra-sharp adds a bold kick. Always shred your own cheese from a block — pre-shredded cheese contains anti-caking agents that prevent smooth melting.
Broccoli florets: Fresh broccoli is best. Look for tight, dark green florets without yellowing. Finely chopping them ensures they cook quickly and blend into the creamy topping. If you’re in a pinch, frozen broccoli works too — just thaw and pat it very dry before using, or the topping will become watery. (I’ll cover that more in the FAQ.)
Sour cream and mayonnaise: This duo creates the creamy base. Sour cream adds tang and lightness; mayonnaise adds richness and helps the topping brown beautifully. You can use full-fat Greek yogurt in place of sour cream for a lighter option, though the flavor will be a bit tangier. For the mayo, I recommend a good-quality one like Hellmann’s or Duke’s.
| Original Ingredient | Best Substitution | Flavor / Texture Impact |
|---|---|---|
| Sharp cheddar cheese | Colby Jack or Gouda | Milder, less tangy; still melts well |
| Sour cream | Plain Greek yogurt (full-fat) | Tangier, slightly thinner consistency |
| Mayonnaise | Extra sour cream or cream cheese | Less rich; cream cheese makes it denser |
| Broccoli florets | Cauliflower or peas | Cauliflower: similar texture but milder; peas: sweeter, smaller |
How to Make Baked Chicken Breasts with Creamy Cheddar and Broccoli Topping — Step-by-Step
Don’t worry — this recipe is simple, and I’ll walk you through each step with visual cues so you get perfect results every time.
Step 1: Prepare the Chicken
Preheat your oven to 375°F (190°C). Lightly grease a 9×13-inch baking dish with cooking spray or a drizzle of oil. Place the chicken breasts in the dish and drizzle with olive oil. Season both sides generously with salt and pepper. If your chicken breasts are very thick (more than 1 inch), gently pound them to an even thickness using a rolling pin or meat mallet — this ensures they cook evenly and stay juicy.
⚠️ Common Mistake to Avoid: Don’t skip pounding. Uneven chicken leads to dry ends and undercooked centers. Aim for about ¾-inch thickness.
Step 2: Mix the Topping
In a small bowl, combine the chopped broccoli, shredded cheddar, sour cream, mayonnaise, Parmesan, garlic powder, and paprika. Stir until everything is well incorporated. The mixture should look like a thick, chunky spread. Taste a tiny bit — the sharpness of the cheddar and the tang of sour cream should balance nicely. If it seems too dry, add another tablespoon of sour cream.
💡 mia’s Pro Tip: Use finely chopped broccoli so it integrates smoothly. I chop the florets into tiny rice-sized pieces — this way, even picky eaters won’t notice big chunks of broccoli!
Step 3: Assemble
Evenly divide the broccoli-cheese mixture over each chicken breast, spreading it to cover the top completely. Don’t worry if some falls off the sides; it will create delicious crispy bits in the dish. Make sure the topping forms a thick layer — about ⅓ inch thick.
Step 4: Bake
Place the dish in the preheated oven and bake uncovered for 25–30 minutes. The topping should be bubbly and lightly browned at the edges. The most reliable doneness test is an instant-read thermometer inserted into the thickest part of the chicken — it should register 165°F (74°C). If you don’t have a thermometer, check that the juices run clear and the chicken feels firm to the touch.
⚠️ Common Mistake to Avoid: Overbaking is the #1 mistake. Even with the creamy topping, chicken can dry out if left too long. Start checking at 25 minutes, and pull it out as soon as it hits 165°F.
Step 5: Rest and Serve
Remove the baking dish from the oven and let the chicken rest for 5 minutes. This allows the juices to redistribute throughout the meat. The topping will also set slightly, making it easier to serve. Use a spatula to transfer each chicken breast to a plate, spooning any extra cheesy sauce from the dish on top.
💡 mia’s Pro Tip: While the chicken rests, I like to sprinkle a pinch of flaky sea salt and a few red pepper flakes over the top for an extra burst of flavor. Serve with steamed rice or a green salad to balance the richness.
| Step | Action | Duration | Key Visual Cue |
|---|---|---|---|
| 1 | Prepare chicken + season | 10 min | Chicken evenly thick, seasoned |
| 2 | Mix topping | 5 min | Thick, chunky, well combined |
| 3 | Assemble and spread topping | 3 min | Topping covers each breast |
| 4 | Bake uncovered | 25–30 min | Bubbly, browned edges; chicken 165°F |
| 5 | Rest and serve | 5 min | Topping set, juices clear |
Serving & Presentation
I love serving this creamy cheddar chicken bake with a simple side of steamed white rice or fluffy couscous — both soak up the extra creamy sauce wonderfully. The dish is already a complete meal with protein and vegetables, but a crisp green salad with lemon vinaigrette adds freshness and cuts through the richness. For a touch of Moroccan flair, I sometimes serve it with a side of roasted carrots dusted with cumin and honey.
When plating, use a wide spatula to lift each chicken breast carefully, keeping the topping intact. Spoon any leftover sauce from the baking dish over the top. Garnish with a sprinkle of fresh parsley or chives for color, and maybe a few red pepper flakes if you like heat. It’s a dish that looks impressive on the plate without any fuss — perfect for a weeknight dinner or a casual gathering.
| Pairing Type | Suggestions | Why It Works |
|---|---|---|
| Side Dish | Steamed rice, couscous, mashed potatoes | Absorbs the creamy sauce, balances richness |
| Sauce / Dip | Extra pan sauce, lemon wedges | Adds brightness and cuts through fat |
| Beverage | Chardonnay, light lager, iced tea | Wine complements cheese; beer cleanses palate |
| Garnish | Fresh parsley, chives, red pepper flakes | Adds color, freshness, optional heat |
Make-Ahead, Storage & Reheating
As a busy NYC food blogger, I rely on make-ahead meals. This recipe is perfect for meal prep — you can assemble the dish up to the baking step and refrigerate it for up to 24 hours. Just add 5 extra minutes of baking time if starting cold. Leftovers store beautifully and reheat well, making it a great option for lunch the next day.
| Method | Container | Duration | Reheating Tip |
|---|---|---|---|
| Refrigerator | Airtight container | Up to 4 days | Reheat in oven at 350°F for 10–12 min, or microwave in 30-sec bursts |
| Freezer | Freezer-safe container, wrap tightly | Up to 2 months | Thaw overnight in fridge, then reheat as above |
| Make-Ahead | Assemble in baking dish, cover, refrigerate | Up to 24 hours before baking | Add 5 min to baking time if cold; check temp |
For reheating, I prefer the oven because it restores the crispiness of the topping. If you’re in a hurry, the microwave works but the topping will be softer. To keep the chicken moist, add a splash of water or chicken broth to the dish before reheating and cover with foil for the first 5 minutes.
Variations & Easy Swaps
This recipe is incredibly versatile. Here are three variations I’ve tested in my own kitchen, each bringing a different flavor profile.
| Variation | Key Change | Best For | Difficulty Impact |
|---|---|---|---|
| Mediterranean Twist | Add 2 tbsp sun-dried tomatoes & 1 tsp oregano | Bold, tangy flavor | No change |
| Spicy Jalapeño | Add 1 finely diced jalapeño to topping | Heat lovers | Easy (handle seeds optional) |
| Dairy-Free | Use vegan cheddar, vegan sour cream, vegan mayo | Dairy-free diets | Moderate (texture may differ) |
Mediterranean Twist
Inspired by the sun-drenched flavors of North Africa and the Mediterranean, I often add a handful of chopped sun-dried tomatoes (rehydrated in warm water if they’re dry) and a teaspoon of dried oregano to the topping. The tomatoes add a sweet-tangy pop that complements the sharp cheddar beautifully. This version reminds me of a tagine my mother would make, but with a creamy, cheesy finish. Serve with couscous and a side of tzatziki for an extra cool contrast.
Spicy Jalapeño
My husband loves heat, so I created this variation just for him. Finely dice one fresh jalapeño (remove seeds for milder heat) and mix it into the topping. The jalapeño adds a fresh, vegetal spiciness that cuts through the richness. If you want even more kick, add a pinch of cayenne pepper along with the paprika. I like to serve this version with a dollop of cool sour cream on the side. It’s become a favorite for game-day dinners.
Dairy-Free Version
For those avoiding dairy, this works surprisingly well with plant-based alternatives. Use a good-quality vegan cheddar shreds (I like Daiya or Follow Your Heart), vegan sour cream, and vegan mayonnaise. The texture will be slightly less creamy, and the vegan cheese may not brown as deeply, but the flavor is still delicious. Add an extra tablespoon of nutritional yeast to the topping to boost the cheesy flavor. I’ve tested this for a friend’s dairy-free dinner party, and everyone — even the non-vegans — enjoyed it.
FAQ – Baked Chicken Breasts with Creamy Cheddar and Broccoli Topping
Can I use frozen broccoli instead of fresh for the creamy cheddar topping?
Yes, you can use frozen broccoli, but it requires a little extra care. Thaw the broccoli completely and pat it very dry with paper towels to remove as much moisture as possible. Frozen broccoli holds more water than fresh, and if you add it directly to the topping, it can make the mixture watery and prevent the topping from setting properly. I recommend using fresh broccoli for the best texture and flavor, but if you only have frozen, just make sure it’s well-drained and chopped into small pieces. You may also need to bake the dish an extra 3–5 minutes to evaporate any excess moisture.
How long should I bake chicken breasts with a cheese and broccoli topping?
At 375°F (190°C), bake the chicken uncovered for 25–30 minutes. The exact time depends on the thickness of your chicken breasts. Thinner breasts (about ¾ inch) may be done in 22 minutes, while thicker ones (1 inch) may need the full 30 minutes. The most reliable method is to use an instant-read thermometer inserted into the thickest part of the chicken — it should reach 165°F (74°C). The topping should be bubbly and lightly browned around the edges. Avoid overbaking, which can dry out the chicken. Let the chicken rest for 5 minutes before serving to lock in juices.
What can I substitute for cheddar cheese in this baked chicken recipe?
You can substitute the sharp cheddar with several other cheeses. Colby Jack melts beautifully and has a milder, slightly sweet flavor. Gouda adds a smoky richness (smoked Gouda is fantastic). Monterey Jack is creamy and mild, and it browns well. If you want to keep the sharp tang, try a mix of Gruyère and Parmesan. For a dairy-free option, use vegan cheddar shreds. Keep in mind that the substitute will change the flavor profile; milder cheeses may need a pinch of extra salt or a dash of mustard powder to mimic the tang of cheddar.
How do I keep the chicken breasts from drying out when baking with the topping?
The creamy cheddar and broccoli topping actually helps protect the chicken from drying out by acting as a barrier. To ensure even juiciness, pound the chicken breasts to an even thickness (about ¾ inch) before baking. This promotes uniform cooking. Also, do not overbake — check for doneness at 25 minutes and use a thermometer. The resting period after baking (5 minutes) is crucial because it allows the juices to redistribute throughout the meat. If you’re using particularly thick breasts, you can cover the dish with foil for the first 15 minutes of baking, then uncover for the remaining time to let the topping brown.
Can I make this recipe ahead of time and bake later?
Absolutely! This is one of my favorite make-ahead dinners. Assemble the entire dish — place the seasoned chicken in the baking dish, spread the topping over it, cover tightly with plastic wrap or foil, and refrigerate for up to 24 hours. When you’re ready to bake, remove the dish from the fridge while the oven preheats (about 15 minutes). Bake as directed, but add 5–8 minutes to the baking time because the dish starts cold. Check that the internal temperature reaches 165°F. The topping may take a little longer to brown, but it will still be delicious.
Is this chicken broccoli casserole recipe gluten-free?
Yes, this recipe is naturally gluten-free! None of the ingredients contain gluten — the chicken, fresh broccoli, cheeses, sour cream, mayonnaise, garlic powder, and paprika are all gluten-free. Just be sure to check the labels on your specific brands, especially for mayonnaise and spices, as some may contain additives or be processed in facilities that handle gluten. Serve it with a gluten-free side like rice, quinoa, or roasted potatoes to keep the entire meal gluten-free. Enjoy without worry!
Can I use boneless chicken thighs instead of chicken breasts?
Yes, boneless skinless chicken thighs work beautifully in this recipe. They are even more forgiving than breasts because they have a higher fat content, which keeps them juicy. The baking time may need to be adjusted slightly — thighs typically take 25–30 minutes at 375°F, but they can go a little longer without drying out. Check for doneness at 165°F (though thighs are safe at 175°F for best texture). I love using thighs when I want an extra-rich flavor. Just make sure they are of even thickness, or pound them lightly if needed.
What side dishes go well with this cheesy chicken broccoli bake?
This dish is quite rich and creamy, so I recommend sides that are light, starchy, or acidic to balance it. Steamed white rice or fluffy couscous are classic choices — they soak up the sauce perfectly. A simple green salad with lemon vinaigrette adds brightness and cuts through the richness. Roasted vegetables like asparagus, bell peppers, or zucchini also work well. For a more filling meal, serve with crusty bread to mop up every last bit of the cheesy topping. If you’re serving it for a crowd, a side of garlic knots or roasted potatoes is always a hit.
Share Your Version!
I hope you love this baked chicken breasts with creamy cheddar and broccoli topping as much as I do! It’s the perfect easy baked chicken dinner for busy nights when you need something comforting and satisfying. If you make it, please leave a star rating and a comment below — I read every single one and I’d love to know how it turned out for you. Did you add a twist? Share your photo on Instagram or Pinterest and tag @exorecipes so I can see your creation. And if you have any questions, don’t hesitate to ask — I’m always here to help.
From my NYC kitchen to yours — I hope this recipe brings as much warmth to your table as it does to mine. — mia 🧡
Love This Recipe? Save It to Pinterest!
If you enjoyed this Baked Chicken Breasts with Creamy Cheddar and Broccoli Topping recipe, don’t let it get lost in your browser tabs! 😄 Pin it now so you can find it again anytime — and explore hundreds more tried-and-tested recipes waiting for you on my Pinterest boards.
👉 Follow mia on Pinterest @chefrecipes2
📌 Pin this recipe · 🔁 Re-pin your favorites · 💬 Tag me when you make it — I love seeing your creations!

Baked Chicken Breasts with Creamy Cheddar and Broccoli Topping
- Prep Time: 10 minutes
- Cook Time: 30 minutes
- Total Time: 40 minutes
- Yield: 4 1x
- Method: Main Course
- Cuisine: American
Description
Juicy baked chicken breasts topped with a creamy cheddar and broccoli mixture, perfect for a comforting weeknight dinner.
Ingredients
- 4 boneless, skinless chicken breasts
- 1 tablespoon olive oil
- Salt and pepper to taste
- 1 cup broccoli florets, chopped
- 1 cup shredded sharp cheddar cheese
- 1/2 cup sour cream
- 1/4 cup mayonnaise
- 1/4 cup grated Parmesan cheese
- 1/2 teaspoon garlic powder
- 1/4 teaspoon paprika
Instructions
- Preheat oven to 375°F (190°C).
- Place chicken breasts in a greased 9×13-inch baking dish. Drizzle with olive oil and season with salt and pepper.
- In a small bowl, combine chopped broccoli, cheddar cheese, sour cream, mayonnaise, Parmesan cheese, garlic powder, and paprika. Mix well.
- Spread the broccoli-cheese mixture evenly over each chicken breast.
- Bake uncovered for 25-30 minutes, or until chicken is cooked through (internal temperature reaches 165°F) and topping is bubbly and lightly browned.
- Let rest for 5 minutes before serving.
Notes
For extra flavor, add a pinch of red pepper flakes to the topping. Serve with rice or a side salad.
Nutrition
- Calories: 380
- Sugar: 2g
- Fat: 22g
- Carbohydrates: 5g
- Protein: 40g

k">
Tried This Recipe? Leave a Comment!
Did you make this recipe? I’d love to hear how it turned out! Please leave a comment and a rating below. Your feedback helps other home cooks and supports cheerychop.com!
For more delicious inspiration, follow me on Pinterest!