Table of Contents
Baked Brie with Roasted Plums and Thyme: A Savory Delight for Every Occasion – Balsamic Honey Roasted Plums
I still remember the first time I made baked brie with plums. It was a crisp autumn evening in my tiny Parisian apartment, and I was trying to impress a few friends from culinary school. I had picked up a wheel of brie from the fromagerie down the street and some late-season plums from the outdoor market. Back then, I just tossed everything together with a little honey and thyme—no fancy technique. But that simple, gooey, sweet-and-savory combination stole the show. Now, here in my New York City kitchen, I’ve perfected that same baked brie with plums recipe with a balsamic honey twist that brings out even deeper flavors. It’s the kind of appetizer that makes everyone lean in and ask for the recipe. And trust me, once you taste that caramelized, jammy plum topping against creamy melted brie, you’ll understand why this roasted plum brie recipe has become my signature party starter.
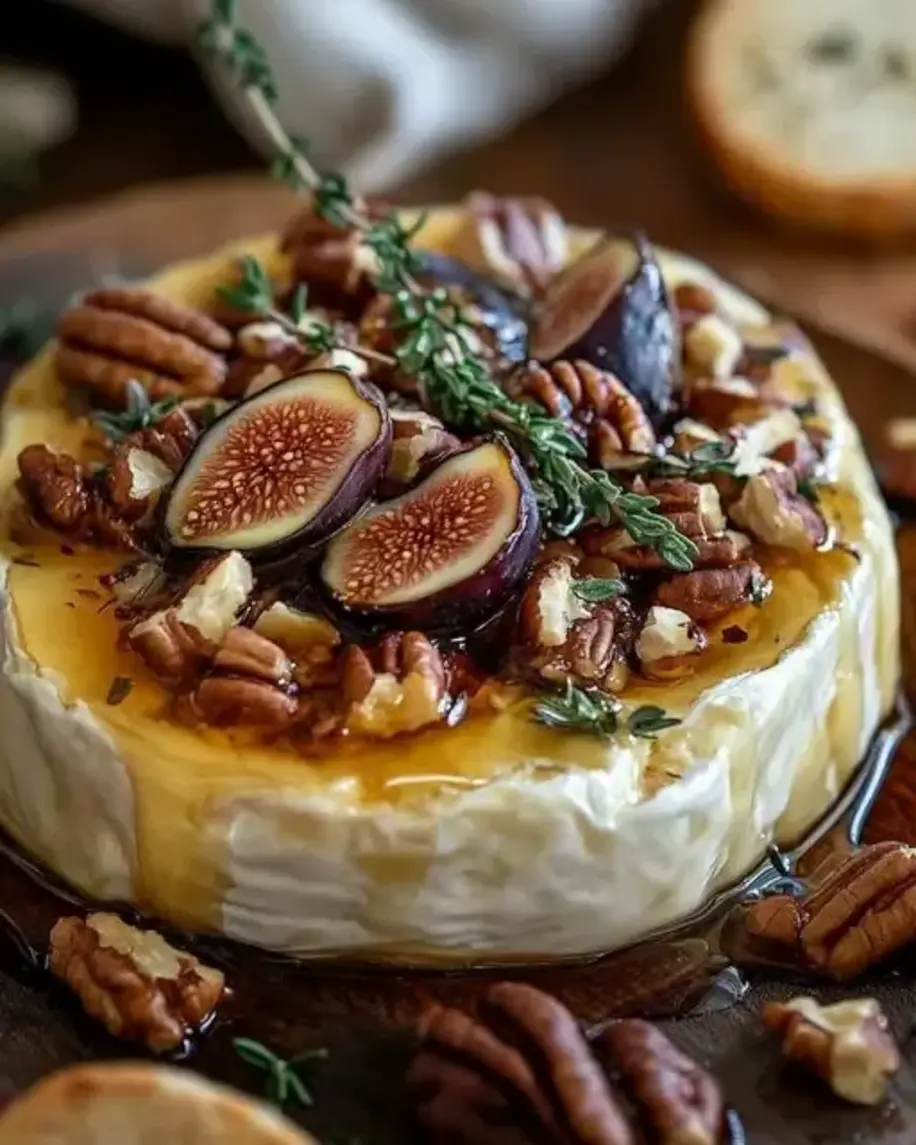
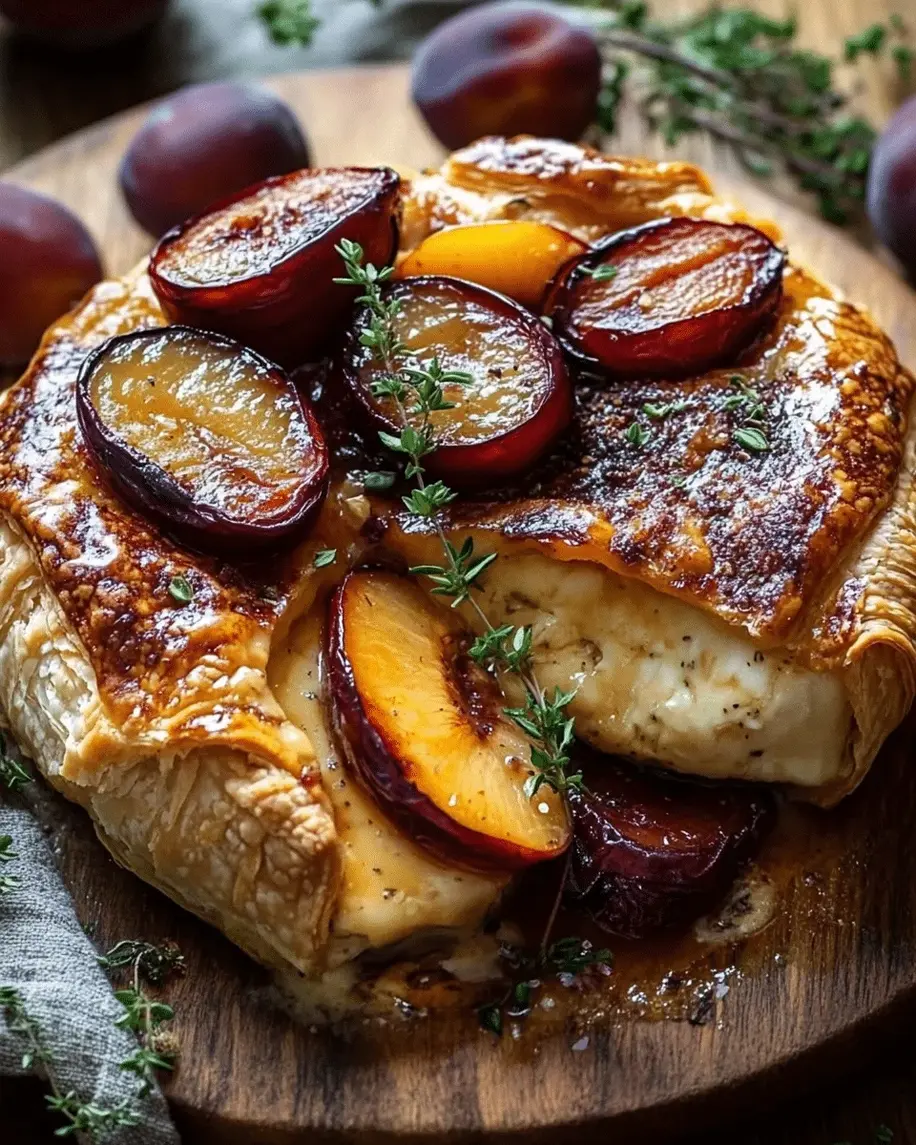
Let me paint the picture for you: the moment you pull this dish from the oven, the kitchen fills with the intoxicating scent of warm cheese and roasted fruit, mingled with earthy thyme. The plums have softened into jewel-toned, syrupy slices, their natural tartness balanced by honey and a tangy hit of balsamic vinegar. The brie becomes molten and luscious, its bloomy rind offering just a hint of textural contrast. When you scoop it onto a crunchy baguette slice, the cheese stretches in long, elegant ribbons. You get a burst of sweet-sour plum, a whisper of herbal thyme, and a rich, buttery finish. It’s the kind of appetizer that feels both rustic and elegant—perfect for a holiday gathering, a wine night with friends, or even a cozy solo dinner when you deserve something special.
I’ve tested this easy baked brie recipe more times than I can count, tweaking the honey-to-balsamic ratio, adjusting the bake time, and even trying it with different cheeses (camembert works beautifully!). What I’m sharing today is the version I’m most proud of: a foolproof method that delivers consistently spectacular results. My Moroccan mother taught me the importance of balancing sweet and savory, and my French chef training drilled in the precision of heat and timing. In this recipe, I’ve combined those influences into a dish that’s both approachable and impressive. And yes, I’ll include my best pro tip for avoiding a common mistake—like ending up with a sad, runny brie puddle instead of that perfect, spoonable texture. Let’s get started!
Why This Baked Brie with Roasted Plums Recipe Is the Best
The Flavor Secret: The real magic here is the balsamic honey glaze. Growing up in Morocco, my mother always added a splash of vinegar to fruit dishes to cut sweetness and add depth. In Paris, I learned how balsamic reduction can transform simple ingredients. For this baked brie appetizer, the balsamic vinegar works with the honey to create a sticky, tangy syrup that clings to the plums and seeps into the brie as it bakes. It’s not overpowering—just a subtle acidity that keeps every bite interesting. I also add a pinch of salt and pepper to the plums before roasting, a trick that enhances the fruit’s natural sweetness and makes the cheese pop even more.
Perfected Texture: The key to a great baked brie is getting that interior molten while keeping the structure intact. I bake the whole wheel on a small baking sheet or in a cast-iron skillet so the cheese holds its shape but becomes irresistibly creamy inside. The plums roast right on top, releasing their juices into the brie, creating a beautiful, self-saucing effect. The 15-20 minute window at 375°F is exactly right: the brie puffs slightly, the plums caramelize at the edges, and everything comes together in a cohesive, scoopable dish. Brie with thyme is a classic pairing, and the fresh sprigs infuse the cheese with gentle herbaceousness without overwhelming it.
Foolproof & Fast: This easy baked brie recipe comes together in under 30 minutes with just a handful of ingredients. You don’t need any special equipment—just a bowl for tossing the plums and a baking dish or skillet. It’s forgiving: you can adjust the sweetness by adding more or less honey, swap in different stone fruits when plums aren’t in season, or even use frozen fruit in a pinch. I’ve made this for last-minute guests and formal dinner parties alike, and it’s always a hit. Plus, there’s no fussy plating—the rustic look of the roasted plums on top of the brie is beautiful as is. Trust me, this is one recipe you’ll turn to again and again.
Baked Brie with Plums Ingredients
Every ingredient in this recipe has a purpose, and I’ve chosen each one with care. When I shop for these at my local farmers market in Union Square, I look for ripe but firm plums—not too soft, or they’ll turn to mush. The brie should be at room temperature before baking for even melting. And the honey? I always buy a local wildflower honey, which has a floral complexity that complements the fruit and cheese beautifully. Here’s what you’ll need:
Ingredients List
- 1 (8-ounce) wheel of brie cheese
- 4 ripe plums, pitted and sliced (about 1/4-inch thick)
- 2 tablespoons honey (plus extra for drizzling, optional)
- 1 tablespoon balsamic vinegar
- 2 sprigs fresh thyme, plus more for garnish
- 1 tablespoon olive oil
- Salt and pepper to taste
- Crackers or baguette slices for serving
Ingredient Spotlight
Brie: The star of the show. I recommend a double-cream brie (like a classic French brie or an American-made Triple Cream). It melts beautifully and has a rich, buttery flavor. Avoid overly ripe, soft-ripened brie that’s already leaking—it will collapse during baking. Look for one that gives slightly when pressed but holds its shape.
Plums: Black plums, red plums, or even prune plums all work. They should be fragrant and slightly soft at the stem end. If they’re too hard, they won’t caramelize well. In a pinch, you can use nectarines or apricots—each will bring its own sweetness level. Frozen plums (thawed and drained) are an acceptable substitute, but fresh is best for texture.
Honey and Balsamic Vinegar: This duo creates the glaze. Use a good-quality honey—nothing too processed (it should taste floral, not sugary). The balsamic adds complexity. A thick, aged balsamic will give a syrupy sweetness; a regular supermarket balsamic is fine if you simmer it briefly to reduce it. Both ingredients are pantry staples that elevate the entire dish.
| Original Ingredient | Best Substitution | Flavor / Texture Impact |
|---|---|---|
| Brie cheese | Camembert | Similar creamy texture, slightly earthier flavor; melt is identical. |
| Plums | Nectarines or apricots | Sweeter, less tart; apricots hold shape well. |
| Honey | Maple syrup or agave nectar | Maple adds smoky notes; agave is milder, less floral. |
| Balsamic vinegar | Sherry vinegar or red wine vinegar + ½ tsp sugar | Less sweet, more acidic; adjust honey if needed. |
| Fresh thyme | Rosemary or dried thyme (½ tsp) | More piney or earthy; rosemary is stronger, use less. |
How to Make Baked Brie with Roasted Plums — Step-by-Step
Follow these simple steps, and you’ll have a stunning appetizer that looks like it came from a fancy bistro but takes hardly any effort. I’ve included my best tips and common pitfalls so you nail it every time.
Step 1: Prepare the Plums
Preheat your oven to 375°F (190°C). Pit and slice the plums into even ¼-inch wedges. In a small mixing bowl, combine the plum slices with 2 tablespoons honey, 1 tablespoon balsamic vinegar, 1 tablespoon olive oil, a pinch of salt, and a few cracks of black pepper. Toss gently until every slice is coated. Let them sit for a couple of minutes so the flavors begin to meld.
💡 mia’s Pro Tip: For an extra layer of flavor, add a tiny pinch of cinnamon or cardamom to the plum mixture. It’s a trick I picked up in Morocco—just a whisper of spice makes the fruit taste even more complex.
Step 2: Assemble and Bake
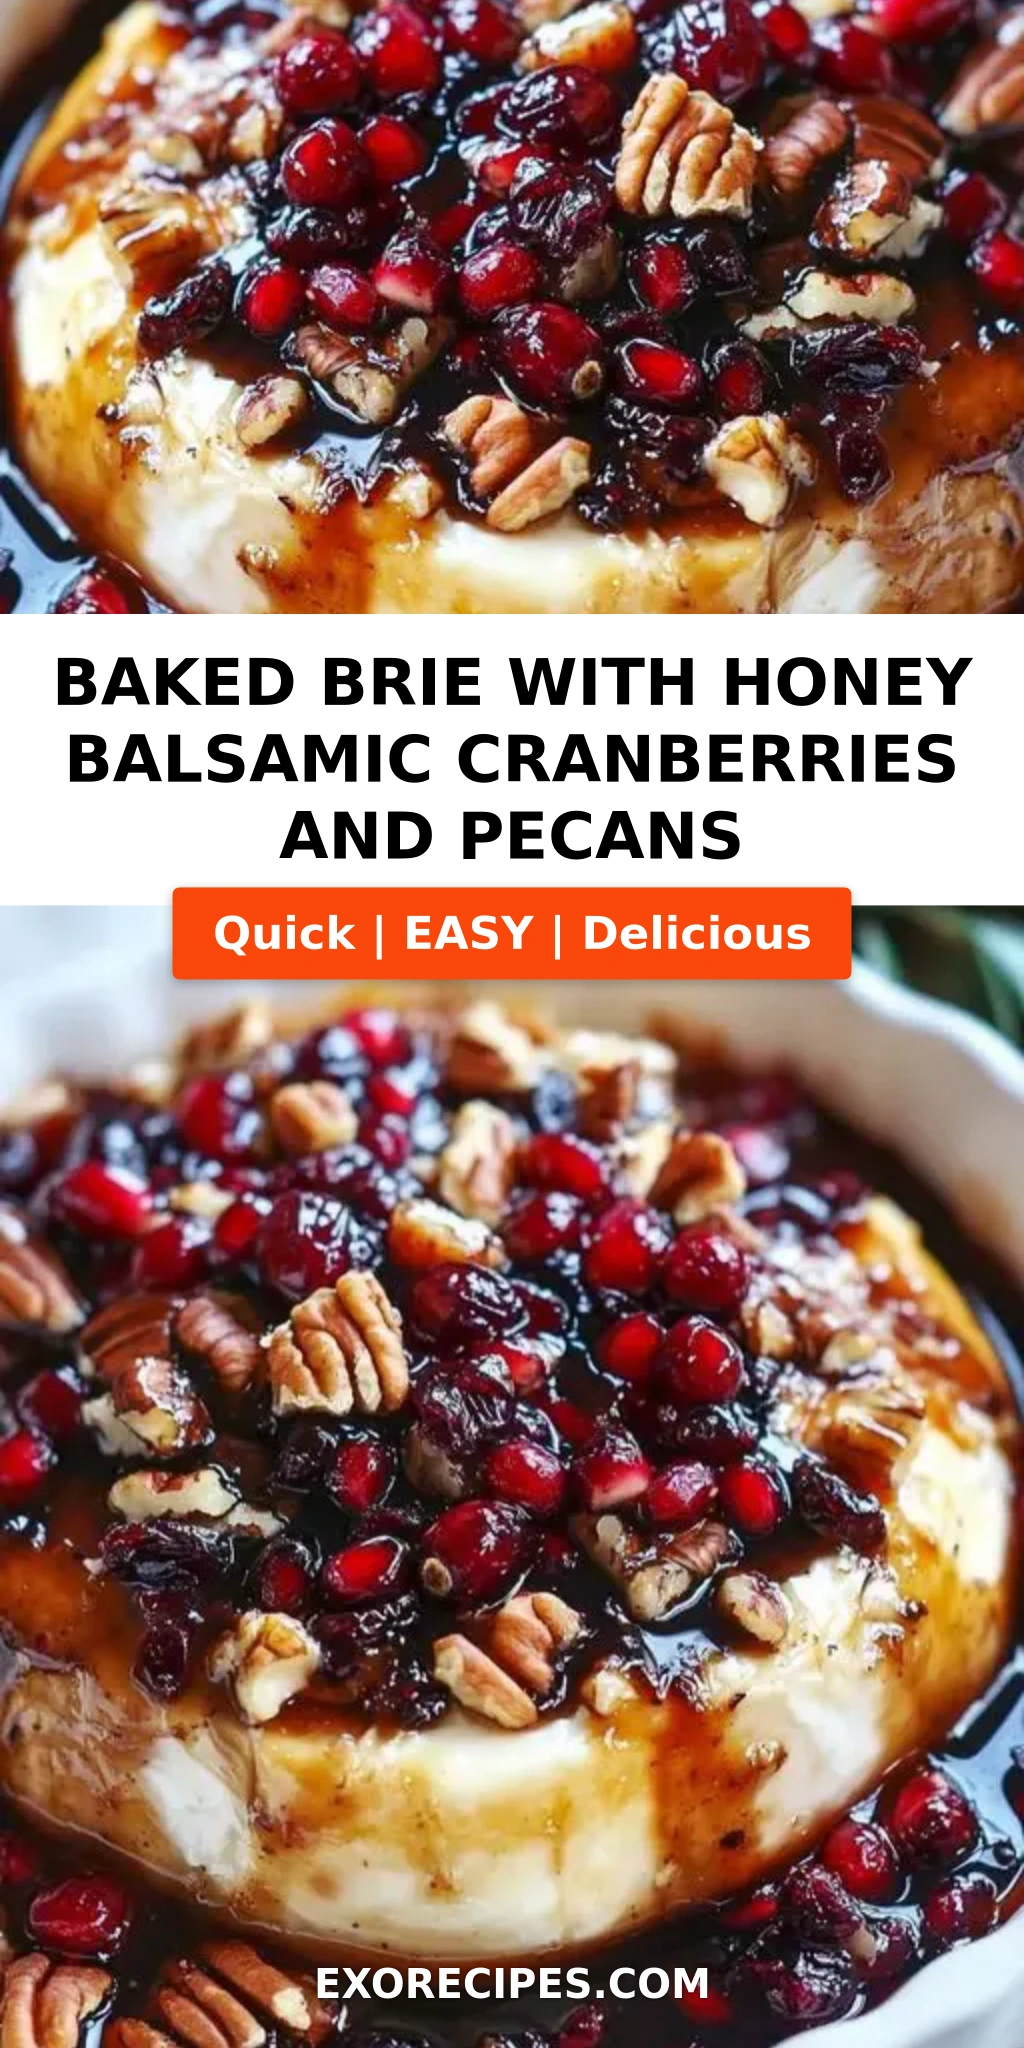
Place the brie wheel on a small baking sheet lined with parchment paper or in a small cast-iron skillet. If the brie is cold, let it sit at room temperature for 10–15 minutes first (this helps it melt evenly). Arrange the plum slices on top of the brie in a single, overlapping layer, making sure to pour any remaining juices from the bowl over the cheese. Tuck the two thyme sprigs among the plums. Bake for 15–20 minutes, until the brie is puffed and soft in the center, and the plums are tender and beginning to caramelize at the edges. The cheese should jiggle slightly when you gently shake the pan.
⚠️ Common Mistake to Avoid: Overbaking! If you leave the brie in too long, it will turn into a flat, greasy puddle. Start checking at 15 minutes—you want the center to be molten but still hold its shape. When you see the rind start to bulge, it’s ready.
Step 3: Serve
Remove the skillet from the oven and carefully discard the thyme sprigs if you like (they’ve done their job). Sprinkle fresh thyme leaves over the top for a final pop of green. You can also drizzle a little extra honey or balsamic glaze over the hot brie—I often do this for an extra glossy finish. Serve immediately with crackers or toasted baguette slices. Encourage guests to scoop from the center, making sure each bite gets some cheese, some plum, and some syrup.
💡 mia’s Pro Tip: If you want a more dramatic presentation, serve the skillet right on a wooden board surrounded by nuts, dried figs, and apple slices. It makes a gorgeous cheese board centerpiece.
| Step | Action | Duration | Key Visual Cue |
|---|---|---|---|
| 1 | Preheat & toss plums | 10 mins | Plums evenly coated in honey-balsamic mixture |
| 2 | Assemble & bake | 15-20 mins | Brie puffed, plums caramelized at edges, cheese jiggly |
| 3 | Garnish & serve | 1-2 mins | Fresh thyme leaves on top, dripping honey (optional) |
Serving & Presentation
This baked brie is all about the communal experience. I like to serve it right in the cast-iron skillet I baked it in—it keeps the cheese warm and looks rustic-chic on the table. Place the skillet on a large wooden board or a platter, and surround it with an assortment of dippers: crunchy baguette slices (lightly toasted if possible), buttery water crackers, and perhaps some crostini brushed with olive oil. Add a small bowl of extra honey or balsamic glaze on the side for those who want an extra drizzle. For a festive touch, scatter fresh thyme sprigs, edible flowers (like pansies or nasturtiums), and a few whole roasted plums around the board.
When it comes to pairings, I lean into the French influence. A crisp white wine like Sauvignon Blanc or a dry Chenin Blanc cuts through the richness beautifully. If you prefer red, try a light Pinot Noir—it won’t overpower the delicate flavors. For a non-alcoholic option, sparkling water with a splash of elderflower cordial or a chilled green tea with honey works wonderfully. And don’t forget a side of fresh apple slices or pear wedges to add a crisp, juicy contrast. This dish also pairs beautifully with a simple arugula salad dressed with lemon vinaigrette—the peppery greens balance the sweet cheese.
| Pairing Type | Suggestions | Why It Works |
|---|---|---|
| Side Dish | Arugula salad with lemon vinaigrette, roasted nuts, sliced pears | Peppery greens cut richness; fruit echoes the plums. |
| Sauce / Dip | Extra balsamic glaze, honey, fig jam | Adds another layer of sweet-tangy flavor. |
| Beverage | Sauvignon Blanc, dry Chenin Blanc, light Pinot Noir | Acidic wines cut fat; Pinot harmonizes with fruit. |
| Garnish | Fresh thyme leaves, edible flowers, a drizzle of honey | Brightens presentation and adds fresh herbal notes. |
Make-Ahead, Storage & Reheating
Life in New York is busy, so I’m always looking for ways to get ahead. This baked brie recipe lends itself well to advance prep. You can assemble the plums (step 1) up to a day ahead and keep them in the fridge in an airtight container—the flavors will meld beautifully. On the day you serve, simply top the brie with the plum mixture and bake as directed. If you have leftovers (which rarely happens in my house!), here’s how to store and reheat them so the cheese stays delicious.
| Method | Container | Duration | Reheating Tip |
|---|---|---|---|
| Refrigerator | Airtight container (separate brie from plums if possible) | Up to 3 days | Reheat in a 350°F oven for 8-10 mins until warm and bubbly. |
| Freezer | Freezer-safe bag (plums only; brie does not freeze well) | Plums up to 3 months | Thaw plums in fridge overnight; bake with fresh brie. |
| Make-Ahead | Covered dish in fridge (unbaked) | Up to 1 day in advance | Assemble without baking; add 5 mins to baking time if chilled. |
If you do have leftover baked brie, it’s still delicious cold or at room temperature—spread it on crackers like a pâté. But for that fresh-from-the-oven experience, reheating in the oven (not the microwave!) is key. The microwave will turn the cheese rubbery and split the sauce. I place leftovers in a small oven-safe dish and reheat at 350°F just until the cheese is melty again, usually 8–10 minutes. Plums will soften a bit more, but the flavor remains fantastic. And if you want to repurpose it, chop up the leftover brie and plums and toss with hot pasta or roasted potatoes for an instant decadent dinner.
Variations & Easy Swaps
One of the best things about this roasted plum brie recipe is how versatile it is. Over the years, I’ve experimented with different fruits, spices, and even cheese types. Here are three of my favorite variations, each tested and approved by my taste testers (including my Moroccan mother, who still thinks I should add more cumin to everything).
| Variation | Key Change | Best For | Difficulty Impact |
|---|---|---|---|
| Moroccan Spice Twist | Add ½ tsp ras el hanout + ¼ tsp cinnamon to plum mix | Fans of warm, exotic flavors | Easy (just add spices) |
| Gluten-Free/Dairy-Free | Use dairy-free brie-style cheese + gluten-free crackers | Dietary restrictions | Easy if you find good alternatives |
| Seasonal Fruit Swap | Replace plums with sliced pears or figs | Fall and winter entertaining | Easy (swap 1:1) |
Moroccan Spice Twist
This variation is a nod to my roots. Add ½ teaspoon of ras el hanout (a North African spice blend with cinnamon, cumin, coriander, and ginger) and ¼ teaspoon of ground cinnamon to the honey-balsamic mixture before tossing the plums. The warm, floral spices pair divinely with the fruit and cheese. I also like to sprinkle a few toasted slivered almonds over the finished dish for crunch. It’s a subtle change, but it transforms the flavor profile into something truly special—a taste of my mother’s kitchen in Marrakech.
Gluten-Free & Dairy-Free Version
For guests with dietary needs, this recipe adapts well. Look for a high-quality vegan brie-style cheese made from cashews or coconut oil—brands like Miyoko’s Creamery work beautifully. They melt and soften similarly to dairy brie, though the texture is a bit less stretchy. Use gluten-free crackers or sliced vegetables like cucumber or bell pepper for dipping. The plum topping remains exactly the same. I’ve tested this for a friend’s allergy-friendly party, and it was a hit—the fruit and honey are so flavorful that no one misses the dairy.
Seasonal Fruit Swap
When plums aren’t in season (or if you just want a change), swap in ripe pears, figs, or even apple slices. For pears, use Bosc or Anjou; they hold their shape during baking. For figs, halve them lengthwise and place cut-side up on the brie—they become jammy and sweet. I often make this version in the fall with pears and a dash of nutmeg, or in the summer with fresh figs and a drizzle of pomegranate molasses. Each fruit brings its own character, but the essential method stays the same: toss with honey-balsamic, top the brie, and bake until heavenly.
Can I make baked brie with roasted plums ahead of time and reheat it?
Yes, you can absolutely make this baked brie ahead of time, with a few best practices. For the best texture, I recommend assembling the dish (topping the brie with the plum mixture) up to one day in advance, then covering and refrigerating it unbaked. When you’re ready to serve, bake as directed, adding about 5 extra minutes because of the cold cheese. If you have fully baked leftovers, store the brie and plums separately in airtight containers in the fridge for up to three days. Reheat in a 350°F oven for 8–10 minutes until warmed through—avoid the microwave, as it will make the cheese rubbery and break the sauce. The reheated brie won’t be as puffed and dramatic as fresh, but it will still be deliciously creamy and full of flavor.
What type of brie is best for baking in this recipe?
For the best results, look for a double-cream or triple-cream brie that is firm but yields slightly to gentle pressure. Avoid overly ripe, soft brie that is already oozing at the edges—it will collapse into a puddle during baking. A classic French brie (like Brie de Meaux or a good American-made double-cream) works perfectly. If you prefer a milder, creamier texture, go for a triple-cream brie. You can also use Camembert, which has a slightly earthier flavor and melts beautifully. The key is to choose a wheel that is about 8 ounces and has an intact, white bloomy rind.
What can I substitute for plums in baked brie with thyme?
There are several excellent substitutes for plums, each bringing its own personality. Nectarines and apricots are my top choices—they have a similar stone-fruit sweetness and hold their shape during baking. Pears (especially Bosc or Anjou) are wonderful in the fall; they become tender and slightly caramelized. Fresh figs, halved, make a gorgeous and elegant substitute, with their honeyed flavor. If you use frozen fruit, thaw and drain it well before tossing with the honey-balsamic mixture. Each substitution works 1:1 by volume, so feel free to experiment based on what’s in season at your farmers market.
How long should I bake brie with roasted plums and thyme?
Bake your brie with plums and thyme at 375°F (190°C) for 15–20 minutes. The exact time depends on the starting temperature of your cheese (room temperature is best) and your oven’s quirks. Start checking at 15 minutes: the brie should be puffed in the center, the plums should be tender and starting to caramelize at the edges, and the cheese should jiggle when you gently shake the pan. If you prefer a very molten, fully melted center, go to 20 minutes. Do not exceed 25 minutes, or the brie’s structure will break down and the cheese will separate into greasy liquid. Your visual cue is a slight bulge of the rind and a soft, spoonable interior.
Can I use dried thyme instead of fresh?
Yes, you can substitute dried thyme, but fresh is highly recommended for the best flavor and aroma. Dried thyme is more concentrated, so use about 1 teaspoon of dried leaves (not ground) in the plum mixture instead of the fresh sprigs. However, you’ll miss the visual elegance of the whole sprigs and the gentle infusion from the stems. If using dried, I suggest sprinkling it directly into the honey-balsamic dressing. For garnish at the end, fresh thyme leaves add a pop of green and a burst of fragrance that dried simply can’t match. If you only have dried, it will still taste delicious.
What can I serve with baked brie and roasted plums besides crackers?
Beyond crackers and baguette slices, there are many delicious accompaniments. Toasted crostini brushed with olive oil, apple or pear slices, celery sticks, and even roasted baby potatoes all work beautifully. For a more substantial spread, add prosciutto, salami, or sliced chorizo alongside. I also love serving it with a simple arugula salad dressed with lemon and Parmesan—the peppery greens contrast the rich cheese. Nuts like toasted walnuts or pecans add crunch, and dried figs or apricots reinforce the sweet-savory theme. The goal is variety in texture and flavor, so feel free to get creative with what’s in your pantry.
Can I add nuts to this baked brie with plums?
Absolutely! Adding nuts brings a wonderful crunch that contrasts the creamy brie and soft plums. I recommend toasted walnuts, pecans, or slivered almonds. Scatter them over the finished dish just before serving, or mix a handful into the plum mixture before baking if you want them to caramelize as well. If you add them before baking, toss them in a little honey and salt first to make them extra delicious. Just be aware that nuts can burn if they’re too exposed at the edges, so keep them tucked among the plums. This addition is especially good if you’re serving the brie as part of a cheese board.
Is this baked brie recipe gluten-free?
The baked brie and roasted plums themselves are naturally gluten-free, as the recipe contains no wheat or flour. However, most crackers and baguette slices contain gluten, so for a fully gluten-free serving, simply choose gluten-free crackers, rice cakes, or vegetable crudités like cucumber rounds, bell pepper strips, or endive leaves. You can also serve it with gluten-free bread or toasted gluten-free baguette slices. I always recommend reading labels carefully, especially if your guests have celiac disease. The good news is that the cheese and fruit topping are safe, and with the right dippers, everyone can enjoy it.
What wine pairs best with baked brie and roasted plums?
For this sweet-savory, creamy appetizer, I recommend a wine with good acidity to cut through the richness of the brie and balance the sweetness of the plums. A crisp, unoaked Sauvignon Blanc is my go-to—its herbaceous notes complement the thyme beautifully. A dry Chenin Blanc from the Loire Valley is another excellent choice, offering a subtle fruitiness that echoes the plums. If you prefer red, go for a light, fruity Pinot Noir; avoid heavy, tannic wines that will clash. For a festive sparkling option, a dry Prosecco or Crémant de Loire works wonders, cleansing the palate between bites. And if you’re serving this at a holiday gathering, a chilled Rosé is always a hit.
Can I use a different cheese instead of brie?
Yes, you can! The most common substitute is Camembert, which has a similar creamy texture and a slightly earthier, more intense flavor. It bakes just like brie and is an excellent choice. For a more assertive flavor, try a soft-ripened goat cheese (like a Crottin de Chavignol or a chèvre log) – it will become spreadable and tangy, pairing well with the sweet plums. Avoid hard cheeses like cheddar or gouda, as they won’t melt into the same gooey consistency. If you use a very soft cheese like a triple-cream, reduce the baking time by a few minutes. I’ve tested this with Camembert many times, and it’s always a success.
Share Your Version!
I’d love to hear how this baked brie with roasted plums and thyme turns out in your kitchen! Did you try the Moroccan spice twist, or did you swap in pears from your local orchard? Drop a comment below and let me know what you think—I read every single one and try to respond personally. And if you snap a photo of your bubbly, beautiful brie, please share it on Instagram or Pinterest and tag @exorecipes. It makes my day to see your creations. If you have any questions about the recipe, don’t hesitate to ask—I’m here to help you nail this dish every time.
From my NYC kitchen to yours — I hope this recipe brings as much warmth to your table as it does to mine. — mia 🧡
Love This Recipe? Save It to Pinterest!
If you enjoyed this Baked Brie with Roasted Plums and Thyme recipe, don’t let it get lost in your browser tabs! 😄 Pin it now so you can find it again anytime — and explore hundreds more tried-and-tested recipes waiting for you on my Pinterest boards.
👉 Follow mia on Pinterest @exorecipe
📌 Pin this recipe · 🔁 Re-pin your favorites · 💬 Tag me when you make it — I love seeing your creations!
Baked Brie with Roasted Plums and Thyme: A Savory Delight for Every Occasion
- Prep Time: 10 minutes
- Cook Time: 15-20 minutes
- Total Time: 25-30 minutes
- Yield: 4 1x
- Method: Appetizer
- Cuisine: French-inspired
Description
A decadent baked brie topped with roasted plums and fresh thyme, perfect for entertaining or a cozy night in.
Ingredients
- 1 (8-ounce) wheel of brie cheese
- 4 ripe plums, pitted and sliced
- 2 tablespoons honey
- 1 tablespoon balsamic vinegar
- 2 sprigs fresh thyme, plus more for garnish
- 1 tablespoon olive oil
- Salt and pepper to taste
- Crackers or baguette slices for serving
Instructions
- Preheat oven to 375°F (190°C).
- In a small bowl, toss the sliced plums with honey, balsamic vinegar, olive oil, and a pinch of salt and pepper.
- Place the brie wheel on a small baking sheet or in a cast-iron skillet. Top with the plum mixture and thyme sprigs.
- Bake for 15-20 minutes until the brie is soft and slightly melted, and the plums are tender and caramelized.
- Remove from oven, discard the thyme sprigs (if desired), and garnish with fresh thyme leaves.
- Serve warm with crackers or baguette slices.
Notes
For extra flavor, drizzle with additional honey or balsamic glaze before serving. Brie can be swapped for camembert.
Nutrition
- Calories: 320
- Sugar: 14g
- Fat: 22g
- Carbohydrates: 18g
- Protein: 14g
Tried This Recipe? Leave a Comment!
Did you make this recipe? I’d love to hear how it turned out! Please leave a comment and a rating below. Your feedback helps other home cooks and supports cheerychop.com!
For more delicious inspiration, follow me on Pinterest!