Table of Contents
Baked Brie with Caramelized Onions and Pecans – The Ultimate Holiday Appetizer
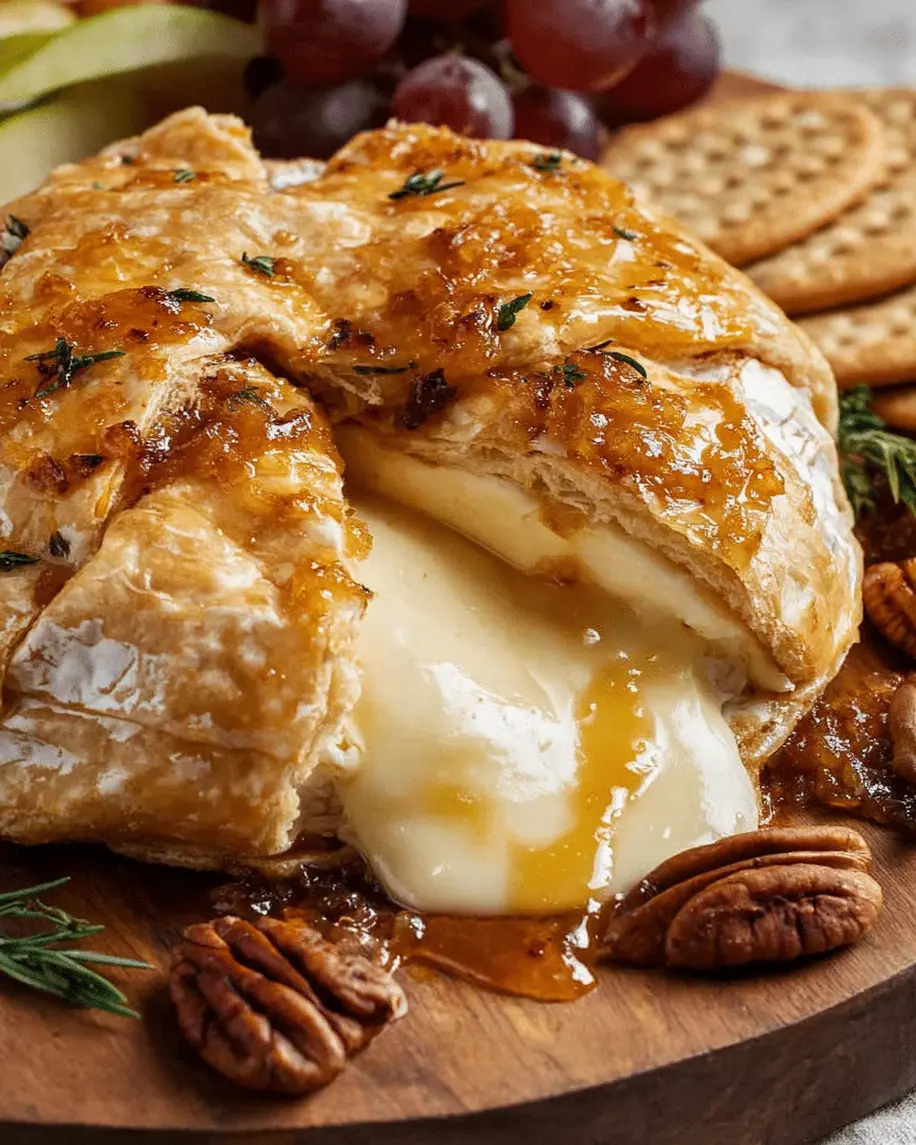
There’s a reason this baked brie with caramelized onions and pecans has become my go-to holiday appetizer. It reminds me of slow winter afternoons in my mother’s kitchen in Morocco, where she would caramelize onions for hours until they turned into a sweet, silky jam – except here we get the same depth in under half an hour thanks to a simple trick I learned in Paris. Place a warm, oozing wheel of brie crowned with those golden onions, crunchy pecans, and a ribbon of honey in front of a crowd, and watch it vanish. This isn’t just a recipe; it’s a showstopper that makes everyone feel like a guest of honor.
Imagine cutting into that creamy, bloomy rind and seeing the molten cheese spill out, mingling with the sweet, jammy onions and the nutty crunch of toasted pecans. The honey adds a floral sweetness that ties everything together, while fresh thyme provides a subtle herby lift. Each bite is a contrast of warm and cool, soft and crisp, earthy and sweet – pure comfort on a cracker. When I make this for a party, I always stand back and watch the faces light up as they dip in for seconds, and thirds.
Now, I’ve tested dozens of baked brie recipes, but my version leans on a few key techniques: browning the butter before caramelizing the onions (a trick from a Parisian chef), and baking the brie just until it’s soft but not fully melted – so it holds its shape and doesn’t turn into a puddle. Plus, I sneak in a pro tip for avoiding leaks that I’ll share below. If you’re looking for an easy baked brie appetizer that’s elegant enough for Christmas dinner but simple enough for a Tuesday night, this one’s for you. Let’s get your oven preheated!
Why This Baked Brie with Caramelized Onions and Pecans Recipe Is the Best
The Flavor Secret: Most baked brie recipes dump plain onions on top – not here. I caramelize them slowly in butter with a pinch of salt until they’re deeply browned, then hit them with brown sugar for that extra gloss. This technique, which I refined during my pastry training in Paris, gives the onions a complex sweetness that perfectly balances the rich, creamy brie. It’s the same method my mother used for her tagines, but adapted for the American palate.
Perfected Texture: The key is baking the brie just until it’s soft and beginning to ooze – about 12-15 minutes at 350°F. Overbaking turns it into a liquid mess; underbaking leaves it cold in the center. I’ll show you exactly what to look for: the cheese should give slightly when pressed but still hold its wheel shape. That perfect molten center is what gets everyone reaching for another cracker.
Foolproof & Fast: Even if you’ve never worked with brie before, this recipe is forgiving. The onions can be made a day ahead, the brie can be assembled an hour before baking, and the whole thing comes together in under an hour. It’s the kind of dish that makes you look like a professional cook (I should know!) without any stress. Plus, the Pinterest-worthy presentation makes it a guaranteed crowd-pleaser for holidays, game days, or any gathering.
Baked Brie with Caramelized Onions and Pecans Ingredients
Whenever I make this caramelized onion brie for friends in NYC, I head to the Union Square Greenmarket for the freshest onions and pecans – but even the supermarket staples work beautifully. Below are the exact ingredients you’ll need. Quality matters: good brie (French or domestic), real butter, and fresh thyme make all the difference.
Ingredients List
- 1 (8 ounce) wheel of brie cheese
- 2 tablespoons unsalted butter
- 2 large onions, thinly sliced
- 1/2 teaspoon salt
- 1/4 teaspoon black pepper
- 2 tablespoons brown sugar
- 1/2 cup pecan halves
- 2 tablespoons honey
- Fresh thyme sprigs for garnish (optional)
- Crackers or sliced baguette for serving
Ingredient Spotlight
Brie: Look for a wheel that’s slightly soft when pressed (like a ripe avocado) – this indicates it will melt evenly. Triple-cream brie (like Brillat-Savarin) is even richer. Avoid brie that’s rock-hard or smells of ammonia. Substitution: Camembert works, but it’s milder and less creamy.
Onions: Yellow or sweet onions (like Vidalia) are best for caramelizing – they’re high in sugar and break down beautifully. Red onions give a slight purple tint but are sharper. Slice them uniformly thin (about 1/8 inch) so they cook evenly.
Pecans: Toasting raw pecans before adding them intensifies their nutty flavor. If you only have pre-chopped pecans, they work fine – just reduce the quantity to 1/3 cup. Walnuts or almonds are excellent alternatives.
Honey: Use a runny honey (like clover or orange blossom) for easy drizzling. If honey is too thick, warm it slightly. Maple syrup is a wonderful substitute for a deeper, earthier sweetness.
| Original Ingredient | Best Substitution | Flavor / Texture Impact |
|---|---|---|
| Brie | Camembert | Milder, less creamy; still delicious |
| Pecans | Walnuts or almonds | Walnuts are slightly bitter; almonds are crunchier |
| Honey | Maple syrup | Deeper, earthier sweetness |
| Brown sugar | Coconut sugar or maple sugar | Less molasses flavor; slightly different caramelization |
How to Make Baked Brie with Caramelized Onions and Pecans — Step-by-Step
Don’t let the word “caramelized” scare you – this is a straightforward process. Follow these steps and you’ll have an irresistible appetizer that disappears in minutes.
Step 1: Preheat and Prepare
Preheat your oven to 350°F (175°C). Line a baking sheet with parchment paper or lightly grease a small ovenproof dish (a 6-inch cast-iron skillet works beautifully). Take the brie out of the fridge about 15 minutes before baking so it starts to come to room temperature – this helps it melt evenly.
⚠️ Common Mistake to Avoid: Don’t bake the brie straight from the fridge – it will cook unevenly, leaving the center cold while the edges overheat. Let it sit for 10-15 minutes.
Step 2: Caramelize the Onions
In a large skillet, melt the butter over medium heat. Add the sliced onions, salt, and pepper. Stir to coat. Cook, stirring occasionally, for 20-25 minutes. The onions should go from translucent to deep golden brown. If they start to stick, add a tablespoon of water and scrape up the brown bits – that’s flavor! You’ll notice the kitchen starts to smell like a cozy bistro.
💡 mia’s Pro Tip: For extra richness, brown the butter first – let it foam and turn golden before adding the onions. This adds a nutty depth that pairs perfectly with the brie.
Step 3: Add Brown Sugar
Stir in the brown sugar and continue cooking for 2-3 minutes, until the onions are glossy and caramelized. The sugar will melt and create a syrupy coating. Remove the skillet from heat. Taste and adjust seasoning – you want a sweet-savory balance.
⚠️ Common Mistake to Avoid: Don’t rush this step! If you add the sugar too early, it may burn. Wait until the onions are soft and golden before adding it.
Step 4: Assemble the Brie
Place the brie wheel on your prepared baking sheet or ovenproof dish. Spoon the caramelized onions over the top, covering the entire surface (including the sides if you like). Sprinkle the pecan halves evenly over the onions, pressing them in lightly so they stick.
💡 mia’s Pro Tip: To prevent leaking, score the top rind of the brie in a crosshatch pattern with a sharp knife – this allows steam to escape without bursting the sides. Also, bake on a parchment-lined sheet to catch any drips.
Step 5: Bake to Perfection
Bake for 12-15 minutes, until the brie is soft and beginning to ooze around the edges but still holds its wheel shape. The center should feel pliable when gently pressed. Keep an eye on it – ovens vary, and overbaking can cause the cheese to leak entirely.
⚠️ Common Mistake to Avoid: Don’t overbake! Once the brie starts to pool into a flat puddle, it’s too late. Take it out when it’s just soft – it will continue to warm from residual heat.
Step 6: Drizzle and Garnish
Remove the brie from the oven and immediately drizzle with honey. The heat will help the honey melt and soak into the onions. Garnish with fresh thyme sprigs if using – they add a beautiful color and a subtle herbal aroma.
💡 mia’s Pro Tip: For an extra pop, sprinkle a few flakes of sea salt over the top just before serving. It enhances all the flavors and cuts through the richness.
Step 7: Serve Immediately
Transfer the baked brie to a serving platter (carefully – it’s hot!). Surround with crackers, baguette slices, or even apple slices. Serve while warm and oozy – this appetizer waits for no one! Encourage guests to dig in and scoop up the toppings.
⚠️ Common Mistake to Avoid: Don’t let the brie sit too long after baking – it will firm up as it cools. If you need to hold it, keep it in a warm oven (200°F) for up to 15 minutes.
| Step | Action | Duration | Key Visual Cue |
|---|---|---|---|
| 1 | Preheat & rest brie | 15 min | Brie softens slightly at edges |
| 2 | Caramelize onions | 20-25 min | Deep golden brown, very soft |
| 3 | Add brown sugar | 2-3 min | Glossy, sticky onions |
| 4 | Assemble brie | 5 min | Onions and pecans evenly distributed |
| 5 | Bake | 12-15 min | Brie soft, edges slightly oozing |
| 6 | Drizzle honey & garnish | 1 min | Golden honey coating, fresh thyme |
| 7 | Serve | Immediately | Warm, oozing, inviting |
Serving & Presentation
To serve, place the warm brie on a wooden board or slate platter. Surround with an assortment of crackers (butter crackers, water biscuits, or everything bagel crisps), thin slices of crusty baguette, and fresh fruit like sliced pears or grapes. The contrast of creamy cheese, crunchy nuts, and crisp bread is pure magic.
I love finishing with a tiny drizzle of extra honey and a sprinkle of flaky sea salt – it takes the dish from elegant to unforgettable. For a festive touch, add pomegranate seeds or dried cranberries around the edges. The red jewels against the golden brie make it a holiday showstopper.
In my NYC apartment, I often serve this alongside a crisp green salad with a lemon vinaigrette to cut the richness. A glass of sparkling wine or a crisp Chardonnay pairs beautifully. And if you have leftovers (unlikely!), spread the cold brie on crackers with a bit of fig jam – it’s a whole new snack.
| Pairing Type | Suggestions | Why It Works |
|---|---|---|
| Side Dish | Mixed greens with lemon vinaigrette, roasted Brussels sprouts | Acidity and bitterness balance the rich cheese |
| Sauce / Dip | Balsamic glaze, fig jam, extra honey | Adds sweetness and tang |
| Beverage | Sparkling wine, Chardonnay, dry cider | Crisp bubbles or acidity cut through the fat |
| Garnish | Fresh thyme, flaky sea salt, pomegranate seeds | Color, crunch, and herbal freshness |
Make-Ahead, Storage & Reheating
Between my food blog and catering gigs, I’ve learned a few time-saving tricks for this easy baked brie appetizer. The caramelized onions can be made up to 3 days ahead and stored in the refrigerator. The whole assembled dish (unbaked) can be prepped a few hours in advance – just cover and refrigerate, then add an extra minute or two to the baking time.
| Method | Container | Duration | Reheating Tip |
|---|---|---|---|
| Refrigerator | Airtight container (onions separately) | Up to 3 days | Reheat onions in a skillet, then assemble and bake |
| Freezer | Freezer-safe bag (onions only) | Up to 3 months | Thaw overnight in the fridge, then reheat gently |
| Make-Ahead | Assembly dish covered with plastic wrap | Up to 4 hours before baking | Add 2-3 minutes to bake time if starting cold |
To reheat leftover baked brie (rare, but it happens!), place it in a 300°F oven for 5-8 minutes until warm and oozy again. Avoid the microwave – it makes the cheese rubbery. The onions and pecans store well separately, so if you have leftover toppings, spoon them over a cheese board or use them as a sandwich spread.
Variations & Easy Swaps
| Variation | Key Change | Best For | Difficulty Impact |
|---|---|---|---|
| Walnut & Maple Twist | Swap pecans for walnuts, honey for maple syrup | Fall gatherings, Thanksgiving | Easy |
| Gluten-Free / Dairy-Free | Use gluten-free crackers, dairy-free brie (like cashew-based) | Dietary restrictions | Moderate (dairy-free brie melts differently) |
| Spicy Honey & Thyme | Add red pepper flakes to honey, replace pecans with pistachios | Party with a kick | Easy |
Variation 1: Walnut and Maple Twist
Growing up in Morocco, my mother would sometimes use walnuts in her sweet-and-savory tagines – that memory inspired this variation. Replace the pecans with roughly chopped walnuts and swap the honey for pure maple syrup. The walnuts offer a slightly more bitter note that balances the sweetness of the caramelized onions. Toast the walnuts lightly in the oven before using to enhance their flavor. This version is particularly lovely for Thanksgiving or a cozy fall dinner.
Variation 2: Gluten-Free / Dairy-Free
I’ve had many NYC friends who follow strict diets, so I tested a dairy-free version using a cashew-based brie (like Treeline or Kite Hill). It melts differently – expect it to become creamy rather than oozy – but the flavor is still wonderful. Serve with gluten-free crackers or sliced cucumber rounds (which add a refreshing crunch). The caramelized onions and pecans are naturally gluten-free and dairy-free, so the only change is the cheese itself. Just be sure to check that your brie alternative is free of casein if needed.
Variation 3: Spicy Honey and Thyme
One of my favorite discoveries at a Union Square Greenmarket was a local beekeeper’s spicy honey infused with chili. For this twist, stir 1/4 teaspoon red pepper flakes into the honey before drizzling (or use chili honey if you can find it). Swap the pecans for pistachios – their vibrant green color looks stunning against the golden brie. The heat from the honey cuts through the richness beautifully, and fresh thyme adds an herbaceous finish. This version is always a hit at holiday parties and pairs wonderfully with a bold red wine like Zinfandel.
Frequently Asked Questions
How do you prevent the brie from leaking out while baking?
To prevent your brie from turning into a puddle, start by scoring the top rind in a crosshatch pattern – this allows steam to escape without bursting the sides. Bake at 350°F for only 12-15 minutes; the cheese should be soft and beginning to ooze at the edges but still hold its shape. Use a parchment-lined baking sheet to catch any drips, and avoid overbaking. Also, let the brie come to room temperature for 15 minutes before baking – a fridge-cold wheel is more likely to leak as it heats unevenly. If you’re nervous, bake the brie in a small cast-iron skillet or a brie baker, which contains any leakage and looks beautiful at the table.
Can I use a different type of cheese instead of brie for this recipe?
Absolutely – while brie is classic, you can substitute with Camembert (milder, less creamy), triple-cream cheese like Brillat-Savarin (even richer), or even a soft goat cheese log for a tangy twist. Keep in mind that different cheeses melt at different rates. Camembert will need similar baking time; goat cheese may need a minute or two less. Avoid hard cheeses like cheddar or gouda – they won’t achieve the same oozy, spreadable texture. If you use a dairy-free alternative (cashew-based “brie”), expect it to become creamy rather than runny; bake just until warmed through.
How long should I caramelize the onions for baked brie with pecans?
For the best flavor, caramelize your onions for 20-25 minutes over medium heat. This allows them to soften and turn a deep golden brown without burning. Start by melting butter (or browning it for extra nuttiness), then add sliced onions, salt, and pepper. Stir every few minutes, scraping up any brown bits. After about 20 minutes, stir in brown sugar and continue for another 2-3 minutes until glossy and sticky. If you’re short on time, you can reduce to 15 minutes, but the depth of flavor won’t be as rich – patience really pays off here. The good news: you can make them days ahead and reheat gently.
What can I serve with baked brie with caramelized onions and pecans?
This baked brie pairs beautifully with a variety of dippers and sides. Classic choices include plain crackers (water biscuits, butter crackers), sliced baguette, or pita chips. For a health twist, try apple slices, pear slices, or celery sticks. I love serving it with a light arugula salad dressed with lemon vinaigrette – the acidity cuts the richness. For drinks, sparkling wine, Chardonnay, or a dry cider complement the creamy cheese and sweet onions. You can also offer extra honey, fig jam, or balsamic glaze on the side for guests to drizzle as they like.
Can I make this baked brie ahead of time?
Yes, you can prep components ahead. The caramelized onions can be made up to 3 days in advance and stored in an airtight container in the fridge. Reheat them gently in a skillet before assembling the brie. You can also assemble the entire dish (brie topped with onions and pecans) up to 4 hours before baking – just cover and refrigerate. When ready to bake, add 2-3 minutes to the oven time because the cheese will be cold. Avoid baking the brie fully ahead, as it loses that wonderful oozy texture when reheated. For best results, bake just before serving.
How do I reheat leftover baked brie?
To reheat leftover baked brie, place it in a preheated 300°F oven for 5-8 minutes, just until warm and oozy again. Avoid the microwave – it makes the cheese rubbery and separates the fats. If you have leftover toppings (onions and pecans) but no brie, spoon them over a cheese board or use as a spread on sandwiches. The baked brie is best enjoyed within a day, but if you have a small amount left, you can also crumble it into a salad or melt it over roasted vegetables for a quick upgrade.
Can I use walnuts instead of pecans in this recipe?
Yes, walnuts are a wonderful substitute for pecans. They have a slightly more bitter, earthy flavor that pairs beautifully with sweet caramelized onions and brie. Toast them lightly (5 minutes at 350°F) before using to enhance their nuttiness and crunch. You can also use almonds, pistachios, or even hazelnuts – each brings a unique character. If using walnuts, consider swapping the honey for maple syrup to create a fall-inspired version. Just keep the quantity the same (1/2 cup) and roughly chop them if they’re whole.
What if I don’t have honey? Can I use something else?
Absolutely – honey adds sweetness and a floral note, but you can substitute with an equal amount of maple syrup (for a deeper, woodsy sweetness), agave nectar (milder), or even a simple syrup infused with vanilla or thyme. If you want a savory twist, drizzle with balsamic glaze instead – its sweet-tart complexity is a fantastic contrast to the rich cheese. For a sugar-free option, use a sugar-free maple syrup or omit the drizzle entirely and rely on the natural sweetness of the caramelized onions. The dish will still be delicious.
Can I freeze baked brie with caramelized onions and pecans?
Freezing fully baked brie is not recommended – the texture becomes grainy and watery upon thawing. However, you can freeze the caramelized onions (without the brie) for up to 3 months. Simply cook the onions as directed, let cool completely, and transfer to a freezer-safe bag. Thaw overnight in the fridge and reheat gently in a skillet before assembling fresh brie. The pecans can also be frozen separately in a sealed bag. This make-ahead strategy allows you to enjoy the dish with minimal last-minute effort while preserving all the fresh, creamy qualities of the baked brie.
Is this baked brie appetizer suitable for a gluten-free diet?
Yes, the baked brie itself (cheese, onions, pecans, honey) is naturally gluten-free. The only adjustment needed is the dippers – serve with gluten-free crackers, rice crackers, sliced cucumber, or vegetable sticks. Be sure to check labels on your brie (some may contain microbial rennet but that’s not gluten). The caramelized onions are made with butter, salt, pepper, and brown sugar – all gluten-free. This dish is a fantastic option for guests with celiac disease or gluten sensitivity, as long as you provide safe accompaniments.
Share Your Version!
If you’ve tried this baked brie with caramelized onions and pecans, I’d love to hear how it turned out! Leave a star rating and a comment below – did you use the scoring trick to prevent leaks? Did you add a twist like spicy honey or walnuts? Every comment helps other readers discover what works best.
Snap a photo of your beautiful baked brie and tag me on Instagram or Pinterest @exorecipes – I feature my favorites in stories! And here’s a question for you: what’s your favorite holiday appetizer to bring to a gathering? I’m always looking for new ideas inspired by my readers. Thank you for being part of this kitchen community.
From my NYC kitchen to yours — I hope this recipe brings as much warmth to your table as it does to mine. — mia 🧡
Love This Recipe? Save It to Pinterest!
If you enjoyed this Baked Brie with Caramelized Onions and Pecans recipe, don’t let it get lost in your browser tabs! 😄 Pin it now so you can find it again anytime — and explore hundreds more tried-and-tested recipes waiting for you on my Pinterest boards.
👉 Follow mia on Pinterest @exorecipe
📌 Pin this recipe · 🔁 Re-pin your favorites · 💬 Tag me when you make it — I love seeing your creations!

Baked Brie with Caramelized Onions and Pecans
- Prep Time: 15 minutes
- Cook Time: 40 minutes
- Total Time: 55 minutes
- Yield: 8 servings 1x
- Method: Appetizer
- Cuisine: American
Description
This baked brie with caramelized onions and pecans is an easy, elegant appetizer that’s perfect for holiday gatherings or any party. Creamy melted brie topped with sweet caramelized onions, crunchy pecans, and a drizzle of honey – it’s absolutely irresistible.
Ingredients
- 1 (8 ounce) wheel of brie cheese
- 2 tablespoons unsalted butter
- 2 large onions, thinly sliced
- 1/2 teaspoon salt
- 1/4 teaspoon black pepper
- 2 tablespoons brown sugar
- 1/2 cup pecan halves
- 2 tablespoons honey
- Fresh thyme sprigs for garnish (optional)
- Crackers or sliced baguette for serving
Instructions
- Preheat oven to 350°F (175°C).
- In a large skillet, melt the butter over medium heat. Add the sliced onions, salt, and pepper. Cook, stirring occasionally, for about 20-25 minutes until the onions are soft and deeply caramelized.
- Stir in the brown sugar and cook for another 2-3 minutes until the onions are glossy and caramelized. Remove from heat.
- Place the brie wheel on a parchment-lined baking sheet or in a small ovenproof dish. Top with the caramelized onions, then sprinkle the pecan halves over the onions.
- Bake for 12-15 minutes, until the brie is soft and beginning to ooze but still holds its shape.
- Remove from oven and drizzle with honey. Garnish with fresh thyme if desired.
- Serve immediately with crackers or baguette slices.
Notes
For easier handling, you can also bake the brie in a small cast-iron skillet or a brie baker. The caramelized onions can be made a day ahead and refrigerated; reheat gently before assembling.
Nutrition
- Calories: 280
- Sugar: 10g
- Fat: 21g
- Carbohydrates: 14g
- Protein: 9g
Tried This Recipe? Leave a Comment!
Did you make this recipe? I’d love to hear how it turned out! Please leave a comment and a rating below. Your feedback helps other home cooks and supports cheerychop.com!