Table of Contents
Baked Brie in Sourdough Bread Bowl with Garlic Butter – Your New Go-To Appetizer
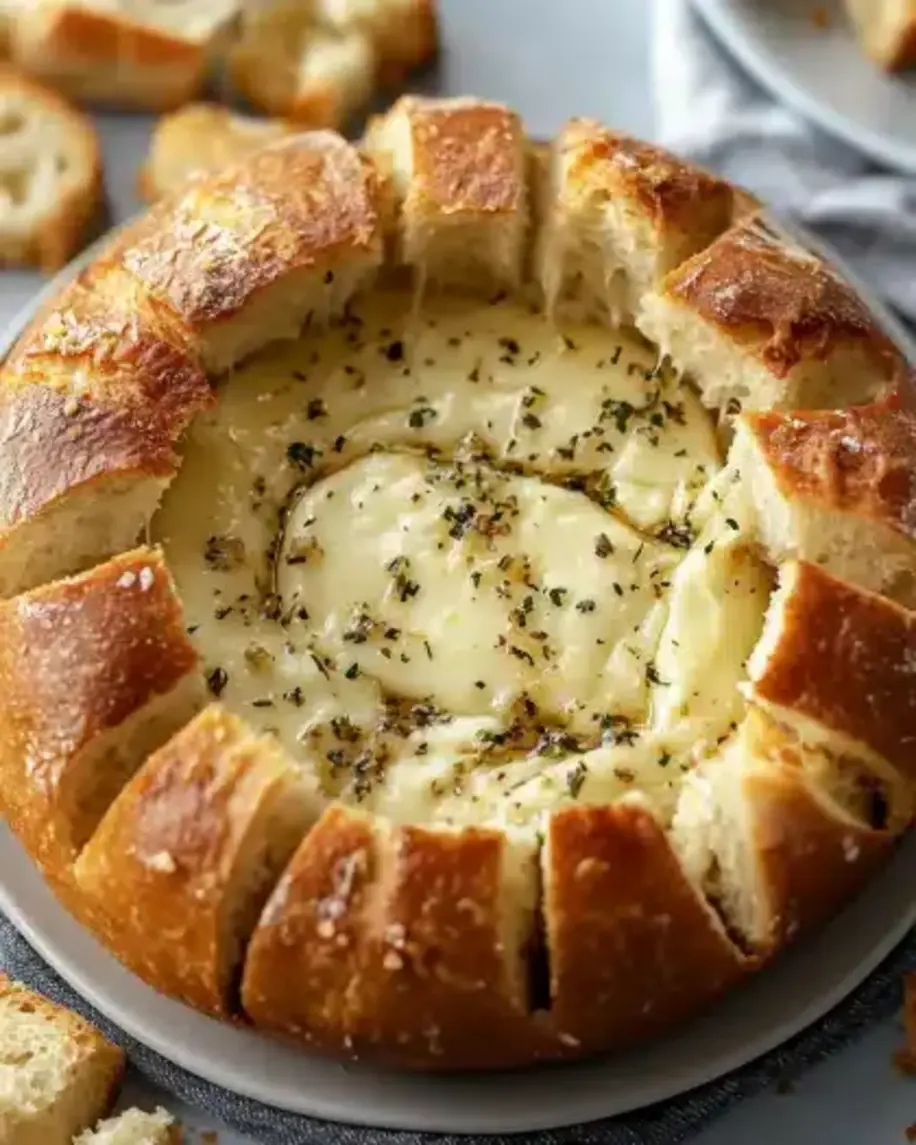
I’ll never forget the first time I saw a bubbling wheel of baked brie emerge from a friend’s oven in Paris. The creamy center, the crisp bread — it felt like pure alchemy. Years later, living in New York and craving that same cozy warmth, I started experimenting with a garlic butter version baked right into a sourdough bread bowl. This baked brie in sourdough bread bowl recipe is the result: a show-stopping appetizer that combines the tang of sourdough, the richness of melted brie, and the punch of garlic butter. It’s become my secret weapon for parties, game nights, and even quiet dinners when I want something truly special.
As it bakes, the sourdough turns golden and crusty on the outside, while the brie melts into a luscious, pull-apart center infused with garlic and herbs. The aroma alone — toasted bread, warm cheese, and a whisper of rosemary — is enough to draw everyone into the kitchen. I love watching guests tear off pieces of the bread bowl and dip them into that creamy, garlicky cheese. It’s messy, it’s indulgent, and it’s exactly the kind of comfort food that brings people together.
With my French training and my Moroccan love for bold flavors, I’ve refined this sourdough bread bowl appetizer to be foolproof even for beginners. The key is hollowing the loaf correctly and using a whole brie wheel (rind and all) so nothing leaks. I’ll show you my pro technique for keeping the bread from getting soggy and how to get that perfect garlic butter balance. Trust me — once you try this easy baked brie recipe, you’ll never go back to a plain cheese board again.
Why This Baked Brie in Sourdough Bread Bowl Recipe Is the Best
The Flavor Secret
My version draws from both my Parisian training and Moroccan roots. The garlic butter is not just a spread — it’s a flavor infusion. I use a generous amount of fresh garlic, parsley, and rosemary, all softened into sweet, creamy butter. This mixture coats the brie and seeps into the sourdough walls, creating layers of savory goodness in every bite. The tangy sourdough beautifully balances the rich, buttery cheese, making each mouthful moreish.
Perfected Texture
I’ve tested this recipe dozens of times to avoid two common problems: a soggy bread bowl or a cheese that’s not fully melted. The trick is to brush the bread lid and outer loaf with olive oil, which creates a barrier that keeps the bread crisp while the brie slowly bakes. The ½-inch bread wall ensures the structure holds without collapsing, and the 20–25 minute bake time is just enough to achieve a molten center without drying out the bread.
Foolproof & Fast
With only 15 minutes of prep and 25 minutes of bake time, this comfort food appetizer is perfect for last-minute entertaining. Even if you’ve never baked brie before, my step-by-step guidance will have you pulling a golden, bubbling masterpiece out of the oven with confidence. Plus, it uses simple, everyday ingredients that you can find at any US grocery store.
Baked Brie in Sourdough Bread Bowl Ingredients
Every ingredient in this recipe has a purpose, and I love sourcing them from my favorite NYC spots — a crusty sourdough from the Sullivan Street Bakery, a creamy French brie from the farmers market, and fresh herbs from my windowsill garden. Here’s what you’ll need.
Ingredients List
- 1 large round sourdough bread loaf (about 1½ pounds)
- 1 (8-ounce) wheel of brie cheese (rind left on)
- ¼ cup unsalted butter, softened
- 3 cloves garlic, minced
- 1 tablespoon fresh parsley, chopped (or 1 teaspoon dried)
- 1 teaspoon fresh rosemary, chopped (or ½ teaspoon dried)
- ½ teaspoon salt
- ¼ teaspoon black pepper
- 1 tablespoon olive oil (for brushing)
- For serving: sliced baguette, crackers, apple slices, or fresh veggies
Ingredient Spotlight
Sourdough Bread Loaf: The hero of this dish. Choose a round, rustic loaf with a sturdy crust. A boule-style sourdough works best because it holds its shape when hollowed. Look for one that’s 1½ to 2 pounds — too small and there won’t be enough room for the brie; too large and the ratio of bread to cheese will be off. At the store, give it a gentle squeeze: it should feel firm but not rock-hard.
Brie Cheese: Use an 8-ounce wheel of good-quality brie. I recommend a double or triple-cream brie for the creamiest melt. Don’t remove the rind — it’s edible and helps the cheese hold its shape as it bakes. For the best flavor, look for a wheel that’s slightly underripe (still firm to the touch) so it melts evenly without becoming too runny. You can also use a Camembert for a similar result.
Garlic Butter: This is where the magic happens. Use unsalted butter so you can control the salt level. Fresh garlic is non-negotiable — it provides that sharp, aromatic kick that dried garlic can’t match. For the herbs, fresh parsley and rosemary add brightness and earthiness, but dried work in a pinch (just use half the amount). A pinch of red pepper flakes in the butter turns this into a spicy version that I love for game day.
| Original Ingredient | Best Substitution | Flavor / Texture Impact |
|---|---|---|
| Sourdough bread loaf | Round artisan bread (ciabatta, Italian loaf) | Less tangy, still good structure; ciabatta may have larger air pockets |
| Brie cheese (8 oz) | Camembert or triple-cream Brie | Very similar texture; Camembert is slightly milder |
| Unsalted butter | Salted butter (reduce added salt by half) | Slightly saltier overall; easy adjustment |
| Fresh parsley & rosemary | ½ tsp dried parsley + ¼ tsp dried rosemary | Less vibrant, but still flavorful; add with garlic |
How to Make Baked Brie in Sourdough Bread Bowl — Step-by-Step
Follow these steps, and you’ll have a stunning, crowd-pleasing appetizer that looks like you spent hours on it. I promise it’s simpler than it looks!
Step 1: Prepare Oven and Bread
Preheat your oven to 375°F (190°C) and line a baking sheet with parchment paper or foil. Slice off the top 1–2 inches of the sourdough loaf to create a “lid.” Set the lid aside. This step is crucial — a clean, flat cut will make your bread bowl look professional.
⚠️ Common Mistake to Avoid: Slicing too deeply. You want the lid to be just thick enough to cover the brie without squashing it. A 1–2 inch slice is perfect.
Step 2: Hollow Out the Bread
Carefully hollow out the center of the bread loaf, leaving a ½-inch thick wall around the edges and bottom. Use a serrated knife or your hands to remove the soft inner bread. Reserve the removed bread pieces — they’re perfect for dipping into the melted cheese later!
💡 mia’s Pro Tip: Don’t throw away the bread scraps! Cut them into cubes and toast them alongside the bread bowl for extra dippers. You can also save them for homemade croutons or breadcrumbs.
Step 3: Make Garlic Butter
In a small bowl, mix the softened butter, minced garlic, parsley, rosemary, salt, and pepper until well combined. The mixture should be spreadable but not runny. Taste and adjust seasoning — the garlic should be fragrant but not overwhelming.
Step 4: Assemble the Bread Bowl
Place the brie wheel in the center of the hollowed bread bowl. Spread the garlic butter mixture evenly over the top and sides of the brie, allowing some to drip onto the bread walls. This is what creates that irresistible garlicky crust on the bread. Don’t be shy — use all the butter!
⚠️ Common Mistake to Avoid: Not buttering the bread walls. The butter not only flavors the bread but also helps it crisp up and prevents sogginess. Make sure to coat the inside of the bread bowl lightly as well.
Step 5: Brush and Bake
Brush the cut edges of the bread lid and the outside of the bread bowl lightly with olive oil. This step is essential for a golden, crispy exterior. Replace the bread lid on top of the brie and bread bowl. Transfer the assembled bread bowl to the prepared baking sheet.
💡 mia’s Pro Tip: For extra crispiness, brush the bottom of the bread bowl with olive oil as well. This prevents it from sticking to the pan and adds another layer of texture.
Step 6: Bake and Check
Bake for 20–25 minutes, until the bread is golden and crusty and the brie is fully melted. To check, gently press the top of the brie through the lid — it should feel soft and molten inside, or peek under the lid to see the cheese bubbling. If the bread is browning too quickly, tent loosely with foil for the last 5 minutes.
Step 7: Cool and Serve
Remove from oven and let cool for 5 minutes. Carefully remove the lid (it will be very hot — use oven mitts!). The melted brie may have expanded and pooled on top; stir gently with a spoon if needed to incorporate any butter that separated. Serve immediately with the reserved bread pieces, sliced baguette, crackers, or your favorite dippers. The bread bowl itself is also edible!
⚠️ Common Mistake to Avoid: Letting the brie cool too long. Baked brie is best served hot and gooey. If it sits too long, the cheese will firm up. Serve within 10 minutes of removing from the oven.
| Step | Action | Duration | Key Visual Cue |
|---|---|---|---|
| 1 | Preheat oven and prepare bread | 5 minutes | Oven at 375°F; bread top sliced cleanly |
| 2 | Hollow out bread loaf | 5 minutes | Even ½-inch wall; reserved bread pieces |
| 3 | Mix garlic butter | 3 minutes | Smooth, spreadable paste |
| 4 | Assemble with brie and butter | 3 minutes | Butter spread over brie and walls |
| 5 | Brush with olive oil and cover | 2 minutes | Oil glistens on lid and sides |
| 6 | Bake | 20–25 minutes | Golden crust; brie bubbles when lid lifted |
| 7 | Cool and serve | 5 minutes | Cheese is molten and stringy |
Serving & Presentation
This baked brie is a centerpiece in itself. I like to place the bread bowl on a large wooden board, surround it with the reserved bread cubes, sliced baguette, crisp apple wedges, and a few crackers. The contrast of warm, gooey cheese against cold, crunchy apples is one of my favorite textures — a nod to the fresh, vibrant salads my mum would serve in Morocco. For an extra touch, sprinkle a little flaky sea salt and fresh thyme on top just before serving.
In my NYC cooking classes, I always tell students to present this appetizer family-style. Let guests tear into the bread bowl with their hands — it’s communal eating at its best. For a more refined presentation, you can serve individual portions by placing a spoonful of the melted brie and garlic butter onto small plates, accompanied by a few bread cubes and a drizzle of honey for sweetness.
I love pairing this with a crisp Sauvignon Blanc or a light Belgian-style ale, which cuts through the richness of the cheese. A fresh green salad with a lemon vinaigrette on the side also works beautifully to balance the indulgence.
| Pairing Type | Suggestions | Why It Works |
|---|---|---|
| Side Dish | Mixed green salad, roasted grapes, pickled vegetables | Acidity and freshness balance the rich cheese |
| Sauce / Dip | Honey, fig jam, balsamic glaze, hot honey | Sweet and spicy elements complement the savory garlic butter |
| Beverage | Sauvignon Blanc, Chardonnay, dry cider, light-bodied ale | Acidity and carbonation cleanse the palate |
| Garnish | Flaky sea salt, fresh thyme sprigs, micro greens, crushed red pepper | Adds visual appeal and extra flavor layers |
Make-Ahead, Storage & Reheating
New York City life keeps me busy, so I love that this appetizer can be partially prepped in advance. You can assemble the entire bread bowl (without baking) and refrigerate it up to 8 hours ahead. Just add 5–10 minutes to the bake time if you’re going straight from the fridge to the oven. If you have leftovers (rare in my house!), here’s how to store and reheat them.
| Method | Container | Duration | Reheating Tip |
|---|---|---|---|
| Refrigerator | Airtight container or tightly wrapped bread bowl | Up to 3 days | Reheat in a 350°F oven for 10 minutes; avoid microwave |
| Freezer | Not recommended for the bread bowl; cheese freezes separately | 1 month (cheese only) | Thaw cheese in fridge overnight and rebake in a new bread bowl |
| Make-Ahead | Assemble, cover with plastic wrap, refrigerate | Up to 8 hours before baking | Add 5–10 minutes bake time; no need to bring to room temperature |
If you’re reheating leftovers, the oven is your best friend. A quick 10-minute blast at 350°F will bring back the creaminess of the cheese and re-crisp the bread. Avoid the microwave — it makes the bread rubbery and the cheese grainy. For a quicker snack, I sometimes scrape the leftover cheese and butter onto crusty bread and toast it under the broiler — pure heaven.
Variations & Easy Swaps
One of the reasons I love this garlic butter brie recipe is how easily it adapts to different tastes and dietary needs. Whether you’re craving a spicy kick or need a gluten-free option, there’s a variation here for you.
| Variation | Key Change | Best For | Difficulty Impact |
|---|---|---|---|
| Spicy Harissa Brie | Add 1–2 tsp harissa paste to garlic butter | North African spice lovers | Easy |
| Gluten-Free Bread Bowl | Use a large gluten-free round boule or sourdough-style loaf | Gluten-free guests | Easy (find a sturdy GF loaf) |
| Herb & Citrus Twist | Add 1 tbsp lemon zest and swap rosemary for thyme | Lighter, fresher flavor profile | Easy |
Spicy Harissa Brie
This variation is a love letter to my Moroccan roots. Stir 1 to 2 teaspoons of harissa paste into the garlic butter before spreading it over the brie. The earthy, smoky heat of the harissa pairs beautifully with the creamy cheese and the tangy sourdough. I often add a drizzle of honey after baking to balance the spice. It’s a huge hit at my game-day gatherings.
Gluten-Free Bread Bowl
Don’t let dietary restrictions keep you from enjoying this appetizer! Look for a large, round gluten-free boule made by brands like Against the Grain or Schär. The texture might be a bit denser, but it still hollows out well and bakes up nicely. Make sure your gluten-free bread is sturdy enough to hold the brie — a tender loaf may collapse. Everything else in the recipe remains the same.
Herb & Citrus Twist
For a brighter, more elegant version, add 1 tablespoon of lemon zest to the garlic butter and swap the rosemary for fresh thyme. This variation is perfect for spring gatherings or a light lunch. The citrus cuts through the richness of the brie, while the thyme adds an earthy, floral note. I love serving this with apple slices and arugula on the side.
What type of Brie is best for baking in a sourdough bread bowl?
For the best results, choose an 8-ounce wheel of double or triple-cream brie. These have a higher fat content, which means they melt into an incredibly creamy, luxurious sauce without becoming oily or separating. Avoid overripe brie that’s very soft and runny at room temperature — it may break down too much during baking and leak through the bread. I always recommend a firm, slightly underripe brie (the center should feel springy when you press it) for the most even and controlled melt. The rind is perfectly edible and helps the cheese hold its shape, so leave it on.
Can I prepare the baked Brie sourdough bowl ahead of time and reheat it?
Absolutely — this is one of my favorite make-ahead tricks for entertaining. You can assemble the entire bread bowl (hollow the loaf, place the brie, spread the garlic butter, and put the lid on) up to 8 hours in advance. Wrap it tightly in plastic wrap and store it in the refrigerator. When you’re ready to serve, simply remove it from the fridge and bake at 375°F, but add 5–10 minutes to the baking time since it’s starting cold. For leftover baked brie, the best reheating method is in a 350°F oven for about 10 minutes. The microwave will make the bread soggy and the cheese grainy, so please avoid it!
How do I prevent the sourdough bread bowl from getting soggy when baking Brie?
This is the most common concern, and it’s easier to solve than you think. First, make sure you leave at least a ½-inch thick wall of bread when hollowing out the loaf — this gives the structure integrity. Second, brush the cut edges of the bread lid and the outside of the bread bowl with olive oil before baking. The oil creates a barrier that prevents the bread from absorbing too much moisture from the cheese. Third, don’t skip the garlic butter on the bread walls; the butter also helps repel moisture and adds flavor. Finally, bake at a high enough temperature (375°F) to crisp the bread quickly while the cheese melts. Follow these tips, and your bowl will be golden and crunchy.
What can I use instead of garlic butter for the baked Brie bread bowl?
If you’re out of garlic butter or looking for a different flavor, there are several delicious alternatives. For a simpler but still buttery version, use plain melted butter and add a pinch of garlic powder and dried herbs. For a dairy-free option, use a high-quality vegan butter (like Miyoko’s) mixed with minced garlic and herbs — it bakes beautifully. You can also skip the butter entirely and use a drizzle of extra-virgin olive oil infused with garlic and rosemary. Another favorite swap: replace the butter with a tablespoon of honey and a splash of balsamic vinegar for a sweet-tangy glaze that caramelizes over the brie. Each option will give you a slightly different but equally delicious result.
Can I use a different cheese instead of Brie for this bread bowl recipe?
Yes, you can experiment with other soft-ripened cheeses, but the results will vary. Camembert is the closest substitute — it has a similar texture and flavor, though it’s slightly milder and less creamy. Triple-cream brie works wonderfully and will be even richer. For a more pronounced flavor, try a small wheel of Brie with truffles or herbs. Avoid hard cheeses like cheddar or gouda, as they won’t melt into the same gooey, dippable consistency. If you want to try something unique, I’ve used a baked chèvre (goat cheese log) with great success — it creates a tangy, spreadable center that pairs beautifully with the garlic butter.
How do I know when the Brie in the bread bowl is fully baked?
The most reliable visual cue is the bread itself: when the sourdough is a deep golden brown and looks crispy, the brie is usually ready. To check the cheese, carefully lift the lid with an oven mitt (it will be steam-hot) — the brie should be bubbling and completely melted, with a soft, creamy center that jiggles slightly if you gently shake the bowl. You can also press the top of the bread lid lightly with a finger; if the brie underneath feels molten and gives way, it’s done. Avoid overbaking, as the cheese will start to separate and become oily. The recipe calls for 20–25 minutes at 375°F, but all ovens vary — check at the 18-minute mark if your oven runs hot.
Is it necessary to hollow out the entire sourdough bread loaf, or can I leave more bread inside?
I recommend hollowing out the bread to a ½-inch thick wall for the best result. If you leave more bread inside, the brie will have less room to melt and expand, and the bread-to-cheese ratio will be off — you’ll end up with mostly bread and not enough creamy goodness. That said, you don’t have to scoop out every last crumb. The goal is to create a bowl that holds the brie snugly, with just enough bread to absorb the garlic butter and become crisp. The reserved bread pieces are perfect for dipping, so nothing goes to waste. For a first-time try, err on the side of hollowing out a bit more rather than less.
What should I serve with baked Brie in a sourdough bread bowl for a party?
This dish is so versatile that you can build an entire appetizer spread around it. I always include a selection of crunchy options like crackers, crostini, and the reserved bread cubes. Fresh fruits are a must — apple slices, pear wedges, and red grapes cut through the richness. For a savory contrast, add roasted nuts (like almonds or pecans), cured meats like prosciutto or salami, and a small bowl of honey or fig jam for dipping. Pickled vegetables like cornichons or pickled onions add acidity. A light arugula salad with lemon vinaigrette on the side completes the spread. For drinks, a crisp white wine or a citrusy IPA pairs perfectly.
Can I make Baked Brie in a sourdough bread bowl if I don’t have sourdough bread?
Absolutely! While sourdough is my top recommendation for its tangy flavor and sturdy structure, you can use any round, artisan-style bread loaf. A ciabatta round or a crusty Italian loaf works well — just make sure it’s about the same size (1½ pounds) and has a firm crust. Avoid soft sandwich bread or baguettes, as they will collapse. If you use a less tangy bread like white bread or whole wheat, consider adding a squeeze of lemon juice to the garlic butter to mimic that sourdough tang. The olive oil brushing and proper hollowing technique still apply to ensure a crispy bowl. I’ve even made this with a pumpernickel loaf for a deeper, earthier flavor — delicious!
How many people does one Baked Brie in a sourdough bread bowl serve?
This recipe is designed as a hearty appetizer for about 8 people, assuming you’re serving it alongside other dishes like vegetables, crackers, and fruit. For a party where it’s the main appetizer, it will generously serve 6. If you’re serving a smaller crowd, you can scale down by using a smaller bread loaf (about 1 pound) and a 4–6 ounce brie wheel, but the hollowing and baking time will need to be reduced slightly — start checking at 15 minutes. Keep in mind that the bread bowl itself is fully edible, so the serving size also depends on how much bread people eat. In my experience, this dish disappears fast, so I’d rather have leftovers than not enough!
Share Your Version!
I hope this baked brie in sourdough bread bowl recipe becomes a staple in your kitchen as much as it is in mine. There’s something magical about pulling that golden, bubbling bowl out of the oven and watching faces light up. If you try it, I’d love to hear how it went — leave a star rating in the comments, or tag me @exorecipes on Instagram or Pinterest when you share your photos. Did you add a spicy twist? Use a different herb? Tell me all about it!
From my NYC kitchen to yours — I hope this recipe brings as much warmth to your table as it does to mine. — mia 🧡
Love This Recipe? Save It to Pinterest!
If you enjoyed this Baked Brie in Sourdough Bread Bowl recipe, don’t let it get lost in your browser tabs! 😄 Pin it now so you can find it again anytime — and explore hundreds more tried-and-tested recipes waiting for you on my Pinterest boards.
👉 Follow mia on Pinterest @chefrecipes2
📌 Pin this recipe · 🔁 Re-pin your favorites · 💬 Tag me when you make it — I love seeing your creations!
💬 I’d love to hear from you!
Did you make this baked brie in sourdough bread bowl? What did you serve with it? Tell me in the comments below — your feedback makes my day!

Baked Brie in Sourdough Bread Bowl with Garlic Butter: The Ultimate Comfort Appetizer
- Prep Time: 15 minutes
- Cook Time: 25 minutes
- Total Time: 40 minutes
- Yield: 8 servings 1x
- Method: Appetizer
- Cuisine: American
Description
A decadent and crowd-pleasing appetizer featuring a wheel of brie cheese baked inside a hollowed sourdough bread bowl, slathered with garlic butter and herbs. The bread becomes crispy and golden, while the brie melts into a creamy, dippable center. Perfect for parties or cozy nights in.
Ingredients
- 1 large round sourdough bread loaf (about 1½ pounds)
- 1 (8-ounce) wheel of brie cheese (rind left on)
- ¼ cup unsalted butter, softened
- 3 cloves garlic, minced
- 1 tablespoon fresh parsley, chopped (or 1 teaspoon dried)
- 1 teaspoon fresh rosemary, chopped (or ½ teaspoon dried)
- ½ teaspoon salt
- ¼ teaspoon black pepper
- 1 tablespoon olive oil (for brushing)
- For serving: sliced baguette, crackers, apple slices, or fresh veggies
Instructions
- Preheat oven to 375°F (190°C). Line a baking sheet with parchment paper or foil.
- Slice off the top 1–2 inches of the sourdough bread loaf to create a 'lid'. Set lid aside.
- Carefully hollow out the center of the bread loaf, leaving a ½-inch thick wall around the edges and bottom. Reserve the removed bread pieces for dipping or croutons.
- In a small bowl, mix the softened butter, minced garlic, parsley, rosemary, salt, and pepper until well combined.
- Place the brie wheel in the center of the hollowed bread bowl. Spread the garlic butter mixture evenly over the top and sides of the brie, allowing some to drip onto the bread walls.
- Brush the cut edges of the bread lid and the outside of the bread bowl lightly with olive oil.
- Replace the bread lid on top of the brie and bread bowl. Transfer the assembled bread bowl to the prepared baking sheet.
- Bake for 20–25 minutes, until the bread is golden and crusty and the brie is fully melted (check by gently pressing the top or peeking under the lid).
- Remove from oven and let cool for 5 minutes. Carefully remove the lid (it will be very hot). The melted brie may have expanded—stir gently with a spoon if needed to incorporate any butter that pooled on top.
- Serve immediately with reserved bread pieces, sliced baguette, crackers, or your favorite dippers. Enjoy!
Notes
For a spicier version, add a pinch of red pepper flakes to the garlic butter. You can also substitute sourdough with a round artisan bread like ciabatta or Italian loaf. To make ahead, assemble the bread bowl (without baking) and refrigerate up to 8 hours; add 5–10 minutes to bake time. Leftover baked brie can be reheated in a 350°F oven for 10 minutes.
Nutrition
- Calories: 380
- Sugar: 3 g
- Fat: 26 g
- Carbohydrates: 28 g
- Protein: 12 g

Tried This Recipe? Leave a Comment!
Did you make this recipe? I’d love to hear how it turned out! Please leave a comment and a rating below. Your feedback helps other home cooks and supports cheerychop.com!