Table of Contents
Baked Chicken Cutlet Rice with Creamy Tomato Sauce – One-Pan Comfort at Its Finest
I still remember the first time I made a creamy tomato sauce that felt like home. It wasn’t in my mother’s kitchen in Marrakech, where tagines and couscous ruled the stove, but years later in my tiny Parisian apartment during culinary school. I had just finished a classic French sauce lesson — sauce tomate enriched with cream — and I thought: what if I pour this over crispy chicken cutlets and rice, bake it all together, and serve it on a busy weeknight? That moment birthed my Baked Chicken Cutlet Rice with Creamy Tomato Sauce, a dish that has become a staple in my New York City kitchen. It’s comfort food with a chef’s twist — simple enough for a beginner, yet layered with flavor deep enough to impress.
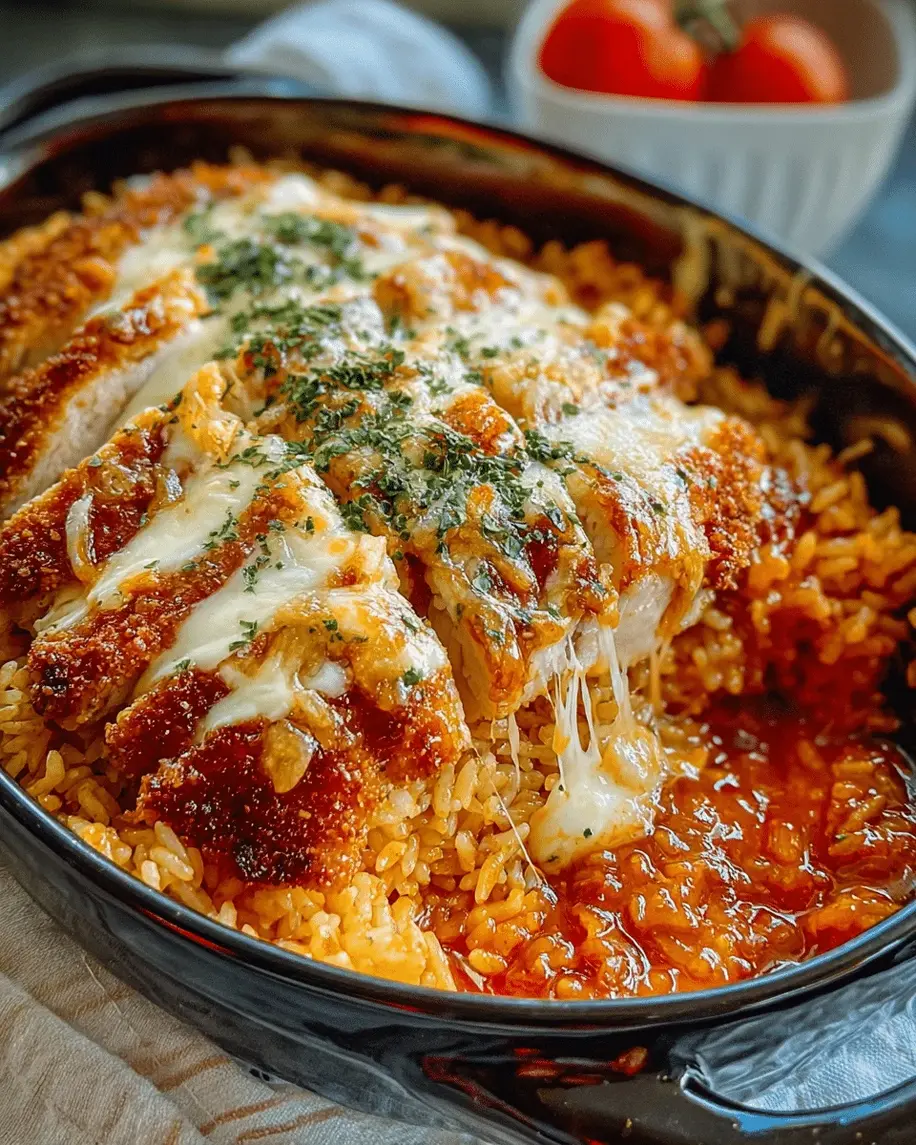
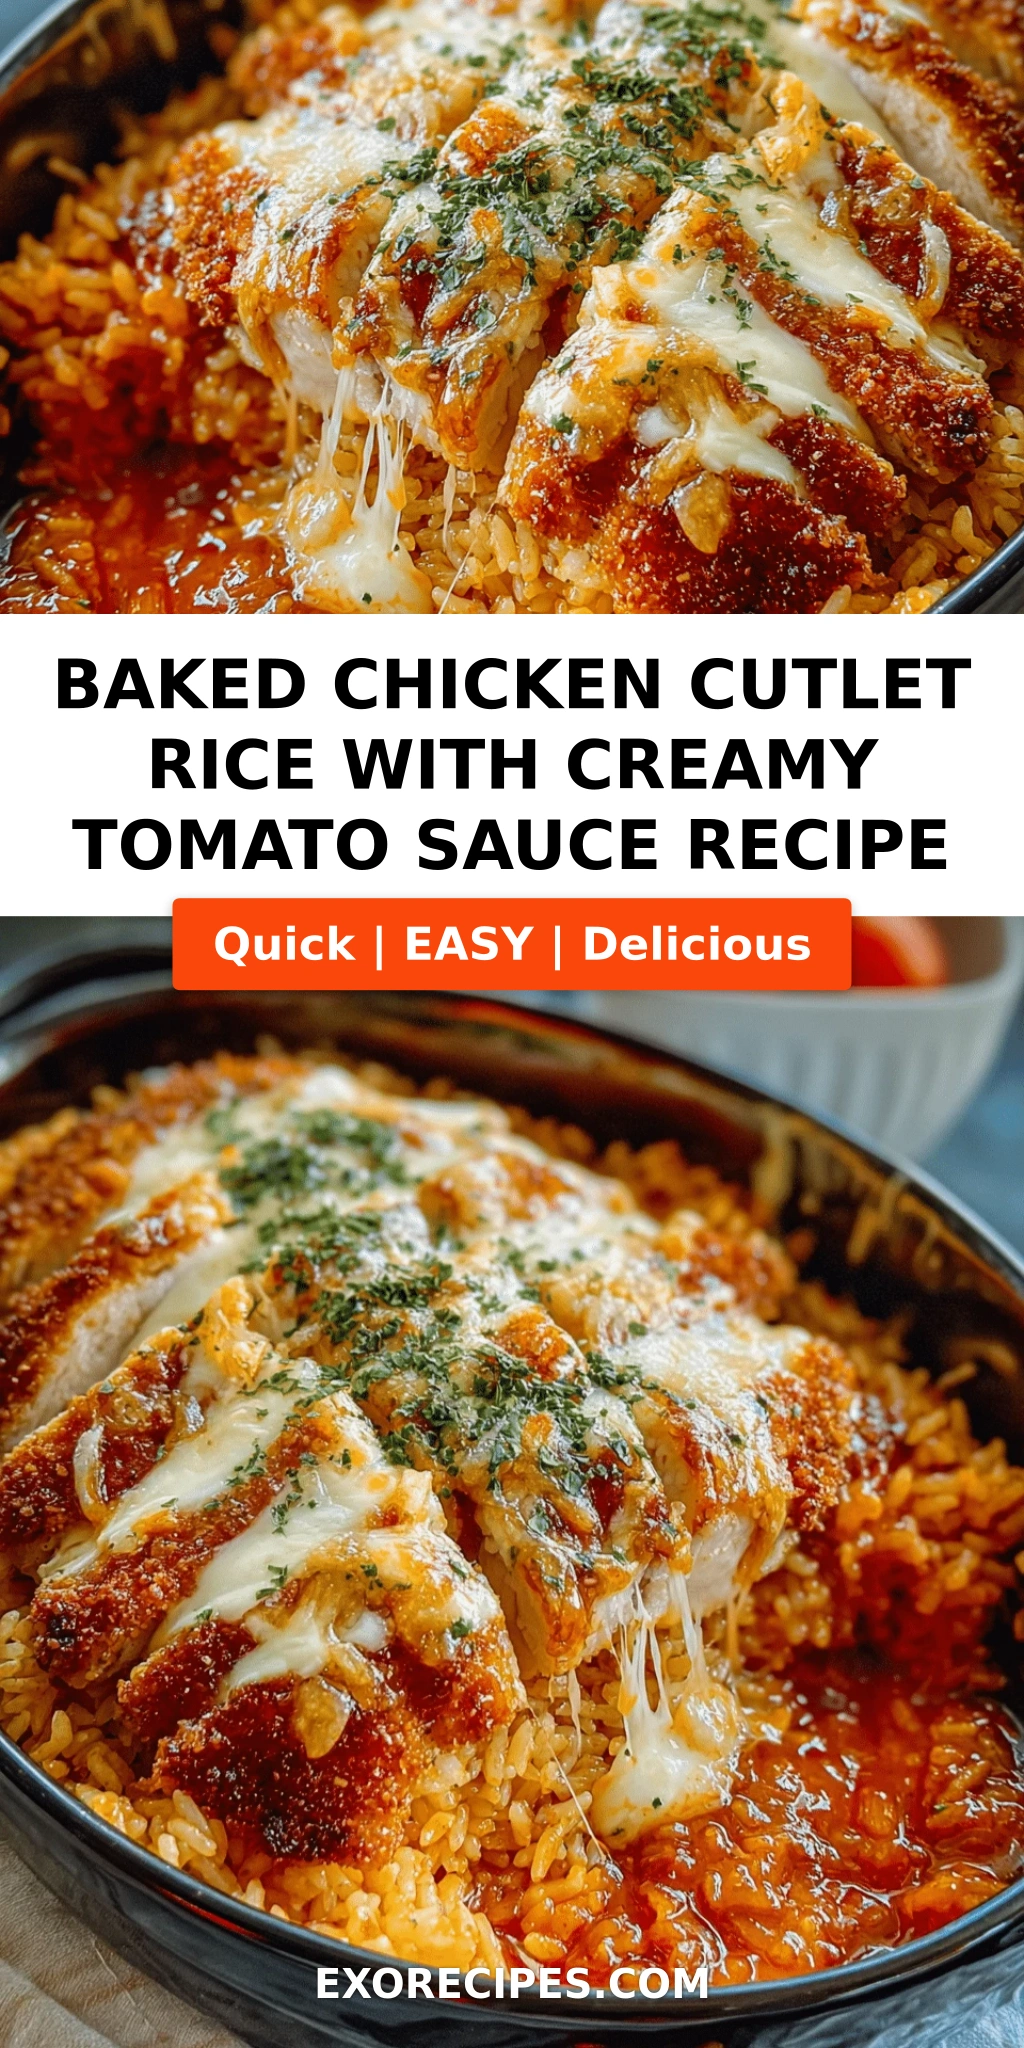
Imagine golden-brown chicken cutlets, their edges caramelized from a quick sear, nestled into a bed of fluffy long-grain rice that’s been stirred into a velvety, Parmesan-flecked tomato cream sauce. The aroma of basil and oregano drifting through your kitchen, the gentle bubbling of the oven — every bite delivers a contrast of textures: the slight crunch of the chicken crust, the creamy sauce clinging to each grain of rice, and the bright hit of fresh parsley at the end. This isn’t just a casserole; it’s a one-pan symphony of flavors that makes you feel like you’ve been cooking all day when really, it came together in under an hour.
What sets my version apart is the technique. Many recipes skip the pan-sear or rely on canned soup, but I learned in Paris that a proper fond — those browned bits left in the skillet — is liquid gold. So I sear the cutlets first, then build the creamy tomato sauce right in the same pan, scraping up every bit of flavor. The rice is cooked separately to ensure perfect texture (no mushy grains here), then folded into the sauce before baking. It’s a foolproof method that guarantees a restaurant-quality meal at home. And as a busy mom and cook, I promise you: this baked chicken cutlet recipe will save your weeknights.
Why This Baked Chicken Cutlet Rice Recipe Is the Best
The Flavor Secret: The combination of crushed tomatoes, heavy cream, and Parmesan creates a sauce that’s both tangy and luxuriously smooth. I add a touch of dried basil and oregano — herbs my mother always kept in her spice cabinet — to bridge North African warmth with Italian-American familiarity. The chicken cutlets absorb just enough of that sauce while staying juicy, thanks to the initial sear that locks in moisture.
Perfected Texture: The key is cooking the rice separately before combining. This prevents the rice from turning to mush and allows it to soak up the creamy sauce without becoming waterlogged. I also use a large oven-safe skillet (cast iron is my go-to) so the rice forms a slightly crispy edge around the pan — a little golden crust that’s pure joy.
Foolproof & Fast: With just 15 minutes of active prep and 50 minutes of hands-off oven time, this dish is forgiving. Even if your chicken cutlets aren’t perfectly even, the sauce keeps them tender. It’s the kind of dinner you can assemble while helping with homework or chatting with a friend — and it always turns out beautifully.
Baked Chicken Cutlet Rice Ingredients
Every ingredient in this recipe has a job. I pick up my chicken cutlets from the butcher at the Union Square Greenmarket, my crushed tomatoes from a little Italian shop in Arthur Avenue, and my Parmesan from a cheese counter in Eataly. But you can find everything at your local supermarket. Below is the complete list, followed by a spotlight on the stars.
Ingredients List
- 1 cup uncooked long-grain white rice
- 1.5 cups water
- 1 lb chicken cutlets (about 4 cutlets)
- 1 tsp salt
- 1/2 tsp black pepper
- 1/2 tsp garlic powder
- 1/2 tsp paprika
- 1 tbsp olive oil
- 1 tbsp butter
- 1 small onion, diced
- 2 cloves garlic, minced
- 1 can (14.5 oz) crushed tomatoes
- 1/2 cup heavy cream
- 1/4 cup grated Parmesan cheese
- 1 tsp dried basil
- 1 tsp dried oregano
- Salt and pepper to taste
- 1/4 cup chopped fresh parsley (for garnish)
Ingredient Spotlight
Chicken Cutlets: Look for cutlets that are about 1/4-inch thick. If they’re thicker, place them between plastic wrap and gently pound to even thickness. This ensures even cooking and a tender bite. Substitution: boneless, skinless chicken breasts sliced in half horizontally work perfectly.
Crushed Tomatoes: I recommend San Marzano tomatoes for their low acidity and natural sweetness. In a pinch, use canned diced tomatoes and pulse them in a food processor for a few seconds. Do not use tomato sauce or paste alone – you need the texture of crushed.
Heavy Cream: This gives the sauce its luxurious, velvety body. For a lighter version, substitute half-and-half or evaporated milk – the sauce will be slightly thinner but still delicious. Avoid milk or cream with less than 18% fat for best results.
Parmesan Cheese: Always grate it fresh from a wedge. Pre-grated cheese contains anti-caking agents that can make the sauce grainy. The nutty, salty flavor of Parmigiano-Reggiano elevates the whole dish.
| Original Ingredient | Best Substitution | Flavor / Texture Impact |
|---|---|---|
| Chicken cutlets | Boneless, skinless chicken breasts (halved) | Slightly thicker, need 2 extra minutes sear per side; still tender. |
| Heavy cream | Half-and-half or evaporated milk | Lighter, less rich; sauce may be slightly thinner. |
| Crushed tomatoes | Diced tomatoes (pulsed in processor) | Slightly chunkier texture; still works beautifully. |
| Parmesan cheese | Pecorino Romano or Grana Padano | Saltier, more tangy; grate fresh for best melt. |
How to Make Baked Chicken Cutlet Rice – Step-by-Step
Follow these steps and you’ll have a beautiful one-pan dinner that looks like you spent hours on it. I’ve broken it down with my chef’s tips and the mistakes I see home cooks make most often.
Step 1: Preheat and Cook the Rice
Preheat your oven to 375°F (190°C). In a medium saucepan, bring 1.5 cups of water to a boil. Add 1 cup of uncooked long-grain white rice, reduce the heat to low, cover, and let it simmer for 15–20 minutes, until all the water is absorbed and the rice is tender. Fluff with a fork and set aside.
💡 mia’s Pro Tip: Rinse the rice under cold water before cooking to remove excess starch. This keeps the grains separate and fluffy.
Step 2: Season the Chicken
Pat the chicken cutlets dry with paper towels. Season both sides evenly with 1 tsp salt, 1/2 tsp black pepper, 1/2 tsp garlic powder, and 1/2 tsp paprika. Let them sit at room temperature for about 5 minutes while you prep the pan.
⚠️ Common Mistake to Avoid: Don’t skip drying the chicken. Moisture on the surface prevents a good sear.
Step 3: Sear the Chicken
Heat 1 tbsp olive oil and 1 tbsp butter in a large oven-safe skillet over medium-high heat. Once the butter is foaming, add the seasoned chicken cutlets in a single layer (work in batches if needed). Cook for 3–4 minutes per side until deep golden brown. Remove the chicken to a plate and set aside.
💡 mia’s Pro Tip: Don’t overcrowd the pan. If you crowd it, the chicken will steam instead of sear. A cast-iron skillet holds heat best for that beautiful crust.
Step 4: Sauté the Aromatics
In the same skillet (with the fond still in the pan), reduce the heat to medium and add the diced onion. Cook for 2–3 minutes, stirring frequently, until softened and translucent. Add the minced garlic and cook for 30 seconds until fragrant.
⚠️ Common Mistake to Avoid: Garlic burns quickly, so keep it moving and don’t let it go beyond 30 seconds.
Step 5: Build the Creamy Tomato Sauce
Pour in the 14.5 oz can of crushed tomatoes, scraping up any browned bits from the bottom of the skillet. Stir in 1/2 cup heavy cream, 1/4 cup grated Parmesan, 1 tsp dried basil, and 1 tsp dried oregano. Season with salt and pepper to taste. Let the sauce simmer for 2–3 minutes, stirring occasionally, until it thickens slightly.
💡 mia’s Pro Tip: Taste the sauce before adding the rice. It should be slightly salty and rich — the rice will absorb some of that flavor.
Step 6: Combine Rice and Sauce
Add the cooked rice to the skillet and stir gently until every grain is coated in the creamy tomato sauce. Spread the rice mixture into an even layer.
⚠️ Common Mistake to Avoid: Stirring too vigorously can break the rice grains. Use a folding motion.
Step 7: Nestle the Chicken
Return the browned chicken cutlets to the skillet, nestling them into the rice mixture. They can be partially submerged — the sauce will bubble up around them as they bake.
💡 mia’s Pro Tip: If your skillet isn’t quite big enough, you can transfer everything to a 9×13 baking dish before adding the chicken. Just make sure it’s oven-safe.
Step 8: Bake
Transfer the skillet to the preheated oven and bake uncovered for 20–25 minutes, until the chicken is cooked through (internal temperature of 165°F) and the sauce is bubbly around the edges.
⚠️ Common Mistake to Avoid: Don’t cover the skillet — you want the top to brown slightly and the sauce to reduce, not steam.
Step 9: Garnish and Serve
Remove the skillet from the oven and let it rest for 5 minutes. Sprinkle with 1/4 cup chopped fresh parsley for a burst of color and freshness. Serve hot directly from the skillet or spoon onto plates.
💡 mia’s Pro Tip: A final grating of Parmesan over the top just before serving adds a lovely salty finish.
| Step | Action | Duration | Key Visual Cue |
|---|---|---|---|
| 1 | Cook rice | 15-20 min | Tender, water absorbed |
| 2 | Season chicken | 2 min | Spices evenly distributed |
| 3 | Sear chicken | 6-8 min | Golden-brown crust |
| 4 | Sauté onion/garlic | 3 min | Onion translucent, garlic fragrant |
| 5 | Make sauce | 2-3 min | Bubbling, slightly thickened |
| 6 | Combine rice & sauce | 1 min | Evenly coated grains |
| 7 | Nestle chicken | 1 min | Chicken settled into rice |
| 8 | Bake | 20-25 min | Bubbly edges, 165°F chicken |
| 9 | Garnish & serve | 5 min rest | Fresh parsley, hot skillet |
Serving & Presentation
I love serving this dish straight from the skillet — it feels rustic and inviting, like something you’d find in a trattoria in Little Italy or a cozy home in the hills of Tuscany. Spoon the creamy rice onto plates, place a chicken cutlet on top, and finish with a shower of fresh parsley. A sprinkle of extra Parmesan and a crack of black pepper never hurt anyone.
For a complete meal, I pair it with a simple arugula salad dressed with lemon and olive oil — the peppery greens cut through the richness. Sometimes I’ll roast asparagus or broccoli on the side, drizzled with balsamic glaze. And because my Moroccan roots love a little heat, I sometimes serve a side of harissa-spiked yogurt for dipping the chicken. It’s unexpected but absolutely delicious.
When I’m in the mood for a wine pairing, a light Pinot Noir or a crisp Sauvignon Blanc works beautifully. For a non-alcoholic option, try sparkling water with a squeeze of lemon — it cleanses the palate between bites.
| Pairing Type | Suggestions | Why It Works |
|---|---|---|
| Side Dish | Arugula salad, roasted asparagus, garlic bread | Bright acidity contrasts creamy sauce; greens add freshness. |
| Sauce / Dip | Extra tomato cream, harissa yogurt, chimichurri | Adds depth or a spicy kick; yogurt cools the heat. |
| Beverage | Pinot Noir, Sauvignon Blanc, lemon sparkling water | Wine cuts richness; sparkling water cleanses palate. |
| Garnish | Fresh parsley, grated Parmesan, cracked black pepper | Adds color, freshness, and a salty umami finish. |
Make-Ahead, Storage & Reheating
As a busy New York mom, I often make this on Sunday to enjoy on busy weeknights. The good news: this dish reheats beautifully. I like to prepare the rice and sauce separately, then combine and bake fresh. But you can also assemble the whole thing and refrigerate it unbaked for up to 2 days.
| Method | Container | Duration | Reheating Tip |
|---|---|---|---|
| Refrigerator | Airtight container or covered skillet | 3-4 days | Reheat in a 350°F oven for 15-20 min, covered with foil to prevent drying. |
| Freezer | Freezer-safe container or heavy-duty ziplock bag | Up to 3 months | Thaw overnight in fridge, then reheat in oven at 350°F until bubbly. |
| Make-Ahead | Assemble in skillet, cover, refrigerate | Up to 2 days before baking | Add 5-10 min to bake time if starting cold; check internal temp of chicken. |
If reheating in the microwave (I do this only in a pinch), add a splash of milk or cream to the rice before covering to restore moisture. But the oven gives you back that slightly crispy edge on the chicken and the bubbly sauce that makes this dish so special. One more thing: if you’re freezing, I recommend freezing the chicken separately from the rice-sauce mixture to avoid the chicken becoming dry upon reheating.
Variations & Easy Swaps
This recipe is a perfect canvas for your creativity. I’ve tested these variations in my own kitchen and they all work beautifully. Check the table for at-a-glance options, then read on for my three favorites.
| Variation | Key Change | Best For | Difficulty Impact |
|---|---|---|---|
| Spicy Moroccan Twist | Add 1 tsp harissa paste to sauce, top with preserved lemon | Lovers of North African flavors | Easy – just stir in harissa |
| Dairy-Free / Lighter | Replace heavy cream with full-fat coconut milk; omit Parmesan or use vegan | Dairy-free or lower-calorie meals | Easy – slight coconut flavor note |
| Mushroom & Spinach | Sauté 8 oz sliced mushrooms with onion; stir in 2 cups spinach before baking | Adding extra veggies | Easy – just extra sautéing |
Spicy Moroccan Twist
This one brings me back to my childhood kitchen in Marrakech. Add 1 teaspoon of harissa paste to the sauce along with the tomatoes — it adds a smoky, spicy depth that pairs beautifully with the creamy tomato. Top the finished dish with strips of preserved lemon and a sprinkle of toasted almonds. The heat is gentle at first, then builds. My Parisian chef instructor would have approved of this cross-cultural fusion.
Dairy-Free / Lighter Version
For a dairy-free adaptation, swap the heavy cream with full-fat coconut milk (the creamy part from the can). Use a vegan Parmesan or simply omit it — the coconut milk adds enough richness. You’ll get a subtle coconut note, which actually works well with the tomato and spices. I tested this for a friend with lactose intolerance and she went back for seconds. The sauce is slightly thinner but still luscious.
Mushroom and Spinach
When I hit the Union Square Greenmarket in fall, I load up on cremini mushrooms and tender spinach. Sauté 8 oz of sliced mushrooms with the onion, then stir in 2 cups of fresh spinach right before adding the rice — it wilts into the sauce beautifully. This variation turns the dish into a true vegetable-forward meal while keeping all that creamy comfort intact. It’s a great way to sneak more greens onto the table.
How do you keep baked chicken cutlets from getting dry in the creamy tomato sauce?
The key is the initial sear. Searing the chicken cutlets over medium-high heat for 3–4 minutes per side creates a golden-brown crust that locks in moisture. Then, when the chicken bakes in the sauce, it stays tender and juicy because the sauce insulates it. Also, I always use cutlets that are about 1/4-inch thick — if they’re thicker, pound them gently. Finally, don’t overbake. Check for an internal temperature of 165°F; any longer and the chicken can start to dry out.
Can I use a different type of rice, like brown rice or jasmine rice, for baked chicken cutlet rice?
Absolutely. For brown rice, cook it separately first because it takes longer — about 40–45 minutes — and use a bit more water (about 2 cups). Jasmine rice works wonderfully; it’s slightly fragrant and cooks in 15 minutes just like long-grain white. Basmati is also great. The key is to cook any rice until just tender before adding it to the sauce, because it will continue to soften slightly during the bake. Avoid instant rice or risotto rice — they won’t hold up well.
What is the best cooking time and temperature for baked chicken cutlet rice with creamy tomato sauce?
I bake this dish uncovered at 375°F (190°C) for 20–25 minutes. That temperature is high enough to bubble the sauce and heat the rice through without drying out the chicken. If you’re using a glass or ceramic dish instead of a skillet, you might need an extra 5 minutes because those materials don’t conduct heat as well. Always use an instant-read thermometer to ensure the chicken reaches 165°F — that’s your most reliable cue regardless of time.
How can I make the creamy tomato sauce dairy-free or lighter for this recipe?
For a dairy-free version, substitute the heavy cream with full-fat coconut milk — the creamy part of the can, not the watery part. The sauce will be slightly thinner and have a gentle coconut flavor that pairs surprisingly well with tomato. Omit the Parmesan or use a vegan Parmesan alternative. For a lighter but still dairy version, use half-and-half or evaporated milk instead of heavy cream. The sauce won’t be as thick, so you might want to let it simmer an extra minute to reduce. Either way, you’ll still get a deliciously comforting meal.
Can I use chicken thighs instead of cutlets?
Yes, boneless, skinless chicken thighs are a great substitute. They are more forgiving and stay juicier because of their higher fat content. Sear them the same way—3–4 minutes per side—but they may need an extra 5–10 minutes in the oven to reach 165°F. I recommend pounding them to an even thickness if they’re very thick. Thighs also bring a deeper chicken flavor to the creamy tomato sauce. Just adjust the bake time accordingly.
Can I prepare this dish ahead of time and refrigerate before baking?
Absolutely. You can assemble the entire dish in the skillet (or a baking dish) up to two days in advance. Simply follow the recipe through step 7, cover the skillet with foil or plastic wrap, and refrigerate. When you’re ready to bake, add about 10 minutes to the oven time to account for the cold start. Check that the chicken reaches 165°F. The flavors actually meld beautifully overnight, making it even more delicious. This is my go-to Sunday meal prep for busy weeks.
What type of skillet is best for this one-pan chicken and rice bake?
A large oven-safe skillet is essential. I use a 12-inch cast-iron skillet because it retains heat beautifully, gives a fantastic sear on the chicken, and goes straight from stovetop to oven. If you don’t have cast iron, a stainless steel or enameled cast-iron skillet works well too. Avoid non-stick skillets unless they are labeled oven-safe up to 375°F — many non-stick pans have plastic handles that can’t handle oven heat. In a pinch, sear the chicken in any pan and transfer everything to a 9×13 baking dish for the oven.
How do I prevent the rice from turning mushy in this casserole?
The trick is to cook the rice separately until just tender, then stir it into the sauce right before baking. That way the rice absorbs some of the creamy tomato sauce during baking but doesn’t become waterlogged. Also, don’t add extra liquid to the sauce — the crushed tomatoes and cream provide enough moisture. If you’re using a more absorbent rice like brown rice, consider undercooking it slightly (about 2 minutes less) before combining. The short oven time is just enough to marry the flavors without turning grains into mush.
Share Your Version!
I would love to hear how this Baked Chicken Cutlet Rice with Creamy Tomato Sauce turned out in your kitchen. Did you try a variation? Did the whole family clean their plates? Snap a photo and tag me on Instagram or Pinterest — I personally read every comment and love seeing your creations. And don’t forget to leave a star rating below; your feedback helps other home cooks find recipes they can trust. If you have a question about a substitution or technique, ask away in the comments — I’m always here to help.
From my NYC kitchen to yours — I hope this recipe brings as much warmth to your table as it does to mine. — mia 🧡
Love This Recipe? Save It to Pinterest!
If you enjoyed this Baked Chicken Cutlet Rice with Creamy Tomato Sauce recipe, don’t let it get lost in your browser tabs! 😄 Pin it now so you can find it again anytime — and explore hundreds more tried-and-tested recipes waiting for you on my Pinterest boards.
👉 Follow mia on Pinterest @exorecipe
📌 Pin this recipe · 🔁 Re-pin your favorites · 💬 Tag me when you make it — I love seeing your creations!

Baked Chicken Cutlet Rice with Creamy Tomato Sauce
- Prep Time: 15 minutes
- Cook Time: 50 minutes
- Total Time: 1 hour 5 minutes
- Yield: 4 servings 1x
- Method: Main Course
- Cuisine: American-Italian
Description
A comforting and easy one-pan meal featuring crispy baked chicken cutlets over rice, smothered in a rich and creamy tomato sauce. Perfect for a family dinner.
Ingredients
- 1 cup uncooked long-grain white rice
- 1.5 cups water
- 1 lb chicken cutlets (about 4 cutlets)
- 1 tsp salt
- 1/2 tsp black pepper
- 1/2 tsp garlic powder
- 1/2 tsp paprika
- 1 tbsp olive oil
- 1 tbsp butter
- 1 small onion, diced
- 2 cloves garlic, minced
- 1 can (14.5 oz) crushed tomatoes
- 1/2 cup heavy cream
- 1/4 cup grated Parmesan cheese
- 1 tsp dried basil
- 1 tsp dried oregano
- Salt and pepper to taste
- 1/4 cup chopped fresh parsley (for garnish)
Instructions
- Preheat oven to 375°F (190°C).
- In a medium saucepan, bring water to a boil. Add rice, reduce heat to low, cover and cook for 15-20 minutes until tender. Set aside.
- Season chicken cutlets on both sides with salt, pepper, garlic powder, and paprika.
- Heat olive oil and butter in a large oven-safe skillet over medium-high heat. Add chicken cutlets and cook for 3-4 minutes per side until golden brown. Remove chicken and set aside.
- In the same skillet, add diced onion and cook for 2-3 minutes until softened. Add minced garlic and cook for 30 seconds until fragrant.
- Pour in crushed tomatoes, then stir in heavy cream, Parmesan cheese, dried basil, and dried oregano. Season with salt and pepper to taste. Let the sauce simmer for 2-3 minutes.
- Stir the cooked rice into the creamy tomato sauce until combined.
- Nestle the browned chicken cutlets back into the skillet over the rice mixture.
- Transfer the skillet to the preheated oven and bake uncovered for 20-25 minutes, until chicken is cooked through and the sauce is bubbly.
- Remove from oven, garnish with fresh parsley, and serve hot.
Notes
For a lighter version, substitute heavy cream with half-and-half or evaporated milk. You can also add a pinch of red pepper flakes for heat.
Nutrition
- Calories: 620
- Sugar: 8g
- Fat: 28g
- Carbohydrates: 45g
- Protein: 42g
k">
Tried This Recipe? Leave a Comment!
Did you make this recipe? I’d love to hear how it turned out! Please leave a comment and a rating below. Your feedback helps other home cooks and supports cheerychop.com!
For more delicious inspiration, follow me on Pinterest!