Table of Contents
Baked Chicken Thighs with Roasted Vegetables and Lemon: The Ultimate Mediterranean-Inspired Meal
I still remember the first time I made baked chicken thighs with roasted vegetables for a dinner party in my tiny Paris apartment. I was a young cook just out of culinary school, craving the bold, sunny flavors of my Moroccan childhood but armed with French technique. That night, I roasted chicken thighs with lemon, peppers, and zucchini — and the aroma drew neighbors to my door. This Mediterranean chicken thighs recipe is my love letter to that moment: a one-pan chicken and vegetables dinner that tastes like you spent hours tending it, but comes together with almost no fuss. The lemon herb chicken thighs get impossibly juicy, the vegetables caramelize at the edges, and the whole dish sings with oregano, thyme, and a whisper of smoked paprika.
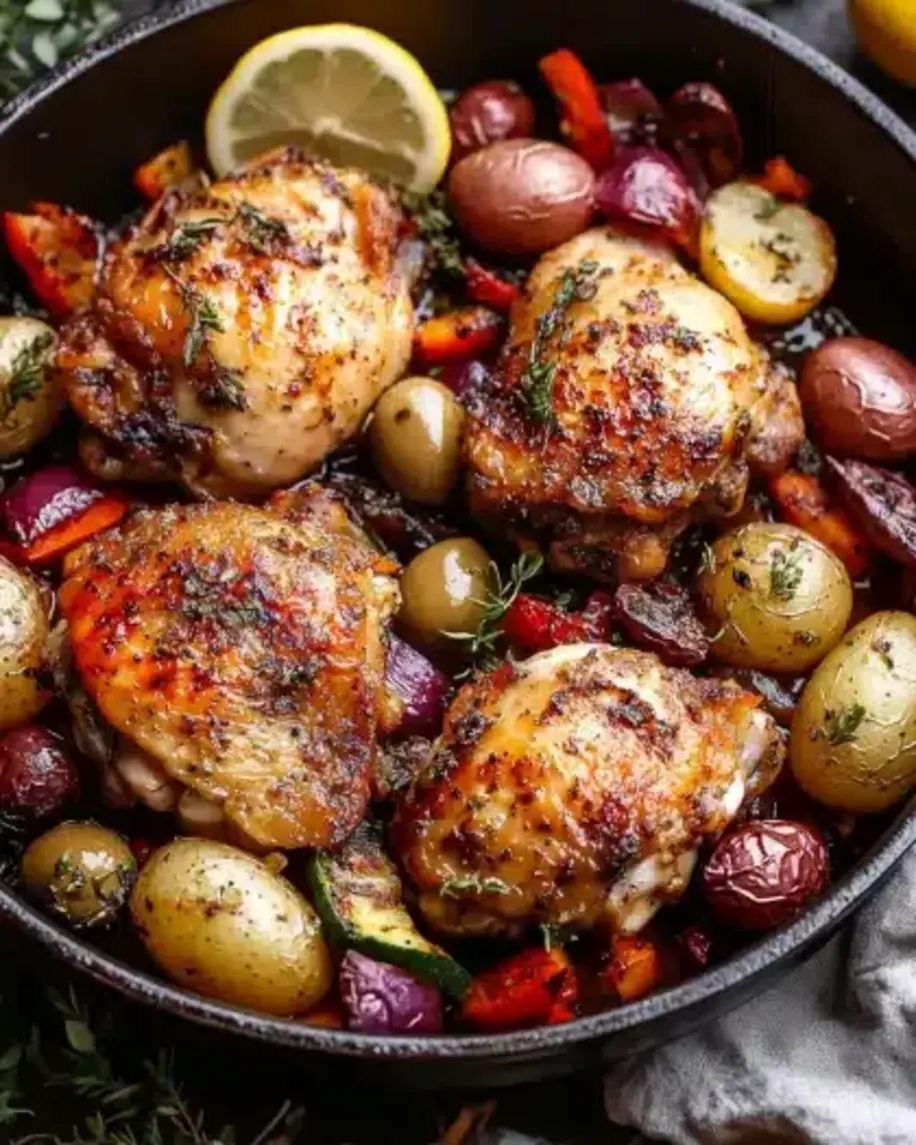
Picture this: golden, crackling chicken skin pulling away from tender meat that falls off the bone. Bell peppers softened into sweet, jammy ribbons. Zucchini with charred, caramelized edges. Red onion wedges that turn buttery and mild. And throughout it all, thin slices of lemon that roast into jewel-like bursts of acidity, cutting through the richness and waking up every single bite. The garlic melts into the olive oil, creating a pan sauce that coats everything in savory, herbaceous goodness. This isn’t just a healthy Mediterranean dinner — it’s the kind of meal that makes you close your eyes at the table.
What sets my version apart is a trick I learned from my mother’s kitchen in Marrakech: pat the chicken thighs dry before seasoning, then let them sit with the spices for ten minutes while the oven preheats. That short rest allows the flavors to penetrate the meat, and the dry surface guarantees that shatteringly crisp skin. I also scatter Kalamata olives into the pan — an optional step that adds a briny pop against the sweet roasted vegetables. One-pan chicken and vegetables has never been this thoughtful. Stick with me, and I’ll show you the exact temperature, timing, and technique to get perfect results every time.
Why This Baked Chicken Thighs with Roasted Vegetables Recipe Is the Best
The Flavor Secret. Most recipes just toss everything in a pan and hope for the best. I season the chicken and vegetables separately, which means the chicken gets a concentrated rub of oregano, thyme, smoked paprika, salt, and pepper, while the vegetables stay bright and lightly seasoned. The lemon slices do double duty — they perfume the chicken as it roasts and then soften into edible morsels that you can eat right alongside the meat. This Mediterranean chicken thighs recipe draws on my French training in layering flavors: each component is seasoned with intention, and they come together in the oven to create something greater than the sum of their parts.
Perfected Texture. I spent weeks testing this one-pan chicken and vegetables to get the skin exactly right — crispy enough to shatter, but not dry. The solution was bone-in, skin-on thighs (always my preference for roasting) and a 400°F oven that’s hot enough to render fat quickly without burning the vegetables. The lemons release steam that keeps the chicken moist while the skin above the liquid stays exposed and crisps beautifully. My Paris chef taught me that moisture management is everything in roasting, and this recipe nails it.
Foolproof & Fast. If you can chop vegetables and toss them in oil, you can make this healthy Mediterranean dinner. There’s no marinating overnight, no complicated basting — just 15 minutes of prep and 40 minutes in the oven. The recipe is forgiving enough for a Tuesday night but impressive enough for company. And because it’s all on one sheet pan, cleanup is practically nonexistent. Whether you’re a seasoned cook or someone who’s never roasted a chicken thigh in your life, this recipe works.
Baked Chicken Thighs with Roasted Vegetables Ingredients
I source most of my produce from the Union Square Greenmarket in Manhattan, where the bell peppers in late summer are almost obscenely sweet. In colder months, I rely on the reliable abundance of my local Fairway market. The key is choosing vegetables that can stand up to 40 minutes of roasting without turning to mush — bell peppers, zucchini, and red onion are my go-to trio. And the lemon, of course: I use thin slices because they soften into the dish rather than overwhelming it.
Ingredients List
- 4 bone-in, skin-on chicken thighs (about 1.5 lbs)
- 2 tablespoons olive oil
- 1 lemon, thinly sliced
- 1 red bell pepper, cut into chunks
- 1 yellow bell pepper, cut into chunks
- 1 zucchini, sliced into half-moons
- 1 red onion, cut into wedges
- 3 cloves garlic, minced
- 1 teaspoon dried oregano
- 1 teaspoon dried thyme
- 1/2 teaspoon smoked paprika
- Salt and black pepper to taste
- 1/4 cup pitted Kalamata olives (optional)
- Fresh parsley for garnish
Ingredient Spotlight
Chicken Thighs. Bone-in, skin-on thighs are the star here. The bone adds flavor and prevents the meat from drying out; the skin renders into crispy perfection. Look for thighs that are similar in size so they cook evenly. If your grocery store only sells skinless thighs, this recipe will still work, but you’ll miss that crackling crust. In a pinch, boneless, skinless thighs work too — just reduce the cook time by 8–10 minutes.
Lemons. Use a firm, bright-yellow lemon with smooth skin. Thin slices are essential — if they’re too thick, they won’t soften enough. I use the entire slice, peel and all, because the pith adds a gentle bitterness that balances the sweet vegetables. Avoid bottled lemon juice here; nothing compares to the way fresh lemon slices infuse the dish as they roast.
Smoked Paprika. This is my secret weapon. Unlike sweet or hot paprika, smoked paprika (pimentón) adds a subtle wood-fired depth that transports the dish straight to a Mediterranean grill. It’s not spicy — just deeply aromatic. Look for it in the spice aisle of any well-stocked US grocery store. If you don’t have it, use sweet paprika plus a pinch of cayenne, though the flavor won’t be quite as complex.
Kalamata Olives. Entirely optional, but I never skip them. Their brine cuts through the richness of the chicken and adds a pop of color and texture. If you’re not an olive fan, capers make a good substitute — use 1 tablespoon, rinsed and drained. Or skip them altogether; the dish is still magnificent.
| Original Ingredient | Best Substitution | Flavor / Texture Impact |
|---|---|---|
| Bone-in, skin-on chicken thighs | Boneless, skinless thighs or bone-in breasts | Less crispy skin; reduce cook time 8–10 min for boneless, 5–10 min for breasts |
| Fresh lemon slices | 2 tbsp lemon juice + 1 tsp lemon zest added at end | Loses roasted lemon’s sweetness; brighter but less integrated |
| Smoked paprika | Sweet paprika + pinch of cayenne | Less smoky depth; slightly more heat |
| Kalamata olives | Capers (1 tbsp, rinsed) or omit | Slightly less briny; still bright |
| Zucchini | Yellow summer squash or eggplant | Similar texture; eggplant adds earthiness |
How to Make Baked Chicken Thighs with Roasted Vegetables — Step-by-Step
Trust me when I say this is one of the easiest, most rewarding dinners you’ll ever make. Follow these steps, and you’ll have a restaurant-quality meal on the table with minimal effort.
Step 1: Prep and Season the Chicken
Preheat your oven to 400°F (200°C). While it heats, pat the chicken thighs completely dry with paper towels — this is crucial for crispy skin. In a large bowl, toss the thighs with 1 tablespoon olive oil, dried oregano, dried thyme, smoked paprika, salt, and black pepper. Use your hands to massage the spices into every surface. Set aside for at least 10 minutes while you prep the vegetables.
💡 mia’s Pro Tip: Patting the chicken dry might seem like a small step, but it’s the difference between soggy skin and golden, shatteringly crisp skin. My Paris chef drilled this into me: moisture is the enemy of crispiness.
Step 2: Prep the Vegetables
In a separate bowl, combine the bell pepper chunks, zucchini half-moons, red onion wedges, and minced garlic. Drizzle with the remaining 1 tablespoon olive oil, season with salt and pepper, and toss well. Spread the vegetables evenly in a large baking dish or rimmed sheet pan — give them room to caramelize rather than steam.
⚠️ Common Mistake to Avoid: Crowding the pan. If the vegetables are piled on top of each other, they’ll steam instead of roast. Use the largest sheet pan you have, and spread everything in a single layer.
Step 3: Assemble and Bake
Nestle the seasoned chicken thighs skin-side up among the vegetables. Tuck the lemon slices around the chicken — they’ll soften and caramelize as they roast. Scatter the Kalamata olives over the top if using. Bake for 35–40 minutes, until the chicken skin is deep golden and crispy, and a meat thermometer inserted into the thickest part of a thigh (without touching bone) reads 165°F (74°C).
💡 mia’s Pro Tip: For extra-crispy skin, switch the oven to broil for the last 2–3 minutes. Watch it carefully — the sugar in the vegetables and lemon can burn quickly. That blast of high heat is the same technique I used at the restaurant for perfectly bronzed poultry.
Step 4: Rest and Garnish
Remove the pan from the oven and let it rest for 5 minutes. This allows the juices to redistribute throughout the chicken, ensuring every bite is moist. Garnish generously with fresh parsley — the bright, herbal notes cut through the richness and add a pop of color. Serve directly from the pan for a rustic presentation, or transfer to a platter.
⚠️ Common Mistake to Avoid: Skipping the rest. If you cut into the chicken immediately, the juices will run out onto the pan, leaving you with dry meat. Five minutes is all it takes.
| Step | Action | Duration | Key Visual Cue |
|---|---|---|---|
| 1 | Season chicken | 10 min (rest) | Spices evenly coating the meat |
| 2 | Prep vegetables | 5 min | Evenly sized pieces, all glistening with oil |
| 3 | Assemble & bake | 35–40 min | Skin golden, internal temp 165°F |
| 4 | Rest & garnish | 5 min | Juices reabsorbed, parsley bright green |
Serving & Presentation
I love serving this one-pan chicken and vegetables straight from the baking dish — it feels rustic and generous, like something my mother would have brought to the table in Marrakech. Scatter extra fresh parsley over the top, and if you have a lemon wedge or two on the side, even better. The roasted lemon slices are edible, so encourage your guests to eat them — they’re sweet, tangy, and completely transformed by the oven.
For a complete healthy Mediterranean dinner, pair the chicken and vegetables with warm pita bread or crusty sourdough to soak up the pan juices. A simple Greek salad with cucumbers, tomatoes, and feta adds freshness, while herbed couscous or lemony rice pilaf turns it into a heartier meal. When I make this for friends in my Brooklyn apartment, I open a bottle of Assyrtiko or a light Sangiovese — both are bright enough to match the lemon and herbs.
If you’re plating for company, arrange the chicken thighs on a large platter surrounded by the vegetables and lemon slices, then spoon the pan juices over the top. A sprinkle of flaky sea salt right before serving adds a final burst of texture and flavor.
| Pairing Type | Suggestions | Why It Works |
|---|---|---|
| Side Dish | Herbed couscous, lemony rice pilaf, warm pita bread | Absorbs pan juices; adds starch to balance the meal |
| Sauce / Dip | Tzatziki, tahini sauce, whipped feta | Cool, creamy contrast to the warm spices |
| Beverage | Assyrtiko, light Sangiovese, mint lemonade | Bright acidity mirrors the lemon and herbs |
| Garnish | Fresh parsley, flaky sea salt, extra lemon wedges | Adds freshness, texture, and visual pop |
Make-Ahead, Storage & Reheating
Between recipe testing for this blog and my freelance catering work, I’m all about meals that work for my schedule — and this one is a dream for meal prep. I often roast a double batch on Sunday, then pack individual portions for quick lunches or busy weeknights. The key is storing the chicken and vegetables together so the flavors continue to meld.
| Method | Container | Duration | Reheating Tip |
|---|---|---|---|
| Refrigerator | Airtight container | 3–4 days | Oven at 350°F for 10 min, or air fryer at 375°F for 5–6 min |
| Freezer | Freezer-safe container or zip-top bag | 2–3 months | Thaw overnight in fridge; reheat in oven at 350°F for 15 min |
| Make-Ahead | Assemble in baking dish, cover, refrigerate | Up to 24 hours in advance | Add 5–8 min to bake time if starting from cold |
My favorite way to reheat is in a hot oven or air fryer — the microwave will make the skin soggy, and we’ve worked too hard for that crispy crust. If you’re reheating in the oven, add a splash of chicken broth or water to the pan to keep the vegetables moist. The lemon slices will be even more caramelized the next day, which is a happy bonus.
Variations & Easy Swaps
One of the things I love most about this Mediterranean chicken thighs recipe is how adaptable it is. Depending on the season, what’s at the farmers market, or what’s in your fridge, you can swap ingredients with confidence. Here are my favorite tested variations.
| Variation | Key Change | Best For | Difficulty Impact |
|---|---|---|---|
| Moroccan Spice | Add 1 tsp ras el hanout, swap olives for preserved lemon | Deeper, warmer spice profile | Easy |
| Spring Vegetable | Replace zucchini with asparagus, add cherry tomatoes | Lighter, brighter seasonal meal | Easy |
| Creamy Lemon Sauce | Add 1/2 cup heavy cream + 2 tbsp capers in last 10 min | Richer, more indulgent version | Easy |
Moroccan Spice Variation
This is the version I grew up eating in my mother’s kitchen. Replace the dried oregano and thyme with 1 teaspoon of ras el hanout — the iconic Moroccan spice blend of cumin, coriander, cinnamon, ginger, and turmeric. Swap the Kalamata olives for 2 tablespoons of chopped preserved lemon (rind only), which adds an intense, briny citrus punch. The result is deeply aromatic and transports me straight back to Marrakech. If you can’t find ras el hanout, mix 1/2 teaspoon each of cumin, coriander, and cinnamon.
Spring Vegetable Variation
When asparagus and cherry tomatoes appear at the NYC farmers market in April, I swap out the zucchini and add 1 bunch of asparagus (cut into 2-inch pieces) and 1 cup of cherry tomatoes. The asparagus roasts quickly, so add it to the pan after the first 15 minutes of cooking. The tomatoes burst into jammy pockets of sweetness. This version is lighter and brighter, perfect for spring entertaining or when you want a lower-carb healthy Mediterranean dinner.
Creamy Lemon Sauce Variation
For those evenings when only something comforting and indulgent will do, I add 1/2 cup of heavy cream and 2 tablespoons of capers (drained) to the pan during the last 10 minutes of baking. The cream mingles with the pan juices and lemon to create a luscious, tangy sauce that coats the chicken and vegetables. It’s not traditional Mediterranean, but it’s the kind of hybrid I love creating — a little Paris bistro meets North African warmth. Serve with crusty bread to soak up every last drop.
What temperature should I bake chicken thighs and vegetables together for the best Mediterranean flavor?
For the best Mediterranean flavor with baked chicken thighs and roasted vegetables, I always use 400°F (200°C). This temperature is hot enough to render the chicken skin crispy and golden while allowing the vegetables to caramelize without burning. At 400°F, the lemon slices soften into sweet, tangy morsels, and the herbs — oregano, thyme, and smoked paprika — bloom and perfume the entire dish. If your oven runs hot, check at 35 minutes; if it runs cool, you may need the full 40 minutes. The internal temperature of the chicken should reach 165°F for safe, juicy meat.
Can I substitute lemon juice for fresh lemon slices in this roasted chicken and vegetable recipe?
You can, but the result will be different. Fresh lemon slices soften and caramelize as they roast, becoming sweet and edible while infusing the chicken and vegetables with a gentle citrus aroma. Lemon juice, on the other hand, adds bright acidity but lacks that roasted depth. If you don’t have a lemon, use 2 tablespoons of lemon juice and 1 teaspoon of lemon zest, stirred into the vegetables before roasting. Add the juice at the end to preserve its freshness, since prolonged heat can make it bitter. For the full Mediterranean experience, I recommend whole lemon slices.
How long do baked chicken thighs with roasted vegetables need to cook at 400°F?
At 400°F, bone-in, skin-on chicken thighs with roasted vegetables need 35 to 40 minutes. The exact time depends on the size of your chicken thighs and how crowded the pan is. I start checking at 35 minutes — the skin should be deep golden and crispy, and a meat thermometer inserted into the thickest part of a thigh (avoiding the bone) should read 165°F. If the skin isn’t as crispy as you’d like, switch the oven to broil for 2 to 3 minutes at the end. For boneless thighs, reduce the time to 25 to 30 minutes.
What vegetables pair best with lemon and chicken thighs in a Mediterranean-style sheet pan meal?
Bell peppers (red and yellow), zucchini, and red onion are my top picks for a Mediterranean-style sheet pan meal with lemon and chicken thighs. Bell peppers become sweet and tender as they roast, zucchini develops caramelized edges, and red onion turns buttery and mild. Cherry tomatoes are excellent too — they burst into jammy pockets of sweetness. For a spring variation, add asparagus and artichoke hearts. In fall, swap zucchini for eggplant or butternut squash. The key is choosing vegetables that can withstand 35 to 40 minutes of roasting without turning mushy.
Can I use boneless skinless chicken thighs for this one-pan chicken and vegetables recipe?
Yes, you can use boneless, skinless chicken thighs, but expect a few differences. Without the skin, you won’t get that signature crispy crust that makes this dish so satisfying. Boneless thighs also cook faster — start checking at 25 to 28 minutes, and use a thermometer to confirm 165°F. To compensate for the lack of skin, I recommend searing the thighs in a hot skillet for 2 minutes per side before adding them to the vegetables. This adds color and flavor. You can also add an extra tablespoon of olive oil to keep them moist.
Is this Mediterranean chicken thighs recipe healthy for a balanced dinner?
Absolutely. This Mediterranean chicken thighs recipe is naturally high in protein (32g per serving), rich in healthy fats from olive oil and olives, and loaded with fiber and vitamins from the roasted vegetables. At 420 calories per serving, it’s a well-balanced meal that fits into most healthy eating plans. The Mediterranean diet emphasizes lean proteins, vegetables, and healthy fats — and this one-pan chicken and vegetables delivers all three. To make it even lighter, you can remove the skin before eating (though I think that’s a shame!) or serve it with a side of greens.
Can I add potatoes to this baked chicken thighs with roasted vegetables recipe?
Yes, potatoes are a wonderful addition to this baked chicken thighs with roasted vegetables recipe. I recommend using baby potatoes or Yukon Golds cut into 1-inch chunks. Toss them with the other vegetables and a bit of extra olive oil — they’ll need the full 40 minutes to become tender and golden. Keep in mind that potatoes will absorb some of the pan juices, so you may want to add an extra tablespoon of olive oil or a splash of chicken broth to keep everything moist. The starchiness of the potatoes makes the meal even more satisfying and helps soak up the lemon-herb flavors.
How do I prevent the vegetables from getting soggy when roasting with chicken thighs?
The key to preventing soggy vegetables is giving them space. Use the largest sheet pan or baking dish you have — crowding causes steam, which leads to sogginess. Cut your vegetables into uniform pieces so they cook evenly, and toss them with olive oil to encourage browning. I also recommend placing the chicken thighs skin-side up on top of the vegetables rather than beside them, so the fat renders down and bastes the vegetables as they roast. If your vegetables release a lot of water (zucchini is notorious for this), pat them dry with a paper towel before tossing with oil.
Can I make this lemon herb chicken thighs recipe dairy-free and gluten-free?
This lemon herb chicken thighs recipe is naturally gluten-free and dairy-free as written. There is no flour, breadcrumbs, butter, or cream in the base recipe. The only potential concern is if you serve it with a side that contains gluten or dairy — like pita bread or tzatziki. To keep the entire meal gluten-free, serve with rice, quinoa, or gluten-free couscous. For a dairy-free creamy variation, use full-fat coconut milk instead of heavy cream in the creamy lemon sauce variation — it adds a subtle sweetness that pairs beautifully with the smoked paprika.
What’s the best way to get crispy skin on baked chicken thighs with roasted vegetables?
Crispy skin comes down to three things: dry the chicken thoroughly, use high heat, and don’t cover the pan. Pat the chicken thighs completely dry with paper towels before seasoning — any moisture on the skin will steam rather than crisp. Roast at 400°F uncovered, and make sure the chicken is skin-side up so the heat can reach it directly. For extra insurance, I recommend a 2- to 3-minute broil at the very end of cooking. Watch it carefully — the sugar in the smoked paprika and lemon can burn. A meat thermometer should read 165°F in the thickest part.
Share Your Version!
I love hearing how this baked chicken thighs with roasted vegetables recipe turns out in your kitchen. Did you add a personal twist? Try the Moroccan spice variation with ras el hanout? Or maybe you discovered a new favorite vegetable combination? Leave a star rating and a comment below — your feedback helps other readers discover the joy of a truly good one-pan chicken and vegetables dinner.
And if you’re on social media, I’d be over the moon if you shared a photo of your creation. Tag @exorecipes on Instagram or Pinterest so I can see your beautiful Mediterranean chicken thighs recipe in action. I can’t wait to see how you make this meal your own!
From my NYC kitchen to yours — I hope this recipe brings as much warmth to your table as it does to mine. — mia 🧡
Love This Recipe? Save It to Pinterest!
If you enjoyed this Baked Chicken Thighs with Roasted Vegetables and Lemon recipe, don’t let it get lost in your browser tabs! 😄 Pin it now so you can find it again anytime — and explore hundreds more tried-and-tested recipes waiting for you on my Pinterest boards.
👉 Follow mia on Pinterest @exorecipe
📌 Pin this recipe · 🔁 Re-pin your favorites · 💬 Tag me when you make it — I love seeing your creations!
⭐️ Loved this recipe? Leave a 5-star rating below and tell me how it turned out! Your feedback helps other home cooks find their way to a perfect dinner.
📸 Share your creation on Instagram or Pinterest and tag @exorecipes — I personally love seeing your beautiful dishes!

Baked Chicken Thighs with Roasted Vegetables and Lemon: The Ultimate Mediterranean-Inspired Meal
- Prep Time: 15 minutes
- Cook Time: 40 minutes
- Total Time: 55 minutes
- Yield: 4 1x
- Method: Main Dish
- Cuisine: Mediterranean
Description
Juicy baked chicken thighs with a medley of roasted vegetables and bright lemon, bursting with Mediterranean flavors. An easy, one-pan dinner that’s both healthy and satisfying.
Ingredients
- 4 bone-in, skin-on chicken thighs (about 1.5 lbs)
- 2 tablespoons olive oil
- 1 lemon, thinly sliced
- 1 red bell pepper, cut into chunks
- 1 yellow bell pepper, cut into chunks
- 1 zucchini, sliced into half-moons
- 1 red onion, cut into wedges
- 3 cloves garlic, minced
- 1 teaspoon dried oregano
- 1 teaspoon dried thyme
- 1/2 teaspoon smoked paprika
- Salt and black pepper to taste
- 1/4 cup pitted Kalamata olives (optional)
- Fresh parsley for garnish
Instructions
- Preheat oven to 400°F (200°C).
- In a large bowl, toss chicken thighs with 1 tablespoon olive oil, oregano, thyme, smoked paprika, salt, and pepper. Set aside.
- In a separate bowl, combine bell peppers, zucchini, red onion, garlic, and remaining 1 tablespoon olive oil. Season with salt and pepper.
- Spread the vegetable mixture evenly in a large baking dish or sheet pan.
- Nestle the seasoned chicken thighs skin-side up among the vegetables. Tuck lemon slices around the chicken.
- Scatter olives over the top if using.
- Bake for 35-40 minutes, until chicken skin is golden and crispy, and internal temperature reaches 165°F (74°C).
- Garnish with fresh parsley and serve warm.
Notes
For extra crispiness, broil the chicken for the last 2-3 minutes. You can substitute chicken thighs with bone-in breasts, but reduce cooking time by 5-10 minutes.
Nutrition
- Calories: 420
- Sugar: 6g
- Fat: 28g
- Carbohydrates: 12g
- Protein: 32g

k">
Tried This Recipe? Leave a Comment!
Did you make this recipe? I’d love to hear how it turned out! Please leave a comment and a rating below. Your feedback helps other home cooks and supports cheerychop.com!
For more delicious inspiration, follow me on Pinterest!