Table of Contents
Beef and Barley Soup with Mushrooms: A Hearty Hug in a Bowl – Comforting, Rich & So Satisfying
I still remember the first time I made this beef and barley soup in my tiny NYC apartment. It was a freezing January evening, and the wind was howling outside my kitchen window. I had just returned from the Union Square farmers market with a bag of cremini mushrooms and a beautiful piece of beef chuck. As the soup began to simmer, the most incredible aroma filled every corner of my home — rich, earthy, and deeply comforting. It reminded me of the slow-cooked tagines my mother used to make in our kitchen in Morocco, where patience and love were always the secret ingredients. This hearty beef soup recipe is everything I crave on a cold day: tender beef, chewy barley, and a broth so flavorful it wraps around you like a warm blanket.
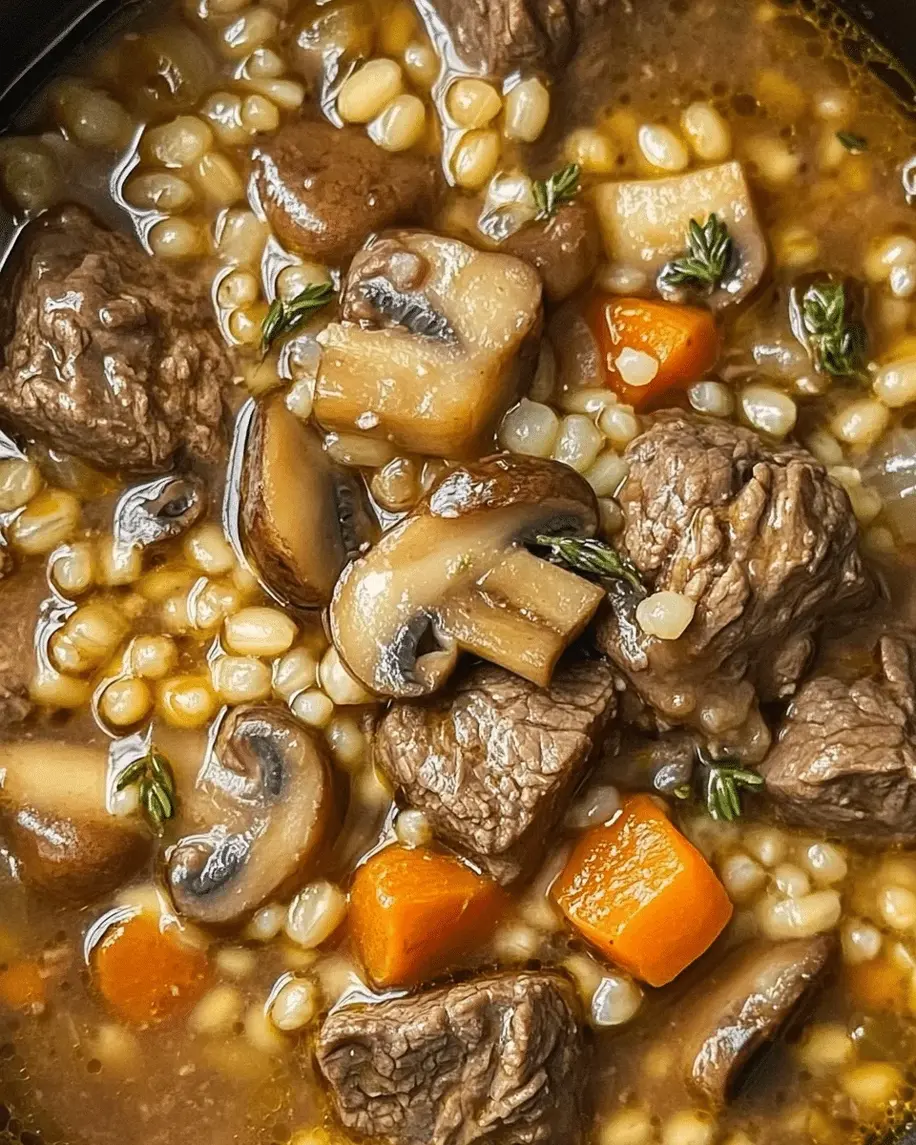
Let me paint you a picture: imagine a deep, mahogany-colored broth infused with the savory essence of seared beef and earthy mushrooms. Each spoonful is a harmony of textures — the hearty chew of pearl barley, the melt-in-your-mouth tenderness of slow-simmered beef chuck, and the soft bite of carrots and celery. The mushrooms bring an umami depth that makes this mushroom barley soup taste like it’s been cooking all day (and honestly, the low-and-slow simmer is key). A whisper of thyme and rosemary adds an aromatic lift, while the diced tomatoes lend a subtle brightness that balances the richness. I love how the barley absorbs the broth as it cooks, plumping up into little pearls of goodness that make every bite satisfying.
What sets my version apart is a technique I learned during my pastry training in Paris: I sear the beef in batches to build a deep, caramelized fond on the bottom of the pot, then deglaze with a splash of broth before adding the vegetables. That fond is pure flavor gold — it’s the foundation of a truly unforgettable broth. I also toast the barley briefly in the pot before adding the liquid, which gives it a nutty depth that you don’t get if you just dump it in. This beef soup with mushrooms is one of those recipes that looks humble but tastes absolutely luxurious. Whether you’re a seasoned cook or a beginner, I promise this winter soup recipe will become a staple in your home. 💡 mia’s Pro Tip: For the most flavorful result, choose a good-quality beef broth — it makes all the difference!
Why This Beef and Barley Soup Recipe Is the Best
The Flavor Secret: This isn’t just another beef soup — it’s a lesson in layering flavors. I start by searing the beef until deeply browned, creating that rich fond on the pot. Then I cook the mushrooms until they release their liquid and begin to caramelize, concentrating their earthy flavor. The barley gets a quick toast in the residual heat, unlocking a nutty aroma that infuses the entire broth. It’s the same technique I use when making a classic French pot-au-feu, and it works beautifully here. Every ingredient is treated with intention, so the final soup tastes complex and deeply satisfying — never flat or watery.
Perfected Texture: Texture is everything in a hearty beef soup, and I’ve dialed this one in perfectly. The beef chuck is cut into 1-inch cubes and simmered low and slow until it’s fork-tender but still holds its shape. The pearl barley is cooked just until chewy — not mushy — so it retains that satisfying bite that makes this soup feel like a meal. The mushrooms are sliced and sautéed until golden, adding a meaty, tender texture that complements the beef beautifully. And the vegetables — carrots and celery — are diced small enough to soften into the broth while still offering a gentle pop of texture. Every spoonful is a perfect balance of tender, chewy, and soft.
Foolproof & Fast (for a slow-simmered soup): I know a 2-hour simmer sounds like a commitment, but the active work is only about 20 minutes. Once everything is in the pot, you just let it bubble away on the stove while you go about your day. This is the kind of recipe that makes you look like a hero with very little effort. It’s also incredibly forgiving — you can use quick-cooking barley if you’re short on time, or swap in a different cut of beef. I’ve tested this recipe more times than I can count, and I promise it works every single time. It’s one of those winter soup recipes that feels both rustic and refined, and it’s absolutely perfect for meal prep.
Beef and Barley Soup Ingredients
I love sourcing my ingredients for this hearty beef soup recipe from my local NYC markets — the cremini mushrooms from the greenmarket, the beef chuck from my neighborhood butcher, and the pearl barley from the bulk bins at the co-op. There’s something so grounding about selecting each component with care, knowing it will all come together in one beautiful pot. When I was growing up in Morocco, my mother would take me to the souk to pick out vegetables and spices for her slow-cooked dishes, and that ritual of choosing ingredients with intention has stayed with me. Every item in this list has a purpose, and together they create a symphony of flavors that will warm you from the inside out.
Ingredients List
- 1 lb beef chuck, cut into 1-inch cubes
- 2 tbsp olive oil
- 1 large onion, chopped
- 3 cloves garlic, minced
- 8 oz cremini mushrooms, sliced
- 2 carrots, peeled and diced
- 2 celery stalks, diced
- 1 cup pearl barley
- 8 cups beef broth
- 1 can (14.5 oz) diced tomatoes
- 2 bay leaves
- 1 tsp dried thyme
- 1 tsp dried rosemary
- Salt and pepper to taste
- 2 tbsp fresh parsley, chopped (for garnish)
Ingredient Spotlight
Beef Chuck: This is my go-to cut for beef soup with mushrooms. It has just the right amount of marbling, which renders during the long simmer and keeps the meat tender and flavorful. When shopping at a US grocery store, look for beef chuck that has good fat distribution — that marbling is what makes it stay moist. If you can’t find beef chuck, a good substitute is boneless short ribs or bottom round, though you may need to simmer a bit longer. I don’t recommend using sirloin or lean cuts, as they tend to dry out and become tough.
Cremini Mushrooms: These earthy little gems are the heart of this mushroom barley soup. They have a deeper, more robust flavor than white button mushrooms, and they hold their shape beautifully during cooking. When selecting cremini at the market, look for firm, dry mushrooms with closed caps — that’s a sign of freshness. If you can find them, a mix of cremini and shiitake mushrooms adds even more umami complexity. I’ve also tested this with portobello mushrooms (diced), and they work well too, though the texture is a bit more substantial.
Pearl Barley: This is the grain that gives this hearty beef soup recipe its signature chew and body. Pearl barley has had the hull and bran removed, so it cooks more quickly and has a tender, creamy texture while still holding its shape. You can find it in the grain aisle of any US supermarket. If you want to experiment, hulled barley (which still has the bran) will take longer to cook and have a nuttier flavor — just adjust your cooking time accordingly. Quick-cooking barley is also an option if you’re short on time, but I prefer the texture of pearl barley for this dish.
Beef Broth: The broth is the backbone of this entire dish, so quality matters. I recommend using a reduced-sodium beef broth so you can control the salt level yourself. If you have the time, homemade beef stock is absolutely incredible here — but a good store-bought brand like Swanson or Kitchen Basics works perfectly. For a deeper flavor, you can stir in a teaspoon of tomato paste or a dash of Worcestershire sauce along with the broth. In a pinch, you can use beef bone broth for an even richer, more collagen-rich base.
| Original Ingredient | Best Substitution | Flavor / Texture Impact |
|---|---|---|
| Beef Chuck | Boneless Short Ribs | Richer, more marbling; slightly longer cook time. |
| Cremini Mushrooms | Shiitake or Baby Bella | Deeper umami; shiitake are more earthy. |
| Pearl Barley | Farro or Brown Rice | Farro is chewier; brown rice is lighter. |
| Beef Broth | Bone Broth or Veggie Broth | Bone broth is richer; veggie broth is lighter. |
How to Make Beef and Barley Soup — Step-by-Step
Trust me, the process is simple and the result is deeply rewarding. Let me walk you through each step so you can create a pot of this winter soup recipe that tastes like it’s been simmering for hours (because it has, but with very little hands-on work).
Step 1: Sear the Beef
Heat the olive oil in a large pot or Dutch oven over medium-high heat until it shimmers. Pat the beef cubes dry with paper towels — this is crucial for good browning. Working in batches so you don’t crowd the pot, add the beef cubes and sear until deeply browned on all sides, about 5 minutes total per batch. Use tongs to turn the pieces, and don’t rush this step: the browned bits that stick to the bottom of the pot are pure flavor. Remove the beef with a slotted spoon and set it aside on a plate.
⚠️ Common Mistake to Avoid: Crowding the pot. If you add all the beef at once, the temperature drops and the meat steams instead of searing. Work in 2-3 batches for the deepest, most flavorful browning.
Step 2: Sauté the Aromatics
Reduce the heat to medium. Add the chopped onion to the same pot (with all those browned bits still in there) and cook, stirring occasionally, for 3 minutes until softened. Add the minced garlic and cook for 30 seconds until fragrant. Then add the sliced cremini mushrooms, diced carrots, and diced celery. Cook for 5 minutes, stirring occasionally, until the mushrooms have released their liquid and started to brown around the edges. The aroma at this point is absolutely incredible — earthy, savory, and so inviting.
💡 mia’s Pro Tip: Let the mushrooms cook undisturbed for a minute or two before stirring. This allows them to develop a nice golden crust, which adds even more umami flavor to the soup.
Step 3: Build the Broth
Stir in the pearl barley and let it toast for about 1 minute, stirring constantly — this brings out its nutty flavor. Pour in the beef broth and the can of diced tomatoes (with their juices), and use a wooden spoon to scrape up all those delicious browned bits from the bottom of the pot. Return the seared beef to the pot, then add the bay leaves, dried thyme, and dried rosemary. Season with a generous pinch of salt and a few grinds of black pepper. Stir everything together to combine.
⚠️ Common Mistake to Avoid: Forgetting to scrape the fond (browned bits) from the bottom of the pot. Those bits are packed with flavor from the seared beef — don’t leave them behind! Use a wooden spoon and a splash of broth to deglaze the pot thoroughly.
Step 4: Simmer to Perfection
Bring the soup to a boil over high heat, then immediately reduce the heat to low. Cover the pot and let it simmer gently for 1.5 to 2 hours, stirring occasionally to prevent the barley from sticking to the bottom. The soup is ready when the beef is fork-tender and the barley is cooked through but still pleasantly chewy. If the soup gets too thick for your liking, you can add a splash of water or extra broth during cooking. Taste and adjust the seasoning with more salt and pepper as needed.
💡 mia’s Pro Tip: Check the soup after 1 hour and 15 minutes — different stoves vary, and you want the barley to be tender but not mushy. The beef should shred easily with a fork when it’s perfectly done.
Step 5: Finish and Serve
Remove the bay leaves from the pot and discard them. Give the soup one final stir and adjust the seasoning with salt and pepper if needed. Ladle the steaming soup into deep bowls, making sure each serving gets a generous portion of beef, barley, and vegetables. Garnish generously with fresh chopped parsley for a pop of color and freshness. Serve hot, with crusty bread or a side salad if desired. Each bowl is a hug in edible form — rich, comforting, and deeply satisfying.
⚠️ Common Mistake to Avoid: Serving the soup immediately if you prefer a thicker consistency. Letting the soup rest for 10 minutes off the heat allows the barley to absorb more broth and thickens the soup naturally. If you want it even thicker, stir in a cornstarch slurry (1 tbsp cornstarch mixed with 2 tbsp water) during the last 10 minutes of cooking.
| Step | Action | Duration | Key Visual Cue |
|---|---|---|---|
| 1 | Sear the Beef | 5 min per batch | Deep brown crust on all sides |
| 2 | Sauté Aromatics | 8 min | Onions translucent, mushrooms golden |
| 3 | Build the Broth | 5 min | Barley toasts, fond dissolves |
| 4 | Simmer | 1.5–2 hours | Beef fork-tender, barley plumped |
| 5 | Finish & Serve | 5 min | Parsley garnish, steaming hot |
Serving & Presentation
This hearty beef soup recipe is a meal in itself, but the way you serve it can elevate the entire experience. I love ladling the soup into deep, wide bowls so you can see all the beautiful components — the tender beef, the plump barley, the earthy mushrooms, and the colorful carrots and celery. A generous sprinkle of fresh parsley on top adds a bright, herbal note that cuts through the richness. In my NYC kitchen, I often serve this soup with a thick slice of crusty sourdough bread for dipping, or a simple green salad with a lemony vinaigrette to balance the heartiness.
When I want to channel my Parisian training, I sometimes finish the soup with a drizzle of extra-virgin olive oil and a few cracks of black pepper right before serving — it adds a luxurious sheen and a peppery kick. For a touch of Moroccan flair, I might sprinkle a pinch of smoked paprika or cumin over the top, which echoes the warm spices my mother used in her cooking. This winter soup recipe is also wonderful served with a side of roasted vegetables or a simple grilled cheese sandwich for the ultimate comfort meal. However you choose to serve it, this mushroom barley soup is guaranteed to bring warmth and smiles to your table.
| Pairing Type | Suggestions | Why It Works |
|---|---|---|
| Side Dish | Crusty sourdough, roasted Brussels sprouts, simple green salad | Adds crunch and freshness; bread soaks up the broth. |
| Sauce / Dip | Horseradish crema, garlic aioli, balsamic glaze | Adds tangy or spicy contrast to the rich broth. |
| Beverage | Full-bodied red wine (Syrah), dark beer (stout), sparkling water with lemon | Red wine complements the beef; beer adds maltiness. |
| Garnish | Fresh parsley, chives, grated Parmesan, drizzle of olive oil | Adds freshness, color, and a final layer of flavor. |
Make-Ahead, Storage & Reheating
As a busy NYC food blogger and mom, I live for make-ahead meals, and this beef soup with mushrooms is one of the best. It actually tastes even better the next day, after the flavors have had time to meld together in the refrigerator. I often make a big batch on Sunday and enjoy it for lunches throughout the week. The barley absorbs some of the broth as it sits, so the soup thickens beautifully overnight — just add a splash of broth or water when reheating to bring it back to your preferred consistency.
| Method | Container | Duration | Reheating Tip |
|---|---|---|---|
| Refrigerator | Airtight container | 4–5 days | Reheat gently on the stovetop over medium-low heat, adding a splash of broth or water to thin. |
| Freezer | Freezer-safe container or zip-top bag | Up to 3 months | Thaw overnight in the fridge, then reheat on the stovetop. The barley may soften slightly but flavor remains excellent. |
| Make-Ahead | Cooked and cooled in the pot | 2–3 days in advance | Cook fully, cool completely, then refrigerate. Reheat and adjust seasoning before serving. |
When reheating, I prefer the stovetop over the microwave because it’s gentler and helps the flavors redevelop. If the soup has thickened too much, just stir in a little beef broth or water until it reaches your desired consistency. Don’t forget to taste and adjust the seasoning after reheating — flavors can mellow in the fridge, and a pinch of salt or a crack of pepper can bring everything back to life. This winter soup recipe is truly one of those dishes that keeps on giving, and I love knowing I have a batch ready to go in the fridge or freezer for busy days.
Variations & Easy Swaps
| Variation | Key Change | Best For | Difficulty Impact |
|---|---|---|---|
| Moroccan-Spiced | Add cumin, coriander, and a pinch of cinnamon | Aromatic, North African twist | Easy — just add spices |
| Gluten-Free | Swap barley for brown rice or quinoa | Gluten-intolerant diets | Easy — adjust cook time |
| Slow Cooker Version | Sear beef then transfer to slow cooker | Set-it-and-forget-it convenience | Easy — longer cook time |
Moroccan-Spiced Version
This one is close to my heart, as it takes me right back to my mother’s kitchen in Morocco. Simply add 1 teaspoon of ground cumin, 1/2 teaspoon of ground coriander, and a pinch of cinnamon along with the dried herbs in step 3. The warm, aromatic spices complement the earthy mushrooms and rich beef beautifully, creating a soup that’s both comforting and exotic. I also like to add a handful of cooked chickpeas and a squeeze of lemon juice at the end for even more Moroccan flair. It’s a simple change that transforms this mushroom barley soup into something truly special, and it always gets rave reviews from my dinner guests in NYC.
Gluten-Free Version
If you need a gluten-free option, swapping the pearl barley is easy and delicious. I’ve tested this with both brown rice and quinoa, and I actually love the results. Brown rice gives the soup a slightly nuttier, chewier texture — use 1 cup of long-grain brown rice and increase the simmer time to about 45 minutes to 1 hour (check the rice package for guidance). Quinoa cooks much faster, so add it during the last 20 minutes of simmering, using 3/4 cup of rinsed quinoa. Both options absorb the broth beautifully and create a satisfying, hearty soup that’s completely gluten-free. The flavor profile stays true to the original, and the soup freezes just as well.
Slow Cooker Version
For those days when you want to come home to a ready-made meal, this slow cooker adaptation is a game-changer. Sear the beef on the stovetop as directed in step 1, then transfer it to your slow cooker. Sauté the aromatics and mushrooms in the same pot, then add them to the slow cooker along with the broth, tomatoes, barley, and seasonings. Cook on low for 7-8 hours or on high for 4-5 hours, until the beef and barley are tender. I recommend adding the barley during the last 2 hours if you prefer it to retain a bit more texture. This version is perfect for busy weekdays, and the results are just as deeply flavorful as the stovetop version. 💡 mia’s Pro Tip: For the slow cooker version, use a bit less broth (about 7 cups) since there’s less evaporation.
What is the best type of beef to use for beef and barley soup with mushrooms?
For this hearty beef soup, I recommend using beef chuck. It has excellent marbling, which renders during the long simmer and keeps the meat incredibly tender and flavorful. Beef chuck is also relatively affordable and widely available at US grocery stores. If you can’t find chuck, boneless short ribs are a great substitute — they’re even more marbled and produce a supremely rich broth. However, avoid lean cuts like sirloin or round steak, as they tend to dry out and become tough during the extended cooking time. The key is to choose a cut with enough fat and connective tissue to break down into tender, succulent pieces over the 1.5- to 2-hour simmer.
Can I substitute pearl barley with quick-cooking barley in this soup?
Absolutely, you can use quick-cooking barley as a substitute, but there are a few things to keep in mind. Quick-cooking barley is essentially pearl barley that has been parboiled and dried, so it cooks much faster — usually in about 10–15 minutes. This means you should add it later in the cooking process, during the last 20 minutes of simmering, to prevent it from becoming mushy. The texture will be slightly less chewy than pearl barley, but it still works well. If you’re short on time, this is a perfectly fine swap. That said, I personally prefer the toothsome, hearty texture of traditional pearl barley for this mushroom barley soup — it holds up better during the long simmer and absorbs the broth more gradually, resulting in a richer overall dish.
How long should I simmer beef and barley soup to get it tender?
For perfectly tender beef and fully cooked barley, you should simmer this soup for 1.5 to 2 hours. The exact time depends on the size of your beef cubes and the specific cut you’re using. Beef chuck typically becomes fork-tender after about 1 hour and 45 minutes of gentle simmering. I recommend checking at the 1 hour and 15 minute mark — the beef should shred easily with a fork, and the barley should be plump and tender but still have a pleasant chew. If the beef is still tough, continue simmering and check every 15 minutes. Remember to keep the heat on low and cover the pot to maintain a gentle bubble, and stir occasionally to prevent the barley from sticking to the bottom. Patience is rewarded with the most comforting winter soup recipes!
Can I freeze beef and barley soup with mushrooms for later?
Yes, this beef soup with mushrooms freezes beautifully! In fact, I often make a double batch so I can stash some in the freezer for busy weeks. The soup will keep in a freezer-safe container for up to 3 months. I recommend letting it cool completely before transferring to containers or zip-top bags. When reheating, thaw overnight in the refrigerator, then warm gently on the stovetop over medium-low heat. The barley will absorb some of the broth during freezing and thawing, so you’ll likely need to add a splash of beef broth or water when reheating to restore the consistency. The flavor remains excellent — if anything, the long rest deepens the savory notes. This is one of the best make-ahead winter soup recipes for meal prep.
Can I make this beef and barley soup in an Instant Pot or pressure cooker?
Yes, this hearty beef soup recipe adapts well to a pressure cooker. Use the sauté function to sear the beef and cook the aromatics, then add all ingredients except the barley. Pressure cook on high for 25 minutes, then allow a natural release for 10 minutes before manually releasing. Open the lid, stir in the barley, and cook on the sauté setting for another 15–20 minutes until the barley is tender. Alternatively, you can cook the barley separately and stir it in at the end. The pressure cooker version is faster but still yields a deeply flavorful broth. Just be careful not to overcook the barley, as it can become mushy under pressure. This is a fantastic option when you’re craving this mushroom barley soup in less than an hour.
How can I make this beef soup with mushrooms dairy-free or vegan?
To make this soup vegan, simply omit the beef and use a rich vegetable broth instead of beef broth. For the protein, I recommend adding a can of drained chickpeas or a cup of cooked lentils along with the broth — they provide a hearty texture and absorb the flavors beautifully. You can also add extra mushrooms, such as shiitake or oyster, for more umami depth. To keep it dairy-free, this recipe is already dairy-free as written! The barley provides a wonderful chewy texture, and the vegetables and mushrooms offer plenty of savory satisfaction. I’ve served this vegan version to friends and they didn’t miss the meat at all. It’s proof that this beef and barley soup recipe is incredibly adaptable.
What can I use instead of barley in beef soup with mushrooms?
If you don’t have barley on hand, there are several excellent substitutes that work well in this hearty beef soup. Farro is my top pick — it has a similar chewy texture and nutty flavor, and it holds up beautifully during simmering. Brown rice is another great option; it’s widely available and adds a wholesome, slightly nutty taste. For a gluten-free alternative, quinoa works wonderfully and cooks much faster (add it during the last 20 minutes). You can also use hulled barley, which is less processed than pearl barley and has an even nuttier flavor, though it requires a longer cooking time. Whatever you choose, adjust the liquid and cooking time accordingly. The soup will still be deliciously satisfying.
How do I thicken beef and barley soup if it’s too thin?
If your soup is thinner than you’d like, there are a few easy ways to thicken it. The most straightforward method is to mash some of the barley and vegetables against the side of the pot with a wooden spoon — this releases their starches and naturally thickens the broth. Alternatively, you can stir in a cornstarch slurry (1 tablespoon cornstarch mixed with 2 tablespoons cold water) during the last 10 minutes of cooking; let it simmer until the soup reaches your desired consistency. Another trick is to remove a cup of the cooked barley and vegetables, blend them until smooth, and stir the purée back into the pot. This adds body without altering the flavor. Remember that the soup will also thicken as it sits, so it might be perfect after a few hours in the fridge.
What are the best mushrooms to use for mushroom barley soup?
Cremini mushrooms are my top choice for this mushroom barley soup because they offer a deep, earthy flavor and a firm texture that holds up well during simmering. They’re also readily available in most US grocery stores. For even more depth, I love mixing cremini with shiitake mushrooms, which have a rich, almost woodsy flavor. If you want to get really creative, try adding a handful of dried porcini mushrooms — rehydrate them in warm water for 20 minutes, then add both the mushrooms and the strained soaking liquid to the pot. This intensifies the umami factor significantly. White button mushrooms work in a pinch, but they have a milder flavor and softer texture. The key is to use mushrooms that are fresh and firm, with closed caps for the best results.
Can I add other vegetables to this beef and barley soup with mushrooms?
Absolutely! This hearty beef soup recipe is very flexible when it comes to vegetables. Along with the carrots and celery, I sometimes add diced parsnips or turnips for a slightly sweet, earthy flavor. A cup of chopped kale or spinach stirred in during the last 10 minutes adds a boost of color and nutrients. For a touch of sweetness, diced sweet potato or butternut squash works beautifully with the savory broth. If you want to add potatoes, use waxy varieties like Yukon Gold, which hold their shape better than russets. Just keep in mind that the total volume of vegetables should not exceed about 2 cups to maintain the soup’s balance. Feel free to experiment with whatever you have in your fridge — this winter soup recipes is wonderfully forgiving.
Share Your Version!
I absolutely love hearing how this recipe turns out in your kitchen! Did you add a special twist, like a pinch of smoked paprika or a handful of fresh spinach? Did you try the Moroccan-spiced variation or the slow cooker version? Drop a comment below and let me know — I read every single one and I’m always inspired by your creativity. If you’re on Instagram or Pinterest, tag @exorecipes when you share a photo of your beef and barley soup. I love seeing your beautiful bowls of comfort! And if you have a moment, please leave a star rating — it helps other readers discover this recipe and lets me know what you think. Your feedback truly makes my day.
From my NYC kitchen to yours — I hope this recipe brings as much warmth to your table as it does to mine. — mia 🧡
Love This Recipe? Save It to Pinterest!
If you enjoyed this Beef and Barley Soup with Mushrooms recipe, don’t let it get lost in your browser tabs! 😄 Pin it now so you can find it again anytime — and explore hundreds more tried-and-tested recipes waiting for you on my Pinterest boards.
👉 Follow mia on Pinterest @exorecipe
📌 Pin this recipe · 🔁 Re-pin your favorites · 💬 Tag me when you make it — I love seeing your creations!
🍲 Made this recipe? I’d love to see!
Tag @exorecipes on Instagram or Pinterest, or leave a comment below with your rating. What did you add or change? Your ideas might inspire someone else!
Beef and Barley Soup with Mushrooms: A Hearty Hug in a Bowl
- Prep Time: 20 minutes
- Cook Time: 2 hours
- Total Time: 2 hours 20 minutes
- Yield: 8 1x
- Method: Main Course
- Cuisine: American
Description
This beef and barley soup with mushrooms is a comforting, hearty meal perfect for cold days. The rich broth, tender beef, earthy mushrooms, and chewy barley create a satisfying bowl of goodness.
Ingredients
- 1 lb beef chuck, cut into 1-inch cubes
- 2 tbsp olive oil
- 1 large onion, chopped
- 3 cloves garlic, minced
- 8 oz cremini mushrooms, sliced
- 2 carrots, peeled and diced
- 2 celery stalks, diced
- 1 cup pearl barley
- 8 cups beef broth
- 1 can (14.5 oz) diced tomatoes
- 2 bay leaves
- 1 tsp dried thyme
- 1 tsp dried rosemary
- Salt and pepper to taste
- 2 tbsp fresh parsley, chopped (for garnish)
Instructions
- In a large pot or Dutch oven, heat olive oil over medium-high heat. Add beef cubes and sear until browned on all sides, about 5 minutes. Remove beef and set aside.
- In the same pot, add onion and garlic; cook until softened, about 3 minutes. Add mushrooms, carrots, and celery; cook for another 5 minutes, stirring occasionally.
- Stir in barley, then pour in beef broth and diced tomatoes. Add the browned beef back to the pot, along with bay leaves, thyme, and rosemary. Season with salt and pepper.
- Bring to a boil, then reduce heat to low. Cover and simmer for 1.5 to 2 hours, until beef is tender and barley is cooked through. Stir occasionally.
- Remove bay leaves. Adjust seasoning with salt and pepper. Ladle into bowls and garnish with fresh parsley. Serve hot.
Notes
For a thicker soup, you can add a cornstarch slurry (1 tbsp cornstarch mixed with 2 tbsp water) during the last 10 minutes of cooking. The soup also freezes well for up to 3 months.
Nutrition
- Calories: 350
- Sugar: 6g
- Fat: 12g
- Carbohydrates: 35g
- Protein: 28g

Tried This Recipe? Leave a Comment!
Did you make this recipe? I’d love to hear how it turned out! Please leave a comment and a rating below. Your feedback helps other home cooks and supports cheerychop.com!
For more delicious inspiration, follow me on Pinterest!