“`html
Table of Contents
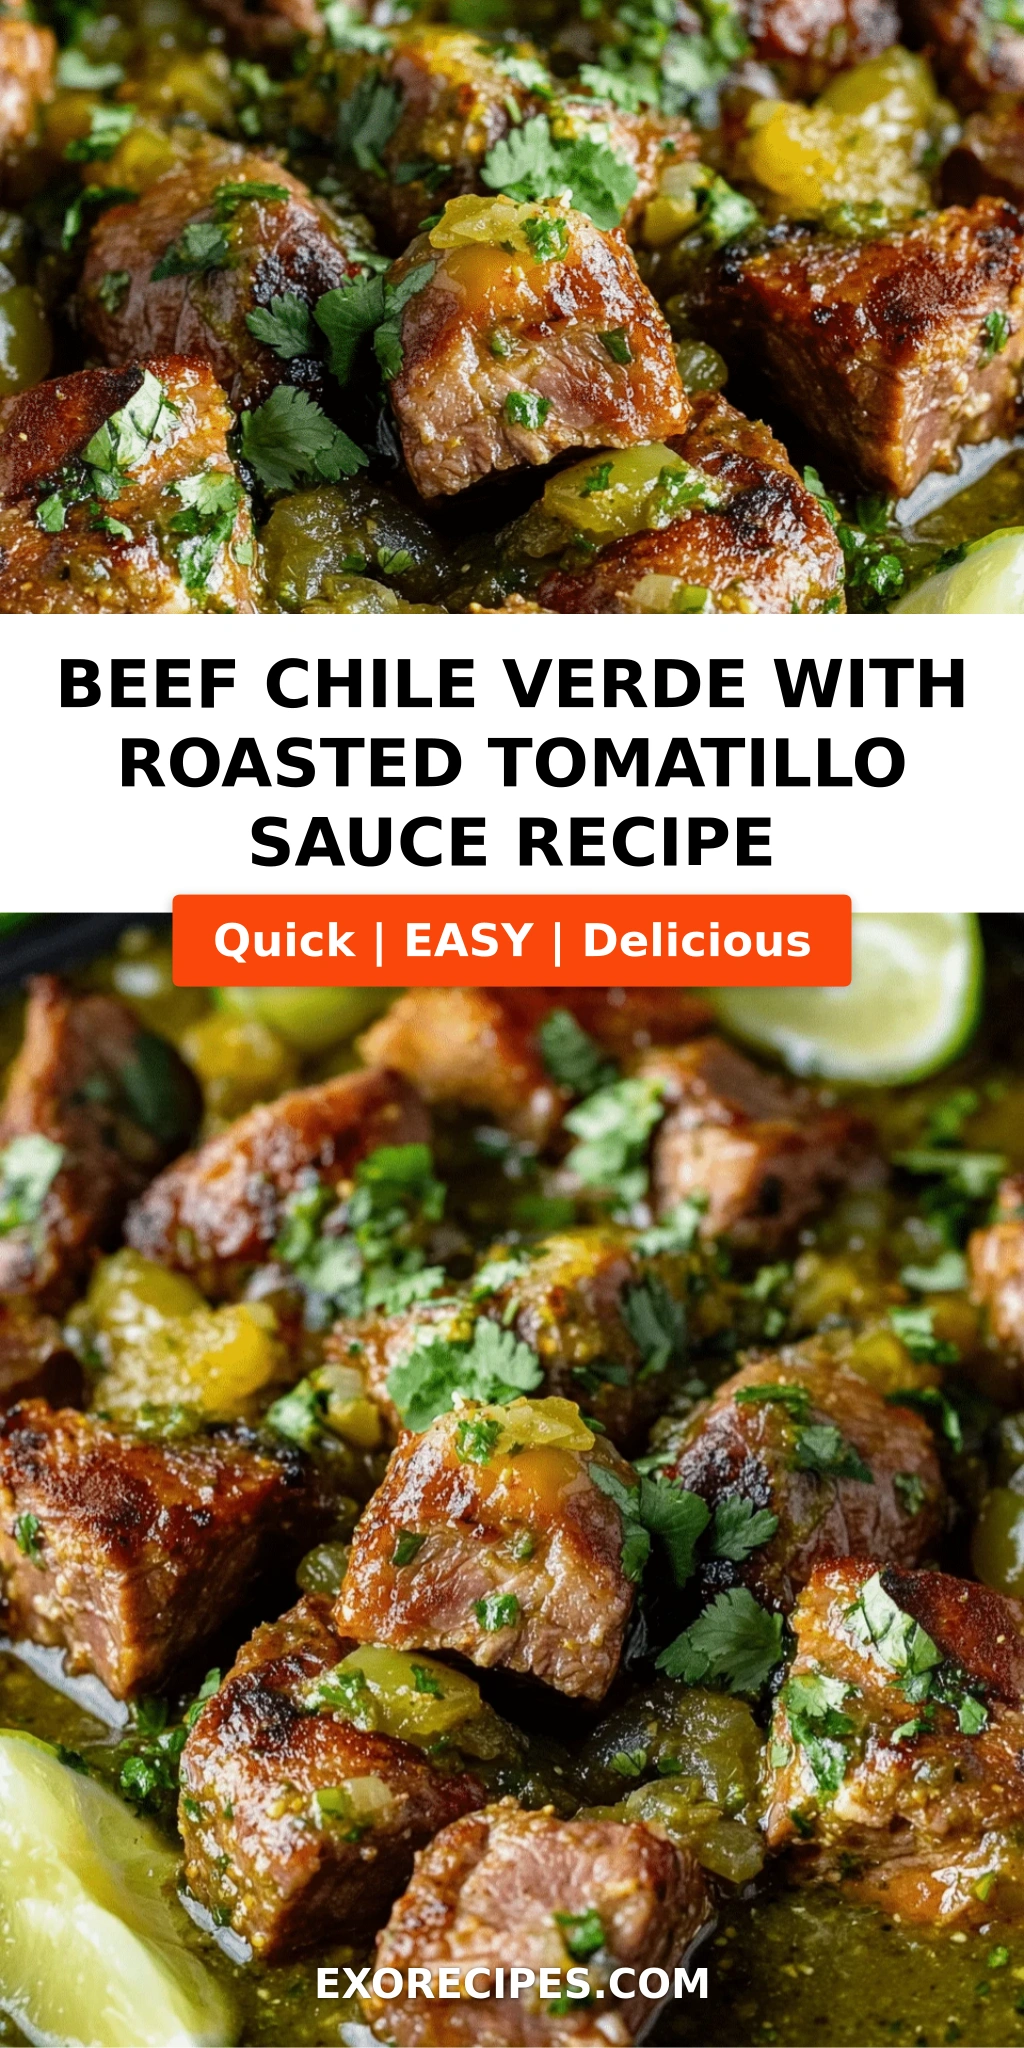
Beef Chile Verde with Roasted Tomatillo Sauce – Your Guide to a Flavor-Packed Mexican Classic
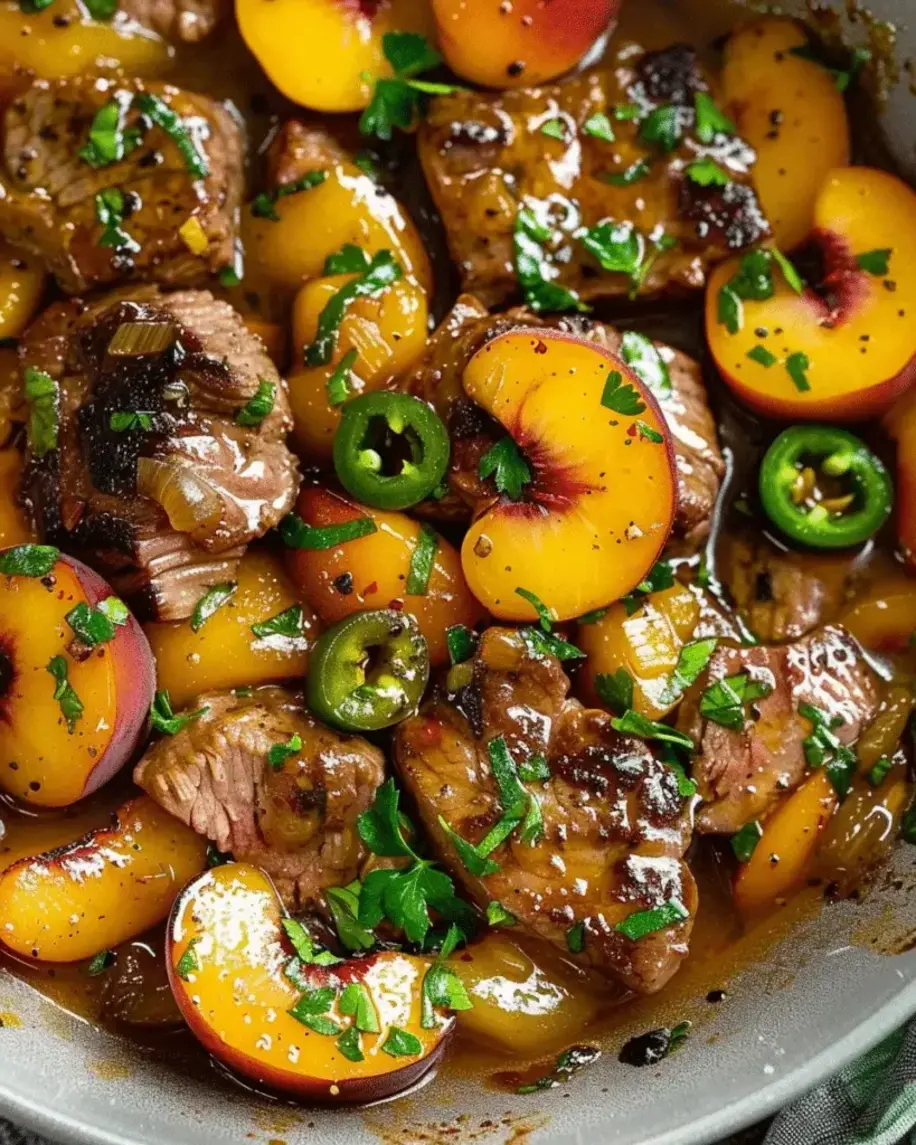
I still remember the first time I tasted a truly great Beef Chile Verde. It was at a tiny taquería in Brooklyn, tucked between a bodega and a laundromat, and the moment that spoonful of tender beef in smoky roasted tomatillo sauce hit my tongue, I was transported. The bright tang of tomatillos, the gentle heat of roasted poblanos, the deep savoriness of slow-simmered beef — it all came together in a bowl of pure comfort. As someone who grew up in Morocco watching my mother layer spices into tagines, then trained in Paris to master the art of building flavor through technique, I recognized right away that this dish was something special. This Beef Chile Verde isn’t just a stew; it’s a masterclass in how roasting transforms simple ingredients into something extraordinary.
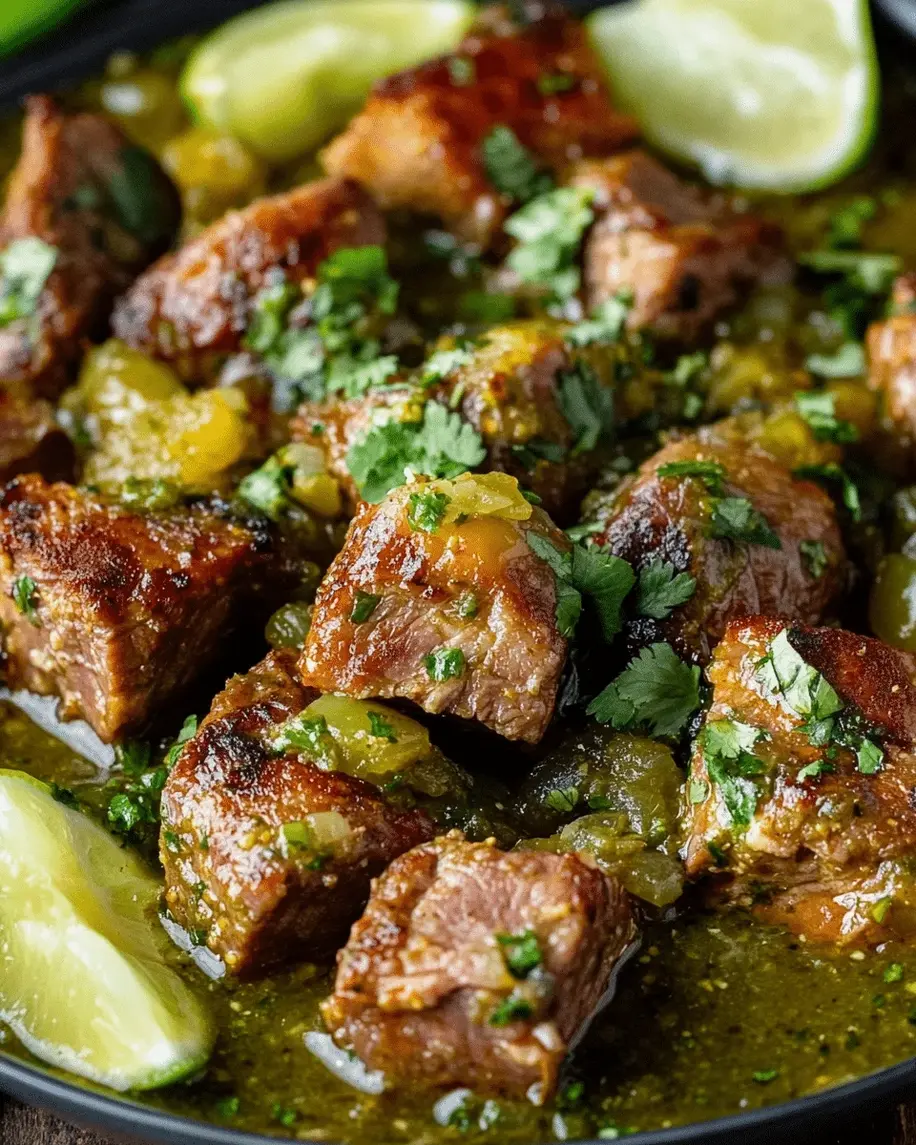
Let me describe the magic. The tomatillos, once roasted under a broiler, release their juices and develop a caramelized sweetness that balances their natural acidity. The poblanos and jalapeños char and soften, their skins blistering to reveal a smoky, earthy depth underneath. When you blend them together, you get a sauce that’s vibrant green, lightly tangy, and subtly spicy — the perfect backdrop for chunks of beef chuck that have been browned until crusty, then simmered low and slow until they yield to the gentlest pressure of a fork. The aroma that fills your kitchen is intoxicating: cumin and oregano mingling with the bright scent of roasted peppers, a hint of garlic, and the rich fragrance of beef cooked in its own juices. Every spoonful is a balance of tender meat, silky sauce, and a warmth that lingers just long enough to make you reach for another bite.
What sets my version apart is the technique I bring from my French culinary training. I brown the beef in batches — not rushing, letting each cube develop a deep, dark crust that adds layers of umami to the final dish. And I roast the tomatillos and peppers until they’re truly charred, not just warmed through, because that smoky note is the backbone of the best Beef Chile Verde. I also finish the sauce with a touch of dried oregano and cumin, a nod to the spice blends I learned to love in my mother’s kitchen in Morocco. One pro tip I always share: let the sauce simmer uncovered for the last 30 minutes if you want it thicker and more concentrated. And a common mistake? Not browning the beef well enough — that browned crust is pure flavor, and skipping it leaves the stew flat. Trust me, every step matters, and I’ll guide you through each one.
Why This Beef Chile Verde Recipe Is the Best
The Flavor Secret: The real star here is the roasted tomatillo sauce. Roasting the tomatillos, poblanos, and jalapeños under a broiler concentrates their natural sugars and adds a smoky char that you simply cannot get from canned or boiled ingredients. I learned this technique in Paris — how a quick blast of high heat can transform a vegetable’s entire flavor profile. The result is a sauce that’s bright, tangy, and deeply complex, with layers of smokiness that wrap around every piece of beef. This isn’t just a stew; it’s a carefully built sauce that carries the whole dish.
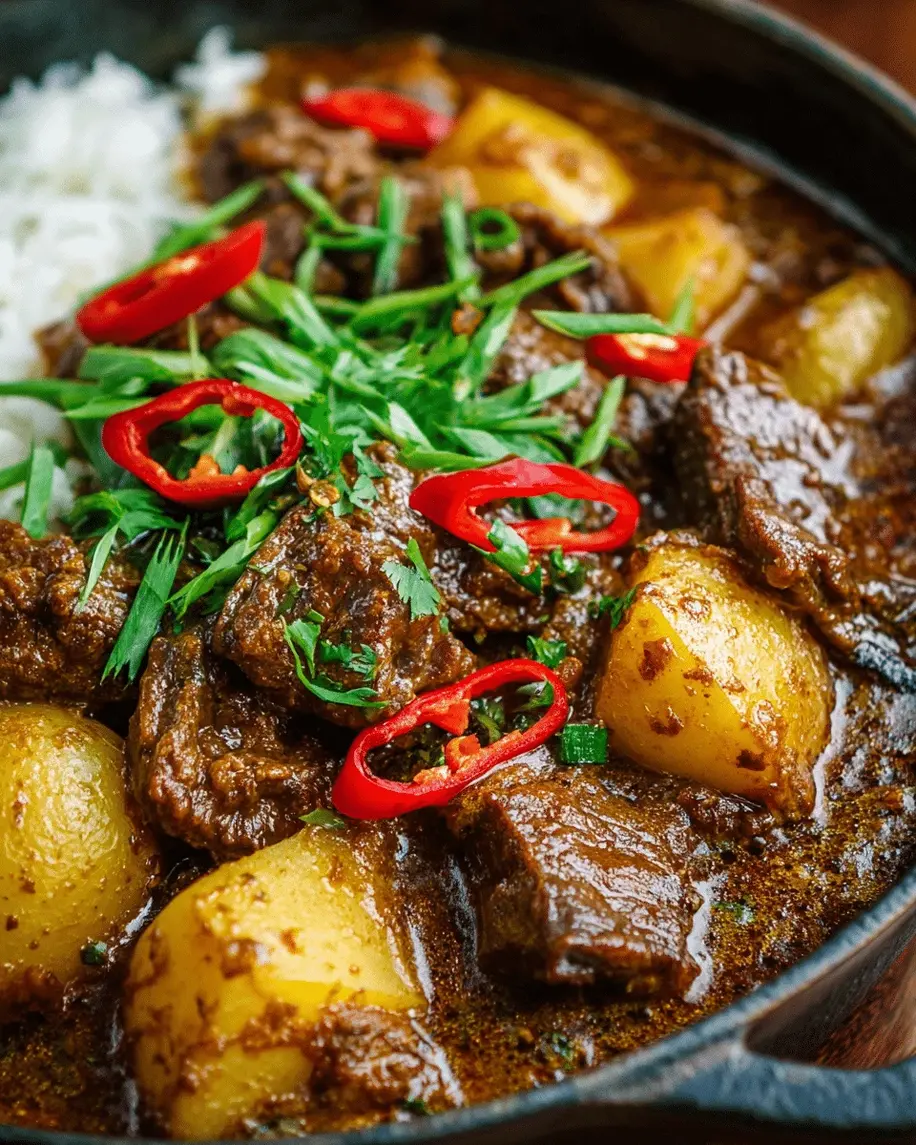
Perfected Texture: I use beef chuck for this recipe, cut into 1-inch cubes, and I brown it in batches over medium-high heat until each piece is deeply caramelized. That crust is the foundation of the stew’s richness. Then I simmer it gently in the roasted tomatillo sauce for 1½ to 2 hours, just until the collagen breaks down and the meat becomes fork-tender but still holds its shape. The sauce thickens naturally as it cooks, and if you want it even thicker, you can uncover the pot for the last 30 minutes. The texture is exactly what you want from an authentic Mexican beef stew: rich, not watery, with tender beef in every bite.
Foolproof & Fast: Despite its deep, complex flavor, this beef chile verde is surprisingly straightforward. The prep takes about 20 minutes, and then the oven does most of the work. I’ve tested this recipe dozens of times in my NYC kitchen to make sure it works for home cooks of all skill levels. The ingredient list is simple, the steps are clear, and the result is consistently delicious. Whether you’re making it for a weeknight dinner or a weekend gathering, this is one of those recipes that looks and tastes like you spent all day cooking — but really, you just let the ingredients shine.
Beef Chile Verde Ingredients
I love sourcing my ingredients for this Mexican beef stew from the Union Square farmers market in NYC — the tomatillos are at their peak from late summer through fall, and the poblano peppers are always vibrant and fragrant. In my mother’s kitchen in Morocco, we would have used fresh tomatoes and a medley of dried spices for a similar tangy depth, but tomatillos bring a uniquely bright, citrusy note that defines this dish. Here’s everything you’ll need for the best Beef Chile Verde of your life.
Ingredients List
- 2 lbs beef chuck, cut into 1-inch cubes
- 1 ½ lbs tomatillos, husked and rinsed
- 2 poblano peppers
- 2 jalapeño peppers (seeds removed for less heat)
- 1 large onion, chopped
- 4 cloves garlic, minced
- 1 cup low-sodium chicken broth
- 1 teaspoon ground cumin
- 1 teaspoon dried oregano
- 1 tablespoon vegetable oil
- Salt and black pepper to taste
- ¼ cup chopped fresh cilantro (for garnish)
- Lime wedges (for serving)
Ingredient Spotlight
Tomatillos: The heart of this roasted tomatillo sauce recipe. Tomatillos look like small green tomatoes wrapped in papery husks, but they have a firmer texture and a much more tart, citrusy flavor. When roasted, they become sweeter and their acidity mellows into something beautifully balanced. Look for tomatillos that are firm, bright green, and with the husks still intact — avoid any that are soft or have blemishes. If you can’t find fresh tomatillos, you can substitute canned ones, but the flavor won’t be as bright, and you’ll miss that roasted smokiness. I always recommend fresh for this beef chile verde.
Poblano Peppers: These mild green chilies are the backbone of the sauce’s earthy, slightly smoky flavor. They have a rich, almost vegetal sweetness that deepens when roasted. Poblanos are generally very mild, so they add complexity without heat. When shopping, choose poblano peppers that are dark green, glossy, and firm — avoid any with wrinkled skin, as that means they’re old. If you want a bit more heat, you can leave a few seeds from the jalapeños, but the poblanos themselves will stay gentle.
Beef Chuck: For an authentic Mexican beef stew that stays tender during long simmering, beef chuck is your best friend. It comes from the shoulder area and has just the right amount of marbling and connective tissue, which breaks down over time into gelatin, making the meat incredibly tender and adding body to the sauce. Look for chuck that’s well-marbled with fat, and cut it into uniform 1-inch cubes so it cooks evenly. Brisket or round can also work, but chuck is the most forgiving and consistently gives the best results.
Cumin and Oregano: These two spices are the aromatic backbone of the dish. Cumin adds a warm, earthy note that complements the roasted tomatillo sauce beautifully, while dried oregano (preferably Mexican oregano if you can find it) brings a citrusy, slightly floral undertone. I use dried oregano here because it holds up well during the long simmer, but if you have fresh oregano, add it toward the end of cooking. Toasting the cumin for 30 seconds in the hot pan before adding liquid intensifies its flavor — a little trick I picked up in Paris.
| Original Ingredient | Best Substitution | Flavor / Texture Impact |
|---|---|---|
| Fresh tomatillos | Canned tomatillos (drained) | Less smoky and tangy; sauce will be milder and slightly less bright |
| Poblano peppers | Anaheim or Cubanelle peppers | Milder flavor; slightly less earthy depth |
| Beef chuck | Beef brisket or boneless short ribs | Equally tender; brisket is leaner, short ribs are richer |
| Dried oregano | Dried marjoram | More floral, less citrusy; still very pleasant |
| Jalapeño peppers | Serrano peppers (use fewer) | More heat; remove seeds to control intensity |
How to Make Beef Chile Verde — Step-by-Step
Making this beef chile verde is a rewarding process, and I promise you’ll feel like a pro by the end. Let’s walk through each step together, with my chef-tested tips to ensure perfect results every time.
Step 1: Roast the Tomatillos and Peppers
Preheat your broiler to high. Place the husked and rinsed tomatillos, poblano peppers, and jalapeño peppers on a baking sheet in a single layer. Broil for 5–7 minutes, turning once halfway through, until the skins are blistered and charred in spots. You want the tomatillos to soften and release their juices, and the peppers to blacken slightly. Transfer everything to a bowl, cover tightly with plastic wrap, and let steam for 10 minutes. This steaming step loosens the skins so they come off easily.
💡 mia’s Pro Tip: Don’t skip the steaming step! The steam loosens the pepper skins effortlessly, so you get all the smoky flavor without any bitter charred bits in your sauce.
Step 2: Blend the Roasted Tomatillo Sauce
After steaming, peel the skins from the poblano and jalapeño peppers. Remove the stems and seeds (for less heat, discard all seeds; for more, leave some). Place the peeled peppers and the tomatillos (along with all the juices that accumulated in the bowl) into a blender. Puree until completely smooth, about 30 seconds. Set the sauce aside. You should have a vibrant green, slightly thick puree that smells incredibly bright and smoky.
⚠️ Common Mistake to Avoid: Blending the peppers and tomatillos while they’re still hot can cause steam to build up and blow the lid off your blender. Let them cool for 5 minutes after steaming, or leave the blender lid slightly ajar and cover with a kitchen towel.
Step 3: Brown the Beef
Season the beef cubes generously with salt and black pepper. Heat the vegetable oil in a large Dutch oven or heavy-bottomed pot over medium-high heat until shimmering. Working in batches (don’t overcrowd the pot!), add the beef cubes in a single layer and cook for about 4 minutes per side, until a deep brown crust forms. Transfer the browned beef to a plate and repeat with the remaining batches. This step builds the foundation of flavor for your authentic Mexican beef stew.
💡 mia’s Pro Tip: Pat the beef cubes dry with paper towels before seasoning. Moisture is the enemy of browning, and you want that deep, dark crust for maximum flavor. Also, don’t rush this step — good browning takes time, but it’s worth every minute.
Step 4: Sauté the Aromatics
Reduce the heat to medium. Add the chopped onion to the pot and cook, stirring occasionally, for about 5 minutes until softened and translucent. Add the minced garlic, ground cumin, and dried oregano, stirring constantly for 1 minute until fragrant. The aroma at this point is incredible — warm and earthy, with the cumin blooming in the residual oil. If the pot seems dry, add a splash of chicken broth to deglaze any browned bits from the bottom.
⚠️ Common Mistake to Avoid: Don’t let the garlic burn! Garlic cooks very quickly and can become bitter if overdone. Stir it in and keep it moving for just 60 seconds before adding the liquid.
Step 5: Combine and Simmer
Return the browned beef cubes to the pot, along with any juices that accumulated on the plate. Pour in the roasted tomatillo-pepper puree and the chicken broth, stirring to combine. Bring the mixture to a gentle boil, then reduce the heat to low. Cover the pot and let it simmer for 1½ to 2 hours, stirring occasionally, until the beef is tender enough to shred with a fork. The sauce will thicken as it cooks, and the flavors will meld into something truly harmonious.
💡 mia’s Pro Tip: For a thicker sauce, remove the lid during the last 30 minutes of simmering. This allows excess liquid to evaporate and concentrates the roasted tomatillo sauce even further. If you prefer a thinner, soupier stew, keep the lid on the whole time.
Step 6: Season and Serve
Taste the beef chile verde and adjust the seasoning with additional salt and black pepper as needed. The sauce should be bright, smoky, and well-balanced. Serve hot, garnished with fresh chopped cilantro and lime wedges on the side. Squeezing fresh lime juice over each bowl just before eating brightens all the flavors and adds a final note of freshness. This is your moment — enjoy every bite.
⚠️ Common Mistake to Avoid: Don’t skip the final seasoning adjustment! The long simmer can mellow the salt, so always taste before serving. A pinch of salt at the end can make all the difference in bringing the flavors into focus.
| Step | Action | Duration | Key Visual Cue |
|---|---|---|---|
| 1 | Roast tomatillos & peppers | 5–7 mins + 10 mins steam | Skins blistered and charred; tomatillos softened |
| 2 | Blend sauce | 30 seconds | Smooth, vibrant green puree |
| 3 | Brown beef | ~4 mins per batch | Deep brown crust on all sides |
| 4 | Sauté aromatics | 5–6 mins total | Onion translucent; garlic fragrant |
| 5 | Simmer stew | 1.5–2 hours | Beef fork-tender; sauce slightly thickened |
| 6 | Season & serve | 5 minutes | Bright, balanced flavor; garnished with cilantro and lime |
Serving & Presentation
This Beef Chile Verde with Roasted Tomatillo Sauce is wonderfully versatile, and the way you serve it can transform the entire meal. In my NYC kitchen, I love to ladle it over a bed of fluffy white rice or into warm corn tortillas for tacos, topped with a spoonful of crema and a sprinkle of cotija cheese. The bright, smoky sauce clings to the tender beef, and each bite is a perfect balance of textures. For a heartier meal, serve it with crusty bread or roasted potatoes — the sauce is so good you’ll want to soak up every last drop. And always, always serve lime wedges on the side; that fresh squeeze of citrus just before eating lifts the entire dish.
Growing up in Morocco, my mother would often serve slow-cooked meat with a side of fresh herbs, a wedge of lemon, and warm bread — the idea was to let each person build their own bite. I bring that same philosophy to this dish. Set out small bowls of chopped cilantro, diced white onion, sliced radishes, and a creamy avocado or crema, and let everyone customize their bowl. It makes the meal feel special, interactive, and deeply satisfying. Whether you’re hosting a dinner party or just feeding your family on a Tuesday night, this is the kind of food that brings everyone to the table.
| Pairing Type | Suggestions | Why It Works |
|---|---|---|
| Side Dish | Mexican rice, refried beans, roasted sweet potatoes | Absorb the sauce and add texture; complement the smoky flavors |
| Sauce / Dip | Crema, sour cream, guacamole, salsa verde | Cool and creamy; balance the heat and acidity of the stew |
| Beverage | Horchata, Mexican Coke, light lager, sparkling lime water | Refreshing and palate-cleansing; cut through the richness |
| Garnish | Fresh cilantro, lime wedges, diced white onion, radish slices | Add freshness, crunch, and brightness to each bite |
Make-Ahead, Storage & Reheating
One of the things I love most about this Beef Chile Verde is how well it keeps. In fact, I often make it a day ahead on purpose — the flavors meld and deepen overnight, making the second-day stew even more delicious. As a busy NYC food blogger, I rely on make-ahead meals like this to keep my weeknights stress-free. Here’s everything you need to know about storing, reheating, and freezing this authentic Mexican beef stew.
| Method | Container | Duration | Reheating Tip |
|---|---|---|---|
| Refrigerator | Airtight container | Up to 4 days | Reheat gently on stovetop over medium-low heat, stirring occasionally. Add a splash of broth or water if too thick. |
| Freezer | Freezer-safe container or zip-top bag | Up to 3 months | Thaw overnight in the refrigerator. Reheat on stovetop over medium heat, adding broth as needed. Do not microwave from frozen. |
| Make-Ahead | In the pot, cooled, then covered | Up to 2 days in advance | Cool completely before refrigerating. Reheat gently; flavors will be even better the next day. |
When reheating, I prefer the stovetop over the microwave because it’s more gentle and allows you to control the consistency. If the stew has thickened too much after refrigeration, simply stir in a few tablespoons of chicken broth or water until it reaches your desired consistency. The sauce should be luscious and coating, not pasty. And if you’re reheating a frozen portion, plan ahead and thaw it in the refrigerator overnight — it makes a world of difference in preserving the texture of the beef and the brightness of the roasted tomatillo sauce.
Variations & Easy Swaps
| Variation | Key Change | Best For | Difficulty Impact |
|---|---|---|---|
| Pork Chile Verde | Substitute pork shoulder for beef chuck | Pork lovers; slightly milder flavor | No change |
| Smoky Chipotle Twist | Add 1–2 chipotle peppers in adobo with the sauce | Extra smoky heat; deeper red-brown color | Easy |
| Vegetarian Verde | Use hearty mushrooms (king oyster or portobello) and extra beans | Meatless Monday; plant-based dinner | Easy |
Pork Chile Verde
This is the most traditional variation, and it’s absolutely delicious. Simply swap the beef chuck for an equal amount of pork shoulder, cut into 1-inch cubes. Pork shoulder has a similar fat content and becomes just as tender when slow-cooked. The flavor is slightly milder and sweeter than beef, which lets the roasted tomatillo sauce shine even more. I love adding a pinch of ground cinnamon and a dash of cloves to the pork version — a trick I learned from a Moroccan spice blend that pairs beautifully with the smoky sauce.
Smoky Chipotle Twist (Gluten-Free / Dairy-Free)
For those who love extra heat and a deeper, smokier flavor, add 1 or 2 chipotle peppers in adobo sauce to the blender along with the roasted tomatillo-pepper puree. Chipotles are smoked dried jalapeños, and they bring an intense, almost bacon-like smokiness that takes this Beef Chile Verde in a bolder direction. This variation is naturally gluten-free and dairy-free as written. The sauce will turn a slightly deeper red-brown, but the flavor will be unmistakably rich. Start with one chipotle and taste before adding a second — they can be quite spicy.
Vegetarian Verde
I developed this version for a friend who’s vegetarian, and it’s become a staple in my own kitchen. Replace the beef with a mix of hearty mushrooms — king oyster mushrooms sliced into thick coins, and portobello caps cut into chunks. Sear them in the same way you would the beef, until deeply browned. Then add a can of drained and rinsed black beans or pinto beans along with the sauce and broth. The mushrooms provide a meaty texture, the beans add protein and creaminess, and the roasted tomatillo sauce ties it all together. This variation is quick to make and satisfies even the most dedicated meat-eaters.
Can I use canned tomatillos instead of roasting fresh ones for this beef chile verde recipe?
Yes, you can use canned tomatillos in a pinch, but I strongly recommend fresh tomatillos for the best flavor. Fresh tomatillos roasted under a broiler develop a deep, smoky sweetness that canned tomatillos simply cannot replicate. Canned tomatillos are boiled rather than roasted, so they lack that charred complexity and have a more one-dimensional tartness. If you must use canned, drain them and roast them in a dry skillet over high heat for a few minutes to try to reintroduce some smokiness. However, for an authentic beef chile verde with that signature depth, fresh roasted tomatillos are absolutely worth seeking out.
What cut of beef is best for chile verde to keep it tender when slow-cooking?
Beef chuck is my top choice for chile verde, and it’s what I recommend in this recipe. It comes from the shoulder area and has a perfect balance of marbling and connective tissue, which breaks down during slow cooking into rich, tender meat that stays moist and flavorful. The collagen in chuck transforms into gelatin, which also helps thicken the sauce naturally. Other good options include beef brisket or boneless short ribs — both have enough fat and connective tissue to remain tender after hours of simmering. Avoid lean cuts like sirloin or round, as they will become tough and dry. The key is to choose a cut that rewards long, gentle cooking.
How do I thicken the roasted tomatillo sauce for beef chile verde without it becoming watery?
The best way to thicken the sauce naturally is to simmer the stew uncovered during the last 30 minutes of cooking. This allows excess moisture to evaporate, concentrating the flavors and giving the sauce a richer, silkier consistency. Additionally, the natural collagen from the beef chuck helps thicken the sauce as it breaks down. If the sauce still seems thin after 2 hours, you can remove the beef with a slotted spoon and let the sauce simmer uncovered for an additional 10–15 minutes on its own, then return the beef to the pot. Avoid using cornstarch or flour — this dish doesn’t need it, and those additions can dull the bright flavor of the roasted tomatillos.
Should I brown the beef before adding it to the tomatillo sauce for better flavor?
Absolutely yes — browning the beef is one of the most important steps in this recipe. When you sear beef cubes over medium-high heat until a deep brown crust forms, you create hundreds of new flavor compounds through a process called the Maillard reaction. This adds a rich, savory, almost nutty depth to the stew that you simply cannot get from raw or boiled beef. The browned bits that stick to the bottom of the pot also infuse the sauce with extra umami as the stew simmers. Always brown the beef in batches to avoid overcrowding the pan, and pat the cubes dry beforehand for the best sear. This step is non-negotiable for the most flavorful authentic Mexican beef stew.
Can I make beef chile verde in a slow cooker or Instant Pot?
Yes, you can adapt this recipe for a slow cooker or Instant Pot with a few adjustments. For a slow cooker, brown the beef and sauté the aromatics on the stovetop first, then transfer everything to the slow cooker and cook on low for 6–8 hours or on high for 3–4 hours. The sauce may be thinner than the stovetop version, so you can uncover and simmer on high for the last 30 minutes to thicken. For an Instant Pot, use the sauté function to brown the beef and aromatics, then pressure cook on high for 35 minutes with a natural release. The flavor is still excellent, but you’ll miss some of the slow-simmered depth that comes from the longer stovetop method. Either way, the roasted tomatillo sauce is the hero.
What is the best way to roast tomatillos for chile verde?
The best method is broiling, which is what I use in this recipe. Place husked and rinsed tomatillos on a baking sheet in a single layer and broil on high for 5–7 minutes, turning once, until the skins are blistered and charred in spots and the tomatillos have softened. The high heat of the broiler closely mimics the effect of a wood fire, giving you that authentic smoky flavor. You can also roast them on a cast-iron skillet over medium-high heat, turning occasionally, for a similar result. Avoid boiling or microwaving tomatillos for this recipe — those methods produce a watery, flat sauce without the deep, complex character that makes such a difference in beef chile verde.
Can I freeze leftover beef chile verde, and how should I reheat it?
Yes, beef chile verde freezes beautifully. Let the stew cool completely, then transfer it to freezer-safe containers or zip-top bags, removing as much air as possible. It will keep for up to 3 months. When you’re ready to enjoy it, thaw the frozen stew overnight in the refrigerator — this is the safest and most effective method. To reheat, warm it gently on the stovetop over medium-low heat, stirring occasionally. Add a splash of chicken broth or water if the sauce has thickened too much after freezing. I don’t recommend microwaving directly from frozen, as it can heat unevenly and toughen the beef. The stovetop method preserves the tender texture and bright flavor of the roasted tomatillo sauce.
What should I serve with beef chile verde for a complete meal?
Beef chile verde is wonderfully versatile and pairs beautifully with many sides. For a classic Mexican meal, serve it over fluffy white rice or with warm corn tortillas for tacos. Refried beans or black beans on the side add protein and creaminess. For a lower-carb option, serve it over cauliflower rice or with a side of roasted vegetables. I also love to set out garnishes like fresh cilantro, diced white onion, sliced radishes, lime wedges, and a dollop of crema or sour cream — they add freshness, crunch, and a cooling contrast to the smoky, tangy sauce. A simple green salad with a citrus vinaigrette also works wonderfully to balance the richness of the stew.
How can I make beef chile verde less spicy without losing flavor?
To reduce the heat while keeping the full flavor, start by removing all seeds and membranes from the jalapeño peppers before roasting — that’s where most of the capsaicin is concentrated. The poblano peppers are naturally mild and add earthy flavor without heat, so they won’t contribute to spiciness. You can also replace one or both jalapeños with a mild green pepper like a cubanelle or Anaheim, which will still provide that green chile character without the burn. The roasted tomatillo sauce itself is not inherently spicy, so by controlling the peppers, you can make this dish as mild or as bold as you like. A dollop of crema or sour cream at the end can also help tame any lingering heat while adding richness.
Why is my beef chile verde bitter, and how can I fix it?
Bitterness in beef chile verde usually comes from over-charred pepper skins or burnt garlic. When roasting poblano and jalapeño peppers, you want the skins to be blistered and blackened in spots, but not completely charred through to the flesh — that deep, uniform black char can create bitter flavors. After roasting, always steam the peppers and peel off the skins completely; any remaining black bits will add bitterness. Also, be careful not to burn the garlic when sautéing — it should be fragrant and just golden, not brown. If your stew is already bitter, try adding a pinch of sugar or a splash of lime juice to balance the bitterness. A small piece of dark chocolate stirred in can also help mellow bitter notes, a trick I learned in Paris.
Share Your Version!
I truly hope this Beef Chile Verde with Roasted Tomatillo Sauce becomes a staple in your kitchen the way it has in mine. There’s something so satisfying about watching simple ingredients transform into a deeply flavorful, soul-warming stew — and I’d love to see how yours turns out. Did you stick with beef chuck, or try the pork or mushroom variation? Did you add extra chipotle for heat, or keep it mild with extra crema? Every kitchen puts its own spin on a recipe, and that’s exactly what makes cooking so beautiful.
Leave a star rating and a comment below to let me know how it went — your feedback helps other home cooks discover and perfect this recipe too. And if you share a photo on Instagram or Pinterest, please tag me @exorecipes so I can cheer you on and share your creation with our community. I’d especially love to hear: what’s your favorite way to serve this — over rice, in tacos, or with a big stack of warm tortillas? Let me know in the comments!
From my NYC kitchen to yours — I hope this recipe brings as much warmth to your table as it does to mine. — mia 🧡
Love This Recipe? Save It to Pinterest!
If you enjoyed this Beef Chile Verde with Roasted Tomatillo Sauce recipe, don’t let it get lost in your browser tabs! 😄 Pin it now so you can find it again anytime — and explore hundreds more tried-and-tested recipes waiting for you on my Pinterest boards.
👉 Follow mia on Pinterest @chefrecipes2
📌 Pin this recipe · 🔁 Re-pin your favorites · 💬 Tag me when you make it — I love seeing your creations!
💬 What’s Your Favorite Way to Serve Beef Chile Verde?
Drop a comment below and share your go-to pairing — rice, tacos, or something totally unexpected? I read every single one! 👇
“`
Print

Beef Chile Verde with Roasted Tomatillo Sauce: Your Guide to a Flavor-Packed Mexican Classic
- Prep Time: 20 minutes
- Cook Time: 2 hours
- Total Time: 2 hours 20 minutes
- Yield: 6 1x
- Method: Main Course
- Cuisine: Mexican
Description
This Beef Chile Verde features tender chunks of beef simmered in a smoky, tangy roasted tomatillo sauce with green chiles and spices. It’s a hearty, flavor-packed Mexican classic perfect for tacos, burritos, or served over rice.
Ingredients
- 2 lbs beef chuck, cut into 1-inch cubes
- 1 ½ lbs tomatillos, husked and rinsed
- 2 poblano peppers
- 2 jalapeño peppers (seeds removed for less heat)
- 1 large onion, chopped
- 4 cloves garlic, minced
- 1 cup low-sodium chicken broth
- 1 teaspoon ground cumin
- 1 teaspoon dried oregano
- 1 tablespoon vegetable oil
- Salt and black pepper to taste
- ¼ cup chopped fresh cilantro (for garnish)
- Lime wedges (for serving)
Instructions
- Preheat broiler. Place tomatillos, poblano peppers, and jalapeño peppers on a baking sheet. Broil 5-7 minutes until charred, turning once. Transfer to a bowl, cover with plastic wrap, and let steam 10 minutes.
- Peel skins from peppers, remove stems and seeds. Place peppers and tomatillos (with juices) in a blender; puree until smooth.
- Season beef cubes with salt and pepper. Heat oil in a large Dutch oven over medium-high heat. Brown beef in batches, about 4 minutes per batch; transfer to a plate.
- Reduce heat to medium. Add onion to pot; cook 5 minutes until softened. Stir in garlic, cumin, and oregano; cook 1 minute.
- Return beef to pot. Pour in tomatillo-pepper puree and chicken broth; bring to a boil.
- Reduce heat to low, cover, and simmer 1 ½ to 2 hours until beef is tender, stirring occasionally.
- Taste and adjust seasoning with salt and pepper. Serve garnished with cilantro and lime wedges.
Notes
For a thicker sauce, uncover during the last 30 minutes of simmering. Leftovers keep well for up to 4 days in the refrigerator.
Nutrition
- Calories: 420
- Sugar: 6g
- Fat: 24g
- Carbohydrates: 14g
- Protein: 38g
k">
Tried This Recipe? Leave a Comment!
Did you make this recipe? I’d love to hear how it turned out! Please leave a comment and a rating below. Your feedback helps other home cooks and supports cheerychop.com!
For more delicious inspiration, follow me on Pinterest!