“`html
Table of Contents
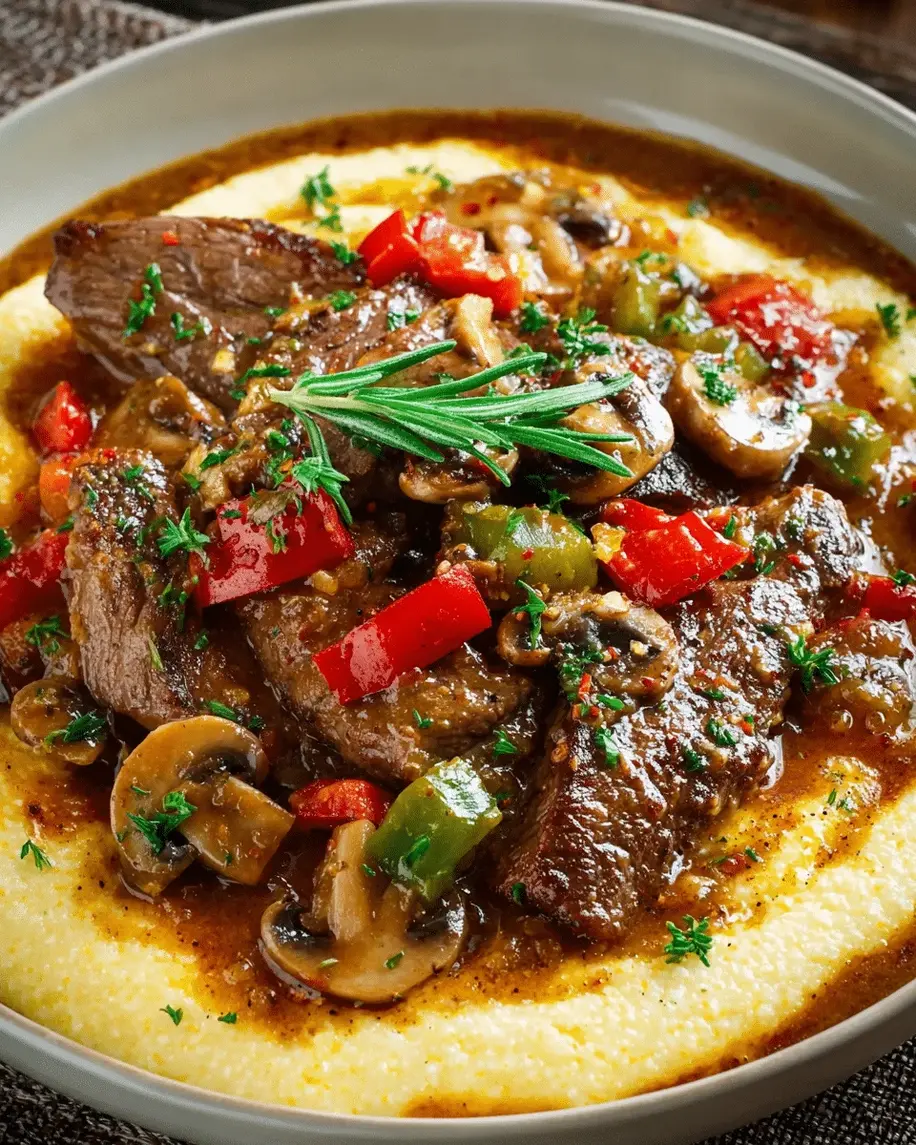
Beef Grillades with Mushrooms and Creamy Cheese Grits: A Soul-Warming Southern Classic Youll Crave Again and Again
I still remember the first time I tasted truly great grillades and grits. It was at a tiny soul food spot in Harlem, about a year after I moved to New York City from Paris. I walked in on a chilly autumn afternoon, and the smell alone — rich beef, smoky paprika, slow-simmered tomatoes — stopped me mid-step. The cook, a grandmotherly woman named Miss Etta, saw my face and just smiled. “Baby, that’s grillades,” she said. “You sit down and let me fix you a plate.” That first bite changed something in me. The beef was fork-tender, swimming in a dark, savory gravy, spooned over grits so creamy and cheesy they practically melted on the tongue. I knew right then I had to learn how to make this dish. Over the years, I’ve put my own spin on it — adding earthy cremini mushrooms, a touch of smoked paprika, and my French-trained sauce technique — and this beef grillades recipe is the result. It’s the kind of meal that wraps around you like a warm blanket.
Let me paint you a picture of what’s happening in this Southern grillades and grits dish. The beef — tender top round medallions — gets dredged in seasoned flour and seared until deep golden brown. That fond left in the pot is pure gold. Then comes the “holy trinity” of Southern cooking: onion, bell pepper, and celery, cooked down until sweet and soft. Sliced cremini mushrooms join the party, soaking up all those browned bits. A can of diced tomatoes, rich beef broth, tomato paste, and a whisper of cayenne create a gravy that’s both robust and silky. After nearly an hour of gentle simmering, the beef becomes so tender it practically falls apart with a fork. And the grits? Stone-ground, slow-cooked in chicken broth, finished with heavy cream, sharp cheddar, and butter. They’re velvety, luscious, and the perfect bed for all that saucy goodness. The aroma alone — earthy, smoky, slightly tangy from the tomatoes — will have your family gathering in the kitchen before you even call them to the table.
What makes my creamy cheese grits recipe different from the rest? It’s the details I’ve honed over years of professional cooking. First, I brown the beef in batches — never crowding the pan — so you get maximum flavor. Second, I deglaze the pot properly, scraping up every bit of that fond before adding the vegetables. Third, I cook the grits low and slow, whisking occasionally, until they’re perfectly tender, then finish them with cream and cheddar off the heat so the cheese stays silky. And I’ve added mushrooms, which aren’t traditional but bring an earthy depth that pairs beautifully with the beef and smoky gravy. This soul food dinner idea is one you’ll come back to again and again. One pro tip I always share: let the grillades rest for 10 minutes after cooking — the gravy thickens slightly and the flavors marry beautifully. And a common mistake? Rushing the browning. If you crowd the pan, the beef steams instead of sears, and you lose that deep, caramelized flavor that makes this dish sing.
Why This Beef Grillades Recipe Is the Best
The flavor secret in my beef grillades recipe comes straight from my French training combined with my love for Southern cooking. In Paris, I learned how to build layers of flavor — how a proper sear creates a foundation that carries through an entire dish. Here, I take that technique and pair it with the bold, smoky warmth of smoked paprika and a touch of cayenne. The mushrooms aren’t just an afterthought; they’re sliced and caramelized alongside the aromatics, adding an umami richness that makes the gravy deeply satisfying. This isn’t a quick weeknight meal — it’s a Sunday supper, a dish you make when you want to fill your home with the kind of aroma that makes people slow down and smile. Every bite tells a story: the beef from the American South, the technique from France, the warmth from my mother’s kitchen in Morocco.
Perfected texture is the hallmark of any great recipe, and this one delivers on every level. The beef is sliced into 1/2-inch medallions, which gives you the perfect ratio of seared exterior to tender interior. The gravy is neither thin nor pasty — it coats the back of a spoon with a silky richness that comes from the slow simmer and the natural gelatin in the beef. And the grits? They’re the star of the show in their own right. Stone-ground grits (never instant!) are cooked in chicken broth instead of water, which adds a savory backbone. Heavy cream and sharp cheddar are stirred in at the end, creating a texture that’s both creamy and slightly fluffy. I’ve tested this countless times to make sure the grits stay soft and luscious even after sitting for a few minutes. The key is to serve them immediately after adding the cheese and butter.
This recipe is foolproof and fast enough for a weekend meal but impressive enough for company. Even if you’ve never made grillades before, the step-by-step instructions will guide you through each stage with clear visual cues. The ingredients are all readily available at any US grocery store — no specialty items needed. I’ve designed this so that the active cooking time is only about 30 minutes; the rest is hands-off simmering while you relax or prep a side salad. The grits come together in about 25 minutes, right as the grillades are finishing. It’s a well-orchestrated dance that any home cook can master. Whether you’re feeding your family on a cozy Sunday or hosting friends for a taste of the South, this beef mushroom grillades recipe will make you look like a pro.
Beef Grillades Recipe Ingredients
When I shop for ingredients for this Southern grillades and grits, I head straight to my local farmers market in Union Square, NYC. The cremini mushrooms there are always earthy and firm, and I can find good stone-ground grits from a mill in Pennsylvania. For the beef, I ask my butcher to slice top round into 1/2-inch medallions — it’s a lean cut that becomes incredibly tender with slow cooking. Here’s everything you’ll need.
Ingredients List
- For the Grillades: 2 lbs beef top round, cut into 1/2-inch medallions
- 1 tsp salt
- 1/2 tsp black pepper
- 1/2 cup all-purpose flour
- 3 tbsp vegetable oil
- 1 large onion, diced
- 1 green bell pepper, diced
- 2 celery stalks, diced
- 3 cloves garlic, minced
- 8 oz cremini mushrooms, sliced
- 1 (14.5 oz) can diced tomatoes, undrained
- 1 cup beef broth
- 2 tbsp tomato paste
- 1 tsp dried thyme
- 1 tsp smoked paprika
- 1/2 tsp cayenne pepper (optional)
- 2 bay leaves
- 2 tbsp chopped fresh parsley
- For the Creamy Cheese Grits: 4 cups chicken broth
- 1 cup stone-ground grits (not instant)
- 1/2 cup heavy cream
- 1 1/2 cups shredded sharp cheddar cheese
- 2 tbsp unsalted butter
- 1/2 tsp salt
- 1/4 tsp black pepper
Ingredient Spotlight
Beef Top Round: This lean cut from the hind leg is ideal for grillades because it becomes meltingly tender when simmered low and slow. When shopping, look for medallions that are evenly thick (about 1/2 inch) so they cook uniformly. If top round isn’t available, beef chuck can be substituted — it has more marbling and will be even more forgiving, though you may need to trim excess fat. Avoid pre-cut stew meat, which is often irregularly sized and can cook unevenly.
Stone-Ground Grits: Not all grits are created equal. Stone-ground grits retain the germ and hull of the corn kernel, giving them a nutty flavor and robust texture that instant or quick grits simply can’t match. They take about 20–25 minutes to cook, but the result is worth every second. Look for them in the grain aisle or at a farmers market. If you must substitute, use quick-cooking grits (not instant) and reduce the cook time by about 10 minutes. The texture will be slightly less creamy, but still delicious.
Cremini Mushrooms: These brown mushrooms are simply baby portobellos, and they bring an earthy, meaty depth to the gravy that regular white button mushrooms can’t match. Their firmer texture holds up well during simmering. When selecting cremini, choose ones that are firm and dry, not slimy. If you can’t find cremini, white button mushrooms will work, or try shiitake for an even earthier flavor. Slice them about 1/4-inch thick so they soften but don’t disappear into the gravy.
Sharp Cheddar Cheese: I use sharp cheddar for its bold flavor that stands up to the rich gravy. Mild cheddar will work but won’t give the same tangy punch. For the creamiest melt, shred the cheese yourself from a block — pre-shredded cheese contains anti-caking agents that can make the grits grainy. You can substitute Gouda for a smoky twist, or Monterey Jack for a milder, creamier texture.
| Original Ingredient | Best Substitution | Flavor / Texture Impact |
|---|---|---|
| Beef top round | Beef chuck, sliced into medallions | More marbling, slightly richer flavor, longer cook time may reduce |
| Stone-ground grits | Quick-cooking grits (not instant) | Less nutty flavor, slightly less creamy texture, faster cook time |
| Cremini mushrooms | White button or shiitake mushrooms | Button: milder flavor / Shiitake: more earthy and intense |
| Sharp cheddar cheese | Gouda or Monterey Jack | Gouda: smoky and creamy / Jack: milder, less tangy |
How to Make Beef Grillades with Mushrooms and Creamy Cheese Grits — Step-by-Step
Trust me, this beef grillades recipe is easier than it looks. Just follow each step, and you’ll have a soul-warming dinner that tastes like it simmered all day.
Step 1: Season and Dredge the Beef
Pat the beef medallions dry with paper towels — this helps the flour stick and promotes browning. Season both sides generously with salt and pepper. Place the flour in a shallow dish and dredge each medallion, shaking off the excess. You want a light, even coating, not a thick crust. Set the floured medallions on a plate while you heat the oil.
💡 mia’s Pro Tip: Don’t skip the drying step. Moisture is the enemy of a good sear. If the beef is wet, it will steam rather than brown, and you’ll lose that deep flavor.
Step 2: Brown the Beef in Batches
Heat the vegetable oil in a large Dutch oven or heavy pot over medium-high heat until it shimmers. Working in batches (do not crowd the pot), place the medallions in a single layer. Cook for 2–3 minutes per side, until deeply browned. Transfer to a plate and repeat with the remaining beef. This step builds the foundation of flavor.
⚠️ Common Mistake to Avoid: Crowding the pan! If you add too many medallions at once, the temperature drops and the beef releases moisture instead of browning. Brown in 2–3 batches for the best results.
Step 3: Cook the Aromatics
Reduce the heat to medium. Add the diced onion, bell pepper, and celery to the pot (there should be about 2 tablespoons of oil remaining; if not, add a splash more). Cook, stirring occasionally, for about 5 minutes until the vegetables are softened and starting to turn golden around the edges. Add the minced garlic and sliced mushrooms and cook for 3 more minutes, until the mushrooms have released their moisture and begin to brown.
💡 mia’s Pro Tip: Scrape up any browned bits from the bottom of the pot as you stir the vegetables. Those bits are pure flavor — that’s the foundation of the gravy.
Step 4: Simmer the Gravy
Stir in the diced tomatoes (with their juices), beef broth, tomato paste, dried thyme, smoked paprika, cayenne (if using), and bay leaves. Bring the mixture to a gentle simmer, scraping up any remaining fond from the bottom. Return the beef and any accumulated juices to the pot, nestling the medallions into the liquid. Cover, reduce the heat to low, and let it simmer for 45–60 minutes, until the beef is fork-tender.
⚠️ Common Mistake to Avoid: Simmering too vigorously. The heat should be low enough that only an occasional bubble breaks the surface. A rapid boil will toughen the beef instead of tenderizing it.
Step 5: Make the Creamy Cheese Grits
While the grillades simmer, bring the chicken broth to a boil in a medium saucepan. Slowly whisk in the stone-ground grits — pouring them in a steady stream while whisking prevents lumps. Reduce the heat to low, cover, and cook, stirring occasionally, for 20–25 minutes, until the grits are thick and tender. Stir in the heavy cream, sharp cheddar, butter, salt, and pepper. Cook for 2 more minutes until the cheese is melted and the grits are velvety smooth. Adjust seasoning to taste.
💡 mia’s Pro Tip: For the creamiest grits, stir in the cheese and butter off the heat. This prevents the cheese from separating and keeps the texture silky. If the grits get too thick, add a splash of warm broth or milk to loosen them.
Step 6: Assemble and Serve
Once the grillades are tender, discard the bay leaves. Taste the gravy and adjust salt and pepper if needed. Stir in the fresh parsley. To serve, spoon a generous portion of creamy cheese grits onto each plate, then top with several beef medallions and a ladleful of mushroom gravy. Garnish with extra parsley if desired. Serve immediately.
| Step | Action | Duration | Key Visual Cue |
|---|---|---|---|
| 1 | Season and dredge beef | 5 minutes | Light, even flour coating |
| 2 | Brown beef in batches | 8–10 minutes | Deep golden-brown crust |
| 3 | Cook aromatics and mushrooms | 8 minutes | Vegetables softened, mushrooms browned |
| 4 | Simmer grillades | 45–60 minutes | Beef fork-tender, gravy thickened |
| 5 | Cook cheese grits | 25 minutes | Thick, creamy, cheese fully melted |
| 6 | Assemble and serve | 5 minutes | Grits topped with beef and gravy |
Serving & Presentation
This beef mushroom grillades recipe is a meal in itself, but the way you serve it can elevate the whole experience. For a true Southern-style presentation, spoon a generous mound of creamy cheese grits into the center of a wide, shallow bowl. Create a slight well in the center, then arrange 3–4 beef medallions on top. Ladle the mushroom gravy over and around the beef, letting it pool into the grits. Garnish with a sprinkle of fresh parsley and a crack of black pepper. I like to add a thin pat of butter on top of the grits just before serving — it melts into a glossy finish that looks beautiful.
For sides, keep it classic. A simple side of collard greens or sautéed green beans with garlic balances the richness of the dish. Buttered cornbread is another favorite — it’s perfect for sopping up any leftover gravy. If you’re serving this for a dinner party, add a crisp green salad with a tangy vinaigrette to cut through the richness. I often make this for friends here in NYC, and I always set out a bottle of Louisiana hot sauce for those who want extra heat. It’s a nod to my Moroccan roots, where we always have a spicy condiment on the table.
When it comes to beverages, a medium-bodied red wine like Zinfandel or a fruity Grenache pairs beautifully with the smoky, beefy flavors. For beer lovers, a malty brown ale or a dark lager works wonderfully. And if you’re in the mood for something non-alcoholic, sweet tea with a sprig of mint is the quintessential Southern pairing. Whatever you choose, this soul food dinner idea is meant to be shared slowly, with good company and good conversation.
| Pairing Type | Suggestions | Why It Works |
|---|---|---|
| Side Dish | Collard greens, sautéed green beans, buttered cornbread | Balances richness; cornbread soaks up gravy |
| Sauce / Dip | Louisiana hot sauce, pepper vinegar | Adds brightness and heat to cut richness |
| Beverage | Zinfandel, brown ale, sweet tea with mint | Fruity wine complements smoky beef; ale matches hearty flavors |
| Garnish | Fresh parsley, pat of butter, cracked black pepper | Adds freshness, color, and richness |
Make-Ahead, Storage & Reheating
As a busy NYC food blogger and mom, I rely on make-ahead meals that taste even better the next day. This Southern grillades and grits recipe is one of my favorites for meal prep. The grillades and gravy can be made up to 3 days in advance and stored separately from the grits. The flavors actually deepen and meld overnight, making the leftovers even more delicious. I often make a double batch on Sunday and enjoy it for lunch throughout the week.
| Method | Container | Duration | Reheating Tip |
|---|---|---|---|
| Refrigerator | Airtight container | Up to 3 days | Reheat grillades gently on stovetop, add splash of broth |
| Freezer | Freezer-safe container | Up to 3 months | Thaw overnight in fridge, reheat stovetop |
| Make-Ahead | Separate containers for grillades and grits | 2–3 days in advance | Reheat grits with splash of milk or broth to restore creaminess |
For reheating the grillades, I place them in a saucepan over medium-low heat with a splash of beef broth. Cover and let them warm gently for 8–10 minutes, stirring occasionally. The gravy will loosen back up and the beef will stay tender. For the grits, transfer them to a saucepan with a tablespoon or two of milk or chicken broth. Reheat over low heat, stirring constantly, until smooth and creamy again. Avoid the microwave for the grits — it can make them rubbery. If you’re planning to freeze, I recommend freezing only the grillades and gravy, then making fresh grits when you’re ready to serve. Grits don’t freeze well — their texture becomes grainy upon thawing.
Variations & Easy Swaps
This creamy cheese grits recipe and beef grillades recipe are both incredibly versatile. Over the years, I’ve tested many variations to suit different diets, seasons, and cravings. Here are some of my favorites.
| Variation | Key Change | Best For | Difficulty Impact |
|---|---|---|---|
| Spicy Creole Version | Add andouille sausage, increase cayenne to 1 tsp, add okra | Cajun/Creole flavor lovers | Easy (adds ingredients, same technique) |
| Gluten-Free Version | Use gluten-free all-purpose flour for dredging | Gluten-sensitive diets | Very easy (direct swap) |
| Dairy-Free Grits | Use vegan butter, full-fat oat milk, and dairy-free cheddar | Dairy-free / vegan diets | Easy (swap ingredients, watch for melting) |
Spicy Creole Version
For a taste of New Orleans, add 8 oz sliced andouille sausage along with the mushrooms in Step 3. Increase the cayenne pepper to 1 full teaspoon and add 1 cup sliced okra (fresh or frozen) during the last 20 minutes of simmering. The sausage adds smoky richness, while the okra thickens the gravy naturally. This version is a nod to the Creole influences in Southern cooking, and it pairs beautifully with the creamy grits. I love making this when I’m craving something with a real kick — it reminds me of the spicy stews my mother made in Morocco, but with a Louisiana accent.
Gluten-Free Version
Making this recipe gluten-free is as simple as swapping the all-purpose flour for a good gluten-free all-purpose blend. I recommend King Arthur Measure-for-Measure or Bob’s Red Mill 1-to-1 — both work beautifully for dredging and create a similar light crust on the beef. The gravy will thicken just as well, and no one will notice the difference. Double-check that your beef broth is certified gluten-free (most are, but always read the label). All other ingredients in this recipe are naturally gluten-free, including the grits. This is a fantastic option for anyone with celiac disease or gluten sensitivity who still wants to enjoy this soul food dinner idea.
Dairy-Free Grits
For a dairy-free version of the creamy cheese grits recipe, use vegan butter (Miyoko’s or Earth Balance work well), full-fat oat milk or unsweetened cashew milk in place of the heavy cream, and a shredded dairy-free cheddar alternative. I’ve tested this with Violife and Follow Your Heart cheddar shreds, and both melt reasonably well. The texture will be slightly less rich than the original, but still very creamy. Add an extra tablespoon of vegan butter at the end for richness. The key is to serve the grits immediately — dairy-free cheeses can stiffen as they cool. This variation is perfect for those who are lactose intolerant or following a plant-based diet.
What is the best way to tenderize beef for grillades to ensure it’s not tough?
The best way to tenderize beef for grillades is a combination of proper slicing and slow, gentle cooking. First, slice the beef into 1/2-inch medallions across the grain — this shortens the muscle fibers, making each bite more tender. Second, use a cut like top round or chuck, which benefits from long, moist cooking. Third, brown the beef quickly over high heat to develop flavor, then simmer it low and slow in the tomato-based gravy for at least 45–60 minutes. The acidity of the tomatoes helps break down the connective tissue. I also recommend letting the beef rest in the hot gravy for 10 minutes off the heat before serving — the residual heat continues to tenderize without overcooking. Avoid boiling the beef; a gentle simmer is key.
Can I use a different type of cheese in the creamy grits instead of the one specified?
Absolutely! While sharp cheddar is my go-to for its bold, tangy flavor, you can experiment with many other cheeses. Gouda (smoked or regular) adds a creamy, slightly sweet richness that pairs beautifully with the smoky paprika in the grillades. Monterey Jack melts beautifully and gives a mild, buttery flavor. For a more Southern twist, try using pimento cheese — it adds a tangy, slightly spicy kick. If you want an extra-indulgent version, mix half cheddar and half cream cheese for an ultra-creamy texture. Just avoid using pre-shredded cheese, as the anti-caking agents can make the grits grainy. Shred your cheese from a block for the smoothest results. The key is to add the cheese off the heat so it melts gently without becoming greasy.
How long should I cook the grillades and mushrooms so the beef is fork-tender?
The total simmering time for the grillades and mushrooms should be between 45 and 60 minutes over low heat. I find that the sweet spot is usually around 50 minutes — the beef is fork-tender but still holds its shape, and the mushrooms have softened beautifully into the gravy. The exact time depends on the thickness of your medallions and the cut of beef. For top round, start checking at 45 minutes by piercing a medallion with a fork. If it slides through with little resistance, it’s done. If not, cover and continue simmering, checking every 5 minutes. The mushrooms should be cooked through and tender after about 10 minutes of simmering, but they benefit from the full cooking time as they absorb the flavors of the gravy. Remember: low and slow is the key — a rapid boil will toughen the beef.
Can I make the beef grillades and cheese grits ahead of time for a crowd?
Yes, this is one of the best recipes for making ahead for a crowd. I recommend preparing the beef grillades and gravy up to 3 days in advance and storing them in an airtight container in the refrigerator. The flavors will actually deepen and meld overnight, making the dish even better. For the grits, I suggest making them fresh the day you’re serving — they’re quick to prepare and have the best texture when freshly made. If you must make the grits ahead, spread them in a baking dish, cover, and refrigerate. To reheat, transfer them to a saucepan with a splash of broth or milk and warm over low heat, stirring constantly until creamy. You can also reheat the grillades in a large pot or slow cooker on low. For a party, I often double the recipe and keep the grillades warm in a slow cooker set to “warm,” then make the grits just before guests arrive.
What is the difference between grillades and regular beef stew?
Great question! While both dishes involve simmering beef in a flavorful liquid, there are a few key differences. Grillades are specifically a Southern Louisiana dish where beef (or sometimes veal) is cut into thin medallions or pounded thin, dredged in flour, browned, and then simmered in a tomato-based gravy. The cooking time for grillades is typically shorter than a traditional stew — about 45–60 minutes — because the meat is sliced thinner. Grillades are almost always served over grits, which is a defining characteristic of the dish. A beef stew, on the other hand, uses larger chunks of beef, cooks for longer (often 2–3 hours), and includes more vegetables like carrots and potatoes. Stew is typically served as a one-pot meal with crusty bread. Grillades are more about the combination of tender, saucy beef and creamy grits.
Can I use a slow cooker or Instant Pot for this beef grillades recipe?
Yes, you can adapt this recipe for both a slow cooker and an Instant Pot. For the slow cooker: brown the beef and cook the aromatics and mushrooms on the stovetop as directed, then transfer everything to the slow cooker. Add the remaining ingredients (except parsley) and cook on low for 6–8 hours or on high for 3–4 hours. For the Instant Pot: use the sauté function to brown the beef and cook the aromatics. Add all remaining ingredients except parsley, then pressure cook on high for 20 minutes with a natural release of 10 minutes. In both cases, the grits should be made separately on the stovetop. I personally prefer the stovetop method for the best depth of flavor and control, but the slow cooker and Instant Pot both work well for busy days.
What can I serve alongside grillades and grits to make it a complete meal?
This Southern grillades and grits is already a hearty and complete meal on its own, but if you want to round it out with additional sides, I recommend keeping it simple and complementary. Classic Southern pairings include collard greens cooked with smoked turkey, sautéed green beans with garlic and bacon, or a simple coleslaw with a tangy vinaigrette. Buttered cornbread or crusty French bread is perfect for sopping up any extra gravy. For a lighter option, serve a crisp green salad with a lemon vinaigrette to cut through the richness. In the summer, I love adding a side of grilled okra or tomato salad with fresh herbs. If you’re serving a crowd, set up a buffet with the grillades and grits as the main attraction, surrounded by these side dishes.
How do I prevent my cheese grits from becoming lumpy?
Lumpy grits are a common frustration, but they’re easy to avoid with the right technique. The most important rule is to add the grits to the boiling liquid slowly while whisking constantly. I use a wire whisk and pour the grits in a thin, steady stream, all while stirring in a circular motion. This prevents the grains from clumping together. Second, use stone-ground grits, not instant or quick grits — they have a more forgiving texture and are less likely to clump. Third, cook the grits over low heat and stir them occasionally (every 5–7 minutes) to redistribute the starches. If lumps do form, you can whisk vigorously to break them up, or use an immersion blender for a few seconds to smooth them out. Finally, adding the cheese and butter off the heat ensures a silky finish without graininess.
Can I use chicken instead of beef for this recipe?
Yes, you can absolutely make a chicken version of this dish. I’d recommend using boneless, skinless chicken thighs for the best flavor and tenderness — they stay moist during simmering and have enough richness to stand up to the gravy. Cut the thighs into 2-inch pieces, season, dredge in flour, and brown them just like the beef. The cooking time will be shorter: simmer the chicken for about 25–30 minutes, or until it’s tender and cooked through. Use chicken broth instead of beef broth for a cohesive flavor. The creamy cheese grits remain the same. This chicken version is a wonderful option when you want something lighter but still soul-satisfying. I’ve made it for friends who don’t eat red meat, and it’s always a hit.
What is the best way to reheat leftover grillades without drying them out?
The stovetop is the best method for reheating leftover grillades while keeping the beef moist and the gravy silky. Place the leftover grillades and gravy in a saucepan or skillet over medium-low heat. Add a splash of beef broth or water (about 2–3 tablespoons per cup of leftovers) to loosen the gravy, as it will have thickened in the refrigerator. Cover the pan and heat gently for 8–10 minutes, stirring occasionally, until the beef is warmed through and the gravy is bubbling. Avoid high heat, which can toughen the beef. If you’re short on time, you can use the microwave, but do it in 30-second bursts at 50% power, stirring between each burst. For the grits, reheat them separately with a splash of milk or broth, stirring constantly over low heat until creamy. Never microwave the grits for long periods — they’ll become rubbery.
Share Your Version!
I absolutely love seeing how this beef grillades recipe comes to life in your kitchen. Did you add extra spice? Swap the cheese? Serve it for a special Sunday dinner? Leave a star rating and a comment below — your feedback helps other readers and makes my day every single time. If you share a photo on Instagram or Pinterest, tag me @exorecipes so I can see your beautiful creation. I personally reply to as many comments and tags as I can, and I love hearing about your own twists on this Southern classic. What’s your favorite way to make it yours? Let me know in the comments!
From my NYC kitchen to yours — I hope this recipe brings as much warmth to your table as it does to mine. — mia 🧡
Love This Recipe? Save It to Pinterest!
If you enjoyed this Beef Grillades with Mushrooms and Creamy Cheese Grits recipe, don’t let it get lost in your browser tabs! 😄 Pin it now so you can find it again anytime — and explore hundreds more tried-and-tested recipes waiting for you on my Pinterest boards.
👉 Follow mia on Pinterest @exorecipe
📌 Pin this recipe · 🔁 Re-pin your favorites · 💬 Tag me when you make it — I love seeing your creations!
⭐️ Made this recipe? I’d love to hear from you!
Leave a star rating and comment below — or tag me on Instagram @exorecipes.
👇 Your feedback makes my day!
“`
Print

Beef Grillades with Mushrooms and Creamy Cheese Grits: A Soul-Warming Southern Classic Youll Crave Again and Again
- Prep Time: 20 minutes
- Cook Time: 1 hour 10 minutes
- Total Time: 1 hour 30 minutes
- Yield: 6 1x
- Method: Main Course
- Cuisine: Southern
Description
Tender beef medallions simmered in a rich mushroom gravy, served over velvety cheddar cheese grits. This Southern classic is pure comfort in a bowl.
Ingredients
- For the Grillades:
- 2 lbs beef top round, cut into 1/2-inch medallions
- 1 tsp salt
- 1/2 tsp black pepper
- 1/2 cup all-purpose flour
- 3 tbsp vegetable oil
- 1 large onion, diced
- 1 green bell pepper, diced
- 2 celery stalks, diced
- 3 cloves garlic, minced
- 8 oz cremini mushrooms, sliced
- 1 (14.5 oz) can diced tomatoes, undrained
- 1 cup beef broth
- 2 tbsp tomato paste
- 1 tsp dried thyme
- 1 tsp smoked paprika
- 1/2 tsp cayenne pepper (optional)
- 2 bay leaves
- 2 tbsp chopped fresh parsley
- For the Creamy Cheese Grits:
- 4 cups chicken broth
- 1 cup stone-ground grits (not instant)
- 1/2 cup heavy cream
- 1 1/2 cups shredded sharp cheddar cheese
- 2 tbsp unsalted butter
- 1/2 tsp salt
- 1/4 tsp black pepper
Instructions
- For the Grillades:
- Season the beef medallions with salt and pepper. Dredge in flour, shaking off excess.
- Heat oil in a large Dutch oven or heavy pot over medium-high heat. Brown the beef in batches (do not crowd the pot), about 2-3 minutes per side. Transfer to a plate.
- Reduce heat to medium. Add onion, bell pepper, and celery; cook, stirring, until softened, about 5 minutes. Add garlic and mushrooms; cook 3 more minutes.
- Stir in diced tomatoes, beef broth, tomato paste, thyme, smoked paprika, cayenne (if using), and bay leaves. Bring to a simmer.
- Return the beef and any accumulated juices to the pot. Cover and simmer over low heat for 45–60 minutes, or until the beef is very tender. Discard bay leaves. Stir in parsley.
- For the Creamy Cheese Grits:
- In a medium saucepan, bring chicken broth to a boil. Slowly whisk in grits. Reduce heat to low, cover, and cook, stirring occasionally, for 20–25 minutes, until thick and tender.
- Stir in heavy cream, cheddar cheese, butter, salt, and pepper. Cook 2 more minutes until cheese is melted and smooth. Adjust seasoning.
- To serve, spoon a generous portion of grits onto each plate, top with grillades and mushroom gravy. Garnish with extra parsley if desired.
Notes
Leftovers can be refrigerated for up to 3 days. Reheat gently on the stovetop, adding a splash of broth if needed. For a spicier version, increase cayenne to 1 teaspoon.
Nutrition
- Calories: 680
- Sugar: 6g
- Fat: 36g
- Carbohydrates: 38g
- Protein: 48g

k">
Tried This Recipe? Leave a Comment!
Did you make this recipe? I’d love to hear how it turned out! Please leave a comment and a rating below. Your feedback helps other home cooks and supports cheerychop.com!
For more delicious inspiration, follow me on Pinterest!