“`html
Table of Contents
Cheesy Pepperoni Sourdough Pizza Bread: A Delicious Twist on Classic Pizza – Your New Favorite Appetizer
Growing up in a bustling kitchen in Morocco, my mother would often bake round, hearty breads that filled our home with the most incredible aroma — warm, yeasty, and deeply comforting. Years later, after training at Le Cordon Bleu in Paris and settling into my tiny but fiercely loved kitchen here in New York City, I found myself craving that same bread energy but with a bold, pizza-inspired twist. This cheesy pepperoni sourdough pizza bread recipe is exactly that: a soulful mash-up of my North African bread roots, French technique, and the unapologetic, cheesy indulgence that New Yorkers — myself included — absolutely live for. It is the ultimate easy sourdough pizza recipe that transforms a humble loaf into a showstopper.
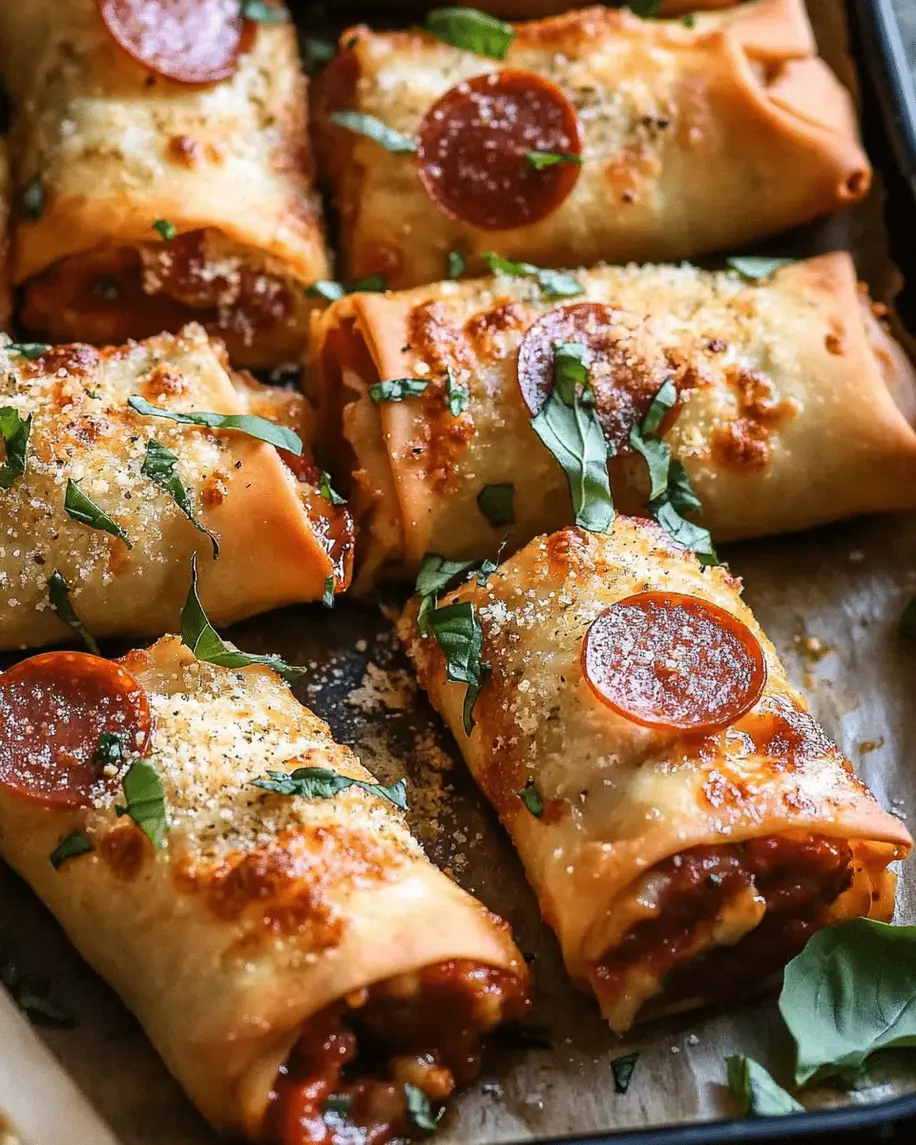
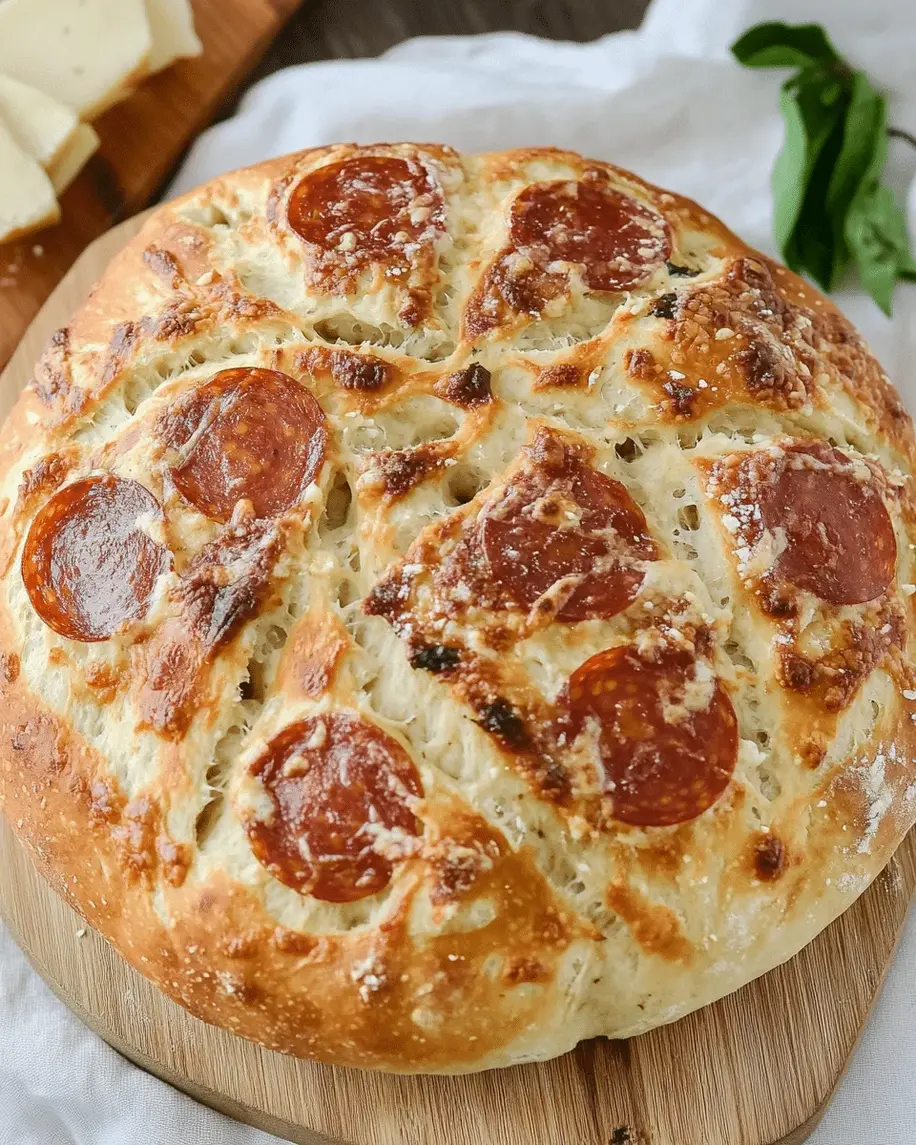
Picture this: a crusty sourdough loaf, sliced open and generously layered with tangy pizza sauce, a blanket of gooey mozzarella and nutty Parmesan, and perfectly crisped pepperoni edges that curl and char ever so slightly in the oven. The bread itself — with its signature sour tang and chewy crumb — becomes the perfect canvas, soaking up just enough sauce while staying sturdy enough to hold every glorious topping. The aroma that fills your kitchen is pure magic: garlic, oregano, melted cheese, and that unmistakable sourdough fragrance that reminds me of the bustling bakeries near the Marché d’Aligre in Paris. Every bite delivers a satisfying crunch, a stretchy cheese pull, and a burst of peppery, savory flavor.
What makes my version of homemade pepperoni pizza bread truly special is the technique I picked up during my pastry training — lightly brushing the cut sides of the bread with olive oil and pre-toasting them briefly before adding the toppings. This simple step ensures the bread stays crispy and never turns soggy, a common mistake that can ruin even the best pizza bread. I also use a blend of mozzarella and Parmesan for that dual texture: stretchy and crispy. Whether you are a sourdough enthusiast or a pizza lover looking for something new, this recipe is foolproof, fast, and incredibly satisfying. From my NYC kitchen to yours — I hope this recipe brings as much warmth to your table as it does to mine. — mia 🧡
Why This Cheesy Pepperoni Sourdough Pizza Bread Recipe Is the Best
The Flavor Secret: The magic of this cheesy pepperoni sourdough pizza bread recipe lies in the sourdough itself. Unlike regular pizza dough, sourdough brings a subtle tang that cuts through the richness of the cheese and pepperoni, creating a more complex, adult-friendly flavor profile. It is the same principle I learned in Paris — balancing fat with acidity — and it elevates this dish from simple snack to something truly memorable. The slight chewiness of a good sourdough loaf also means every bite has texture and substance, making it far more satisfying than standard garlic bread or flatbread pizzas I have tried over the years.
Perfected Texture: The number one issue with most pizza bread recipes is sogginess. Soggy bread is a heartbreak I know all too well. My technique — brushing the cut sides with olive oil and baking the assembled bread directly on a sheet pan without covering — ensures the crust stays shatteringly crisp while the interior remains soft and pillowy. The cheese melts into the nooks and crannies of the sourdough, creating little pockets of gooey goodness that contrast beautifully with the crispy edges. It is a textural experience that honestly rivals any slice from a top NYC pizzeria.
Foolproof & Fast: This easy sourdough pizza recipe comes together in just 30 minutes, with only 10 minutes of active prep. You do not need to proof dough, stretch it, or worry about it sticking to your hands. All you need is a good loaf of sourdough (store-bought works beautifully!), your favorite pizza sauce, and a handful of toppings. It is the perfect solution for busy weeknights, last-minute guests, or game-day gatherings. Even beginner home cooks will nail this on the first try because the sourdough base does all the heavy lifting — you simply assemble and bake.
Cheesy Pepperoni Sourdough Pizza Bread Recipe Ingredients
When I am shopping for ingredients for this pepperoni sourdough bread, I usually head straight to the Italian deli on Arthur Avenue in the Bronx or my local farmers market in Union Square. There is something so satisfying about picking out a round, crusty sourdough loaf still warm from the oven and imagining all the cheesy, peppery goodness it is about to hold. The ingredients are simple, but each one plays a vital role in creating that perfect balance of flavors and textures that makes this recipe so irresistible.
Ingredients List
- 1 loaf sourdough bread (about 1 pound)
- 1/2 cup pizza sauce
- 2 cups shredded mozzarella cheese
- 1/2 cup grated Parmesan cheese
- 4 ounces sliced pepperoni
- 1/4 cup sliced black olives (optional)
- 1 tablespoon olive oil
- 1 teaspoon dried oregano
- 1/2 teaspoon garlic powder
Ingredient Spotlight
Sourdough Bread: This is the heart of the dish. Look for a loaf that is firm and crusty on the outside with a slightly chewy, open crumb on the inside. A day-old loaf actually works perfectly here because it is sturdy enough to hold the toppings without turning to mush. In a pinch, you can use a French boule or ciabatta, but the tangy flavor of true sourdough really makes this recipe shine. Avoid pre-sliced sandwich bread — it lacks the structure needed for a good pizza bread.
Mozzarella Cheese: For that iconic, stretchy cheese pull, use low-moisture, whole-milk mozzarella. It melts evenly and does not release too much water, which keeps the bread crisp. Fresh mozzarella can be used but be sure to pat it dry very well and shred it rather than slicing it, as fresh mozzarella contains more moisture and can make the bread soggy if not handled properly. I always buy a block and shred it myself — pre-shredded cheese often contains anti-caking agents that affect melting.
Pepperoni: The pepperoni is what gives this homemade pepperoni pizza bread its signature savory punch. I prefer using standard-sized pepperoni slices (about 1.5 inches in diameter) that curl up into little crispy cups as they bake. For a spicier kick, look for pepperoni with added red pepper flakes. You can also use turkey pepperoni for a leaner option, though the flavor will be milder. I always buy a 4-ounce package and arrange the slices generously — overlapping them slightly so every bite gets some peppery goodness.
| Original Ingredient | Best Substitution | Flavor / Texture Impact |
|---|---|---|
| Sourdough Bread | French Boule or Ciabatta | Less tangy; still crispy but slightly denser crumb |
| Low-Moisture Mozzarella | Fresh Mozzarella (patted dry & shredded) | More moisture; less stretch, softer melt; risk of sogginess |
| Pepperoni | Cooked Italian Sausage or Soppressata | Richer, more robust flavor; less crispy edges |
| Pizza Sauce | Marinara or Tomato Basil Sauce | Slightly sweeter or more herbaceous; still works beautifully |
| Parmesan Cheese | Pecorino Romano | Saltier, sharper flavor; use slightly less |
How to Make Cheesy Pepperoni Sourdough Pizza Bread — Step-by-Step
Trust me when I say this is one of the easiest and most rewarding recipes you will ever make. In just a few simple steps, you will have a golden, bubbly, irresistibly cheesy sourdough pizza bread that looks and tastes like it came from a rustic Italian bakery. Let me walk you through each step with the tips and tricks I have learned from years of teaching cooking classes here in NYC and from my own trial and error in the kitchen.
Step 1: Preheat and Prepare the Bread
Preheat your oven to 375°F (190°C). While the oven is heating, take your sourdough loaf and slice it in half horizontally, as if you are making a giant sandwich. Place both halves cut-side up on a baking sheet. Brush the cut sides generously with the olive oil — this is the barrier that prevents sogginess and creates a beautiful golden crust.
💡 mia’s Pro Tip: For an even crispier base, pop the bread halves into the oven for 3-4 minutes before adding any toppings. This extra step dries out the surface slightly and ensures the bread stays crunchy even after baking with the sauce and cheese. I learned this trick during my time at Le Cordon Bleu when we would pre-toast bread for canapés — it makes a world of difference!
Step 2: Layer the Sauce and Cheese
Spread the pizza sauce evenly over both bread halves, leaving a small border around the edges. Next, sprinkle the shredded mozzarella and grated Parmesan evenly over the sauce. Do not be shy with the cheese — this is what makes the dish so indulgent and satisfying. Make sure to cover the sauce completely so every bite has that gooey, cheesy goodness.
⚠️ Common Mistake to Avoid: Do not overload the bread with too much sauce or cheese. While it may be tempting to pile it on, too much moisture from the sauce can seep into the bread and make it soggy. Stick to about 1/2 cup of sauce and 2 cups of mozzarella for a 1-pound loaf — that is the sweet spot for perfect texture.
Step 3: Arrange the Pepperoni and Seasonings
Lay the pepperoni slices evenly over the cheese, slightly overlapping them so they create a nice, even layer. If you are using black olives, scatter them on top now. Finally, sprinkle the dried oregano and garlic powder evenly over everything. The oregano adds that classic pizza parlor aroma, while the garlic powder enhances the savory notes without burning, as fresh garlic might at this temperature.
💡 mia’s Pro Tip: For the crispiest pepperoni, place the slices on top of the cheese rather than burying them under it. This allows the edges to curl up and get delightfully crunchy as they bake. I also like to use a mix of regular and turkey pepperoni for a slightly lighter option — the kids never notice the difference!
Step 4: Bake and Serve
Place the baking sheet on the center rack of the oven and bake for 15-20 minutes, or until the cheese is fully melted, bubbly, and starting to turn golden brown in spots. The edges of the bread should be deeply golden and crispy. Remove from the oven and let it cool on the baking sheet for exactly 2 minutes — this allows the cheese to set slightly so it does not slide off when you cut it.
⚠️ Common Mistake to Avoid: Do not skip the cooling step! If you cut into the pizza bread immediately after it comes out of the oven, the cheese will be lava-hot and the structure will not hold, resulting in a messy, sliding pile of toppings. Two minutes of patience makes all the difference between a beautiful presentation and a delicious but messy situation. Use a sharp serrated knife to slice into wedges or strips and serve warm.
| Step | Action | Duration | Key Visual Cue |
|---|---|---|---|
| 1 | Preheat oven & slice bread | 5 min | Oven ready; bread cut cleanly in half |
| 2 | Brush with oil & pre-toast (optional) | 3-4 min | Bread edges lightly golden |
| 3 | Spread sauce & add cheeses | 3 min | Sauce evenly coated; cheese fully covering sauce |
| 4 | Add pepperoni & seasonings | 2 min | Pepperoni overlapping slightly; herbs visible |
| 5 | Bake | 15-20 min | Cheese bubbly & golden; bread edges deep brown |
| 6 | Cool & slice | 2 min | Cheese set but still warm; clean cuts |
Serving & Presentation
This cheesy pepperoni sourdough pizza bread is incredibly versatile when it comes to serving. I love bringing it out as a showstopping appetizer at parties — it disappears within minutes. Arrange the slices on a large wooden board or a rustic platter, garnished with a sprinkle of fresh basil or a pinch of red pepper flakes for color and heat. In my NYC apartment, I often serve it alongside a crisp Caesar salad or a bowl of tomato soup for a cozy, satisfying meal that feels both elevated and effortless.
For an extra touch that reminds me of the antipasto platters I enjoyed in Parisian wine bars, I like to serve small bowls of marinara sauce, pesto, or even a creamy ranch dip on the side for dunking. The combination of the tangy sourdough, rich cheese, and spicy pepperoni is absolutely divine when paired with a bright, herby dip. I also recommend serving it with a side of pickled vegetables or a simple arugula salad dressed with lemon and olive oil to cut through the richness.
Whether you are hosting a Super Bowl party, a casual dinner with friends, or just treating yourself on a cozy Friday night, this recipe delivers every single time. It is the kind of food that brings people together — sharing a warm, cheesy, crispy slice of something delicious, with no fancy plating required. Just good food, good company, and happy hearts.
| Pairing Type | Suggestions | Why It Works |
|---|---|---|
| Side Dish | Caesar salad, tomato soup, roasted vegetables | Balances richness with freshness or acidity |
| Sauce / Dip | Marinara, pesto, ranch, garlic aioli | Adds moisture and complementary flavors |
| Beverage | Sparkling water, light lager, Pinot Noir | Cuts through fat; complements the tangy bread |
| Garnish | Fresh basil, red pepper flakes, parsley, chives | Adds freshness, color, and a pop of flavor |
Make-Ahead, Storage & Reheating
Living in NYC means my schedule is always packed, so I love recipes that can be prepped ahead or stored beautifully. This easy sourdough pizza recipe is incredibly forgiving when it comes to planning. You can assemble the entire pizza bread (without baking) up to 6 hours in advance, cover it tightly with plastic wrap, and refrigerate it. When you are ready to eat, simply bake it straight from the fridge, adding 3-5 minutes to the baking time. It is a lifesaver on busy weeknights or when you have guests coming over and want to minimize last-minute stress.
| Method | Container | Duration | Reheating Tip |
|---|---|---|---|
| Refrigerator | Airtight container or tightly wrapped | Up to 3 days | Reheat in oven at 350°F for 8-10 min to restore crispness |
| Freezer | Wrap tightly in foil then place in freezer bag | Up to 2 months | Bake from frozen at 375°F for 18-22 min, uncovered |
| Make-Ahead | Assembled but unbaked, covered, in fridge | Up to 6 hours | Bake directly from fridge, add 3-5 min to bake time |
When reheating leftovers, the key is to avoid the microwave at all costs — it will turn your beautiful crispy bread into a sad, chewy mess. Instead, pop the slices on a baking sheet in a 350°F oven for 8-10 minutes, or until the cheese is bubbly again and the bread is crisp. If you are in a hurry, an air fryer set to 350°F for 4-5 minutes works like a charm and actually makes the edges even crunchier. I often make a double batch on purpose so I can enjoy it throughout the week — it is that good.
Variations & Easy Swaps
One of the things I absolutely adore about this cheesy pepperoni sourdough pizza bread recipe is how customizable it is. Over the years, I have tested countless variations in my NYC kitchen, drawing inspiration from the diverse flavors of this city and from my Moroccan and French culinary roots. Whether you are looking for a vegetarian option, a spicy twist, or something completely different, there is a version here for everyone. Below is a quick overview of three of my favorite variations, followed by detailed descriptions to help you choose the perfect one for your table.
| Variation | Key Change | Best For | Difficulty Impact |
|---|---|---|---|
| Vegetarian Mediterranean | Replace pepperoni with roasted red peppers, artichokes, and feta | Meat-free Monday; Mediterranean flavor lovers | Easy (same method) |
| Spicy Harissa & Sausage | Add harissa paste to the sauce; use spicy Italian sausage crumbles | Heat seekers; Moroccan-inspired flavor twist | Easy (adds 5 min prep) |
| Gluten-Free & Dairy-Free | Use gluten-free sourdough or boule; dairy-free mozzarella and Parmesan | Dietary restrictions; allergy-friendly entertaining | Easy (ingredient swap only) |
Vegetarian Mediterranean Version
This variation is all about bright, briny, and herbaceous flavors that remind me of the Greek islands and the Mediterranean coast. Instead of pepperoni, I use a combination of jarred roasted red peppers (drained and sliced), marinated artichoke hearts (quartered), and crumbled feta cheese. I also add a sprinkle of sumac — a tangy, lemony spice I fell in love with during my travels in Morocco — and some Kalamata olives for extra saltiness. The result is a lighter, fresher take on pizza bread that is absolutely perfect for spring and summer gatherings. It pairs beautifully with a glass of crisp white wine or a lemon-infused sparkling water.
Spicy Harissa & Sausage Version
This is the variation that most reflects my North African roots. I mix a tablespoon of harissa paste (a smoky, spicy chili paste from Morocco and Tunisia) into the pizza sauce before spreading it on the bread. Then, instead of pepperoni, I top the cheese with crumbled cooked spicy Italian sausage and a scattering of pickled jalapeños. The harissa adds an incredible depth of flavor — smoky, spicy, and slightly sweet — that pairs perfectly with the tangy sourdough and rich cheese. For a finishing touch, I drizzle a little honey over the top before serving, which balances the heat beautifully. This version is not for the faint of heart, but it is absolutely unforgettable. I often make it when I am craving bold, warming flavors on a chilly NYC evening.
Gluten-Free & Dairy-Free Version
I have tested this version extensively because so many of my friends and readers follow gluten-free or dairy-free diets, and I firmly believe everyone deserves a great pizza bread experience. Use a good-quality gluten-free sourdough loaf or a sturdy gluten-free boule — the key is to choose one that is crusty and not too crumbly. For the cheese, I recommend a combination of dairy-free mozzarella shreds (look for a brand that melts well, like Follow Your Heart or Violife) and a sprinkle of nutritional yeast or dairy-free Parmesan for that savory kick. The bake time remains the same, though you may want to add 2-3 minutes if the dairy-free cheese takes a little longer to bubble. This version is every bit as delicious and satisfying as the original, and it is always a hit at parties where dietary needs vary widely.
Can I use active sourdough starter instead of discard for cheesy pepperoni sourdough pizza bread?
Absolutely — you can use active sourdough starter in place of discard, and it will work beautifully. However, the recipe as written uses a full loaf of already-baked sourdough bread, not sourdough starter. If you are asking about making your own sourdough bread from scratch to use as the base, yes, active starter is ideal for baking the loaf itself because it provides more leavening and a more pronounced tang. That said, if you already have a baked loaf of sourdough (whether store-bought or homemade using your active starter or discard), you can absolutely use it for this recipe — the bread just needs to be sturdy and crusty. The beauty of this recipe is that it works with any good-quality sourdough loaf, regardless of how the bread itself was leavened.
What is the best cheese to use for a gooey topping on sourdough pizza bread?
For the ultimate gooey, stretchy topping, I highly recommend using low-moisture, whole-milk mozzarella as your base cheese. It melts beautifully, stretches like a dream, and has a mild, creamy flavor that complements the tangy sourdough and savory pepperoni without overpowering them. I also highly recommend adding a sprinkling of grated Parmesan or Pecorino Romano — these hard cheeses add a nutty, salty depth and create lovely crispy golden spots as they bake. If you want to elevate it further, you can mix in a small amount of provolone or fontina for extra creaminess and a more complex flavor profile. The key ratio I use is about 4 parts mozzarella to 1 part Parmesan, which gives you the perfect balance of stretch and flavor.
How long do I bake cheesy pepperoni sourdough pizza bread to get a crispy crust?
For a perfectly crispy crust on your cheesy pepperoni sourdough pizza bread, bake it at 375°F (190°C) for 15 to 20 minutes. The exact time depends on your oven and how crispy you like your bread. I recommend starting to check at the 15-minute mark — you are looking for the cheese to be fully melted and bubbly, with the edges of the bread turning a deep golden brown and the pepperoni beginning to curl and crisp at the edges. If you want an extra-crispy crust, there are two tricks I swear by: first, brush the cut sides of the bread with olive oil before adding the toppings, and second, for maximum crunch, place the assembled pizza bread directly on the oven rack (with a baking sheet on the rack below to catch any drips) for the last 3-4 minutes of baking.
Can I substitute pepperoni with another meat in this sourdough pizza bread recipe?
Yes, you can absolutely substitute pepperoni with other meats, and each swap will bring a completely different flavor profile to your sourdough pizza bread. Cooked and crumbled Italian sausage (either sweet or spicy) is one of my favorite alternatives — it adds a robust, herby richness that pairs beautifully with the tangy sourdough. Thinly sliced soppressata or salami are also excellent choices, as they have a similar cured-meat texture and curl up nicely in the oven. For a leaner option, you can use turkey pepperoni or even shredded rotisserie chicken. If you go with chicken, I recommend tossing it in a little olive oil and Italian seasoning before adding it to the bread so it stays flavorful and moist. Just be sure to cook any raw meats fully before assembling the pizza bread, since the 15-20 minute bake time is primarily for melting the cheese and crisping the bread.
Can I make this sourdough pizza bread ahead of time for a party?
Yes, this recipe is perfect for party planning! You can fully assemble the cheesy pepperoni sourdough pizza bread up to 6 hours in advance, then cover it tightly with plastic wrap and store it in the refrigerator. When your guests arrive, simply unwrap it and bake it straight from the fridge, adding 3 to 5 minutes to the recommended bake time. This make-ahead strategy is a lifesaver when you are hosting a party or gathering, as it allows you to focus on other preparations without sacrificing the quality of the dish. I would not recommend baking it fully in advance and reheating it, as the bread can lose its crispness and the cheese may become oily. The unbaked, refrigerated method ensures that the bread stays crusty and the cheese stays perfectly gooey.
What type of sourdough bread works best for this recipe — round or oblong?
Both round boules and oblong loaves work wonderfully for this recipe, and the choice really comes down to personal preference and presentation. A round boule is great if you plan to cut the pizza bread into wedges, similar to a round pizza — this is my preferred shape when I am serving it as an appetizer at parties because the wedges look gorgeous on a platter. An oblong loaf (like a standard batard or sourdough sandwich loaf) is easier to slice into rectangular strips, which are perfect for dipping and for portion control. Whichever shape you choose, make sure the loaf is at least 8 to 10 inches in diameter or length so you have enough surface area for the toppings. I also recommend a loaf with a sturdy, thick crust, as it holds up better under the weight of the cheese and sauce.
Can I add vegetables to this cheesy pepperoni sourdough pizza bread?
Absolutely — adding vegetables is a fantastic way to customize this recipe and boost its nutritional value. I often add sautéed mushrooms, thinly sliced bell peppers, or red onion rings to the toppings before baking. If you are adding vegetables that release a lot of moisture (like mushrooms, zucchini, or tomatoes), I highly recommend giving them a quick sauté or roast beforehand to remove excess water, which helps keep the bread crispy. Roasted red peppers from a jar (drained and patted dry) and marinated artichoke hearts are also excellent choices because they are already cooked and have concentrated flavor. My personal favorite vegetable combination includes sautéed cremini mushrooms, caramelized onions, and a handful of fresh arugula added right after baking for a peppery, fresh contrast to the rich cheese and pepperoni.
Is this sourdough pizza bread recipe suitable for kids?
Yes, this recipe is incredibly kid-friendly and is one of the most popular dishes I make when I have young guests over. Kids love the familiar pizza flavors — the cheese, the pepperoni, the tomato sauce — and the sourdough bread base is a fun twist that feels playful and different. The recipe is also very mild in terms of spice (the garlic powder and oregano are gentle), so it is unlikely to be too intense for little palates. If you are serving it to very young children, you can easily omit the black olives or cut the pepperoni into smaller pieces. I also love that this recipe is hands-on enough that kids can help assemble it — spreading the sauce, sprinkling the cheese, and arranging the pepperoni are all tasks that little hands can manage with minimal supervision, making it a wonderful family cooking activity.
Can I use a gluten-free sourdough loaf for this recipe?
Yes, you can absolutely use a gluten-free sourdough loaf, and the recipe works beautifully with it. I have tested this several times with high-quality gluten-free sourdough from a local NYC bakery, and the results were excellent. When choosing a gluten-free loaf, look for one that is crusty and sturdy rather than soft and crumbly — a dense, well-structured gluten-free sourdough will hold the toppings much better. You may need to adjust the bake time slightly, as gluten-free breads can dry out faster or take longer to crisp depending on their moisture content. I recommend checking the pizza bread at the 15-minute mark and adding time in 2-minute increments if needed. The same make-ahead and storage instructions apply, though gluten-free breads are often best eaten the same day they are baked or reheated for optimal texture.
What is the best way to reheat leftover sourdough pizza bread without it getting soggy?
The absolute best way to reheat leftover sourdough pizza bread is in the oven or an air fryer — never the microwave, which will make the bread tough and chewy. To reheat in the oven, place the slices on a baking sheet and warm them at 350°F (175°C) for 8 to 10 minutes, or until the cheese is bubbly again and the bread is crisp. If you have an air fryer, it is even faster and produces incredibly crispy results — just pop the slices in at 350°F for 4 to 5 minutes. I also recommend placing a small oven-safe dish of water on the lower rack of your oven while reheating, as the steam helps prevent the bread from drying out while the direct heat crisps the exterior. If you are reheating frozen pizza bread, do not thaw it first — bake it directly from frozen at 375°F for 18 to 22 minutes, uncovered, for the best texture.
Share Your Version!
I absolutely love hearing how this cheesy pepperoni sourdough pizza bread recipe turns out in your kitchen! Did you try one of my variations — or invent your own spin? Did you add extra veggies, swap in a different cheese, or turn up the heat with some spicy harissa? Drop a star rating and a comment below to let me and the whole community know how it went. Your feedback helps other home cooks discover new twists and feel confident trying this recipe for the first time.
And do not forget to snap a photo of your beautiful creation and share it on Instagram or Pinterest! Tag me @exorecipes so I can see your masterpiece — I love nothing more than scrolling through my feed and spotting your gorgeous pizza bread slices. Whether you are a seasoned baker or a first-time sourdough explorer, your version is worth celebrating. From my NYC kitchen to yours — I hope this recipe brings as much warmth to your table as it does to mine. — mia 🧡
Love This Recipe? Save It to Pinterest!
If you enjoyed this Cheesy Pepperoni Sourdough Pizza Bread recipe, do not let it get lost in your browser tabs! 😄 Pin it now so you can find it again anytime — and explore hundreds more tried-and-tested recipes waiting for you on my Pinterest boards.
👉 Follow mia on Pinterest @exorecipe
📌 Pin this recipe · 🔁 Re-pin your favorites · 💬 Tag me when you make it — I love seeing your creations!
“`
Print

Cheesy Pepperoni Sourdough Pizza Bread: A Delicious Twist on Classic Pizza
- Prep Time: 10 minutes
- Cook Time: 20 minutes
- Total Time: 30 minutes
- Yield: 4 1x
- Method: Appetizer
- Cuisine: Italian-American
Description
A delicious twist on classic pizza, using sourdough bread as the base for a cheesy, pepperoni-loaded pizza bread that’s perfect for sharing.
Ingredients
- 1 loaf sourdough bread (about 1 pound)
- 1/2 cup pizza sauce
- 2 cups shredded mozzarella cheese
- 1/2 cup grated Parmesan cheese
- 4 ounces sliced pepperoni
- 1/4 cup sliced black olives (optional)
- 1 tablespoon olive oil
- 1 teaspoon dried oregano
- 1/2 teaspoon garlic powder
Instructions
- Preheat oven to 375°F (190°C).
- Slice the sourdough loaf in half horizontally, creating a top and bottom half.
- Place the bread halves cut-side up on a baking sheet. Brush the cut sides with olive oil.
- Spread pizza sauce evenly over both halves.
- Sprinkle mozzarella and Parmesan cheese over the sauce.
- Arrange pepperoni slices on top of the cheese. Add black olives if desired.
- Sprinkle oregano and garlic powder over the top.
- Bake for 15-20 minutes, until the cheese is melted and bubbly and the bread edges are golden.
- Remove from oven, let cool for 2 minutes, then slice into pieces and serve.
Notes
You can add other toppings like mushrooms, bell peppers, or cooked sausage if desired. For extra crunch, toast the bread halves lightly before assembling.
Nutrition
- Calories: 450
- Sugar: 4g
- Fat: 24g
- Carbohydrates: 38g
- Protein: 22g

k">
Tried This Recipe? Leave a Comment!
Did you make this recipe? I’d love to hear how it turned out! Please leave a comment and a rating below. Your feedback helps other home cooks and supports cheerychop.com!
For more delicious inspiration, follow me on Pinterest!