Table of Contents
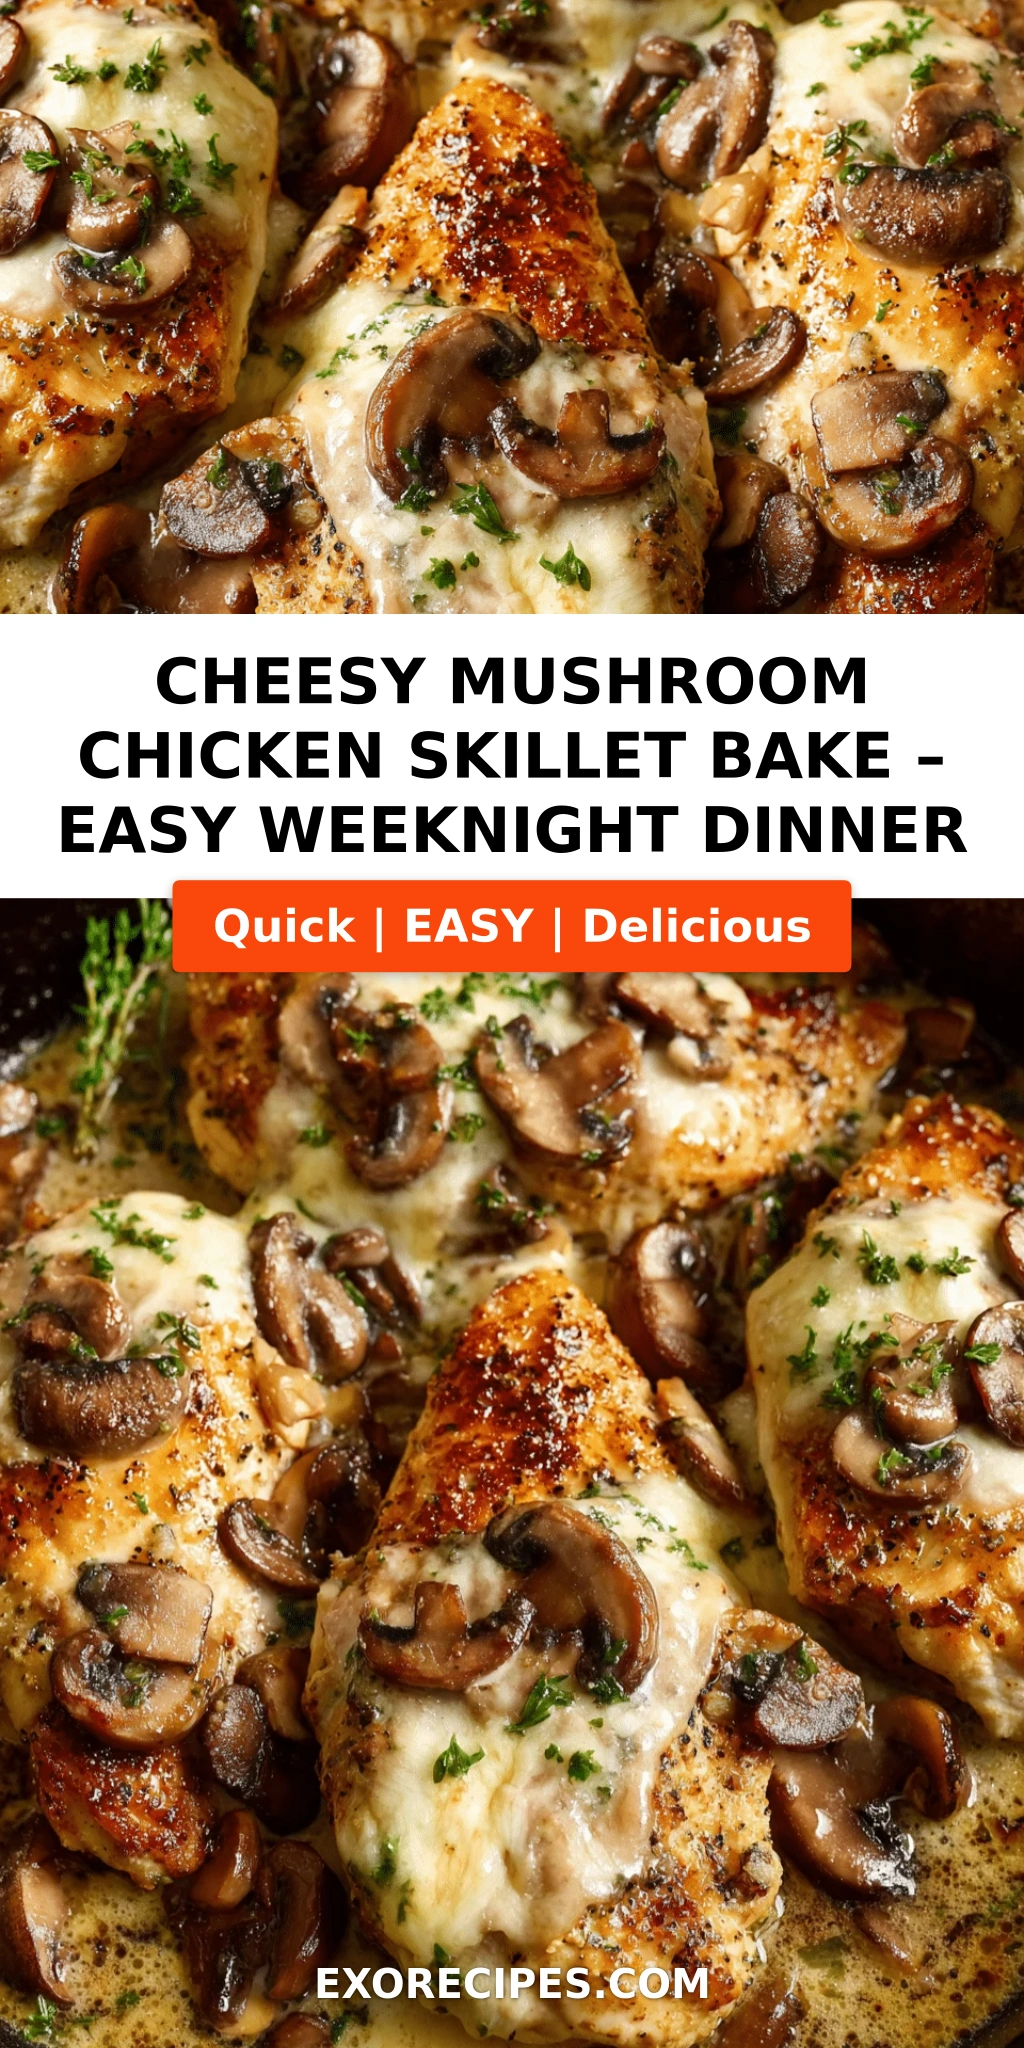
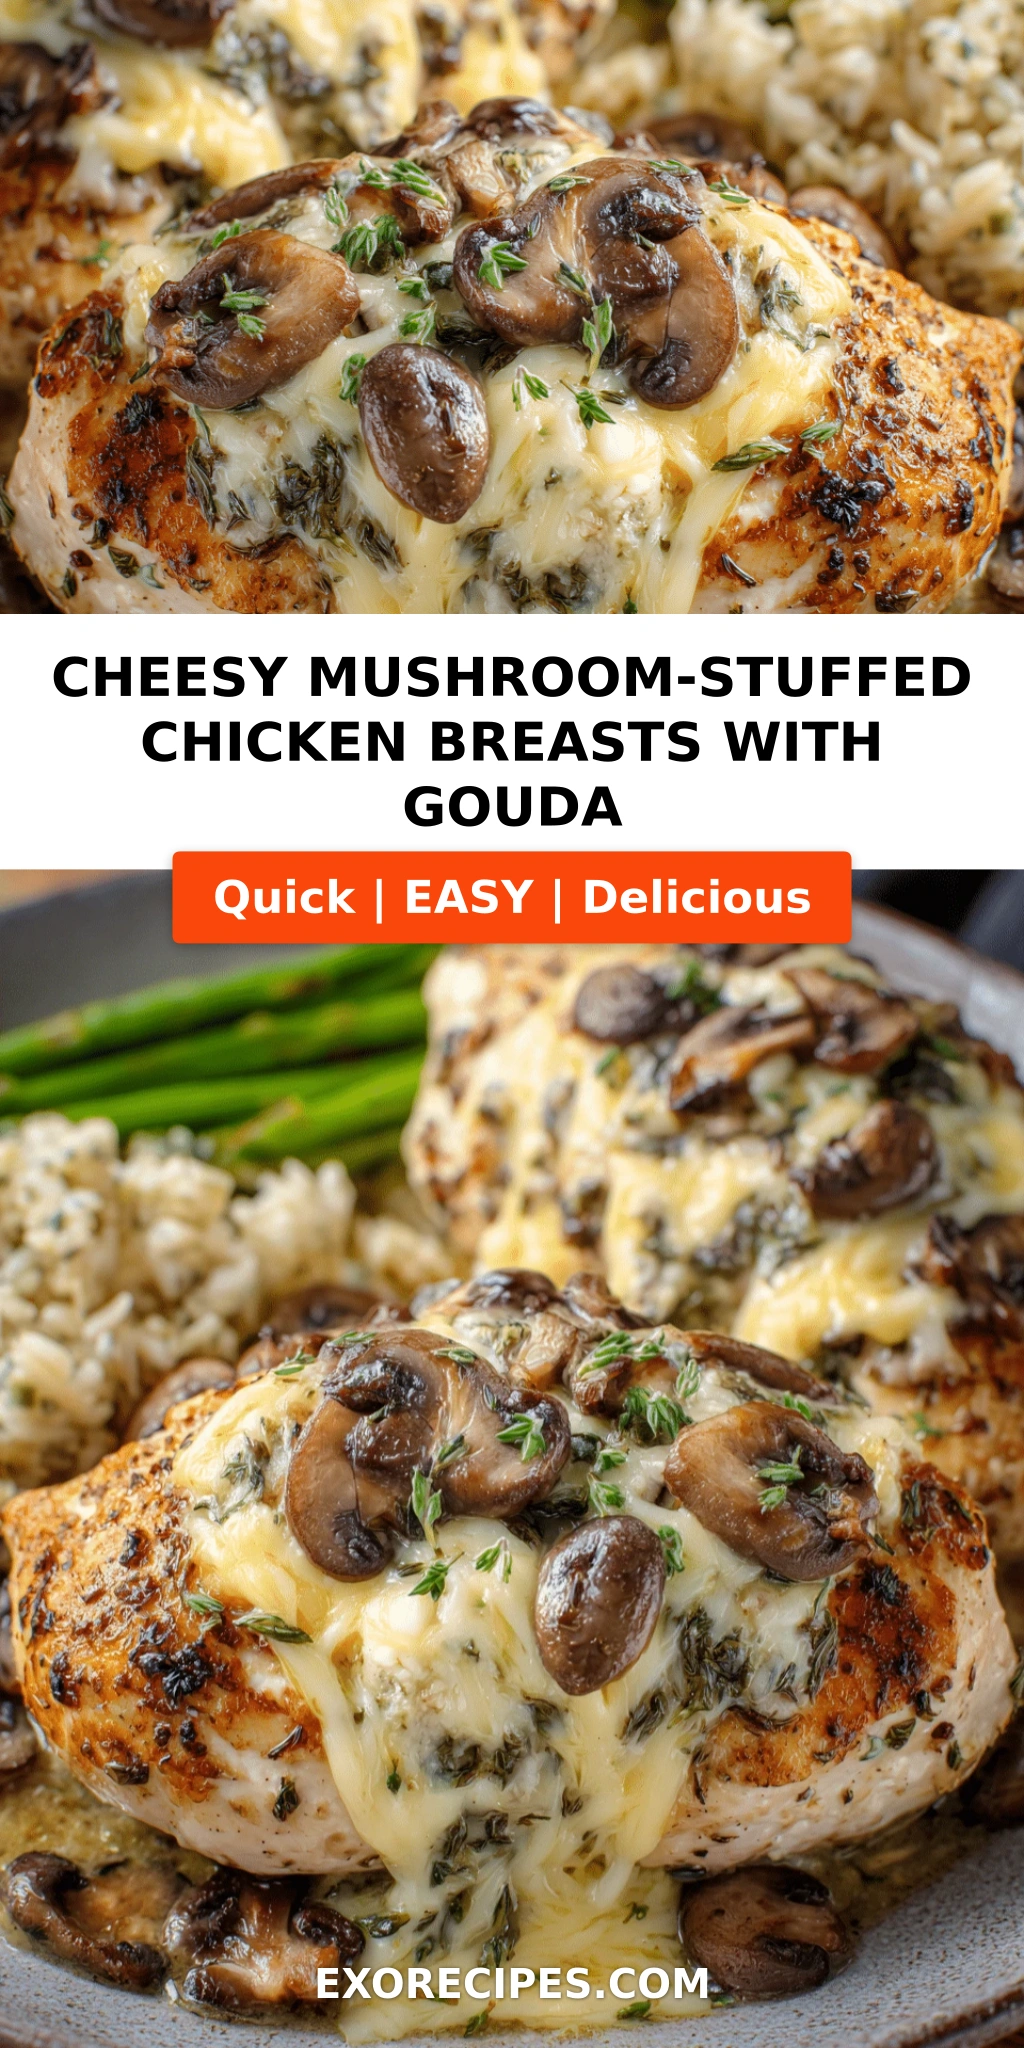
Cheesy Mushroom-Stuffed Chicken Breasts with Golden Gouda – A Rich, Savory Stuffed Chicken Breast Recipe
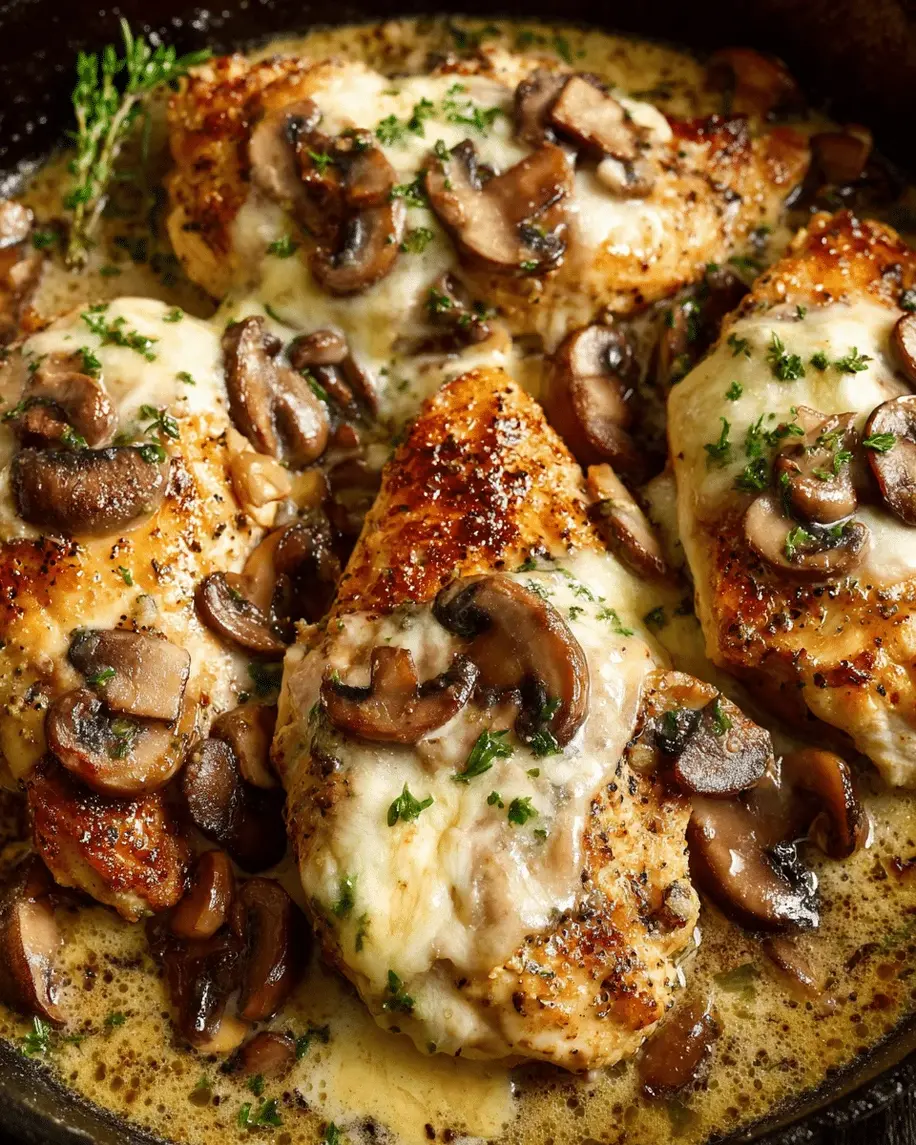
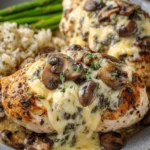
I still remember the first time I made this stuffed chicken breast recipe for a dinner party in my tiny Manhattan walk-up. The smell of mushrooms caramelizing in butter and garlic filled every corner of that apartment, and when I pulled the golden, Gouda-stuffed chicken breasts out of the oven, my guests actually applauded. That night, I knew this cheesy mushroom chicken was something special — a dish that feels impressive enough for a celebration yet simple enough for a Tuesday night. With its creamy, savory filling and a beautifully browned crust, this Gouda stuffed chicken has become one of my most-requested recipes, and I’m so excited to share it with you today.
Picture this: tender, juicy chicken breast with mushrooms that have been sautéed until deeply golden and fragrant, then blended with velvety cream cheese and nutty, melted Gouda. Every bite gives you that perfect contrast — a crisp, seared exterior giving way to a luscious, cheesy center. The aroma alone will have everyone gathered in your kitchen before you even call them to the table. I love how the thyme adds a subtle earthiness that ties the whole dish together, while the pan juices create a light, silky sauce that coats each slice beautifully. It’s the kind of baked chicken with Gouda that feels like a warm hug on a plate.
What sets this chicken breast with mushrooms apart from other stuffed chicken recipes is the technique I developed during my time at culinary school in Paris: searing the chicken first to lock in flavor and create that gorgeous golden crust, then finishing it in the oven with a splash of broth and a pat of butter. This two-step method ensures the chicken stays incredibly moist while the Gouda melts into a luscious, creamy pool. 💡 mia’s Pro Tip: Let the mushroom filling cool completely before stuffing — this prevents the cream cheese from thinning out and keeps the filling thick and luxurious. And one common mistake to avoid: don’t skip the toothpicks! They keep the filling securely inside while the chicken sears and bakes, so every bite is perfectly stuffed.
Why This Stuffed Chicken Breast Recipe Is the Best
The Flavor Secret — The magic here lies in the combination of Gouda and mushrooms. Gouda brings a wonderfully nutty, slightly sweet flavor that melts beautifully without becoming greasy, while the mushrooms add an earthy, umami depth that elevates this far beyond a simple chicken dinner. I learned the value of layering flavors in my mother’s kitchen in Morocco, where every dish had multiple dimensions. Here, I’ve applied that same principle: sautéing the mushrooms until all their moisture evaporates concentrates their flavor, then blending them with cream cheese for richness and fresh thyme for brightness. The result is a stuffing that’s deeply savory, luxuriously creamy, and utterly irresistible.
Perfected Texture — The dual cooking method — sear then bake — is something I honed during my pastry and sauce training in Paris. Searing the chicken at high heat creates a caramelized crust that locks in juices and adds incredible flavor, while the gentle oven heat finishes the cooking evenly without drying out the breast. The Gouda melts into a molten, velvety center while the exterior stays beautifully golden. This technique transforms an ordinary chicken breast into something truly restaurant-worthy, and it’s foolproof once you know a few key cues — like waiting for that deep amber color on the first side before flipping.
Foolproof & Fast — I know that weeknight cooking needs to be both doable and delicious, and this recipe delivers on both fronts. From start to finish, you’re looking at just 45 minutes, and most of that is hands-off oven time. The ingredients are straightforward — things you can find at any grocery store — and the steps are easy to follow, even for someone new to stuffing chicken. I’ve tested this recipe dozens of times to make sure it works every single time, whether you’re cooking for your family on a busy Wednesday or impressing guests on a Saturday night. It’s the kind of dish that makes you look like a hero with minimal fuss.
Stuffed Chicken Breast Recipe Ingredients
I picked up these ingredients at my favorite Union Square farmers market last weekend — the mushrooms were earthy and fragrant, the thyme was bright and perky, and the Gouda was aged just right. Whenever I shop for this chicken breast with mushrooms, I think about how my mother would send me to the souk in Marrakech with a woven basket, teaching me to choose the freshest ingredients by touch and smell. That same care goes into every ingredient here. Let’s look at what you’ll need and how to choose each component for the best results.
Ingredients List
- 4 boneless, skinless chicken breasts (about 6 oz each)
- 2 tablespoons olive oil, divided
- 1 cup mushrooms, finely chopped (cremini or button work beautifully)
- 2 cloves garlic, minced
- 1 cup grated Gouda cheese (smoked or young — both are wonderful)
- ¼ cup cream cheese, softened to room temperature
- 1 tablespoon fresh thyme leaves (or 1 teaspoon dried)
- Salt and pepper to taste
- ½ cup chicken broth, low-sodium preferred
- 1 tablespoon unsalted butter
Ingredient Spotlight
Gouda Cheese — This is the star of the show. Gouda melts into a wonderfully creamy, stretchy, and nutty filling. I recommend using a young or medium-aged Gouda for the creamiest melt. Smoked Gouda adds an extra layer of depth that’s lovely, but regular Gouda keeps the flavor clean and approachable. Look for blocks that feel firm but have a slight give — that’s a sign of good moisture content for melting. Pre-shredded cheese often contains anti-caking agents that can prevent smooth melting, so grate your own for the best texture.
Mushrooms — Cremini mushrooms are my go-to here because they have a deeper, earthier flavor than white button mushrooms, but both work perfectly. The key is chopping them very finely so they blend seamlessly into the cream cheese filling. When you sauté them, cook until all the released liquid has evaporated — this concentrates the mushroom flavor and prevents the stuffing from making the chicken soggy. I’ll share more on this in the pro tips below!
Chicken Breasts — Look for breasts that are roughly the same size and thickness for even cooking. If some are much thicker than others, you can place them between two sheets of plastic wrap and gently pound them to an even ½-inch thickness with a rolling pin or meat mallet. This ensures they cook in the same amount of time and roll up easily for stuffing. I prefer organic or free-range chicken for the best flavor and texture.
| Original Ingredient | Best Substitution | Flavor / Texture Impact |
|---|---|---|
| Gouda cheese | Gruyère, fontina, or provolone | Gruyère is nuttier; fontina is creamier — all melt beautifully |
| Cream cheese | Mascarpone or ricotta (drained) | Mascarpone is richer; ricotta gives a lighter, fluffier texture |
| Fresh thyme | Dried thyme or fresh rosemary (use half for dried) | Rosemary is more piney — use sparingly |
| Chicken broth | Dry white wine or vegetable broth | Wine adds acidity and depth; broth keeps it mild |
| Mushrooms (cremini) | White button, shiitake, or portobello (diced) | Shiitake are earthier; portobello more meaty — all work well |
How to Make Cheesy Mushroom-Stuffed Chicken Breasts — Step-by-Step
This baked chicken with Gouda comes together in a few simple steps. I’ll walk you through each one with the exact timing, visual cues, and my personal tips so you get a perfect result every time.
Step 1: Prepare the Mushroom Filling
Preheat your oven to 375°F (190°C). In a skillet, heat 1 tablespoon of olive oil over medium heat. Add the finely chopped mushrooms and minced garlic, and cook, stirring occasionally, until the mushrooms are soft and all the liquid they release has evaporated — about 5 minutes. You’ll know they’re ready when they start to sizzle in the oil rather than steam, and the pan looks dry. Remove from heat and let cool for 5 minutes. In a mixing bowl, combine the cooked mushrooms, grated Gouda, softened cream cheese, and fresh thyme. Mix until everything is evenly incorporated and you have a thick, spreadable paste.
💡 mia’s Pro Tip: Let the mushroom mixture cool completely before stuffing. If it’s warm, it will thin out the cream cheese and make the filling runny, which can leak out during cooking. Pop it in the fridge for 10 minutes if you’re short on time.
Step 2: Stuff the Chicken
Take each chicken breast and, using a sharp knife, cut a horizontal pocket into the thickest side, being careful not to cut all the way through. You want to create a deep pocket that can hold the filling without tearing. Season the chicken inside and out with salt and pepper. Divide the mushroom-cheese mixture evenly among the four breasts, spooning it into the pockets. If the pockets aren’t closing easily, secure the openings with toothpicks — insert them at an angle so they hold the edges together snugly.
⚠️ Common Mistake to Avoid: Don’t overstuff the chicken! If you pack too much filling in, it will burst out during searing. Use about 3 tablespoons of filling per breast — enough to be generous but not overflowing.
Step 3: Sear and Bake
In the same skillet you used for the mushrooms, heat the remaining 1 tablespoon of olive oil over medium-high heat until it shimmers. Place the stuffed chicken breasts in the skillet, being careful not to crowd them — work in batches if needed. Sear for 3-4 minutes per side, until deeply golden brown. The crust should look caramelized and crisp. Carefully pour the chicken broth into the skillet and add the tablespoon of butter, letting it melt into the broth. Transfer the entire skillet to the preheated oven and bake for 20-25 minutes, until the chicken is cooked through and the internal temperature reaches 165°F on an instant-read thermometer. Remove toothpicks, let rest 5 minutes, then slice and serve with the pan juices spooned over the top.
💡 mia’s Pro Tip: For an extra-golden crust, pat the chicken breasts dry with paper towels before seasoning and searing. Moisture is the enemy of browning — dry surfaces = gorgeous crust every time.
| Step | Action | Duration | Key Visual Cue |
|---|---|---|---|
| 1 | Sauté mushrooms and garlic | 5 minutes | Liquid evaporates, mushrooms begin to sizzle |
| 2 | Mix filling and stuff chicken | 5 minutes | Thick, spreadable paste; pockets sealed with toothpicks |
| 3 | Sear chicken in skillet | 3-4 minutes per side | Deep golden-brown crust forms |
| 4 | Add broth and butter, then bake | 20-25 minutes | Internal temp 165°F; juices run clear |
| 5 | Rest and serve | 5 minutes | Pan juices thicken slightly; chicken rests before slicing |
Serving & Presentation
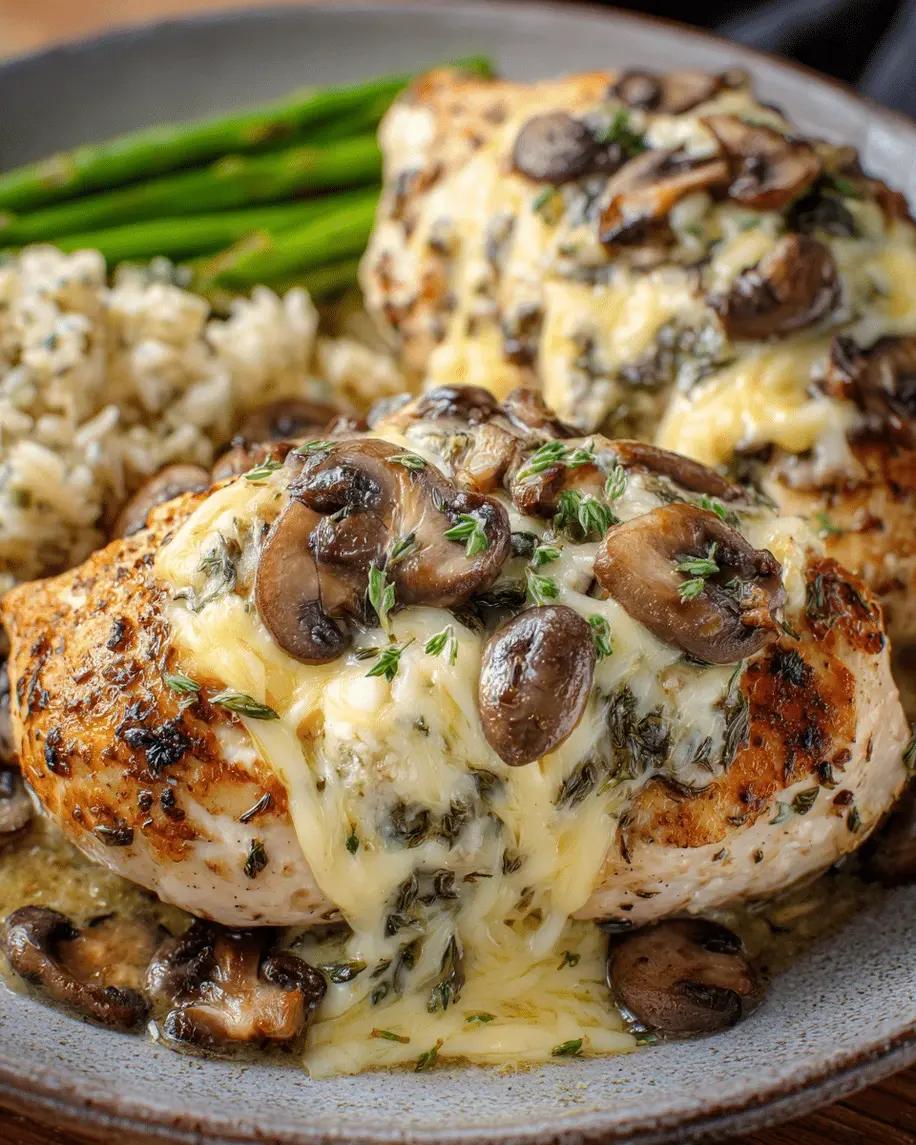
When I serve this cheesy mushroom chicken, I like to bring the whole skillet to the table — it feels so warm and rustic, like something you’d find in a cozy Parisian bistro. Spoon the pan juices over each breast just before serving; they’re liquid gold, rich with mushroom and Gouda flavor. I love to garnish with a few extra fresh thyme sprigs and a light crack of black pepper. The golden crust against the creamy filling is gorgeous, and the aroma will have everyone reaching for their forks before you even sit down.
In my NYC kitchen, I often pair this with simple roasted asparagus or a crisp green salad with lemon vinaigrette to cut through the richness. Mashed potatoes or buttered egg noodles are also wonderful for soaking up every last drop of that pan sauce. And if you’re feeling like celebrating, pour a glass of Chardonnay or a light Pinot Noir — the wine’s acidity balances the creamy Gouda beautifully. Whether it’s a weeknight dinner or a special occasion, this baked chicken with Gouda always feels like an event.
| Pairing Type | Suggestions | Why It Works |
|---|---|---|
| Side Dish | Roasted asparagus, garlic green beans, or arugula salad | Bright, fresh flavors contrast the rich, creamy chicken |
| Starch | Mashed potatoes, buttered egg noodles, or crusty bread | Soaks up the savory pan juices perfectly |
| Beverage | Chardonnay, Pinot Noir, or sparkling water with lemon | Acidity cuts through the richness of Gouda and cream cheese |
| Garnish | Fresh thyme sprigs, flaky sea salt, cracked black pepper | Adds color, freshness, and a final layer of flavor |
Make-Ahead, Storage & Reheating
Between my busy recipe-testing schedule and life in New York City, I’m all about smart meal prep. This stuffed chicken breast recipe works beautifully for make-ahead dinners — you can assemble everything in advance and simply sear and bake when you’re ready. I often prep the mushroom filling a day ahead and stuff the chicken in the morning, so all I have to do is cook it after work. Here’s everything you need to know about storing and reheating this dish.
| Method | Container | Duration | Reheating Tip |
|---|---|---|---|
| Refrigerator | Airtight container | 3-4 days | Reheat in a 350°F oven for 10-12 minutes, covered with foil |
| Freezer | Freezer-safe bag or container | Up to 3 months | Thaw overnight in fridge, then reheat in a covered skillet with a splash of broth |
| Make-Ahead | Covered dish in fridge | Up to 24 hours in advance | Assemble but don’t sear — sear and bake just before serving for best texture |
When reheating, the key is to add a little moisture to prevent the chicken from drying out. I like to place leftover chicken in a baking dish with a splash of chicken broth or even just water, cover with foil, and warm in a 350°F oven until heated through — about 10-12 minutes. The foil traps steam and keeps the meat tender. For a quicker option, you can slice the chicken and reheat it in a covered skillet over medium-low heat with a tablespoon of broth, flipping once. Avoid the microwave if you can — it tends to make the chicken rubbery and can cause the cheese filling to separate.
Variations & Easy Swaps
One of the things I love most about this chicken breast with mushrooms is how adaptable it is. Over the years, I’ve played with different cheeses, herbs, and even added a little North African warmth with a pinch of cumin or paprika. Here are some of my favorite variations — each one tested and loved in my own kitchen.
| Variation | Key Change | Best For | Difficulty Impact |
|---|---|---|---|
| Moroccan Spice Twist | Add ½ tsp cumin + ½ tsp paprika to filling | Warm, aromatic depth; unique flavor profile | Easy |
| Dairy-Free / Light | Use dairy-free cream cheese and vegan Gouda-style shreds | Lighter option without sacrificing creaminess | Easy |
| Spinach & Artichoke | Add ½ cup thawed chopped spinach + ¼ cup chopped artichoke hearts to filling | Extra vegetables and a tangy, creamy twist | Easy |
Moroccan Spice Twist
This variation is very close to my heart. When I add a pinch of cumin and a dash of smoked paprika to the mushroom filling, it transports me straight back to my mother’s kitchen in Marrakech. The cumin adds an earthy warmth that pairs beautifully with the nutty Gouda, while the paprika brings a subtle smokiness. I also like to stir in a tablespoon of chopped fresh cilantro at the end for brightness. Serve this version with couscous tossed with lemon and herbs — it’s a beautiful fusion of my North African heritage and this French-inspired technique that always gets rave reviews.
Dairy-Free / Light Version
For those who are dairy-conscious or looking for a lighter option, this swap works beautifully. Use a good-quality dairy-free cream cheese — I like the one from Kite Hill or Miyoko’s — and look for a vegan Gouda-style shred that melts well (Violife and Follow Your Heart both do excellent versions). The texture will be slightly less rich, but the flavor is still deeply savory and satisfying. I also add an extra tablespoon of nutritional yeast to the filling for a cheesy, umami boost without any dairy. This version is wonderful for anyone who wants all the comfort with fewer restrictions.
Spinach & Artichoke Stuffed Chicken
This is a fantastic way to sneak in extra vegetables while adding a tangy, creamy twist. I thaw frozen chopped spinach and squeeze it completely dry — this is crucial to avoid adding excess moisture to the filling — then mix it into the mushroom and cheese base along with finely chopped canned or jarred artichoke hearts. The artichokes add a lovely tang that cuts through the richness, and the spinach gives the filling a beautiful green fleck. I often pick up fresh baby spinach and artichoke hearts from the Union Square farmers market in spring, and this variation always feels like a fresh, seasonal celebration.
How do you prevent the mushroom stuffing from making the chicken breasts soggy?
The key to keeping the stuffing from making your chicken soggy is to cook the mushrooms thoroughly before mixing them into the filling. Sauté the chopped mushrooms over medium heat until all the moisture they release has completely evaporated — you’ll see the pan go from steamy to dry, and the mushrooms will start to sizzle in the oil. This usually takes about 5 minutes. Then, let the mushroom mixture cool completely before stuffing the chicken. Warm mushrooms will release steam inside the chicken as it bakes, creating excess moisture. I also recommend letting the stuffed chicken rest for 5 minutes after baking — this allows the juices to redistribute and the filling to set, so every slice is clean and not watery.
Can I use a different type of cheese instead of Gouda for stuffed chicken breasts?
Absolutely! Gouda is wonderful for its creamy melt and nutty flavor, but many other cheeses work beautifully in this stuffed chicken breast recipe. Gruyère is my top substitute — it has a similar nuttiness but with a slightly firmer texture and a more pronounced, earthy flavor. Fontina is another excellent choice; it’s incredibly creamy and melts into a velvety pool. Provolone (especially the smoked variety) adds a lovely savory depth, and mild cheddar brings a familiar, comforting taste. For a lighter option, try part-skim mozzarella — it will be stretchy and mild but less rich. Just avoid very hard cheeses like Parmesan (which won’t melt smoothly) or very soft cheeses like fresh goat cheese (which can become grainy). Whichever cheese you choose, grate it yourself for the best melt.
How long should you bake stuffed chicken breasts to ensure they are fully cooked?
For this recipe, you’ll bake the stuffed chicken breasts at 375°F (190°C) for 20-25 minutes after searing them on the stovetop. The exact time depends on the thickness of your chicken breasts — larger, thicker breasts may need closer to 25 minutes, while thinner ones might be done in 18-20 minutes. The most reliable way to check doneness is with an instant-read thermometer inserted into the thickest part of the breast (not into the stuffing). The chicken is fully cooked when it reaches an internal temperature of 165°F. If you don’t have a thermometer, you can check by cutting into the thickest part — the juices should run clear, and the meat should be opaque all the way through with no pinkness. Always let the chicken rest for 5 minutes after baking to allow the juices to settle.
What is the best way to get a golden crust on the outside of stuffed chicken breasts?
Getting that beautiful golden crust comes down to three things: dry chicken, hot oil, and patience. First, pat the chicken breasts completely dry with paper towels before seasoning — any surface moisture will create steam and prevent browning. Second, heat your olive oil in the skillet over medium-high heat until it shimmers and moves fluidly across the pan — this is the visual cue that it’s hot enough. Third, place the chicken in the pan and leave it alone for 3-4 minutes without moving it. Resist the urge to peek or shuffle the chicken around; a proper crust needs uninterrupted contact with the hot surface. You’ll know it’s ready to flip when the edges look golden and the chicken releases easily from the pan. If it sticks, it needs another minute. For an extra-deep color, add a pat of butter to the pan just before flipping — the milk solids in the butter accelerate browning beautifully.
Can I prepare stuffed chicken breasts ahead of time for a dinner party?
Yes, this is one of the best make-ahead dishes for entertaining! You can fully assemble the stuffed chicken breasts up to 24 hours in advance. Simply prepare the mushroom filling, stuff the chicken, secure with toothpicks, and place the stuffed breasts in a baking dish. Cover tightly with plastic wrap and refrigerate. When you’re ready to cook, sear the chicken directly from the fridge — you may need to add 1-2 minutes to the searing time since the chicken will be cold. Then bake as directed, adding 5 extra minutes to the oven time. The internal temperature should still reach 165°F. This make-ahead approach is a game-changer for dinner parties: all the messy work is done in advance, and you get to enjoy the evening while the chicken bakes. Just remember to let the chicken sit at room temperature for 15 minutes before searing to help it cook more evenly.
What type of mushrooms work best for stuffed chicken breasts?
Cremini mushrooms are my top choice for this stuffed chicken breast recipe because they have a deeper, earthier flavor than white button mushrooms but are still widely available and affordable. White button mushrooms work beautifully too and have a milder, more neutral taste that lets the Gouda shine. For a more robust, woodsy flavor, try shiitake mushrooms — just remove the tough stems before chopping. Portobello mushrooms are also excellent; they have a meaty texture that holds up well in the filling. Whichever type you choose, the key is to chop them very finely so they blend seamlessly into the cream cheese mixture, and to sauté them until all moisture evaporates. This concentrates their flavor and prevents a soggy filling. I often mix cremini with a few dried porcini mushrooms that I rehydrate and chop finely — it adds an incredible umami depth that’s truly special.
How do I keep the cheese filling from leaking out while cooking?
Keeping the filling inside while cooking is all about proper sealing and temperature. First, don’t overstuff — use about 3 tablespoons of filling per breast, which is enough to be generous but not so much that it bursts out. Second, secure the opening with toothpicks inserted at a slight angle, weaving them through the edges of the pocket so they hold snugly. I typically use 2-3 toothpicks per breast, spaced evenly. Third, make sure your filling is cool or at room temperature before stuffing — warm filling can thin out during cooking and leak. Fourth, when searing, use medium-high heat and don’t overcrowd the pan; if the chicken is too close together, it steams instead of searing, and the filling can bubble out. Finally, if any filling does escape into the pan, don’t worry — it will incorporate into the pan juices and create an even more delicious sauce.
Can I use this stuffed chicken breast recipe for meal prep?
Absolutely! This recipe is fantastic for meal prep. You can cook the full batch of stuffed chicken breasts on Sunday and enjoy them throughout the week. After baking, let the chicken cool completely, then store each breast in an airtight container in the refrigerator for up to 4 days. For the best texture when reheating, I recommend slicing the chicken and reheating it gently in a covered skillet with a splash of chicken broth over medium-low heat. This method keeps the meat moist and the filling creamy. You can also freeze the cooked chicken for up to 3 months — wrap each breast individually in plastic wrap, then place them in a freezer-safe bag. Thaw overnight in the refrigerator before reheating. For meal prep, I also love making the mushroom filling alone in advance and storing it in the fridge for up to 5 days, then stuffing fresh chicken the night before I plan to cook it.
What should I serve with cheesy mushroom-stuffed chicken breasts?
This dish is wonderfully versatile and pairs beautifully with a wide range of sides. For vegetables, I love roasted asparagus, garlic green beans, or a bright arugula salad with lemon vinaigrette — the freshness and acidity cut through the rich, creamy filling. For starches, creamy mashed potatoes are a classic choice that soaks up every drop of those delicious pan juices, while buttered egg noodles or a bed of fluffy couscous also work beautifully. Crusty bread is a must for wiping the plate clean! If you want to keep things light, serve the chicken alongside a simple steamed vegetable like broccoli or zucchini. For a special occasion, I like to pair it with roasted fingerling potatoes and a glass of Chardonnay — the wine’s acidity balances the Gouda’s richness, and the potatoes get crispy and golden alongside the chicken.
How do I know when the stuffed chicken breasts are done without a thermometer?
While an instant-read thermometer is the most reliable tool, there are visual cues you can use. First, check the juices — insert a knife or skewer into the thickest part of the breast and gently press; the juices should run clear, not pink or red. Second, the meat should feel firm to the touch but still have a slight spring — if it feels hard and tight, it may be overcooked. Third, cut into the thickest part of the breast at the thickest point; the meat should be opaque white all the way through with no translucent or pink areas. Keep in mind that the stuffing will be very hot and may still look slightly moist even when fully cooked, so focus on the chicken itself. When in doubt, cook a little longer — chicken that reaches 165°F is safe and juicy, but slightly over is safer than under. After 20-25 minutes of baking following a good sear, most standard-sized breasts will be perfectly done.
Share Your Version!
I absolutely love hearing how this stuffed chicken breast recipe turns out in your kitchen! Did you try the Moroccan spice twist? Or maybe you experimented with a different cheese blend? Drop a comment below and let me know how it went — your feedback helps other home cooks feel confident trying it too. And if you’re feeling proud of your golden, Gouda-stuffed creation, snap a photo and share it on Instagram or Pinterest. Tag @exorecipes so I can see your beautiful dish and maybe even feature it in my stories!
I’d especially love to know: what side dish did you serve alongside this cheesy mushroom chicken? I’m always looking for new pairing ideas, and your creativity inspires me every single day. Leave a star rating and a comment — it means the world to me and helps this recipe reach more hungry folks who need a little comfort on their table.
From my NYC kitchen to yours — I hope this recipe brings as much warmth to your table as it does to mine. — mia 🧡
Love This Recipe? Save It to Pinterest!
If you enjoyed this Cheesy Mushroom-Stuffed Chicken Breasts with Golden Gouda recipe, don’t let it get lost in your browser tabs! 😄 Pin it now so you can find it again anytime — and explore hundreds more tried-and-tested recipes waiting for you on my Pinterest boards.
👉 Follow mia on Pinterest @exorecipe
📌 Pin this recipe · 🔁 Re-pin your favorites · 💬 Tag me when you make it — I love seeing your creations!
Cheesy Mushroom-Stuffed Chicken Breasts with Golden Gouda
- Prep Time: 15 minutes
- Cook Time: 30 minutes
- Total Time: 45 minutes
- Yield: 4 servings 1x
- Method: Main Course
- Cuisine: American
Description
Juicy chicken breasts stuffed with a savory mushroom and Gouda cheese filling, pan-seared to golden perfection.
Ingredients
- 4 boneless, skinless chicken breasts
- 2 tablespoons olive oil
- 1 cup mushrooms, finely chopped
- 2 cloves garlic, minced
- 1 cup grated Gouda cheese
- 1/4 cup cream cheese, softened
- 1 tablespoon fresh thyme leaves
- Salt and pepper to taste
- 1/2 cup chicken broth
- 1 tablespoon butter
Instructions
- Preheat oven to 375°F (190°C).
- In a skillet, heat 1 tablespoon olive oil over medium heat. Add mushrooms and garlic, cook until mushrooms are soft and liquid evaporates, about 5 minutes.
- Remove from heat and let cool slightly. In a bowl, combine cooked mushrooms, Gouda cheese, cream cheese, and thyme. Mix well.
- Cut a pocket into each chicken breast horizontally, being careful not to cut all the way through. Season chicken inside and out with salt and pepper.
- Stuff each breast with the mushroom-cheese mixture, securing with toothpicks if needed.
- In the same skillet, heat remaining 1 tablespoon olive oil over medium-high heat. Sear chicken breasts until golden, about 3-4 minutes per side.
- Add chicken broth and butter to the skillet. Transfer to oven and bake for 20-25 minutes, or until chicken is cooked through (internal temperature reaches 165°F).
- Remove toothpicks, let rest 5 minutes, then serve with pan juices.
Notes
For extra richness, sprinkle additional Gouda on top before baking. Serve with steamed vegetables or rice.
Nutrition
- Calories: 420 kcal
- Sugar: 2 g
- Fat: 28 g
- Carbohydrates: 4 g
- Protein: 38 g
Tried This Recipe? Leave a Comment!
Did you make this recipe? I’d love to hear how it turned out! Please leave a comment and a rating below. Your feedback helps other home cooks and supports cheerychop.com!
For more delicious inspiration, follow me on Pinterest!