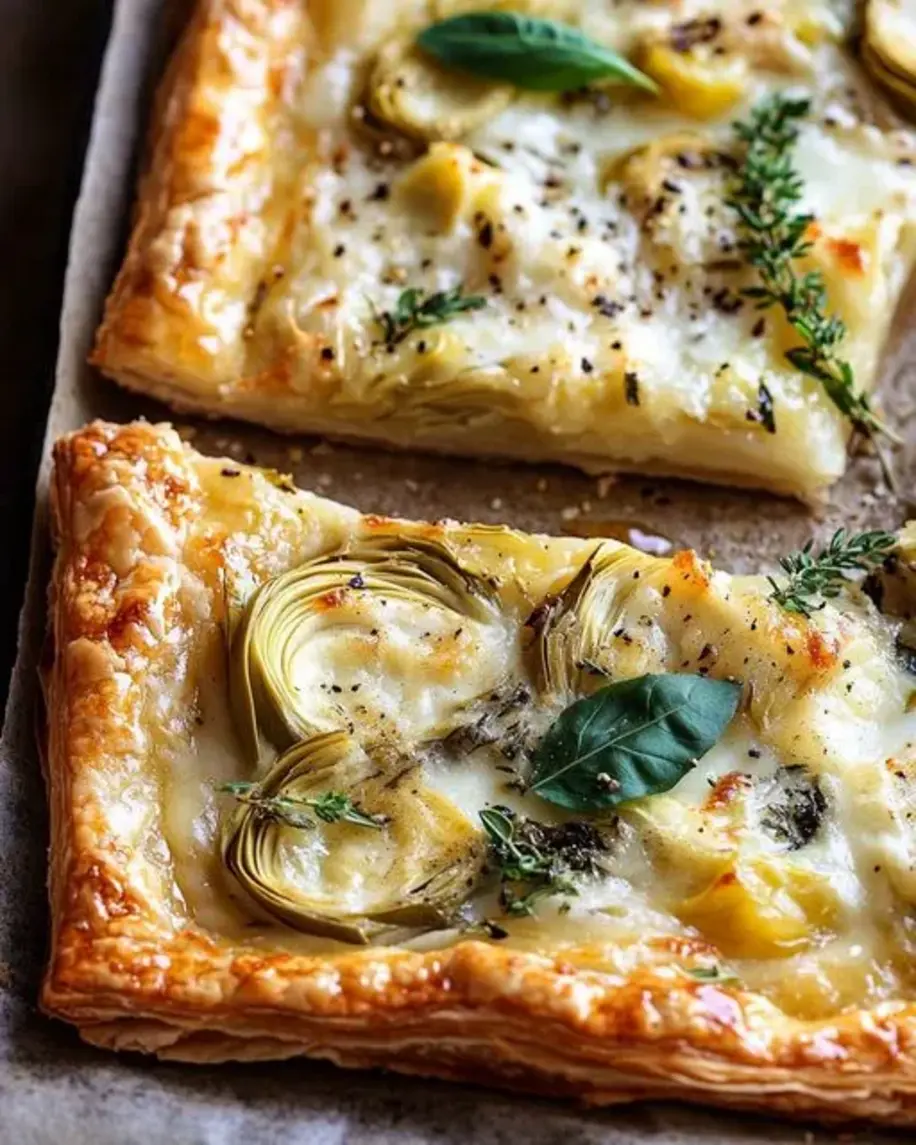
Blackberry, Basil & Ricotta Pizza – A Sweet & Savory Showstopper

⚖️
Difficulty
Easy
⏲️
Prep Time
10 mins
🕒
Cook Time
15 mins
⏱️
Total Time
25 mins
🍽️
Servings
4

I still remember the first time I made a blackberry basil ricotta pizza — it was a warm August evening in my tiny New York City apartment. I had just come back from the Union Square farmers market with a basket of plump, jewel‑like blackberries and a bunch of fragrant basil. Throwing together a simple dinner, I spread creamy ricotta on a store‑bought crust, scattered the berries, drizzled honey, and baked. When I pulled it out and added fresh basil, the aroma was nothing short of magic. That moment, this blackberry pizza became my summer signature.

Every bite of this fruit ricotta pizza is a harmonious clash of sweet, tart, creamy, and herbal. The ricotta melts into a luscious base, while the blackberries burst with juice against a crisp, golden crust. A drizzle of honey adds floral sweetness, and the basil brings a peppery, almost minty freshness that cuts through the richness. I finish with a pinch of flaky sea salt — a trick I learned in pastry school in Paris — to elevate every flavor. It’s a savory fruit pizza that surprises and delights.

I’ve made this basil ricotta pizza dozens of times for friends, weeknight dinners, and even as a showstopping appetizer at parties. What sets my version apart? I pre‑bake the crust before adding the ricotta, and I always tear the basil rather than chop it — both techniques prevent sogginess and preserve the herb’s bright flavor. 💡 mia’s Pro Tip: For the crispiest outcome, bake the pizza directly on a preheated pizza stone. And a common mistake to avoid? Overloading with berries — they release moisture and dull the crust. Stick to a single layer for perfection.

Why This Blackberry Basil Ricotta Pizza Recipe Is the Best

The Flavor Secret – Growing up in Morocco, my mother always taught me to balance sweet and savory with a touch of acid. Here, the honey and blackberries bring sweetness, while the ricotta’s mild tang and basil’s punch create a perfectly rounded bite. My French training taught me to respect each ingredient — nothing is masked, only enhanced.

Perfected Texture – The key is a two‑stage bake: first the crust alone for 5 minutes, then the topped pizza. This guarantees a cracker‑crisp foundation that holds up to the creamy ricotta and juicy berries. The ricotta stays velvety, the berries soften without disintegrating, and every slice has a satisfying crunch.

Foolproof & Fast – From pantry to plate in 25 minutes. I use pre‑made pizza dough or crust, so there’s no yeast‑wrangling or rising time. Even beginner cooks nail this fruit ricotta pizza on the first try. It’s the kind of recipe that looks like you spent hours, but really comes together in a snap.

Blackberry Basil Ricotta Pizza Ingredients

I source my crust from a tiny Italian bakery in Brooklyn, but any quality pre‑made dough works beautifully. The ricotta? I always reach for whole‑milk — it’s creamier and won’t separate during baking. As for the blackberries, the best ones are plump, deep purple, and barely fragrant; if they’re tart, the honey will balance them out.

Ingredients List

  • 1 pre‑made pizza crust or dough (12‑inch)
  • ½ cup whole‑milk ricotta cheese
  • 1 cup fresh blackberries (about 4–5 oz)
  • ¼ cup fresh basil leaves, torn
  • 2 tablespoons honey (plus more for drizzling)
  • 1 tablespoon extra‑virgin olive oil
  • Flaky sea salt and freshly ground black pepper, to taste

Ingredient Spotlight

Ricotta – The heart of this savory fruit pizza. Look for fresh, high‑quality ricotta with a smooth, spoonable texture. Avoid the grainy, low‑fat versions. Substitution: full‑fat cottage cheese, blended until creamy, will work in a pinch — the texture will be slightly looser but still delightful.

Blackberries – Choose berries that are firm, dark, and not leaking juice. If blackberries are out of season, frozen (thawed and patted dry) are okay, but fresh yields the best texture. For a softer, sweeter profile, try sliced figs or pitted cherries.

Basil – Always use fresh basil; dried basil has a muted, hay‑like flavor that can’t compete here. Genovese basil is classic, but Thai basil adds a subtle licorice note that pairs beautifully with blackberries.

Honey – A good quality honey — orange blossom or wildflower — adds floral depth. Maple syrup is a fine alternative, though it brings a woodsy sweetness that changes the character slightly.

Original IngredientBest SubstitutionFlavor / Texture Impact
RicottaBlended cottage cheeseSlightly thinner, less rich
BlackberriesRaspberries or sliced strawberriesSimilar tartness; strawberries will be more tender
BasilMint or arugulaMint adds cooling effect; arugula adds peppery bite
HoneyMaple syrup or agaveMaple adds woodsy note; agave is neutral

How to Make Blackberry Basil Ricotta Pizza — Step-by-Step

Follow these simple steps, and you’ll have a gorgeous blackberry basil ricotta pizza that rivals any restaurant. I’ve included chef‑tested tips and pitfalls to avoid — so you get perfect results every time.

Step 1: Preheat and Prep

Set your oven to 450°F (230°C) and place a pizza stone or inverted baking sheet inside to preheat. While the oven heats, take your pizza crust out of the fridge and let it come to room temperature for about 10 minutes — this prevents a tough crust.

💡 mia’s Pro Tip: If using a baking sheet instead of a stone, line it with parchment paper for easy transfer. The preheated surface ensures a crispy bottom.

Step 2: Spread the Ricotta

Once the crust is ready, place it on a lightly floured surface or directly on your work surface. Using an offset spatula or the back of a spoon, spread the ricotta evenly over the crust, leaving a ½‑inch border for the edges. The layer should be about ¼‑inch thick — not too thin or the cheese will burn, not too thick or it’ll be runny.

⚠️ Common Mistake to Avoid: Spreading ricotta all the way to the edge. That border creates a beautiful, puffy crust. Without it, the cheese drips off and makes a mess.

Step 3: Arrange Blackberries

Scatter the fresh blackberries evenly over the ricotta. Use about ¾ of the berries now; you’ll add a few more halfway through baking if you want extra visual pop. Gently press each berry into the ricotta so it stays put.

💡 mia’s Pro Tip: If your blackberries are very ripe and juicy, pat them dry with a paper towel first. This extra step prevents a watery pizza and keeps the crust crisp.

Step 4: Drizzle and Season

Drizzle the honey evenly over the pizza — aim from a height to get a thin, even coating. Then drizzle the olive oil in the same way. Finish with a generous pinch of flaky sea salt and a few grinds of black pepper.

⚠️ Common Mistake to Avoid: Skimping on salt. Salt balances the sweetness of the honey and the tartness of the berries. Without it, the pizza can taste flat.

Step 5: Bake to Golden

Carefully slide the pizza onto the preheated stone or baking sheet. Bake for 12–15 minutes, rotating the pizza halfway through. The crust should be deep golden brown on the bottom and edges, and the ricotta will be set and lightly browned in spots.

💡 mia’s Pro Tip: For an even browner top, switch to broil for the last 1–2 minutes. Watch closely — it goes from perfect to burnt fast!

Step 6: Finish with Basil

Remove the pizza from the oven and let it rest for 1 minute. Scatter the torn basil leaves over the top. The residual heat will wilt the basil just enough to release its aroma. Slice with a pizza cutter or sharp chef’s knife and serve immediately.

⚠️ Common Mistake to Avoid: Adding basil before baking. The leaves will shrivel and turn black, losing their fresh flavor. Always add after baking.

StepActionDurationKey Visual Cue
1Preheat & rest dough10 minutesOven fully hot, dough at room temp
2Spread ricotta2 minutesEven layer with border
3Arrange blackberries2 minutesBerries evenly spaced
4Drizzle & season1 minuteHoney and oil glistening
5Bake12–15 minutesGolden brown crust, set ricotta
6Add basil & serve1 minuteFresh basil, fragrant steam

Serving & Presentation

I love serving this blackberry basil ricotta pizza as a stunning appetizer or a light main course. For a party, cut it into small squares and arrange on a wooden board — the deep purple berries against the white ricotta and green basil look like edible art. A final drizzle of balsamic glaze (store‑bought or homemade) adds a tangy‑sweet finish that echoes my Moroccan love for sweet‑sour contrasts.

Pair this pizza with a crisp green salad dressed with lemon vinaigrette — the acidity cuts through the richness. For a heartier meal, serve it alongside a bowl of arugula and shaved Parmesan. My favorite beverage pairing is a chilled rosé or a sparkling water with a splash of pomegranate juice. And never forget: a pinch of flaky salt right before serving makes every flavor sing.

Pairing TypeSuggestionsWhy It Works
Side DishMixed greens with lemon vinaigrette, roasted asparagusBright acidity balances the creamy, sweet pizza
Sauce / DipBalsamic glaze, honey‑thyme drizzle, whipped goat cheeseEnhances fruitiness and adds tangy depth
BeverageDry rosé, sparkling water with pomegranate, light lagerCrisp, refreshing drinks cut richness
GarnishFlaky sea salt, extra basil, edible flowers, micro greensElevates presentation and adds freshness

Make-Ahead, Storage & Reheating

As a busy New York food blogger, I love recipes that work with my schedule. This pizza is best enjoyed fresh from the oven, but with a few smart tricks you can prep components ahead or save leftovers without sacrificing texture.

MethodContainerDurationReheating Tip
RefrigeratorAirtight containerUp to 2 daysReheat in a 350°F oven for 8–10 minutes to re‑crisp crust
FreezerWrap in foil then place in freezer bagUp to 1 monthBake frozen at 400°F for 15–18 minutes (no thawing)
Make-AheadPrepare ricotta spread and berries separatelyUp to 1 day in advanceAssemble and bake just before serving

For the best leftover experience, never microwave this pizza — the crust becomes tough and the ricotta turns rubbery. Instead, use a skillet: place the slice in a non‑stick pan over medium heat, cover with a lid, and cook for 4–5 minutes. The bottom crisps up and the top warms through gently. Trust me, it’s the NYC shortcut I use in my own kitchen.

Variations & Easy Swaps

VariationKey ChangeBest ForDifficulty Impact
Savory Herb TwistAdd crumbled goat cheese + fresh thymeHosting a sophisticated dinnerEasy (same steps)
Gluten‑FreeUse a gluten‑free pizza crust (cauliflower or GF dough)Dietary restrictionsEasy (watch baking time)
Spicy Honey VersionDrizzle hot honey + add red pepper flakesHeat loversEasy

Savory Herb Twist

This variation takes the pizza in a more savory direction. Spread the ricotta as usual, then dot with ¼ cup crumbled goat cheese. Add a few sprigs of fresh thyme before baking. The goat cheese adds tangy creaminess, and thyme’s earthy notes play beautifully with the blackberries. Finish with basil as usual — this version is a crowd‑pleaser at my holiday gatherings.

Gluten‑Free & Dairy‑Free Option

For a gluten‑free pizza, use a high‑quality gluten‑free crust or a cauliflower crust (pre‑bake it 5 minutes longer). To make it dairy‑free, swap ricotta with a thick cashew cream (soaked cashews blended with lemon juice and salt) — it’s surprisingly similar in richness. The rest of the ingredients are naturally dairy‑free. This version bakes up just as crispy and satisfying.

Spicy Honey Version

If you love sweet‑heat, replace regular honey with hot honey (or add ½ teaspoon red pepper flakes to the olive oil). The spicy kick cuts through the creamy ricotta and elevates the fruit. I discovered this combo at a little pizza joint in Brooklyn, and it’s become one of my most requested variations. Serve with a dollop of Greek yogurt on the side to cool things down.

What can I substitute for ricotta cheese on a blackberry and basil pizza?

The best ricotta substitute for this blackberry basil pizza is full‑fat cottage cheese that has been blended until perfectly smooth. It mimics the creamy texture without the graininess. Alternatively, you can use mascarpone (richer, less tangy) or a soft goat cheese (tangy, more savory). If you’re dairy‑free, try a thick cashew cream — combine 1 cup soaked cashews, 2 tablespoons lemon juice, and a pinch of salt in a high‑speed blender. Whichever substitute you choose, aim for a thick, spreadable consistency that won’t make the crust soggy. Avoid low‑fat versions as they tend to separate when baked.

Should I use fresh or dried basil for this blackberry ricotta pizza?

Always use fresh basil for this blackberry ricotta pizza. Dried basil has a very different flavor profile — it’s more hay‑like, less aromatic, and loses the bright, peppery notes that make this pizza special. Fresh basil leaves, torn just before serving, release their essential oils and create that beautiful fragrant burst with every bite. If you can’t find fresh basil, a good substitute is fresh mint or even fresh arugula — both add a lively, herbal kick. Dried herbs simply won’t deliver the same vibrant result.

How do you prevent the blackberries from making the pizza crust soggy?

There are three key techniques to keep the crust crisp. First, preheat your pizza stone or baking sheet in the oven for at least 15 minutes before sliding the pizza on. The immediate high heat sears the bottom. Second, pat the blackberries dry with a paper towel if they’re very ripe and juicy. Third, use a pre‑baked crust or par‑bake a raw dough for 5 minutes before adding toppings. Also, don’t overload — a single layer of berries is enough; too many release excess moisture. Finally, avoid adding wet ingredients like extra honey or oil directly on the crust — always spread ricotta first as a protective barrier.

Can I make blackberry, basil and ricotta pizza on a grill instead of in the oven?

Absolutely, grilling adds a lovely smoky char that complements the sweet fruit. Preheat your grill to medium‑high (about 450°F). Use a pre‑cooked crust or a sturdy dough that can hold up on the grates. Lightly oil the grill grates. Grill the crust for 2–3 minutes per side before adding toppings. Then spread the ricotta, add blackberries, and drizzle honey and oil directly on the grilled side. Close the lid and cook for another 5–7 minutes until the cheese is warm and the berries soften. Remove from heat, add fresh basil, and serve immediately. The grill method gives you those beautiful char marks and a slightly smoky touch — wonderful for summer cookouts.

Is this blackberry basil ricotta pizza sweet or savory?

It’s beautifully both — a perfect sweet‑savory balance. The ricotta base is mild and savory, the blackberries offer tart sweetness, and the honey adds floral sweetness. Fresh basil brings a savory, peppery note, while salt and pepper tie everything together. I call it a “savory fruit pizza” because the creamy, salty elements keep it from being dessert‑like. It works wonderfully as an appetizer or light main course, and even as a unique brunch dish. The key is not to oversweeten — a light drizzle of honey is all you need.

Can I use frozen blackberries for this recipe?

Yes, but with a few precautions. Frozen blackberries release a lot of juice as they thaw, which can make the crust soggy. Thaw them first in a colander set over a bowl, then gently pat dry with paper towels. You may want to reduce the honey slightly since the berries will be a bit sweeter. Also, arrange them in a single layer and avoid overcrowding. Fresh blackberries are preferred for the best texture — they hold their shape better and don’t create excess moisture. But if you’re in winter or on a budget, frozen works; just be extra diligent with drying.

What type of pizza crust works best for fruit ricotta pizza?

A thin, crispy crust works best — pre‑made pizza crusts from the grocery store, such as Boboli or fresh dough from a pizzeria, are ideal. Avoid thick, fluffy crusts (like deep dish) because the ratio of cheese to bread becomes off. I personally love using a pre‑baked naan or pita bread for a quick individual pizza. If using raw dough, par‑bake it for 5 minutes at 450°F before adding toppings to guarantee crispness. A gluten‑free crust works well too, though you may need to adjust the baking time by a few minutes.

Can I add other fruits besides blackberries?

Absolutely! Blackberries pair beautifully with other summer fruits. Try mixing in raspberries, sliced strawberries, or halved cherries for a mixed‑berry pizza. Sliced figs are a classic fall substitute — they’re sweet and slightly jammy. Stone fruits like peaches or nectarines (sliced thin) also work wonderfully; their soft texture melts into the ricotta. If you use a combination, keep the total amount to about 1 cup so the crust doesn’t become overwhelmed. The basil and honey will complement any of these fruits, so feel free to experiment with what’s in season.

Share Your Version!

I absolutely love seeing your kitchen creations. If you try this Blackberry Basil Ricotta Pizza, please leave a star rating and a comment below — your feedback helps me create better recipes for you. Share a photo on Instagram or Pinterest and tag @exorecipes so I can see your beautiful version. And tell me: Did you try the spicy honey variation or the classic? I’m always curious which twist becomes your favorite.

From my NYC kitchen to yours — I hope this recipe brings as much warmth to your table as it does to mine. — mia 🧡

📌

Love This Recipe? Save It to Pinterest!

If you enjoyed this Blackberry Basil Ricotta Pizza recipe, don’t let it get lost in your browser tabs! 😄 Pin it now so you can find it again anytime — and explore hundreds more tried-and-tested recipes waiting for you on my Pinterest boards.

👉 Follow mia on Pinterest @exorecipes

📌 Pin this recipe · 🔁 Re-pin your favorites · 💬 Tag me when you make it — I love seeing your creations!

Print

clock clock iconcutlery cutlery iconflag flag iconfolder folder iconinstagram instagram iconpinterest pinterest iconfacebook facebook iconprint print iconsquares squares iconheart heart iconheart solid heart solid icon

Blackberry, Basil & Ricotta Pizza

  • Author: Chef Mia
  • Prep Time: 10 minutes
  • Cook Time: 15 minutes
  • Total Time: 25 minutes
  • Yield: 4 1x
  • Method: Appetizer, Main Course
  • Cuisine: Italian-inspired

Description

A sweet and savory twist on pizza with creamy ricotta, juicy blackberries, and fresh basil on a crispy crust.


Ingredients

Scale
  • 1 pre-made pizza crust or dough
  • 1/2 cup ricotta cheese
  • 1 cup fresh blackberries
  • 1/4 cup fresh basil leaves, torn
  • 2 tablespoons honey
  • 1 tablespoon olive oil
  • Salt and pepper to taste

Instructions

  1. Preheat oven to 450°F (230°C).
  2. Place pizza crust on a baking sheet or pizza stone.
  3. Spread ricotta cheese evenly over the crust.
  4. Arrange blackberries on top of the ricotta.
  5. Drizzle with honey and olive oil, then season with salt and pepper.
  6. Bake for 12-15 minutes until crust is golden and edges are crisp.
  7. Remove from oven and scatter fresh basil leaves on top.
  8. Slice and serve warm.

Notes

You can substitute blackberries with raspberries or sliced strawberries if desired. For a sweeter pizza, add a drizzle of balsamic glaze before serving.


Nutrition

  • Calories: 280
  • Sugar: 14g
  • Fat: 12g
  • Carbohydrates: 38g
  • Protein: 9g


Blackberry, Basil & Ricotta Pizza

k">

Tried This Recipe? Leave a Comment!

Did you make this recipe? I’d love to hear how it turned out! Please leave a comment and a rating below. Your feedback helps other home cooks and supports cheerychop.com!

For more delicious inspiration, follow me on Pinterest!

Blackberry Goat Cheese Crostini: The Ultimate Sweet & Savory Appetizer – A Perfect Blend of Sweet and Savory

⚖️
Difficulty
Easy
⏲️
Prep Time
10 mins
🕒
Cook Time
8 mins
⏱️
Total Time
18 mins
🍽️
Servings
12 crostini (4-6 servings)

I still remember the first time I made these blackberry goat cheese crostini. It was a warm summer evening in my little NYC kitchen, and I had just come back from the Union Square Greenmarket with a basket of the most glorious blackberries I’d ever seen. The deep purple berries, still warm from the sun, reminded me of the wild blackberry bushes my mother would pick from in the hills outside Marrakech. That sweet-tart flavor paired with creamy, tangy goat cheese—a staple from my Parisian culinary training—was the beginning of my go-to sweet and savory crostini. This blackberry goat cheese crostini recipe is the appetizer I turn to again and again, whether for a casual dinner party or a quiet night in.

What makes this crostini so addictive is the contrast in every bite. The baguette slices are brushed with olive oil and toasted until they shatter with a satisfying crunch. Then comes a generous spread of softened goat cheese—creamy, tangy, and a little bit funky. A dollop of blackberry jam adds concentrated sweetness, while fresh blackberries provide bursts of juice and a hint of acidity. Finally, a drizzle of honey and a sprinkle of fresh thyme (if you’re feeling fancy) bring everything together. The result is a beautifully balanced bite that dances between sweet, savory, and tangy, with a texture that goes from crispy to creamy to jammy.

Now, I know what you’re thinking—crostini are supposed to be fussy, right? Not this version. I’ve streamlined every step to make it foolproof for home cooks. The secret is using high-quality blackberry jam (I prefer Bonne Maman or a small-batch local one) and letting your goat cheese come to room temperature so it spreads like a dream. A common mistake is over-toasting the bread—we want golden, not dark brown. I’ll share my exact oven timing and a pro tip for making the goat cheese extra luscious. By the end of this post, you’ll have a blackberry goat cheese crostini recipe that will become your signature appetizer.

Why This Blackberry Goat Cheese Crostini Recipe Is the Best

The Flavor Secret: The genius of this sweet and savory crostini lies in the balance of three elements: the tangy goat cheese, the sweet-tart blackberry jam, and the fresh burst of whole blackberries. Growing up in Morocco, I learned that the best dishes balance sweet, savory, and acidic notes. Here, that Moroccan influence meets a classic French technique—using a high-quality jam as a shortcut to deep fruit flavor. The goat cheese is the creamy anchor that ties everything together.

Perfected Texture: During my pastry days in Paris, I obsessed over the perfect toast: crispy on the outside, slightly chewy on the inside. For these crostini, I brush the baguette rounds with olive oil (not melted butter, which can burn) and bake at 375°F until just golden. This gives a robust crunch that holds up to the toppings without falling apart. The goat cheese is softened so it spreads evenly, and the whole blackberries add a final juicy pop.

Foolproof & Fast: With just 10 minutes of prep and 8 minutes of oven time, this easy crostini idea is perfect for last-minute entertaining. You can assemble the components in minutes, and the crostini come together faster than you can say charcuterie board. Even if you’ve never made crostini before, you’ll nail this one—I promise.

Blackberry Goat Cheese Crostini Recipe Ingredients

When I’m shopping for a blackberry appetizer like this, I always hit the farmers market first. In NYC, that means heading to Union Square in the summer or sourcing from a good grocery store the rest of the year. For the baguette, I recommend a crusty French baguette from a local bakery—nothing too soft. Goat cheese? I love a log from Vermont Creamery or a domestic French-style chèvre. And blackberry jam? Homemade is amazing, but store-bought works beautifully—just look for one with fruit as the first ingredient, not corn syrup.

Ingredients List

  • 1 baguette, sliced into 1/2-inch rounds
  • 2 tablespoons olive oil
  • 4 ounces goat cheese, softened
  • 1/3 cup blackberry jam
  • 1 cup fresh blackberries
  • 2 tablespoons honey
  • Fresh thyme leaves for garnish (optional)
  • Salt and pepper to taste

Ingredient Spotlight

Baguette: The foundation of any goat cheese toast recipe. Look for a baguette that is firm on the outside but still airy inside. A day-old baguette actually works better—it toasts up crunchier. Substitution: Use a ciabatta or sourdough boule sliced thin and toasted.

Goat Cheese: The star of the show. For the creamiest texture, take it out of the fridge 30 minutes before assembling. If you can find a fresh, soft chèvre (not aged), that’s ideal. Substitution: Cream cheese or a spreadable brie will work, but you’ll lose the tangy edge—still delicious though.

Blackberry Jam: This provides the sweet backbone. I love using a jam with visible fruit pieces. In a pinch, raspberry or fig jam are excellent swaps. Substitution: For a savory twist, try a balsamic fig jam or even a red onion marmalade.

Fresh Blackberries: Choose berries that are plump, deep purple, and not mushy. If blackberries aren’t in season, frozen are fine—just thaw and pat dry so they don’t make the crostini soggy.

Original IngredientBest SubstitutionFlavor / Texture Impact
BaguetteCiabatta or sourdoughLarger crumb, slightly chewier
Goat CheeseCream cheese + splash of lemon juiceLess tangy, still creamy
Blackberry JamRaspberry jam or fig jamRaspberry is similar; fig adds deeper sweetness
Fresh BlackberriesFrozen blackberries (thawed & pat-dried)Slightly softer, but same flavor
HoneyMaple syrup or agaveMaple adds woodsy notes; agave is neutral

How to Make Blackberry Goat Cheese Crostini — Step-by-Step

These sweet and savory crostini come together in just a few simple steps. Follow along, and you’ll have a platter of gorgeous, crowd-pleasing appetizers in no time.

Step 1: Preheat and Prep the Baguette

Preheat your oven to 375°F (190°C). Slice the baguette into ½-inch rounds. You should get about 24 slices from a standard baguette, but you only need 12 for this recipe—save the rest for another use. Arrange the slices on a baking sheet in a single layer. Brush each round lightly with olive oil and season with a pinch of salt and pepper.

⚠️ Common Mistake to Avoid: Don’t soak the bread with oil. A thin layer is enough to promote golden browning without making the bread greasy.

Step 2: Toast the Bread

Bake for 6-8 minutes, until the edges are golden brown and the bread feels crisp when you tap it. Keep an eye on them after 6 minutes—ovens vary. Let the crostini cool on the baking sheet for a few minutes before handling.

💡 mia’s Pro Tip: For extra flavor, rub a cut garlic clove over each warm crostini right after they come out of the oven. This is a trick I learned in a Parisian bistro—it adds a subtle savory note that complements the sweetness beautifully.

Step 3: Spread and Assemble

Spread about 1 teaspoon of softened goat cheese onto each crostini. It’s easiest to let the cheese come to room temperature first—it will spread like butter. Top with a small dollop (about ½ teaspoon) of blackberry jam, then place 2-3 fresh blackberries on top.

⚠️ Common Mistake to Avoid: Don’t overload the crostini. A single layer of toppings ensures every bite has the perfect balance of flavors and the crostini stays crunchy.

Step 4: Drizzle and Garnish

Drizzle each crostini with a little honey. If you have fresh thyme, sprinkle a few leaves over the top for a beautiful finish and a hint of herbal flavor. Serve immediately—these are best right after assembly, while the bread is still crisp.

💡 mia’s Pro Tip: For an elegant presentation, arrange the crostini on a wooden board or a white platter. Drizzle the honey in a zigzag pattern over all the crostini at once—it looks gorgeous and saves time.

StepActionDurationKey Visual Cue
1Slice baguette, brush with oil, season5 minEvenly oiled rounds
2Toast in oven6-8 minGolden edges, crisp tap
3Spread goat cheese & jam, add berries5 minLayers neat, not overflowing
4Drizzle honey, garnish with thyme1 minShiny honey drizzle, green flecks

Serving & Presentation

These blackberry appetizer bites are meant to be served immediately, while the bread is still crunchy and the goat cheese is cool and creamy. I love placing them on a rustic wooden board alongside a small bowl of extra honey for dipping and a few sprigs of fresh thyme for color. They’re perfect for cocktail parties, summer brunches, or even as a light lunch alongside a crisp green salad.

When I serve these at my NYC dinner parties, I often pair them with a sparkling rosé or a dry Prosecco—the bubbles cut through the richness of the goat cheese and honey. For a non-alcoholic option, a chilled hibiscus iced tea is divine. As a side, consider a simple arugula salad with lemon vinaigrette to keep the meal light and fresh.

Pairing TypeSuggestionsWhy It Works
Side DishArugula salad with lemon vinaigrette, mixed olivesPeppery greens balance sweetness; olives add saltiness
Sauce / DipExtra honey, balsamic glaze, or a dollop of crème fraîcheAdds acidity or extra creaminess
BeverageSparkling rosé, dry Prosecco, hibiscus iced teaBubbles refresh the palate; hibiscus echoes berry notes
GarnishFresh thyme, edible flowers (pansies or nasturtiums), flaky sea saltHerbal and floral notes elevate presentation

Make-Ahead, Storage & Reheating

Living in NYC means I’m always looking for ways to streamline prepping for gatherings. These crostini are best assembled fresh, but you can do a lot of the work ahead. Toast the baguette slices and soften the goat cheese separately — then assemble just before serving. Here’s my storage guide for maximum freshness.

MethodContainerDurationReheating Tip
Refrigerator (toasted bread only)Airtight container with paper towel3 daysRe-crisp in a 350°F oven for 3-4 minutes
Freezer (toasted bread only)Freezer bag, remove air1 monthThaw on counter, then re-crisp in oven as above
Make-Ahead (components separate)Bread in container, cheese covered, jam & berries in bowlsAssemble up to 2 hours aheadAssemble just before serving; honey drizzle last

If you have leftover assembled crostini (unlikely!), the bread will get soft from the toppings. I recommend eating them within an hour of assembly. You can pop them under the broiler for 1-2 minutes to crisp them up, but the texture won’t be quite the same as fresh. To avoid waste, only assemble as many as you plan to serve and store the components separately for later.

Variations & Easy Swaps

One of the best things about this goat cheese toast recipe is how easily it adapts to different tastes and seasons. Over the years, I’ve played with countless variations, inspired by my Moroccan roots and the brilliant produce at NYC markets. Here are three of my favorite twists.

VariationKey ChangeBest ForDifficulty Impact
Moroccan SpicedAdd a pinch of cumin and cinnamon to the goat cheese; substitute honey with pomegranate molassesExotic flavor seekersEasy
Savory Herb & GarlicRub toasted bread with garlic, top with goat cheese, roasted red pepper strips, and fresh basilSavory loversEasy
Fall Fig & WalnutReplace blackberry jam with fig jam, add toasted walnut pieces and a sprinkle of blue cheeseHoliday entertainingEasy

Moroccan Spiced Variation

This is my nod to my mother’s kitchen. Mix ¼ teaspoon each of ground cumin and cinnamon into the softened goat cheese before spreading. Instead of honey, drizzle with pomegranate molasses for a tangy-sweet finish. The warm spices bridge the cheese and fruit beautifully, and the pomegranate molasses adds a unique depth that reminds me of the souks of Marrakech.

Gluten-Free / Dairy-Free Variation

To make this sweet and savory crostini gluten-free, use a high-quality gluten-free baguette or thick slices of gluten-free sourdough. For a dairy-free version, swap the goat cheese with a cashew-based cream cheese (Kite Hill makes a great one) or a thick coconut yogurt. The texture will be a bit different—less tangy, more mellow—but still delicious. I’ve tested this with my gluten-intolerant friends and it was a hit.

Seasonal Flavor Twist

At the height of summer, when peaches are juicy at the Union Square Greenmarket, I swap the blackberry jam for peach preserves and add thin slices of fresh peach over the goat cheese. It’s a gorgeous golden-and-pink plate that tastes like sunshine. In fall, try it with apple butter and a pinch of nutmeg.

What is the best type of bread to use for blackberry goat cheese crostini?

The best bread for crostini is a crusty French baguette. Look for one that’s firm on the outside with an airy crumb—it toasts up perfectly crunchy without being too dense. A day-old baguette is actually ideal because it has lost some moisture, so it gets even crispier in the oven. Avoid soft sandwich bread or overly fluffy artisan loaves, as they won’t hold the toppings well. If you want a different texture, ciabatta or sourdough boule sliced thin also work beautifully.

Can I use frozen blackberries instead of fresh for this recipe?

Absolutely, but you need to handle them carefully. Thaw the frozen blackberries completely, then drain off any excess liquid and pat them dry with paper towels. If you skip this step, the berries will release too much moisture and make your crostini soggy. Using frozen blackberries is perfect when fresh ones aren’t in season—they still deliver great flavor and color. For the best results, use individually frozen blackberries (not a solid block) so you can pick out the nicest ones.

How far in advance can I assemble blackberry goat cheese crostini?

I recommend assembling these crostini no more than 30 minutes before serving. The bread will start to soften from the moisture in the goat cheese, jam, and blackberries, so the longer they sit, the less crunchy they’ll be. For a party, it’s much better to prepare all the components individually: toast the bread up to 3 days ahead (store in an airtight container), soften the cheese, and have the jam and berries ready. Then, assemble right before your guests arrive—it takes less than 10 minutes.

What savory toppings pair well with blackberry and goat cheese on crostini?

Savory toppings can elevate this sweet and savory crostini to new heights. I love adding thinly sliced prosciutto or speck for a salty, umami punch. A drizzle of balsamic glaze adds tangy depth, while fresh basil or arugula brings a peppery contrast. For a bit of heat, sprinkle red pepper flakes or add a thin slice of jalapeño. If you want a Moroccan twist, try a pinch of za’atar—the sesame and sumac notes are incredible with blackberries and goat cheese.

Can I make these crostini vegan?

Yes, with a few simple swaps. Replace the goat cheese with a high-quality vegan cream cheese (I like Treeline or Kite Hill) or a cashew-based ricotta. For the honey, use agave syrup or maple syrup to keep it plant-based. The blackberry jam is usually vegan, but check labels to be sure. The rest of the ingredients—baguette, olive oil, fresh blackberries, thyme—are already vegan. The result is less tangy than the original, but still creamy, sweet, and delicious.

How do I prevent the crostini from getting soggy?

The key is to toast the bread until it’s fully crisp and to not overload the toppings. Brush the baguette slices with olive oil and bake at 375°F for 6-8 minutes—you want them golden and dry. When assembling, use a conservative amount of jam (about ½ teaspoon per crostini) and make sure the goat cheese is spread in a thin, even layer. If using frozen blackberries, pat them very dry. Assemble just before serving for the best crunchy texture.

What other fruits can I use instead of blackberries?

This recipe is very flexible with fruit. Raspberries are the most direct swap—they have a similar sweet-tart profile. Sliced strawberries work wonderfully, especially in spring. In summer, try thin slices of peach or nectarine. For a fall version, use figs and pair them with fig jam. You can even use sliced pears with a pear butter. Just keep in mind that softer fruits like berries and peaches require no additional cooking, while firmer fruits like pears may need a quick sauté if you want them softer.

Is this blackberry goat cheese crostini recipe suitable for a crowd?

Absolutely—this recipe scales beautifully. For a party of 12, simply double or triple the ingredients. The toasting step is the only part that may require multiple baking sheets, but you can toast the bread in batches. I often make a double batch for my NYC holiday gatherings. Just remember to assemble them in waves so they stay crunchy. Set up a “crostini bar” with all the components and let guests build their own—it’s interactive and ensures everyone gets a fresh one.

Share Your Version!

I hope you love this blackberry goat cheese crostini recipe as much as I do. It’s one of those recipes that’s greater than the sum of its parts—simple ingredients, expertly balanced, and just plain delicious. If you try it, I’d love to hear your thoughts. Did you add a personal twist? Did you serve it at a party that turned it into the star of the show? Drop a comment below and let me know how it went.

And don’t forget to snap a photo and share it on Instagram or Pinterest—tag me @exorecipes so I can see your beautiful creations. I love nothing more than seeing my recipes come to life in your kitchens. From my NYC kitchen to yours — I hope this recipe brings as much warmth to your table as it does to mine. — mia 🧡

📌

Love This Recipe? Save It to Pinterest!

If you enjoyed this Blackberry Goat Cheese Crostini recipe, don’t let it get lost in your browser tabs! 😄 Pin it now so you can find it again anytime — and explore hundreds more tried-and-tested recipes waiting for you on my Pinterest boards.

👉 Follow mia on Pinterest @exorecipe

📌 Pin this recipe · 🔁 Re-pin your favorites · 💬 Tag me when you make it — I love seeing your creations!

Print

clock clock iconcutlery cutlery iconflag flag iconfolder folder iconinstagram instagram iconpinterest pinterest iconfacebook facebook iconprint print iconsquares squares iconheart heart iconheart solid heart solid icon

Blackberry Goat Cheese Crostini: A Perfect Blend of Sweet and Savory

  • Author: Chef Mia
  • Prep Time: 10 minutes
  • Cook Time: 8 minutes
  • Total Time: 18 minutes
  • Yield: 12 crostini (4-6 servings) 1x
  • Method: Appetizer
  • Cuisine: American

Description

These easy blackberry goat cheese crostini are the perfect appetizer: crunchy toasted baguette slices topped with creamy goat cheese, sweet blackberry jam, fresh blackberries, and a drizzle of honey. Sweet, savory, and tangy all at once!


Ingredients

Scale
  • 1 baguette, sliced into 1/2-inch rounds
  • 2 tablespoons olive oil
  • 4 ounces goat cheese, softened
  • 1/3 cup blackberry jam
  • 1 cup fresh blackberries
  • 2 tablespoons honey
  • Fresh thyme leaves for garnish (optional)
  • Salt and pepper to taste

Instructions

  1. Preheat oven to 375°F (190°C).
  2. Arrange baguette slices on a baking sheet. Brush each slice with olive oil and season lightly with salt and pepper.
  3. Toast in the oven for 6-8 minutes, until golden and crisp. Let cool slightly.
  4. Spread each crostini with about 1 teaspoon of softened goat cheese.
  5. Top with a small dollop of blackberry jam.
  6. Add 2-3 fresh blackberries on top.
  7. Drizzle honey over the crostini.
  8. Garnish with fresh thyme leaves if desired. Serve immediately.

Notes

For a savory twist, add a pinch of black pepper or a sprinkle of flaky sea salt. You can also substitute the blackberry jam with fig jam or raspberry jam.


Nutrition

  • Calories: 180
  • Sugar: 12g
  • Fat: 8g
  • Carbohydrates: 22g
  • Protein: 5g


Blackberry Goat Cheese Crostini: A Perfect Blend of Sweet and Savory

“`html

Blackberry Brie Pastry Swirls – The Perfect Easy Brie Appetizer

⚖️
Difficulty
Easy
⏲️
Prep Time
15 mins
🕒
Cook Time
20 mins
⏱️
Total Time
35 mins
🍽️
Servings
8 swirls

I still remember the first time I made these Blackberry Brie Pastry Swirls. It was a brisk autumn afternoon in my New York City kitchen, and I was craving something that bridged my French pastry training with the bold, fruit-forward flavors I grew up with in Morocco. My mother would often make warm, honey-drizzled pastries with seasonal fruit, and that memory sparked this recipe. These easy brie appetizer swirls are exactly what I reach for when I want something impressive but unfussy — a flaky, buttery puff pastry wrapped around creamy brie and juicy blackberries, finished with a touch of honey. Within my first 100 words, I want you to know this: these Blackberry Brie Pastry Swirls are going to become your new go-to appetizer.

Imagine biting into a golden, puffed swirl — the exterior shatters lightly, giving way to a warm, molten center of brie that stretches ever so slightly as you pull it apart. The blackberries burst with tart-sweet juice, and the honey adds a floral sweetness that ties everything together. The aroma alone — butter, baked fruit, and caramelized pastry — will fill your kitchen and draw everyone to the oven. These are the kind of baked brie bites that disappear in minutes, leaving guests asking for the recipe before they’ve even finished chewing.

What sets my version apart is the technique I learned in pastry school in Paris: rolling the pastry tightly so each slice holds its shape and creates those beautiful spiraled layers. Plus, I add a sprinkle of turbinado sugar on top for a delicate crunch that contrasts the creamy cheese. One 💡 mia’s Pro Tip I’ll share early — chill the rolled log for 10 minutes before slicing to get the cleanest rounds. And the most common mistake? Overcrowding the baking sheet, which steams the pastry instead of letting it puff. Trust me, these blackberry puff pastry recipe swirls are foolproof if you follow these steps.

Why This Blackberry Brie Pastry Swirls Recipe Is the Best

The Flavor Secret: The combination of creamy, buttery brie with tart blackberries and honey is a classic French flavor pairing that I’ve elevated with a hint of floral sweetness. My Moroccan heritage taught me to balance sweet and savory, and here the honey doesn’t just sweeten — it caramelizes in the oven, creating a glaze that seeps into the pastry and cheese. This isn’t just another easy brie appetizer; it’s a carefully balanced bite that hits every note on your palate.

Perfected Texture: In Paris, I learned that the secret to exceptional puff pastry is keeping everything cold and handling it minimally. By rolling the pastry to exactly 12×10 inches and slicing into 1-inch rounds, each swirl bakes into concentric layers that are crisp on the outside and tender within. The brie stays lusciously melted without leaking out — a technique I’ll walk you through step by step.

Foolproof & Fast: With just 15 minutes of prep and 20 minutes in the oven, this blackberry puff pastry recipe is designed for real life. Whether you’re hosting a last-minute gathering or need a crowd-pleasing appetizer for game day, these swirls deliver restaurant-quality results without the stress. I’ve tested this recipe a dozen times in my NYC kitchen to make sure it works every single time, even for first-time bakers.

Blackberry Brie Pastry Swirls Ingredients

I source most of my ingredients from the Union Square Greenmarket in Manhattan, where the blackberries are plump and the honey is locally sourced. The brie I usually pick up from Murray’s Cheese Shop in Greenwich Village — their double-cream brie is perfectly ripe and creamy. This recipe is proof that a handful of high-quality ingredients can create something truly memorable. Let me walk you through each one.

Ingredients List

  • 1 sheet puff pastry, thawed (from a 17.3 oz box, usually comes with 2 sheets)
  • 4 oz brie cheese, sliced (rind on or off — your choice; I leave it on for texture)
  • 1/2 cup fresh blackberries (about 4 oz)
  • 1 tablespoon honey (I use wildflower or orange blossom)
  • 1 egg, beaten (for egg wash)
  • 1 tablespoon turbinado sugar (optional, for crunch)

Ingredient Spotlight

Puff Pastry: This is the backbone of the recipe. Look for all-butter puff pastry in the freezer section — brands like Dufour or Trader Joe’s work beautifully. Thaw it in the refrigerator overnight or on the counter for 30 minutes until pliable but still cold. Never microwave it to thaw, or you’ll lose those flaky layers. If you’re feeling ambitious, you can make your own, but store-bought is my go-to for quick entertaining.

Brie Cheese: Choose a double-cream brie for the best melt. The rind is edible and adds a subtle earthy note, but you can trim it if you prefer a smoother texture. I recommend buying the brie in a wedge and slicing it yourself — pre-sliced brie is often too thin. Look for brie that gives slightly when pressed, indicating it’s ripe but not overripe.

Blackberries: Fresh blackberries are ideal because they hold their shape during baking. Choose berries that are deep purple-black, plump, and not leaking juice. If blackberries aren’t in season, you can substitute raspberries or diced strawberries. Frozen blackberries work in a pinch — I’ll cover that in the FAQ section below.

Honey: The honey adds sweetness and helps caramelize the fruit. I love using orange blossom honey for its floral notes, but any mild honey works. Avoid robust varieties like buckwheat honey, which can overpower the brie. Maple syrup is a great alternative if you don’t have honey.

Original IngredientBest SubstitutionFlavor / Texture Impact
Puff PastryCrescent Dough (sheet)Less flaky, more bread-like; still delicious but not as crispy
Brie CheeseCamembert or Cream CheeseCamembert is almost identical; cream cheese is tangier and firmer
BlackberriesRaspberries or BlueberriesRaspberries are tarter; blueberries are sweeter and less juicy
HoneyMaple Syrup or AgaveMaple adds a woody sweetness; agave is neutral but thinner
Turbinado SugarDemerara or Granulated SugarDemerara is similar; granulated melts faster, less crunch

How to Make Blackberry Brie Pastry Swirls — Step-by-Step

Making these Blackberry Brie Pastry Swirls is easier than you think. I’ve broken it down into four simple steps with my chef-tested tips so you get perfect results every time. Let’s get started!

Step 1: Prepare the Puff Pastry

Preheat your oven to 400°F (200°C) and line a baking sheet with parchment paper. Lightly flour your work surface and roll the thawed puff pastry into a 12×10 inch rectangle. If the pastry feels sticky, dust with a little more flour. You want an even thickness throughout — about 1/8 inch thick. Use a sharp knife or pizza cutter to trim any uneven edges for a clean rectangle.

💡 mia’s Pro Tip: Keep the puff pastry cold. If it starts to feel soft or sticky, slide it onto a baking sheet and refrigerate for 10 minutes. Cold pastry puffs better and holds its shape during baking.

Step 2: Layer the Brie and Blackberries

Arrange the sliced brie evenly over the pastry, leaving a 1-inch border along all edges. I like to place the slices in rows running parallel to the long edge — this ensures every swirl gets a good amount of cheese. Scatter the fresh blackberries over the brie, pressing them gently into the cheese so they stay in place. Drizzle the honey evenly over the top.

⚠️ Common Mistake to Avoid: Don’t overfill! Too many blackberries or too much brie will cause the swirls to burst open during baking. Stick to the measurements for perfect, intact spirals.

Step 3: Roll and Slice

Starting from a long edge, roll the pastry tightly into a log, using your fingers to keep the filling in place. Pinch the seam firmly to seal. For the cleanest slices, transfer the log to the refrigerator for 10 minutes to firm up. Then, using a serrated knife, slice the log into 1-inch thick rounds. Place each round cut-side up on the prepared baking sheet, spacing them about 2 inches apart.

💡 mia’s Pro Tip: Use dental floss to slice the log for ultra-clean cuts! Slide a long piece of unflavored floss under the log, cross the ends over the top, and pull through. No squishing, perfect spirals every time.

Step 4: Bake to Golden Perfection

Brush the tops of each swirl with the beaten egg wash, making sure to cover all the exposed pastry. Sprinkle with turbinado sugar if using — this adds a wonderful caramelized crunch. Bake at 400°F for 18-20 minutes, until the pastry is puffed, golden brown, and the brie is bubbly. Let cool on the baking sheet for 5 minutes before serving — the cheese will set slightly and be easier to handle.

⚠️ Common Mistake to Avoid: Don’t skip the egg wash! It’s what gives the pastry that beautiful golden color and helps the sugar adhere. Without it, the swirls will look pale and lack that professional finish.

StepActionDurationKey Visual Cue
1Roll puff pastry to 12×10 inch rectangle2-3 minutesEven thickness, clean edges
2Layer brie, blackberries, and honey3-4 minutesEven distribution, 1-inch border
3Roll into log, chill, slice into rounds15 minutes (with chilling)Tight spiral, clean 1-inch slices
4Egg wash, sugar, bake18-20 minutesGolden brown, puffed, bubbly cheese

Serving & Presentation

These Blackberry Brie Pastry Swirls are best served warm, straight from the oven when the cheese is still molten and the pastry is at its crispiest. I like to arrange them on a wooden serving board with a small bowl of extra honey for drizzling and a few fresh blackberries scattered around for color. A sprinkle of fresh thyme leaves adds a savory note that cuts through the richness — it’s a touch I picked up from a Parisian bistro near the Louvre.

In my NYC apartment, I often serve these alongside a crisp green salad with a tangy vinaigrette to balance the richness. They’re also fantastic as part of a brunch spread — I’ve brought them to countless Sunday gatherings and they always steal the show. The contrast of the warm, gooey center with the flaky pastry is absolute perfection.

For a Moroccan-inspired twist, dust the finished swirls with a pinch of cinnamon and a drizzle of orange blossom honey — a nod to the pastries my mother made when I was growing up in Marrakech. It’s unexpected, but the warm spice pairs beautifully with the blackberries and brie.

Pairing TypeSuggestionsWhy It Works
Side DishArugula salad, roasted grapes, or charcuterie boardPeppery greens balance richness; fruit echoes the blackberries
Sauce / DipHoney drizzle, balsamic glaze, or fig jamExtra sweetness or acidity enhances the creamy-tart balance
BeverageSparkling water with lemon, dry rosé, or apple ciderCrisp, acidic drinks cut through the buttery pastry
GarnishFresh thyme, flaky sea salt, or edible flowersHerbs and salt balance sweetness; flowers add visual appeal

Make-Ahead, Storage & Reheating

Between my busy NYC schedule and hosting friends on weekends, I rely on make-ahead strategies. These Blackberry Brie Pastry Swirls are surprisingly flexible. You can assemble them a day ahead, refrigerate, and bake just before guests arrive — the pastry will still puff beautifully because the chilling actually helps the layers. Here’s my tested storage and reheating guide.

MethodContainerDurationReheating Tip
RefrigeratorAirtight container in single layerUp to 3 daysReheat at 350°F for 8-10 minutes until crisp
FreezerFreezer bag, parchment between layersUp to 2 monthsBake from frozen at 400°F for 22-25 minutes
Make-AheadCovered baking sheet or trayUp to 24 hours in advanceAssemble, refrigerate unbaked, add 2-3 minutes to bake time

If you’re reheating, the oven is your best friend — avoid the microwave at all costs, as it will turn the pastry soggy and the brie rubbery. Place the swirls on a baking sheet and warm them at 350°F for about 8-10 minutes. If frozen, bake straight from the freezer at 400°F for 22-25 minutes. The pastry will crisp right back up, and the cheese will become gooey again. For make-ahead assembly, I like to arrange the sliced swirls on the baking sheet, cover with plastic wrap, and refrigerate overnight. The next day, I brush with egg wash and bake — it’s a total time-saver.

Variations & Easy Swaps

One of the things I love most about this easy brie appetizer is how adaptable it is. Whether you’re catering to dietary needs or just want to experiment with flavors, here are my favorite variations. I’ve tested each one in my home kitchen so you can swap with confidence.

VariationKey ChangeBest ForDifficulty Impact
Savory Herb TwistAdd fresh thyme and black pepperSavory lovers, holiday appetizersNo change (easy)
Gluten-Free / Dairy-FreeGF puff pastry + DF brie alternativeDietary restrictionsEasy (same technique)
Seasonal Berry SwapRaspberries, blueberries, or sliced strawberriesYear-round adaptabilityNo change (easy)

Savory Herb Twist

For a more savory take, scatter 1 teaspoon of fresh thyme leaves and a generous pinch of freshly cracked black pepper over the brie and blackberries before rolling. The thyme’s earthiness complements the creamy cheese, while the pepper adds a gentle warmth. This variation is a nod to the French technique of pairing herbs with soft-ripened cheeses — I learned this combination during my pastry training in Paris, and it’s become one of my most requested versions. The herbs also make these swirls an excellent addition to a holiday appetizer spread alongside roasted meats.

Gluten-Free / Dairy-Free

You can easily adapt this recipe for dietary needs. Use a high-quality gluten-free puff pastry — brands like Schär or GeeFree work well. For the cheese, substitute with a dairy-free brie-style cheese or a soft cashew cheese. The texture will be slightly less stretchy, but the flavor remains rich and satisfying. I’ve tested this version for a friend with celiac disease, and it was a hit. Keep in mind that gluten-free pastry can be more delicate, so handle it gently and roll between two sheets of parchment paper to prevent sticking.

Seasonal Berry Swap

Depending on what’s available at your local farmers market, you can swap the blackberries for raspberries, blueberries, or sliced strawberries. Each berry brings its own personality: raspberries are tarter and break down more during baking, creating a jammy texture; blueberries hold their shape well and add a sweet pop; strawberries become soft and almost compote-like. I love using a mix of whatever looks best at the Union Square market. If using strawberries, slice them thin and pat dry with a paper towel to remove excess moisture.

Can I use frozen blackberries instead of fresh for blackberry brie pastry swirls?

Yes, you can use frozen blackberries, but there’s a catch: frozen berries release more moisture as they thaw, which can make the pastry soggy. To prevent this, do not thaw the berries before using them — add them directly from the freezer to the pastry. You may also want to toss the frozen berries in 1 tablespoon of cornstarch before arranging them on the brie. The cornstarch will absorb excess liquid as the berries bake, keeping the pastry crisp and flaky. Expect slightly more juice leakage compared to fresh berries, but the flavor will still be delicious. I’ve tested this method multiple times and it works reliably.

How do you keep the brie from leaking out of the pastry swirls while baking?

The key to preventing brie leakage is twofold: keep everything cold and seal the seam properly. First, make sure your brie is cold when you slice it — cold brie holds its shape better and melts more slowly. Second, when you roll the pastry into a log, pinch the seam firmly along the entire length and place the log seam-side down on the baking sheet. Chilling the rolled log for 10-15 minutes before slicing also helps the pastry firm up, which reduces the chance of the brie pushing out during baking. Finally, don’t overfill — stick to 4 oz of brie for one sheet of puff pastry. If some cheese does escape, it will caramelize on the pan and still taste wonderful, so don’t stress!

What type of pastry works best for blackberry brie swirls—puff pastry or crescent dough?

Puff pastry is absolutely the best choice for these blackberry brie swirls. Puff pastry contains many thin layers of butter that create those beautiful, flaky, airy pockets when baked — exactly what you want for an elegant appetizer. Crescent dough, while convenient and tasty, has a denser, more bread-like texture and won’t puff up as dramatically. It also tends to be sweeter, which can compete with the honey and blackberries. If you only have crescent dough on hand, it will still work in a pinch, but for the most impressive results with that signature golden, shatteringly crisp texture, stick with all-butter puff pastry. Your guests will notice the difference!

Can I make blackberry brie pastry swirls ahead of time and reheat them?

Absolutely! I actually recommend making these ahead for stress-free entertaining. The best make-ahead method is to assemble the swirls completely (including slicing and arranging on the baking sheet) up to 24 hours in advance, then cover and refrigerate. When you’re ready to serve, brush with egg wash and bake as directed, adding 2-3 minutes to the bake time since the pastry is cold. You can also bake them fully, let them cool, and refrigerate for up to 3 days. To reheat, place them on a baking sheet at 350°F for 8-10 minutes until the pastry crisps up again. Avoid the microwave — it will make the pastry soggy and the brie rubbery. I often bake a batch on Sunday and reheat for weekday snacks!

What wine pairs well with blackberry brie pastry swirls?

These blackberry brie pastry swirls pair beautifully with a variety of wines. For white wine, I recommend a dry Riesling or a Sauvignon Blanc — their crisp acidity cuts through the buttery pastry and creamy brie, while complementing the tartness of the blackberries. If you prefer red, go for a light-bodied Pinot Noir or a Beaujolais; their fruity notes echo the berries without overpowering the cheese. For a festive option, a dry sparkling wine or Champagne works wonderfully, as the bubbles cleanse your palate between each rich bite. As a Moroccan-inspired alternative, serve with mint tea — the sweetness and herbaceous notes are a lovely contrast to the savory-sweet swirls.

Can I use a different cheese instead of brie?

Yes, you can substitute the brie with other soft-ripened cheeses. Camembert is the closest alternative — it has a similar texture and flavor profile, so the results will be nearly identical. For a firmer option, try a triple-cream cheese like Brillat-Savarin or Saint-André, which will melt into an even richer, creamier center. If you want a tangy twist, goat cheese (chèvre) works beautifully with blackberries and honey, though it will have a firmer, more crumbly texture rather than the stretchy melt of brie. For a dairy-free option, use a soft cashew-based cheese. Avoid hard cheeses like cheddar or gouda, as they won’t melt into the same luscious, spreadable consistency that makes these swirls so special.

How do I prevent the pastry from getting soggy?

Soggy pastry is usually caused by excess moisture from the fruit or cheese. Here are my tested tips to keep your blackberry brie pastry swirls crisp: First, pat the blackberries gently with a paper towel to remove any surface moisture before using them. Second, don’t over-sweeten — too much honey can create a syrupy liquid that soaks into the pastry. Stick to 1 tablespoon. Third, make sure your puff pastry is fully thawed but still cold when you roll it, and bake at a high temperature (400°F) so the pastry puffs and sets quickly before the filling has a chance to release moisture. Finally, always bake on a parchment-lined sheet and leave space between each swirl so steam can escape. If you follow these steps, you’ll get perfectly crisp, flaky swirls every time.

Can I add other fruits to the filling?

Absolutely! This recipe is very adaptable, and you can mix or swap the blackberries with other fruits. Raspberries are a natural choice — they have a similar tartness and hold up well during baking. Blueberries are sweeter and stay intact, adding little pops of juice. Sliced strawberries work but release more liquid, so pat them dry and consider adding a teaspoon of cornstarch to the mix. For a tropical twist, diced mango or pineapple pairs surprisingly well with brie and honey — I discovered this combination while experimenting for a summer party. You could also add a thin layer of fig jam or apricot preserves under the brie for extra sweetness and depth. Just keep the total fruit quantity to about 1/2 cup to avoid overfilling.

Share Your Version!

I absolutely love seeing how you make these Blackberry Brie Pastry Swirls your own! Did you add a savory twist with thyme? Swap in raspberries or blueberries? Or maybe you tried the gluten-free version for a family gathering? Drop a star rating and a comment below — your feedback helps me create more recipes you’ll love, and it helps other readers know exactly what to expect.

Snap a photo of your beautiful swirls and share them on Instagram or Pinterest — tag me @exorecipes so I can see your creations. I personally reply to every comment and love hearing about the small tweaks you make that turn this recipe into your family’s favorite. And here’s a question for you: What’s your favorite dipping sauce or side dish to serve with these? I’m always looking for new ideas to try in my NYC kitchen!

From my NYC kitchen to yours — I hope this recipe brings as much warmth to your table as it does to mine. — mia 🧡

📌

Love This Recipe? Save It to Pinterest!

If you enjoyed this Blackberry Brie Pastry Swirls recipe, don’t let it get lost in your browser tabs! 😄 Pin it now so you can find it again anytime — and explore hundreds more tried-and-tested recipes waiting for you on my Pinterest boards.

👉 Follow mia on Pinterest @exorecipe

📌 Pin this recipe · 🔁 Re-pin your favorites · 💬 Tag me when you make it — I love seeing your creations!

“`

Print

clock clock iconcutlery cutlery iconflag flag iconfolder folder iconinstagram instagram iconpinterest pinterest iconfacebook facebook iconprint print iconsquares squares iconheart heart iconheart solid heart solid icon

Blackberry Brie Pastry Swirls

  • Author: Chef Mia
  • Prep Time: 15 minutes
  • Cook Time: 20 minutes
  • Total Time: 35 minutes
  • Yield: 8 swirls 1x
  • Method: Appetizer
  • Cuisine: American

Description

Flaky puff pastry swirls filled with creamy brie and sweet blackberries, baked until golden and bubbly.


Ingredients

Scale
  • 1 sheet puff pastry, thawed
  • 4 oz brie cheese, sliced
  • 1/2 cup fresh blackberries
  • 1 tablespoon honey
  • 1 egg, beaten (for egg wash)
  • 1 tablespoon turbinado sugar (optional)

Instructions

  1. Preheat oven to 400°F (200°C) and line a baking sheet with parchment paper.
  2. Roll out puff pastry on a lightly floured surface into a 12×10 inch rectangle.
  3. Arrange brie slices evenly over the pastry, leaving a 1-inch border.
  4. Scatter blackberries over the brie and drizzle with honey.
  5. Starting from a long edge, roll the pastry tightly into a log. Pinch seam to seal.
  6. Slice the log into 1-inch thick rounds and place cut-side up on the baking sheet.
  7. Brush tops with beaten egg and sprinkle with turbinado sugar if using.
  8. Bake for 18-20 minutes until puffed and golden. Serve warm.

Notes

For a savory twist, add a sprinkle of fresh thyme or black pepper. These are best enjoyed fresh out of the oven.


Nutrition

  • Calories: 220
  • Sugar: 5g
  • Fat: 14g
  • Carbohydrates: 16g
  • Protein: 6g


Blackberry Brie Pastry Swirls

Blackberry Basil Ricotta Pizza – A Sweet-Savory Twist on Pizza Night

⚖️
Difficulty
Easy
⏲️
Prep Time
10 mins
🕒
Cook Time
15 mins
⏱️
Total Time
25 mins
🍽️
Servings
4

I still remember the first time I made a blackberry basil ricotta pizza. It was a humid Saturday in late August, and I had just come back from the Union Square Greenmarket with a basket of glossy, deep-purple blackberries that practically begged to be used. Growing up in Morocco, my mother taught me to balance sweet and savory — think lamb tagine with apricots or chicken with preserved lemons and olives. That instinct stayed with me through culinary school in Paris, where I learned how a single herb like basil can elevate a dish from everyday to unforgettable. This blackberry pizza recipe is pure New York City energy — bold, unexpected, and full of contrasts. It’s the pizza you never knew you needed, and trust me, once you try it, you’ll wonder why you haven’t been making fruit pizza with basil all along.

Picture this: a golden, crispy crust spread with creamy ricotta that’s been whipped with olive oil, salt, and pepper until it’s light and luscious. Then come the blackberries — some whole, some slightly crushed — scattered across the ricotta like tiny jewels. As the pizza bakes, the berries soften and release their sweet-tart juice into the cheese, creating pockets of jammy goodness. The fragrance of fresh basil, torn and scattered right after baking, cuts through the richness with its peppery, almost minty aroma. A final drizzle of honey ties everything together — it’s the kind of sweet-savory harmony that makes a ricotta and blackberry pizza feel both luxurious and completely approachable.

I’ve tested this savory fruit pizza more times than I can count, tweaking the crust temperature, the ricotta thickness, and the baking time to get the perfect balance. The version I’m sharing today is the one that wins over skeptics every time — even my Parisian chef-instructor, who once told me fruit on pizza was “a gimmick,” asked for seconds. The key is using high-quality ricotta (look for whole milk, no gums or stabilizers) and baking at a high temperature so the crust gets crisp before the berries release too much moisture. I’ll show you exactly how to nail it, including a pro tip for the crispiest crust and the one mistake most people make that turns their pizza soggy. Let’s get started on this blackberry basil ricotta pizza.

Why This Blackberry Basil Ricotta Pizza Recipe Is the Best

The Flavor Secret — Most fruit pizza recipes either go fully sweet (dessert pizza) or use heavy sauces that mask the fruit. My ricotta and blackberry pizza hits that elusive sweet-savory midpoint. The ricotta is seasoned simply with olive oil, salt, and pepper — a technique I picked up in Paris, where we treat fresh cheese with restraint and respect. The blackberries provide bright acidity, the honey adds floral sweetness, and the basil brings an herbaceous finish. It’s a flavor profile that works as a main course, a lunch, or even an appetizer, and it never feels heavy.

Perfected Texture — I’ve tested this blackberry pizza recipe with every type of crust, from Neapolitan to thick Sicilian, and I’ve landed on the ideal: a thin, crisp crust that’s sturdy enough to hold the creamy ricotta and juicy berries without getting soggy. The trick? Pre-baking the dough for 5 minutes before adding the toppings. This creates a barrier that keeps the base crisp even after baking. It’s a small extra step from my French training — we call it précuisson — and it makes all the difference.

Foolproof & Fast — This blackberry basil ricotta pizza comes together in just 25 minutes from start to finish. I know how busy life gets — I’m juggling recipe development, farmers market runs, and Manhattan traffic just like everyone else. That’s why I designed this recipe to be simple enough for a weeknight dinner but impressive enough for company. No obscure ingredients, no complicated techniques — just high-quality components assembled with care.

Blackberry Basil Ricotta Pizza Ingredients

When I walk through the Chelsea Market or my local Whole Foods, I always pick up the ingredients for this blackberry pizza recipe with a specific plan. The beauty of this dish is that every ingredient plays a distinct role — no filler, no shortcuts. Here’s everything you’ll need to make a truly memorable fruit pizza with basil.

Ingredients List

  • 1 pre-made pizza crust or 1 lb pizza dough
  • 1 cup ricotta cheese (whole milk, preferably)
  • 1 cup fresh blackberries
  • 1/4 cup fresh basil leaves, torn
  • 2 tablespoons olive oil (extra virgin)
  • 1 tablespoon honey (local, if available)
  • 1/4 teaspoon salt
  • 1/4 teaspoon black pepper

Ingredient Spotlight

Ricotta Cheese — This is the foundation of your ricotta and blackberry pizza. Look for whole-milk ricotta with a short ingredient list — ideally just milk, cream, vinegar or lemon juice, and salt. Avoid “light” or part-skim ricotta, which can be grainy and dry. My favorite is the fresh ricotta from Calabro in Connecticut — it’s creamy, slightly sweet, and widely available in Northeastern US grocery stores as well as online. If you can’t find it, a good substitute is fresh goat cheese blended with a splash of cream to mimic ricotta’s texture.

Blackberries — Fresh blackberries are non-negotiable here; frozen berries release too much water and will make your crust soggy. Look for berries that are deep black-purple, plump, and dry — not wet or mushy. I love the ones from Driscoll’s that I find at my local Fairway Market, but any fresh, ripe blackberry will work. If blackberries are out of season, you can swap in fresh figs, sliced peaches, or even halved cherries — each brings its own sweetness and structure.

Basil — Fresh basil is the aromatic backbone of this blackberry pizza recipe. Use the small, tender leaves from the top of the bunch, and always tear them by hand right before serving — cutting basil with a knife causes the edges to brown and the flavor to dull. I grow my own basil on my fire escape in Brooklyn, but store-bought works perfectly. For a different twist, try mint or a mix of basil and mint — it’s a combination I learned in Morocco and it pairs beautifully with the honey.

Honey — A good-quality honey adds floral sweetness that complements the blackberries and softens the ricotta’s tang. I use wildflower or orange blossom honey from the Hudson Valley — the flavor is nuanced without being overpowering. If you’re out of honey, a drizzle of pure maple syrup or agave nectar works, though the flavor will shift slightly.

Original IngredientBest SubstitutionFlavor / Texture Impact
Ricotta (whole milk)Fresh goat cheese + creamTangier, slightly firmer spread
Fresh blackberriesFresh figs, sliced peaches, or cherriesSweeter, less tart; figs add honeyed notes
Fresh basilFresh mint or basil-mint blendBrighter, more aromatic (great with honey)
HoneyMaple syrup or agave nectarLess floral, more woody (maple) or neutral (agave)

How to Make Blackberry Basil Ricotta Pizza — Step-by-Step

Making this blackberry basil ricotta pizza is straightforward, but a few key techniques make the difference between a good pizza and a great one. Follow these steps, and you’ll get a crisp crust, creamy cheese, and jammy berries every time.

Step 1: Preheat and Prep

Preheat your oven to 450°F (230°C) with a pizza stone or inverted baking sheet inside if you have one. Let the oven heat for at least 20 minutes so the surface is fully hot — this gives you that restaurant-quality golden bottom. While the oven heats, take your pizza dough out of the fridge and let it sit at room temperature for about 15 minutes — cold dough is harder to stretch and will shrink back in the oven.

💡 mia’s Pro Tip: If you’re using a pre-made pizza crust (like Boboli or a par-baked shell), place it directly on the oven rack for 2 minutes before adding toppings. This dries out the surface and prevents sogginess.

Step 2: Prepare the Crust

If using pizza dough, lightly dust your work surface with flour and stretch the dough into a 12-inch round using your hands — a rolling pin can deflate the air bubbles that create a light, airy crust. Transfer the stretched dough to a piece of parchment paper or a lightly oiled baking sheet. If using a pre-made crust, place it on your baking surface as-is.

⚠️ Common Mistake to Avoid: Don’t roll the dough too thin — aim for about 1/4-inch thickness. Too thin, and the crust won’t hold the ricotta and berries; too thick, and it won’t cook through in 15 minutes.

Step 3: Make the Ricotta Spread

In a small bowl, combine 1 cup of ricotta cheese with 2 tablespoons of olive oil, 1/4 teaspoon of salt, and 1/4 teaspoon of black pepper. Stir until smooth and creamy — the olive oil lightens the texture and adds richness. Spread this mixture evenly over the crust, leaving a 1/2-inch border around the edge for the crust to puff up.

💡 mia’s Pro Tip: For an extra-creamy spread, whip the ricotta with a fork for about 30 seconds before adding the olive oil. This aerates the cheese and makes it feel lighter on the palate.

Step 4: Add the Blackberries

Scatter 1 cup of fresh blackberries evenly over the ricotta. Gently press a few of them into the cheese so they stay in place — don’t mash them, just nestle them slightly. Leave some berries whole and lightly crush a few with your fingers to release a little juice; this creates those beautiful jammy pockets as the pizza bakes.

⚠️ Common Mistake to Avoid: Don’t overload the pizza with blackberries. Too many berries release too much moisture, which can make the center of the pizza soggy. One cup is the perfect amount for a 12-inch pizza.

Step 5: Bake to Perfection

Place the pizza in the preheated oven and bake for 12-15 minutes, until the crust is golden brown and the edges are crisp and slightly charred. The ricotta should be set but still creamy — it shouldn’t look watery or separated. If the top is browning too quickly but the bottom isn’t done, move the pizza to a lower rack for the last 3 minutes.

💡 mia’s Pro Tip: For an extra-crispy crust, pre-bake the dough (without toppings) for 5 minutes before adding the ricotta and blackberries. This is the précuisson technique I learned in Paris, and it guarantees a crunchy bottom every time.

Step 6: Add Finishing Touches

Remove the pizza from the oven and let it rest for 1 minute on a wire rack. Drizzle 1 tablespoon of honey over the top in a zigzag pattern — the heat will help the honey melt into the cheese and berries. Sprinkle the torn fresh basil leaves over the pizza. The residual heat will slightly wilt the basil, releasing its essential oils without cooking away their brightness.

⚠️ Common Mistake to Avoid: Don’t add the basil before baking — it will turn black and bitter. Always add basil (and any fresh herbs) after the pizza comes out of the oven.

Step 7: Slice and Serve

Use a sharp pizza cutter or chef’s knife to slice the pizza into 8 wedges. Serve immediately while the crust is still crisp and the ricotta is warm and creamy. A final pinch of flaky sea salt (like Maldon) just before serving is optional but highly recommended — it accentuates the sweet-savory balance.

StepActionDurationKey Visual Cue
1Preheat oven + rest dough20 min preheatPizza stone hot to the touch
2Stretch or place crust2–3 minEven 1/4-inch thickness
3Mix and spread ricotta2 minSmooth, even layer
4Scatter blackberries1 minBerries evenly spaced
5Bake12–15 minGolden crust, set ricotta
6Honey + basil finish1 minHoney melts, basil bright green
7Slice and serve1–2 minClean slices, creamy center

Serving & Presentation

This blackberry basil ricotta pizza is a showstopper right out of the oven, and how you serve it can elevate the whole experience. I like to slide the pizza onto a large wooden cutting board — the same one I brought back from a cooking trip to Tuscany — and slice it tableside. The contrast of the golden crust, creamy white ricotta, deep purple berries, and bright green basil is absolutely stunning. For a restaurant-quality finish, I add a few whole basil leaves on top and a light drizzle of extra honey right before serving.

As a main course, this ricotta and blackberry pizza pairs beautifully with a simple arugula salad dressed with lemon juice and olive oil — the peppery greens cut through the richness of the cheese. If I’m serving it as an appetizer or part of a dinner spread, I cut it into smaller squares and pair it with a crisp white wine like a Sauvignon Blanc or a dry sparkling rosé. My mother would have served it with mint tea on the side — and honestly, that works too.

Pairing TypeSuggestionsWhy It Works
Side DishArugula salad with lemon vinaigrette, roasted asparagus, or grilled zucchiniPeppery greens and bright acidity balance the creamy, sweet pizza
Sauce / DipBalsamic glaze drizzle, extra honey, or chili-infused olive oilAdds acidity, sweetness, or heat — each enhances a different note
BeverageSauvignon Blanc, dry sparkling rosé, or mint-infused iced teaCrisp, acidic drinks cut the richness; herbal notes echo the basil
GarnishFlaky sea salt, extra basil leaves, crushed red pepper, lemon zestSalt enhances sweetness; red pepper adds contrast; zest brightens

Make-Ahead, Storage & Reheating

In my busy NYC life — between recipe testing, farmers market runs, and exploring new restaurants — I’ve learned exactly how to make this blackberry basil ricotta pizza work on a schedule. While it’s absolutely best fresh from the oven, there are smart ways to prep ahead and store leftovers without losing that crispy-cheesy magic.

MethodContainerDurationReheating Tip
RefrigeratorAirtight container or wrapped in foilUp to 3 daysReheat on a baking sheet at 375°F for 6–8 minutes — not the microwave
FreezerWrap each slice in parchment, then foil; place in freezer bagUp to 2 monthsReheat from frozen at 400°F for 12–14 minutes, adding fresh basil after
Make-AheadAssemble on parchment, refrigerate unbakedUp to 8 hours in advanceAdd 2–3 minutes to bake time if starting from cold; do not add basil until after baking

For reheating, skip the microwave — it will turn the crust rubbery and the berries mushy. Instead, place leftover slices on a baking sheet in a 375°F oven for 6-8 minutes. The crust will crisp back up, the ricotta will soften, and the berries will re-warm without breaking down. I like to add a few fresh basil leaves after reheating to bring back that bright, aromatic finish.

If you’re planning to make this blackberry pizza recipe for a party, you can prep everything in advance: stretch the dough, mix the ricotta, and wash the berries. Store each component separately in the fridge, then assemble and bake right before serving. The fresh basil and honey should always be added at the very end.

Variations & Easy Swaps

One of the things I love most about this blackberry basil ricotta pizza is how adaptable it is. Whether you’re cooking for dietary needs, seasonal cravings, or just what’s in your fridge, these variations keep the spirit of the original while letting you make it your own.

VariationKey ChangeBest ForDifficulty Impact
Balsamic Glaze DrizzleReplace honey with balsamic glazeDinner parties, more savory preferenceNo change — easy
Gluten-Free / Dairy-FreeGF crust + plant-based ricotta alternativeDietary restrictions, allergy-friendly mealsModerate — requires tested substitutes
Add Arugula for Peppery KickTop baked pizza with fresh arugula and lemonSalad-lovers, extra layer of freshnessNo change — easy

Balsamic Glaze Drizzle

For a more savory take on this fruit pizza with basil, swap the honey for a drizzle of balsamic glaze. The glaze’s sweet-tart complexity pairs beautifully with the blackberries and ricotta — it’s a classic Italian combination that I learned to appreciate during my pastry training in Paris. Use a good-quality bottled balsamic glaze (look for one with grape must as the first ingredient) or reduce 1/2 cup of balsamic vinegar with a tablespoon of brown sugar until syrupy. Drizzle it over the pizza right after baking, just as you would the honey.

Gluten-Free / Dairy-Free Version

This blackberry pizza recipe adapts beautifully to dietary needs. For gluten-free, use a high-quality gluten-free pizza crust — I like the ones from Against the Grain or a cauliflower crust from Trader Joe’s. Pre-bake the GF crust for 5-7 minutes before adding toppings, as gluten-free dough tends to be more delicate. For dairy-free, substitute the ricotta with a plant-based version — Kite Hill makes a tangy, creamy almond-milk ricotta that holds up well. Alternatively, use a thick cashew cream: blend 1 cup soaked cashews with 2 tablespoons lemon juice, 1 tablespoon olive oil, and salt until smooth. The texture will be slightly nuttier but still delicious.

Add Arugula for a Peppery Kick

Inspired by the peppery salads I’ve had at NYC’s best pizzerias, I sometimes top this ricotta and blackberry pizza with a handful of fresh arugula right after baking. The arugula wilts slightly from the heat but stays crisp enough to add texture, and its peppery bite cuts through the creamy ricotta and sweet berries. Toss the arugula with a squeeze of lemon juice, a drizzle of olive oil, and a pinch of salt before scattering it over the pizza. You can also add a shaving of Parmesan for an extra savory layer.

Frequently Asked Questions

What kind of cheese can I use instead of ricotta on a blackberry basil pizza?

You can absolutely swap the ricotta for another soft, spreadable cheese, and the flavor profile will shift in delicious ways. Fresh goat cheese (chèvre) is my top recommendation — it has a tangy, earthy quality that pairs beautifully with the sweet blackberries and honey. Blend it with a tablespoon of cream or olive oil to make it spreadable, since goat cheese is firmer than ricotta. Mascarpone is another excellent choice — it’s even creamier and sweeter than ricotta, with a buttery richness that feels luxurious. For a lighter option, try cottage cheese blended until smooth (add a splash of milk if needed) or a well-drained, fresh farmer’s cheese. Avoid firm cheeses like mozzarella or cheddar — they don’t spread and their flavor competes with the berries and basil rather than complementing them.

Should I cook the blackberries before putting them on the pizza?

No, you should not cook the blackberries before adding them to the pizza. Fresh, raw blackberries are the way to go for this blackberry pizza recipe. When baked, the berries soften naturally in the heat of the oven, releasing their juices without becoming mushy or losing their shape. If you pre-cook the berries, they’ll turn into jam before the pizza even hits the oven, and during baking the excess moisture will make the crust soggy. The goal is to have pockets of jammy, slightly burst berries scattered across the ricotta, not a uniform layer of compote. That said, do gently press a few berries into the ricotta and lightly crush a couple with your fingers — this gives you those beautiful juice pockets without pre-cooking. And always use fresh, not frozen, berries for the best texture.

What type of crust works best for a fruit and ricotta pizza?

For a fruit and ricotta pizza, I recommend a thin, crisp crust that can support the creamy cheese and juicy berries without collapsing. A classic Neapolitan-style dough (stretched thin, about 1/4-inch thick) is my top choice — it bakes up golden and crunchy around the edges with a slightly chewy center. A pre-made thin pizza crust from the store (like a Boboli thin crust or a par-baked shell) is a great shortcut that still delivers excellent results. Avoid thick, fluffy crusts like Sicilian or deep-dish — they take longer to bake, which can cause the berries to release too much moisture and the ricotta to separate. If you’re using a gluten-free crust, choose one that’s sturdy and pre-bake it for 5-7 minutes before adding toppings to ensure it stays crisp.

Can I add balsamic glaze to a blackberry basil ricotta pizza?

Yes, absolutely — balsamic glaze is a fantastic addition to a blackberry basil ricotta pizza. In fact, I often swap it in for the honey when I want a more savory, complex finish. The sweet-tart acidity of balsamic glaze complements the creamy ricotta and the jammy blackberries beautifully, and it adds a gorgeous dark swirl that looks stunning on the golden crust. Use a good-quality aged balsamic glaze (or make your own by simmering 1/2 cup balsamic vinegar with 1 tablespoon brown sugar until thickened) and drizzle it over the pizza right after baking, just as you would the honey. You can also use both — a drizzle of honey and a drizzle of balsamic glaze for the best of both worlds. Add fresh basil after both drizzles so the herbs stay bright and fragrant.

Can I use frozen blackberries for this pizza?

I don’t recommend using frozen blackberries for this blackberry pizza recipe. Frozen berries contain a lot of excess water, which releases during baking and makes the crust soggy and the ricotta watery. Additionally, frozen blackberries tend to break down and turn mushy rather than holding their shape, so you lose those beautiful pockets of jammy fruit. If fresh blackberries aren’t in season, you have better options: use fresh figs (halved or quartered), fresh peaches (thinly sliced), or fresh cherries (pitted and halved). Each of these fruits works beautifully with ricotta and basil and maintains its structure during baking. If you absolutely must use frozen berries, thaw them first and drain them very well on paper towels, then add an extra 2-3 minutes of bake time to help evaporate the moisture.

Is this blackberry basil ricotta pizza served hot or cold?

This ricotta and blackberry pizza is best served warm, straight from the oven, when the crust is at its crispiest and the ricotta is soft and creamy. The contrast between the warm, melty cheese and the bright, fresh basil is part of what makes this fruit pizza with basil so special. That said, leftovers are also delicious at room temperature — the flavors actually meld together beautifully after the pizza has rested for 30-45 minutes. I’ve even enjoyed a slice cold the next day for a quick lunch, and the basil stays surprisingly vibrant. If you want to serve it at a party or picnic, let the pizza cool for about 10 minutes after baking, then slice and serve at room temperature within an hour. Avoid refrigerating it and serving it straight from the fridge — the crust will be chewy and the ricotta will firm up.

What protein can I add to make this pizza more filling?

This blackberry basil ricotta pizza is already quite satisfying thanks to the protein in the ricotta and the fiber from the blackberries, but you can absolutely add more protein to turn it into a heartier main course. Grilled chicken (sliced thin and placed on top of the ricotta before baking) is a natural pairing — the mild flavor won’t compete with the berries and basil. Crispy prosciutto or pancetta, crumbled over the pizza after baking, adds a salty, savory crunch that beautifully contrasts the sweet honey and berries. For a vegetarian option, I love adding toasted pine nuts or walnuts — they bring both protein and texture, and they echo the nuttiness I remember from Moroccan nut-and-honey pastries. If you want to keep it dairy-free, add cooked chickpeas tossed in olive oil and smoked paprika, scattered over the ricotta before baking.

Can I use dried basil instead of fresh basil for this recipe?

I strongly recommend using fresh basil for this blackberry pizza recipe — dried basil simply won’t deliver the same bright, peppery, aromatic quality that makes this dish so special. Fresh basil is added after baking, so it stays vibrant and fragrant, releasing its essential oils as it warms slightly from the residual heat. Dried basil is designed for cooking in sauces and braises where it has time to rehydrate and infuse; used raw as a finish, it would taste dusty and lack the characteristic sweetness and punch of fresh basil. If you can’t find fresh basil, you can substitute fresh mint (which also pairs wonderfully with blackberries and honey) or a combination of fresh parsley and fresh chives. Both will give you that herbaceous lift without the mustiness of dried herbs.

How do I keep the pizza crust from getting soggy with juicy toppings?

The number one technique I use to prevent a soggy crust on any fruit pizza with basil is pre-baking. If you’re using pizza dough, pre-bake it for 5 minutes at 450°F before adding the ricotta and blackberries — this creates a dry, firm barrier that resists moisture. For pre-made crusts, place them directly on the oven rack for 2 minutes to dry the surface. Another key tip is to not overload the pizza with blackberries — one cup for a 12-inch pizza is the sweet spot. Too many berries release excess liquid during baking. Also, make sure your ricotta isn’t too wet — if it looks watery, drain it in a fine-mesh strainer for 15 minutes before mixing. Finally, bake the pizza on a preheated pizza stone or inverted baking sheet, which helps cook the bottom quickly and evenly.

Can I make this blackberry basil ricotta pizza on a grill?

Yes, you can absolutely make this blackberry basil ricotta pizza on a grill, and it’s actually a fantastic method for achieving a smoky, charred crust that adds another layer of flavor. Preheat your grill to medium-high heat (about 450-500°F) with the lid closed for 15 minutes. Stretch or roll your dough on a piece of parchment, then slide it directly onto the grill grates (or use a pizza stone on the grill). Grill the dough for 2-3 minutes on one side until it’s firm and has grill marks, then flip it over. Quickly spread the ricotta mixture and scatter the blackberries on the grilled side, then close the lid and grill for another 6-8 minutes until the bottom is cooked through and the cheese is warm. Remove the pizza from the grill, drizzle with honey, and add the fresh basil. The smoky char from the grill pairs beautifully with the sweet berries and creamy ricotta.

📌

Love This Recipe? Save It to Pinterest!

If you enjoyed this Blackberry Basil Ricotta Pizza recipe, don’t let it get lost in your browser tabs! 😄 Pin it now so you can find it again anytime — and explore hundreds more tried-and-tested recipes waiting for you on my Pinterest boards.

👉 Follow mia on Pinterest @exorecipe

📌 Pin this recipe · 🔁 Re-pin your favorites · 💬 Tag me when you make it — I love seeing your creations!

Print

clock clock iconcutlery cutlery iconflag flag iconfolder folder iconinstagram instagram iconpinterest pinterest iconfacebook facebook iconprint print iconsquares squares iconheart heart iconheart solid heart solid icon

Blackberry Basil Ricotta Pizza

  • Author: Chef Mia
  • Prep Time: 10 minutes
  • Cook Time: 15 minutes
  • Total Time: 25 minutes
  • Yield: 4 1x
  • Method: Main Course
  • Cuisine: American

Description

A sweet and savory pizza topped with creamy ricotta, fresh blackberries, and fragrant basil on a crispy crust.


Ingredients

Scale
  • 1 pre-made pizza crust or 1 lb pizza dough
  • 1 cup ricotta cheese
  • 1 cup fresh blackberries
  • 1/4 cup fresh basil leaves, torn
  • 2 tablespoons olive oil
  • 1 tablespoon honey
  • 1/4 teaspoon salt
  • 1/4 teaspoon black pepper

Instructions

  1. Preheat oven to 450°F (230°C).
  2. Place pizza crust or rolled-out dough on a baking sheet or pizza stone.
  3. In a small bowl, mix ricotta with olive oil, salt, and pepper. Spread evenly over crust.
  4. Scatter blackberries on top of ricotta.
  5. Bake for 12-15 minutes until crust is golden and edges are crisp.
  6. Remove from oven, drizzle with honey, and sprinkle fresh basil on top.
  7. Slice and serve warm.

Notes

For a crispier crust, pre-bake the dough for 5 minutes before adding toppings.


Nutrition

  • Calories: 320
  • Sugar: 8g
  • Fat: 15g
  • Carbohydrates: 36g
  • Protein: 12g


Blackberry Basil Ricotta Pizza

k">

Tried This Recipe? Leave a Comment!

Did you make this recipe? I’d love to hear how it turned out! Please leave a comment and a rating below. Your feedback helps other home cooks and supports cheerychop.com!

For more delicious inspiration, follow me on Pinterest!

Black Pepper Chicken: Quick & Easy Restaurant-Style Stir-Fry – Bold, Peppery, and Ready in 30 Minutes

⚖️
Difficulty
Easy
⏲️
Prep Time
15 mins
🕒
Cook Time
15 mins
⏱️
Total Time
30 mins
🍽️
Servings
4

Growing up in Morocco, my mother would grind whole black peppercorns in her mortar for mqualli — tender chicken simmered with preserved lemons and olives. I never imagined that same peppery warmth would become the star of a quick stir-fry I now make in my tiny New York City kitchen. This black pepper chicken recipe is my weeknight love letter to bold flavors: tender chicken, crisp vegetables, and a sauce that coats every bite with a deep, savory heat. It’s an easy chicken stir fry that tastes like it came from a restaurant — but comes together in just 30 minutes.

The first thing you’ll notice is the heady aroma of freshly cracked black pepper hitting hot oil — it’s almost floral, with a sharp warmth that mellows as it mingles with oyster sauce and soy. Each piece of chicken is glazed in a silky, slightly sticky sauce that clings to steamed rice. The bell pepper and onion stay crunchy, offering a sweet contrast to the peppery punch. I always use chicken thighs here; they stay juicy and don’t dry out under high heat, a trick I picked up during my pastry training in Paris — where we learned that fat is flavor and patience is key.

What makes my Chinese black pepper chicken different? It’s the double dose of pepper: a generous tablespoon in the sauce, plus a final crack of fresh pepper just before serving. I also marinate the chicken with a little cornstarch and sesame oil, giving it that velvety texture you’d find in your favorite takeout spot. One common mistake I see is crowding the pan — do that and you’ll steam instead of sear. Stick with me, and I’ll show you how to get that perfect wok hei flavor at home.

Why This Black Pepper Chicken Recipe Is the Best

The Flavor Secret: My version leans into freshly ground Tellicherry black pepper — it’s more aromatic and less dusty than pre-ground stuff. I pair it with oyster sauce for umami depth and a touch of sugar to balance the heat. Growing up in Morocco taught me to layer spices, and in Paris I learned how to build sauces that feel luxurious without being heavy. This stir fry chicken recipe brings all that training into one pan.

Perfected Texture: The cornstarch marinade isn’t just for flavor — it creates a protective coating that locks in moisture. High heat sears the chicken fast, giving you golden edges while the inside stays juicy. The vegetables retain a snap because they’re cooked separately and only briefly. This technique, straight from my culinary school days, ensures every forkful is satisfying.

Foolproof & Fast: I’ve tested this black pepper chicken recipe more times than I can count, and it works every single time — even for beginners. The sauce comes together in one bowl, the cooking order is simple, and the whole process takes under 30 minutes. It’s perfect for a busy weeknight when you want something that feels special but doesn’t demand hours in the kitchen.

Black Pepper Chicken Ingredients

I pick up my chicken and veggies at the Union Square Greenmarket when I can, and grab oyster sauce and sesame oil from my go-to Asian market in Chinatown. The black pepper? I always buy whole peppercorns and grind them fresh — it makes all the difference.

Ingredients List

  • 1 lb boneless skinless chicken thighs, cut into bite-sized pieces
  • 2 tablespoons soy sauce
  • 1 tablespoon cornstarch
  • 1 teaspoon sesame oil
  • 2 tablespoons vegetable oil (or any neutral oil)
  • 1 bell pepper (any color), sliced
  • 1 onion, sliced
  • 3 cloves garlic, minced
  • 1 tablespoon freshly ground black pepper (plus more for garnish)
  • 2 tablespoons oyster sauce
  • 1 tablespoon rice vinegar
  • 1 teaspoon sugar
  • ¼ cup chicken broth (low-sodium)

Ingredient Spotlight

Chicken thighs: Boneless, skinless thighs have more fat and stay tender under high heat. In a pinch, you can use chicken breast, but reduce the cooking time by a minute or two and watch carefully — breasts dry out fast.

Freshly ground black pepper: This is non-negotiable. Pre-ground pepper lacks the volatile oils that give this dish its signature kick and aroma. If you only have white pepper, it will still work but the flavor will be less pungent and more earthy — not quite the same.

Oyster sauce: It adds deep umami and gloss to the sauce. Vegetarian oyster sauce (made from mushrooms) is a fine substitute, though the flavor will be slightly less rich. Soy sauce alone won’t give you the same body.

Cornstarch: It’s the key to that velvety restaurant-style texture. It also helps thicken the sauce. Arrowroot powder can be used 1:1 if you need a substitute.

Original IngredientBest SubstitutionFlavor / Texture Impact
Chicken thighsChicken breastLeaner, can dry out if overcooked. Reduce cooking time.
Freshly ground black pepperWhite pepper (ground)Milder, earthier, less aromatic. Use slightly more.
Oyster sauceVegetarian oyster sauce or hoisin sauceLess umami, sweeter if using hoisin. Adjust sugar.
CornstarchArrowroot powder or potato starchSimilar texture. Potato starch gives slightly glossier finish.
Rice vinegarWhite wine vinegar or apple cider vinegarSlightly different acidity; use same amount.

How to Make Black Pepper Chicken – Step-by-Step

Trust me, you’ve got this. Each step is designed to build flavor without stress. Read through once before you start — mise en place makes everything smoother.

Step 1: Marinate the Chicken

In a bowl, combine the chicken pieces with soy sauce, cornstarch, and sesame oil. Toss well to coat every piece. Let it sit for 10 minutes at room temperature — this step tenderizes and adds that silky texture.

💡 mia’s Pro Tip: Use a glass or stainless steel bowl, not plastic — the oils can cling to plastic and affect the flavor.

Step 2: Stir-Fry the Chicken

Heat a wok or large skillet over high heat until it’s smoking slightly. Add vegetable oil and swirl to coat. Add the chicken in a single layer — don’t crowd the pan. Let it sear undisturbed for 1-2 minutes, then stir-fry until golden and cooked through, about 5-6 minutes total. Use a slotted spoon to transfer the chicken to a plate.

⚠️ Common Mistake to Avoid: Adding the chicken before the oil is shimmering hot. If the pan isn’t hot enough, the chicken will release liquid and steam instead of sear.

Step 3: Cook the Vegetables

In the same pan, add the sliced bell pepper and onion. Stir-fry over high heat for 2 minutes until they’re slightly tender but still crisp. Add the minced garlic and the 1 tablespoon of black pepper, and cook for 30 seconds — your kitchen will smell incredible.

💡 mia’s Pro Tip: If you want extra heat, add a sliced red chili or a pinch of red pepper flakes along with the garlic.

Step 4: Make the Sauce

In a small bowl, whisk together oyster sauce, rice vinegar, sugar, and chicken broth. Pour the mixture into the pan with the vegetables. Bring to a simmer, stirring frequently, until the sauce slightly thickens — about 1 minute.

⚠️ Common Mistake to Avoid: Pouring the sauce too early before the garlic and pepper are fragrant. Give them that 30-second head start to release their oils.

Step 5: Combine and Finish

Return the cooked chicken to the pan. Toss everything together and cook for 1-2 minutes, letting the sauce coat every piece evenly. The sauce should be thick enough to cling to the chicken and veggies, not runny. If it’s too thick, add a splash of broth. Serve immediately over steamed rice.

💡 mia’s Pro Tip: Taste before serving — sometimes I add an extra crack of black pepper right at the end for a fresh burst of heat.

StepActionDurationKey Visual Cue
1Marinate chicken10 minsChicken evenly coated in glossy marinade
2Stir-fry chicken5–6 minsGolden brown edges, chicken cooked through
3Cook vegetables2½ minsPeppers bright, onions translucent, garlic fragrant
4Make sauce1 minSauce bubbles and thickens slightly
5Combine and finish1–2 minsSauce coats chicken and vegetables evenly

Serving & Presentation

Black pepper chicken is a shower of colors and textures: deep brown chicken, bright bell pepper, translucent onion, all glistening in a peppery sauce. I like to serve it over a bed of jasmine rice — the fluffy grains soak up the sauce beautifully. For a side, try steamed bok choy or a simple cucumber salad with rice vinegar and sesame seeds. It’s also wonderful with egg rolls or potstickers if you’re craving a full Chinese takeout-style spread.

To garnish, sprinkle sliced scallions, a pinch of toasted white sesame seeds, and an extra crack of black pepper. When I’m feeling fancy, I add edible flowers from the farmers market — a little nod to my Parisian pastry days. This dish also travels well for packed lunches; just keep the rice separate so it doesn’t get soggy.

Pairing TypeSuggestionsWhy It Works
Side DishSteamed jasmine rice, stir-fried bok choy, cucumber saladRice soaks up sauce; veggies add crunch and freshness.
Sauce / DipExtra black pepper sauce on the side, chili oil, plum sauceAdds layers of heat and sweetness.
BeverageTsingtao beer, iced green tea, or a crisp Sauvignon BlancMinerals and acidity cut through the richness of the sauce.
GarnishSliced scallions, sesame seeds, extra cracked pepperAdds color, crunch, and a fresh pepper hit.

Make-Ahead, Storage & Reheating

Living in New York means I’m always meal-prepping for a busy week. This black pepper chicken recipe is perfect for that — the flavors actually deepen overnight. Just follow a few key steps to keep the texture on point.

MethodContainerDurationReheating Tip
RefrigeratorAirtight container (glass or BPA-free plastic)Up to 4 daysReheat in a hot wok or nonstick pan with a splash of broth or water. Microwave on medium power if short on time.
FreezerFreezer-safe bag or container (remove as much air as possible)Up to 2 monthsThaw overnight in the fridge, then pan-fry over medium-high heat. Avoid microwaving frozen — it turns the chicken rubbery.
Make-AheadMarinate chicken and chop vegetables separatelyUp to 1 day in advanceStore chicken and veggies in separate containers. Stir-fry fresh day-of for best texture.

When reheating, I always add a little liquid (broth or water) to the pan to revive the sauce. If it’s too thick, a splash of soy sauce or rice vinegar will brighten it back up. Never reheat in the microwave on full power without covering — it will dry out the chicken.

Variations & Easy Swaps

VariationKey ChangeBest ForDifficulty Impact
Spicy Szechuan TwistAdd 1 tsp Szechuan peppercorns and 1 tbsp chili bean pasteThose who love numbing heatEasy
Gluten-FreeUse tamari instead of soy sauce, and a gluten-free oyster sauceGluten-sensitive dietsEasy
Vegetable-PackedAdd broccoli, snap peas, and carrots; reduce chicken to ½ lbLighter meal or more veggiesEasy

Spicy Szechuan Twist

Inspired by my trips to Chinatown in NYC, this version trades the mild heat for a fiery, numbing sensation. Add 1 teaspoon of Szechuan peppercorns along with the black pepper, and stir in 1 tablespoon of chili bean paste (doubanjiang) with the sauce. It’s intense, aromatic, and pairs beautifully with cold beer.

Gluten-Free

This is the variation I make most often for friends with gluten sensitivities. Swap regular soy sauce for tamari (or coconut aminos) and use a certified gluten-free oyster sauce. The texture stays exactly the same — just double-check your chicken broth is gluten-free, too. I’ve tested this with both brands, and no one can tell the difference.

Vegetable-Packed

When I find gorgeous broccoli and snap peas at the Greenmarket, I load up. Use only half a pound of chicken and double the vegetables. Cut the broccoli into small florets, blanch them for 1 minute in boiling water, then add them along with the bell pepper. This turns the dish into a hearty, veggie-forward meal that still satisfies that stir-fry craving.

What is the best cut of chicken to use for black pepper chicken stir-fry?

For this black pepper chicken recipe, I strongly recommend boneless, skinless chicken thighs. They have a higher fat content than breasts, which keeps the meat tender and juicy even under the high heat of a wok. Chicken breast can be used, but you need to watch the cooking time carefully — it can dry out in seconds. If using breasts, cut them into uniform 1-inch pieces and reduce the stir-fry time to about 4 minutes. The thighs also absorb the marinade better, giving you that restaurant-style velvety texture every time.

Can I substitute black pepper with white pepper in the recipe?

Yes, you can, but the flavor profile will change noticeably. White pepper is less aromatic and has an earthier, slightly fermented taste compared to the bright, pungent heat of freshly ground black pepper. If you’re in a pinch, use the same amount of white pepper, then add an extra pinch of black pepper at the end for some of that characteristic aroma. However, I always recommend sticking with black pepper for this dish — it’s the star. White pepper works better in lighter-colored sauces where you don’t want dark specks, but here the visual of cracked black pepper is part of the appeal.

How do you prevent the chicken from becoming tough when stir-frying?

The two biggest secrets are the marinade and the heat. My marinade includes cornstarch and sesame oil — the cornstarch creates a protective coating that seals in moisture, and the oil adds a layer of fat that prevents sticking. Always marinate for at least 10 minutes. Second, make sure your wok or skillet is screaming hot before adding the chicken. If the pan isn’t hot enough, the chicken will release its juices and steam instead of sear, leading to tough, dry meat. Cook the chicken in a single layer and don’t overcrowd — work in batches if needed. Once the edges are golden and caramelized, it’s done. Overcooking is the number one cause of tough chicken.

What vegetables pair well with black pepper chicken for a complete meal?

This black pepper chicken stir-fry is versatile and pairs beautifully with many vegetables. Bell peppers and onions are classic — they add sweetness and crunch. Broccoli, snap peas, and carrots are excellent additions, especially if you want to boost the nutritional profile. For a more traditional Chinese restaurant feel, add sliced water chestnuts for extra crunch or baby bok choy for a mild, leafy green. Mushrooms, such as shiitake or cremini, also work wonderfully because they absorb the peppery sauce. I often make a “kitchen sink” version with whatever I have in the fridge — the sauce is robust enough to complement almost any vegetable.

How do I make black pepper chicken less spicy?

If you’re sensitive to heat but still want the peppery flavor, start by reducing the freshly ground black pepper to 1½ teaspoons instead of 1 tablespoon. You can also use a coarser grind — larger pieces of black pepper give a milder, slower release of heat. Another trick is to add a teaspoon of sugar or honey to the sauce; sweetness balances out the pungency. If you want even less heat, swap half the black pepper for a pinch of white pepper, which is gentle on the palate. Remember, the pepper’s heat increases as it sits, so taste as you go and add more only if you want it bolder.

Can I use frozen vegetables for this stir-fry?

Yes, you can, but I recommend thawing them first and patting them completely dry with paper towels. Frozen vegetables release a lot of water when they cook, which can turn your sauce watery and prevent proper searing. If you’re in a hurry, you can add them directly from frozen, but be prepared to cook off the extra liquid — this may take a few extra minutes and the vegetables will be softer. For the best texture, stick with fresh vegetables. When I’m meal-prepping, I often use frozen bell pepper strips and broccoli, and they work just fine as long as I adjust the cooking time.

What should I serve with black pepper chicken for a complete dinner?

The most classic pairing is steamed jasmine rice — its fluffy texture and mild flavor let the bold black pepper sauce shine. For a low-carb option, serve it over cauliflower rice or alongside stir-fried zucchini noodles. To round out the meal, add a simple side dish like a cucumber salad with rice vinegar and sesame, or some steamed bok choy with garlic. I also love making egg rolls or spring rolls for a takeout-style feast. If you’re hosting, you can pair it with a cold Asian slaw and some potstickers. The key is balance: the peppery, savory main dish needs something light and fresh on the side.

Is black pepper chicken healthy?

Black pepper chicken can definitely fit into a healthy meal plan. Chicken thighs are a good source of protein and healthy fats, and the stir-fry includes vegetables for fiber and vitamins. The sauce is relatively low in sugar compared to many takeout versions. One serving (about a quarter of this recipe) provides roughly 320 calories, 26g of protein, and 14g of carbs. You can make it even lighter by using chicken breast, reducing the oil to 1 tablespoon, and using low-sodium soy sauce and chicken broth. Black pepper itself has antioxidants and anti-inflammatory properties, so it’s a nutritious way to add flavor without extra salt.

Can I make black pepper chicken ahead of time?

Absolutely! This black pepper chicken stir-fry is great for meal prep because the flavors deepen and meld together overnight. To keep the vegetables from getting too soft, I recommend undercooking them slightly when you stir-fry — they’ll finish cooking when you reheat. Store the chicken and vegetables in an airtight container in the fridge for up to 4 days. When reheating, add a tablespoon of chicken broth or water to restore the sauce’s consistency. Reheat in a hot pan or wok over medium-high heat for the best texture. If using a microwave, cover the dish and heat in 30-second bursts, stirring in between.

How do I get the sauce to be thick and glossy like takeout?

The secret to a glossy, restaurant-quality sauce is the cornstarch in the chicken marinade and the slurry effect when you add the broth mixture. First, the cornstarch that clings to the chicken helps thicken the sauce as it cooks. Second, make sure your sauce ingredients — oyster sauce, soy sauce, rice vinegar, sugar, and chicken broth — are whisked together thoroughly before adding to the pan. Let the sauce simmer for at least a minute after you add it; it will thicken as it reduces. If you want an even thicker sauce, you can mix an extra teaspoon of cornstarch with 2 tablespoons of cold water and stir it in at the end. But trust the recipe as written — it delivers that perfect shine and cling without being pasty.

📌

Love This Recipe? Save It to Pinterest!

If you enjoyed this Black Pepper Chicken recipe, don’t let it get lost in your browser tabs! 😄 Pin it now so you can find it again anytime — and explore hundreds more tried-and-tested recipes waiting for you on my Pinterest boards.

👉 Follow mia on Pinterest @exorecipe

📌 Pin this recipe · 🔁 Re-pin your favorites · 💬 Tag me when you make it — I love seeing your creations!

Print

clock clock iconcutlery cutlery iconflag flag iconfolder folder iconinstagram instagram iconpinterest pinterest iconfacebook facebook iconprint print iconsquares squares iconheart heart iconheart solid heart solid icon

Black Pepper Chicken: A Flavorful Stir-Fry Recipe to Savor

  • Author: Chef Mia
  • Prep Time: 15 minutes
  • Cook Time: 15 minutes
  • Total Time: 30 minutes
  • Yield: 4 servings 1x
  • Method: Main Course
  • Cuisine: Chinese

Description

This black pepper chicken stir-fry is a quick and easy weeknight dinner, featuring tender chicken, crisp vegetables, and a bold, savory black pepper sauce.


Ingredients

Scale
  • 1 lb boneless skinless chicken thighs, cut into bite-sized pieces
  • 2 tablespoons soy sauce
  • 1 tablespoon cornstarch
  • 1 teaspoon sesame oil
  • 2 tablespoons vegetable oil
  • 1 bell pepper, sliced
  • 1 onion, sliced
  • 3 cloves garlic, minced
  • 1 tablespoon freshly ground black pepper
  • 2 tablespoons oyster sauce
  • 1 tablespoon rice vinegar
  • 1 teaspoon sugar
  • ¼ cup chicken broth

Instructions

  1. In a bowl, combine chicken pieces, soy sauce, cornstarch, and sesame oil. Toss to coat and let marinate for 10 minutes.
  2. Heat vegetable oil in a wok or large skillet over high heat. Add chicken and stir-fry until golden and cooked through, about 5-6 minutes. Remove chicken and set aside.
  3. In the same pan, add bell pepper and onion. Stir-fry for 2 minutes until slightly tender. Add garlic and black pepper; cook for 30 seconds.
  4. In a small bowl, whisk together oyster sauce, rice vinegar, sugar, and chicken broth. Pour into the pan and bring to a simmer.
  5. Return the chicken to the pan. Toss everything together and cook for 1-2 minutes until the sauce thickens and coats the chicken and vegetables.
  6. Serve immediately over steamed rice.

Notes

For extra heat, add sliced red chili peppers along with the bell pepper. This dish can also be made with chicken breast; adjust cooking time accordingly.


Nutrition

  • Calories: 320 kcal
  • Sugar: 6 g
  • Fat: 18 g
  • Carbohydrates: 14 g
  • Protein: 26 g


Black Pepper Chicken: A Flavorful Stir-Fry Recipe to Savor