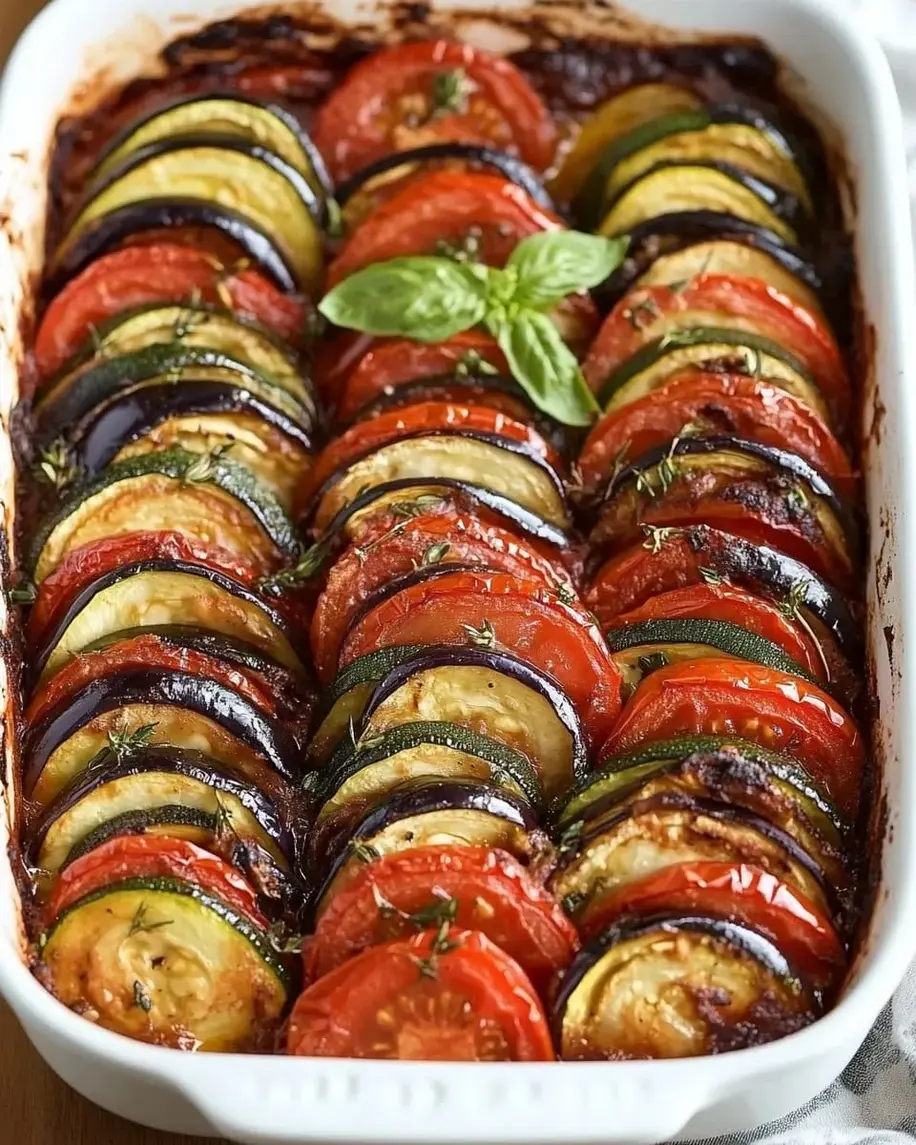
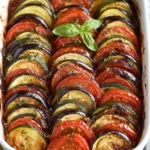
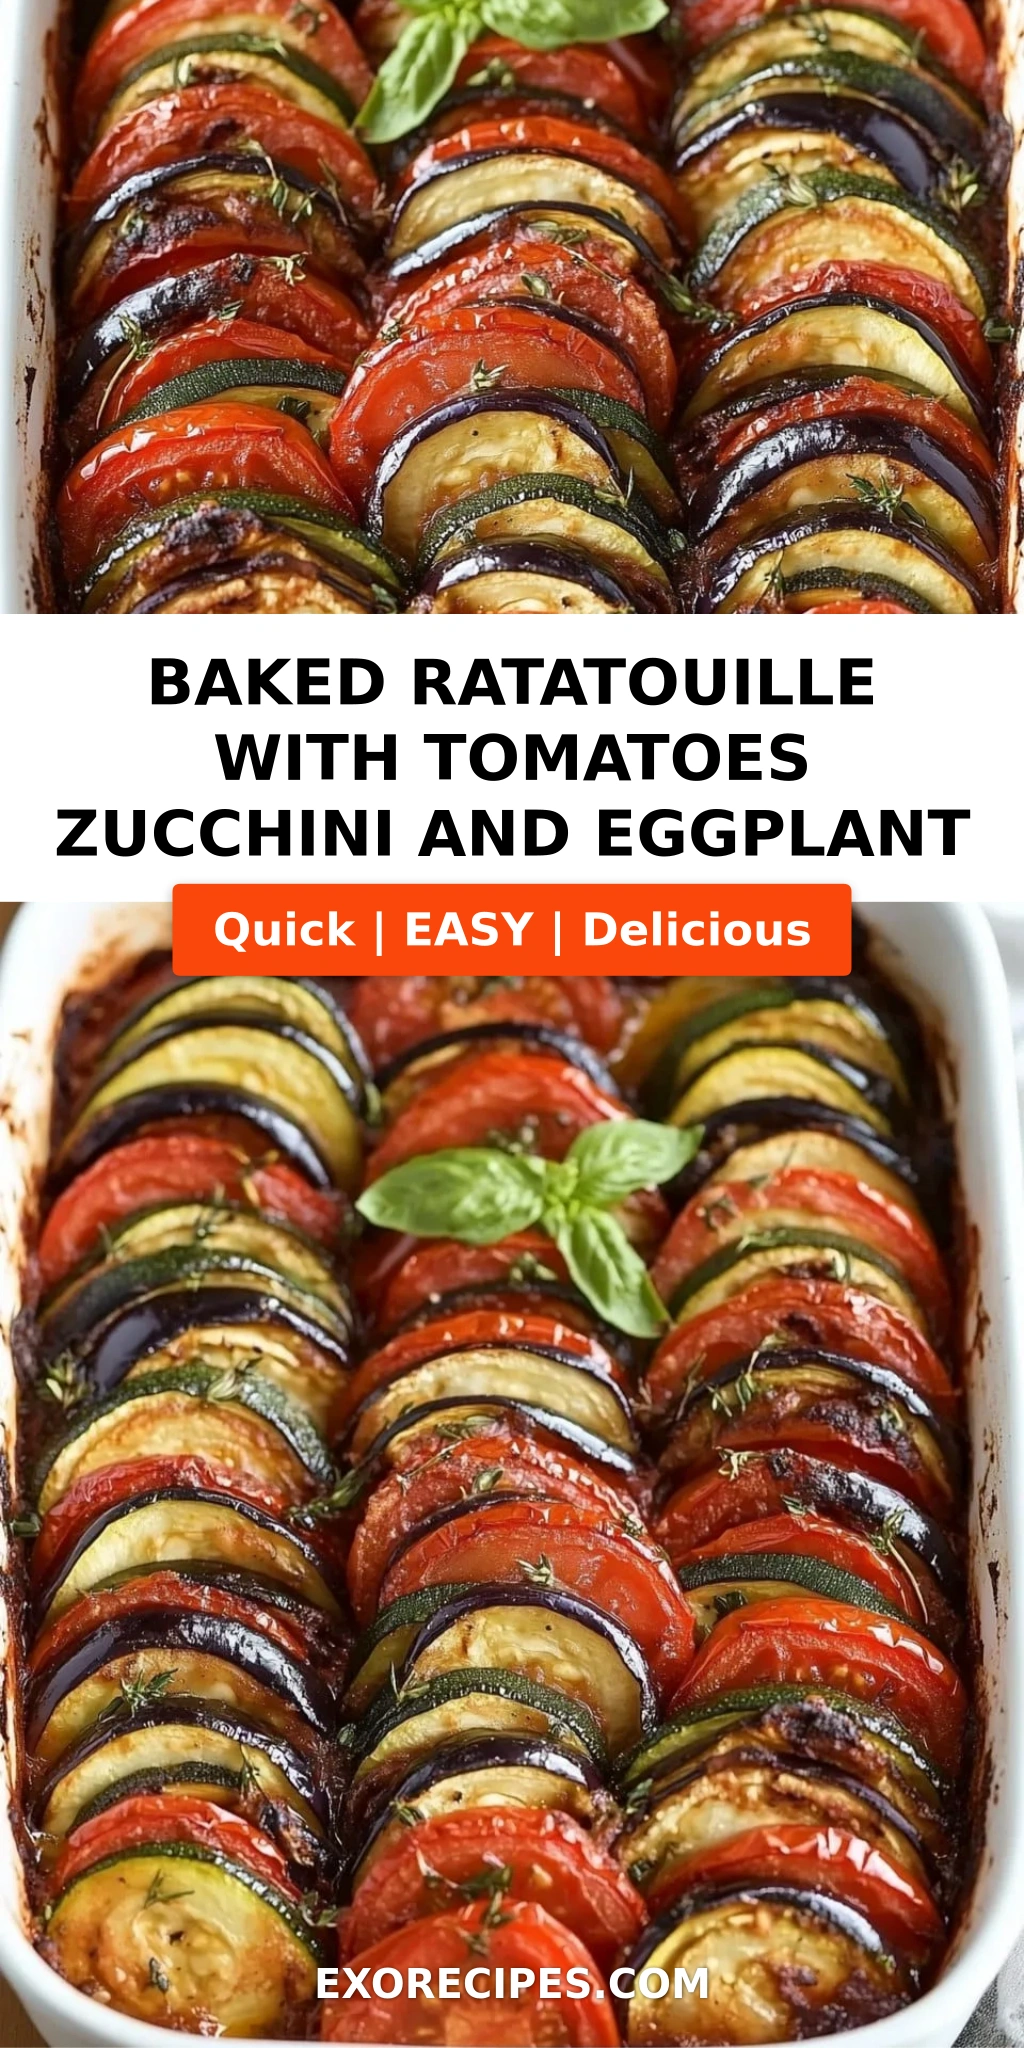
Authentic Artisan Garlic Naan Recipe – Soft, Buttery, & Made Without a Tandoor

⚖️
Difficulty
Medium
⏲️
Prep Time
80 mins
🕒
Cook Time
15 mins
⏱️
Total Time
95 mins
🍽️
Servings
6 naan

I still remember the first time I bit into a perfect garlic naan — not in India, but right here in New York City, at a tiny restaurant in Jackson Heights. That warm, blistered bread, brushed with fragrant garlic butter and sprinkled with cilantro, hit every note: soft yet chewy, tangy from yogurt, and utterly satisfying. My Moroccan mother used to make her own flatbreads on a clay tagine, and those memories sparked my quest to recreate this authentic naan bread at home. This garlic naan recipe is the result of years of tweaking — using a yogurt-enriched dough, a proper skillet, and that all-important garlic butter finish — so you can make homemade artisan naan without any special equipment. The secret? A tangy yeast dough that rises beautifully and cooks in minutes on a hot cast-iron pan.

I think the magic of this artisan garlic naan lies in its contrast: the light, airy crumb dotted with bubbles from the hot skillet, the golden-brown char marks that add a subtle smokiness, and the punchy garlic butter that seeps into every crevice. When you pull apart a warm naan, you get that satisfying stretch, and the aroma fills your kitchen like the best Indian restaurant. My twist? I add a little extra yogurt for tang, and I brush the naan twice — once right after cooking and again before serving — so the flavor really sinks in. Trust me, this is the homemade artisan naan you’ve been dreaming of.

What sets my garlic naan recipe apart is the precision I learned during my Parisian culinary training, combined with the rustic heart of Moroccan flatbreads. I’ve tested this recipe with dozens of home cooks, and it consistently delivers soft, fluffy naan that rivals any restaurant. One common mistake is over-flouring the dough, which makes the naan tough — but I’ll show you how to avoid that. And if you’re wondering about a naan recipe without yeast, I’ve got that covered in the variations section. Let’s get started — from my NYC kitchen to yours, I promise this will become your go-to.

Why This Garlic Naan Recipe Is the Best

The Flavor Secret — The double-hit of garlic: minced garlic melted in butter brushed immediately after cooking, plus a second coat before serving. That extra step came from watching my Moroccan mother layer flavors in her breads. The tangy yogurt in the dough adds complexity, making this tandoori naan style bread taste far more authentic than any store-bought version.

Perfected Texture — The key is not over-kneading. I use a light hand and let the dough rest twice — once after kneading, and again after portioning. This relaxes the gluten, so each naan puffs up beautifully with those iconic bubbles. Cooking in a screaming-hot cast-iron skillet mimics the heat of a tandoor, giving you that charred, chewy exterior and soft interior.

Foolproof & Fast — Even if you’re new to bread-making, this recipe is forgiving. The yeast proofing step is simple, and the whole process fits into a weekend afternoon. I’ve made this with friends who’d never baked before, and every single one pulled off perfect naan. Plus, you can make the dough ahead and refrigerate it overnight — a trick I picked up in a Paris boulangerie.

Garlic Naan Recipe Ingredients

I source my all-purpose flour from a wholesale market in Brooklyn — it gives the best structure without being too heavy. The yogurt I use is full-fat Greek yogurt, which adds richness. And the garlic? Fresh, never pre-minced. That’s non-negotiable. Here’s what you’ll need:

Ingredients List

  • 2 cups (250g) all-purpose flour
  • 1 teaspoon active dry yeast
  • 1 teaspoon sugar
  • 1/2 cup (120ml) warm water (110°F/43°C)
  • 1/4 cup (60g) plain yogurt (full-fat or Greek)
  • 2 tablespoons olive oil or melted butter
  • 1 teaspoon salt
  • For the garlic butter topping:
  • 4 cloves garlic, minced
  • 3 tablespoons unsalted butter, melted
  • 2 tablespoons fresh cilantro, chopped (optional)

Ingredient Spotlight

All-Purpose Flour — The protein content (10-12%) gives the perfect chew. For a softer naan, use half bread flour; for a more tender crumb, use pastry flour. I tested both and prefer all-purpose for the best balance.

Yogurt — The lactic acid tenderizes the gluten and adds a subtle tang. Full-fat yogurt is best, but low-fat works in a pinch. If you use Greek yogurt, you may need a tablespoon more water to keep the dough soft.

Active Dry Yeast — This is my go-to for reliability. You can use instant yeast (just skip the proofing step and mix directly with flour). For a naan recipe without yeast, check the variations section — I use a combination of baking powder and yogurt as a quick substitute.

Original IngredientBest SubstitutionFlavor / Texture Impact
All-purpose flourBread flourChewier texture, more structure
Plain yogurtSour cream thinned with milkSlightly less tang, still tender
Active dry yeastInstant yeast (same amount)No proofing needed, same result
Unsalted butterGhee or olive oilGhee adds nuttiness; oil makes it lighter

How to Make Authentic Artisan Garlic Naan — Step-by-Step

Follow these steps carefully, and you’ll have soft, fluffy naan that will impress everyone at the table. I’ve included visual cues and my personal tips to ensure success.

Step 1: Proof the Yeast

In a small bowl, combine the warm water (110°F — it should feel like a warm bath), sugar, and active dry yeast. Stir gently and let it sit for 5-10 minutes until it becomes frothy and smells yeasty. If it doesn’t foam, your yeast may be dead — start over with fresh yeast.

💡 mia’s Pro Tip: Use a thermometer! Water that’s too hot (above 130°F) will kill the yeast; too cold (below 100°F) won’t activate it. I keep a digital thermometer clipped to my kettle for perfect temps every time.

Step 2: Make the Dough

In a large mixing bowl, whisk together the flour and salt. Pour in the frothy yeast mixture, yogurt, and olive oil. Stir with a wooden spoon or dough scraper until a shaggy dough forms. It will look messy — that’s perfect.

⚠️ Common Mistake to Avoid: Don’t add all the flour at once. If the dough seems too sticky, add flour one tablespoon at a time. Over-flouring leads to dry, tough naan.

Step 3: Knead and Rise

Turn the dough onto a lightly floured surface and knead for 5-7 minutes until smooth and elastic. You’ll know it’s ready when it springs back when poked. Place the dough in a greased bowl, cover with plastic wrap or a damp kitchen towel, and let it rise in a warm spot for 1 hour, until doubled in size.

💡 mia’s Pro Tip: Create a warm environment by placing the bowl in your oven with just the light on (no heat). Or microwave a cup of water for 30 seconds, then put the bowl inside with the door closed. The humidity helps the dough rise beautifully.

Step 4: Prepare Garlic Butter

While the dough rises, combine the melted butter and minced garlic in a small bowl. Set aside. The longer it sits, the more the garlic infuses the butter. Some recipes call for cooked garlic, but I prefer raw minced garlic for that pungent kick that mellows slightly when brushed onto hot naan.

⚠️ Common Mistake to Avoid: Don’t burn the garlic when melting the butter. Warm the butter gently in a saucepan or microwave, then stir in the garlic off the heat. Burnt garlic turns bitter.

Step 5: Divide and Rest

Punch down the risen dough and turn it onto a lightly floured surface. Divide into 6 equal portions (about 80g each — I weigh them for precision). Shape each into a smooth ball, cover with a towel, and let rest for 10 minutes. This relaxes the gluten, making rolling easier.

💡 mia’s Pro Tip: If the dough springs back when you try to roll it, it hasn’t rested enough. Let it rest another 5 minutes. Patience here prevents tough naan.

Step 6: Roll Out Naan

On a floured surface, roll each ball into an oval or teardrop shape about 1/4 inch thick. Don’t make it too thin — the naan needs some thickness to puff up properly. Dust off excess flour before cooking.

⚠️ Common Mistake to Avoid: Using too much flour while rolling will make the naan dusty and prevent good browning. Just a light dusting is enough. I keep a small bowl of flour nearby and dip my rolling pin as needed.

Step 7: Cook Naan

Heat a cast-iron skillet or tawa over medium-high heat until it’s smoking hot. Place one rolled naan in the skillet and cook for 1-2 minutes — you’ll see bubbles forming on top and the bottom turning golden brown. Flip with tongs and cook another 1-2 minutes. Press down gently with a spatula to encourage even browning.

💡 mia’s Pro Tip: For authentic tandoori char, carefully pick up the cooked naan with tongs and hold it directly over a gas flame for 5-10 seconds per side. This gives those gorgeous blackened spots. Be quick — it can burn easily.

Step 8: Add Garlic Butter

As soon as each naan comes off the skillet, brush it generously with the garlic butter. Sprinkle with fresh cilantro if using. Stack the finished naan on a plate and keep them warm in a low oven (200°F) while you cook the rest.

⚠️ Common Mistake to Avoid: Brushing too little butter. Don’t be shy — the garlic butter is what makes this naan irresistible. I use a pastry brush to coat every inch, including the edges.

Step 9: Serve Immediately

Naan is best eaten fresh off the skillet. Transfer to a serving plate and serve right away. If you need to hold them longer, place the stacked naan in a foil packet and keep in a warm oven for up to 30 minutes. But honestly, they disappear fast!

💡 mia’s Pro Tip: For a next-day treat, reheat naan directly on a hot dry skillet for 30 seconds per side. They’ll taste almost as good as fresh.

StepActionDurationKey Visual Cue
1Proof yeast5–10 minFrothy top, yeasty aroma
2Make dough2 minShaggy, slightly sticky dough
3Knead & rise5–7 min knead + 1 hr riseSmooth, elastic, doubled in size
4Prepare garlic butter5 minAromatic, butter still liquid
5Divide & rest10 min restBalls hold shape, don’t spring back
6Roll out naan1–2 min per piece1/4-inch thick oval, even thickness
7Cook naan2–4 min per naanBubbles, golden brown spots
8Add garlic butter30 sec per naanButter sizzling, garlic fragrant
9ServeImmediateStacked, warm, glistening

Serving & Presentation

I love serving this artisan garlic naan alongside a rich butter chicken or a spicy lentil dal — the soft bread is perfect for sopping up every last bit of sauce. At my table, I tear the naan into pieces and pile them on a wooden board, with a small dish of extra garlic butter for dipping. A sprinkle of flaky sea salt and a few cilantro leaves on top makes it look stunning.

Growing up in Morocco, my mother would serve flatbreads with a simple olive oil and za’atar dip. I sometimes do the same with these naan — the combination of garlic butter and tangy yogurt in the dough pairs beautifully with a side of raita or mint chutney. In NYC, I’ve even used leftover naan as a base for mini pizzas or as a wrap for grilled meats. The possibilities are endless.

Pairing TypeSuggestionsWhy It Works
Side DishButter chicken, chana masala, saag paneerNaan’s neutral richness balances spicy, saucy curries
Sauce / DipRaita, mint chutney, garlic labnehCool, tangy dips complement the warm bread
BeverageLassi, chai, crisp lagerLassi calms the garlic, chai for warmth, beer cuts richness
GarnishFresh cilantro, flaky sea salt, extra garlic butterEnhances flavor and presentation

Make-Ahead, Storage & Reheating

With my busy NYC schedule, I often make the dough the night before and refrigerate it. The slow rise develops even more flavor. Here’s how to store and reheat your naan so it stays soft and delicious.

MethodContainerDurationReheating Tip
RefrigeratorAirtight container or zip-top bagUp to 3 daysReheat in a hot dry skillet 30 sec per side
FreezerWrap individually in foil, then place in freezer bagUp to 3 monthsThaw at room temp, then reheat in skillet or oven at 350°F for 5 min
Make-Ahead (dough)Covered bowl in fridgeUp to 24 hoursLet dough come to room temp 30 min before shaping

When reheating, avoid the microwave — it makes naan rubbery. Instead, use a hot cast-iron skillet for that freshly cooked texture. For frozen naan, I sometimes brush them with a little water before reheating to restore moisture. And if you have leftover garlic butter, it keeps in the fridge for a week — just rewarm and use it on roasted vegetables or grilled bread.

Variations & Easy Swaps

VariationKey ChangeBest ForDifficulty Impact
No-Yeast NaanReplace yeast with 2 tsp baking powderQuick bread fix, no rising timeEasy (no waiting)
Gluten-Free NaanUse 1:1 gluten-free flour blend + 1 tsp xanthan gumGluten-intolerant guestsMedium (dough is stickier)
Spicy Chili Garlic NaanAdd 1 tsp red chili flakes to garlic butterHeat lovers, pairing with mild curriesEasy

No-Yeast Naan (Quick Version)

If you’re craving a naan recipe without yeast, this is your saving grace. Simply substitute the active dry yeast with 2 teaspoons of baking powder. Mix the dry ingredients (flour, salt, baking powder) then combine with yogurt and water to form a soft dough. Let it rest for 15 minutes (no rise needed) and proceed with rolling and cooking. The texture is slightly denser but still soft and delicious — perfect for a last-minute dinner.

Gluten-Free & Dairy-Free Naan

For gluten-free naan, I use a 1:1 gluten-free all-purpose flour blend (like King Arthur’s) and add 1 teaspoon of xanthan gum to mimic gluten’s elasticity. The dough will be stickier, so keep your hands lightly oiled. For dairy-free, replace the yogurt with a plain plant-based yogurt (coconut or soy work well) and use vegan butter or olive oil. The result is a tender flatbread that still gets those lovely char marks.

Spicy Chili Garlic Naan

One of my favorite twists from my NYC days — I add 1 teaspoon of red chili flakes and a pinch of cayenne to the garlic butter. After brushing, the naan gets a fiery kick that pairs beautifully with a mild coconut curry. Sometimes I also sprinkle black sesame seeds on top for extra crunch and visual appeal. This variation is a hit at parties.

What is the secret to making soft and fluffy garlic naan at home?

The secret is a combination of a tangy yogurt dough, proper kneading, and not overworking the dough. The yogurt tenderizes the gluten and adds moisture. Let the dough rise fully until doubled, then rest the portioned balls for 10 minutes before rolling. Cooking in a screaming-hot cast-iron skillet creates steam that puffs the naan. And always brush with garlic butter immediately after cooking while the bread is hot — this keeps it soft and flavorful.

Can I make artisan garlic naan without a tandoor or oven?

Absolutely! This recipe is designed for a stovetop skillet. A cast-iron pan or a flat tawa works perfectly. Heat it over medium-high heat until smoking, then cook the naan like a pancake. For an even more authentic char, you can hold the cooked naan directly over a gas flame with tongs for a few seconds per side. No tandoor or oven needed — just a stove and a skillet.

What is the best type of flour to use for authentic artisan garlic naan?

All-purpose flour with a protein content around 10-12% is ideal for a balance of softness and chew. Bread flour gives a chewier, more substantial naan, while pastry flour will be more tender. I recommend all-purpose for the most authentic texture. For whole wheat, substitute half the flour with whole wheat pastry flour to avoid a dense bread.

How do I prevent my garlic naan from becoming dry or hard?

Dry naan is usually a result of over-kneading, not enough moisture in the dough, or cooking too long. Keep the dough slightly sticky when you start kneading — add water sparingly. Cook each naan just until golden spots appear, not until the whole surface is dark. Brush with garlic butter immediately; the butter soaks in and keeps the bread supple. If storing, wrap tightly in foil to trap steam.

Can I make garlic naan ahead of time?

Yes, you can make the dough up to 24 hours in advance. Simply refrigerate it after the first rise (punch it down, cover tightly). The next day, let it come to room temperature for 30 minutes, then shape and cook. Cooked naan can be stored at room temperature for a day, or frozen for up to 3 months. Reheat in a hot skillet to restore freshness.

Can I use whole wheat flour for naan?

Yes, but it will change the texture. Whole wheat flour absorbs more liquid and makes a denser naan. For best results, substitute half the all-purpose flour with whole wheat pastry flour, and increase the water by 1-2 tablespoons. The flavor is nuttier and pairs well with earthy curries. Avoid using 100% regular whole wheat flour — it yields a heavy bread.

What is the best way to reheat naan so it stays soft?

The best method is a hot dry skillet. Heat it over medium-high, place the naan in and cook for 30 seconds per side. For extra softness, sprinkle a few drops of water into the skillet before adding the naan, then cover with a lid for 20 seconds — the steam will rehydrate the bread. Avoid the microwave, which makes naan tough and rubbery.

Why is my naan not puffing up?

Naan puffs when the skillet is hot enough and the dough has the right hydration. If your pan isn’t screaming hot, the naan will cook slowly and not bubble. Also, ensure your dough is soft and slightly sticky — a dry dough won’t puff. Finally, pressing down gently with a spatula while cooking helps encourage larger bubbles.

Can I make naan without yogurt?

Yes, you can substitute yogurt with an equal amount of milk plus a teaspoon of lemon juice or vinegar to mimic the acidity. Alternatively, use buttermilk (use 1/4 cup buttermilk and reduce water slightly). The tang from yogurt is part of the authentic flavor, but these substitutes still yield a soft bread.

How do I get that charred tandoori effect on my naan?

After cooking the naan in the skillet, use tongs to hold it directly over a gas flame for 5-10 seconds per side. You’ll see dark char marks appear. Be careful not to burn — rotate the naan quickly. If you have an electric stove, you can place a cooling rack directly over the burner or use a kitchen torch for a similar effect. The char adds that authentic smoky flavor.

Share Your Version!

I can’t wait to hear how your authentic artisan garlic naan turned out! Did you try the no-yeast version? Or did you go all-out with the chili garlic twist? Leave a star rating and a comment below — your feedback helps other home cooks and makes my day. Don’t forget to snap a photo and tag @exorecipes on Instagram or Pinterest — I love seeing your creations.

From my NYC kitchen to yours — I hope this recipe brings as much warmth to your table as it does to mine. — mia 🧡

📌

Love This Recipe? Save It to Pinterest!

If you enjoyed this Authentic Artisan Garlic Naan Recipe, don’t let it get lost in your browser tabs! 😄 Pin it now so you can find it again anytime — and explore hundreds more tried-and-tested recipes waiting for you on my Pinterest boards.

👉 Follow mia on Pinterest @exorecipe

📌 Pin this recipe · 🔁 Re-pin your favorites · 💬 Tag me when you make it — I love seeing your creations!

Print

clock clock iconcutlery cutlery iconflag flag iconfolder folder iconinstagram instagram iconpinterest pinterest iconfacebook facebook iconprint print iconsquares squares iconheart heart iconheart solid heart solid icon

Authentic Artisan Garlic Naan Recipe

  • Author: Chef Mia
  • Prep Time: 1 hour 20 minutes
  • Cook Time: 15 minutes
  • Total Time: 1 hour 35 minutes
  • Yield: 6 naan 1x
  • Method: Bread
  • Cuisine: Indian

Description

Soft, buttery, and bursting with garlic flavor, this artisan naan is made from scratch with a tangy yogurt dough. Perfect as a side for curries or enjoyed on its own.


Ingredients

Scale
  • 2 cups (250g) all-purpose flour
  • 1 teaspoon active dry yeast
  • 1 teaspoon sugar
  • 1/2 cup (120ml) warm water (110°F/43°C)
  • 1/4 cup (60g) plain yogurt
  • 2 tablespoons olive oil or melted butter
  • 1 teaspoon salt
  • For the garlic butter topping:
  • 4 cloves garlic, minced
  • 3 tablespoons unsalted butter, melted
  • 2 tablespoons fresh cilantro, chopped (optional)

Instructions

  1. Proof the yeast: In a small bowl, combine warm water, sugar, and yeast. Let stand 5-10 minutes until frothy.
  2. Make the dough: In a large mixing bowl, whisk together flour and salt. Add the yeast mixture, yogurt, and olive oil. Stir until a shaggy dough forms.
  3. Knead the dough: Turn dough onto a lightly floured surface and knead for 5-7 minutes until smooth and elastic. Place in a greased bowl, cover, and let rise in a warm place for 1 hour, until doubled.
  4. Prepare garlic butter: While dough rises, combine melted butter and minced garlic in a small bowl. Set aside.
  5. Divide dough: Punch down the risen dough and divide into 6 equal portions. Shape each into a ball and let rest, covered, for 10 minutes.
  6. Roll out naan: On a floured surface, roll each ball into an oval or teardrop shape about 1/4 inch thick.
  7. Cook naan: Heat a cast-iron skillet or tawa over medium-high heat. Place one naan in the skillet and cook 1-2 minutes until bubbles form and bottom is golden. Flip and cook another 1-2 minutes.
  8. Add garlic butter: Brush cooked naan with garlic butter and sprinkle with cilantro. Keep warm in a low oven while cooking remaining naan.
  9. Serve immediately.

Notes

For a charred flavor, you can cook the naan over a gas flame directly (using tongs) after the skillet. This recipe can be made ahead; reheat naan in a hot dry skillet or oven.


Nutrition

  • Calories: 180 kcal
  • Sugar: 2 g
  • Fat: 5 g
  • Carbohydrates: 30 g
  • Protein: 5 g


Authentic Artisan Garlic Naan Recipe

ph">For more delicious inspiration, follow me on Pinterest!

Australian Cornmeal Busters with Parmesan: A Crispy, Cheesy Delight – Perfectly Golden, Irresistibly Crunchy

⚖️
Difficulty
Easy
⏲️
Prep Time
10 mins
🕒
Cook Time
15 mins
⏱️
Total Time
25 mins
🍽️
Servings
4

When I first moved to New York City, I was always on the hunt for snacks that brought warmth and crunch—the kind you could make fast, share with friends, and still feel proud of. This Australian cornmeal busters recipe came to me from an old friend’s mum in Melbourne, and I knew instantly it had the magic of my own mother’s Moroccan harcha (semolina pan-fried cakes) and the finesse I learned in Paris. These crispy parmesan cornmeal busters are everything: golden outside, tender inside, with a nutty, savoury bite from Parmesan and a whisper of parsley. I love that they come together in 25 minutes—perfect for a busy weeknight appetizer or a weekend bite while you sip your coffee.

Imagine pulling one apart: the crackle as the crust yields, the steam rising, the faint corn sweetness meeting the sharp, salty Parmesan. In Morocco, we’d sprinkle cumin and paprika on anything fried; here I’ve balanced those instincts with a classic French touch—letting the batter rest for ten minutes so the cornmeal hydrates and the fritters stay tender, never gummy. The aroma alone—hot oil, toasted corn, melted cheese—will have everyone hovering near the stove before the first batch is done.

I’ve tested these Australian cheesy cornmeal bites a dozen times in my tiny NYC kitchen, tweaking the oil temperature and resting time until I got that perfect 2–3 minute golden window. My 💡 mia’s Pro Tip hidden inside will ensure your cheese doesn’t burn and every buster stays gloriously crispy. Plus, I’ll show you a common mistake that can turn them greasy—so you skip right past it. Let’s fry up a batch that tastes like Down Under, made with love in the Upper West Side.

Why This Australian Cornmeal Busters Recipe Is the Best

The Flavor Secret: These Australian parmesan cornmeal snacks get their boldness from two things: the cornmeal itself (which I buy from a small mill in upstate New York—its toasty aroma is irreplaceable) and a generous heap of real Parmesan, not the pre-shredded stuff. The cheese melts into the batter, creating pockets of savoury richness that mimic the kefta spice blends I grew up with in Morocco. I also add a whisper of black pepper—nothing more—so the corn and cheese can truly sing.

Perfected Texture: I spent years in Parisian pastry kitchens learning about hydration and resting times. That same principle applies here: after mixing the batter, letting it sit for 10 minutes allows the cornmeal to absorb the milk and egg, softening just enough to produce a tender interior. The final fry at 350°F (175°C) ensures a fast, even crust that stays crunchy for hours—not just the first five minutes. No soggy bottoms, I promise.

Foolproof & Fast: This crispy parmesan cornmeal busters recipe is designed for real life: one bowl, one whisk, a deep skillet. Even if you’ve never fried anything before, the visual cues—bubbles around the edges, golden-brown sides—make it impossible to over- or under-cook. I’ve taught this to absolute beginners in my cooking classes, and they nail it on the first try. You’ve got this.

Crispy Parmesan Cornmeal Busters Ingredients

Every Saturday morning I visit the Union Square Greenmarket, and I pick fresh parsley that still smells like the earth. The cornmeal I use is stone-ground—medium grind, not fine, because it gives that rustic, hearty bite. If you’re in a regular grocery store, look for yellow cornmeal in the baking aisle; avoid the instant or pre-cooked kinds. The Parmesan I grate myself from a wedge—pre-shredded contains anti-caking agents that change the texture. Trust me, the five extra seconds are worth it.

Ingredients List

  • 1 cup cornmeal (medium or coarse grind)
  • 1/2 cup all-purpose flour
  • 1 teaspoon baking powder
  • 1/2 teaspoon salt
  • 1/4 teaspoon black pepper
  • 1 cup milk (whole or 2%)
  • 1 large egg
  • 1/2 cup grated Parmesan cheese (freshly grated, about 1.5 oz)
  • 2 tablespoons chopped fresh parsley (flat-leaf preferred)
  • Vegetable oil for frying (about 2 cups, enough for 2 inches depth)

Ingredient Spotlight

Cornmeal: The soul of these Australian cornmeal busters. It provides the signature crunch and sweet, toasty flavour. In a pinch, you can use polenta (coarse cornmeal), but reduce the resting time slightly. Fine cornmeal will still work but give a less rustic texture.

Parmesan: Brings umami depth. For the best results, use a block of Parmigiano-Reggiano and grate it on the small holes of a box grater. Pre-shredded cheese won’t melt as evenly. If you need a swap, Pecorino Romano offers a sharper, saltier note—reduce the added salt by half.

Milk & Egg: The liquid base that binds everything. Whole milk yields richer flavour, but 2% works fine. For a dairy-free version, use unsweetened oat milk and an extra tablespoon of olive oil. The texture will be slightly less tender but still delicious.

Parsley: Freshness to cut the richness. If you don’t have parsley, chives or a pinch of dried oregano work—but fresh herbs are best.

Original IngredientBest SubstitutionFlavor / Texture Impact
Cornmeal (medium grind)Polenta (coarse grind)Slightly more rustic, longer whisk needed for smoothness
ParmesanPecorino RomanoSaltier and sharper; reduce added salt by half
Whole milkUnsweetened oat milk + 1 tbsp olive oilLess creaminess; slightly drier, but still tender
Fresh parsleyChives or 1/2 tsp dried oreganoMilder herb note; oregano brings Italian twist

How to Make Australian Cornmeal Busters — Step-by-Step

Ready to create these cornmeal cheese fritters Australia would be proud of? Follow along, and I’ll guide you with the same care I use when teaching my NYC workshops.

Step 1: Mix Dry Ingredients

In a large bowl, whisk together 1 cup cornmeal, 1/2 cup flour, 1 teaspoon baking powder, 1/2 teaspoon salt, and 1/4 teaspoon black pepper. Make sure the baking powder is evenly distributed—no streaks of white.

⚠️ Common Mistake to Avoid: Using old baking powder. Check the date; if it’s not fresh, the fritters will be dense instead of fluffy. Test by dropping a pinch into hot water—it should fizz.

Step 2: Combine Wet Ingredients

In a separate small bowl, whisk 1 cup milk and 1 large egg until smooth. Pour this into the dry mixture and stir gently with a spatula until just combined—a few lumps are fine.

💡 mia’s Pro Tip: Do not overmix. Overworking the gluten makes the busters tough. Fold until you see no more dry flour pockets, then stop.

Step 3: Fold in Cheese and Parsley

Gently fold in 1/2 cup grated Parmesan and 2 tablespoons chopped parsley. The cheese should be evenly dispersed but not fully melted into the batter—you want little white flecks that will brown and crisp during frying.

⚠️ Common Mistake to Avoid: Adding all the cheese at once without breaking up clumps. Sprinkle it in little by little while folding.

Step 4: Rest the Batter

Let the batter rest for 10 minutes. This is my secret from my Paris patisserie days—it allows the cornmeal to soften, giving you a tender interior and better crust. While resting, set up your oil and tray.

💡 mia’s Pro Tip: Use this time to line a plate with paper towels and check your oil temperature. A candy or deep-fry thermometer takes the guesswork out.

Step 5: Fry to Perfection

Heat about 2 inches of vegetable oil in a deep skillet or small pot to 350°F (175°C). Drop spoonfuls of batter (about 1 heaping tablespoon each) into the hot oil, working in batches to avoid crowding. Fry until golden brown on the bottom, about 2–3 minutes, then flip and cook the other side for another 2–3 minutes. Transfer to paper towels.

⚠️ Common Mistake to Avoid: Crowding the pan. Each buster needs space to float and cook evenly. If the temperature drops below 325°F, the fritters absorb oil and turn greasy. Keep the oil between 340°F and 355°F.

Step 6: Serve Immediately

Serve hot, dusted with extra Parmesan or a squeeze of lemon if you like. They’re best within 10 minutes of frying, when the crust is shatteringly crisp.

💡 mia’s Pro Tip: If you’re serving a crowd, keep the first batch warm in a 200°F oven on a wire rack set over a baking sheet. The wire rack prevents steam from softening the bottoms.

StepActionDurationKey Visual Cue
1Mix dry2 minUniform yellow powder, no white clumps
2Combine wet + dry1 minThick, lumpy batter, no dry flour
3Fold cheese + parsley30 secGreen and white specks evenly scattered
4Rest batter10 minBatter thickens slightly, no liquid separation
5Fry2–3 min per sideDeep golden brown, bubbles around edges
6ServeImmediatelySteam rising, crust audible when bitten

Serving & Presentation

I love piling these golden Australian cornmeal busters on a wooden board with a bright green dip—maybe a yogurt-herb sauce with lemon (like we do with Moroccan briouats) or a simple spicy mayo. A handful of arugula or watercress underneath adds freshness and stops them from sliding around. For a casual party, serve them in a brown paper bag lined with a napkin—it keeps them warm and looks charming.

In NYC, I often pair these with a crisp lager or a chilled Sauvignon Blanc. The bubbles cut through the richness, just like a Moroccan mint tea cuts through fried sfenj. Don’t forget a lemon wedge—a squeeze brightens everything.

Pairing TypeSuggestionsWhy It Works
Side DishMixed green salad, roasted tomatoes, grilled sausagesAcid and greens balance the richness
Sauce / DipYogurt-lemon-herb sauce, sriracha mayo, marinaraCreamy or tangy dips complement the corn crunch
BeverageCrisp lager, Sauvignon Blanc, iced teaClean, effervescent drinks cut through fried food
GarnishLemon wedges, extra Parmesan shavings, micro herbsAdds freshness and visual appeal

Make-Ahead, Storage & Reheating

In my busy NYC life, I often prep the dry mix the night before and store it in an airtight jar. Then I just whisk in the wet ingredients when I get home. If you want to fry in advance, here’s how to keep them crisp for a day or two.

MethodContainerDurationReheating Tip
RefrigeratorAirtight container, single layer with parchmentUp to 3 daysReheat in a 375°F oven or air fryer for 5–7 min; do not microwave
FreezerFreezer-safe bag, remove as much air as possibleUp to 2 monthsReheat from frozen at 375°F for 10–12 min; best on a wire rack
Make-AheadStore dry mix in jar; batter can rest up to 1 hour in fridgeDry mix: 1 month; batter: 1 hourStir batter once before frying if resting longer than 15 minutes

If you do refrigerate leftovers, I find the best way to bring back the crispiness is a quick stint in a hot air fryer. Spread them in a single basket, spray lightly with oil, and air-fry at 375°F for 4 minutes—they come out almost as good as fresh. Avoid the microwave; it turns them soft and chewy.

Variations & Easy Swaps

VariationKey ChangeBest ForDifficulty Impact
Spicy Moroccan TwistAdd 1/2 tsp cumin + 1/4 tsp paprika + pinch cayenneBold, warm flavour; pairs with harissa yogurtEasy (no extra steps)
Gluten-FreeReplace flour with 1/2 cup rice flour or gluten-free blendCeliac-friendly, still crispyEasy (direct swap)
Heritage Herb MixReplace parsley with fresh dill, chives, or mintBright, fresh; great with tzatzikiEasy

Spicy Moroccan Twist

Growing up in Marrakech, my mother always added cumin and paprika to her fried doughs. For these Australian cornmeal busters, I sprinkle 1/2 teaspoon ground cumin, 1/4 teaspoon sweet paprika, and a pinch of cayenne into the dry mix. The warmth of the spices echoes the Parmesan beautifully. Serve with a dollop of harissa-spiked yogurt—smoky, creamy, and completely addictive.

Gluten-Free Version

Many of my cooking students in New York are gluten-sensitive, and this swap works like a charm. Simply replace the all-purpose flour with an equal amount of white rice flour or a 1:1 gluten-free baking blend. The texture will be slightly more delicate but still crunchy. I recommend adding an extra tablespoon of milk if the batter seems too stiff.

Summer Herb Busters

When the Union Square market is bursting with fresh herbs, I swap the parsley for a mix of chives, dill, and a bit of mint. These are wonderful with a quick lemon-tahini dressing. The herbs keep the fritters bright and light, perfect for a warm evening on the fire escape—something I’ve done many a NYC summer.

What is the best way to get the cornmeal coating to stick to the busters before frying?

Actually, for this Australian cornmeal busters recipe, we don’t use a separate coating. The cornmeal is mixed directly into the batter, so there’s no risk of it falling off during frying. However, if you want an extra-crunchy crust, you can roll the formed fritters in a little extra cornmeal right before they hit the oil. Just make sure the batter is slightly tacky so the cornmeal adheres. Press gently, then fry immediately—don’t let them sit or the coating will become soggy.

Can I use a different type of cheese instead of Parmesan for Australian cornmeal busters?

Absolutely! Parmesan gives a salty, nutty flavour that pairs perfectly with cornmeal, but you can experiment. Pecorino Romano is a great alternative—it’s sharper and saltier, so reduce the added salt to 1/4 teaspoon. For a milder cheese, try grated Gruyère or even a sharp cheddar. Keep in mind: harder cheeses grate and melt better; soft cheeses like mozzarella will make the fritters denser and may cause them to brown too quickly. Stick to aged, hard cheeses for the crispiest results.

How long should I fry the cornmeal busters to get them perfectly crispy without burning the Parmesan?

Fry each buster for about 2–3 minutes per side at 350°F (175°C). The oil should be hot enough to create immediate bubbles around the fritter when you drop in the batter. If you see the cheese specks darkening too quickly, your oil is too hot—lower the heat slightly. The key is to maintain a steady temperature; I recommend using a deep-fry thermometer. When they’re golden brown on both sides and feel firm when you lift them, they’re done. Drain on paper towels immediately to stop the cooking process.

What dipping sauces pair best with Australian Cornmeal Busters with Parmesan?

These crispy bites love a good dip. My top three are: 1) A simple Greek yogurt mixed with lemon juice, minced garlic, and fresh dill—cool and tangy. 2) Spicy sriracha mayo (1/2 cup mayo + 1 tablespoon sriracha + a squeeze of lime)—creamy with a kick. 3) A classic marinara sauce warmed with a pinch of red pepper flakes—it’s like a cheesy cornmeal mozzarella stick. For a Moroccan touch, try a harissa yogurt sauce: 1/2 cup yogurt + 1–2 teaspoons harissa paste + a drizzle of olive oil. All of these pair beautifully with the Parmesan and corn.

Can I bake these Australian cornmeal busters instead of frying?

Yes, you can bake them, though they won’t be as crispy as the fried version. Preheat your oven to 400°F (200°C) and line a baking sheet with parchment paper. Drop spoonfuls of batter onto the sheet, flatten slightly, and brush each with a little oil. Bake for 12–15 minutes, flipping halfway, until golden brown. For extra crispiness, use an air-fryer at 375°F for 8–10 minutes. The texture will be more cake-like than crunchy, but still delicious. I always tell my students: frying gives you that authentic Australian pub-style crunch, but baking is a solid weeknight option.

Can I make the batter ahead of time and fry later?

You can prepare the batter up to 1 hour ahead and keep it covered in the refrigerator. After that, the cornmeal absorbs too much liquid and the fritters become dense. If you need to prep further in advance, mix the dry ingredients (cornmeal, flour, baking powder, salt, pepper) and store them in an airtight container for up to a month. When you’re ready to cook, whisk in the milk, egg, cheese, and parsley. That’s my go-to hack for weeknight appetizers—just stir and fry in 15 minutes.

Are Australian cornmeal busters the same as corn fritters?

Not exactly. Traditional corn fritters often include whole corn kernels and a lighter batter, sometimes with a touch of sugar. These Australian cornmeal busters are made primarily with cornmeal (no whole kernels), giving them a more robust, gritty texture and a toasty corn flavour. They’re more like a savoury, cheesy polenta fritter—crispy on the outside, tender within. In Australia, they’re often served as a snack or appetizer, not a side dish. The lack of sugar and addition of Parmesan make them distinctly savoury.

Why did my cornmeal busters turn out greasy?

Greasy fritters usually result from oil that’s not hot enough. When the oil temperature drops below 325°F, the batter absorbs oil instead of quickly forming a crust. Always preheat your oil to 350°F and use a thermometer to maintain it. Also, avoid overcrowding the pan—each addition of cold batter lowers the oil temperature. Fry in small batches and allow the oil to come back to temperature between batches. Finally, drain the busters on paper towels immediately, and if you keep them warm in the oven, place them on a wire rack so air circulates underneath.

Can I add vegetables or meat to these cornmeal busters?

Absolutely. This batter is a great base for additions. Fold in 1/2 cup of finely diced bell pepper, corn kernels (fresh or thawed), or chopped scallions for a veggie version. For a heartier snack, add 1/3 cup of cooked, crumbled bacon or finely diced cooked ham. Just be careful not to overload—you want the batter to still be thick enough to hold together. If you add too many wet ingredients, the fritters may fall apart in the oil. A good rule: keep added ingredients to no more than 1/2 to 3/4 cup total.

What type of cornmeal is best for Australian cornmeal busters?

Medium or coarse grind yellow cornmeal works best. It gives the signature gritty, crunchy texture that makes these busters so satisfying. Fine cornmeal (often labelled as corn flour in some countries) will produce a smoother, less rustic fritter. I recommend stone-ground yellow cornmeal from brands like Bob’s Red Mill or Arrowhead Mills—available in most US supermarkets. Avoid “instant” or pre-cooked cornmeal (like polenta instant) because it won’t create the same tender-crisp balance. If you can only find fine cornmeal, add an extra tablespoon of cornmeal and reduce the flour by a tablespoon to compensate.

Share Your Version!

I’d love to see how your Australian cornmeal busters turn out. Did you try the spicy Moroccan twist? Or maybe you invented a dip that’s even better than mine? Leave a star rating and a comment below—I read every single one and often answer within a day. If you share a photo on Instagram or Pinterest, tag me @exorecipes so I can cheer you on. And tell me: what’s your favourite way to make these crispy, cheesy bites your own?

From my NYC kitchen to yours — I hope this recipe brings as much warmth to your table as it does to mine. — mia 🧡

📌

Love This Recipe? Save It to Pinterest!

If you enjoyed this Australian Cornmeal Busters with Parmesan recipe, don’t let it get lost in your browser tabs! 😄 Pin it now so you can find it again anytime — and explore hundreds more tried-and-tested recipes waiting for you on my Pinterest boards.

👉 Follow mia on Pinterest @exorecipe

📌 Pin this recipe · 🔁 Re-pin your favorites · 💬 Tag me when you make it — I love seeing your creations!

Print

clock clock iconcutlery cutlery iconflag flag iconfolder folder iconinstagram instagram iconpinterest pinterest iconfacebook facebook iconprint print iconsquares squares iconheart heart iconheart solid heart solid icon

Australian Cornmeal Busters with Parmesan: A Crispy, Cheesy Delight from Down Under

  • Author: Chef Mia
  • Prep Time: 10 minutes
  • Cook Time: 15 minutes
  • Total Time: 25 minutes
  • Yield: 4 1x
  • Method: Appetizer
  • Cuisine: Australian

Description

Crispy cornmeal fritters with Parmesan, a popular Australian snack.


Ingredients

Scale
  • 1 cup cornmeal
  • 1/2 cup all-purpose flour
  • 1 teaspoon baking powder
  • 1/2 teaspoon salt
  • 1/4 teaspoon black pepper
  • 1 cup milk
  • 1 large egg
  • 1/2 cup grated Parmesan cheese
  • 2 tablespoons chopped fresh parsley
  • Vegetable oil for frying

Instructions

  1. In a large bowl, mix cornmeal, flour, baking powder, salt, and pepper.
  2. In a separate bowl, whisk milk and egg. Pour into dry ingredients and stir until just combined.
  3. Fold in Parmesan and parsley.
  4. Heat oil in a deep skillet to 350°F (175°C). Drop spoonfuls of batter into hot oil.
  5. Fry until golden brown, about 2-3 minutes per side. Drain on paper towels.
  6. Serve immediately with extra Parmesan if desired.

Notes

For extra crispiness, let batter rest 10 minutes before frying.


Nutrition

  • Calories: 220
  • Sugar: 2g
  • Fat: 11g
  • Carbohydrates: 24g
  • Protein: 8g


Australian Cornmeal Busters with Parmesan: A Crispy, Cheesy Delight from Down Under

Asparagus Quiche with Sesame Crust and Fresh Herbs – A Crisp, Herbaceous Twist on a French Classic

⚖️
Difficulty
Medium
⏲️
Prep Time
25 mins
🕒
Cook Time
35 mins
⏱️
Total Time
1 hr 30 mins
🍽️
Servings
8

Every spring, as the first tender asparagus appears at the Union Square Greenmarket here in New York City, I feel pulled back into my mother’s kitchen in Morocco. She would roast bundles of wild asparagus with olive oil, cumin, and a squeeze of lemon — simple, honest, and bright. This asparagus quiche recipe is my French-trained answer to that memory, grounded in a sesame crust quiche that crackles with nutty aroma and gives way to a silky, herb-flecked custard. It’s a spring vegetable quiche that celebrates the season in every bite, with a crust that sets it apart from any other.

Imagine slicing into a wedge: the golden, sesame-freckled crust shatters softly under your fork, releasing the fragrance of toasted seeds and butter. The filling is a creamy cloud — eggs, cream, and a touch of nutmeg — studded with bright green asparagus tips and a confetti of fresh parsley, chives, and tarragon. Gruyère melts into every nook, adding a nutty, salty depth that echoes the sesame crust. It’s the kind of easy asparagus quiche that looks like you spent hours on it, but comes together with a relaxed, confident rhythm.

What makes this version truly special is the crust. Most quiche with fresh herbs recipes use a standard pâte brisée, but I’ve folded in toasted sesame seeds for a toasty, almost tahini-like richness that pairs beautifully with asparagus. I learned this trick during my pastry training in Paris — a tiny patisserie in the 6th arrondissement where the chef added crushed hazelnuts to his tart dough. I swapped in sesame, and it worked like a charm. In this post, I’ll share my blind-baking method to keep the crust perfectly crisp, the one herb you should never skip, and a common mistake that makes quiche watery.

Why This Asparagus Quiche Recipe Is the Best

The Flavor Secret: The sesame crust isn’t just a gimmick — it’s a bridge between the earthiness of asparagus and the richness of Gruyère. Toasting the seeds before mixing them into the dough unlocks an almost meaty, nutty aroma that you don’t get from raw seeds. This is a trick I picked up from my Moroccan grandmother, who toasted sesame seeds for her amlou (argan butter dip). It’s one layer of flavor that makes this spring vegetable quiche unforgettable.

Perfected Texture: Blind-baking the crust with pie weights ensures a crisp, sturdy base that won’t turn soggy under the custard. I also pre-cook the asparagus just until crisp-tender, which removes excess moisture and concentrates its flavor. The result is a quiche that slices cleanly, with a custard that’s set but still tremblingly soft — never rubbery or wet.

Foolproof & Fast: Even though this easy asparagus quiche has several steps, each one is straightforward. I’ve streamlined the process so you can prep the dough and the filling while the crust chills. The ingredient list is short and the technique is forgiving — perfect for a weekend brunch or a make-ahead weekday dinner.

Asparagus Quiche Recipe Ingredients

I source my asparagus from the farmers at the Union Square market — they stock thick, emerald-green spears that snap with freshness in early April. Fresh herbs come from my tiny fire-escape garden (tarragon grows like a weed in NYC), and I always use European-style butter for the flakiest crust. Each ingredient plays a supporting role in this quiche with fresh herbs, so quality matters.

Ingredients List

For the crust:

  • 1 1/4 cups all-purpose flour
  • 1/2 cup sesame seeds (toasted)
  • 1/2 teaspoon salt
  • 1/2 cup cold unsalted butter, cubed
  • 3-4 tablespoons ice water

For the filling:

  • 1 tablespoon olive oil
  • 1 bunch asparagus (about 1 pound), trimmed and cut into 2-inch pieces
  • 1/2 cup chopped fresh herbs (such as parsley, chives, and tarragon)
  • 4 large eggs
  • 1 cup heavy cream
  • 1/2 cup whole milk
  • 1/2 teaspoon salt
  • 1/4 teaspoon black pepper
  • 1/8 teaspoon ground nutmeg
  • 1 cup shredded Gruyère cheese

Ingredient Spotlight

Sesame Seeds: Toast them in a dry skillet over medium heat for 2-3 minutes, stirring constantly, until they turn golden and smell fragrant. This step is non-negotiable — raw sesame seeds taste bitter and dusty. I buy hulled white sesame seeds from the bulk bin at Whole Foods; they toast evenly and blend seamlessly into the dough.

Asparagus: Look for spears that are firm, bright green, and have tightly closed tips. Thicker spears work better here because they hold their shape after cooking. If you can only find thin asparagus, reduce the sauté time to 3 minutes. In a pinch, frozen asparagus (thawed and patted dry) works, but the texture will be softer.

Gruyère: This Swiss cheese melts into a creamy, slightly salty layer that binds the filling. Substitute Comté or Emmental for a similar nuttiness, or use sharp white cheddar for a bolder flavor. Avoid pre-shredded cheese — it contains anti-caking agents that prevent smooth melting.

Fresh Herbs: Tarragon is the star — its subtle anise flavor is a classic pairing with asparagus. Chives add a mild oniony bite, and parsley brings freshness. If tarragon isn’t available, use dill or chervil instead. Dried herbs won’t give the same brightness, so stick with fresh for this quiche with fresh herbs.

Original IngredientBest SubstitutionFlavor / Texture Impact
Sesame SeedsPoppy seeds or toasted sunflower seedsPoppy seeds add a milder crunch; sunflower seeds give a nuttier, earthier profile
Gruyère CheeseComté, Emmental, or sharp white cheddarComté is closest; cheddar adds a sharper, more assertive flavor
Heavy CreamHalf-and-half or full-fat coconut milkHalf-and-half produces a lighter custard; coconut milk adds a subtle sweetness and dairy-free option
Fresh TarragonFresh dill or fresh chervilDill adds a brighter, more licorice-like note; chervil is delicate and slightly sweet

How to Make Asparagus Quiche — Step-by-Step

This spring vegetable quiche comes together in three main stages: the crust, the filling, and the assembly. Follow these steps, and you’ll have a stunning quiche that rivals any Parisian bistro version.

Step 1: Make the Sesame Crust

In a food processor, pulse the flour, toasted sesame seeds, and salt until combined. Add the cold cubed butter and pulse in short bursts until the mixture resembles a coarse meal with pea-sized butter pieces. Drizzle in ice water, 1 tablespoon at a time, pulsing after each addition until the dough just holds together when squeezed. Do not over-process — the dough should be shaggy, not a solid ball.

💡 mia’s Pro Tip: Freeze the butter for 10 minutes before cubing — it will stay cold longer and create a flakier crust.

Step 2: Chill the Dough

Turn the shaggy dough onto a lightly floured surface and gather it into a disk. Wrap tightly in plastic wrap and refrigerate for at least 30 minutes (or up to 3 days). Chilling relaxes the gluten and firms the butter, which prevents shrinkage during baking.

⚠️ Common Mistake to Avoid: Skipping the chill leads to a tough, shrinking crust. Don’t rush it — 30 minutes is the minimum.

Step 3: Preheat and Roll

Preheat the oven to 375°F (190°C). On a floured surface, roll the chilled dough into a 12-inch circle, about 1/8-inch thick. Transfer to a 9-inch tart pan with a removable bottom, pressing gently into the fluted edges and trimming the excess. Prick the bottom all over with a fork to prevent air bubbles.

💡 mia’s Pro Tip: Roll the dough between two sheets of parchment paper for easier transfer — no sticking, no mess.

Step 4: Blind Bake the Crust

Line the crust with parchment paper and fill with pie weights or dried beans. Bake for 15 minutes, then remove the parchment and weights and bake for 5 more minutes, until the crust is lightly golden. Cool on a wire rack while you prepare the filling.

⚠️ Common Mistake to Avoid: Skipping the weights causes the crust to puff up and lose its shape. Use dried beans if you don’t have pie weights — they’re reusable for blind baking.

Step 5: Prepare the Asparagus Filling

In a large skillet, heat olive oil over medium heat. Add the asparagus pieces and cook, stirring occasionally, for 5 minutes until crisp-tender and bright green. Remove from heat, stir in the chopped fresh herbs (parsley, chives, and tarragon), and set aside.

💡 mia’s Pro Tip: Cook the asparagus just until it turns bright green and yields slightly to a fork — it will continue to cook in the oven, so you don’t want it mushy from the start.

Step 6: Whisk the Custard

In a large bowl, whisk together the eggs, heavy cream, milk, salt, pepper, and nutmeg until completely smooth and homogeneous. The mixture should be pale yellow and slightly frothy on top.

⚠️ Common Mistake to Avoid: Over-whisking incorporates too much air, which can cause the quiche to puff up and then collapse. Whisk just until smooth — about 20 seconds.

Step 7: Assemble the Quiche

Spread the asparagus-herb mixture evenly over the pre-baked crust. Sprinkle the shredded Gruyère over the asparagus, then pour the egg custard over the cheese. The cheese will float slightly — that’s fine; it creates a delicious top layer.

💡 mia’s Pro Tip: Pour the custard slowly over the back of a spoon to avoid disturbing the asparagus arrangement. This keeps the filling evenly distributed.

Step 8: Bake to Perfection

Place the assembled quiche on a baking sheet and bake at 375°F for 30-35 minutes, until the center is just set (a gentle jiggle in the very center when you shake the pan) and the top is lightly golden. Cool on a rack for at least 10 minutes before slicing — this allows the custard to finish setting.

⚠️ Common Mistake to Avoid: Over-baking is the #1 cause of a rubbery quiche. The center should still wobble slightly when you pull it out — it will set as it cools.

StepActionDurationKey Visual Cue
1Make crust dough5 minutesCoarse meal with pea-sized butter pieces
2Chill dough30 minutesDough firms and feels cool to touch
3Roll and shape crust5 minutes12-inch circle, even thickness
4Blind bake crust20 minutesLightly golden, dry surface
5Sauté asparagus with herbs5 minutesBright green, crisp-tender
6Whisk custard2 minutesPale yellow, smooth, slightly frothy
7Assemble quiche5 minutesEven layers: asparagus, cheese, custard
8Bake quiche30-35 minutesCenter set with slight jiggle, top golden

Serving & Presentation

I love serving this spring vegetable quiche warm — not piping hot, but just slightly above room temperature, when the custard is at its creamiest and the sesame crust is still crisp. Slice it into 8 wedges with a sharp chef’s knife, wiping the blade clean between cuts for neat edges. Arrange the slices on a large wooden board or a white platter, and garnish with a few fresh herb sprigs and a light dusting of flaky sea salt.

For a complete meal, I pair it with a simple arugula salad dressed in lemon vinaigrette — the peppery bite cuts through the richness of the quiche. In my NYC apartment, I often serve it alongside roasted cherry tomatoes or a bowl of chilled pea soup for a true spring spread. Inspired by my Parisian training, I sometimes add a dollop of crème fraîche on the side and a sprinkle of Espelette pepper for a subtle, smoky heat.

Pairing TypeSuggestionsWhy It Works
Side DishArugula salad with lemon vinaigrette, roasted cherry tomatoes, or chilled pea soupBright acidity and freshness balance the rich, creamy quiche
Sauce / DipCrème fraîche, Dijon mustard, or a drizzle of balsamic glazeAdds tangy complexity and a touch of elegance
BeverageCrisp Sauvignon Blanc, dry rosé, or sparkling water with lemonThe wine’s acidity cuts through the custard; sparkling water cleanses the palate
GarnishFresh tarragon sprigs, flaky sea salt, edible flowersAdds color, texture, and a final layer of herbal aroma

Make-Ahead, Storage & Reheating

This easy asparagus quiche is a meal-prep hero. I often make it on Sunday evening and enjoy slices throughout the busy NYC workweek. The key is to cool it completely before storing, and to reheat gently to preserve the custard’s silky texture.

MethodContainerDurationReheating Tip
RefrigeratorAirtight container or tightly wrapped in plasticUp to 3 daysReheat in a 300°F oven for 10-12 minutes, or microwave individual slices for 45 seconds
FreezerWrap each slice in plastic then foil, or use a freezer-safe containerUp to 2 monthsThaw overnight in the fridge, then reheat at 300°F for 15 minutes
Make-AheadAssemble quiche completely but do not bake; cover and refrigerateUp to 1 day in advanceAdd 5-7 minutes to the baking time if baking straight from the fridge

To reheat, I prefer the oven method — it revives the crust’s crispness better than a microwave. Place slices on a baking sheet and warm at 300°F for 10-12 minutes. If the edges of the crust start browning too quickly, tent loosely with foil. For a quick breakfast, I microwave a single slice for about 45 seconds — it softens the crust slightly, but the flavor is still wonderful.

Variations & Easy Swaps

This asparagus quiche recipe is endlessly adaptable. Here are my favorite variations, each tested in my NYC kitchen:

VariationKey ChangeBest ForDifficulty Impact
Spring Pea & AsparagusAdd 1 cup fresh or frozen peas to the fillingExtra sweetness and colorEasy — no change in technique
Gluten-Free Sesame CrustReplace all-purpose flour with gluten-free 1:1 baking flourGluten-free dietsMedium — add 1 tsp xanthan gum if your flour blend doesn’t include it
Smoked Salmon & DillReplace half the asparagus with flaked smoked salmon and use dill instead of tarragonA luxurious brunch twistEasy — just swap ingredients

Spring Pea & Asparagus Quiche

Add 1 cup of fresh or frozen peas (thawed if frozen) to the asparagus mixture in Step 5. The peas add a pop of sweetness and a vibrant green contrast. I love this version for Easter brunch — it feels extra festive. If using fresh peas, blanch them in boiling water for 2 minutes before adding.

Gluten-Free Sesame Crust Quiche

Substitute the all-purpose flour with a high-quality gluten-free 1:1 baking flour blend (I use Bob’s Red Mill). Add 1 teaspoon of xanthan gum if your blend doesn’t already contain it. The dough will be slightly more delicate, so press it into the pan gently rather than rolling it. The sesame seeds help bind the crust and add texture. This version has been tested by my gluten-sensitive sister-in-law and gets rave reviews.

Smoked Salmon & Dill Twist

Replace half of the asparagus with 4 ounces of flaked smoked salmon, and swap the tarragon for fresh dill. The smoky, salty salmon pairs beautifully with the creamy custard and sesame crust. I discovered this combination at a Sunday brunch spot in Brooklyn — it’s now my go-to for special occasions. Reduce the salt in the custard slightly, as the salmon is already salty.

Can I use a different type of crust for this asparagus quiche if I don’t have sesame seeds?

Absolutely — the sesame crust is a signature element, but this asparagus quiche recipe works beautifully with a standard pâte brisée or even a store-bought pie crust. If you skip the sesame seeds, simply replace them with an equal volume of flour (1/2 cup). For a nutty alternative, try using toasted sunflower seeds or poppy seeds — they’ll give a similar crunch and visual appeal. A gluten-free crust made from almond flour or a ready-made gluten-free pie shell also works well. Just be sure to blind-bake any crust to prevent sogginess.

How do I prevent the quiche crust from getting soggy when using fresh asparagus?

The key to a crisp, non-soggy crust in any spring vegetable quiche is a two-step approach: blind-bake the crust until lightly golden, and pre-cook the asparagus to remove excess moisture. Sautéing the asparagus for 5 minutes until crisp-tender evaporates much of its water content. Additionally, sprinkle the shredded Gruyère directly onto the asparagus before pouring the custard — the cheese acts as a barrier that helps protect the crust from absorbing liquid. Let the quiche cool for at least 10 minutes after baking to allow the custard to set fully before slicing.

Should I blanch the asparagus before adding it to the quiche filling?

Blanching is not necessary for this easy asparagus quiche — in fact, I recommend sautéing rather than blanching. Sautéing in olive oil concentrates the asparagus flavor and keeps the spears firm enough to hold their shape during baking. Blanching would add an extra step and could make the asparagus waterlogged, which would release moisture into the custard. If you prefer a very tender asparagus texture, you can blanch the pieces for 2 minutes in salted boiling water, then plunge them into ice water and pat them very dry before adding to the quiche.

What fresh herbs pair best with asparagus in a quiche recipe?

For a quiche with fresh herbs, my top three are tarragon, chives, and parsley. Tarragon has a subtle licorice-like flavor that is a classic French pairing with asparagus — it elevates the quiche without overpowering it. Chives add a mild oniony freshness, and parsley brings a clean, grassy note. If you want to experiment, dill works beautifully with asparagus (especially if you add smoked salmon), and chervil adds a delicate, almost sweet flavor. Avoid strongly flavored herbs like rosemary or sage, as they can dominate the delicate custard and asparagus.

Can I make this asparagus quiche dairy-free?

Yes, with a few smart substitutions. Replace the heavy cream and whole milk with full-fat canned coconut milk (shake well before measuring) or a good-quality unsweetened oat cream. For the cheese, use a dairy-free shredded mozzarella or cheddar-style alternative — look for one that melts well, like Violife or Miyoko’s. In the crust, substitute the butter with cold vegan butter or coconut oil (use 1/3 cup coconut oil instead of 1/2 cup butter). Blind-bake the crust as directed. The texture will be slightly less rich but still deliciously creamy.

How do I know when the quiche is fully baked?

The classic test for a perfectly baked asparagus quiche recipe is the jiggle test. Gently shake the tart pan — the center should have a slight, soft wobble, like a firm custard, while the edges should be fully set. If the center ripples like liquid, it needs more time. Additionally, insert a thin knife about 1 inch from the center; if it comes out clean, the quiche is done. The internal temperature should read 165°F to 170°F on an instant-read thermometer. Remember that the quiche continues to cook as it cools, so pull it out when the center still has a gentle jiggle.

Can I use frozen asparagus for this quiche?

Yes, frozen asparagus works in a pinch, but the texture will be softer than fresh. Thaw the spears completely, then pat them very dry with paper towels to remove as much moisture as possible. Cut them into 2-inch pieces and sauté in olive oil for 3-4 minutes (frozen asparagus cooks faster than fresh). Frozen asparagus tends to be more watery, so I recommend increasing the blind-baking time by 2-3 minutes to ensure the crust stays crisp. Fresh asparagus is always best for this spring vegetable quiche, but frozen is a fine substitute when asparagus is out of season.

What can I serve alongside this quiche for a complete meal?

This quiche with fresh herbs is hearty enough to be the star of the meal, but a few simple sides turn it into a feast. A crisp green salad with a tangy lemon vinaigrette is my go-to — the acidity cuts through the rich custard. Roasted baby potatoes or a bowl of spring pea soup make excellent warm sides. For a lighter option, serve with steamed green beans or a simple tomato salad. I also love offering a small bowl of cornichons and whole-grain mustard on the side — it’s a French bistro touch that adds a punchy, acidic contrast to every bite.

Can I freeze the unbaked quiche for later?

Absolutely — this easy asparagus quiche freezes beautifully before baking. Assemble the quiche completely in the tart pan, but do not bake. Wrap the entire pan tightly in plastic wrap, then in a layer of aluminum foil, and freeze for up to 2 months. When ready to bake, do not thaw — bake directly from frozen at 375°F, adding 15-20 minutes to the baking time. Cover the edges with foil if they brown too quickly. The texture will be slightly less delicate than a freshly assembled quiche, but it’s a wonderful time-saving option for busy weeks.

Why did my quiche turn out watery on top?

A watery top layer usually indicates that the custard separated during baking — this happens when the quiche is over-baked or baked at too high a temperature. The eggs overcook and release moisture, which pools on the surface. To fix this, always bake at the recommended 375°F and use an oven thermometer to verify accuracy. Another cause is using vegetables that haven’t been properly dried — make sure to sauté the asparagus until any excess moisture has evaporated. If the top still weeps, try reducing the milk by 2 tablespoons and increasing the cream by the same amount for a more stable custard.

Share Your Version!

I absolutely love seeing how this asparagus quiche recipe turns out in your kitchen! Did you stick with the sesame crust or try one of the variations? Did you add a pinch of cumin for a Moroccan touch, or swap in dill for a Scandinavian vibe? Leave a star rating and a comment below — your feedback helps other home cooks decide which version to try first.

Snap a photo of your quiche and tag me on Instagram or Pinterest @exorecipes — I share my favorites in my stories every week. And if you made the gluten-free or dairy-free version, I’d especially love to hear how it went. What’s your favorite herb to pair with asparagus in a spring quiche? Drop your answer in the comments!

From my NYC kitchen to yours — I hope this recipe brings as much warmth to your table as it does to mine. — mia 🧡

📌

Love This Recipe? Save It to Pinterest!

If you enjoyed this Asparagus Quiche with Sesame Crust and Fresh Herbs recipe, don’t let it get lost in your browser tabs! 😄 Pin it now so you can find it again anytime — and explore hundreds more tried-and-tested recipes waiting for you on my Pinterest boards.

👉 Follow mia on Pinterest @exorecipe

📌 Pin this recipe · 🔁 Re-pin your favorites · 💬 Tag me when you make it — I love seeing your creations!

Print

clock clock iconcutlery cutlery iconflag flag iconfolder folder iconinstagram instagram iconpinterest pinterest iconfacebook facebook iconprint print iconsquares squares iconheart heart iconheart solid heart solid icon

Asparagus Quiche with Sesame Crust and Fresh Herbs

  • Author: Chef Mia
  • Prep Time: 25 minutes
  • Cook Time: 35 minutes
  • Total Time: 1 hour 30 minutes (includes chilling)
  • Yield: 8 1x
  • Method: Main Course
  • Cuisine: French-inspired

Description

A savory quiche featuring a crisp sesame crust, tender asparagus, and a medley of fresh herbs baked in a creamy egg custard.


Ingredients

Scale
  • For the crust:
  • 1 1/4 cups all-purpose flour
  • 1/2 cup sesame seeds (toasted)
  • 1/2 teaspoon salt
  • 1/2 cup cold unsalted butter, cubed
  • 34 tablespoons ice water
  • For the filling:
  • 1 tablespoon olive oil
  • 1 bunch asparagus (about 1 pound), trimmed and cut into 2-inch pieces
  • 1/2 cup chopped fresh herbs (such as parsley, chives, and tarragon)
  • 4 large eggs
  • 1 cup heavy cream
  • 1/2 cup whole milk
  • 1/2 teaspoon salt
  • 1/4 teaspoon black pepper
  • 1/8 teaspoon ground nutmeg
  • 1 cup shredded Gruyère cheese

Instructions

  1. Make the crust: In a food processor, pulse flour, sesame seeds, and salt. Add butter and pulse until mixture resembles coarse meal. Drizzle in ice water, 1 tablespoon at a time, pulsing until dough just holds together.
  2. Turn dough onto a floured surface, shape into a disk, wrap in plastic, and refrigerate for at least 30 minutes.
  3. Preheat oven to 375°F (190°C).
  4. Roll dough on a floured surface to a 12-inch circle. Transfer to a 9-inch tart pan with removable bottom, pressing into bottom and sides. Trim excess. Prick bottom with a fork.
  5. Line crust with parchment paper and fill with pie weights or dried beans. Bake for 15 minutes. Remove parchment and weights, bake 5 more minutes until lightly golden. Cool on a rack.
  6. Prepare filling: In a skillet, heat olive oil over medium heat. Add asparagus and cook 5 minutes, until crisp-tender. Stir in fresh herbs; set aside.
  7. In a bowl, whisk eggs, cream, milk, salt, pepper, and nutmeg until smooth.
  8. Spread asparagus mixture evenly over crust. Sprinkle Gruyère over asparagus. Pour egg mixture on top.
  9. Bake quiche for 30-35 minutes, until center is set and top is lightly golden. Cool on rack 10 minutes before slicing.
  10. Serve warm or at room temperature. Garnish with extra fresh herbs if desired.

Notes

To toast sesame seeds, heat a dry skillet over medium heat and stir seeds for 2-3 minutes until fragrant. Quiche can be stored in the refrigerator for up to 3 days.


Nutrition

  • Calories: 380
  • Sugar: 3g
  • Fat: 30g
  • Carbohydrates: 18g
  • Protein: 14g


Asparagus Quiche with Sesame Crust and Fresh Herbs

k">

Tried This Recipe? Leave a Comment!

Did you make this recipe? I’d love to hear how it turned out! Please leave a comment and a rating below. Your feedback helps other home cooks and supports cheerychop.com!

For more delicious inspiration, follow me on Pinterest!

Asparagus Pasta Salad with Steak and Bacon – A Hearty, Flavor-Packed Meal You’ll Crave

⚖️
Difficulty
Medium
⏲️
Prep Time
20 mins
🕒
Cook Time
20 mins
⏱️
Total Time
40 mins + chill
🍽️
Servings
8

I still remember the first time I made this asparagus pasta salad with steak and bacon for a summer gathering on my rooftop in Brooklyn. My neighbor, a retired butcher from Long Island, took one bite and said, “Mia, this is the kind of salad that makes you forget it’s a salad.” That’s exactly what I was going for. This hearty pasta salad recipe brings together tender slices of sirloin, crispy bacon, bright green asparagus, and a tangy, creamy dressing that ties every bite together. It’s a main-course salad that satisfies like a steak dinner but feels lighter and brighter — perfect for warm-weather entertaining or a weeknight meal that feels special.

Picture this: al dente rotini cradling the creamy dressing in every spiral, juicy steak slices with that perfect sear, salty bacon crumbles that add crunch in every forkful, and tender-crisp asparagus that still has that fresh snap. The dressing — a blend of mayonnaise, sour cream, red wine vinegar, and Dijon mustard — coats everything beautifully without weighing it down. There’s a whisper of garlic, a hint of Parmesan, and a pop of fresh parsley that keeps each bite bright. It’s the kind of dish that tastes even better the next day, after the flavors have had time to get to know each other in the fridge.

My training at Le Cordon Bleu in Paris taught me that the best dishes are built on technique and quality ingredients. For this steak and bacon pasta salad, I use a simple pan-sear method for the steak that delivers a gorgeous crust and juicy interior, and I blanch the asparagus just long enough to take the raw edge off while keeping it vibrant. One mistake I see home cooks make is overcooking the pasta or the asparagus — both should have bite. I’ll walk you through every step so you can nail this hearty pasta salad recipe on your first try. From my kitchen in New York City to yours, let’s make something beautiful.

Why This Asparagus Pasta Salad with Steak and Bacon Recipe Is the Best

The Flavor Secret. This isn’t your average pasta salad. The combination of umami-rich steak, smoky bacon, and bright, grassy asparagus creates a depth of flavor that most cold salads simply don’t have. I add a pinch of salt and a hit of red wine vinegar to the dressing, which cuts through the richness and keeps the whole dish balanced. Growing up in Morocco, my mother taught me that acidity is the secret to making rich foods feel light — and that principle carries through in everything I make, from tagines to this hearty pasta salad.

Perfected Texture. As a trained chef, I obsess over texture. The pasta is cooked to al dente, then rinsed with cold water to stop the cooking and remove excess starch. The asparagus is blanched for exactly two minutes, then shocked in ice water to lock in that brilliant green color and crisp-tender bite. The steak is rested for a full five minutes before slicing so the juices stay in the meat, not on the cutting board. Every component is treated with care so that when you take a bite, everything works in harmony.

Foolproof & Fast. Despite how impressive this salad looks and tastes, it’s surprisingly approachable. The ingredients are all easy to find at any US grocery store — I pick up my asparagus and fresh parsley at the Union Square Greenmarket, and the steak and bacon from my local butcher in the East Village. The steps are straightforward, and the whole thing comes together in about 40 minutes of active time. Plus, it’s make-ahead friendly, which is a lifesaver for busy home cooks.

Asparagus Pasta Salad with Steak and Bacon Ingredients

I love how simple and honest this ingredient list is. When I shop for this steak and bacon pasta salad, I head to the farmers market first for the asparagus and parsley — there’s nothing like the flavor of just-picked asparagus in late spring. The steak I source from a local butcher who dry-ages his beef, and the bacon I look for is thick-cut and applewood-smoked. Every ingredient has a job to do, and when you start with quality, the final dish sings.

Ingredients List

  • 1 lb sirloin steak
  • 1 lb bacon
  • 1 lb asparagus, trimmed and cut into 1-inch pieces
  • 1 lb rotini or fusilli pasta
  • 1/2 cup mayonnaise
  • 1/4 cup sour cream
  • 2 tablespoons red wine vinegar
  • 1 tablespoon Dijon mustard
  • 1 clove garlic, minced
  • 1/2 teaspoon salt
  • 1/4 teaspoon black pepper
  • 1/4 cup chopped fresh parsley
  • 1/4 cup grated Parmesan cheese

Ingredient Spotlight

Sirloin Steak: This cut is my go-to for this salad because it’s tender, flavorful, and more affordable than ribeye or filet. Look for steaks with good marbling — those thin white streaks of fat running through the meat — which keep the steak juicy as it cooks. If you can’t find sirloin, flank steak or skirt steak are excellent substitutes, though they benefit from a slightly shorter cooking time. When I’m in a pinch, I’ve even used leftover grilled steak from a weekend barbecue, and it works beautifully.

Asparagus: Fresh, bright green asparagus is the star vegetable here. When selecting asparagus at the store, look for spears that are firm, straight, and have tightly closed tips. The thickness doesn’t matter much — thin spears cook faster, thick spears have a meatier texture. I trim the woody ends by holding each spear near the bottom and bending gently until it snaps naturally. That’s where the tender part begins. One tested swap: green beans or broccolini work well if asparagus is out of season.

Bacon: Thick-cut bacon adds the most satisfying crunch and a smoky depth that complements the steak beautifully. I cook mine until deep golden and crispy, then drain it well on paper towels before crumbling. For a lighter option, try turkey bacon or even a plant-based bacon — just cook it a bit longer to get that crispness. Canadian bacon or pancetta are also fantastic swaps that bring a more refined, less smoky flavor to this bacon pasta salad.

Pasta: Rotini or fusilli are my top choices because their spirals and ridges catch the creamy dressing and hold onto it with every bite. I recommend cooking the pasta to al dente — one minute less than the package directs — because it will continue to absorb dressing as it chills. Short pasta shapes like farfalle, penne, or cavatappi also work wonderfully. Avoid long, delicate pasta like spaghetti or angel hair, which won’t hold up to the chunky mix of steak, bacon, and asparagus.

Original IngredientBest SubstitutionFlavor / Texture Impact
Sirloin SteakFlank or Skirt SteakSlightly chewier, more beefy flavor
BaconTurkey Bacon or PancettaLess smoky, lighter texture; pancetta adds a cured depth
AsparagusGreen Beans or BroccoliniSimilar crunch; broccolini is slightly more bitter
Sour CreamGreek Yogurt (plain, full-fat)Tangier, slightly less rich — excellent for lighter version
Rotini PastaFusilli or FarfalleSimilar holding power; farfalle has a different shape but works well

How to Make Asparagus Pasta Salad with Steak and Bacon — Step-by-Step

I’ve broken this down into simple, manageable steps so you can cook with confidence. Trust the process — each step builds on the last to create a salad that’s balanced, beautiful, and deeply satisfying.

Step 1: Cook the Pasta

Bring a large pot of salted water to a rolling boil — use about 1 tablespoon of salt per 4 quarts of water. Add the rotini and cook according to package directions until al dente, typically 7-9 minutes. Drain the pasta in a colander, then rinse thoroughly with cold running water to stop the cooking process and remove surface starch. Shake the colander well to drain excess water, then set aside.

💡 mia’s Pro Tip: Cook the pasta one minute less than the package suggests. The pasta will continue to absorb moisture from the dressing as it chills, so starting with a firmer bite ensures it won’t become mushy by the next day.

Step 2: Sear the Steak

Pat the sirloin steak dry with paper towels — this is crucial for a good sear. Season generously on both sides with salt and pepper. Heat a heavy skillet (cast iron is ideal) over medium-high heat until it’s smoking hot. Add a drizzle of olive oil, then lay the steak in the pan. Cook for 4-5 minutes per side for medium-rare, or until the internal temperature reaches 130°F. Use tongs to flip and also sear the fat cap on the side for extra flavor. Transfer the steak to a cutting board and let it rest for at least 5 minutes before slicing.

⚠️ Common Mistake to Avoid: Slicing the steak immediately after cooking forces all the juices out onto the board, leaving dry meat. Always rest your steak for 5-7 minutes to let the juices redistribute.

Step 3: Crisp the Bacon

While the steak rests, cook the bacon in the same skillet (or a separate one). Place bacon strips in a cold skillet, then turn the heat to medium. Cook, flipping occasionally, until deep golden and crispy, about 6-8 minutes total. Transfer to a paper-towel-lined plate to drain and cool. Once cool enough to handle, crumble or chop into bite-sized pieces.

💡 mia’s Pro Tip: Save 1-2 tablespoons of the rendered bacon fat and whisk it into the dressing for an extra layer of smoky, savory flavor. It’s a trick I learned from a chef friend in Paris who adds bacon fat to everything from vinaigrettes to mashed potatoes.

Step 4: Blanch the Asparagus

Bring a small pot of salted water to a boil. Add the trimmed and cut asparagus pieces and cook for exactly 2 minutes — they should turn bright green and be tender but still have a slight snap. Immediately transfer the asparagus to a bowl of ice water (an ice bath) to stop the cooking. Let it sit for 2 minutes, then drain well and pat dry with a clean kitchen towel or paper towels.

⚠️ Common Mistake to Avoid: Skipping the ice bath is a big no-no. If you don’t shock the asparagus, residual heat will continue cooking it, turning it limp and dull green. The ice bath locks in color and crunch.

Step 5: Make the Dressing

In a small bowl, combine the mayonnaise, sour cream, red wine vinegar, Dijon mustard, minced garlic, salt, and pepper. Whisk until smooth and creamy. Taste and adjust — you might want an extra splash of vinegar for more tang, or a pinch more salt to brighten the flavors. Set aside while you assemble the rest.

💡 mia’s Pro Tip: Let the dressing sit for 10-15 minutes before tossing it with the salad. This allows the garlic to mellow and the flavors to meld, giving you a more rounded, cohesive taste.

Step 6: Assemble the Salad

In a large mixing bowl, combine the cooked and cooled pasta, sliced steak, crumbled bacon, blanched asparagus, chopped parsley, and grated Parmesan cheese. Pour the dressing over the top and toss gently with a large spatula or wooden spoon until everything is evenly coated. Be careful not to overmix — you want the steak to stay in nice slices and the asparagus to remain intact.

Step 7: Chill and Serve

Cover the bowl with plastic wrap or a lid and refrigerate for at least 1 hour. This resting time is essential — it allows the pasta to absorb the dressing and the flavors to marry. When you’re ready to serve, give the salad a gentle stir, taste, and adjust seasoning if needed. Garnish with a little extra parsley and Parmesan on top for presentation.

⚠️ Common Mistake to Avoid: Serving the salad straight from the fridge without letting it sit for 5-10 minutes at room temperature. Chilled dressing can taste flat — letting it warm slightly brings the flavors back to life.

StepActionDurationKey Visual Cue
1Cook pasta7-9 minAl dente — tender but firm bite
2Sear steak4-5 min per sideDeep golden brown crust
3Cook bacon6-8 minDeep golden and crispy
4Blanch asparagus2 minBright green, slightly tender
5Make dressing5 minSmooth, creamy, well blended
6Assemble5 minEverything evenly coated
7Chill1 hr minimumFlavors melded, pasta slightly softened

Serving & Presentation

This asparagus steak salad is a showstopper on any table. I love serving it in a wide, shallow bowl or on a large platter so all the colorful components — the green asparagus, the golden pasta, the deep brown steak slices, and the crispy bacon crumbles — are visible. A final sprinkle of fresh parsley and a light dusting of Parmesan cheese on top adds a restaurant-quality touch. For a dinner party, I sometimes add a handful of cherry tomato halves for an extra pop of color and sweetness.

In terms of pairings, this hearty pasta salad recipe is substantial enough to be a complete main course, but it also plays beautifully alongside other dishes. In the summer, I serve it with a chilled cucumber soup or a simple green salad with lemon vinaigrette. In cooler months, it’s wonderful with a bowl of roasted tomato soup or even as a side to grilled chicken or fish. My husband loves it with a glass of crisp Sauvignon Blanc, while I prefer a cold IPA — the bitterness cuts through the richness of the steak and bacon beautifully.

The way I like to plate this for guests is to mound the salad in the center of the platter, then fan the steak slices artfully on top rather than mixing them all in. This keeps the steak as the hero of the dish and ensures every person gets a nice piece of meat on their first serving. A few extra bacon crumbles and a drizzle of the dressing on top make it look intentional and beautiful.

Pairing TypeSuggestionsWhy It Works
Side DishCucumber soup, green salad, roasted tomato soupLight sides balance the hearty pasta and steak
Sauce / DipExtra dressing on the side, chimichurri, ranchAdds moisture and extra flavor for those who want it
BeverageSauvignon Blanc, cold IPA, lemonade with mintAcidity and bubbles cut through the richness
GarnishFresh parsley, Parmesan shavings, cherry tomatoesAdds color, freshness, and visual appeal

Make-Ahead, Storage & Reheating

This bacon pasta salad is a dream for meal prep. I often make it on a Sunday evening for easy lunches throughout the week. The flavors actually improve after a day or two in the fridge, as the dressing soaks into the pasta and the steak marinates ever so slightly. Here’s everything you need to know about storing and reheating so your salad stays at its best.

MethodContainerDurationReheating Tip
RefrigeratorAirtight containerUp to 3 daysServe cold or let sit at room temp 10 min
FreezerFreezer-safe containerUp to 2 monthsThaw in fridge overnight; add fresh parsley before serving
Make-AheadAirtight container1-2 days in advanceAssemble but add bacon and parsley just before serving to keep crunch

If you plan to make this salad ahead for a party, here’s my best strategy: assemble everything except the bacon, parsley, and Parmesan. Store the salad base in the fridge, and keep the bacon crumbles, chopped parsley, and grated cheese in separate containers. When you’re ready to serve, add those final three ingredients and toss gently. This keeps the bacon crispy and the parsley bright. For the best texture, I don’t recommend reheating this salad — it’s designed to be served cold or at room temperature. If you’re like me and enjoy a slightly warm version, you can microwave a single serving for about 30 seconds, just enough to take the chill off without cooking the steak or wilting the asparagus.

Variations & Easy Swaps

Over the years, I’ve played with this recipe in so many ways — testing new ingredients, swapping proteins, and adapting it for different diets. Whether you’re cooking for a crowd with dietary restrictions or just want to try something new, these variations are all tested and approved from my kitchen to yours.

VariationKey ChangeBest ForDifficulty Impact
Moroccan Spice TwistAdd ras el hanout + harissa to dressingAdventurous palates, North African flavor loversEasy
Lighter / Greek Yogurt SwapReplace sour cream with Greek yogurtLighter meals, calorie-consciousEasy
Summer Berry & HerbAdd strawberries or blueberries + basilSummer entertaining, fresh and brightEasy

Moroccan Spice Twist

This variation is close to my heart — it brings the flavors of my childhood in Morocco right into this hearty pasta salad recipe. Whisk 1 teaspoon of ras el hanout (a warm, aromatic Moroccan spice blend) into the dressing, and drizzle in 1-2 teaspoons of harissa paste for a gentle heat. The cumin, coriander, and cinnamon notes in the ras el hanout pair beautifully with the steak and bacon. I also like to add a handful of chopped dried apricots for a touch of sweetness that echoes the souks of Marrakech. This version is incredible served with a side of warm flatbread.

Lighter / Greek Yogurt Swap

If you’re looking for a lighter take on this bacon pasta salad, swap the sour cream for an equal amount of plain full-fat Greek yogurt. The yogurt adds a tangy creaminess while significantly reducing the fat and calories. I’ve tested this swap dozens of times, and the texture remains luxuriously creamy — just be sure to use full-fat yogurt, as non-fat versions can separate and become watery. You can also reduce the mayonnaise by half and bulk up the dressing with extra yogurt for an even lighter option. The flavor stays bright and satisfying, and no one will guess it’s a lighter version.

Summer Berry & Herb

In the peak of summer, when the Union Square Greenmarket is overflowing with berries, I love adding a fruity twist to this asparagus steak salad. Fold in 1 cup of halved fresh strawberries or blueberries and swap the parsley for fresh basil. The sweetness of the berries plays against the savory steak and bacon in the most delightful way, and the basil adds an aromatic freshness that ties everything together. This variation is best served within a few hours of assembling, as the berries can release moisture if left too long. It’s a showstopper for Fourth of July gatherings or summer barbecues.

How do you cook the steak for the asparagus pasta salad to keep it tender and juicy?

The key to tender, juicy steak for this asparagus pasta salad with steak and bacon starts with the right cut and technique. Pat the sirloin steak dry with paper towels, season generously with salt and pepper, and let it come to room temperature for about 20 minutes before cooking. Sear it in a hot cast-iron skillet over medium-high heat for 4-5 minutes per side for medium-rare. The most important step is resting the steak for at least 5 minutes after cooking — this allows the juices to redistribute throughout the meat rather than running out onto the cutting board. Slice thinly against the grain for the most tender bite possible. I also recommend using a meat thermometer to remove guesswork: 130°F for medium-rare, 140°F for medium.

What can I substitute for bacon in this asparagus pasta salad recipe?

There are several excellent substitutes for bacon in this steak and bacon pasta salad, depending on your dietary needs or what you have on hand. Turkey bacon is a popular lighter option — cook it until extra crispy since it has less fat. Pancetta, which is Italian cured pork belly, brings a more refined, less smoky flavor and crisps up beautifully. For a vegetarian version, try smoked tempeh strips or coconut bacon, which offers a smoky, crunchy texture without any meat. Canadian bacon (which is more like ham) is another option, though it won’t get as crispy. If you’re simply out of bacon, you can skip it entirely and add an extra pinch of smoked paprika to the dressing to mimic that smoky depth.

Can I make this asparagus pasta salad with steak and bacon ahead of time?

Absolutely — this asparagus pasta salad with steak and bacon is actually one of those dishes that tastes better when made ahead! I recommend assembling the salad up to 1-2 days in advance, but with one important strategy: keep the bacon, parsley, and Parmesan cheese separate and add them just before serving. This ensures the bacon stays crispy and the herbs remain bright. The rest of the salad — pasta, steak, asparagus, and dressing — can be combined and refrigerated in an airtight container. When you’re ready to serve, let the salad sit at room temperature for 10-15 minutes, then add the reserved bacon, parsley, and Parmesan, and toss gently. The flavors will have melded beautifully overnight, making for a truly delicious meal.

What type of pasta works best for a hearty steak and asparagus salad?

For a hearty steak and bacon pasta salad, you want a short pasta shape with plenty of nooks and crannies to hold the dressing. Rotini and fusilli are my top choices because their spirals and ridges catch the creamy dressing beautifully and hold onto it with every bite. Cavatappi (sometimes called cellentani) is another excellent option — those corkscrew shapes are perfect for trapping dressing and small pieces of bacon and asparagus. Farfalle (bow-tie pasta) works well too, though it doesn’t hold dressing quite as well. I recommend cooking the pasta to al dente, about one minute less than the package directs, since it will continue to absorb dressing as it chills. Avoid long, thin pasta shapes like spaghetti or linguine — they won’t stand up to the chunky mix of steak, bacon, and vegetables.

Can I use frozen asparagus instead of fresh for this recipe?

You can use frozen asparagus, but fresh is strongly recommended for the best texture and flavor in this asparagus pasta salad. Frozen asparagus tends to be softer and more watery after thawing, which can dilute the dressing and make the salad less vibrant. If frozen is all you have, thaw it completely in the refrigerator, pat it very dry with paper towels, and skip the blanching step — frozen asparagus is already blanched before freezing. Add it directly to the salad without cooking. The texture will be more tender and less firm than fresh, but the flavor will still be good. For the brightest green color and best snap, stick with fresh asparagus when it’s in season.

How do I prevent the pasta salad from becoming too dry after refrigeration?

Pasta salads naturally absorb dressing as they sit, so a little prevention goes a long way. First, reserve about 1/4 cup of the dressing separately and add it just before serving if the salad seems dry. Second, cook the pasta to al dente — slightly undercooked pasta absorbs less dressing initially and holds its texture better. Third, toss the warm pasta with a tablespoon of olive oil before adding the dressing; this creates a light barrier that slows absorption. Finally, when storing, press a piece of plastic wrap directly onto the surface of the salad before covering the container — this prevents a skin from forming and keeps the top layer from drying out. If your salad does become dry, a splash of milk or a dollop of extra mayonnaise stirred in will revive the creaminess.

Can I leave out the steak and make this a vegetarian pasta salad?

Yes, this hearty pasta salad recipe works beautifully as a vegetarian dish! Simply skip the steak and double the bacon (or use a vegetarian bacon alternative) to maintain the smoky, savory flavor profile. For extra protein and heartiness, add 1 cup of chickpeas or cannellini beans — they absorb the dressing wonderfully and add a creamy texture. You can also toss in some grilled mushrooms (portobello or cremini) for that meaty, umami quality that steak typically provides. If you’re keeping the bacon but omitting the steak, consider adding an extra vegetable like roasted red peppers or artichoke hearts to round out the dish. The dressing and asparagus base are so flavorful that you won’t miss the meat at all.

What is the best way to trim asparagus for this salad?

Trimming asparagus is simple once you know the trick. The woody end of each spear naturally breaks at the point where the tender part begins. Take one spear and hold it near the bottom with both hands, then gently bend it until it snaps — discard the woody end. Line up the remaining spears with this trimmed one and cut them all at the same spot using a chef’s knife. For this steak and asparagus salad, I then cut the trimmed spears into 1-inch pieces, which gives you nice bite-sized pieces that are easy to eat with the pasta and steak. If you prefer thinner pieces, you can slice thicker spears lengthwise before cutting into pieces. No need to peel the asparagus — the skin is tender and adds fiber and color.

Share Your Version!

I absolutely love hearing how this recipe turns out in your kitchen. When you make this asparagus pasta salad with steak and bacon, snap a photo and tag me on Instagram or Pinterest — I’m @exorecipes everywhere. Leave a star rating and a comment below to tell me what you think, what swaps you tried, or how you served it. Did you add the Moroccan spice twist? Did you make it for a party? I read every comment and I love learning from your kitchen adventures.

If there’s one thing I hope you take away from this recipe, it’s that a hearty, satisfying salad can be so much more than a bowl of greens. With quality ingredients, a few simple techniques, and a little love, you can create something that feels both special and approachable. Whether you’re meal-prepping for the week, feeding your family on a busy Tuesday, or impressing friends at a summer cookout, this steak and bacon pasta salad delivers every time.

From my NYC kitchen to yours — I hope this recipe brings as much warmth to your table as it does to mine. — mia 🧡

📌

Love This Recipe? Save It to Pinterest!

If you enjoyed this Asparagus Pasta Salad with Steak and Bacon recipe, don’t let it get lost in your browser tabs! 😄 Pin it now so you can find it again anytime — and explore hundreds more tried-and-tested recipes waiting for you on my Pinterest boards.

👉 Follow mia on Pinterest @exorecipe

📌 Pin this recipe · 🔁 Re-pin your favorites · 💬 Tag me when you make it — I love seeing your creations!

Print

clock clock iconcutlery cutlery iconflag flag iconfolder folder iconinstagram instagram iconpinterest pinterest iconfacebook facebook iconprint print iconsquares squares iconheart heart iconheart solid heart solid icon

Asparagus Pasta Salad with Steak and Bacon A Flavorful, Hearty Salad Youll Love

  • Author: Chef Mia
  • Prep Time: 20 minutes
  • Cook Time: 20 minutes
  • Total Time: 40 minutes plus chilling
  • Yield: 8 1x
  • Method: Main Course
  • Cuisine: American

Description

A hearty and flavorful pasta salad with tender steak, crispy bacon, fresh asparagus, and a tangy dressing.


Ingredients

Scale
  • 1 lb sirloin steak
  • 1 lb bacon
  • 1 lb asparagus, trimmed and cut into 1-inch pieces
  • 1 lb rotini or fusilli pasta
  • 1/2 cup mayonnaise
  • 1/4 cup sour cream
  • 2 tablespoons red wine vinegar
  • 1 tablespoon Dijon mustard
  • 1 clove garlic, minced
  • 1/2 teaspoon salt
  • 1/4 teaspoon black pepper
  • 1/4 cup chopped fresh parsley
  • 1/4 cup grated Parmesan cheese

Instructions

  1. Cook pasta according to package directions until al dente. Drain and rinse with cold water.
  2. Season steak with salt and pepper. Grill or pan-sear over medium-high heat to desired doneness (about 4-5 minutes per side for medium-rare). Let rest 5 minutes, then slice thinly against the grain.
  3. Cook bacon in a skillet until crisp. Drain on paper towels, then crumble.
  4. Blanch asparagus in boiling salted water for 2 minutes, then plunge into ice water. Drain and set aside.
  5. In a small bowl, whisk together mayonnaise, sour cream, red wine vinegar, Dijon mustard, garlic, salt, and pepper.
  6. In a large bowl, combine cooked pasta, steak slices, bacon, asparagus, dressing, parsley, and Parmesan cheese. Toss gently to coat.
  7. Taste and adjust seasoning. Refrigerate for at least 1 hour before serving for best flavor.

Notes

For a lighter version, substitute Greek yogurt for sour cream. This salad can be stored in an airtight container in the refrigerator for up to 3 days.


Nutrition

  • Calories: 520
  • Sugar: 4g
  • Fat: 26g
  • Carbohydrates: 45g
  • Protein: 28g


Asparagus Pasta Salad with Steak and Bacon A Flavorful, Hearty Salad Youll Love

Asian-Style Crispy Garlic Chicken – Double-Coated Crunch in 35 Minutes

⚖️
Difficulty
Medium
⏲️
Prep Time
20 mins
🕒
Cook Time
15 mins
⏱️
Total Time
35 mins
🍽️
Servings
4

Growing up in Morocco, my mother’s kitchen was a symphony of garlic, cumin, and coriander. When I moved to Paris for culinary school, I learned how a simple pan sauce could transform humble ingredients into something elegant. Now, in my New York City apartment, I find myself craving that same bold, comforting energy—and this Asian-Style Crispy Garlic Chicken delivers it every time. The secret? A double-coating of cornstarch and panko that locks in moisture and shatters with every bite, all wrapped in a glossy garlic-soy sauce that’s sweet, savory, and just a little bit spicy. This isn’t just another crispy chicken recipe; it’s the one I turn to after a long day when I need dinner on the table fast, but refuse to compromise on flavor. And today, I’m thrilled to share my tested, foolproof version with you.

Imagine this: golden nuggets of chicken, each one encased in a crackling shell that gives way to tender, juicy meat. The aroma of garlic sizzling in sesame oil fills your kitchen, mingling with the deep umami of soy sauce and the floral sweetness of honey. As you toss the crispy pieces in that sticky, glossy sauce, every piece gets perfectly coated—not soggy, but glistening. The first bite is a crunch, followed by a burst of savory-sweet flavor, with a gentle heat from red pepper flakes that lingers just enough to keep you reaching for more. It’s the kind of dish that makes you close your eyes and smile, the kind that turns a Tuesday night into something special.

I’ve tested this recipe countless times to strike the perfect balance between crunch and tenderness, garlic punch and balanced sweetness. My approach combines French technique (a proper three-step breading station) with Moroccan love for bold aromatics and New York practicality (one skillet, minimal cleanup). The result is an Asian garlic chicken that’s weeknight-friendly but impressive enough for guests. In the instructions ahead, I’ll show you my favorite trick for keeping the garlic from burning, plus a common mistake that can ruin your crust. Follow these steps, and you’ll have a plate of crispy chicken that rivals any takeout—fresher, crunchier, and made with love.

Why This Asian-Style Crispy Garlic Chicken Recipe Is the Best

The Flavor Secret – My version leans on a double hit of garlic: minced fresh cloves sizzled briefly in the pan, plus a touch of garlic powder in the breading (optional, but I add it). The sauce combines soy sauce, honey, and rice vinegar for that classic Asian sweet-and-savory balance, finished with toasted sesame oil. Growing up, my mother taught me that garlic should be fragrant, not bitter—so I always cook it just 30 seconds before adding liquid. This technique comes straight from my Paris training: respect your aromatics, and they’ll reward you.

Perfected Texture – The triple-coating method—cornstarch mixture, egg, then panko—creates a crust that stays shatter-crisp for hours. I add a pinch of salt and pepper to the cornstarch-flour blend, which seasons the chicken from the inside out. Frying in batches at medium-high heat ensures the oil temperature stays consistent (around 350°F), so the breading browns evenly without absorbing grease. No rubbery coatings here. I’ve even tested an air-fryer version for a lighter take—details in the variations section.

Foolproof & Fast – With just 20 minutes of prep and 15 minutes of cooking, this recipe fits seamlessly into a busy weeknight. The instructions are straightforward enough for a beginner cook, yet the technique will impress seasoned home chefs. I’ve included visual cues at every step—when the chicken is golden, when the sauce thickens—so you know exactly what to look for. No fancy equipment required: one skillet, a few bowls, and you’re on your way to a restaurant-quality meal.

Asian-Style Crispy Garlic Chicken Ingredients

I shop for my ingredients at the Union Square Greenmarket and my local Asian grocery in Chinatown. The quality of soy sauce and sesame oil makes a big difference here—I always go for a naturally brewed soy sauce (like Kikkoman or a small-batch one) and toasted sesame oil for that nutty depth. One sniff of the garlic at the market reminds me of my mother’s hands mincing cloves for her famous chermoula. Let’s gather everything you need.

Ingredients List

  • 1 lb boneless skinless chicken thighs, cut into bite-sized pieces
  • 1/2 cup cornstarch
  • 2 large eggs, beaten
  • 1 cup panko breadcrumbs
  • 1/2 cup all-purpose flour
  • 1 teaspoon salt
  • 1/2 teaspoon black pepper
  • 1/4 cup vegetable oil, for frying
  • 6 cloves garlic, minced
  • 1/4 cup soy sauce
  • 2 tablespoons honey
  • 1 tablespoon rice vinegar
  • 1 tablespoon sesame oil
  • 1/2 teaspoon red pepper flakes (optional)
  • 2 green onions, sliced (for garnish)
  • 1 tablespoon sesame seeds (for garnish)

Ingredient Spotlight

Chicken Thighs – I always prefer thighs over breasts for this crispy garlic chicken recipe. They’re more forgiving, stay juicy even if you cook them a minute too long, and have a richer flavor that stands up to the bold sauce.

Panko Breadcrumbs – These Japanese-style breadcrumbs are larger and flakier than regular ones, yielding a lighter, crunchier crust. You’ll find them in the Asian aisle of most grocery stores. No panko? Crush some cornflakes or use regular breadcrumbs, but the texture won’t be as airy.

Garlic – Fresh garlic is non-negotiable. Pre-minced jarred garlic has a dull, slightly sour flavor. Buy firm, plump heads and mince them yourself. For a mellower garlic taste, you can roast the cloves before mincing, but I love the sharpness of raw garlic quickly cooked.

Soy Sauce & Honey – These create the sticky, savory-sweet glaze. Low-sodium soy sauce works fine; if using regular, you may want to reduce the added salt in the breading. For a deeper flavor, try dark soy sauce (thicker, less salty) or add a splash of hoisin.

Original IngredientBest SubstitutionFlavor / Texture Impact
Panko breadcrumbsCrushed cornflakesLess airy but still crunchy; slightly sweeter
Chicken thighsChicken breast, cubedLeaner; can dry out if overcooked – reduce frying time by 1 min/side
Soy sauceTamari (gluten-free) or coconut aminosTamari is similar; coconut aminos are sweeter and less salty
HoneyBrown sugar or maple syrupBrown sugar gives deeper molasses flavor; maple syrup is thinner, less sticky
Sesame oilToasted sesame oil (same) or omitEssential for authentic flavor; omitting loses nutty aroma

How to Make Asian-Style Crispy Garlic Chicken — Step-by-Step

Trust me, this process is easier than it looks. I’ll walk you through every step, with my best tips to ensure golden, crispy perfection.

Step 1: Set Up Breading Station

In a shallow dish, combine 1/2 cup cornstarch, 1/2 cup flour, 1 teaspoon salt, and 1/2 teaspoon black pepper. In a second shallow dish, beat 2 eggs. In a third, add 1 cup panko. This three-station setup is classic French “panure à l’anglaise” — it ensures an even, thick coating.

💡 mia’s Pro Tip: Line your dishes in order—dry, egg, panko—and keep one hand dry and one hand wet. Use your “dry hand” for the flour mixture and panko, and your “wet hand” for the egg. This keeps the coating from clumping on your fingers.

Step 2: Dredge Chicken

Working with a few pieces at a time, coat each chicken piece in the cornstarch mixture, shaking off excess. Dip into beaten egg, letting any extra drip off, then press into panko until fully coated. Place breaded pieces on a plate or baking sheet.

⚠️ Common Mistake to Avoid: Don’t skip shaking off the excess cornstarch mixture. Too much will create a pasty coating that doesn’t crisp. The egg should be a thin, even layer—if it’s too thick, the panko will slide off during frying.

Step 3: Fry Chicken

Heat 1/4 cup vegetable oil in a large skillet over medium-high heat. The oil is ready when a breadcrumb sizzles immediately. Fry chicken pieces in a single layer, in batches, without crowding. Cook about 4–5 minutes per side, until deep golden brown and cooked through (internal temperature 165°F). Transfer to a paper towel-lined plate.

💡 mia’s Pro Tip: Use a thermometer to keep oil around 350°F. If the oil is too cool, the chicken absorbs grease; too hot, the crust burns before the inside cooks. Let the oil reheat between batches.

Step 4: Make the Garlic Sauce

In a small bowl, whisk together 1/4 cup soy sauce, 2 tablespoons honey, 1 tablespoon rice vinegar, 1 tablespoon sesame oil, and 1/2 teaspoon red pepper flakes (if using). Set aside. Carefully wipe out the skillet with a paper towel (be careful, it’s hot!) to remove any breading bits.

⚠️ Common Mistake to Avoid: Don’t forget to wipe the skillet. Leftover breading will burn and smoke when you add the garlic. This 10-second step keeps your sauce clean and prevents bitterness.

Step 5: Sauté Garlic and Finish

Return the skillet to medium heat. Add the 6 minced garlic cloves and cook, stirring constantly, for 30 seconds until fragrant. Pour in the sauce mixture and let it simmer for 1–2 minutes, stirring occasionally, until it thickens slightly and becomes glossy. Add the fried chicken pieces and toss gently to coat. Transfer to a serving plate and garnish with sliced green onions and sesame seeds. Serve immediately.

💡 mia’s Pro Tip: To keep the chicken extra crispy, don’t let it sit in the sauce too long. Toss just until coated, then serve right away. If you’re making a large batch, keep the sauce separate and toss individual servings as needed.

StepActionDurationKey Visual Cue
1Set up breading station5 minThree dishes in order
2Dredge chicken10 minEven coating, no bare spots
3Fry chicken8–10 minDeep golden brown, sizzling stops
4Make sauce2 minSauce slightly thickened, glossy
5Sauté garlic & toss chicken2 minGarlic fragrant, chicken coated

Serving & Presentation

I love serving this crispy garlic chicken family-style on a large platter, with the green onions and sesame seeds scattered over the top. The contrast of the dark, glossy sauce against the white sesame and bright green scallions is gorgeous. For a complete meal, I pair it with steamed jasmine rice and a simple cucumber salad (thinly sliced cucumbers, rice vinegar, a pinch of sugar, and chili flakes). The cool, crunchy salad balances the warm, savory chicken beautifully.

In my NYC apartment, I often set the table with a bowl of steamed edamame on the side and a bottle of cold sake or a crisp lager. For a non-alcoholic option, try iced green tea with a squeeze of lemon. And don’t forget the extra napkins—this dish is meant to be eaten with your hands, fingers licked clean. It reminds me of the Friday night dinners my mother would make, where we’d all gather around and eat with our hands, tearing off pieces of bread to scoop up the last bits of sauce. That same communal joy is what I hope you feel.

Pairing TypeSuggestionsWhy It Works
Side DishSteamed jasmine rice, cucumber salad, stir-fried bok choyRice soaks up sauce; salad adds crunch and freshness; bok choy complements garlic
Sauce / DipExtra garlic sauce (reserve some before tossing), sweet chili sauce, sriracha mayoAdds extra moisture and heat; sriracha mayo is creamy and cool
BeverageCold sake, crisp lager (like Sapporo), iced green teaSake and lager cut through richness; green tea refreshes palate
GarnishSliced green onions, toasted sesame seeds, fresh cilantro, lime wedgesAdds color, texture, and bright acidity; cilantro and lime balance sweetness

Make-Ahead, Storage & Reheating

As a busy cook in New York City, I rely on make-ahead tricks. You can bread the chicken up to 4 hours in advance and keep it covered in the fridge. For meal prep, I fry the chicken, let it cool completely, then store it separately from the sauce. This way the coating stays crisp until you’re ready to reheat.

MethodContainerDurationReheating Tip
RefrigeratorAirtight container, separate from sauceUp to 3 daysOven at 375°F for 8–10 min, then toss with reheated sauce
FreezerFreezer-safe bag or container (breaded, uncooked chicken pieces)Up to 2 monthsFry from frozen, adding 1–2 extra minutes per side
Make-AheadBreaded chicken on a tray, coveredUp to 4 hours in fridgeFry directly from fridge – no need to come to room temp

My favorite way to reheat leftovers (if there are any!) is in the air fryer at 375°F for 4–5 minutes. The hot air restores the crunch beautifully. If you don’t have an air fryer, the oven works well too—just spread the chicken in a single layer on a baking sheet. I don’t recommend microwaving; it makes the crust chewy. And always reheat the sauce separately in a small pan or microwave, then toss just before eating.

Variations & Easy Swaps

I love how adaptable this recipe is. Whether you need a gluten-free version or want to play with flavors, here are my favorite twists.

VariationKey ChangeBest ForDifficulty Impact
Air-Fryer VersionCook breaded chicken in air fryer at 375°F for 10–12 min, flipping halfwayLess oil, healthier, still crispyEasy (watch closely)
Spicy Korean GochujangSwap honey for 2 tbsp gochujang + 1 tbsp honey; add 1 tsp grated gingerSpicy, bold, Korean-inspiredEasy (sauce change)
Gluten-FreeUse cornstarch (no flour) and gluten-free panko; tamari instead of soy sauceCeliac or GF dietEasy (use certified GF ingredients)

Air-Fryer Version

This is my go-to when I want lighter crispy garlic chicken. Follow the same breading steps, then place the coated pieces in a single layer in the air fryer basket. Spritz lightly with cooking spray. Air fry at 375°F for 10-12 minutes, flipping halfway, until golden and cooked through. While the chicken cooks, make the sauce on the stovetop. Toss and serve. The texture isn’t quite as shatter-crisp as deep frying, but it’s 90% there with way less oil. I tested this version while developing recipes for a client who wanted a healthier weeknight meal – it’s now a staple in my own kitchen.

Spicy Korean Gochujang Variation

For a bolder, spicier take, replace the honey with 2 tablespoons gochujang (Korean chili paste) and add 1 teaspoon freshly grated ginger. Reduce the soy sauce to 2 tablespoons and add 1 tablespoon water to thin. The gochujang brings a complex, fermented heat that pairs beautifully with the garlic. This variation reminds me of the vibrant food stalls in Seoul – a flavor journey without leaving home. I love serving it with quick-pickled radishes and steamed sticky rice.

Gluten-Free Version

To make this Asian garlic chicken gluten-free, simply replace all-purpose flour with extra cornstarch (use 1 cup total cornstarch) and use certified gluten-free panko breadcrumbs. Swap soy sauce for tamari or coconut aminos. The cornstarch-only coating yields an even lighter, crunchier crust – a technique I picked up from a gluten-free baking class in Paris. Be careful not to overbrown, as cornstarch can burn faster. Otherwise, the recipe works perfectly. My gluten-free friends rave about this version, and honestly, I sometimes prefer the cornstarch-only crunch.

What is the secret to getting the chicken extra crispy without frying it?

For oven-baked or air-fryer crispy garlic chicken, the secret lies in the breading and a light oil spray. Use a combination of cornstarch and panko, and make sure the chicken is patted very dry before breading. For the oven, bake at 425°F on a wire rack set over a baking sheet – the air circulation keeps the bottom crisp. For the air fryer, spritz the breaded pieces generously with cooking spray. Also, don’t skip the double-coating (cornstarch mixture, egg, panko). While you won’t get the same deep-fried crunch, these methods deliver a satisfyingly crispy result that’s much lighter. I’ve tested both extensively, and the air fryer wins for speed and texture.

Can I use chicken thighs instead of chicken breast for Asian-style crispy garlic chicken?

Absolutely! In fact, I strongly recommend boneless, skinless chicken thighs over breasts. Thighs have higher fat content, which means they stay juicy and tender even after frying – crucial for a crispy coating. Breasts can easily dry out, especially if you double-coat and fry them. Thighs also have a richer, more savory flavor that stands up to the bold garlic-soy sauce. If you do use breasts, cut them into slightly larger pieces (to prevent overcooking) and reduce the frying time by about 1 minute per side. Either way, this recipe is delicious – but thighs are the true star in my kitchen.

How do I prevent the garlic from burning when making crispy garlic chicken?

Garlic burns in seconds if you’re not careful. The key is to use medium heat (not high) and only cook the minced garlic for 30 seconds, stirring constantly, until it becomes fragrant. The residual heat from the pan will continue to cook it after you add the liquid. I also recommend wiping out the skillet after frying the chicken – any leftover breading bits will burn and taint the garlic. If your skillet is very hot, reduce the heat before adding the garlic. And always add the garlic to the pan before the sauce, so the sauce itself acts as a buffer and prevents the garlic from scorching. Trust me, burnt garlic is bitter – this method keeps it sweet and pungent.

What is the best sauce to serve with Asian-style crispy garlic chicken?

The sauce in this recipe is designed to be the perfect accompaniment: a balance of soy sauce, honey, rice vinegar, sesame oil, and garlic. However, if you want options, I love serving this chicken with a side of sweet chili sauce for dipping, or a creamy sriracha mayo (mix 1/4 cup mayonnaise with 1 tablespoon sriracha and a squeeze of lime). For a tangier twist, try a ponzu-style sauce (soy sauce, citrus juice, mirin). The key is to keep the sauce separate and dip as you eat, which preserves the chicken’s crunch. But honestly, the garlic sauce from this recipe is my non-negotiable favorite – it’s sticky, savory, and absolutely addictive.

How do I keep the breading from falling off during frying?

This is one of the most common frustrations, and I’ve nailed down three fixes. First, make sure the chicken pieces are dry before breading – pat them with paper towels. Any moisture will create steam and cause the coating to separate. Second, press the panko firmly onto the chicken; don’t just sprinkle it. Use your hands to really push it in. Third, let the breaded chicken rest on a plate for 5 minutes before frying – this allows the coating to set. When frying, handle the chicken gently and don’t overcrowd the pan. If you follow these steps, your coating will stay put. This technique comes straight from my French training, where a perfect “panure” is essential.

Can I make this recipe dairy-free?

Yes, this recipe is naturally dairy-free! There is no milk, butter, or cheese in any component. The breading uses cornstarch, flour, eggs, and panko – all dairy-free. The sauce is soy-based with honey and sesame oil. So if you’re avoiding dairy for any reason, you can follow the recipe exactly as written. Just double-check your panko brand (some may contain dairy, though most are dairy-free). For a vegan version, you can try substituting the eggs with a flax egg (1 tablespoon ground flaxseed + 3 tablespoons water per egg, let sit for 5 minutes) – the coating will be less crispy but still good. I’ve made this for dairy-free friends and they always give it two thumbs up.

How do I make the sauce thicker?

If you prefer a thicker, stickier sauce that really clings to the chicken, there are two easy methods. First, you can add a cornstarch slurry: mix 1 teaspoon cornstarch with 2 teaspoons cold water, then stir it into the simmering sauce and cook for another 30 seconds until thickened. Second, you can simply simmer the sauce a little longer – 2 to 3 minutes instead of 1 – to reduce and concentrate it. I usually go with the second method because I like how the natural sugars in the honey caramelize slightly. Just watch it carefully; if it reduces too much, it can become too salty. Remember, the sauce will thicken slightly as it cools, so don’t over-reduce it.

Can I double this recipe for a crowd?

Absolutely, this recipe doubles beautifully. Just keep a few things in mind: Don’t overcrowd the skillet when frying. Fry in batches, allowing the oil to return to temperature between batches (about 1 minute). Use a large skillet or two skillets side by side to speed things up. For the sauce, you can double the ingredients and simmer in a larger pan. I often make a double batch for potlucks or game days. One pro tip: toss the chicken with the sauce in batches right before serving to maintain maximum crunch. If you’re serving a large crowd, set up a sauce station and let people toss their own portions. It’s interactive and ensures the crispiest result.

What can I serve with crispy garlic chicken to make it a complete meal?

To turn this crispy garlic chicken into a balanced dinner, I always include a starch, a vegetable, and a refreshing element. My go-to is steamed jasmine rice (or brown rice for more fiber) to soak up the extra sauce. For veggies, I love a quick stir-fry of bok choy, snow peas, or broccoli with a splash of soy sauce and garlic. A simple cucumber salad – sliced cucumbers, rice vinegar, sugar, and chili flakes – adds a cool, tangy contrast. If I’m feeling indulgent, I’ll also serve crispy spring rolls or edamame as appetizers. This combination echoes the kind of family-style meals I grew up with in Morocco, where multiple small dishes create a feast.

Why is my chicken not crispy after adding the sauce?

This is the most common issue with saucy crispy chicken, and it’s all about timing and technique. The number one rule: toss the chicken with the sauce right before serving, not in advance. If you let it sit, the moisture from the sauce will soften the crust. Also, make sure the sauce is not too watery – it should be slightly thickened and glossy. If your sauce is thin, it will soak into the breading. Another tip: serve the chicken on a wire rack or a plate lined with paper towels to prevent steam from accumulating underneath. And finally, double-check that your oil was hot enough during frying (around 350°F). Properly fried chicken has a robust crust that can handle a quick toss without getting soggy. Follow these tips, and you’ll get that perfect shatter every time.

Share Your Version!

I absolutely love seeing how you bring this recipe to life. Did you make the air-fryer version? Add extra chili? Serve it with something unexpected? Drop a comment below and let me know – your twist might inspire someone else. If you share a photo on Instagram or Pinterest, please tag @exorecipes so I can cheer you on. And if you’re feeling generous, leave a star rating for this recipe – it helps other home cooks find it, and it means the world to me. I read every single comment, and your stories make my day. What’s your favorite part of this crispy garlic chicken? I’d love to know in the comments.

From my NYC kitchen to yours — I hope this recipe brings as much warmth to your table as it does to mine. — mia 🧡

📌

Love This Recipe? Save It to Pinterest!

If you enjoyed this Asian-Style Crispy Garlic Chicken recipe, don’t let it get lost in your browser tabs! 😄 Pin it now so you can find it again anytime — and explore hundreds more tried-and-tested recipes waiting for you on my Pinterest boards.

👉 Follow mia on Pinterest @exorecipe

📌 Pin this recipe · 🔁 Re-pin your favorites · 💬 Tag me when you make it — I love seeing your creations!

Print

clock clock iconcutlery cutlery iconflag flag iconfolder folder iconinstagram instagram iconpinterest pinterest iconfacebook facebook iconprint print iconsquares squares iconheart heart iconheart solid heart solid icon

Asian-Style Crispy Garlic Chicken

  • Author: Chef Mia
  • Prep Time: 20 minutes
  • Cook Time: 15 minutes
  • Total Time: 35 minutes
  • Yield: 4 1x
  • Method: Main Course
  • Cuisine: Asian

Description

Crispy chicken pieces tossed in a savory garlic sauce with Asian flavors. Perfect for a quick weeknight dinner.


Ingredients

Scale
  • 1 lb boneless skinless chicken thighs, cut into bite-sized pieces
  • 1/2 cup cornstarch
  • 2 large eggs, beaten
  • 1 cup panko breadcrumbs
  • 1/2 cup all-purpose flour
  • 1 teaspoon salt
  • 1/2 teaspoon black pepper
  • 1/4 cup vegetable oil, for frying
  • 6 cloves garlic, minced
  • 1/4 cup soy sauce
  • 2 tablespoons honey
  • 1 tablespoon rice vinegar
  • 1 tablespoon sesame oil
  • 1/2 teaspoon red pepper flakes (optional)
  • 2 green onions, sliced (for garnish)
  • 1 tablespoon sesame seeds (for garnish)

Instructions

  1. In a shallow dish, mix cornstarch, flour, salt, and pepper.
  2. Place beaten eggs in another shallow dish, and panko in a third.
  3. Dredge each chicken piece first in the cornstarch mixture, then dip in egg, then coat with panko.
  4. Heat vegetable oil in a large skillet over medium-high heat.
  5. Fry chicken pieces in batches until golden and crispy, about 4-5 minutes per side. Drain on paper towels.
  6. In a small bowl, whisk together soy sauce, honey, rice vinegar, sesame oil, and red pepper flakes.
  7. In the same skillet (wipe out excess oil), cook minced garlic over medium heat for 30 seconds until fragrant.
  8. Pour the sauce mixture into the skillet and let it simmer for 1-2 minutes until slightly thickened.
  9. Add the fried chicken pieces and toss to coat evenly with the sauce.
  10. Transfer to a serving plate. Garnish with green onions and sesame seeds. Serve immediately.

Notes

For extra crunch, double-coat the chicken by repeating the breading process. Adjust honey to taste for sweetness.


Nutrition

  • Calories: 480
  • Sugar: 12g
  • Fat: 22g
  • Carbohydrates: 38g
  • Protein: 30g


Asian-Style Crispy Garlic Chicken

k">

Tried This Recipe? Leave a Comment!

Did you make this recipe? I’d love to hear how it turned out! Please leave a comment and a rating below. Your feedback helps other home cooks and supports cheerychop.com!

For more delicious inspiration, follow me on Pinterest!