Table of Contents
Bang Bang Shrimp Recipe: The Ultimate Crispy Delight – A Sweet & Spicy Appetizer in 25 Minutes
I still remember the first time I tasted Bang Bang Shrimp at a seafood shack in the Outer Banks – that addictive combination of crunchy tempura-like shrimp drenched in a creamy, sweet-and-spicy sauce. It was love at first bite. Growing up in Morocco, I learned that the best dishes balance heat, sweetness, and crunch – my mother’s harissa-laced fish taught me that. Later, training in Paris refined my technique for achieving that perfect golden crust without greasiness. This Bang Bang Shrimp recipe is my New York City homage: all the crave-worthy flavor with a chef’s touch. I use a buttermilk soak for tenderness and a cornstarch-heavy coating for maximum crispiness. The sauce? Bright, tangy, and just fiery enough. This is the ultimate crispy delight, and I’m so excited to share it with you. (Keywords: Bang Bang Shrimp recipe, crispy shrimp recipe, easy Bang Bang Shrimp, homemade shrimp appetizer, spicy shrimp sauce.)
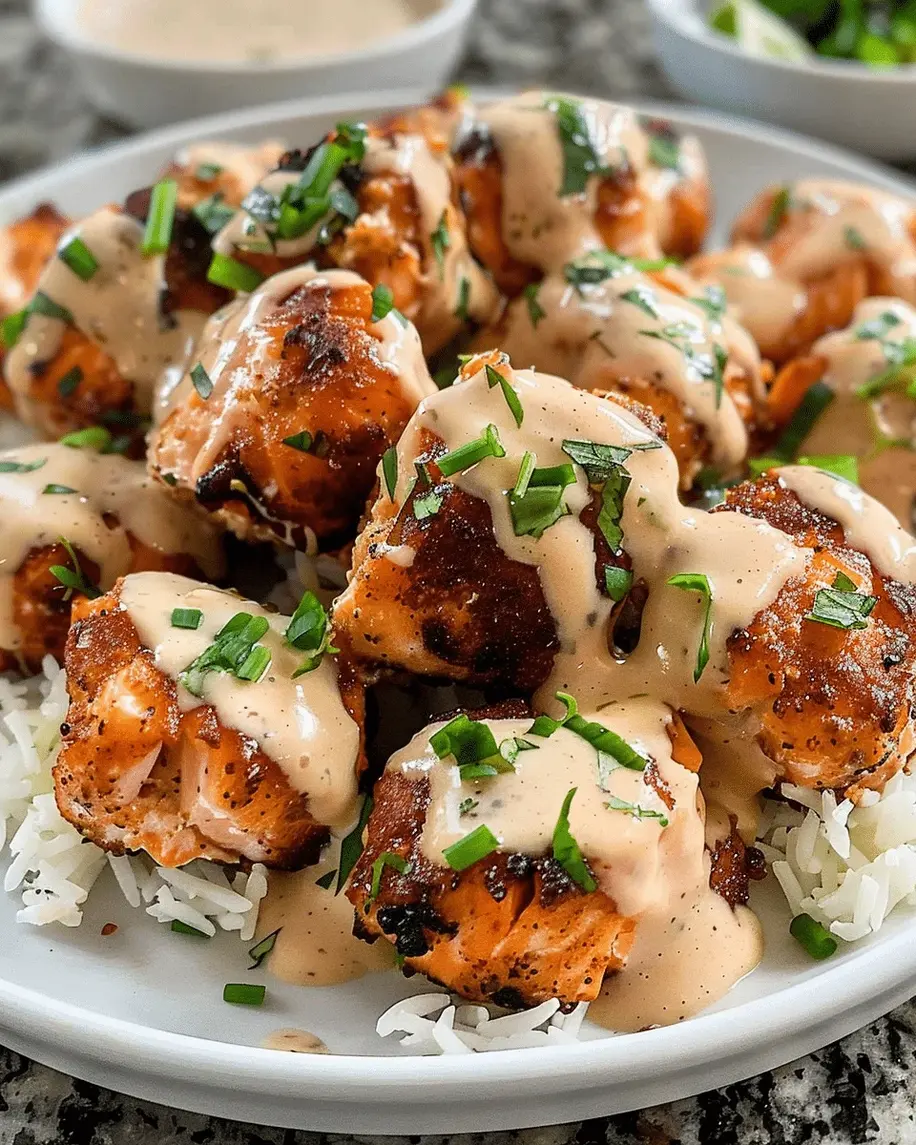
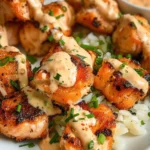
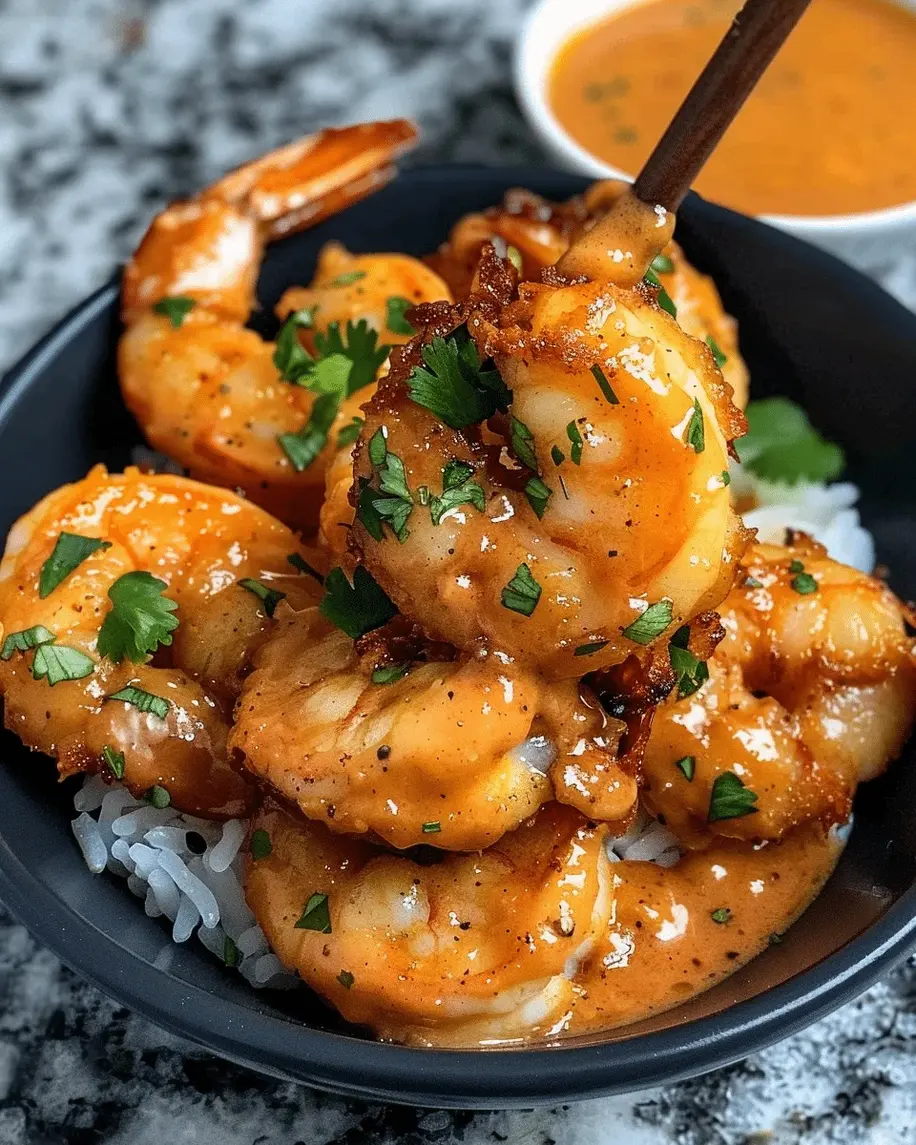
Every bite of these Bang Bang Shrimp delivers a satisfying crunch that gives way to plump, juicy shrimp. The sauce clings to every nook – creamy mayonnaise mingling with sweet chili sauce and a kick of Sriracha, finished with a whisper of honey. The aroma of hot oil and paprika fills your kitchen, and within minutes you have a platter of burnt-orange beauties. Garnish with sliced scallions and sesame seeds – the contrast of colors and textures is stunning. I love serving them on a bed of shredded lettuce with extra sauce drizzled on top. It’s the kind of appetizer that disappears at parties, but honestly? I often make it for a weeknight dinner, paired with steamed rice and a quick cucumber salad. The balance of heat and sweetness is exactly what my Paris-trained palate demands – and it’s simpler than you think.
What sets my version apart is the double-dredge technique – a trick I picked up from a tempura master in Tokyo. After the buttermilk bath, you dredge, shake off excess, let it rest for a minute, then dredge again. That second coating locks in the crunch and ensures it stays crispy even after tossing in the sauce. I also call for a precise oil temperature of 350°F – too low and the shrimp absorb oil; too high and the coating burns before the shrimp cooks. The result is foolproof. And the sauce? I’ve tweaked the ratios so it’s not too heavy – just enough mayo to carry the chili and Sriracha. If you’re nervous about frying, don’t be. I’ll guide you through every step. One bite and you’ll be hooked.
Why This Bang Bang Shrimp Recipe Is the Best
The Flavor Secret: The magic lies in the sauce – a balance of creamy, sweet, spicy, and a hint of tang. Growing up in Morocco, I learned that a great sauce lifts every component. Here, the mayonnaise provides richness, sweet chili sauce adds that characteristic sticky sweetness, Sriracha brings the heat, and honey rounds it all out. This is the same philosophy my mother used when making her chermoula – layers of flavor that sing together.
Perfected Texture: The double-dredge technique (buttermilk + seasoned flour-cornstarch mix, double-dipped) ensures the coating stays shatteringly crisp. In Paris, I learned that moisture is the enemy of crunch – that’s why we let the first dredge rest and why we maintain oil temperature. The cornstarch absorbs less fat than flour alone, giving you a lighter, crispier finish that withstands the sauce.
Foolproof & Fast: From start to finish, you’ll have these beauties on the table in 25 minutes – faster than ordering takeout. The steps are simple, the ingredients are pantry-friendly for most US kitchens, and the result is restaurant-worthy. Even if you’ve never fried shrimp before, my detailed tips will make you feel like a pro. This truly is the best Bang Bang Shrimp recipe for both beginners and seasoned cooks.
Bang Bang Shrimp Recipe Ingredients
When I walk through the Union Square farmers market in NYC, I always pick up fresh shrimp from the fishmonger – wild-caught if possible. But good-quality frozen shrimp (thawed properly) work brilliantly too. The ingredients are simple, but each plays a crucial role. Let me walk you through them so you can make this Bang Bang Shrimp with confidence.
Ingredients List
- For the Shrimp:
1 lb large shrimp, peeled and deveined
½ cup buttermilk
½ cup all-purpose flour
½ cup cornstarch
1 teaspoon salt
½ teaspoon black pepper
½ teaspoon garlic powder
½ teaspoon paprika
Oil for frying (vegetable or canola) - For the Bang Bang Sauce:
½ cup mayonnaise
3 tablespoons sweet chili sauce
1 tablespoon Sriracha (or to taste)
1 teaspoon honey
Ingredient Spotlight
Shrimp: Large (21-25 count per pound) are ideal – they cook quickly and stay juicy. Look for raw, peeled, deveined shrimp. The tail can be left on for a pretty presentation, but removing it makes eating easier. If using frozen, thaw overnight in the fridge or under cold running water.
Buttermilk: This tenderizes the shrimp gently (acids in buttermilk help without making them mushy) and helps the coating adhere. No buttermilk? Use whole milk + 1 tablespoon lemon juice – let sit 5 minutes.
Cornstarch & Flour: The 50-50 blend creates the crispy coating. Cornstarch gives that light, tempura-like crunch; flour provides structure. For gluten-free, swap flour for rice flour.
Sweet Chili Sauce: The backbone of the sauce – look for a brand that’s thick and slightly chunky (like Mae Ploy). It provides sweetness and a mild heat. If you can’t find it, use a mix of ketchup + honey + red pepper flakes.
Sriracha & Honey: Sriracha adds the “bang” – adjust to your heat tolerance. Honey balances the acidity and spice. You can substitute maple syrup or agave.
| Original Ingredient | Best Substitution | Flavor / Texture Impact |
|---|---|---|
| Buttermilk | Whole milk + lemon juice | Slightly less tang, still tenderizes |
| All-purpose flour | Rice flour (for GF) | Lighter, crispier, slightly different browning |
| Mayonnaise | Greek yogurt (plain) | Tangier, less rich, still creamy |
| Sweet chili sauce | Ketchup + honey + red pepper flakes | Less sticky, sweeter, still flavorful |
How to Make Bang Bang Shrimp — Step-by-Step
Let’s get cooking! These steps are easy to follow, and I’ve included my best tips for perfect Bang Bang Shrimp every time.
Step 1: Marinade the Shrimp
In a medium bowl, combine the shrimp and buttermilk. Stir to coat each shrimp. Let it sit for 10 minutes at room temperature. This short marinade tenderizes the shrimp without making it mushy and ensures the coating sticks.
💡 mia’s Pro Tip: Don’t marinate longer than 15 minutes – the acid in buttermilk can start to cook the shrimp, making it tough.
Step 2: Prepare the Dry Coating
In a wide shallow bowl, whisk together the flour, cornstarch, salt, pepper, garlic powder, and paprika. The cornstarch is key for extra crispiness.
⚠️ Common Mistake to Avoid: Don’t skip the resting time after first dredge – letting the coated shrimp sit for 2 minutes helps the coating adhere and prevents falling off during frying.
Step 3: Heat the Oil
Pour about 2 inches of oil into a deep skillet or heavy pot. Heat over medium-high until it reaches 350°F (175°C). Use a thermometer – it’s the only reliable way. If you don’t have one, test with a wooden spoon: bubbles form quickly around the tip.
💡 mia’s Pro Tip: Keep the oil between 340-360°F. If it drops too low when you add shrimp, the coating absorbs oil and becomes greasy. Fry in small batches (4-5 shrimp at a time) to maintain temperature.
Step 4: Dredge the Shrimp
Remove a shrimp from the buttermilk, letting excess drip off. Coat it in the flour mixture, pressing gently. Shake off excess. For extra crispiness, dip it back into the buttermilk briefly and coat a second time (double-dredge). Place on a wire rack while you finish the rest.
⚠️ Common Mistake to Avoid: Don’t crowd the dredging bowl – work in small batches so the flour stays dry and coats evenly.
Step 5: Fry the Shrimp
Carefully add 4-5 coated shrimp to the hot oil. Fry for 2-3 minutes, turning once halfway, until golden brown and the shrimp are cooked through (they’ll curl slightly). Transfer to a paper towel-lined plate. Repeat with remaining shrimp.
💡 mia’s Pro Tip: Keep the fried shrimp in a warm oven (200°F) on a wire rack set over a baking sheet while you finish all the batches. This keeps them crispy without steaming.
Step 6: Make the Bang Bang Sauce
While the shrimp are frying, whisk together the mayonnaise, sweet chili sauce, Sriracha, and honey in a large bowl. Taste and adjust – add more Sriracha for heat, more honey for sweetness.
⚠️ Common Mistake to Avoid: Don’t toss the hot shrimp directly into the sauce – let them cool for 1-2 minutes so the coating doesn’t steam and soften immediately.
Step 7: Toss and Serve
Add the warm fried shrimp to the sauce bowl. Gently toss until each shrimp is evenly coated. Serve immediately – the earlier you serve, the crisper they stay. Garnish with sliced green onions and sesame seeds.
💡 mia’s Pro Tip: For the absolute best texture, toss only the amount you plan to eat right away. Keep extra sauce and shrimp separate, then combine as you go.
| Step | Action | Duration | Key Visual Cue |
|---|---|---|---|
| 1 | Marinate shrimp in buttermilk | 10 minutes | Buttermilk coats shrimp evenly |
| 2 | Whisk dry coating | 2 minutes | Smooth, well-mixed flour blend |
| 3 | Heat oil to 350°F | 5 minutes | Oil shimmers, wooden spoon bubbles |
| 4 | Dredge shrimp (double if desired) | 3-4 minutes | Shrimp coated, no bare spots |
| 5 | Fry shrimp in batches | 2-3 minutes per batch | Golden brown, shrimp curled |
| 6 | Make sauce | 2 minutes | Smooth, creamy, pinkish |
| 7 | Toss and serve | 1 minute | Glossy, fully coated shrimp |
Serving & Presentation
Bang Bang Shrimp are incredible as an appetizer – pile them on a platter with a sprinkle of scallions and sesame seeds, and a few lime wedges on the side. The bright colors and aromas will draw everyone to the table. In my NYC apartment, I often serve them alongside a crisp Asian slaw (shredded cabbage, carrots, rice vinegar, sesame oil) for a refreshing contrast. They also shine as a main – serve over steamed jasmine rice with steamed broccoli or a simple cucumber salad. The sauce that pools at the bottom is gold – I always make extra for dipping.
For a Moroccan twist, I sometimes garnish with chopped fresh cilantro and a drizzle of spicy harissa oil – it adds another layer of warmth. And if you’re feeling French, serve them on a bed of butter lettuce with a light vinaigrette – the creamy shrimp against the crisp greens is divine. No matter how you plate them, these Bang Bang Shrimp are a showstopper.
| Pairing Type | Suggestions | Why It Works |
|---|---|---|
| Side Dish | Steamed jasmine rice, Asian slaw, cucumber salad | Neutral bases balance the spicy sauce |
| Sauce / Dip | Extra Bang Bang sauce, sriracha mayo, sweet chili dip | More of the same deliciousness |
| Beverage | Crisp lager (e.g., Sapporo), Sauvignon Blanc, iced green tea | Cuts through the richness, refreshes palate |
| Garnish | Scallions, sesame seeds, cilantro, lime wedges | Adds freshness, color, and brightness |
Make-Ahead, Storage & Reheating
In my busy NYC life, I prep these Bang Bang Shrimp components separately. You can marinate the shrimp in buttermilk up to 2 hours ahead (keep refrigerated), and mix the dry coating and sauce in advance. But for best results, fry just before serving. Leftovers? They’re still good, but the crunch fades. Here’s how to store and reheat to bring back some of that crispness.
| Method | Container | Duration | Reheating Tip |
|---|---|---|---|
| Refrigerator | Airtight container | Up to 2 days | Reheat in air fryer at 375°F for 3-4 minutes |
| Freezer | Freezer-safe bag, flat | Up to 1 month | Reheat directly from frozen in oven at 400°F for 8-10 minutes |
| Make-Ahead | Separate containers | Marinate + dry mix + sauce: 1 day ahead | Fry just before serving for best crunch |
To reheat, the air fryer is your best friend – it revives the coating beautifully. If you don’t have one, use a preheated oven at 400°F on a wire rack (so hot air circulates) for about 5-6 minutes. Avoid microwaving – it will turn the coating soggy. For frozen shrimp (already fried), I recommend thawing in the fridge overnight, then reheating in the oven. And always toss the reheated shrimp in fresh sauce – the old sauce will have broken down.
Variations & Easy Swaps
I love how versatile this Bang Bang Shrimp recipe is. Whether you’re feeding a crowd with dietary needs or just want to shake things up, these variations are all tested in my kitchen. Here’s a quick overview table, followed by detailed ideas.
| Variation | Key Change | Best For | Difficulty Impact |
|---|---|---|---|
| Baked Bang Bang Shrimp | Oven-bake at 425°F, spray with oil | Healthier, less mess | Easy (watch time) |
| Gluten-Free Version | Use rice flour + cornstarch | GF diets | Easy |
| Spicy Mango Twist | Add 2 tbsp mango purée to sauce | Fruity heat lovers | Easy |
Baked Version (Healthier Option)
To make baked Bang Bang Shrimp, preheat oven to 425°F. Line a baking sheet with parchment and place a wire rack on top. Coat the shrimp as directed, then place on the rack. Spray generously with cooking oil. Bake for 10-12 minutes, flipping halfway, until golden and crispy. The texture won’t be as shatteringly crisp as fried, but it’s still delicious and much lighter. This is my go-to on weeknights when I want to avoid deep-frying but still crave that Bang Bang fix.
Gluten-Free Version
For gluten-free Bang Bang Shrimp, replace all-purpose flour with an equal amount of rice flour (or a GF all-purpose blend). Keep the cornstarch as is – it’s naturally gluten-free. The rice flour gives a slightly crunchier, lighter coating. Be sure to double-dredge for extra adhesion. Also check that your sweet chili sauce and Sriracha are certified GF (most are). This version has become a favorite at my gluten-free dinner parties – no one misses the wheat!
Spicy Mango Twist
During mango season, I love adding a spoonful of ripe mango purée to the Bang Bang sauce. The fruitiness complements the chili beautifully and adds a tropical note that reminds me of my trips to the Caribbean. In New York, I buy Ataulfo mangoes from the corner bodega. Blend a few cubes of ripe mango with a teaspoon of water, then stir into the sauce. Reduce honey slightly if the mango is very sweet. It’s a stunning variation that kids and adults alike adore.
What is the best way to make Bang Bang Shrimp extra crispy at home?
The best way to ensure extra crispy Bang Bang Shrimp is to use a double-dredge technique. First, dip the shrimp in buttermilk, then coat in a flour-cornstarch mixture. Let the coated shrimp rest for 2 minutes, then dip again in buttermilk and repeat the coating. This creates a thicker, crunchier crust. Also, maintain the oil at a steady 350°F – too low and the coating absorbs oil; too high and it burns. Finally, don’t overcrowd the pan; fry in small batches so the temperature doesn’t drop. After frying, drain on a wire rack instead of paper towels to keep the bottom from steaming. These tips from my Paris training will give you restaurant-quality crunch every time.
Can I use frozen shrimp for Bang Bang Shrimp, and do I need to thaw them first?
Yes, frozen shrimp work great for Bang Bang Shrimp, but you must thaw them completely before using. Thaw shrimp overnight in the refrigerator, or place them in a colander under cold running water for about 10-15 minutes. Pat them very dry with paper towels – excess moisture will make the coating soggy and cause the oil to splatter. Once thawed and dried, proceed with the buttermilk marinade as directed. I often use frozen shrimp when I can’t get fresh, and they turn out just as delicious. Just avoid thawing in warm water or microwaving, which can partially cook the shrimp and affect texture.
What can I substitute for the mayonnaise in Bang Bang Shrimp sauce?
If you want to replace mayonnaise in the Bang Bang sauce, the best substitute is plain Greek yogurt (full-fat or 2% – avoids a watery sauce). It still provides creaminess and tang but with less fat and a slightly different flavor. You can also use sour cream for a richer tang, or a blend of half yogurt, half sour cream. For a vegan option, use vegan mayo or blended silken tofu with a splash of lemon juice. Each substitute will change the sauce’s richness: yogurt makes it lighter and more tangy, while vegan mayo is closest to original. Adjust the sweet chili sauce and Sriracha accordingly to rebalance the consistency.
How long should I marinate the shrimp before frying for the ultimate Bang Bang Shrimp?
For the ultimate Bang Bang Shrimp, marinate the shrimp in buttermilk for exactly 10-15 minutes at room temperature. This short marinade is enough to tenderize the shrimp and help the coating adhere without making the flesh mushy. If you marinate longer than 20 minutes, the acid in the buttermilk can start to break down the proteins, leading to a slightly chalky texture. For best results, set a timer. If you need to prep ahead, you can marinate the shrimp up to 2 hours in advance and keep them in the fridge – just pull them out 10 minutes before coating to take the chill off. But the 10-minute soak is truly ideal.
Is Bang Bang Shrimp gluten-free? How can I make it GF?
Traditional Bang Bang Shrimp is not gluten-free because it uses all-purpose flour in the coating. However, you can easily make it gluten-free by swapping the all-purpose flour with rice flour or a gluten-free all-purpose blend. Keep the cornstarch as is – it’s naturally gluten-free. Also ensure your sweet chili sauce and Sriracha are certified gluten-free (most major brands are). The double-dredge technique works beautifully with rice flour. For the sauce, mayonnaise is usually gluten-free, but check labels. This easy swap makes the dish safe for those with celiac disease or gluten sensitivity without sacrificing crunch or flavor. I’ve served this version to GF guests and they rave about it.
Can I bake Bang Bang Shrimp instead of frying?
Absolutely! For a healthier twist, you can bake Bang Bang Shrimp. Preheat your oven to 425°F. Place a wire rack on a baking sheet lined with parchment paper. Coat the shrimp as directed, then place them on the rack. Spray generously with cooking spray (avocado or canola oil spray works well). Bake for 10-12 minutes, flipping halfway through, until golden and crisp. The texture will be slightly less crunchy than deep-fried, but the flavor is still fantastic. To boost crunch, consider using panko breadcrumbs for part of the coating – bake them first for a few minutes to toast. This method cuts down on oil significantly and is perfect for everyday cooking.
How do I store leftover Bang Bang Shrimp and reheat them?
Leftover Bang Bang Shrimp should be stored in an airtight container in the refrigerator for up to 2 days. Keep the sauce separate if possible – toss the shrimp with sauce just before serving. For reheating, the best method is an air fryer at 375°F for 3-4 minutes. Alternatively, reheat in a preheated oven at 400°F on a wire rack for 5-6 minutes. Avoid the microwave, which will make the coating soggy. If the sauce has already been mixed, the shrimp won’t be as crispy, but still delicious. You can also freeze fried shrimp (without sauce) for up to 1 month – reheat directly from frozen at 400°F for 8-10 minutes. Then toss with fresh sauce.
What kind of shrimp is best for Bang Bang Shrimp – large, extra-large, or jumbo?
I recommend using large shrimp (21-25 count per pound) for Bang Bang Shrimp. They are plump enough to stay juicy after frying, but not so large that they take too long to cook through. Extra-large (16-20 count) work great too – just increase frying time by about 30 seconds. Jumbo shrimp can be used, but you may need to butterfly them to ensure even cooking. Smaller shrimp (31-40) tend to dry out quickly. The key is to have shrimp that are big enough to provide a satisfying bite in a single piece. Always buy raw, peeled, and deveined to save time. If you can only find shell-on, peel them before marinating.
Share Your Version!
I hope you love making this Bang Bang Shrimp recipe as much as I do. It’s one of those dishes that feels special yet comes together so quickly. If you try it, please leave a star rating and a comment below – your feedback helps other home cooks decide to give it a shot. Snap a photo of your crispy shrimp and share it on Instagram or Pinterest, tagging @exorecipes. I love seeing your creations and hearing how you personalized the recipe. Did you try the mango twist? Or the gluten-free version? Let me know in the comments!
From my NYC kitchen to yours – I hope this recipe brings as much warmth to your table as it does to mine. — mia 🧡
Love This Recipe? Save It to Pinterest!
If you enjoyed this Bang Bang Shrimp recipe, don’t let it get lost in your browser tabs! 😄 Pin it now so you can find it again anytime – and explore hundreds more tried-and-tested recipes waiting for you on my Pinterest boards.
👉 Follow mia on Pinterest @exorecipe
📌 Pin this recipe · 🔁 Re-pin your favorites · 💬 Tag me when you make it – I love seeing your creations!

Bang Bang Shrimp Recipe The Ultimate Crispy Delight
- Prep Time: 15 minutes
- Cook Time: 10 minutes
- Total Time: 25 minutes
- Yield: 4 servings 1x
- Method: Appetizer
- Cuisine: Asian-American
Description
Crispy, creamy, and spicy – these Bang Bang Shrimp are the ultimate appetizer or main dish, featuring a crunchy coating and a sweet-savory chili sauce.
Ingredients
- For the Shrimp:
- 1 lb large shrimp, peeled and deveined
- 1/2 cup buttermilk
- 1/2 cup all-purpose flour
- 1/2 cup cornstarch
- 1 teaspoon salt
- 1/2 teaspoon black pepper
- 1/2 teaspoon garlic powder
- 1/2 teaspoon paprika
- Oil for frying (vegetable or canola)
- For the Bang Bang Sauce:
- 1/2 cup mayonnaise
- 3 tablespoons sweet chili sauce
- 1 tablespoon Sriracha (or to taste)
- 1 teaspoon honey
Instructions
- In a bowl, combine the shrimp and buttermilk. Let sit for 10 minutes.
- In a separate bowl, whisk together flour, cornstarch, salt, pepper, garlic powder, and paprika.
- Heat oil in a deep skillet or fryer to 350°F (175°C).
- Dredge each shrimp in the flour mixture, shaking off excess.
- Fry in batches for 2-3 minutes until golden brown and crispy. Drain on paper towels.
- In a small bowl, whisk together mayonnaise, sweet chili sauce, Sriracha, and honey.
- Toss the fried shrimp in the sauce until coated. Serve immediately.
Notes
For extra crunch, double-dredge the shrimp. Adjust Sriracha to desired spice level.
Nutrition
- Calories: 380 kcal
- Sugar: 4 g
- Fat: 24 g
- Carbohydrates: 22 g
- Protein: 18 g
Tried This Recipe? Leave a Comment!
Did you make this recipe? I’d love to hear how it turned out! Please leave a comment and a rating below. Your feedback helps other home cooks and supports cheerychop.com!
For more delicious inspiration, follow me on Pinterest!