Table of Contents
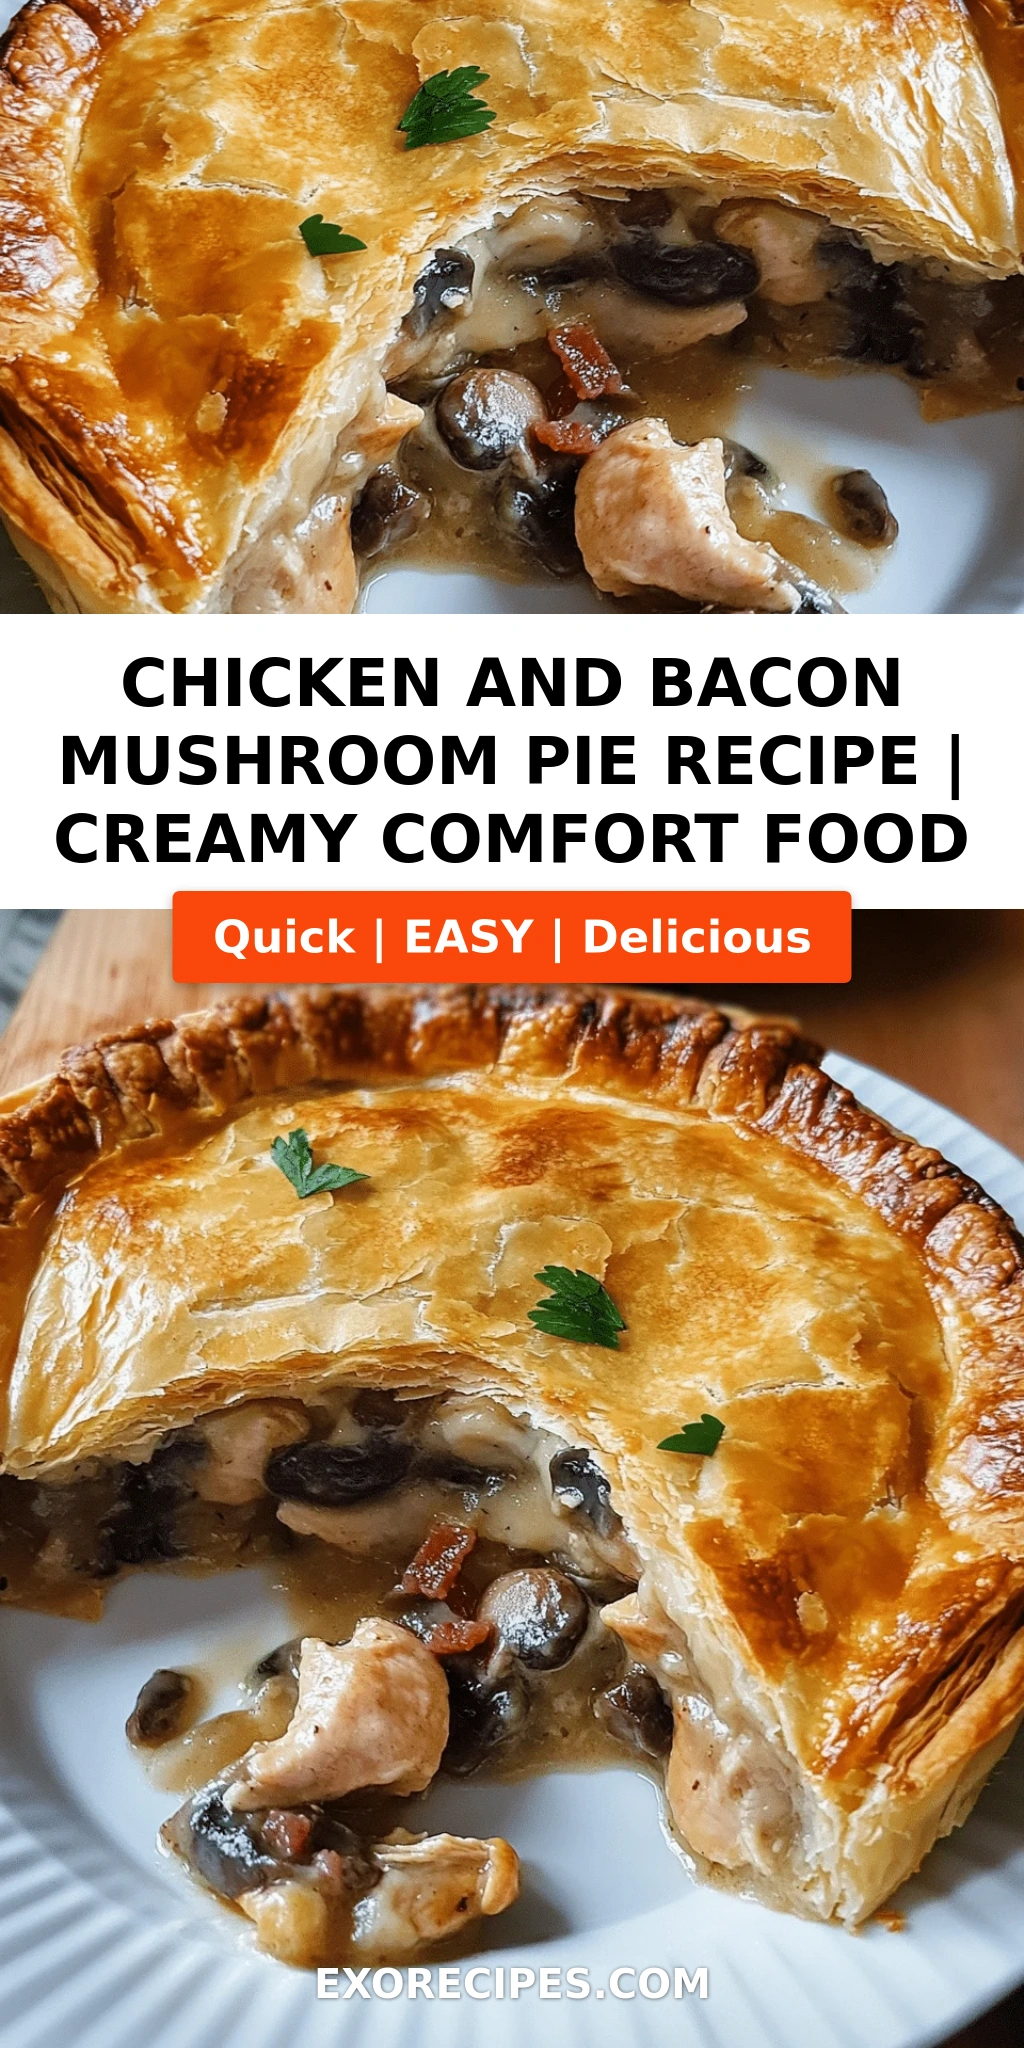
Chicken and Bacon Mushroom Pie: A Comfort Food Classic Youll Crave – A Cozy, Creamy Classic Made Simple
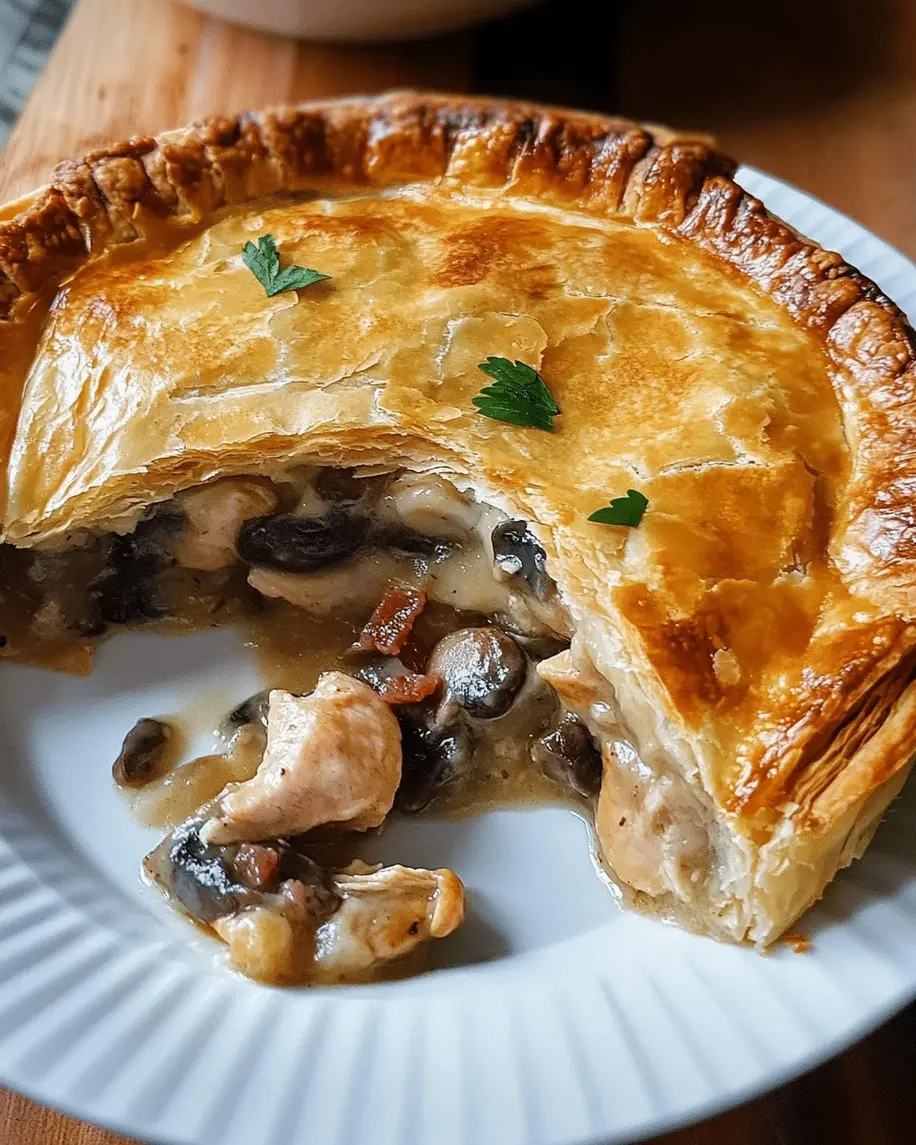
There’s nothing like pulling a golden, bubbling pie out of the oven on a chilly evening. This chicken and bacon mushroom pie is the kind of dish that wraps you up in warmth—creamy, savory, and utterly comforting. Growing up in Morocco, my mother would make a rich tagine with chicken and preserved lemons, but my French-trained palate later discovered the magic of a classic French pâte brisée filled with velvety béchamel. Here in New York, I’ve taken those memories and created a pie that’s pure American comfort with a chef’s touch: chicken and bacon mushroom pie, loaded with crispy bacon, tender chicken, and earthy mushrooms in a creamy mustard sauce, all encased in flaky puff pastry. This easy chicken pie comfort food comes together in under an hour and will have everyone asking for seconds.
Imagine cutting through a puff pastry top that shatters into crisp, buttery layers, releasing a fragrant steam infused with thyme and Dijon. Beneath it, the filling is luxuriously thick—each piece of chicken is juicy, every mushroom slice silky, and the bacon adds a smoky crunch. The sauce is rich without being heavy, thanks to a roux made from the pan drippings. That’s the technique I honed at Le Cordon Bleu in Paris: building flavor at every step, rather than relying on cream alone. The aroma alone will have your family hovering by the oven.
This is not your average chicken pot pie. I’ve added a few professional touches—like browning the bacon separately to keep it crispy, and using Dijon mustard to brighten the cream sauce. One common mistake? Overcooking the chicken before baking. I’ll show you how to keep it tender. 💡 mia’s Pro Tip: Searing the chicken just until golden, then letting the oven finish cooking, keeps it moist and flavorful. Whether you’re a seasoned cook or trying pies for the first time, this recipe is designed to succeed.
Why This Chicken and Bacon Mushroom Pie Recipe Is the Best
The flavor secret here is the layer of umami from crispy bacon and earthy mushrooms, balanced by a touch of Dijon mustard—a trick I learned in a Parisian bistro kitchen. The bacon isn’t just a garnish; it’s fried first so the fat renders, then the chicken and mushrooms cook in that smoky oil. That’s a Moroccan-inspired step: we never waste flavors. Growing up, my mother would fry leftover lamb fat with spices; here, I do the same with bacon. The result? Every bite is infused with savory depth.
Perfected texture comes from the roux technique. Instead of adding flour at the end, I sprinkle it over the cooked mushrooms and cook it for a minute before adding broth and cream. This removes the raw flour taste and creates a silky, clingy sauce. The puff pastry bakes to a golden crisp because I brush it with egg wash—another classic French trick. The steam escapes through slits, so the pastry stays shatteringly crisp, not soggy.
Foolproof and fast? Absolutely. With just 20 minutes of prep and store-bought puff pastry, this bacon chicken pie recipe is accessible to anyone. I’ve tested it in my tiny NYC kitchen and on busy weeknights. It works with leftover rotisserie chicken, too. The recipe includes a make-ahead option so you can prep the filling on Sunday and bake on Monday. Comfort food that fits your schedule—that’s what makes this homemade chicken bacon pie a winner.
Chicken and Bacon Mushroom Pie Ingredients
I love shopping for these ingredients at the Union Square Greenmarket in New York. The mushrooms are best when they’re cremini or baby bellas—meaty and earthy. For the chicken, I use boneless skinless breasts from a local farm; thighs work too for extra richness. And the bacon? I grab a thick-cut applewood-smoked variety. When I was a child in Morocco, we’d visit the souk for spices like dried thyme—here I use dried thyme from the pantry, but fresh if you have it. This ingredient list is short, honest, and built for flavor.
Ingredients List
- 2 tablespoons olive oil
- 1 large onion, chopped
- 2 cloves garlic, minced
- 8 ounces bacon, chopped
- 1 pound boneless skinless chicken breasts, cubed
- 8 ounces mushrooms, sliced (cremini or button)
- 3 tablespoons all-purpose flour
- 1½ cups chicken broth
- ½ cup heavy cream
- 1 tablespoon Dijon mustard
- 1 teaspoon dried thyme
- Salt and pepper to taste
- 1 sheet puff pastry, thawed
- 1 egg, beaten (for egg wash)
Ingredient Spotlight
Mushrooms: Cremini mushrooms are my go-to for this creamy chicken and mushroom pie. They have a deeper, earthier flavor than white buttons and hold their shape during cooking. Look for firm, dry mushrooms with no slime. Substitute: shiitake mushrooms for an even more intense, woodsy note. They’ll add a stronger umami.
Bacon: Thick-cut bacon provides the best smoky crunch. The rendered fat is used to cook the chicken and mushrooms, infusing them with flavor. Avoid super-lean bacon as it won’t yield enough fat. Substitute: pancetta (Italian cured pork belly) for a slightly milder, more refined flavor.
Chicken: I prefer boneless skinless chicken breasts because they are lean and quick-cooking. For more richness, use boneless thighs; they add moisture and flavor. Substitute: leftover rotisserie chicken—just add it at the end of step 8 (no need to brown).
Dijon mustard: A key ingredient that brightens the creamy sauce and cuts through the richness. Do not substitute yellow mustard; it lacks the same complex tang. A whole-grain mustard works beautifully for extra texture.
| Original Ingredient | Best Substitution | Flavor / Texture Impact |
|---|---|---|
| Chicken breasts | Chicken thighs | More moist, richer flavor |
| Cremini mushrooms | Shiitake mushrooms | More earthy, umami-forward |
| Bacon | Pancetta | Milder, less smoky, but still rich |
| Dijon mustard | Whole-grain mustard | More texture, slightly tangier |
| Heavy cream | Half-and-half + 1 tbsp butter | Less rich, still creamy |
How to Make Chicken and Bacon Mushroom Pie — Step-by-Step
Let me walk you through each step. The key is to work in layers, building flavor in the pan. Don’t rush—those few extra minutes of browning make all the difference. Here we go.
Step 1: Preheat Oven
Preheat your oven to 400°F (200°C). Position a rack in the center. While the oven heats, you can prepare the filling on the stovetop—this keeps the workflow smooth.
⚠️ Common Mistake to Avoid: Forgetting to preheat fully. If the oven isn’t hot enough, the puff pastry won’t rise properly and will turn out pale and dense. Always allow at least 10 minutes after the preheat signal.
Step 2: Sauté Aromatics
In a large skillet, heat olive oil over medium heat. Add chopped onion and minced garlic. Cook, stirring often, until softened and translucent—about 5 minutes. Don’t let them brown; you want sweet, not caramelized.
💡 mia’s Pro Tip: Add a pinch of salt when you start the onions. It draws out moisture and speeds up softening without burning.
Step 3: Cook Bacon
Add chopped bacon to the skillet. Cook until crispy, about 6 minutes. Use a slotted spoon to transfer the bacon to a paper towel-lined plate. Leave the rendered fat in the pan—it will flavor the chicken and mushrooms.
⚠️ Common Mistake to Avoid: Crowding the bacon. If you add all the bacon at once, it will steam rather than fry. Work in batches if needed. Crispy bacon is essential for texture.
Step 4: Brown Chicken
Add the cubed chicken to the same skillet with the bacon fat. Cook over medium-high heat until browned on all sides, about 5 minutes. The chicken will not be fully cooked through—that’s fine. Transfer chicken to a plate alongside the bacon.
💡 mia’s Pro Tip: Pat the chicken pieces dry with paper towels before adding to the skillet. This ensures a deep brown sear, not a gray steam.
Step 5: Cook Mushrooms
Add sliced mushrooms to the skillet. Cook over medium heat until they release their liquid and start to turn golden, about 4 minutes. Stir occasionally. The fond (browned bits) on the bottom of the pan is flavor gold.
⚠️ Common Mistake to Avoid: Salting mushrooms too early. Salt draws out moisture too quickly and they steam. Add salt only after they’ve started browning, or wait until step 7.
Step 6: Make the Roux
Sprinkle the flour over the mushrooms and stir well to coat. Cook for 1 minute, stirring constantly. This cooks out the raw flour taste and preps the base for a smooth sauce.
💡 mia’s Pro Tip: Use a wooden spoon to scrape up any browned bits from the bottom as you stir—those bits will dissolve into the sauce and add deep flavor.
Step 7: Build the Sauce
Gradually whisk in the chicken broth and heavy cream. Pour slowly while whisking continuously to avoid lumps. Bring to a gentle simmer and cook until thickened, about 3 minutes. The sauce should coat the back of a spoon.
⚠️ Common Mistake to Avoid: Adding all liquid at once—this creates lumps. Whisk constantly as you pour. If lumps form, use an immersion blender to smooth the sauce.
Step 8: Combine Filling
Stir in Dijon mustard, dried thyme, and salt and pepper to taste. Return the cooked bacon and chicken to the skillet along with any accumulated juices. Mix everything together until evenly coated in the sauce.
💡 mia’s Pro Tip: Taste the filling before adding the pastry. It should be slightly saltier than you think because the puff pastry and egg wash will balance it.
Step 9: Assemble Pie
Transfer the filling to a 9-inch pie dish or individual ramekins. Spread it evenly. If making ahead, stop here, cover, and refrigerate unbaked for up to 24 hours.
⚠️ Common Mistake to Avoid: Filling the dish too full. Leave about ½ inch from the rim so the puff pastry has room to dome and doesn’t overflow.
Step 10: Top with Pastry
On a lightly floured surface, roll out the thawed puff pastry sheet slightly to even it out. Cut a piece slightly larger than your dish. Lay the pastry over the filling, pressing the edges onto the rim of the dish to seal. Cut 4–5 slits in the top to allow steam to escape.
💡 mia’s Pro Tip: For a decorative touch, use a paring knife to score a simple leaf pattern on the pastry. It bakes into a beautiful design.
Step 11: Egg Wash
Brush the top of the pastry generously with beaten egg. This gives the pie a glossy, golden-brown finish. Don’t let the egg pool at the edges; brush evenly.
⚠️ Common Mistake to Avoid: Skipping the egg wash or using a light coat. The egg wash is what creates that beautiful sheen and helps the pastry brown beautifully.
Step 12: Bake
Place the assembled pie on a baking sheet to catch any drips. Bake at 400°F for 20–25 minutes, until the pastry is puffed and deep golden brown and the filling is bubbling through the slits. Let cool for 5 minutes before serving—this sets the filling so it doesn’t run.
💡 mia’s Pro Tip: If the pastry is browning too quickly but the filling isn’t bubbling, tent loosely with foil and continue baking until bubbly.
| Step | Action | Duration | Key Visual Cue |
|---|---|---|---|
| 1 | Preheat oven | 10 min | Oven reaches 400°F |
| 2 | Sauté onion and garlic | 5 min | Onions translucent, not brown |
| 3 | Cook bacon | 6 min | Bacon crispy, fat rendered |
| 4 | Brown chicken | 5 min | Golden edges, still raw inside |
| 5 | Cook mushrooms | 4 min | Mushrooms softened, browned |
| 6 | Make roux | 1 min | Flour fully incorporated |
| 7 | Build sauce | 3 min | Sauce thickens, coats spoon |
| 8 | Combine filling | 2 min | Meat and mushrooms evenly coated |
| 9 | Assemble pie | 5 min | Filling in dish, even surface |
| 10 | Add pastry | 3 min | Pastry draped, slits cut |
| 11 | Egg wash | 1 min | Evenly glossy surface |
| 12 | Bake | 20–25 min | Pastry puffed, deep golden, filling bubbling |
Serving & Presentation
Let the pie rest for 5 minutes after baking – this sets the filling so it slicks smoothly rather than pouring out. Serve it straight from the dish with a big spoon. I love to plate it with a simple side salad of arugula dressed in lemon vinaigrette to cut the richness. For a heartier meal, pair it with roasted green beans or mashed potatoes. In Morocco, we’d serve a similar dish with a side of harissa-spiced couscous – that works beautifully here too. In New York, I often see this pie served with a dollop of crème fraîche and minced chives on top. It adds a touch of elegance without fuss.
For individual ramekins, you can bake them for 18–20 minutes and serve each person their own golden mini-pie. The puff pastry will dome beautifully. Garnish with fresh thyme leaves or a sprinkle of black pepper. This homemade chicken bacon pie is also wonderful with a glass of light red wine like a Pinot Noir or a crisp cider.
| Pairing Type | Suggestions | Why It Works |
|---|---|---|
| Side Dish | Arugula salad, roasted green beans, mashed potatoes | Freshness cuts richness; starch complements |
| Sauce / Dip | Crème fraîche, whole-grain mustard, harissa | Adds tang or heat, balances creaminess |
| Beverage | Pinot Noir, hard cider, unsweetened iced tea | Light tannins or acidity cut through fat |
| Garnish | Fresh thyme, chives, flaky sea salt | Herbaceous aroma, visual pop, final seasoning |
Make-Ahead, Storage & Reheating
My NYC schedule is always busy, so I often make the filling a day in advance. Just prepare through step 8, let it cool completely, then cover and refrigerate. When you’re ready to bake, assemble the pie (steps 9–12) and add 5–10 minutes to the baking time. The filling can also be frozen separately for up to 3 months.
| Method | Container | Duration | Reheating Tip |
|---|---|---|---|
| Refrigerator | Covered dish or airtight container | 3–4 days | Reheat in 350°F oven for 15–20 min; if microwave, use 50% power to avoid soggy pastry |
| Freezer | Fully assembled unbaked, tightly wrapped in foil and plastic | Up to 3 months | Bake from frozen at 400°F for 35–40 min, covering top if browning too fast |
| Make-Ahead | Filling only, refrigerated in a bowl | Up to 24 hours | Reheat filling gently on stovetop before assembling if it seems thick; add splash of broth |
The best way to reheat individual slices? I place them on a baking sheet in a 350°F oven for 10–12 minutes. The oven crisps the pastry perfectly. If you’re short on time, the microwave works, but the pastry will soften. I always serve any leftover pie with a fresh green salad to brighten the flavors.
Variations & Easy Swaps
This recipe is incredibly versatile. Here are a few ways I’ve tweaked it depending on what’s in my fridge or what season it is in the NYC markets.
| Variation | Key Change | Best For | Difficulty Impact |
|---|---|---|---|
| Moroccan Spiced | Add 1 tsp ras el hanout, ½ tsp cinnamon, and chopped dried apricots | A sweet and savory twist that feels like home | Easy (just add spices with thyme) |
| Gluten-Free | Use gluten-free flour blend (1:1) and gluten-free puff pastry | Those with gluten intolerance | Easy (gluten-free flour behaves the same; check pastry labels) |
| Dairy-Free | Replace heavy cream with full-fat canned coconut milk; use olive oil instead of butter in roux | Dairy-free diet | Medium (coconut milk changes flavor slightly; add extra thyme) |
Moroccan Spiced Variation
In this version, I bring my heritage into the creamy chicken and mushroom pie. Add 1 teaspoon ras el hanout (a fragrant Moroccan spice blend) and ½ teaspoon cinnamon along with the thyme. Toss in ¼ cup chopped dried apricots when you add the broth. The sweetness of apricots balances the smoky bacon and warm spices. It’s a twist that reminds me of Sunday dinners in Marrakech, but it works perfectly with the French-inspired creamy sauce.
Gluten-Free Version
To make this recipe gluten-free, substitute the all-purpose flour with a good 1:1 gluten-free flour blend (I use Bob’s Red Mill). Also, swap the puff pastry for a gluten-free version—many grocery stores now carry it (check for Schär or homemade options). The roux will thicken just as well; just be sure to cook the flour mixture for a full 1½ minutes to avoid any gritty texture. The flavor remains rich and creamy.
Dairy-Free Version
For a dairy-free pie, replace the heavy cream with full-fat coconut milk (not light). The sauce will have a subtle coconut aroma, which pairs surprisingly well with the bacon and thyme. Use olive oil instead of butter in the roux (the recipe already uses the bacon fat, so you don’t need extra). The result is still luscious and satisfying. I’ve served this at a dinner party without anyone guessing it’s dairy-free.
Can I use a different type of meat instead of chicken in this bacon mushroom pie?
Absolutely. This creamy chicken and mushroom pie works beautifully with other proteins. Turkey is a fantastic substitute—use cubed turkey breast or even leftover roasted turkey. For a richer flavor, try boneless pork chops or pork tenderloin, cut into bite-sized pieces. Ground beef or sausage are also options, but note that ground meats change the texture slightly; cook them thoroughly and drain excess fat. If you prefer a vegetarian version, replace the chicken with extra mushrooms (like portobello) and add chickpeas or white beans for protein. Just adjust the simmering time if using pre-cooked meat.
How do I prevent the pie crust from getting soggy when making chicken and bacon mushroom pie?
The number one trick is to not let the filling sit too long before adding the pastry. Assemble the pie just before baking. If you’ve made the filling ahead, reheat it gently on the stovetop until hot before topping with puff pastry—this ensures the oven gets a head start on crisping the bottom. Also, brush the bottom of the pastry (the side that touches the filling) with a thin layer of egg white or mustard to create a moisture barrier. Finally, bake at a high temperature (400°F) and don’t crowd the oven—proper air circulation helps the pastry puff and stay crisp.
What is the best way to reheat leftover chicken and bacon mushroom pie?
For the best texture, reheat leftover slices in a 350°F oven for 10–12 minutes. Place the pie on a baking sheet so the heat circulates underneath, which helps re-crisp the puff pastry. If the top starts browning too quickly, tent loosely with foil. Avoid microwaving if you want a crispy crust—the microwave will steam the pastry and make it soggy. If you must use a microwave, use 50% power and eat immediately. For individual ramekins, the oven is still your best friend; they come back to life in about 8–10 minutes.
Can I make this chicken and bacon mushroom pie ahead of time and freeze it?
Yes! This easy chicken pie comfort food freezes beautifully. Assemble the pie completely (filling, pastry, egg wash) but do not bake. Wrap the dish tightly in plastic wrap, then a layer of aluminum foil, and freeze for up to 3 months. To bake, do not thaw—remove the wrapping and place the frozen pie directly in a preheated 400°F oven. Bake for 35–40 minutes, covering the top with foil if it browns too quickly. The internal temperature should reach 165°F. Let it rest 5 minutes before serving. The filling will be just as creamy.
Can I use a different type of mushroom in this creamy chicken and mushroom pie?
Of course. Cremini or white button mushrooms are standard, but you can mix in shiitake, oyster, or chanterelles for an upscale twist. Shiitakes add a more intense, almost meaty flavor. If using wild mushrooms, expect a slightly deeper earthy taste and a more elegant texture. Always clean mushrooms with a dry brush or damp paper towel—never rinse them, as excess water makes them steam instead of brown. For a budget-friendly option, stick with cremini; they deliver great flavor without breaking the bank.
What can I use instead of puff pastry for the pie topping?
If you don’t have puff pastry, you have several options. A classic pie crust (either homemade or store-bought) works wonderfully—use a 9-inch top crust and crimp the edges. For a quicker topping, drop spoonfuls of buttermilk biscuit dough over the filling and bake as directed (biscuits soften more but are delicious). Dairy-free? Use a gluten-free pie crust or even polenta rounds. Puff pastry is my favorite for its flakiness, but any pastry or biscuit topping will turn this bacon chicken pie recipe into a homey meal.
How can I add more vegetables to this chicken and bacon mushroom pie?
Extra vegetables are a great way to boost nutrition and flavor. I love adding frozen peas (stir them in frozen at step 8—they warm through during baking). Sliced carrots, parsnips, or leeks can be cooked with the mushrooms. For a green touch, add chopped spinach or kale in the last minute of cooking the mushrooms—they wilt quickly and blend into the creamy sauce. Just be careful not to add too many water-rich veggies (like zucchini) as they may make the sauce thinner. If you do, simply simmer a little longer to thicken.
Share Your Version!
I’d love to see how your chicken and bacon mushroom pie turns out! Did you try a variation like the Moroccan-spiced one or a gluten-free version? Leave a star rating and a comment below—your feedback helps other readers and inspires me to create more recipes. Share a photo of your golden pie on Instagram or Pinterest and tag @exorecipes. Tell me: what’s your favorite comfort food memory? I can’t wait to hear from you.
From my NYC kitchen to yours — I hope this recipe brings as much warmth to your table as it does to mine. — mia 🧡
Love This Recipe? Save It to Pinterest!
If you enjoyed this Chicken and Bacon Mushroom Pie recipe, don’t let it get lost in your browser tabs! 😄 Pin it now so you can find it again anytime — and explore hundreds more tried-and-tested recipes waiting for you on my Pinterest boards.
👉 Follow mia on Pinterest @exorecipe
📌 Pin this recipe · 🔁 Re-pin your favorites · 💬 Tag me when you make it — I love seeing your creations!
Did you make this recipe? I’d love to hear about it!
Drop a comment below with your star rating and any tweaks you made. Your version might just become someone else’s new favorite!

Chicken and Bacon Mushroom Pie: A Comfort Food Classic Youll Crave
- Prep Time: 20 minutes
- Cook Time: 35 minutes
- Total Time: 55 minutes
- Yield: 6 1x
- Method: Main Course
- Cuisine: American
Description
A hearty, creamy chicken and bacon mushroom pie with a flaky golden crust. Perfect comfort food for chilly evenings.
Ingredients
- 2 tablespoons olive oil
- 1 large onion, chopped
- 2 cloves garlic, minced
- 8 ounces bacon, chopped
- 1 pound boneless skinless chicken breasts, cubed
- 8 ounces mushrooms, sliced
- 3 tablespoons all-purpose flour
- 1 1/2 cups chicken broth
- 1/2 cup heavy cream
- 1 tablespoon Dijon mustard
- 1 teaspoon dried thyme
- Salt and pepper to taste
- 1 sheet puff pastry, thawed
- 1 egg, beaten (for egg wash)
Instructions
- Preheat oven to 400°F (200°C).
- In a large skillet, heat olive oil over medium heat. Add onion and garlic, cook until softened, about 5 minutes.
- Add bacon and cook until crispy, about 6 minutes. Remove bacon with a slotted spoon and set aside.
- Add chicken to the skillet and cook until browned on all sides, about 5 minutes. Remove and set aside.
- Add mushrooms and cook until tender, about 4 minutes.
- Sprinkle flour over the mushrooms and stir to coat. Cook for 1 minute.
- Gradually whisk in chicken broth and heavy cream. Bring to a simmer and cook until thickened, about 3 minutes.
- Stir in Dijon mustard, thyme, salt, and pepper. Return bacon and chicken to the skillet. Mix well.
- Transfer the filling to a 9-inch pie dish or individual ramekins.
- Roll out puff pastry on a lightly floured surface. Cut to fit the top of the dish(es). Place pastry over filling, pressing edges to seal. Cut a few slits in the top for steam to escape.
- Brush pastry with beaten egg.
- Bake for 20-25 minutes, until pastry is golden brown and filling is bubbling. Let cool for 5 minutes before serving.
Notes
For a gluten-free version, substitute all-purpose flour with a gluten-free flour blend and use gluten-free puff pastry. The pie can be made ahead and refrigerated unbaked for up to 24 hours; bake as directed, adding 5-10 minutes to the baking time.
Nutrition
- Calories: 520 kcal
- Sugar: 4 g
- Fat: 34 g
- Carbohydrates: 24 g
- Protein: 28 g
Tried This Recipe? Leave a Comment!
Did you make this recipe? I’d love to hear how it turned out! Please leave a comment and a rating below. Your feedback helps other home cooks and supports cheerychop.com!
For more delicious inspiration, follow me on Pinterest!