Table of Contents
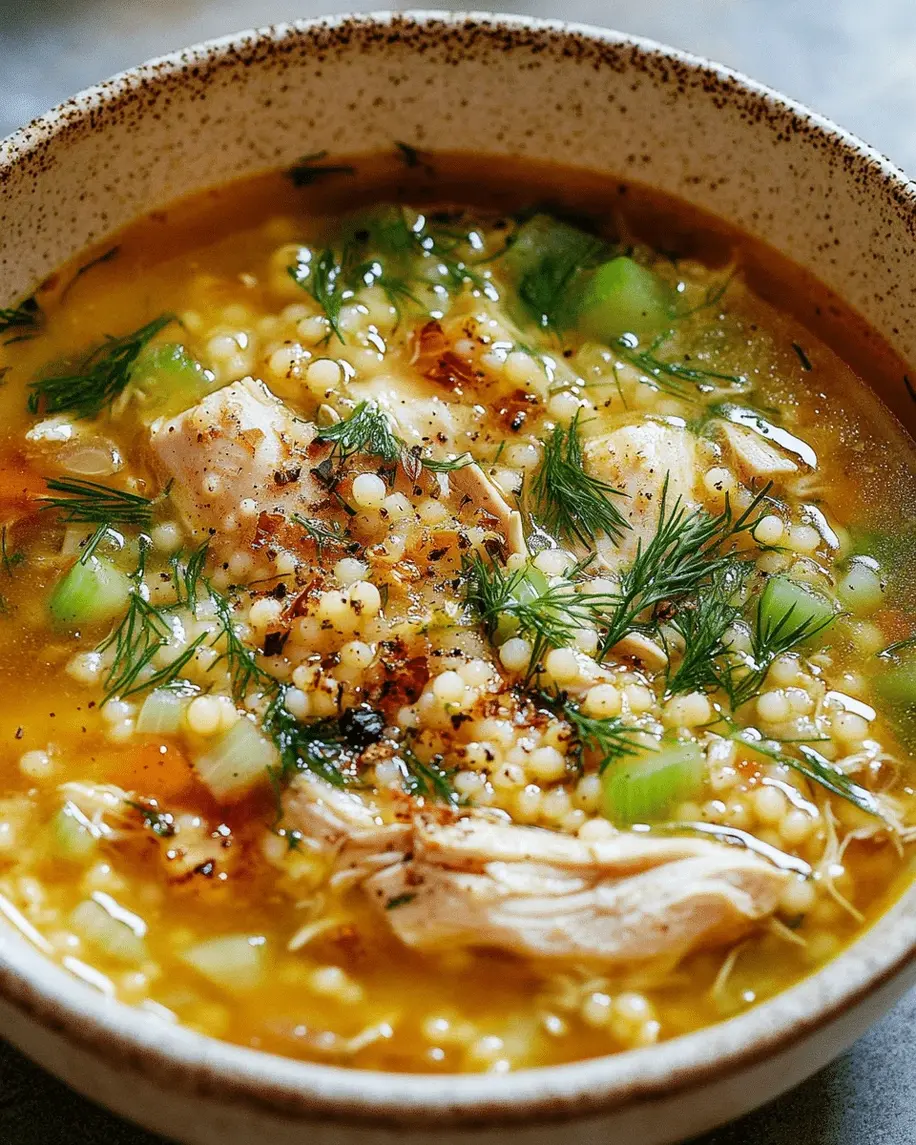
Chicken and Shirataki Noodle Soup: A Low-Carb Comfort in Every Bowl – A Nourishing Bowl of Warmth
Cold weather in New York City always pulls me back to the warmth of a soup pot. As a chef trained in Paris and raised in Morocco, I’ve learned that comfort doesn’t have to come from heavy carbs. This low carb chicken noodle soup is my answer to cozy, soul-warming flavor without the grain. When I first introduced shirataki noodles into my kitchen, my mother in Marrakech raised an eyebrow — but after one taste she admitted the texture was spot on. Every spoonful here is like a hug in a bowl, and the best part? You can enjoy it without logging a single net carb.
The aroma of thyme and rosemary dancing with tender chicken and a delicate broth fills the whole apartment. As the vegetables soften and the shirataki noodles soak up the savory liquid, you get that same mouthfeel as traditional egg noodles — but with only a fraction of the carbs. The bright pop of fresh parsley at the end adds a touch of green that reminds me of the fresh herbs my grandmother would snip from her little garden near the Atlas Mountains. It’s familiar, nourishing, and deeply satisfying.
Over the years I’ve tested every trick to keep shirataki noodles from turning rubbery, and I’m excited to share the simple technique that makes all the difference. This recipe is specifically designed for the keto chicken soup lovers and anyone looking for healthy chicken soup low carb. In the step-by-step below, I’ll show you how to rinse, dry-fry, and simmer the noodles so they become delicate and silky — not plastic-like. One common mistake is tossing them straight into the broth; a quick extra step changes everything. Keep reading for my chef-approved method.
Why This Low-Carb Chicken Noodle Soup Recipe Is the Best
The Flavor Secret: My French culinary training taught me that a great soup starts with a proper mirepoix — onions, carrots, and celery cooked slowly in olive oil until they release their sweetness. I build that foundation before adding the broth, which gives the low carb chicken noodle soup a rich, layered taste you won’t get from just boiling vegetables. The Moroccan influence? A touch of dried rosemary, which I’ve always loved for its piney warmth that pairs beautifully with poultry.
Perfected Texture: The biggest challenge with shirataki noodle soup recipe is avoiding that spongy bite. I solve it by first rinsing the noodles under cold running water, then dry-frying them in a hot non-stick pan for 2-3 minutes until they squeak. This evaporates excess liquid and firms them up just enough so they slurp like real noodles in the finished soup. It’s a quick trick I learned from a Japanese chef in a soba shop near Les Halles in Paris.
Foolproof & Fast: This keto chicken soup comes together in 30 minutes flat, making it perfect for a busy weeknight. Even if you’ve never cooked with shirataki before, the step-by-step instructions and visual cues in the table below will guide you through. And because the recipe is infinitely adaptable, you can make it your own — just check the variations section for ideas inspired by my NYC farmers market finds.
Low-Carb Chicken Noodle Soup Ingredients
When I’m planning this soup for a cozy Sunday, I head to the Union Square Greenmarket for the freshest carrots and celery. But even from a regular supermarket, these simple low-carb comfort food ingredients work beautifully. The shirataki noodles can be found in the refrigerated section of most grocery stores or online — look for the kind packed in liquid, not dry. Let’s break down everything you’ll need.
Ingredients List
- 1 tablespoon olive oil
- 1 small onion, diced
- 2 cloves garlic, minced
- 2 carrots, peeled and sliced
- 2 celery stalks, sliced
- 6 cups chicken broth (low-sodium recommended)
- 2 cups cooked shredded chicken (rotisserie works great)
- 1 (8-ounce) package shirataki noodles, rinsed and drained
- 1 teaspoon dried thyme
- 1 teaspoon dried rosemary
- Salt and pepper to taste
- 2 tablespoons fresh parsley, chopped (for garnish)
Ingredient Spotlight
Shirataki Noodles: These translucent noodles are made from the konjac yam and are virtually zero net carbs. They come packed in liquid with a faint odor — a quick rinse under cold water removes that. For the very best texture in a low carb chicken noodle soup, dry-fry them first as I explain in the steps. Substitution: If you can’t find shirataki, use zucchini noodles (zoodles) or kelp noodles. Zoodles will be softer; kelp noodles are crunchier.
Chicken Broth: I always use low-sodium store-bought broth and season later — this gives me control over the salt level. For a richer flavor, try homemade bone broth or add a Parmesan rind while simmering. The broth is the backbone of healthy chicken soup low carb, so don’t skimp here.
Cooked Shredded Chicken: Rotisserie chicken is a lifesaver for speed. I pick up a bird from the market, shred it while still warm, and freeze the leftovers for future soups. Dark meat adds juiciness, but white meat keeps it lean. Either works perfectly in this keto chicken soup.
| Original Ingredient | Best Substitution | Flavor / Texture Impact |
|---|---|---|
| Shirataki noodles | Zucchini noodles (zoodles) or kelp noodles | Zoodles: softer, more tender; kelp noodles: crunchier, slightly salty |
| Chicken broth | Vegetable broth or bone broth | Vegetable: lighter, less savory; bone broth: richer, more collagen |
| Cooked chicken | Turkey, pork tenderloin, or firm tofu (for vegetarian) | Turkey: similar poultry flavor; pork: sweeter; tofu: absorbs broth |
| Carrots | Zucchini or turnip | Zucchini: lower carb, softer; turnip: slightly bitter, earthier |
How to Make Low-Carb Chicken Noodle Soup — Step-by-Step
Follow these simple steps and you’ll have a comforting bowl that rivals any classic soup — without the carbs. I’ve included visual cues and a quick-reference table so you can check your doneness at a glance.
Step 1: Sauté the Aromatics
Heat 1 tablespoon olive oil in a large pot over medium heat. Add the diced onion and minced garlic, stirring often. Cook until the onion turns translucent and fragrant — about 2 minutes. The garlic should sizzle but not brown.
💡 mia’s Pro Tip: Don’t rush this step. A slow sauté draws out the natural sweetness of the onion and creates a flavor base that will perfume the entire low carb chicken noodle soup.
Step 2: Add Vegetables
Add the sliced carrots and celery to the pot. Cook for about 3 minutes, stirring occasionally. You want the carrots to brighten in color and the celery to soften slightly. This mirepoix duo adds body and subtle sweetness.
⚠️ Common Mistake to Avoid: Cutting vegetables too large — they won’t soften in time. Aim for uniform ¼-inch slices so everything cooks evenly.
Step 3: Simmer the Broth
Pour in 6 cups chicken broth and bring to a boil. Once boiling, reduce the heat to low and let it simmer uncovered for 10 minutes. This allows the herbs and vegetables to infuse the liquid with flavor. The broth should be gently bubbling, not a rolling boil.
💡 mia’s Pro Tip: If you have a Parmesan rind, toss it in during this simmer. It adds an umami depth that makes the soup taste like it’s been cooking for hours.
Step 4: Add Chicken and Noodles
Stir in the 2 cups shredded chicken, the rinsed and drained shirataki noodles, 1 teaspoon thyme, and 1 teaspoon rosemary. Let everything simmer for 5 more minutes. The noodles should be tender but not mushy, and the chicken will be warmed through.
⚠️ Common Mistake to Avoid: Adding shirataki noodles without dry-frying them first can lead to a rubbery texture. After rinsing, toss them in a hot skillet with no oil for 2-3 minutes until they “squeak” — this step is key for a silky result in your shirataki noodle soup recipe.
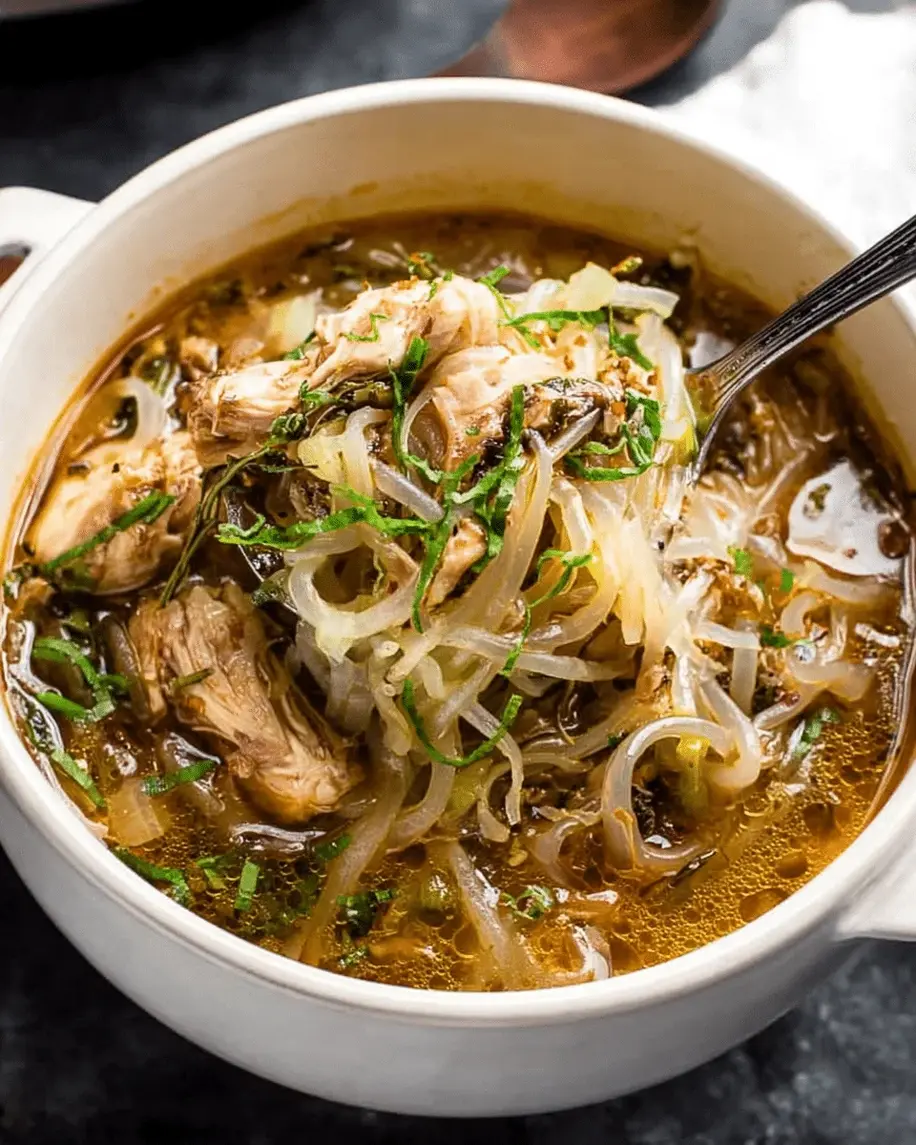
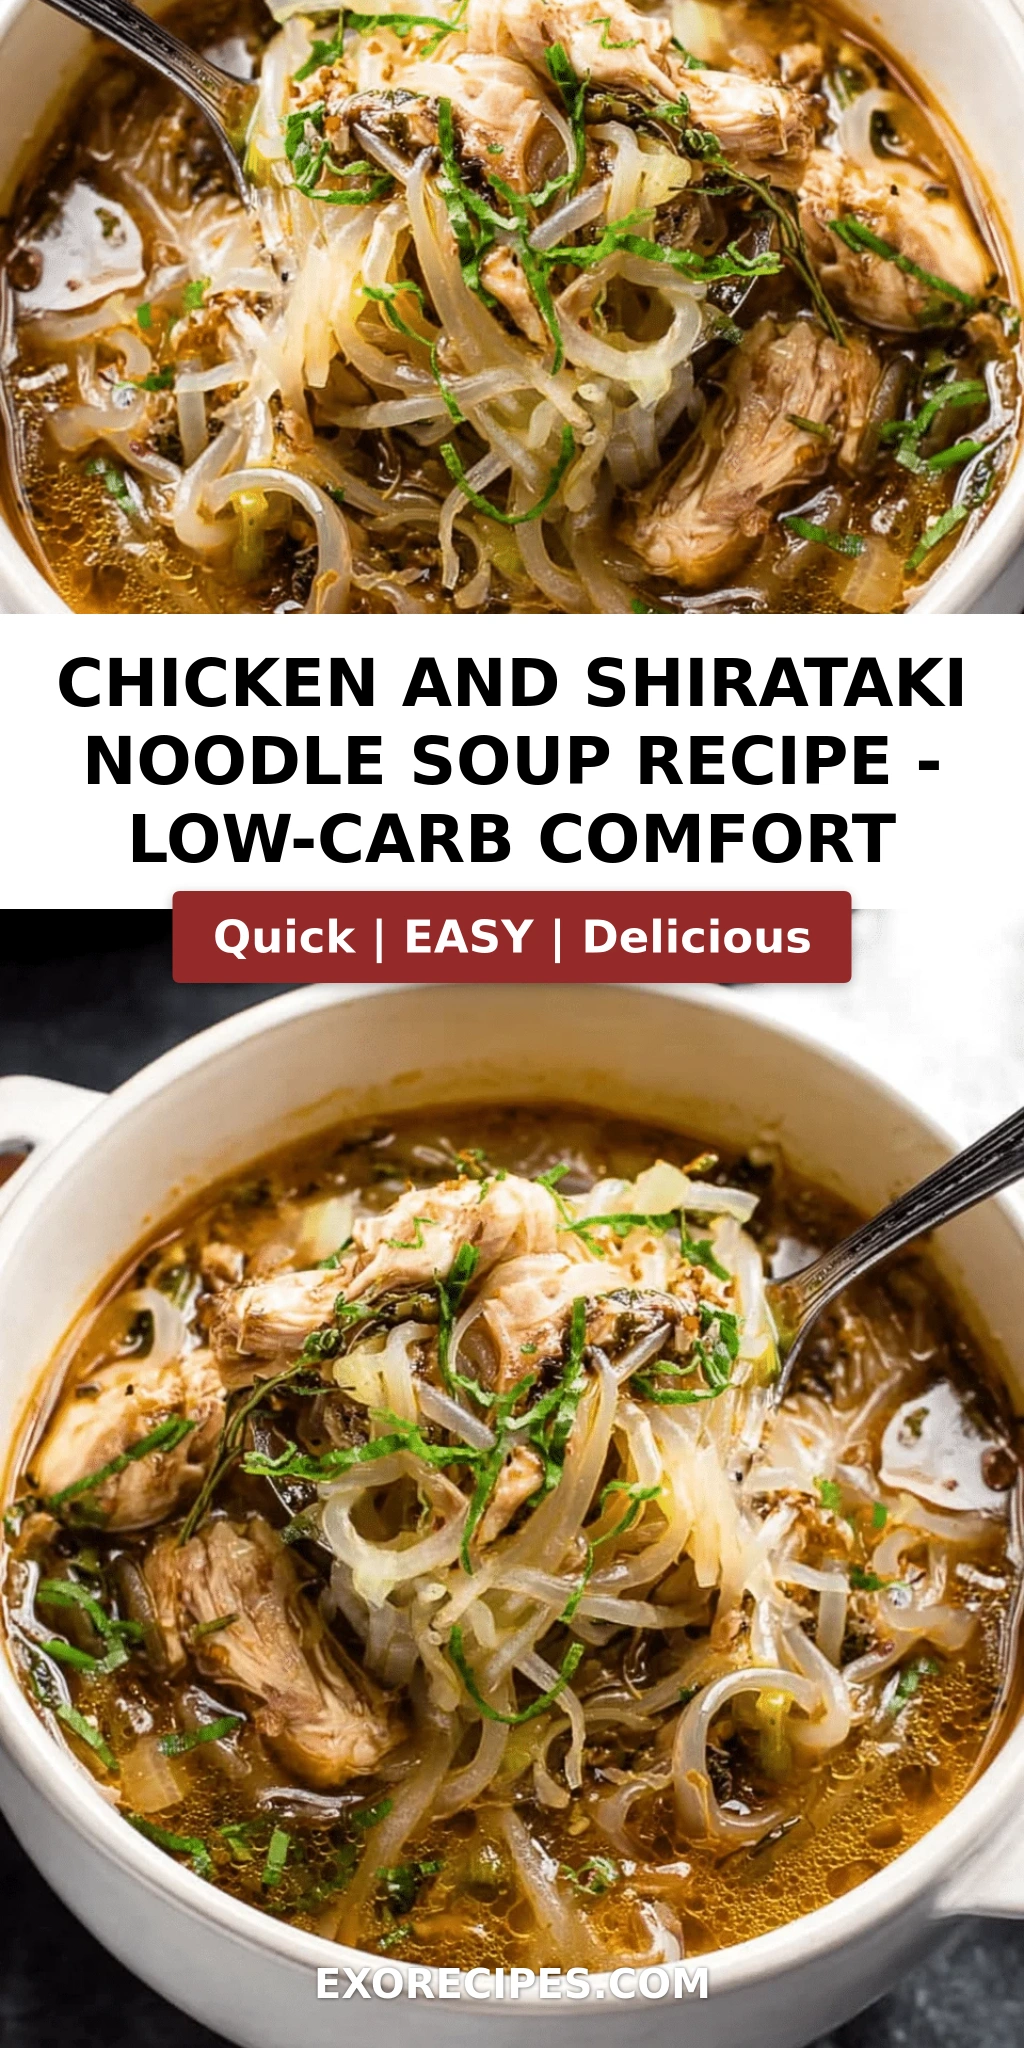
Step 5: Season and Serve
Turn off the heat. Season with salt and pepper to taste. Ladle the soup into four bowls and garnish generously with fresh parsley. The parsley adds a bright, clean finish that balances the savory notes.
💡 mia’s Pro Tip: Taste before salting — some broths are already salty. Start with ½ teaspoon of salt and adjust from there. A squeeze of lemon juice at the table can also brighten the flavors.
| Step | Action | Duration | Key Visual Cue |
|---|---|---|---|
| 1 | Sauté aromatics | 2 minutes | Onion turns translucent, garlic fragrant |
| 2 | Add vegetables | 3 minutes | Carrots brighten, celery softens |
| 3 | Simmer broth | 10 minutes | Gentle bubbles, broth lightly colored |
| 4 | Add chicken and noodles | 5 minutes | Noodles become translucent, chicken warmed |
| 5 | Season and serve | — | Bright green parsley on top |
Serving & Presentation
I love to serve this low carb chicken noodle soup in deep, wide bowls so the broth is front and center. A final drizzle of good quality extra-virgin olive oil adds a fruity note that reminds me of the olive groves near my hometown. For a little crunch, I sometimes sprinkle toasted sesame seeds or a few shards of Parmesan crisp on top — a nod to my Parisian bistro days.
In New York, I like to pair this soup with a simple side like a crisp green salad or a slice of 90-second keto bread (made with almond flour). It also works wonderfully as a starter for a cozy dinner party. The fresh parsley is non-negotiable for me — it brightens the entire bowl.
| Pairing Type | Suggestions | Why It Works |
|---|---|---|
| Side Dish | Green salad with vinaigrette, keto garlic bread, roasted asparagus | Adds freshness and crunch; low-carb complements |
| Sauce / Dip | Pesto drizzle, sriracha mayo, tahini yogurt (if not dairy-free) | Pesto adds herbaceous richness; sriracha gives heat |
| Beverage | Iced herbal tea, sparkling water with lemon, dry white wine | Light drinks cleanse palate; wine matches comfort food |
| Garnish | Fresh parsley, lemon wedge, shaved Parmesan | Parsley for fresh pop; lemon acidity; Parmesan umami |
Make-Ahead, Storage & Reheating
As a busy NYC food blogger and mom, I rely on make-ahead meals. This low carb chicken noodle soup is a superstar for meal prep — the flavors actually deepen overnight. I do recommend storing the shirataki noodles separately if you plan to keep the soup for more than a day, because they can absorb too much broth and become mushy. But if you’re eating within 24 hours, you can leave them in.
| Method | Container | Duration | Reheating Tip |
|---|---|---|---|
| Refrigerator | Airtight container | Up to 4 days | Reheat gently on stove; add a splash of broth if thickened |
| Freezer | Freezer-safe zip bag (remove noodles) | Up to 3 months | Thaw overnight in fridge; reheat and add fresh noodles after |
| Make-Ahead | Cook soup base, store noodles separately | Up to 3 days in advance | Reheat base, then add dry-fried noodles and simmer 3 mins |
For the best reheating results, I always use the stove over the microwave. The microwave can make the noodles tough and the vegetables overly soft. Pour the soup into a saucepan, bring to a gentle simmer over medium-low heat, and stir occasionally until warmed through. If you stored the noodles separately, rinse them again under hot water and add them just before serving.
Another tip from my Parisian training: if the soup thickens too much after refrigeration, add a bit of hot broth or water to loosen it. This keeps the texture light and silky — exactly what you want from a healthy chicken soup low carb.
Variations & Easy Swaps
One of the reasons I love this shirataki noodle soup recipe is how flexible it is. Whether you’re avoiding dairy, need more protein, or just want to clean out the fridge, here are my go-to variations. Each one has been tested in my own kitchen.
| Variation | Key Change | Best For | Difficulty Impact |
|---|---|---|---|
| Moroccan Spiced | Add 1 tsp cumin, ½ tsp cinnamon, a pinch of saffron | Warming, exotic twist | Easy (same process) |
| Creamy Coconut | Add 1 cup coconut milk, omit carrots | Dairy-free, rich | Easy (simmer with coconut milk) |
| Veggie-Loaded | Add mushrooms, zucchini, bell peppers | More vegetables, low carb | Easy (add in step 2) |
Moroccan Spiced Variation
This is my personal favorite — a nod to my roots. Add 1 teaspoon cumin, ½ teaspoon cinnamon, and a pinch of saffron threads to the broth along with the herbs. The cumin warms the soup, the cinnamon adds a subtle sweetness, and saffron gives a golden color and floral aroma. It transforms the keto chicken soup into something truly special.
Creamy Coconut Variation (Dairy-Free)
For a rich, dairy-free version, replace the carrots with sliced zucchini (to keep carbs low) and stir in 1 cup of full-fat coconut milk at the end. The coconut pairs beautifully with the ginger I sometimes add — just grate in a 1-inch piece of fresh ginger with the garlic. This gives the low carb chicken noodle soup a Thai-inspired feel that’s silky and satisfying.
Veggie-Loaded Variation
When the Union Square market is overflowing with summer produce, I double down on vegetables. Add sliced mushrooms, diced zucchini, and chopped bell peppers in step 2. The mushrooms add an umami punch, and the zucchini keeps the carb count low. This version is perfect for healthy chicken soup low carb when you want extra fiber and color.
How do you prepare shirataki noodles so they don’t have a rubbery texture in soup?
Great question! The key is to first rinse the noodles under cold running water for about 30 seconds to remove the packing liquid. Then, dry-fry them in a hot non-stick skillet over medium-high heat for 2-3 minutes, stirring constantly, until they start to squeak and look slightly dry. This removes excess moisture and firms up the texture. Once added to the soup, they’ll absorb broth without becoming rubbery. Avoid overcooking — simmer only 5 minutes after adding them to the pot. That simple trick makes all the difference for a silky shirataki noodle soup recipe.
Can I substitute chicken with another protein in chicken and shirataki noodle soup?
Absolutely. This low carb chicken noodle soup is very flexible. Turkey breast or ground turkey works well and keeps a similar flavor profile. For a red meat option, try thinly sliced beef sirloin or pork tenderloin; just sear them first and add them at the same time as the chicken. If you’re looking for a vegetarian or vegan version, firm tofu or tempeh are excellent substitutes. Tofu can be cubed and added directly to the broth; tempeh has a nuttier flavor and holds up beautifully. Adjust the cooking time so the protein is heated through but not overcooked.
How long should I cook chicken and shirataki noodle soup on the stove?
The total stove time is about 20 minutes after the initial prep. You’ll simmer the broth with vegetables for 10 minutes to develop flavor, then add the chicken and shirataki noodles and simmer for another 5 minutes. So from the moment you put the pot on, you’re looking at roughly 30 minutes total. The key is not to let the noodles cook longer than necessary — 5 minutes is ideal. Overcooking can make the shirataki release more water and become mushy. For the best texture, follow the timing in the recipe closely.
What are the best low-carb vegetables to add to this chicken and shirataki noodle soup?
You already have a solid base with carrots and celery, but if you want to keep carbs even lower, swap the carrots for zucchini, yellow squash, or finely chopped broccoli stems. Mushrooms (any variety) add wonderful umami and almost no carbs. Bell peppers add color and a bit of sweetness. For a slight crunch, try sliced bok choy or napa cabbage stirred in at the last minute. Leafy greens like spinach or kale can also be added in the final 2 minutes of cooking — they wilt quickly and boost nutrients. These additions keep the soup satisfying and low-carb.
Can I freeze this low carb chicken noodle soup?
Yes, but with one important tip: remove the shirataki noodles before freezing. The noodles can become very mushy and lose their texture after thawing. Freeze just the broth, vegetables, and chicken in an airtight container for up to 3 months. When you’re ready to eat, thaw the base overnight in the refrigerator, reheat it on the stove, and then add fresh (dry-fried) shirataki noodles. Simmer for 5 minutes and you’ll have a soup that tastes freshly made. This method preserves the quality of both the broth and the noodles.
Is this soup keto-friendly? What are the net carbs?
Yes, this is a perfect keto chicken soup! Per serving, the recipe contains only 8g total carbohydrates. The fiber in the vegetables and the negligible carbs from shirataki noodles bring the net carbs even lower — around 5g net carbs per serving, depending on your specific ingredients. With 25g protein and 10g fat, it fits beautifully into a standard keto macro plan. If you need extra fat, drizzle a little olive oil or swirl in a pat of butter before serving. It’s satisfying, nourishing, and keeps you in ketosis.
What is the best broth to use for the most flavor?
I recommend using a high-quality, low-sodium chicken broth as the base. My personal favorites are the organic broths from the refrigerated section of the grocery store — they have a cleaner, more natural chicken flavor. If you have time, homemade bone broth is unbeatable for richness and collagen. For a shortcut, add a Parmesan rind while the soup simmers (remove before serving) or a splash of coconut aminos for depth. Avoid overly salty broths; you can always add salt later. The broth is the soul of this healthy chicken soup low carb, so choose one you enjoy drinking on its own.
Can I make this soup vegetarian or vegan?
Definitely. Simply replace the chicken with firm tofu, tempeh, or chickpeas. Use vegetable broth instead of chicken broth. For extra umami, add a few dried shiitake mushrooms to the simmering broth and remove them before serving. The shirataki noodles and vegetable base remain the same. You can also boost protein with a scoop of unflavored vegan protein powder stirred into the broth, or by adding edamame. The result is a delicious low carb comfort food that’s completely plant-based and still very satisfying.
How can I add more heat to this soup?
If you like a spicy kick, there are several easy ways to heat up this low carb chicken noodle soup. Add ½ teaspoon crushed red pepper flakes along with the thyme and rosemary. Or stir in 1 teaspoon sriracha or sambal oelek before serving. For a smoky heat, use a pinch of chipotle powder or a chopped chipotle pepper in adobo sauce. You can also garnish with thinly sliced fresh jalapeño. Start with a small amount, taste, and adjust — you can always add more heat but can’t take it out. Spice lovers, go for it!
Can I use other types of low-carb noodles besides shirataki?
Absolutely. While shirataki noodles are my favorite for this shirataki noodle soup recipe because of their neutral flavor and zero net carbs, you can substitute with other low-carb options. Kelp noodles are a great alternative — they are firmer and have a mild sea salt taste. Zucchini noodles (zoodles) are popular but add more liquid and can become very soft after a few minutes in broth. Palmini (hearts of palm noodles) are another good choice; they have a slightly crunchy texture similar to bamboo shoots. For each substitute, adjust the cooking time: no-cook zoodles can be stirred in at the end, while kelp noodles benefit from a 5-minute simmer.
Share Your Version!
I truly believe the best recipes are the ones we share and make our own. If you tried this low carb chicken noodle soup, I’d love to hear how it turned out! Did you add the Moroccan spices? Or swap in coconut milk? Leave a star rating and a comment below — every review helps another home cook find the perfect bowl of comfort.
And don’t forget to snap a photo and tag @exorecipes on Instagram or Pinterest. I love scrolling through your creations — it reminds me why I do what I do. If you have a question about the shirataki noodle soup recipe or want to suggest a variation, ask away in the comments. I read every single one.
From my NYC kitchen to yours — I hope this recipe brings as much warmth to your table as it does to mine. — mia 🧡
Love This Recipe? Save It to Pinterest!
If you enjoyed this Chicken and Shirataki Noodle Soup recipe, don’t let it get lost in your browser tabs! 😄 Pin it now so you can find it again anytime — and explore hundreds more tried-and-tested recipes waiting for you on my Pinterest boards.
👉 Follow mia on Pinterest @exorecipes
📌 Pin this recipe · 🔁 Re-pin your favorites · 💬 Tag me when you make it — I love seeing your creations!
Chicken and Shirataki Noodle Soup: A Low-Carb Comfort in Every Bowl
- Prep Time: 10 minutes
- Cook Time: 20 minutes
- Total Time: 30 minutes
- Yield: 4 1x
- Method: Soup
- Cuisine: American
Description
A warming, low-carb chicken soup with shirataki noodles that delivers comfort without the carbs. Perfect for keto and gluten-free diets.
Ingredients
- 1 tablespoon olive oil
- 1 small onion, diced
- 2 cloves garlic, minced
- 2 carrots, peeled and sliced
- 2 celery stalks, sliced
- 6 cups chicken broth
- 2 cups cooked shredded chicken
- 1 (8-ounce) package shirataki noodles, rinsed and drained
- 1 teaspoon dried thyme
- 1 teaspoon dried rosemary
- Salt and pepper to taste
- 2 tablespoons fresh parsley, chopped (for garnish)
Instructions
- Heat olive oil in a large pot over medium heat. Add onion and garlic, sauté until fragrant, about 2 minutes.
- Add carrots and celery, cook for another 3 minutes, stirring occasionally.
- Pour in chicken broth and bring to a boil. Reduce heat and simmer for 10 minutes.
- Stir in shredded chicken, shirataki noodles, thyme, and rosemary. Simmer for 5 minutes.
- Season with salt and pepper to taste. Ladle into bowls and garnish with fresh parsley.
Notes
Shirataki noodles are low in calories and carbs. Rinse them well before using to remove any odor. For a richer flavor, use homemade chicken broth.
Nutrition
- Calories: 220
- Sugar: 4g
- Fat: 10g
- Carbohydrates: 8g
- Protein: 25g
Tried This Recipe? Leave a Comment!
Did you make this recipe? I’d love to hear how it turned out! Please leave a comment and a rating below. Your feedback helps other home cooks and supports cheerychop.com!
For more delicious inspiration, follow me on Pinterest!