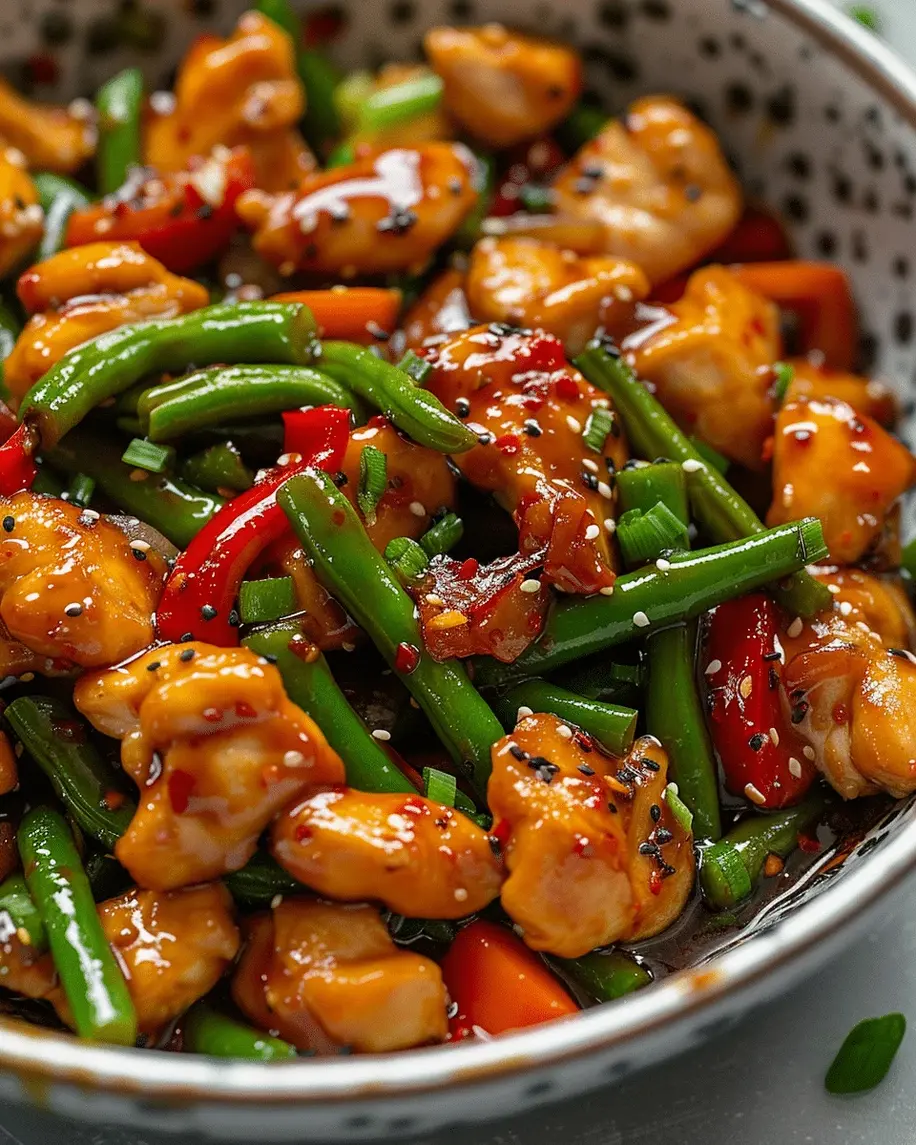
Chicken and Mushroom Skillet in a Creamy Asiago and Mustard Sauce – A Rich, One-Pan Wonder

⚖️
Difficulty
Easy
⏲️
Prep Time
10 mins
🕒
Cook Time
25 mins
⏱️
Total Time
35 mins
🍽️
Servings
4

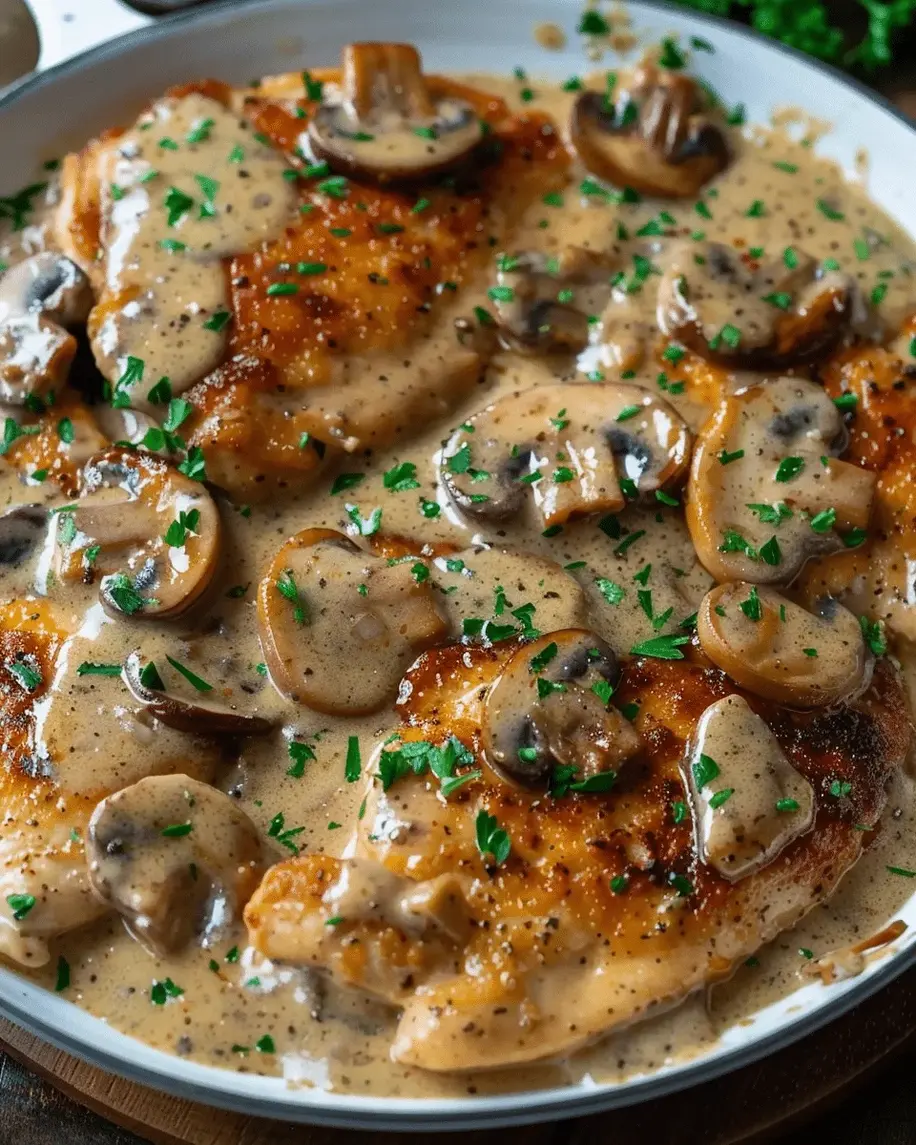
There are some dinners that feel like a warm hug after a long day, and this creamy chicken and mushroom skillet is exactly that. I first made this recipe on a rainy Tuesday in my tiny Upper West Side kitchen, craving something deeply comforting but quick enough to pull off before my daughter’s homework meltdown started. The combination of nutty Asiago, two kinds of Dijon mustard, and earthy cremini mushrooms became an instant classic in our household. This skillet chicken dinner with creamy sauce is the kind of meal that makes you look like you spent hours in the kitchen—but really, it’s on the table in just over half an hour.

Imagine slicing into a perfectly seared chicken breast, the golden crust giving way to juicy, tender meat, all while the sauce wraps around every bite like a silky blanket. The sharp tang of whole‑grain mustard cuts through the richness of the cream, while Asiago adds a subtle nuttiness that lingers. The mushrooms—oh, the mushrooms! They soak up every bit of that savory, mustard‑infused cream and become little umami bombs. I always say the secret is scraping the browned bits off the bottom of the pan after searing the chicken; that’s where the flavor lives. It’s a technique I learned in Paris, and it turns a simple skillet meal into something truly restaurant‑worthy.

What I love most about this easy chicken mushroom recipe is how forgiving it is. You don’t need a culinary degree to nail the creamy sauce—just a good skillet and a little patience. My version balances the acidity of the mustards with the richness of the cream, so every spoonful is perfectly rounded. I’ll share my trick for keeping the sauce velvety (no curdling here!), plus a common mistake that can turn your dish greasy. Whether you’re a busy parent, a weeknight warrior, or someone who just loves a cozy dinner, this recipe will become a favorite.

Why This Chicken Mushroom Asiago Skillet Recipe Is the Best

The Flavor Secret: The double‑mustard approach is my little twist. I use both smooth Dijon for depth and whole‑grain Dijon for those little bursts of tangy seeds. Growing up in Morocco, my mother always used mustard in her tagines to brighten slow‑cooked meats. That memory inspired me to elevate a simple American skillet with that same brightness. The Asiago cheese, with its firm, salty profile, melts beautifully and doesn’t overpower the mustard—it just makes the whole sauce more luxurious.

Perfected Texture: The key to a silky sauce—no lumps, no breakage—lies in the order of ingredients. After deglazing the pan with white wine (or broth), I reduce the heat before adding the cream. This prevents the dairy from shocking and splitting. I stir in the cheese off the heat, letting the residual warmth melt it gently. The result is a sauce that clings to every piece of chicken and mushroom like a dream.

Foolproof & Fast: This is a true one‑pan meal. No transferring, no extra dishes. Even if you’re new to cooking chicken, the visual cues are easy to follow: golden crust on the chicken, mushrooms that smell nutty and browned, and a sauce that thickens just enough to coat the back of a spoon. I’ve tested this recipe a dozen times with friends and family, and everyone—even the pickiest eaters—asks for seconds.

Creamy Chicken and Mushroom Skillet Ingredients

I pick up most of these ingredients at my local farmers market in Brooklyn, where the cremini mushrooms are always piled high and the cream comes from a nearby dairy farm. In my Paris years, I learned to respect every component—each one plays a role. Let’s look at what you’ll need.

Ingredients List

  • 1 1/2 lbs boneless, skinless chicken breasts (about 2 large)
  • Salt and freshly ground black pepper
  • 2 tablespoons olive oil
  • 8 oz cremini mushrooms, sliced
  • 3 cloves garlic, minced
  • 1/2 cup dry white wine (or chicken broth)
  • 1 cup heavy cream
  • 1/4 cup grated Asiago cheese
  • 2 tablespoons whole-grain Dijon mustard
  • 1 tablespoon Dijon mustard
  • 1 teaspoon dried thyme
  • 1/4 cup chopped fresh parsley (for garnish)

Ingredient Spotlight

Cremini Mushrooms – These are simply baby portobellos, with a deeper flavor than white button mushrooms. They hold their shape well and add an earthy, meaty texture. Look for firm, dry caps without blemishes. If you can’t find cremini, white button mushrooms work, but you’ll lose a bit of depth. Shiitake mushrooms are also a fantastic swap—just remove the stems.

Asiago Cheese – Aged Asiago is salty and crumbly, while fresh Asiago is more buttery and meltable. For this sauce, fresh Asiago is best because it melts smoothly. I grate it myself from a block—pre‑shredded cheese often contains anti‑caking agents that can make the sauce grainy. If you can’t find Asiago, Parmesan or Pecorino Romano are decent substitutes, but they’re saltier, so adjust your seasoning.

Whole‑Grain Dijon Mustard – This adds both texture and a milder, more complex heat than standard Dijon. If you only have smooth Dijon, increase the amount slightly and add a pinch of mustard powder for a similar kick. The seeds are what make the sauce pretty and give little bursts of flavor.

Heavy Cream – This is the backbone of the sauce. For a lighter version, you can use half‑and‑half, but the sauce will be thinner and less luscious. If you go that route, reduce the simmering time to avoid over‑reducing. I never use milk because it curdles easily with the acidity of the mustard and wine.

Dry White Wine – Use something you’d drink—Sauvignon Blanc or Pinot Grigio work beautifully. The alcohol cooks off, leaving behind bright acidity that balances the cream. No wine? Chicken broth with a squeeze of lemon juice does the job, though the flavor will be slightly less complex.

Original IngredientBest SubstitutionFlavor / Texture Impact
Cremini mushroomsWhite button or shiitakeLighter or more intense earthy flavor
Asiago cheeseParmesan or Pecorino RomanoSaltier, slightly grainier melt
Whole-grain DijonSmooth Dijon + pinch mustard powderLess texture, still tangy
Heavy creamHalf‑and‑half (not milk)Thinner sauce, less rich
Dry white wineChicken broth + lemon juiceLess wine flavor, still acidic

How to Make Chicken and Mushroom Skillet – Step by Step

Trust me, this is one of those recipes where the process is as satisfying as the result. You’ll see the magic happen right in the skillet.

Step 1: Prepare the Chicken

Pat the chicken breasts dry with paper towels. This is non‑negotiable for a good sear. Season both sides generously with salt and pepper. Let them sit for a few minutes while you heat the pan.

💡 mia’s Pro Tip: If the chicken breasts are very thick, slice them horizontally into two thinner cutlets. They’ll cook more evenly and faster, staying juicy.

Step 2: Sear the Chicken

Heat the olive oil in a large skillet over medium‑high heat until shimmering. Add the chicken and cook without moving it for 4–5 minutes, until the bottom is golden brown. Flip and cook another 4–5 minutes. Transfer to a plate; it will finish cooking later.

⚠️ Common Mistake to Avoid: Crowding the pan. If the chicken pieces touch, they steam instead of sear. Use a large skillet or cook in batches if needed.

Step 3: Cook the Mushrooms

In the same skillet (don’t wipe it clean!), add the sliced mushrooms. Cook over medium‑high heat, stirring occasionally, until they release their liquid and start to brown, about 5 minutes. Add the garlic and cook 1 minute more.

💡 mia’s Pro Tip: Don’t salt the mushrooms until they start browning. Salt draws out moisture too early and can make them soggy. Wait until they’ve released their water and then season lightly.

Step 4: Build the Sauce

Pour in the white wine (or broth) and use a wooden spoon to scrape up all the browned bits stuck to the bottom of the pan. Let it simmer for 2 minutes. Reduce the heat to medium‑low, then stir in the heavy cream, grated Asiago, whole‑grain mustard, Dijon mustard, and dried thyme. Cook for about 3 minutes, stirring occasionally, until the sauce thickens slightly.

⚠️ Common Mistake to Avoid: Adding the cream over high heat. That’s the fastest way to curdle the sauce. Keep the heat low and stir gently.

Step 5: Finish and Serve

Return the chicken to the skillet, spoon the sauce over the tops. Cover the skillet and simmer for 5–7 minutes, until the chicken reaches an internal temperature of 165°F. Garnish with fresh parsley and serve immediately.

💡 mia’s Pro Tip: Let the chicken rest for 2–3 minutes under the sauce before serving. This allows the juices to redistribute, making every slice extra moist.

StepActionDurationKey Visual Cue
1Pat and season chicken2 minDry surface, even seasoning
2Sear chicken8–10 minGolden brown crust on both sides
3Cook mushrooms + garlic6 minMushrooms release liquid then brown; garlic fragrant
4Deglaze + make sauce5 minWine bubbles, bits lift; sauce thickens slightly
5Simmer covered5–7 minChicken reaches 165°F internally

Serving and Presentation

This creamy chicken and mushroom skillet begs to be served over something that soaks up the sauce—mashed potatoes, egg noodles, or a pile of buttery rice. I love to spoon the chicken and mushrooms onto a warm plate, then drizzle extra sauce from the pan over everything. A sprinkle of fresh parsley and maybe a few extra cracks of black pepper finish it off. In my home, we often have a simple arugula salad on the side, dressed with lemon and olive oil, to cut through the richness.

When I entertain, I sometimes transfer the whole skillet to a wooden board (after it’s cooked) and set it on the table with a big spoon. It feels rustic and inviting—a perfect dish for a casual dinner party. My French training taught me that the best dishes don’t need fussy plating; let the colors and textures speak for themselves.

Pairing TypeSuggestionsWhy It Works
Side DishMashed potatoes, egg noodles, rice, crusty breadSoaks up the creamy mustard sauce
VegetableSautéed spinach, roasted asparagus, green beansAdds color and freshness to balance richness
BeverageSauvignon Blanc, unoaked Chardonnay, dry hard ciderAcidity cuts through the cream, complements mustard
GarnishFresh parsley, chopped chives, a few grinds of black pepper, lemon zestBrightens the dish visually and flavor‑wise

Make-Ahead, Storage and Reheating

I’m all about meal prep that doesn’t sacrifice quality. This recipe works beautifully for busy weeknights. You can cook the chicken and mushrooms, make the sauce, and store everything together. Just reheat gently to keep the sauce smooth.

MethodContainerDurationReheating Tip
RefrigeratorAirtight containerUp to 3 daysReheat in a skillet over low heat, adding a splash of cream or broth if sauce looks thick
FreezerFreezer‑safe container (leave headspace)Up to 2 monthsThaw overnight in fridge, then reheat low and slow; stir in a little cream to refresh texture
Make-AheadCombine all in a baking dish1 day in advanceBake covered at 350°F for 15–20 min until hot; finish uncovered 5 min for browning

My favorite way to reheat leftovers is in a small skillet over low heat, covered, for about 10 minutes. If the sauce seems too thick after chilling, I add a tablespoon of cream or chicken broth and stir constantly. Never microwave this dish at full power—it can make the chicken rubbery and the sauce separate. A gentle warm‑up keeps it as luscious as the day you made it.

Variations and Easy Swaps

VariationKey ChangeBest ForDifficulty Impact
Chicken ThighsUse boneless, skinless thighs instead of breastsMore forgiving, stays juicierSame – just adjust cooking time slightly (thighs need an extra minute per side)
Dairy‑FreeSubstitute coconut cream (full‑fat) for heavy cream, use nutritional yeast for AsiagoLactose‑intolerant or dairy‑free guestsSlightly harder – coconut cream adds a hint of sweetness; use a pinch of sugar to balance mustard
Herb & Lemon TwistAdd 1 tbsp fresh lemon juice and 1 tsp lemon zest with the cream; swap thyme for fresh tarragonBrighter, springtime feelSame – a tangy twist that pairs well with chicken

Chicken Thighs Adaptation

If you’re a thigh person (like my husband!), switch to boneless, skinless thighs. They are more forgiving and stay succulent even if you cook them a minute too long. Sear them the same way as breasts, about 5 minutes per side, then finish covered for 10 minutes. The sauce works beautifully with the richer meat. I often add a sprinkle of smoked paprika to the seasoning for a deeper, almost North African touch—a nod to my mother’s spice cabinet.

Dairy‑Free Variation

For a dairy‑free version, I replace the heavy cream with full‑fat coconut cream and use nutritional yeast instead of Asiago. The coconut adds a subtle sweetness that actually complements the mustard wonderfully. Be sure to use a good quality coconut cream with no gums. The sauce will be slightly thinner, so simmer it an extra couple of minutes. I tested this for a friend’s dairy‑free dinner party, and everyone went back for seconds—even the dairy lovers!

Herb and Lemon Twist

When I find beautiful fresh tarragon at the NYC farmers market in spring, I swap the thyme for 2 tablespoons of chopped tarragon and add a good squeeze of lemon juice and a teaspoon of lemon zest at the end. The tarragon’s licorice‑like notes and the lemon’s brightness lift the creamy sauce to something ethereal. This version is especially lovely served over fluffy couscous—a dish that reminds me of warm evenings in Morocco.

What is the best type of mushroom to use in a creamy chicken and mushroom skillet?

I always reach for cremini mushrooms—they’re baby portobellos with a deeper, earthier flavor than plain white buttons. They hold their shape well during cooking and release just enough moisture to help build the sauce. If you can’t find cremini, white button mushrooms work in a pinch, but you’ll miss that robust taste. For a more gourmet twist, sliced shiitake mushrooms (stems removed) add a wonderful umami kick. Avoid using pre-sliced mushrooms from the store if possible—they tend to be wet and won’t brown as beautifully. Give the mushrooms plenty of space in the skillet so they caramelize instead of steam.

Can I substitute the Asiago cheese with another cheese in this creamy mustard sauce?

Absolutely! Asiago has a nutty, slightly salty flavor that melts beautifully, but you can use Parmesan or Pecorino Romano in its place. Parmesan is milder, while Pecorino is saltier—so you may need to adjust the salt in the recipe. For a creamier, less sharp cheese, try Gruyère or fontina. They melt like a dream and add a buttery note. Just avoid pre-shredded cheeses, as they contain anti-caking agents that can make the sauce grainy. Grate your cheese fresh from a block for the smoothest, most flavorful sauce.

How do I prevent the creamy sauce from curdling when cooking chicken and mushrooms?

Curdling happens when cream is shocked by high heat or acid. To keep your sauce silky, always reduce the heat to medium‑low before adding the cream. After deglazing the pan with wine, let it simmer for a minute, then turn the heat down. Pour the cream in slowly while stirring gently. Don’t let it boil rapidly—a gentle simmer is all it needs to thicken. Adding the cheese off the heat and stirring until melted also helps. If you’re substituting half‑and‑half, be extra careful because it has less fat and can curdle more easily. A splash of cornstarch slurry (1 tsp cornstarch + 2 tsp water) whisked into the cream before adding it can stabilize the sauce, though I rarely need it.

What should I serve with chicken and mushroom skillet in creamy Asiago mustard sauce?

This dish is incredibly versatile. I love serving it over a bed of buttery mashed potatoes, wide egg noodles, or fluffy white rice—all of them soak up the luscious sauce. For a lighter meal, try it with roasted asparagus or a simple green salad dressed with lemon vinaigrette. Crusty bread is also perfect for dipping into the leftover sauce. If you’re feeding a crowd, double the recipe and serve with a side of sautéed spinach and a glass of Sauvignon Blanc. The acidity of the wine cuts through the cream and complements the mustard beautifully.

Can I use chicken thighs instead of breasts in this recipe?

Yes, chicken thighs are a fantastic swap. Boneless, skinless thighs are more forgiving and stay juicy even if you cook them an extra minute. The flavor is richer, which pairs wonderfully with the bold mustard and Asiago sauce. For cooking, sear the thighs the same way as breasts—about 5 minutes per side—then let them simmer in the sauce covered for about 10 minutes until they reach 165°F. Thighs can sometimes release a bit more fat, so you may want to spoon off any excess before building the sauce. I often use thighs when I want an even more decadent result.

Is this chicken and mushroom skillet recipe gluten‑free?

As written, this recipe is naturally gluten‑free! None of the ingredients contain gluten—the chicken, mushrooms, cream, cheese, mustards, and wine are all safe. Just be sure to use a gluten‑free chicken broth if you substitute the white wine. Also check your whole‑grain Dijon mustard label; most are gluten‑free, but a few brands may contain malt vinegar stabilizers. Serve it with gluten‑free pasta or rice, and you have a complete, celiac‑friendly dinner that doesn’t sacrifice flavor.

How can I make this creamy chicken mushroom recipe lower in calories?

For a lighter version, swap the heavy cream for half‑and‑half or a mixture of evaporated milk and a tablespoon of cornstarch. The sauce will be less rich but still satisfying. You can also reduce the amount of Asiago cheese by half or use a low‑fat Parmesan. Instead of pan‑searing the chicken in 2 tablespoons of olive oil, use a non‑stick skillet and just 1 tablespoon or a cooking spray. For the mushrooms, skip the extra oil—they’ll release enough moisture to cook without sticking. Serve the dish over cauliflower rice or zucchini noodles to cut carbs and calories while keeping the flavors bold.

Can I add vegetables to this skillet dinner?

Absolutely—this recipe welcomes extra vegetables. I often toss in a handful of baby spinach or chopped kale right after adding the cream; they wilt into the sauce beautifully. Roasted red bell peppers or artichoke hearts also add color and texture. For a heartier meal, try adding quartered small potatoes or parsnips. Just be aware that watery vegetables like zucchini should be sautéed first to avoid thinning the sauce. The mushrooms are the star, but feel free to make this a true one‑pot veggie‑packed dinner—the creamy mustard sauce ties everything together.

Can I prepare this chicken and mushroom skillet ahead of time for a dinner party?

Yes, you can prepare most of it in advance. Cook the chicken and mushrooms, make the sauce, and combine them in a baking dish. Cover and refrigerate for up to 24 hours. When ready to serve, bake covered at 350°F for 15–20 minutes until hot, then uncover for another 5 minutes to brown the top slightly. If the sauce seems too thick after chilling, stir in a splash of cream or chicken broth before reheating. For best results, wait to garnish with fresh parsley until just before serving. This method takes the stress out of entertaining and still impresses guests.

What if I don’t have white wine? Can I still make the sauce?

No problem at all! Replace the 1/2 cup of dry white wine with the same amount of low‑sodium chicken broth or vegetable broth. To mimic the acidity that wine brings, add a squeeze of fresh lemon juice (about 1 tablespoon) after the broth simmers. You can also use a splash of apple cider vinegar or white wine vinegar—start with 1 teaspoon and adjust to taste. The sauce won’t have the same complexity as wine, but it will still be delicious and tangy thanks to the two mustards. I use this swap often when I’m out of wine and it never disappoints.

📌

Love This Recipe? Save It to Pinterest!

If you enjoyed this Chicken and Mushroom Skillet recipe, don’t let it get lost in your browser tabs! 😄 Pin it now so you can find it again anytime — and explore hundreds more tried‑and‑tested recipes waiting for you on my Pinterest boards.

👉 Follow mia on Pinterest @exorecipe

📌 Pin this recipe · 🔁 Re‑pin your favorites · 💬 Tag me when you make it — I love seeing your creations!

Print

clock clock iconcutlery cutlery iconflag flag iconfolder folder iconinstagram instagram iconpinterest pinterest iconfacebook facebook iconprint print iconsquares squares iconheart heart iconheart solid heart solid icon

Chicken and Mushroom Skillet in a Creamy Asiago and Mustard Sauce

  • Author: Chef Mia
  • Prep Time: 10 minutes
  • Cook Time: 25 minutes
  • Total Time: 35 minutes
  • Yield: 4 1x
  • Method: Main Course
  • Cuisine: American

Description

A quick and easy one-pan chicken dinner with a rich, creamy Asiago and mustard sauce, featuring tender mushrooms and perfectly cooked chicken breasts.


Ingredients

Scale
  • 1 1/2 lbs boneless, skinless chicken breasts (about 2 large)
  • Salt and freshly ground black pepper
  • 2 tablespoons olive oil
  • 8 oz cremini mushrooms, sliced
  • 3 cloves garlic, minced
  • 1/2 cup dry white wine (or chicken broth)
  • 1 cup heavy cream
  • 1/4 cup grated Asiago cheese
  • 2 tablespoons whole-grain Dijon mustard
  • 1 tablespoon Dijon mustard
  • 1 teaspoon dried thyme
  • 1/4 cup chopped fresh parsley (for garnish)

Instructions

  1. Pat the chicken breasts dry and season both sides with salt and pepper.
  2. Heat olive oil in a large skillet over medium-high heat. Add the chicken and cook until golden brown, about 4-5 minutes per side. Transfer to a plate and set aside.
  3. In the same skillet, add the sliced mushrooms and cook until they release their moisture and start to brown, about 5 minutes.
  4. Add the minced garlic and cook for 1 minute until fragrant.
  5. Pour in the white wine (or broth) and scrape up any browned bits from the bottom of the pan. Let simmer for 2 minutes.
  6. Reduce heat to medium-low and stir in the heavy cream, Asiago cheese, whole-grain mustard, Dijon mustard, and dried thyme. Cook until the sauce thickens slightly, about 3 minutes.
  7. Return the chicken to the skillet, spooning the sauce over the tops. Cover and simmer for 5-7 minutes, until the chicken is cooked through (internal temperature 165°F).
  8. Garnish with fresh parsley and serve immediately.

Notes

For a lighter version, substitute half-and-half for heavy cream. Leftovers can be stored in an airtight container in the refrigerator for up to 3 days.


Nutrition

  • Calories: 480
  • Sugar: 3g
  • Fat: 32g
  • Carbohydrates: 8g
  • Protein: 38g


Chicken and Mushroom Skillet in a Creamy Asiago and Mustard Sauce

Chicken and Mushroom Miso Ramen Bowl A Cozy Hug in a Bowl – Perfectly Seared Chicken and Earthy Mushrooms in a Silky Miso Broth

⚖️
Difficulty
Easy
⏲️
Prep Time
15 mins
🕒
Cook Time
25 mins
⏱️
Total Time
40 mins
🍽️
Servings
2

I still remember the first time I made a bowl of chicken and mushroom miso ramen that truly felt like home. It was a gray, drizzly afternoon in my tiny NYC apartment, and I was craving the kind of warmth that only comes from a bowl of soup that hugs you back. Growing up in Morocco, my mother would make rich, slow-simmered broths with fragrant spices and tender meat — and though this miso ramen recipe is a world away from North Africa, the feeling it gives me is exactly the same. That first spoonful of silky miso broth, with seared chicken and earthy cremini mushrooms, transported me straight back to her kitchen. This chicken and mushroom miso ramen recipe is my love letter to comfort food — a bowl that’s equal parts soothing and deeply satisfying.

Let me paint you a picture: the broth is golden and velvety, with white miso paste dissolving into warm chicken stock to create a backdrop that’s both savory and subtly sweet. The chicken thighs are seared until the skin is crackling gold, then sliced thin so each piece soaks up the broth. The cremini mushrooms — sautéed with garlic and ginger until they’re caramelized at the edges — add an earthy depth that makes the whole bowl feel substantial without being heavy. Add in chewy ramen noodles that cling to the broth, a soft-boiled egg with a jammy center, and the pop of sesame seeds and nori on top, and you’ve got a bowl that hits every single note: savory, umami, tender, and bright.

What makes my version special is the way I layer the flavors. I trained in Paris, where I learned that the key to a great soup is building depth at every step — searing the chicken in the same pan as the mushrooms so the fond (those browned bits on the bottom) melts into the final dish. It’s a technique that takes only minutes but makes a world of difference. This chicken and mushroom miso ramen recipe is deceptively simple: it comes together in 40 minutes, uses everyday ingredients you can find at any US grocery store, and delivers restaurant-quality results. I’ll show you my favorite pro tip for keeping the mushrooms perfectly textured, plus one common mistake that can make your broth taste flat — so you can nail it on your first try.

Why This Chicken and Mushroom Miso Ramen Recipe Is the Best

The Flavor Secret: The magic of this easy miso ramen bowl lies in the double-use of your skillet. By searing the chicken thighs first, then sautéing the mushrooms in the same pan with garlic and ginger, you capture all the caramelized bits — what the French call sucs — and let them infuse the mushrooms with deep, meaty flavor. In Paris, my chef instructor would say, “The pan holds the memory of everything you’ve cooked in it,” and that couldn’t be more true here. That single skillet builds a layer of savory richness that makes this chicken mushroom ramen taste like it simmered for hours, when in reality it’s on the table in 40 minutes.

Perfected Texture: Texture is everything in a bowl of homemade ramen soup. The chicken is seared at high heat so the outside is golden and crisp while the inside stays moist and tender. The mushrooms are cooked until they’re just tender and starting to brown at the edges — not steamed or soggy, which is the common pitfall. The ramen noodles are cooked separately and added to the bowl right before serving, so they stay firm and bouncy rather than turning mushy in the hot broth. Every element is treated with the respect it deserves, and you can taste it in every bite.

Foolproof & Fast: I’ve tested this miso ramen recipe a dozen times to make sure it works for everyone — from a busy weeknight cook to someone making ramen from scratch for the first time. The ingredients are straightforward: chicken broth, white miso paste, soy sauce, sesame oil, fresh chicken thighs, cremini mushrooms, garlic, ginger, and ramen noodles. No obscure ingredients, no complicated techniques. The steps are designed to flow from one to the next so you’re never waiting around. It’s the kind of recipe that makes you feel like a chef without the stress.

Chicken and Mushroom Miso Ramen Ingredients

I love shopping for these ingredients at the Union Square Greenmarket in NYC — the cremini mushrooms are always earthy and firm, the green onions are snappy, and I can pick up a block of white miso paste from a local purveyor. It reminds me of the way my mother would handpick every herb and spice in the medina. You can find all of these in any well-stocked US grocery store; they’re simple, honest ingredients that come together to create something truly special.

Ingredients List

  • 4 cups chicken broth
  • 2 tablespoons white miso paste
  • 1 tablespoon soy sauce
  • 1 teaspoon sesame oil
  • 2 boneless, skinless chicken thighs
  • 8 ounces cremini mushrooms, sliced
  • 3 cloves garlic, minced
  • 1 tablespoon grated fresh ginger
  • 2 packs (about 6 ounces) dry ramen noodles
  • 2 soft-boiled eggs, halved
  • 2 green onions, sliced
  • 1 sheet nori, torn into pieces
  • 1 tablespoon sesame seeds

Ingredient Spotlight

White Miso Paste: This is the heart of the broth. White miso (also known as shiro miso) is fermented soybean paste with a mild, slightly sweet flavor that’s less intense than red or brown miso. It dissolves easily into broth and creates a silky, savory base without overpowering the other ingredients. Look for it in the refrigerated section of your grocery store near the tofu or in the international aisle.

Cremini Mushrooms: Also called baby bellas, cremini mushrooms are the perfect choice for this easy miso ramen bowl because they have a meaty texture and deep earthy flavor that holds up well to sautéing. They’re more flavorful than white button mushrooms but more accessible than shiitake. Choose mushrooms that are firm and dry, with no slimy spots.

Boneless Chicken Thighs: I use boneless, skinless thighs because they stay juicy and tender even after searing and resting. Chicken breasts can be used, but they dry out more easily. Thighs have a higher fat content, which means more flavor and a better texture in the finished bowl.

Fresh Ginger and Garlic: These two aromatics are the backbone of the mushroom sauté. Fresh ginger adds warmth and a slight peppery kick, while garlic brings pungent depth. Grate them just before cooking for the brightest flavor — I use a microplane for ginger and a press for garlic.

Original IngredientBest SubstitutionFlavor / Texture Impact
White miso pasteYellow or red miso paste + 1 tsp honeyDeeper, funkier flavor; slightly less sweet
Chicken thighsBoneless, skinless chicken breastsLeaner, less juicy; reduce sear time to 4 min per side
Cremini mushroomsShiitake or oyster mushroomsMore intense umami; shiitake are chewier, oyster are delicate
Dry ramen noodlesFresh ramen noodles or udon noodlesFresh ramen: more bounce; udon: thicker and chewier

How to Make Chicken and Mushroom Miso Ramen — Step-by-Step

Making this homemade ramen soup is easier than you think, and each step builds layers of flavor. Follow these steps, and you’ll have a restaurant-worthy bowl on the table in 40 minutes. Let’s get started.

Step 1: Simmer the Broth

In a large pot, bring 4 cups of chicken broth to a gentle simmer over medium heat. You want small bubbles, not a rolling boil — a gentle simmer allows the flavors to meld without clouding the broth. Keep the broth warm while you prepare the other ingredients.

💡 mia’s Pro Tip: Use a good-quality chicken broth — it makes a real difference. I like Swanson or Pacific Foods for a clean, rich base. If you have homemade stock, even better.

Step 2: Whisk in the Miso

Whisk in the white miso paste, soy sauce, and sesame oil until fully dissolved. The miso should blend in smoothly, creating a creamy, golden broth. Taste and adjust the soy sauce or miso to your preference — some like it saltier, some prefer it milder.

⚠️ Common Mistake to Avoid: Never boil the broth after adding miso paste. High heat can destroy the beneficial probiotics in miso and make the flavor turn bitter. Keep the broth at a gentle simmer only.

Step 3: Sear the Chicken

Heat a skillet over medium-high heat. Add a drizzle of oil, then cook the chicken thighs until golden brown and cooked through, about 5-6 minutes per side. The chicken should feel firm to the touch and register 165°F internally. Let the thighs rest for 5 minutes before slicing thinly against the grain.

💡 mia’s Pro Tip: Pat the chicken thighs dry with paper towels before searing — this ensures a deep golden crust. If the pan is crowded, the chicken will steam instead of sear, so cook in batches if needed.

Step 4: Sauté the Mushrooms

In the same skillet (don’t wipe it out!), add the sliced cremini mushrooms and minced garlic. Sauté over medium-high heat, stirring occasionally, until the mushrooms are tender and starting to brown, about 4 minutes. Add the grated ginger and cook 1 minute more, stirring constantly to prevent burning.

⚠️ Common Mistake to Avoid: Don’t overcrowd the mushrooms — they need room to brown. If the skillet is too full, they’ll release water and steam rather than caramelize. Use a large skillet so they have space to breathe.

Step 5: Cook the Noodles

Cook the ramen noodles according to the package directions — usually about 3-4 minutes in boiling water. Drain them well and divide between two large bowls. Do not rinse the noodles unless the package instructs you to; the starch helps the broth cling to them.

💡 mia’s Pro Tip: Cook the noodles just before assembling the bowls. If they sit too long, they’ll clump together and lose their bounce. Set a timer so you time everything perfectly.

Step 6: Assemble the Bowls

Pour the hot miso broth over the noodles in each bowl — about 1 ½ to 2 cups per bowl. Top with the sliced chicken, sautéed mushrooms with garlic and ginger, halved soft-boiled eggs, sliced green onions, torn nori pieces, and a generous sprinkle of sesame seeds.

💡 mia’s Pro Tip: For the perfect soft-boiled egg, boil for exactly 6 ½ minutes, then transfer to an ice bath. The yolk will be jammy and golden — slice it in half right before adding it to the bowl so it stays intact.

Step 7: Serve

Serve the chicken and mushroom miso ramen immediately, stirring gently to combine all the flavors. The heat from the broth will warm the eggs and wilt the green onions slightly. Encourage everyone to mix everything together before digging in — each spoonful should have a bit of broth, noodle, chicken, and mushroom.

⚠️ Common Mistake to Avoid: Don’t let the assembled bowl sit before serving. Ramen is best enjoyed the moment it’s ready — the noodles can become soggy, and the broth loses its edge. Set the table before you start cooking so everything is ready to go.

StepActionDurationKey Visual Cue
1Simmer broth5 minGentle bubbles, not boiling
2Whisk in miso2 minSmooth, golden broth
3Sear chicken10-12 minGolden brown crust, firm to touch
4Sauté mushrooms5 minTender, browned edges
5Cook noodles3-4 minAl dente, separate strands
6Assemble bowls3 minBeautiful layered presentation
7ServeImmediateSteaming hot, inviting

Serving & Presentation

Serving this chicken and mushroom miso ramen is an experience in itself. I like to use wide, deep bowls that allow the broth to pool around the noodles and the toppings to sit beautifully on top. Arrange the sliced chicken in a fan over one side, place the halved soft-boiled egg in the center with the yolk facing up, and scatter the mushrooms, green onions, nori, and sesame seeds artfully around. The visual contrast — golden broth, dark mushrooms, bright green onions, and the glossy egg — is stunning and makes the bowl feel special before you even take a bite.

In terms of pairings, this easy miso ramen bowl is hearty enough to stand alone, but I love serving it with a simple side of steamed edamame sprinkled with sea salt, or a small cucumber salad dressed with rice vinegar and sesame oil. For a beverage, a cold Japanese lager or a cup of hot green tea complements the savory broth beautifully. If you want to go all out, add a dollop of chili crisp on the side for those who like heat — it’s my NYC adaptation of the harissa my mother would serve alongside her soups.

Pairing TypeSuggestionsWhy It Works
Side DishSteamed edamame, cucumber salad, gyozaLight, fresh accompaniments balance the rich broth
Sauce / DipChili crisp, extra soy sauce, ponzuAdds heat or acidity to customize each bite
BeverageJapanese lager, hot green tea, sakeCrisp or clean drinks cut through umami richness
GarnishChili threads, pickled ginger, shichimi togarashiAdds color, heat, and a touch of elegance

Make-Ahead, Storage & Reheating

In my busy NYC life, meal-prepping is a lifesaver — and this chicken mushroom ramen is surprisingly fridge-friendly if you store the components separately. I often cook the chicken and mushrooms in advance, then simply reheat the broth and cook fresh noodles when I’m ready to eat. Here’s how to store and reheat each element so nothing gets soggy or loses its texture.

MethodContainerDurationReheating Tip
RefrigeratorAirtight container (broth separate from solids)Up to 4 daysReheat broth gently on stove, cook fresh noodles
FreezerFreezer-safe container or zip-top bagUp to 3 monthsThaw overnight in fridge, reheat on stove, add fresh noodles
Make-AheadCooked chicken + mushrooms in one container, broth in anotherUp to 2 days in advanceReheat broth, warm chicken and mushrooms in a skillet, then assemble

My best advice for reheating: never microwave the noodles — they turn rubbery. Instead, reheat the broth in a pot until steaming, then pour it over freshly cooked noodles. The chicken and mushrooms can be quickly reheated in a hot skillet with a splash of soy sauce to restore their texture. The soft-boiled egg is best made fresh, but if you have leftovers, add it to the bowl just before serving without reheating — the warm broth will take the chill off.

Variations & Easy Swaps

One of the things I love most about this easy miso ramen bowl is how adaptable it is. Whether you’re cooking for a vegetarian friend or craving a spicy twist, there’s a version here for you. These variations have all been tested in my NYC kitchen — each one delivers the same cozy hug in a bowl, just with a different personality.

VariationKey ChangeBest ForDifficulty Impact
Vegetarian Miso RamenReplace chicken with tofu, use vegetable brothMeatless Monday or plant-based mealEasy
Gluten-Free Miso RamenUse gluten-free ramen noodles, tamari instead of soy sauceGluten-sensitive dietsEasy
Spicy Miso RamenAdd 1 tbsp chili crisp or gochujang to brothHeat seekers, cold-weather comfortEasy

Vegetarian Miso Ramen

For a meatless version, replace the chicken with firm tofu that’s been pressed and pan-seared until golden on all sides. Use vegetable broth instead of chicken broth — look for a brand with mushrooms added for extra umami. The tofu absorbs the miso broth beautifully, and the mushrooms carry even more weight as the savory star. This version reminds me of the simple, nourishing soups my mother would make on Fridays when we ate light before the weekend.

Gluten-Free Miso Ramen

Making this miso ramen recipe gluten-free is straightforward: swap the dry ramen noodles for certified gluten-free ramen or rice noodles, and use tamari or coconut aminos instead of soy sauce. All other ingredients — miso paste, sesame oil, chicken, mushrooms — are naturally gluten-free. The texture changes slightly with rice noodles (they’re a bit more delicate), but the flavor remains just as satisfying. I tested this with my gluten-sensitive friends, and it passed the “clean bowl” test every time.

Spicy Miso Ramen

If you’re someone who reaches for the hot sauce at every meal, this is your version. Stir in 1 tablespoon of chili crisp (like Lao Gan Ma or a homemade version) or 1 tablespoon of gochujang (Korean fermented chili paste) into the broth along with the miso. The result is a broth that’s simultaneously savory, sweet, and fiery — the perfect pick-me-up on a cold NYC night. I like to top this version with extra sesame seeds and a drizzle of chili oil for drama.

Frequently Asked Questions

What is the best type of miso paste to use for chicken and mushroom miso ramen?

For this chicken and mushroom miso ramen recipe, I recommend white miso paste (shiro miso) as the best choice. White miso has a mild, slightly sweet flavor with a gentle saltiness that allows the chicken and mushrooms to shine without being overpowered. It dissolves easily into the broth, creating a silky, creamy texture that feels luxurious. You can find white miso in the refrigerated section of most US grocery stores near the tofu or in the international aisle. If you only have yellow or red miso on hand, you can use those too — just be aware that they have a stronger, funky flavor, so start with 1 tablespoon and add more to taste, and consider balancing with a tiny bit of honey or mirin for sweetness.

Can I substitute the chicken with another protein in this ramen bowl?

Absolutely — this easy miso ramen bowl is very flexible when it comes to protein. Firm tofu is my top substitution: press it dry, cube it, and pan-sear until golden for a vegetarian option that soaks up the broth beautifully. Pork belly or thinly sliced pork loin work wonderfully if you want to keep it meaty — just sear the pork belly slices until crisp, or cook the loin quickly in the skillet for about 3 minutes per side. Shrimp is another excellent choice: sauté peeled shrimp in the same skillet for about 2 minutes per side until pink and curled. Each protein brings a different character, but the miso broth pairs well with all of them. Adjust cooking times based on your protein of choice.

How do I prevent the mushrooms from getting soggy in the miso broth?

The key to keeping mushrooms from turning soggy in this homemade ramen soup is to sauté them separately before adding them to the bowl, not to the broth. By cooking the cremini mushrooms in a hot skillet with garlic and ginger until they’re golden and tender, you drive off excess moisture and concentrate their flavor. They develop a caramelized exterior that stays firm even when nestled in the hot broth. Another tip: slice the mushrooms evenly — about ¼-inch thick — so they cook uniformly without some pieces becoming mushy. Finally, don’t add the mushrooms to the broth pot; instead, place them directly on top of the noodles and pour the hot broth over them. This way, they warm through without stewing.

What toppings pair best with a chicken and mushroom miso ramen bowl?

For this chicken and mushroom miso ramen bowl, the classic toppings I recommend are a soft-boiled egg with a jammy yolk, sliced green onions, torn nori sheets, and toasted sesame seeds — these create a beautiful balance of texture and flavor. For extra crunch, add a handful of bean sprouts or a sprinkle of fried shallots. If you want heat, a dollop of chili crisp or a drizzle of sriracha works beautifully. For freshness, a few cilantro leaves or a wedge of lime can brighten the rich broth. I also love adding a small pat of butter to the hot broth — it melts into the miso and creates an even silkier mouthfeel. Feel free to customize based on what you have in your fridge; ramen is a very forgiving and creative dish.

How do I make sure the chicken is tender and not dry in this ramen?

The most important step for tender chicken in this miso ramen recipe is to use chicken thighs instead of breasts. Thighs have a higher fat content, which means they stay juicy even after searing. Pat the thighs dry, season with a pinch of salt, and sear them over medium-high heat for 5-6 minutes per side until golden and cooked through (165°F internally). Let them rest for a full 5 minutes before slicing — this allows the juices to redistribute throughout the meat. Slice against the grain into thin strips so they soak up the miso broth without becoming chewy. If you must use chicken breasts, pound them to an even thickness first and reduce the cooking time to about 4 minutes per side.

Can I make this chicken and mushroom miso ramen recipe in advance for meal prep?

Yes, this chicken mushroom ramen is ideal for meal prep if you store the components separately. Cook the chicken and mushrooms as directed, let them cool, and store them in an airtight container in the fridge for up to 4 days. Keep the miso broth in a separate container — this is important because the noodles will become soggy if stored with the broth. When you’re ready to eat, simply reheat the broth on the stove until steaming, cook fresh ramen noodles (which takes only 3-4 minutes), and assemble the bowls with the pre-cooked chicken and mushrooms. For the soft-boiled egg, I recommend making it fresh each time, but you can store peeled soft-boiled eggs in a container of water in the fridge for up to 2 days.

What are the best noodles to use for an easy miso ramen bowl at home?

For this easy miso ramen bowl, I recommend using dry ramen noodle packs, which are widely available in US grocery stores — brands like Nongshim or Sapporo Ichiban work well, and you can discard the seasoning packet since we’re making our own broth. Dry ramen noodles are affordable, cook in about 3-4 minutes, and have a satisfying chewiness that holds up well in the hot miso broth. Fresh ramen noodles are even better if you can find them in the refrigerated section of Asian markets or specialty stores — they have a bouncier, fresher texture. In a pinch, you can use udon noodles (thicker and chewier) or even soba noodles (which are buckwheat-based and have a nutty flavor), but the texture will be different from traditional ramen.

Can I make this miso ramen recipe without soy sauce?

Certainly — if you need to avoid soy sauce, there are several excellent substitutions that work well in this chicken and mushroom miso ramen. Tamari is my top recommendation: it’s a gluten-free soy sauce alternative that has a similar salty, savory profile without the wheat. Coconut aminos are another great option — they’re made from fermented coconut sap and have a slightly sweeter, milder taste that pairs beautifully with white miso paste. You can also use a splash of fish sauce (if you’re not avoiding animal products) for a deeper umami kick, or simply omit the soy sauce altogether and add an extra teaspoon of miso paste to compensate for the lost saltiness. Taste the broth before serving and adjust with a pinch of salt or a dash of sesame oil if needed.

Share Your Version!

I absolutely love hearing how this chicken and mushroom miso ramen bowl turns out in your kitchen — it makes my day every time someone tries one of my recipes and puts their own spin on it. Did you add extra spice? Swap in tofu? Use a different mushroom variety? I want to know all about it! Leave a star rating and a comment below to share your experience and help other home cooks discover what works best. Your feedback makes this community so special, and it helps me create more recipes that you’ll truly enjoy.

If you’re on social media, snap a photo of your beautiful bowl and tag me @exorecipes on Instagram or Pinterest — I’m always scrolling and love to feature your creations in my stories. Don’t forget to save this recipe to your Pinterest boards so you can find it again next time you’re craving a cozy bowl. With winter in NYC knocking at the door, this miso ramen recipe is about to become your go-to comfort meal. From my NYC kitchen to yours — I hope this recipe brings as much warmth to your table as it does to mine. — mia 🧡

📌

Love This Recipe? Save It to Pinterest!

If you enjoyed this Chicken and Mushroom Miso Ramen Bowl recipe, don’t let it get lost in your browser tabs! 😄 Pin it now so you can find it again anytime — and explore hundreds more tried-and-tested recipes waiting for you on my Pinterest boards.

👉 Follow mia on Pinterest @chefrecipes2

📌 Pin this recipe · 🔁 Re-pin your favorites · 💬 Tag me when you make it — I love seeing your creations!

Print

clock clock iconcutlery cutlery iconflag flag iconfolder folder iconinstagram instagram iconpinterest pinterest iconfacebook facebook iconprint print iconsquares squares iconheart heart iconheart solid heart solid icon

Chicken and Mushroom Miso Ramen Bowl A Cozy Hug in a Bowl

  • Author: Chef Mia
  • Prep Time: 15 minutes
  • Cook Time: 25 minutes
  • Total Time: 40 minutes
  • Yield: 2 1x
  • Method: Main Course
  • Cuisine: Japanese-inspired

Description

This chicken and mushroom miso ramen is the ultimate comfort food—a rich, savory broth with tender chicken, earthy mushrooms, and chewy ramen noodles. It’s like a cozy hug in a bowl, perfect for chilly days or when you need a little warmth.


Ingredients

Scale
  • 4 cups chicken broth
  • 2 tablespoons white miso paste
  • 1 tablespoon soy sauce
  • 1 teaspoon sesame oil
  • 2 boneless, skinless chicken thighs
  • 8 ounces cremini mushrooms, sliced
  • 3 cloves garlic, minced
  • 1 tablespoon grated fresh ginger
  • 2 packs (about 6 ounces) dry ramen noodles
  • 2 soft-boiled eggs, halved
  • 2 green onions, sliced
  • 1 sheet nori, torn into pieces
  • 1 tablespoon sesame seeds

Instructions

  1. In a large pot, bring chicken broth to a gentle simmer over medium heat.
  2. Whisk in miso paste, soy sauce, and sesame oil until dissolved. Keep warm.
  3. Meanwhile, heat a skillet over medium-high heat. Cook chicken thighs until golden brown and cooked through, about 5-6 minutes per side. Let rest, then slice thinly.
  4. In the same skillet, sauté mushrooms and garlic until mushrooms are tender, about 4 minutes. Add ginger and cook 1 minute more.
  5. Cook ramen noodles according to package directions; drain and divide between two bowls.
  6. To assemble: Pour hot miso broth over noodles. Top with sliced chicken, sautéed mushrooms, soft-boiled egg halves, green onions, nori pieces, and sesame seeds.
  7. Serve immediately, stirring to combine flavors.


Nutrition

  • Calories: 520 kcal
  • Sugar: 4 g
  • Fat: 20 g
  • Carbohydrates: 42 g
  • Protein: 38 g


Chicken and Mushroom Miso Ramen Bowl A Cozy Hug in a Bowl

k">

Tried This Recipe? Leave a Comment!

Did you make this recipe? I’d love to hear how it turned out! Please leave a comment and a rating below. Your feedback helps other home cooks and supports cheerychop.com!

For more delicious inspiration, follow me on Pinterest!

Chicken and Mushroom Casserole – The Ultimate Comfort Dinner

⚖️
Difficulty
Easy
⏲️
Prep Time
15 mins
🕒
Cook Time
25 mins
⏱️
Total Time
40 mins
🍽️
Servings
6

Every time I make this chicken and mushroom casserole, I’m transported back to winter evenings in my mother’s kitchen in Morocco. She would slow-cook chicken with earthy mushrooms and warm spices, filling the house with a fragrance that meant comfort was on its way. Now, living in New York City, I’ve taken those soulful roots and blended them with classic American casserole tradition and a touch of French technique from my Paris training. This creamy chicken casserole recipe is the result: a one-dish wonder that’s rich, velvety, and topped with golden melted cheese. It’s the kind of meal that hugs you from the inside — perfect for busy weeknights when you need easy chicken dinner ideas that still feel special.

Imagine tender pieces of chicken, browned to perfection, swimming in a luscious sauce made with cream of mushroom soup, sour cream, and a whisper of thyme. Sliced mushrooms add an earthy depth, while frozen peas bring pops of sweetness and color. The whole thing is topped with a generous blanket of sharp cheddar that bubbles and browns in the oven. The aroma alone will have your family gathering in the kitchen. Each bite is creamy, savory, and deeply satisfying — exactly what comforting casserole recipes should be.

What sets my version apart is the extra step of browning the mushrooms until they’re deep golden — a trick I learned in Paris that unlocks their umami power. I also use a mix of cream of mushroom soup and sour cream for a sauce that’s rich but not heavy. No canned soup taste here! And I always add a handful of frozen peas for a fresh pop. One common mistake? Skipping the browning step — don’t do it! That caramelization is the secret to a casserole that tastes homemade and deeply flavorful. Below I’ll share my best pro tip for getting that perfect cheese crust every time.

Why This Chicken and Mushroom Casserole Recipe Is the Best

The Flavor Secret: The heart of this dish is the double mushroom boost — fresh cremini mushrooms are browned until golden, then combined with a good-quality cream of mushroom soup. The result is a deep, savory mushroom flavor that permeates every bite. Growing up, my mother would use dried porcini in her tagines; here, I channel that same earthy richness through fresh mushrooms and a splash of chicken broth.

Perfected Texture: From my days at Le Cordon Bleu in Paris, I learned the importance of controlling moisture. In this casserole, the chicken stays juicy because it’s browned first, sealing in the juices, and the sauce is just thick enough to coat everything without becoming watery. The sour cream adds a silky finish that makes the sauce feel luxurious. And that cheddar topping? It bakes into a crispy, golden crust that contrasts beautifully with the creamy interior.

Foolproof & Fast: With only 15 minutes of prep and a short bake time, this mushroom chicken bake is perfect for anyone who wants a hearty meal without hours in the kitchen. I’ve tested it with beginning cooks in my NYC cooking classes, and it always comes out perfectly. Plus, you can prep it ahead and pop it in the oven when you’re ready — see my make-ahead tips below.

Chicken and Mushroom Casserole Ingredients

I pick up my ingredients from the Union Square Greenmarket and my local grocery store. The key is quality: good chicken, fresh mushrooms, and a reliable cream of mushroom soup (I like the organic brand for a cleaner flavor). My mother always said the best casseroles start with the best building blocks — and that’s especially true here.

Ingredients List

  • 1 lb boneless skinless chicken breasts, cut into bite-sized pieces
  • 2 tbsp olive oil
  • 1 medium onion, chopped
  • 3 cloves garlic, minced
  • 8 oz mushrooms, sliced (cremini or white button)
  • 1 can (10.5 oz) cream of mushroom soup (use low-sodium if preferred)
  • 1/2 cup chicken broth
  • 1/2 cup sour cream
  • 1 tsp dried thyme
  • 1/2 tsp salt
  • 1/4 tsp black pepper
  • 1 cup frozen peas
  • 1 cup shredded cheddar cheese

Ingredient Spotlight

Mushrooms: The star of the show. I recommend cremini (baby bella) mushrooms for their deeper flavor and firm texture. White button mushrooms work too but have a milder taste. Choose mushrooms that are firm, dry, and free of slimy spots. Never wash them — wipe with a damp paper towel to keep them from absorbing water and steaming instead of browning.

Chicken: Boneless skinless chicken breasts are lean and cook quickly. For extra juiciness, you can use boneless skinless thighs — just increase the cooking time by a few minutes. If using chicken thighs, cut them into similar sized pieces for even cooking.

Cheese: Sharp cheddar gives the best flavor and golden color. You can substitute with Monterey Jack for a milder melt, or a mix of cheddar and mozzarella for extra cheesiness. For a dairy-free option, use a plant-based shredded cheddar — look for one that melts well.

Original IngredientBest SubstitutionFlavor / Texture Impact
Chicken breastsBoneless chicken thighsMore tender, slightly richer flavor; cook 2-3 min longer
Cremini mushroomsWhite button mushroomsMilder flavor; still good, but less earthy depth
Sour creamGreek yogurt (plain, full-fat)Slightly tangier, leaner; may curdle if boiled, stir in after baking

How to Make Chicken and Mushroom Casserole — Step-by-Step

Let’s get cooking! Follow these simple steps and you’ll have a bubbling, golden casserole in no time.

Step 1: Brown the Chicken

Preheat your oven to 375°F (190°C). In a large skillet, heat 2 tablespoons of olive oil over medium-high heat. Add the chicken pieces in a single layer (you may need to work in batches). Cook without moving them too much for about 4-5 minutes, until the underside is deep golden brown. Flip and cook another 2-3 minutes. Transfer the browned chicken to a plate. Don’t worry if it’s not fully cooked through — it will finish in the oven.

💡 mia’s Pro Tip: For the best browning, pat the chicken pieces dry with paper towels before cooking. Wet chicken will steam instead of brown, robbing you of that deep flavor.

Step 2: Sauté the Aromatics and Mushrooms

Reduce the heat to medium. Add the chopped onion and minced garlic to the same skillet. Sauté for 2 minutes, stirring often, until the onion softens. Then add the sliced mushrooms. Cook for 4-5 minutes, stirring occasionally, until the mushrooms release their liquid and start to brown. This is where the magic happens — the mushrooms should look caramelized and shrunken.

⚠️ Common Mistake to Avoid: Overcrowding the pan! Too many mushrooms will steam. Cook them in batches if needed, or use a larger skillet.

Step 3: Build the Creamy Sauce

Stir in the cream of mushroom soup, chicken broth, sour cream, dried thyme, salt, and pepper. Mix until everything is smooth and well combined. Let the sauce simmer gently for 1 minute — it will thicken slightly.

💡 mia’s Pro Tip: Taste the sauce before adding the chicken. Adjust salt and pepper now — I often add an extra pinch of black pepper for a little warmth.

Step 4: Combine and Transfer

Return the browned chicken to the skillet, along with any juices that have collected on the plate. Stir in the frozen peas. Transfer everything to a 9×13-inch casserole dish (or a similar 2-quart baking dish). Spread it evenly. Sprinkle the shredded cheddar cheese all over the top.

⚠️ Common Mistake to Avoid: Don’t skip stirring the peas in — they add a lovely pop of color and sweetness. If you forget to add them, just scatter them on top before baking.

Step 5: Bake and Finish

Place the casserole dish in the preheated oven. Bake for 20-25 minutes, until the sauce is bubbly around the edges and the cheese is melted and golden brown. If you want extra brown spots, turn on the broiler for the last 2 minutes — watch carefully so it doesn’t burn.

Let the casserole rest for at least 5 minutes before serving. This allows the sauce to set slightly so it doesn’t run all over the plate.

💡 mia’s Pro Tip: For an extra crispy cheese topping, mix 1/4 cup of panko breadcrumbs with the cheddar before sprinkling. It adds a lovely crunch.

StepActionDurationKey Visual Cue
1Brown chicken5-7 minGolden brown crust on both sides
2Sauté aromatics & mushrooms6-7 minOnions softened, mushrooms browned and shrunken
3Make sauce1-2 minSmooth, creamy consistency
4Combine & transfer2 minEvenly mixed, peas distributed
5Bake20-25 minBubbling edges, cheese melted and golden

Serving & Presentation

This casserole is a complete meal on its own, but I love to pair it with simple sides to round out the plate. Serve it steaming hot, spooned onto plates or shallow bowls. Let the cheese pull apart in long strings — that’s the sign of a good casserole! I like to garnish with a sprinkle of fresh parsley for color (my mother always did that with her tagines).

For a true American comfort spread, serve with a crisp green salad dressed with lemon vinaigrette — the acidity cuts through the richness. Crusty sourdough bread or garlic bread is perfect for sopping up every last bit of creamy sauce. And if you’re craving something more substantial, a side of steamed green beans or roasted broccoli works beautifully. In the fall, I love serving it with a side of roasted butternut squash — a nod to the Moroccan sweet squashes I grew up eating.

Pairing TypeSuggestionsWhy It Works
Side DishGreen salad with lemon vinaigrette, garlic bread, roasted green beansAcidity and crunch balance the creamy casserole
Sauce / DipExtra sour cream on the side, hot sauce (like sriracha)Adds tang or heat for contrast
BeverageCrisp white wine (Sauvignon Blanc), iced tea, or sparkling water with lemonRefreshing drinks cleanse the palate from richness
GarnishFresh parsley, chives, or a pinch of smoked paprikaAdds color and a fresh herb finish

Make-Ahead, Storage & Reheating

As a busy New Yorker, I often prep this casserole the night before. It’s a lifesaver for hectic weeknights! You can assemble the entire dish (without baking), cover it, and refrigerate it for up to 24 hours. When you’re ready, bake as directed — you may need to add 5-10 minutes since it starts cold.

MethodContainerDurationReheating Tip
RefrigeratorCovered casserole dish or airtight containerUp to 4 daysReheat in a 350°F oven for 15-20 min until hot; or microwave individual portions
FreezerFreezer-safe container or resealable bag (remove as much air as possible)Up to 3 monthsThaw in fridge overnight then reheat; add a splash of broth if dry
Make-AheadAssembled in casserole dish, unbaked, covered tightlyUp to 24 hours in fridgeAdd 5-10 min to baking time; do not overbake

For best results reheating, I recommend the oven. It keeps the cheese crisp and the sauce creamy. If you’re in a pinch, the microwave works, but the cheese will be soft. To revive the crispiness, pop it under the broiler for a minute after microwaving.

Variations & Easy Swaps

VariationKey ChangeBest ForDifficulty Impact
Mushroom and Herb TwistAdd fresh rosemary + mixed wild mushroomsElevated dinner partyEasy
Gluten-Free / Dairy-FreeUse gluten-free cream of mushroom soup + dairy-free sour cream + vegan cheeseDietary restrictionsEasy
Seasonal Vegetable AdditionAdd diced carrots or broccoli florets in Step 4Nutrition boostEasy

Mushroom and Herb Twist

For a more elegant version, swap the cremini for a mix of shiitake, oyster, and cremini mushrooms — you can find these at any NYC farmers market. Add 1 tablespoon of fresh chopped rosemary along with the thyme. The woodsy aroma will remind you of the forests in Morocco where my father would forage for wild mushrooms. Serve this upscale casserole with a glass of Chardonnay.

Gluten-Free / Dairy-Free Version

I’ve tested this with plenty of friends who have dietary needs. Use a certified gluten-free cream of mushroom soup (Pacific Foods makes a good one). Swap the sour cream for a dairy-free alternative like Kite Hill plain unsweetened yogurt or Tofutti sour cream. For the cheese, Daiya or Follow Your Heart cheddar-style shreds melt nicely. The texture will be slightly less creamy, but still delicious. Bake at the same temperature — no changes needed.

Seasonal Vegetable Addition

In the fall, I love adding diced carrots along with the onion. In spring, throw in some baby broccoli florets (blanched briefly) just before baking. You can even swap the peas for edamame for a protein boost. My Moroccan grandmother would have added a handful of raisins — it sounds unusual but the sweetness is wonderful with the mushrooms. Give it a try!

What is the best type of mushroom to use in a chicken and mushroom casserole?

I recommend cremini (baby bella) mushrooms for their robust flavor and firm texture that holds up well during cooking. White button mushrooms are a fine substitute but have a milder taste. For a more luxurious depth, try a mix of cremini and shiitake mushrooms. Whatever you choose, slice them about 1/4-inch thick so they cook evenly.

Can I make chicken and mushroom casserole ahead of time and reheat it?

Yes! This casserole is perfect for make-ahead meals. You can assemble it completely (without baking), cover tightly, and refrigerate for up to 24 hours. When ready, bake as directed, adding 5-10 extra minutes since it starts cold. Leftovers keep in the fridge for up to 4 days and reheat beautifully in the oven or microwave. For freezing, store in a freezer-safe container for up to 3 months.

Do I need to brown the chicken before putting it in the casserole?

Absolutely — browning the chicken is essential for the best flavor. It creates a deep, savory crust through the Maillard reaction, and it also adds rich brown bits to the pan that get incorporated into the sauce. If you skip this step, the chicken will be paler and the sauce won’t have that same depth. It only takes 5-7 minutes but makes a huge difference.

What can I serve with chicken and mushroom casserole for a complete dinner?

This casserole is filling on its own, but I love pairing it with a simple green salad dressed with lemon vinaigrette — the acidity balances the creamy sauce. Crusty bread or garlic bread is perfect for sopping up extra sauce. For veggies, steamed green beans or roasted broccoli work great. A crisp white wine like Sauvignon Blanc or an iced tea rounds out the meal.

Can I use a different type of cheese?

Certainly! Sharp cheddar is my go-to for its bold flavor and beautiful golden crust. But you can substitute with Monterey Jack for a milder, meltier finish, or a mix of cheddar and mozzarella for extra stretch. Gouda adds a smoky note, and Gruyère would be a fancy French twist. Just make sure the cheese is shredded so it melts evenly.

Is this chicken and mushroom casserole gluten-free?

As written, it contains gluten from the cream of mushroom soup (most brands use wheat flour as a thickener). However, it’s easy to make gluten-free! Use a certified gluten-free cream of mushroom soup (Pacific Foods is reliable) and ensure your chicken broth is gluten-free. The rest of the ingredients naturally have no gluten. The texture and flavor stay delicious.

Can I use chicken thighs instead of breasts?

Yes, boneless skinless chicken thighs work wonderfully and are often more forgiving (they stay juicy). Cut them into the same bite-sized pieces as the breasts. Because thighs are a bit fattier, they may lend extra richness to the casserole. Just brown them a minute or two longer since they’re slightly thicker.

Can I add extra vegetables to this casserole?

Absolutely! This recipe is very flexible. You can add diced carrots (sauté with the onions), broccoli florets (blanch then stir in before baking), or even sliced zucchini. If adding watery vegetables like zucchini, sauté them first to remove excess moisture. The peas are a classic, but feel free to use frozen mixed vegetables instead.

How do I prevent the casserole from becoming watery?

The key is to brown the mushrooms properly — let them cook until their moisture evaporates and they turn golden. Also, don’t add extra liquid beyond what’s called for. If you’re using frozen peas, add them straight from the bag; no need to thaw them. And finally, let the casserole rest for 5 minutes after baking so the sauce thickens slightly as it cools.

Can I use fresh cream of mushroom soup instead of canned?

While canned soup makes this recipe super quick, you can certainly use homemade cream of mushroom soup. I have a recipe on my blog that uses milk, butter, flour, and sautéed mushrooms. It will take an extra 15 minutes but the flavor is even more refined. If using homemade, ensure it’s thick enough — it should coat the back of a spoon.

Share Your Version!

I’d love to see how this chicken and mushroom casserole turns out in your kitchen! Did you stick with classic cheddar or try a fun twist? Leave me a star rating and comment below — your feedback helps other readers find the best version. Tag me on Instagram or Pinterest when you make it — I’m always inspired by your creativity. And here’s a question for you: what’s your favorite side dish to serve with a creamy casserole? Let me know!

From my NYC kitchen to yours — I hope this recipe brings as much warmth to your table as it does to mine. — mia 🧡

📌

Love This Recipe? Save It to Pinterest!

If you enjoyed this Chicken and Mushroom Casserole recipe, don’t let it get lost in your browser tabs! 😄 Pin it now so you can find it again anytime — and explore hundreds more tried-and-tested recipes waiting for you on my Pinterest boards.

👉 Follow mia on Pinterest @exorecipe

📌 Pin this recipe · 🔁 Re-pin your favorites · 💬 Tag me when you make it — I love seeing your creations!

Print

clock clock iconcutlery cutlery iconflag flag iconfolder folder iconinstagram instagram iconpinterest pinterest iconfacebook facebook iconprint print iconsquares squares iconheart heart iconheart solid heart solid icon

Chicken and Mushroom Casserole A Comforting Dinner Recipe

  • Author: Chef Mia
  • Prep Time: 15 minutes
  • Cook Time: 25 minutes
  • Total Time: 40 minutes
  • Yield: 6 1x
  • Method: Main Course
  • Cuisine: American

Description

A creamy and hearty chicken and mushroom casserole that makes the perfect comforting dinner.


Ingredients

Scale
  • 1 lb boneless skinless chicken breasts, cut into bite-sized pieces
  • 2 tbsp olive oil
  • 1 medium onion, chopped
  • 3 cloves garlic, minced
  • 8 oz mushrooms, sliced
  • 1 can (10.5 oz) cream of mushroom soup
  • 1/2 cup chicken broth
  • 1/2 cup sour cream
  • 1 tsp dried thyme
  • 1/2 tsp salt
  • 1/4 tsp black pepper
  • 1 cup frozen peas
  • 1 cup shredded cheddar cheese

Instructions

  1. Preheat oven to 375°F (190°C).
  2. In a large skillet, heat olive oil over medium-high heat. Add chicken pieces and cook until browned, about 5-7 minutes. Remove chicken and set aside.
  3. In the same skillet, add onion and garlic. Sauté for 2 minutes until softened. Add mushrooms and cook for another 4-5 minutes until browned.
  4. Stir in cream of mushroom soup, chicken broth, sour cream, thyme, salt, and pepper. Mix well.
  5. Return chicken to the skillet. Stir in frozen peas. Transfer the mixture to a 9×13-inch casserole dish.
  6. Sprinkle cheddar cheese evenly over the top.
  7. Bake for 20-25 minutes until bubbly and cheese is melted and golden.
  8. Let rest for 5 minutes before serving.

Notes

For a lighter version, use low-fat soup and sour cream. You can also add other vegetables like carrots or broccoli.


Nutrition

  • Calories: 385
  • Sugar: 4g
  • Fat: 22g
  • Carbohydrates: 12g
  • Protein: 32g


Chicken and Mushroom Casserole A Comforting Dinner Recipe

ph">For more delicious inspiration, follow me on Pinterest!

Chicken and Ham Pot Pie with Creamy Vegetable Filling – A Cozy, Golden Crust Comfort Meal

⚖️
Difficulty
Easy
⏲️
Prep Time
20 mins
🕒
Cook Time
30 mins
⏱️
Total Time
50 mins
🍽️
Servings
6

Growing up in Morocco, my mother’s kitchen was a symphony of slow-cooked stews and fragrant spices. But every now and then, she’d surprise us with something different — a creamy, oven-baked pie that felt like a warm hug. That memory came back to me one chilly New York evening as I stood in my tiny Brooklyn kitchen, craving comfort. I started building this chicken and ham pot pie with a creamy vegetable filling — a marriage of the French bouchée à la reine I learned in Paris and the hearty, no-fuss American pot pie. The first bite took me right back to that cozy table in Marrakech.

This isn’t just any pot pie. The filling is luxuriously creamy — a velvety béchamel thickened with a classic roux, studded with tender chicken, smoky ham, and sweet peas. A whisper of dried thyme adds an earthy warmth that lingers. Under a blanket of flaky, golden puff pastry, the filling bubbles and steams, releasing an aroma that fills your entire home. When you cut into that crust, you get the perfect crackle, then the sight of that luscious, chunky sauce. It’s pure magic.

I’ve tested this recipe more times than I can count, tweaking the ratio of broth to cream, the size of the dice, even the resting time. What I’m sharing today is the result — a foolproof, beginner-friendly version that still tastes like a professional chef made it. 💡 mia’s Pro Tip: blind-baking the bottom crust (if you use a double crust) prevents sogginess, but I love using puff pastry on top only for extra flakiness. And a common mistake? Overcooking the vegetables before baking — they should still have a little bite when they go into the oven.

Why This Chicken and Ham Pot Pie Recipe Is the Best

The Flavor Secret
Most pot pie recipes rely on just chicken. By adding ham — a tip I picked up from a Parisian bistro — you get a double hit of savory depth. The ham’s saltiness balances the cream, and the slight smoky edge makes every bite more interesting. I often buy a thick slice of ham from the Union Square farmers market and dice it myself.

Perfected Texture
I trained at Le Cordon Bleu in pastry arts, so I know a soggy bottom crust is the enemy. This recipe calls for a puff pastry lid only — no bottom crust to worry about. The filling is thickened just enough to hold its shape without becoming pasty. The key is cooking the roux until it smells nutty before adding the liquid.

Foolproof & Fast
I know your weeknights are busy. This come-together in under an hour, using pre-cooked chicken and frozen peas. It’s the kind of meal you can pull together after a long day and still feel like you’ve made something special. The hardest part is waiting for it to cool.

Creamy Chicken Pot Pie Ingredients

When I’m shopping for this at the Chelsea Market, I always look for good quality ham and a fresh bunch of thyme. The rest is pantry basics. This reminds me of the way my mother would use up leftover chicken and ham from a Sunday dinner — nothing went to waste. Let’s gather what you’ll need.

Ingredients List

  • For the Filling:
  • 2 tablespoons butter
  • 1 medium onion, diced
  • 2 carrots, diced
  • 2 celery stalks, diced
  • 1/4 cup all-purpose flour
  • 1 1/2 cups chicken broth
  • 1 cup heavy cream
  • 2 cups cooked chicken, shredded
  • 1 cup cooked ham, diced
  • 1 cup frozen peas
  • 1 teaspoon dried thyme (or 1 tablespoon fresh)
  • Salt and pepper to taste
  • For the Crust:
  • 1 sheet puff pastry (thawed if frozen), or 2 pie crusts
  • 1 egg, beaten (for egg wash)

Ingredient Spotlight

Chicken and Ham – The double protein makes this extra satisfying. For the chicken, I often roast a couple of bone-in thighs — they stay moist and flavorful. Leftover rotisserie chicken works too. Ham: choose a thick, unsmoked ham steak or leftover Easter ham. The ham adds salt, so go easy on added salt until you taste.

Heavy Cream – This gives the filling its rich, luxurious texture. You can substitute half-and-half, but the filling will be thinner. I don’t recommend milk — the sauce won’t be as velvety.

Puff Pastry – I use store-bought all-butter puff pastry (like Dufour) for convenience. It bakes up shatteringly flaky. If you prefer a double crust, use two rolled pie crusts and blind bake the bottom for 10 minutes at 400°F before filling.

Original IngredientBest SubstitutionFlavor / Texture Impact
Heavy creamHalf-and-half + 1 tbsp butterSlightly less rich, still creamy
Puff pastryHomemade or refrigerated pie crustLess flaky, more like traditional pie
Dried thymeFresh thyme (1 tbsp) or 1/2 tsp dried tarragonSimilar earthy flavor; tarragon adds anise note
HamChicken thighs only (omit ham)Loses smoky depth, still good

How to Make Chicken and Ham Pot Pie — Step-by-Step

This recipe moves quickly once you start. Read through once, then let’s cook.

Step 1: Prepare the Vegetables

Melt the butter in a large skillet or Dutch oven over medium heat. Add the diced onion, carrots, and celery. Cook, stirring occasionally, for about 5 minutes until the vegetables are softened but not browned. You want them tender enough to bite through but still holding their shape.

⚠️ Common Mistake to Avoid: Don’t rush this step. If the vegetables are still hard, your final filling will have crunchy bits that don’t blend with the creamy sauce.

Step 2: Make the Creamy Filling

Sprinkle the flour over the cooked vegetables and stir constantly for 1 minute. You’re making a roux — it should smell faintly nutty. Slowly pour in the chicken broth while whisking to prevent lumps. Then add the heavy cream, still whisking. Cook for 2–3 minutes until the sauce thickens enough to coat the back of a spoon.

💡 mia’s Pro Tip: For an even richer sauce, swap 1/2 cup of the chicken broth for dry white wine. Add it after the roux and let it bubble for a minute before adding the rest of the liquid.

Step 3: Add the Meat and Peas

Stir in the shredded chicken, diced ham, frozen peas, and dried thyme. Season with salt and pepper — start with 1/2 teaspoon salt and 1/4 teaspoon pepper, then adjust to taste. Let the filling simmer gently for 2 minutes. Remove from heat.

Step 4: Assemble and Bake

Pour the filling into a 9-inch pie dish. Top with the sheet of puff pastry (or rolled pie crust). Trim any overhang and press the edges to seal. Cut 4–5 slits in the top for steam vents. Brush the entire surface with the beaten egg. Bake at 400°F (200°C) for 25–30 minutes, until the crust is deep golden brown and you can see the filling bubbling through the slits. Let rest for 5 minutes before serving.

⚠️ Common Mistake to Avoid: Don’t skip the slits! Without steam vents, the filling may bubble over and the crust will be soggy rather than crisp.

StepActionDurationKey Visual Cue
1Sauté vegetables5 minOnions translucent, carrots bright
2Make roux + add liquids3–4 minSauce thickens, coats spoon
3Add meat and peas2 min simmerFilling looks cohesive
4Assemble & bake25–30 minCrust golden, filling bubbly

Serving & Presentation

I love serving this pot pie straight from the dish — it’s rustic and inviting. For individual portions, use ramekins and adjust the baking time by 5 minutes. Sprinkle a little fresh parsley or chives over the top for a pop of green. A side of steamed green beans or a simple arugula salad with lemon vinaigrette cuts through the richness beautifully.

In my French training, we often paired a creamy pie with a crisp, acidic beverage. A cold glass of Sauvignon Blanc or a hard apple cider works wonders. For a non-alcoholic option, sparkling water with a squeeze of lemon.

Pairing TypeSuggestionsWhy It Works
Side DishSteamed green beans, roasted asparagus, or a fresh green saladAdds crunch and freshness to balance creamy pie
Sauce / CondimentWhole grain mustard, cranberry sauce, or a drizzle of balsamic glazeMustard cuts fat; cranberry adds sweet-tart contrast; balsamic adds depth
BeverageChardonnay, hard cider, or sparkling water with lemonAcidity and bubbles cut through creaminess
GarnishFresh parsley, chives, a pinch of flaky sea saltBrightens flavor and adds visual appeal

Make-Ahead, Storage & Reheating

As a busy New Yorker, I often prep the filling the night before. It saves me time and the flavors meld beautifully. Here’s how to store and reheat like a pro.

MethodContainerDurationReheating Tip
RefrigeratorCovered dish or airtight containerUp to 3 daysReheat in 350°F oven, 15–20 min, until bubbly
Freezer (baked)Wrap well in foil and plasticUp to 3 monthsThaw overnight in fridge; reheat 350°F 30–40 min
Make-Ahead (unbaked)Assemble without crust; cover and refrigerateUp to 2 days in advanceAdd crust just before baking; add 5 min to bake time

If you have leftovers (bless you), I recommend reheating in the oven rather than the microwave — it preserves the crust’s flakiness. If you must use a microwave, do so in short bursts and cover loosely.

Variations & Easy Swaps

VariationKey ChangeBest ForDifficulty Impact
Moroccan SpicedAdd 1 tsp ras el hanout + 1/2 tsp cinnamonAromatic, exotic twistEasy
Gluten-Free / Dairy-FreeUse GF flour blend + coconut cream + GF pie crustDietary restrictionsMedium (adjust liquid)
Spring Vegetable SwapReplace carrots/celery with asparagus, leeks, and mushroomsSeasonal freshnessEasy

Variation 1: Moroccan Spiced Pot Pie

Add 1 teaspoon of ras el hanout and 1/2 teaspoon of cinnamon to the roux when you add the flour. This is a nod to my Moroccan roots — the warm spices complement the chicken and ham beautifully. Finish with a sprinkle of toasted almonds on top before serving. The whole house will smell incredible.

Variation 2: Gluten-Free / Dairy-Free

Substitute a gluten-free all-purpose flour blend (like Bob’s Red Mill 1-to-1) in the roux. Use full-fat coconut cream or a good quality dairy-free creamer instead of heavy cream. For the crust, choose a gluten-free pie crust or puff pastry. The sauce may be slightly thinner, so cook it a minute or two longer. I’ve tested this with friends who have celiac, and they couldn’t tell the difference.

Variation 3: Spring Vegetable Swap

When asparagus and leeks hit the Union Square market, I swap out the carrots and celery for 2 sliced leeks (white and light green parts) and 1 cup of chopped asparagus. Add 1 cup of sliced mushrooms for extra umami. The cooking time stays the same — just sauté the leeks and asparagus until tender. This version feels lighter and brighter, perfect for early spring dinners.

How do you prevent the bottom crust of a chicken and ham pot pie from getting soggy?

The easiest way is to skip a bottom crust altogether and use only a top crust, as I do in this recipe. If you prefer a double crust, blind-bake the bottom crust first: line it with parchment, fill with pie weights or dried beans, and bake at 400°F for 10 minutes. Remove the weights and parchment, then fill and top with the second crust. Also, make sure your filling is thick enough — if it’s too thin, it will soak into the crust. Cooking the roux until it bubbles and thickens properly is key.

Can you substitute frozen vegetables for fresh in a creamy chicken and ham pot pie?

Absolutely! Frozen peas are already in this recipe. For the carrots and celery, you can use a frozen “soup mix” of diced carrots, celery, and onion. Thaw them first and pat dry to remove excess moisture, or add them frozen directly to the pan — just cook an extra minute or two. Frozen vegetables are often flash-frozen at peak freshness, so they work beautifully. I always keep a bag in my freezer for quick dinners.

What is the best way to thicken the creamy vegetable filling for a chicken and ham pot pie?

The classic method is a roux — equal parts fat and flour cooked together. In this recipe, I use butter and all‑purpose flour. After adding the flour, cook it for a full minute to remove the raw flour taste. Then whisk in the liquid gradually. The sauce will thicken as it simmers. If your filling still seems thin after simmering, make a slurry by whisking 1 tablespoon of cornstarch with 2 tablespoons of cold water and stir it in. Cook one more minute until thickened.

How long should you bake a chicken and ham pot pie and at what temperature?

Bake at 400°F (200°C) for 25 to 30 minutes. The oven should be fully preheated. You want the crust to be deep golden brown and the filling to bubble visibly through the steam vents. If the crust is browning too quickly, tent loosely with foil for the last 5–10 minutes. Let the pie rest for 5 minutes before cutting to allow the filling to set slightly — this prevents it from running all over your plate.

Can I use leftover turkey instead of chicken?

Definitely. Leftover turkey works wonderfully in this pot pie. It has a similar texture and flavor to chicken. Shred or dice the turkey, and use it in the same quantity (2 cups). This is a fantastic way to repurpose holiday leftovers. The rest of the recipe remains the same.

Do I need to pre-cook the ham before adding it to the filling?

Most ham from the grocery store is already fully cooked (check the label). If you’re using a fresh ham or raw ham steak, you should cook it first. Dice it and sauté it in a little butter until lightly browned before adding to the filling. If the ham is already cooked, simply dice and stir it in with the chicken. The heat from the simmering filling is enough to warm it through.

Can I make this pot pie in a casserole dish instead of a pie dish?

Yes, any oven-safe dish about 9×9 inches or similar volume works. If the dish is wider or shallower, the filling may spread thinner and bake faster, so check for doneness at 20 minutes. If it’s deeper, you might need 30–35 minutes. Make sure there’s at least a 1/2‑inch rim to hold the crust. You can also make individual pot pies in ramekins — bake at 400°F for about 20 minutes.

What can I use instead of puff pastry for the crust?

You can use a double pie crust (homemade or store‑bought) — roll one crust for the bottom and one for the top. If you only want a top crust, a sheet of refrigerated pie crust works well. For a lower carb option, use a cauliflower crust, but note it will be less flaky. I’ve also made this with canned biscuit dough cut into rounds in a pinch.

Can I freeze the pot pie before baking?

Absolutely. Assemble the pie completely (without egg wash) and freeze it, uncovered, until the crust is firm. Then wrap it tightly in plastic wrap and foil. It will keep for up to 3 months. When ready to bake, thaw overnight in the refrigerator. Unwrap, brush with egg wash, and bake at 400°F for 35–40 minutes, until bubbly and golden. You may need to tent the crust halfway through.

How can I add more vegetables to this pot pie?

This recipe is very adaptable. You can add mushrooms (sauté with the onions), green beans (blanch first), or corn. Keep the total vegetable volume similar to the original (about 1 1/2 cups of mixed veggies). Just be careful not to overcrowd — too many vegetables can make the filling watery. If adding frozen corn or peas, no need to thaw; just stir them in with the meat.

Share Your Version!

I hope this chicken and ham pot pie becomes a favorite in your home. If you try it, I’d love to hear how it turned out! Leave a star rating and a comment below — tell me if you added any of the variations or swaps. Share a photo on Instagram or Pinterest and tag @exorecipes so I can see your beautiful creation.

What’s your favorite twist on a classic pot pie? Let me know in the comments — I read every single one.

From my NYC kitchen to yours — I hope this recipe brings as much warmth to your table as it does to mine. — mia 🧡

📌

Love This Recipe? Save It to Pinterest!

If you enjoyed this Chicken and Ham Pot Pie with Creamy Vegetable Filling recipe, don’t let it get lost in your browser tabs! 😄 Pin it now so you can find it again anytime — and explore hundreds more tried-and-tested recipes waiting for you on my Pinterest boards.

👉 Follow mia on Pinterest @exorecipe

📌 Pin this recipe · 🔁 Re-pin your favorites · 💬 Tag me when you make it — I love seeing your creations!

Print

clock clock iconcutlery cutlery iconflag flag iconfolder folder iconinstagram instagram iconpinterest pinterest iconfacebook facebook iconprint print iconsquares squares iconheart heart iconheart solid heart solid icon

Chicken and Ham Pot Pie with Creamy Vegetable Filling

  • Author: Chef Mia
  • Prep Time: 20 minutes
  • Cook Time: 30 minutes
  • Total Time: 50 minutes
  • Yield: 6 1x
  • Method: Main Course
  • Cuisine: American

Description

A comforting pot pie filled with tender chicken, ham, and a creamy vegetable medley, all encased in a flaky golden crust.


Ingredients

Scale
  • For the Filling:
  • 2 tablespoons butter
  • 1 medium onion, diced
  • 2 carrots, diced
  • 2 celery stalks, diced
  • 1/4 cup all-purpose flour
  • 1 1/2 cups chicken broth
  • 1 cup heavy cream
  • 2 cups cooked chicken, shredded
  • 1 cup cooked ham, diced
  • 1 cup frozen peas
  • 1 teaspoon dried thyme
  • Salt and pepper to taste
  • For the Crust:
  • 1 sheet puff pastry (or 2 pie crusts)
  • 1 egg, beaten (for egg wash)

Instructions

  1. Preheat oven to 400°F (200°C).
  2. Melt butter in a large skillet over medium heat. Add onion, carrots, and celery; cook until softened, about 5 minutes.
  3. Stir in flour and cook for 1 minute.
  4. Gradually whisk in chicken broth and heavy cream, stirring constantly until thickened.
  5. Add chicken, ham, peas, thyme, salt, and pepper. Simmer for 2 minutes, then remove from heat.
  6. Pour filling into a 9-inch pie dish.
  7. Top with puff pastry (or pie crust), pressing edges to seal. Cut slits in the top for steam vents.
  8. Brush with beaten egg.
  9. Bake for 25-30 minutes, until crust is golden and filling is bubbly. Let cool 5 minutes before serving.

Notes

For a thicker filling, cook an additional 2-3 minutes. Leftovers keep refrigerated for 3 days.


Nutrition

  • Calories: 480 kcal
  • Sugar: 5 g
  • Fat: 28 g
  • Carbohydrates: 24 g
  • Protein: 32 g


Chicken and Ham Pot Pie with Creamy Vegetable Filling

ph">For more delicious inspiration, follow me on Pinterest!

“`html

Chicken and Green Bean Stir Fry: A Deliciously Simple Weeknight Dinner – Ready in 30 Minutes!

⚖️
Difficulty
Easy
⏲️
Prep Time
15 mins
🕒
Cook Time
15 mins
⏱️
Total Time
30 mins
🍽️
Servings
4

Let me tell you something about this chicken and green bean stir fry — it’s the exact kind of meal I turn to after a long day of recipe testing in my NYC kitchen. I remember standing at the stove in my tiny Paris apartment during culinary school, a well-worn wok in hand, trying to recreate the vibrant, crisp-tender vegetables I’d fallen in love with at a little Asian market near the Bastille. This easy chicken stir fry recipe is the culmination of those early experiments, refined through years of professional cooking and countless weeknight dinners. The secret? It’s not about complicated techniques — it’s about timing, heat, and letting each ingredient shine.

Imagine this: tender slices of chicken, kissed with soy and sesame, nestled alongside bright green beans that still have that perfect snap. The sauce is glossy and rich, clinging to every piece without being heavy. A whisper of garlic and ginger warms the air as it hits the hot wok. This healthy chicken and vegetables recipe delivers all the deep, savory satisfaction of takeout — but faster, fresher, and made entirely on your terms. Every bite brings that perfect contrast: juicy chicken, crisp beans, and a silky sauce that ties it all together.

What makes my version different? I use a quick blanch for the green beans to lock in their color and crunch, plus a clever cornstarch slurry that gives the sauce exactly the right body — no gloopy mess here. I’ve tested this green bean chicken dinner more times than I can count, and I’ve honed every step so it works flawlessly in a home kitchen, whether you have a restaurant-grade wok or just a large skillet. 💡 mia’s Pro Tip: Don’t skip the blanching step — it’s the difference between sad, limp beans and beans that stay vibrantly crisp even after they’re sauced. And one common mistake? Overcrowding the pan. Give that chicken room to sear, not steam.

Why This Chicken and Green Bean Stir Fry Recipe Is the Best

The flavor secret here is built on a foundation I learned from my mother’s kitchen in Morocco and refined in Paris: layering. The chicken marinates in soy, sesame, garlic, and ginger for just ten minutes — long enough to infuse flavor, short enough to keep dinner on the table fast. That marinade does double duty, tenderizing the chicken while building the first layer of savory depth. Then the sauce — a quick mix of chicken broth, oyster sauce, and a touch of sugar — brings everything together with a balanced umami that tastes far more complex than its short ingredient list suggests.

Perfected texture is what elevates this quick weeknight stir fry above the rest. The blanching technique I use for the green beans comes straight from professional kitchens: a 2-minute plunge in boiling water, then a quick drain, sets their color and crunch so they can survive the final stir-fry without turning mushy. The chicken gets cooked in batches over high heat, developing a light golden sear while staying juicy inside. Every component is cooked to its ideal state before they meet in the wok for a final saucy toss.

This recipe is foolproof and fast — and that’s by design. I’ve taught this dish to busy friends, home cooks, and even my own kids. The timing is forgiving, the ingredients are easy to find at any US grocery store, and the whole thing comes together in 30 minutes flat. Whether you’re a beginner or a seasoned cook, this chicken and green bean stir fry delivers restaurant-quality results without the stress. It’s become my go-to for nights when I need something delicious, nourishing, and speedy.

Chicken and Green Bean Stir Fry Ingredients

I pick up my green beans from the Union Square Greenmarket when they’re in season — there’s nothing like the snap of a freshly harvested bean. In winter, I rely on the reliable bags from my local grocery store; look for beans that are bright, firm, and free of blemishes. For the chicken, I always buy boneless, skinless breasts from the butcher counter where I can see the quality. Every ingredient in this easy chicken stir fry recipe has a purpose, and I want you to know exactly what to look for.

Ingredients List

  • 1 lb boneless, skinless chicken breasts, thinly sliced against the grain
  • 2 tablespoons soy sauce (low-sodium is fine)
  • 1 tablespoon sesame oil
  • 2 cloves garlic, minced
  • 1 tablespoon fresh ginger, grated
  • 1 lb fresh green beans, trimmed and cut into 2-inch pieces
  • 2 tablespoons vegetable oil (or any neutral oil with high smoke point)
  • 1/4 cup chicken broth
  • 1 tablespoon cornstarch
  • 1 tablespoon oyster sauce
  • 1 teaspoon sugar
  • Salt and pepper to taste
  • Sesame seeds and sliced green onions for garnish

Ingredient Spotlight

Fresh Green Beans: The star of this green bean chicken dinner. Look for beans that snap crisply when bent — that’s the best test of freshness. At the store, choose beans with vibrant color and no limp ends. If you can only find frozen, see the FAQ below for my tested method.

Chicken Breasts: I prefer breasts for this recipe because they slice neatly and cook quickly. For the best texture, slice the chicken against the grain into even 1/4-inch thick pieces. If you have chicken thighs on hand, they work beautifully too — just cook them a minute or two longer.

Oyster Sauce: This is the umami backbone of the sauce. It adds a subtle richness that soy sauce alone can’t provide. Look for it in the Asian foods aisle of most US grocery stores. If you need a substitute, hoisin sauce works in a pinch (see the table below).

Fresh Ginger: Don’t use the dried powder here — fresh ginger adds a warm, peppery brightness that’s essential to this quick weeknight stir fry. Peel it with the edge of a spoon and grate it on a microplane for the best texture.

Original IngredientBest SubstitutionFlavor / Texture Impact
Soy SauceTamari (gluten-free) or coconut aminosTamari is very similar; coconut aminos are sweeter and less salty
Oyster SauceHoisin sauce + 1 tsp fish sauce (or just hoisin)Hoisin is sweeter and thicker; fish sauce adds back some savory depth
Fresh Green BeansFrozen green beans (see FAQ for method) or snap peasFrozen beans are softer; snap peas are sweeter and stay very crisp
Sesame OilToasted sesame oil (use half the amount) or omitToasted oil has a stronger flavor; omitting loses the nutty note
Chicken BreastsBoneless, skinless chicken thighsThighs are juicier and more forgiving; cook 1-2 minutes longer

How to Make Chicken and Green Bean Stir Fry — Step-by-Step

Trust me, this easy chicken stir fry recipe comes together faster than you can order takeout. Follow these steps, and you’ll have a beautiful, steaming plate of green bean chicken dinner in exactly 30 minutes. I’ve included my best pro tips and common mistakes to watch for at every stage.

Step 1: Marinate the Chicken

In a medium bowl, combine the thinly sliced chicken with 2 tablespoons soy sauce, 1 tablespoon sesame oil, minced garlic, and grated ginger. Toss well to coat every piece. Let this sit for 10 minutes — no longer needed, as the acid in the soy sauce will start to gently tenderize the meat. While it marinates, trim your green beans and set up your blanching pot.

💡 mia’s Pro Tip: Slice the chicken against the grain — look for the natural lines running through the meat and cut perpendicular to them. This shortens the muscle fibers, giving you tender bites every time.

Step 2: Blanch the Green Beans

Bring a medium pot of water to a rolling boil. Add the trimmed green beans and cook for exactly 2 minutes. Drain immediately and rinse under cold running water to stop the cooking. This step sets the bright green color and par-cooks the beans so they only need a quick finish in the wok.

⚠️ Common Mistake to Avoid: Over-blanching! Two minutes is all it takes. If you cook them longer, the beans will lose their snap and turn dull green. Set a timer if you need to.

Step 3: Stir-Fry the Chicken

Heat 2 tablespoons vegetable oil in a wok or large skillet over high heat until shimmering. Add the marinated chicken in a single layer — work in two batches if necessary. Cook without moving for 1 minute to get a light sear, then stir-fry for another 3–4 minutes until the chicken is cooked through and golden at the edges. Use a slotted spoon to transfer the chicken to a plate.

💡 mia’s Pro Tip: Don’t crowd the pan! If you add too much chicken at once, the temperature drops and the meat steams instead of searing. Cook in batches for that beautiful golden color and the best texture.

Step 4: Stir-Fry the Green Beans

Add the blanched green beans to the hot wok (add another teaspoon of oil if needed) and stir-fry for 2 minutes, letting them char slightly in spots. You want them to heat through and pick up a little smoky flavor from the pan. They should still be bright green and crisp-tender.

⚠️ Common Mistake to Avoid: Adding the beans straight from the fridge into the hot oil. Make sure they’re well-drained and at room temperature so they don’t cause the oil to splatter and cool down the pan.

Step 5: Make the Sauce

In a small bowl, whisk together 1/4 cup chicken broth, 1 tablespoon cornstarch, 1 tablespoon oyster sauce, and 1 teaspoon sugar until the cornstarch is fully dissolved and no lumps remain. This slurry is the key to a glossy, clingy sauce that coats every piece of chicken and every bean.

💡 mia’s Pro Tip: Whisk the cornstarch into the cold broth before adding anything else. If you add cornstarch directly to hot liquid, it will form clumps. A smooth slurry gives you a silky sauce every time.

Step 6: Combine and Finish

Return the cooked chicken to the wok. Give the sauce mixture a quick stir (the cornstarch settles fast), then pour it over the chicken and beans. Stir-fry everything together for 1–2 minutes, until the sauce thickens and turns glossy, coating every piece evenly. Season with salt and pepper to taste. Remove from heat immediately.

⚠️ Common Mistake to Avoid: Cooking the sauce too long. Once it thickens and coats the ingredients, take the wok off the heat. Overcooking can make the sauce gummy and cause the green beans to lose their color.

Step 7: Garnish and Serve

Transfer the stir-fry to a serving platter or divide directly among bowls. Sprinkle with sesame seeds and sliced green onions for a fresh, aromatic finish. Serve immediately over steamed rice or your favorite grain.

StepActionDurationKey Visual Cue
1Marinate chicken10 minutesChicken looks evenly coated and glossy
2Blanch green beans2 minutesBeans turn bright, vivid green
3Stir-fry chicken4–5 minutesGolden edges, cooked through, no pink
4Stir-fry green beans2 minutesBeans are hot, slightly charred in spots
5Prepare sauce1 minuteSmooth, no cornstarch lumps
6Combine and finish1–2 minutesSauce thickens and clings to chicken and beans
7Garnish and serve1 minuteSesame seeds and green onions on top

Serving & Presentation

I love serving this chicken and green bean stir fry family-style, straight from the wok to the table. The glossy sauce and bright green beans make a stunning presentation with minimal effort. Spoon it over a bed of steamed jasmine rice or fluffy white rice to catch every drop of that savory sauce. For a low-carb option, serve it over cauliflower rice or on its own as a hearty bowl.

A few finishing touches elevate this from weeknight dinner to something special: a final drizzle of toasted sesame oil, a sprinkle of black sesame seeds for contrast, and a handful of fresh cilantro leaves if you have them. I sometimes add a wedge of lime on the side — a squeeze of citrus brightens the whole dish and cuts through the richness. In my NYC apartment, I’ve served this to everyone from my French-trained chef friends to my kid’s playdate crew, and it disappears every time.

For pairings, think simple and complementary. A crisp cucumber salad with rice vinegar is a refreshing side. Or try a bowl of miso soup to start. For drinks, a cold beer (like a crisp lager or pilsner) or a glass of dry Riesling works beautifully with the savory-sweet flavors.

Pairing TypeSuggestionsWhy It Works
Side DishSteamed jasmine rice, cauliflower rice, or quinoaGrains soak up the sauce and balance the savory flavors
Sauce / DipExtra soy sauce + chili crisp on the sideAdds heat and saltiness for those who want more kick
BeverageCrisp lager, dry Riesling, or iced green teaClean flavors cut through the richness of the sauce
GarnishSesame seeds, green onions, cilantro, lime wedgesFreshness, color, and a pop of acidity to brighten each bite

Make-Ahead, Storage & Reheating

In my busy NYC life, I’m all about smart meal prep. This healthy chicken and vegetables recipe is fantastic for making ahead — just keep the components separate until you’re ready to eat. The chicken and green beans can be prepped and stored individually, then quickly stir-fried together with the sauce when hunger strikes. It’s my favorite way to ensure a home-cooked dinner even on the craziest days.

MethodContainerDurationReheating Tip
RefrigeratorAirtight glass containerUp to 3 daysReheat in a hot skillet with 1 tbsp water to refresh the sauce
FreezerFreezer-safe zip-top bag or containerUp to 2 monthsThaw overnight in fridge; reheat in skillet — beans will be softer
Make-AheadPrep components separatelyUp to 2 days in advanceStore blanched beans, cooked chicken, and sauce separately; combine and reheat in wok

If you’re reheating leftovers, the key is to avoid the microwave if possible — it can make the chicken rubbery and the beans mushy. Instead, use a hot skillet or wok over medium-high heat, add a splash of chicken broth or water to rehydrate the sauce, and toss for 1–2 minutes until everything is hot and glossy. The green beans won’t be as crisp as day one, but the flavor will still be delicious. I’ve been known to pack this for lunch, and it’s always a hit.

Variations & Easy Swaps

One of the things I love most about this easy chicken stir fry recipe is how adaptable it is. Whether you’re cooking for dietary needs, seasonal produce, or just a change of pace, these variations will keep this dish fresh in your rotation all year long.

VariationKey ChangeBest ForDifficulty Impact
Spicy SzechuanAdd chili paste and Szechuan peppercornsHeat lovers who want authentic numbing-spicy flavorEasy (adds 1 minute)
Gluten-FreeUse tamari instead of soy sauce; verify oyster sauce is GFThose with gluten sensitivity or celiacEasy (simple swap)
Spring VegetableAdd snap peas, asparagus tips, and baby cornSeasonal eating and extra veggiesEasy (adds 2 minutes)

Spicy Szechuan Variation

For a fiery twist on this green bean chicken dinner, add 1 tablespoon of chili bean paste (doubanjiang) and a teaspoon of Szechuan peppercorns to the sauce. The peppercorns bring that unique tingly, numbing sensation that’s so iconic in Szechuan cooking. I learned this technique from a chef friend in Paris who specialized in Sichuan cuisine — she taught me to toast the peppercorns briefly in the dry wok before adding oil. The result is a deeply aromatic, spicy stir-fry that’s utterly addictive. If you can’t find Szechuan peppercorns, red pepper flakes and a splash of chili oil make a good substitute.

Gluten-Free Variation

This quick weeknight stir fry is easily made gluten-free. Simply swap the soy sauce for tamari (which is naturally gluten-free and has a very similar flavor) and check that your oyster sauce is certified gluten-free — some brands contain wheat. I use Kikkoman’s gluten-free tamari and a brand called Wok Mei for GF oyster sauce. The texture and flavor are nearly identical to the original, so no one at your table will know the difference. Serve with rice or rice noodles for a completely gluten-free meal.

Spring Vegetable Variation

When spring hits the NYC farmers markets, I can’t resist loading this healthy chicken and vegetables recipe with seasonal finds. Add a handful of sugar snap peas (blanched for 30 seconds), a few thin asparagus spears (cut into 2-inch pieces and blanched with the beans), and some baby corn (canned is fine — just drain and add in the last minute). The variety of textures and colors makes this a stunning one-pan dinner. My mother would approve of this abundance — she always said the best cooking uses what’s freshest and most beautiful at the market.

What is the best way to tenderize chicken for a stir fry?

The best way to tenderize chicken for a stir fry is a combination of two techniques: slicing against the grain and a quick marinade. First, look at the raw chicken breast and identify the direction of the muscle fibers — slice perpendicular to those lines into even 1/4-inch pieces. This shortens the fibers, making each bite naturally tender. Then, marinate the sliced chicken in a mixture of soy sauce, sesame oil, garlic, and ginger for at least 10 minutes. The soy sauce contains a small amount of acid that gently breaks down proteins, while the oil helps keep the meat moist during high-heat cooking. For even more tenderness, you can add 1 teaspoon of cornstarch to the marinade — it creates a light coating that protects the chicken from the intense heat of the wok. In my kitchen, this method has never failed to produce juicy, tender chicken every single time.

Can I use frozen green beans instead of fresh for this stir fry?

Yes, you can use frozen green beans for this chicken and green bean stir fry, but you’ll need to adjust your technique slightly. Frozen beans are already blanched during processing, so they cook faster and tend to be softer than fresh. To get the best results, do not thaw them first — add them directly to the wok frozen. Increase the initial stir-fry time by about 1 minute to evaporate the excess moisture, and expect a slightly less crisp texture compared to fresh beans. The flavor will still be great, and for a quick weeknight dinner, frozen green beans are a perfectly convenient option. In fact, I keep a bag in my freezer for nights when I don’t have fresh produce on hand. Just be sure to pat them dry before adding to the oil to minimize splattering.

How long should I cook the chicken and green beans to keep them from getting mushy?

The key to avoiding mushy chicken and green beans is precise timing and high heat. For the chicken, stir-fry over high heat for 4–5 minutes total — cook in a single layer without moving for the first minute to get a light sear, then toss until just cooked through. Overcooking chicken by even a minute can make it dry and tough. For the green beans, the most important step is blanching them for exactly 2 minutes in boiling water, then draining and shocking them under cold water. This par-cooks them while preserving their crunch. When you add them to the wok later, stir-fry for only 2 minutes — just enough to heat through and pick up some color. The total time the beans spend in the wok should be no more than 2 minutes. If you follow this timing, you’ll get tender chicken and crisp, vibrant green beans every time.

What can I substitute for soy sauce in a chicken and green bean stir fry?

If you need to substitute soy sauce in this easy chicken stir fry recipe, you have several excellent options. Tamari is the closest substitute — it’s made from soybeans but typically contains little or no wheat, making it gluten-free, and the flavor is nearly identical to soy sauce. Coconut aminos are a great soy-free alternative; they’re made from fermented coconut sap and have a slightly sweeter, less salty profile. If you use coconut aminos, consider adding an extra pinch of salt to balance the flavor. Liquid aminos (made from soy protein) are another option with a similar savory taste. For a completely different but delicious twist, you can use fish sauce combined with a little water — use half the amount since fish sauce is much saltier. In a pinch, I’ve even used Worcestershire sauce (though it’s not traditional and will change the flavor profile). Whichever substitute you choose, taste and adjust the seasoning before serving.

Can I add other vegetables to this stir fry?

Absolutely! This chicken and green bean stir fry is a fantastic base for adding more vegetables. I frequently add sliced bell peppers (red, yellow, or orange), snow peas, broccoli florets, or thinly sliced carrots. The key is to adjust the blanching time based on the vegetable’s density. For example, broccoli needs about 2 minutes of blanching just like green beans, while snow peas need only 30 seconds. Bell peppers don’t need blanching at all — just add them to the wok with the green beans and stir-fry for 2 minutes. I love to load this dish with whatever looks good at the Union Square market. Just be careful not to overcrowd the wok, as too many vegetables will lower the temperature and cause steaming instead of stir-frying. Stick to about 1 1/2 to 2 cups total of additional veggies for the best results.

What type of wok or pan is best for this stir fry?

For this quick weeknight stir fry, you have several good options. A traditional carbon steel wok is ideal — it heats up quickly, distributes heat evenly, and develops a natural non-stick patina over time. However, a large 12-inch stainless steel or non-stick skillet works beautifully too. The most important factor is using a pan that’s large enough to hold all the ingredients without crowding. If your pan is too small, the ingredients will steam instead of sear. I use a 14-inch carbon steel wok at home, but when I’m testing recipes for the blog, I often use a standard non-stick skillet — and it works perfectly. Avoid using a pan with a non-stick coating that’s scratched or worn, as high heat can damage it. Whatever pan you choose, preheat it thoroughly over high heat until a drop of water dances across the surface before adding the oil.

Is this chicken and green bean stir fry healthy?

Yes, this healthy chicken and vegetables recipe is a nutritious choice for a weeknight dinner. Each serving contains approximately 320 calories, 30 grams of protein, 12 grams of carbohydrates, and 16 grams of fat. The chicken provides lean protein that’s satisfying and supports muscle health, while the green beans offer fiber, vitamin C, and vitamin K. The sauce is relatively low in sugar compared to many takeout versions, and you can easily adjust the sodium by using low-sodium soy sauce. To make it even healthier, serve it over cauliflower rice for a low-carb option, or add extra vegetables like bell peppers and snap peas to boost the nutrient content. I love that this dish feels indulgent and flavorful while still being balanced and wholesome — exactly the kind of meal I want to feed my family on a busy weeknight.

Can I make this stir fry ahead of time for meal prep?

Yes, this green bean chicken dinner is excellent for meal prep! The best approach is to prepare the components separately and store them in the refrigerator for up to 3 days. Blanch the green beans, cook the chicken, and mix the sauce (store the cornstarch separately and add it just before cooking, as it can settle). When you’re ready to eat, simply reheat the chicken and green beans in a hot skillet with a splash of water, then add the sauce mixture and toss until thickened. This method ensures the best texture and flavor. Alternatively, you can freeze the fully cooked stir-fry for up to 2 months. Thaw overnight in the refrigerator and reheat in a skillet rather than a microwave to preserve the texture. I often double the recipe on Sunday and use the leftovers for quick lunches throughout the week — it’s a lifesaver on busy days.

What should I serve with this chicken and green bean stir fry?

This easy chicken stir fry recipe pairs beautifully with a variety of sides. The most classic choice is steamed jasmine rice or plain white rice, which soaks up the glossy sauce perfectly. For a healthier option, try cauliflower rice, quinoa, or brown rice. If you’re in the mood for noodles, serve it over lo mein noodles, udon, or even ramen — just toss the noodles with a little sesame oil to keep them from sticking. For a complete meal, add a simple side like cucumber salad with rice vinegar, edamame, or a bowl of miso soup. I also love serving this stir-fry with a side of pickled vegetables for a bright, tangy contrast. On busy nights, I sometimes skip the extra sides and just pile the stir-fry into bowls with a sprinkle of sesame seeds — it’s satisfying enough on its own to be a complete meal.

How do I prevent the sauce from becoming too thick or gluey?

The key to a silky, not gluey, sauce in this chicken and green bean stir fry is the cornstarch slurry technique. Always dissolve the cornstarch in cold liquid (chicken broth) before adding it to the hot wok — this prevents clumps from forming. Whisk it thoroughly until no white streaks remain. When you pour the slurry into the wok, stir continuously and watch closely — the sauce will thicken in about 1 to 2 minutes. As soon as it coats the back of a spoon and clings to the chicken and beans, remove the wok from the heat. Overcooking the sauce is the most common cause of a gluey texture, as the cornstarch breaks down and becomes sticky. If your sauce does get too thick, add a tablespoon of hot water or chicken broth and toss to loosen it. The sauce should be glossy and smooth, not pasty or gummy. With a little practice, you’ll nail that perfect consistency every time.

Share Your Version!

I absolutely love hearing about how this chicken and green bean stir fry turns out in your kitchen. Did you try the spicy Szechuan variation? Did you add extra veggies from your farmers market? Drop a star rating and a comment below — your feedback helps me create more recipes you’ll love, and it helps other home cooks know exactly what to expect.

Snap a photo of your beautiful stir-fry and share it on Instagram or Pinterest — tag me @exorecipes so I can see your creation. I always feature my favorites in my stories! And if you have a specific question about this recipe or a substitution you’re considering, ask away in the comments. I read every single one and answer personally. From my NYC kitchen to yours — I hope this recipe brings as much warmth to your table as it does to mine. — mia 🧡

📌

Love This Recipe? Save It to Pinterest!

If you enjoyed this Chicken and Green Bean Stir Fry recipe, don’t let it get lost in your browser tabs! 😄 Pin it now so you can find it again anytime — and explore hundreds more tried-and-tested recipes waiting for you on my Pinterest boards.

👉 Follow mia on Pinterest @exorecipe

📌 Pin this recipe · 🔁 Re-pin your favorites · 💬 Tag me when you make it — I love seeing your creations!

“`

Print

clock clock iconcutlery cutlery iconflag flag iconfolder folder iconinstagram instagram iconpinterest pinterest iconfacebook facebook iconprint print iconsquares squares iconheart heart iconheart solid heart solid icon

Chicken and Green Bean Stir Fry: A Deliciously Simple Weeknight Dinner

  • Author: Chef Mia
  • Prep Time: 15 minutes
  • Cook Time: 15 minutes
  • Total Time: 30 minutes
  • Yield: 4 1x
  • Method: Main Course
  • Cuisine: Asian

Description

An easy and flavorful stir-fry made with tender chicken and crisp green beans, perfect for a quick weeknight meal.


Ingredients

Scale
  • 1 lb boneless, skinless chicken breasts, thinly sliced
  • 2 tablespoons soy sauce
  • 1 tablespoon sesame oil
  • 2 cloves garlic, minced
  • 1 tablespoon fresh ginger, grated
  • 1 lb fresh green beans, trimmed
  • 2 tablespoons vegetable oil
  • 1/4 cup chicken broth
  • 1 tablespoon cornstarch
  • 1 tablespoon oyster sauce
  • 1 teaspoon sugar
  • Salt and pepper to taste
  • Sesame seeds and sliced green onions for garnish

Instructions

  1. In a bowl, combine sliced chicken with soy sauce, sesame oil, garlic, and ginger. Let marinate for 10 minutes.
  2. Blanch green beans in boiling water for 2 minutes, then drain and set aside.
  3. Heat vegetable oil in a wok or large skillet over high heat. Add chicken and stir-fry until cooked through, about 4-5 minutes. Remove from wok.
  4. Add green beans to the wok and stir-fry for 2 minutes.
  5. In a small bowl, mix chicken broth, cornstarch, oyster sauce, and sugar until smooth.
  6. Return chicken to the wok, pour in the sauce mixture, and stir-fry for 1-2 minutes until sauce thickens and coats everything.
  7. Season with salt and pepper. Garnish with sesame seeds and green onions. Serve hot over rice.

Notes

For a spicier version, add red pepper flakes or Sriracha with the garlic. Substitute green beans with snap peas if desired.


Nutrition

  • Calories: 320
  • Sugar: 4g
  • Fat: 16g
  • Carbohydrates: 12g
  • Protein: 30g


Chicken and Green Bean Stir Fry: A Deliciously Simple Weeknight Dinner

k">

Tried This Recipe? Leave a Comment!

Did you make this recipe? I’d love to hear how it turned out! Please leave a comment and a rating below. Your feedback helps other home cooks and supports cheerychop.com!

For more delicious inspiration, follow me on Pinterest!