“`html
Table of Contents
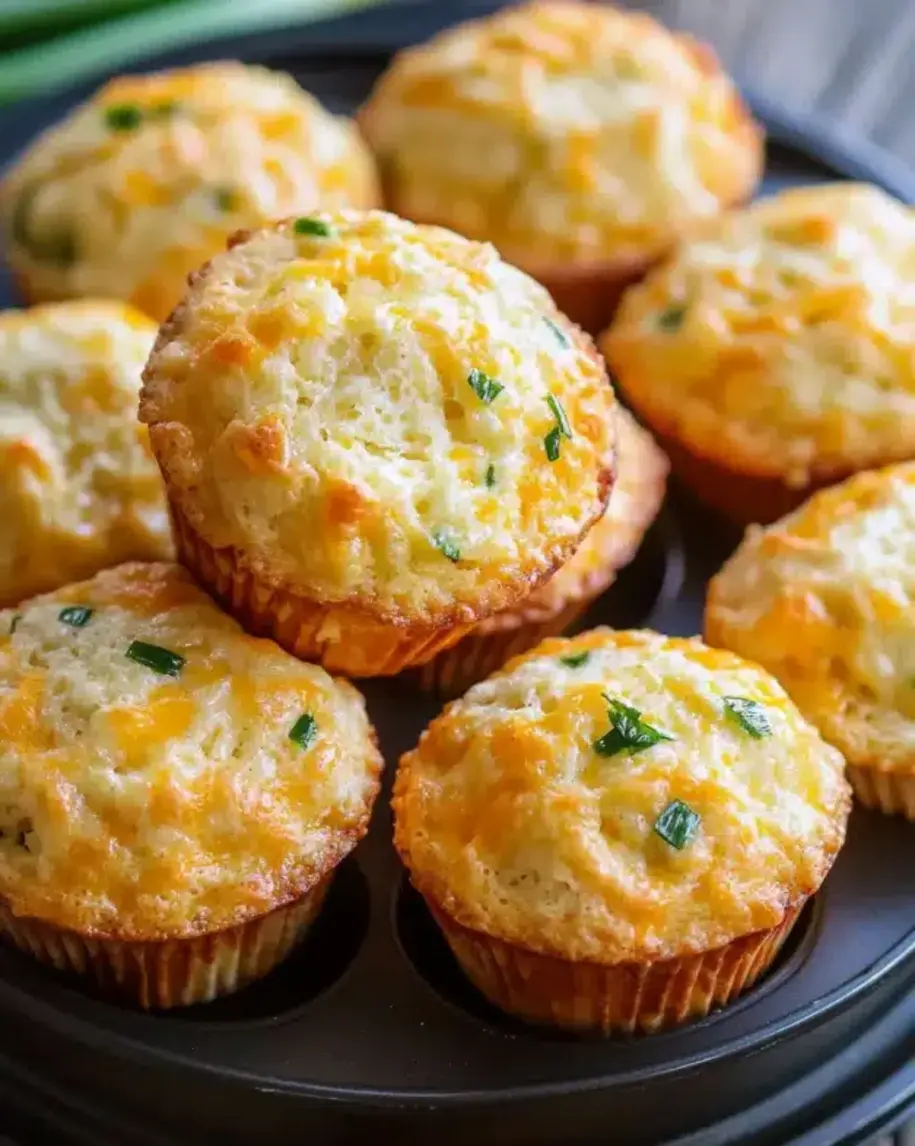
Cheddar and Scallion Muffins – The Perfect Savory Breakfast Treat
Back when I was a little girl in Morocco, my mother would wake up before dawn to prepare bread for our family. The aroma of warm dough and melted butter would drift through our home in Marrakech, pulling me out of bed and into the kitchen. She never used a recipe — she measured everything by feel, by the way the dough responded to her hands. Now, decades later and thousands of miles away, living in my bustling New York City apartment, I still chase that same feeling of comfort. These cheddar and scallion muffins are my homage to those mornings — a quick, savory, no-fuss recipe that fills your kitchen with that same warmth. They’re the perfect easy savory muffin recipe for busy weekdays or lazy weekend brunches.
Imagine biting into a golden, domed muffin and tasting the sharp, creamy richness of melted cheddar, punctuated by the fresh, mild bite of scallions. The texture is tender and moist on the inside, with a slightly crisp, buttery top that gives way to a soft crumb. These scallion cheese muffins are wonderfully aromatic — the scallions mellow as they bake, releasing a subtle sweetness that pairs beautifully with the savory cheese. I love how the cheddar forms little pockets of gooeyness throughout the batter, and the scallions add just the right amount of freshness. It’s the kind of muffin that doesn’t need butter or jam — it’s perfectly satisfying all on its own.
What sets my version apart is the technique I learned during my pastry training in Paris: never overmix the batter. It sounds simple, but it’s the single most important step for achieving a light, fluffy cheddar muffin breakfast muffin. Overmixing develops the gluten too much and turns your muffins dense and rubbery. I’ll show you exactly how to fold the wet and dry ingredients together until they’re just combined — a few lumps are perfectly fine. Plus, I’m sharing my favorite pro tip for getting those extra-cheesy, golden tops that everyone fights over. Whether you’re a seasoned baker or making muffins for the first time, this recipe is foolproof and deeply rewarding.
Why This Cheddar and Scallion Muffins Recipe Is the Best
The Flavor Secret: Growing up in Morocco, I learned that the best dishes rely on a few high-quality ingredients layered together with intention. Here, sharp cheddar is the star — its bold, tangy flavor stands up beautifully to the fresh scallions. I use extra-sharp cheddar because it delivers more flavor per bite. The scallions are chopped fine and folded in at the last moment, so they stay vibrant and fragrant. A touch of black pepper rounds out the savory profile without overwhelming the palate. This is a savory cheddar muffins recipe that lets every ingredient shine.
Perfected Texture: My Parisian pastry training taught me that the difference between a good muffin and a great one is all in the handling. The key is to combine the dry and wet ingredients with a light hand — just 12 to 15 folds, no more. The result is a tender, moist crumb with a delicate, cake-like structure. The melted butter keeps the muffins soft for days, while the milk ensures they stay tender on the inside. I’ve tested this ratio six times to make sure the texture is absolutely spot-on — fluffy, not dense, with a satisfyingly soft chew.
Foolproof & Fast: This easy savory muffin recipe comes together in under 30 minutes with just one bowl and a whisk. No stand mixer, no complicated steps. It’s the kind of recipe you can make on a Wednesday morning before the school run or whip up for unexpected guests. I’ve streamlined every step so that even a complete beginner can nail it on the first try. And because it’s so versatile, you can customize it with whatever cheese or herbs you have on hand — though I promise, the cheddar-scallion combination is a classic for a reason.
Savory Cheddar Muffins Ingredients
I source my cheddar from a small dairy farm in upstate New York that I discovered at the Union Square Greenmarket. The scallions I pick up at my local Korean grocer in Koreatown — they’re always crisp and bright. Using fresh, quality ingredients makes a real difference in these cheddar and scallion muffins, but I’ve also tested smart substitutions so you can use what you have. Here’s everything you’ll need.
Ingredients List
- 2 cups all-purpose flour
- 1 tablespoon baking powder
- 1/2 teaspoon salt
- 1/4 teaspoon black pepper
- 1 cup shredded sharp cheddar cheese (plus extra for topping, optional)
- 1/4 cup chopped scallions (green onions), green and light green parts
- 1 cup milk (whole or 2% preferred)
- 1/4 cup unsalted butter, melted
- 1 large egg
Ingredient Spotlight
Sharp Cheddar Cheese: This is the backbone of your scallion cheese muffins. Sharp cheddar brings a bold, tangy depth that mild cheddar just can’t match. When shopping, look for a block of cheddar and shred it yourself — pre-shredded cheese contains anti-caking agents that prevent it from melting smoothly. If you prefer a milder flavor, colby jack or gouda work well, though the taste will be less pronounced.
Scallions (Green Onions): Fresh scallions add a gentle onion flavor that softens as the muffins bake. Use both the white and green parts for the best balance. If scallions aren’t available, you can substitute chives (use 3 tablespoons) or finely chopped shallots (use 2 tablespoons, sautéed briefly to mellow the bite). Avoid yellow or red onions — they’re too pungent and won’t cook through properly in this short bake time.
All-Purpose Flour: Standard all-purpose flour gives these muffins the ideal structure — sturdy enough to hold the cheese and scallions, but tender enough to be light. I’ve tested this with whole wheat pastry flour (use 1 cup whole wheat + 1 cup all-purpose) for a nuttier flavor, and with a 1:1 gluten-free baking blend for those who need it. Both work, but the texture will be slightly denser.
| Original Ingredient | Best Substitution | Flavor / Texture Impact |
|---|---|---|
| Sharp cheddar cheese | Colby jack, gouda, or gruyère | Milder flavor; slightly less tangy but still creamy |
| Fresh scallions | Chives (3 tbsp) or finely chopped shallot (2 tbsp, sautéed) | Chives are milder; shallots add a sweeter, deeper flavor |
| All-purpose flour | Whole wheat pastry flour or 1:1 GF blend | Denser, nuttier texture with whole wheat; slightly crumblier with GF |
| Whole milk | 2% milk, buttermilk, or unsweetened almond milk | Buttermilk adds tang and tenderness; almond milk makes them slightly less rich |
| Unsalted butter | Melted coconut oil or neutral vegetable oil | Coconut oil adds a subtle sweetness; vegetable oil makes them slightly softer |
How to Make Cheddar and Scallion Muffins — Step-by-Step
Trust me when I say this is one of the simplest, most satisfying bakes you’ll ever make. Follow these steps, and you’ll have a tray of golden, cheesy cheddar and scallion muffins ready in under half an hour.
Step 1: Prep the Oven and Pan
Preheat your oven to 400°F (200°C). Grease a 12-cup muffin tin generously with butter or nonstick spray, or line with paper liners. If using liners, give them a quick spritz of spray — this helps the muffins release cleanly and keeps the paper from sticking to the cheese.
💡 mia’s Pro Tip: For the crispiest, most golden edges, use a metal muffin tin instead of a nonstick one. Metal conducts heat better and gives you that beautifully browned crust.
Step 2: Mix the Dry Ingredients
In a large mixing bowl, whisk together 2 cups all-purpose flour, 1 tablespoon baking powder, 1/2 teaspoon salt, and 1/4 teaspoon black pepper. Whisk for about 15 seconds to aerate the flour and ensure the baking powder is evenly distributed. This step is crucial — no one wants a pocket of baking powder in their muffin.
Step 3: Add Cheese and Scallions
Stir in 1 cup shredded sharp cheddar cheese and 1/4 cup chopped scallions until they’re evenly coated in the flour mixture. This coating prevents the cheese from sinking to the bottom of the muffins during baking — a trick I learned from a pastry chef in Paris.
⚠️ Common Mistake to Avoid: Don’t dump the cheese and scallions in without tossing them in flour first. If you skip this step, the heavy cheese will sink to the bottom of the muffin cups, leaving you with a bare top and a dense, cheesy base.
Step 4: Combine Wet Ingredients
In a separate medium bowl or a large liquid measuring cup, whisk together 1 cup milk, 1/4 cup melted unsalted butter (cooled slightly), and 1 large egg. Whisk until the egg is fully incorporated and the mixture looks smooth and slightly creamy. If the butter solidifies when it hits the cold milk, gently warm the mixture for a few seconds in the microwave — just until it’s liquid again.
Step 5: Mix Wet into Dry
Pour the wet ingredients into the bowl with the dry ingredients. Use a rubber spatula to fold everything together gently. Stir only until the flour disappears — about 12 to 15 strokes. The batter will be thick, lumpy, and a little shaggy. That’s exactly what you want. Do NOT overmix.
💡 mia’s Pro Tip: A few streaks of flour are fine. Overmixing activates the gluten and will give you tough, dense muffins. Trust the lumps — they’ll bake out beautifully.
Step 6: Fill the Muffin Tin
Divide the batter evenly among the 12 prepared muffin cups, filling each about 2/3 full. I like to use a spring-loaded ice cream scoop for even, mess-free portions. If you want extra-cheesy tops, sprinkle a pinch of reserved shredded cheddar on top of each muffin before baking.
Step 7: Bake to Perfection
Bake for 15 to 18 minutes, rotating the pan halfway through for even browning. The muffins are done when the tops are golden brown and a toothpick inserted into the center of a muffin comes out clean or with a few moist crumbs. Let the muffins cool in the pan for 5 minutes — this allows them to set and makes them easier to remove.
⚠️ Common Mistake to Avoid: Don’t skip the 5-minute cooling step in the pan. If you try to transfer them immediately, the muffins can fall apart because they’re still too tender. Let them rest so the structure firms up.
Step 8: Cool and Serve
Transfer the muffins to a wire rack to cool completely, or serve them warm for the ultimate experience. The cheese will be perfectly melted, the scallions fragrant, and the tops slightly crisp. These cheddar muffin breakfast muffins are at their best within the first hour, but they’re still wonderful the next day.
| Step | Action | Duration | Key Visual Cue |
|---|---|---|---|
| 1 | Preheat oven & grease tin | 5 min | Oven at 400°F, tin fully coated |
| 2 | Mix dry ingredients | 2 min | Fluffy, aerated flour mixture |
| 3 | Add cheese & scallions to dry mix | 2 min | Cheese and scallions evenly coated |
| 4 | Whisk wet ingredients | 1 min | Smooth, homogenous liquid |
| 5 | Fold wet into dry | 1 min | Thick, lumpy batter with no dry streaks |
| 6 | Fill muffin cups | 3 min | Each cup 2/3 full |
| 7 | Bake | 15–18 min | Golden tops, toothpick comes clean |
| 8 | Cool & serve | 5 min in pan | Muffins hold their shape, cheese slightly set |
Serving & Presentation
These cheddar and scallion muffins are wonderfully versatile. I love serving them warm from the oven alongside a bowl of tomato soup for lunch, or as a grab-and-go breakfast with a piece of fruit. In my NYC apartment, I often pair them with a soft-boiled egg and a drizzle of hot honey for a savory-sweet morning treat. The muffins are sturdy enough to split and toast, too — just halve them, butter the cut sides, and crisp them in a skillet for a next-day breakfast that’s almost better than the original.
For presentation, I arrange the muffins on a rustic wooden board or a simple white platter, with a small dish of softened butter or whipped ricotta on the side. A sprinkle of flaky sea salt and a few extra chopped scallions on top makes them look gorgeous for brunch guests. In the summer, I serve them with a side of sliced heirloom tomatoes from the Union Square market — the acidity cuts through the richness of the cheese beautifully.
| Pairing Type | Suggestions | Why It Works |
|---|---|---|
| Side Dish | Tomato soup, green salad, roasted vegetables | The acidity and freshness balance the rich, cheesy muffins |
| Sauce / Dip | Honey mustard, herbed butter, spicy mayo, balsamic glaze | Adds moisture and a flavor contrast — sweet, tangy, or spicy |
| Beverage | Iced coffee, chai latte, fresh orange juice, dry cider | The caffeine or acidity cuts through the richness and refreshes the palate |
| Garnish | Flaky sea salt, extra chopped scallions, micro greens, edible flowers | Adds visual appeal, texture, and a fresh pop of flavor |
Make-Ahead, Storage & Reheating
Living in New York City means my schedule is always packed — between recipe testing, writing, and exploring the latest food pop-ups, I need recipes that work on my terms. These cheddar and scallion muffins are ideal for meal prep. I often bake a double batch on Sunday evening, and we enjoy them all week long. Here’s exactly how to store and reheat them so they stay fresh and delicious.
| Method | Container | Duration | Reheating Tip |
|---|---|---|---|
| Refrigerator | Airtight container or zip-top bag | Up to 5 days | Microwave 15–20 sec, or air fry at 350°F for 3 min |
| Freezer | Freezer-safe bag or container, layers separated by parchment | Up to 3 months | Thaw at room temp, then reheat in oven at 350°F for 5–7 min |
| Make-Ahead | Batter in a covered bowl (bake fresh) | Up to 1 day in advance | Stir gently before filling cups; add 1–2 min to bake time |
For the best reheated texture, I always use the oven or air fryer instead of the microwave. The dry heat revives the crispy top and keeps the inside moist. If you’re in a rush, microwaving works fine — just wrap the muffin in a damp paper towel for 15 seconds to add a little steam back into the crumb. And if you froze them, let them thaw on the counter for about 30 minutes before reheating for the most even result.
One more thing from my NYC meal-prep routine: I sometimes freeze the unbaked batter directly in the muffin tin (without liners), then pop the frozen pucks into a freezer bag. When a craving hits, I bake them straight from frozen — just add 4 to 5 minutes to the bake time. It’s a game-changer for busy mornings.
Variations & Easy Swaps
One of the things I love most about this easy savory muffin recipe is how adaptable it is. Over the years, I’ve played with countless variations — some inspired by my mother’s Moroccan pantry, others by the French technique I mastered in Paris, and a few from the vibrant farmers market scene here in New York. Here are three of my favorite twists.
| Variation | Key Change | Best For | Difficulty Impact |
|---|---|---|---|
| Moroccan Spiced | Add 1 tsp cumin, 1/2 tsp paprika, and 1/4 tsp cayenne | A warm, aromatic twist with North African flair | Easy — just add spices to the flour |
| Gluten-Free / Dairy-Free | Use 1:1 GF flour, plant-based milk, and dairy-free cheddar | Dietary restrictions without sacrificing flavor | Easy — same method, slightly different texture |
| Bacon & Chive | Add 1/2 cup cooked crumbled bacon and swap scallions for chives | A heartier, smoky-savory brunch star | Easy — cook bacon first, then fold in |
Moroccan Spiced Cheddar Muffins
This variation is a nod to my childhood in Marrakech. Add 1 teaspoon ground cumin, 1/2 teaspoon sweet paprika, and 1/4 teaspoon cayenne pepper to the flour mixture. The cumin adds an earthy warmth that pairs beautifully with the sharp cheddar, while the paprika and cayenne bring a gentle heat. I sometimes throw in a handful of toasted sesame seeds for extra crunch. Serve these with a bowl of harira soup for a truly North African-inspired meal.
Gluten-Free & Dairy-Free Version
For my friends with dietary restrictions, I’ve tested this with a high-quality 1:1 gluten-free flour blend (I love King Arthur’s) and unsweetened oat milk. Use a dairy-free shredded cheddar alternative — look for one that melts well, like Violife or Daiya. The texture will be slightly more tender and a little less fluffy than the original, but the flavor is still fantastic. Add an extra tablespoon of melted butter or oil to compensate for the lack of dairy fat.
Bacon & Chive Brunch Muffins
This is my go-to weekend brunch variation. Cook 4 strips of bacon until crispy, let them cool, and crumble them into small pieces. Swap the scallions for 3 tablespoons of fresh chopped chives. Fold the bacon in along with the cheese and chives. The smoky, salty bacon adds incredible depth, and the chives keep it fresh. These are especially good served alongside a Bloody Mary or a mimosa — a true NYC brunch vibe.
Can I use a different type of cheese instead of cheddar in scallion muffins?
Absolutely! While sharp cheddar is my top recommendation for its bold, tangy flavor, you can absolutely experiment with other cheeses. Gruyère melts beautifully and adds a nutty, slightly sweet note that pairs wonderfully with scallions. Gouda (especially smoked gouda) brings a rich, creamy depth. Monterey Jack is mild and melts like a dream — perfect if you’re serving these to kids or prefer a gentler flavor. For a stronger kick, try crumbled feta or blue cheese, though keep in mind that these won’t melt the same way. Whichever cheese you choose, shred it yourself from a block for the best melt and texture.
How do I keep cheddar and scallion muffins from sticking to the pan?
This is such a common question, and the answer is simple: grease your muffin tin generously, and don’t skip the 5-minute cooling step after baking. I recommend using a good nonstick baking spray that contains flour (like Baker’s Joy), or brushing each cup with melted butter and then dusting lightly with flour. If you’re using paper liners, give them a quick spritz of spray as well — the cheese can cause the paper to stick. Letting the muffins rest in the pan for 5 minutes after baking allows them to firm up and pull away from the sides naturally. After that, run a thin knife around the edge of each muffin to release it.
What can I substitute for buttermilk in cheddar scallion muffin batter?
This recipe actually uses regular milk rather than buttermilk, but if you want to swap in buttermilk for a tangier, more tender muffin, go for it — use the same amount (1 cup). If you don’t have buttermilk on hand, you can make a quick substitute: add 1 tablespoon of lemon juice or white vinegar to a liquid measuring cup, then fill with milk to the 1-cup line. Let it sit for 5 minutes until it thickens slightly and curdles. That’s your DIY buttermilk. For a dairy-free option, unsweetened oat milk or almond milk work well, though the muffins will be slightly less rich and tender.
How long do cheddar and scallion muffins stay fresh and how should I store them?
These muffins stay fresh for up to 5 days when stored properly in an airtight container at room temperature. If your kitchen is warm or humid, I recommend refrigerating them — they’ll last up to a week in the fridge. For longer storage, freeze them for up to 3 months. The key is to let them cool completely before storing, or condensation will make them soggy. I like to line the storage container with a paper towel to absorb any excess moisture. When reheating, pop them in a 350°F oven for 5-7 minutes or in the air fryer for 3 minutes to revive that crispy top.
Can I make these muffins vegan?
Yes, you can make a delicious vegan version of these cheddar and scallion muffins! Use unsweetened oat or soy milk in place of dairy milk, and substitute the melted butter with melted coconut oil or a neutral vegetable oil. For the egg, use a flax egg (1 tablespoon ground flaxseed mixed with 3 tablespoons water, let sit for 5 minutes) or a commercial egg replacer. The biggest challenge is the cheese — look for a high-quality vegan cheddar that melts well, such as Violife or Follow Your Heart. The texture will be slightly denser and less fluffy, but the flavor will still be savory and satisfying.
Why did my cheddar and scallion muffins turn out dense and heavy?
Dense muffins are almost always the result of overmixing the batter. When you stir the wet and dry ingredients together too vigorously or for too long, you develop the gluten in the flour, which creates a tough, rubbery texture. The fix is simple: mix only until the flour disappears — about 12 to 15 gentle folds. A few lumps are perfectly fine. Another potential culprit is using too much flour. Make sure you’re measuring correctly: spoon the flour into your measuring cup and level it off with a knife, rather than scooping directly from the bag, which compacts the flour.
Can I add other vegetables to these savory cheddar muffins?
Definitely! This easy savory muffin recipe is very forgiving when it comes to add-ins. Finely diced bell peppers (red or orange) add sweetness and color. Sautéed mushrooms, chopped finely, bring an earthy umami flavor. Fresh or frozen corn kernels (thawed and patted dry) are wonderful in the summer. Just keep a few things in mind: any vegetable you add should be chopped small (about the size of a pea) and patted very dry with paper towels to remove excess moisture. Too much moisture can make the muffins soggy. Stick to about 1/3 cup of additional vegetables.
Can I use whole wheat flour instead of all-purpose flour?
Yes, but I recommend using a mix of whole wheat and all-purpose flour for the best texture. Whole wheat flour absorbs more liquid and creates a denser, heartier muffin. I’ve tested this with a 50/50 blend (1 cup whole wheat + 1 cup all-purpose) and it works beautifully — the muffins are still tender but have a lovely nutty flavor and a bit more structure. If you use 100% whole wheat, your muffins will be significantly denser and may need an extra tablespoon or two of milk to keep them from drying out. White whole wheat flour is a great option if you want whole grain nutrition with a lighter texture.
What’s the best way to reheat frozen cheddar and scallion muffins?
For the best results, thaw the muffins at room temperature first — about 30 minutes on the counter. Then reheat them in a 350°F oven for 5 to 7 minutes, or in an air fryer at 350°F for 3 to 4 minutes. This method restores the crispy, golden top and keeps the inside moist and tender. If you’re in a hurry, you can microwave a frozen muffin for 20 to 25 seconds, but the texture won’t be as crisp. I like to split the muffin in half, toast it in a skillet with a little butter, and then put it back together — it’s almost better than fresh!
Are these cheddar and scallion muffins gluten-free friendly?
Yes, with a simple swap! Use a high-quality 1:1 gluten-free all-purpose flour blend (one that contains xanthan gum, like King Arthur or Bob’s Red Mill) in place of the regular flour. The rest of the ingredients remain the same. The texture will be slightly more tender and a bit more delicate than the original, so handle the batter gently and avoid overmixing. I also recommend letting the batter rest for 10 minutes after mixing — this gives the gluten-free flour time to hydrate fully, which results in a better rise and a more even crumb. Bake for the same amount of time, checking for doneness with a toothpick.
Share Your Version!
I absolutely love hearing how my recipes come to life in your kitchen. Did you try the Moroccan spice twist? Did you add bacon and make it a full brunch spread? Or maybe you discovered a new favorite cheese combination? Drop a star rating and a comment below — your feedback helps me create more recipes you’ll love. And if you share a photo on Instagram or Pinterest, be sure to tag me @exorecipes so I can see your beautiful creations. It makes my day every single time.
Here’s a question for you: what’s one ingredient you always add to your savory muffins that might surprise me? I’m always looking for new ideas from your kitchens. From my NYC kitchen to yours — I hope this recipe brings as much warmth to your table as it does to mine. — mia 🧡
Love This Recipe? Save It to Pinterest!
If you enjoyed this Cheddar and Scallion Muffins recipe, don’t let it get lost in your browser tabs! 😄 Pin it now so you can find it again anytime — and explore hundreds more tried-and-tested recipes waiting for you on my Pinterest boards.
👉 Follow mia on Pinterest @exorecipe
📌 Pin this recipe · 🔁 Re-pin your favorites · 💬 Tag me when you make it — I love seeing your creations!
⭐ Did you make this recipe? I’d love to hear from you!
Leave a star rating below, share a photo on Instagram tagging @exorecipes, or tell me in the comments — what’s your favorite savory muffin add-in? Your feedback makes my NYC kitchen shine! 🧡
“`
Print

Cheddar and Scallion Muffins
- Prep Time: 10 minutes
- Cook Time: 18 minutes
- Total Time: 28 minutes
- Yield: 12 muffins 1x
- Method: Breakfast
- Cuisine: American
Description
Savory muffins loaded with sharp cheddar cheese and fresh scallions, perfect for breakfast or a snack.
Ingredients
- 2 cups all-purpose flour
- 1 tablespoon baking powder
- 1/2 teaspoon salt
- 1/4 teaspoon black pepper
- 1 cup shredded sharp cheddar cheese
- 1/4 cup chopped scallions (green onions)
- 1 cup milk
- 1/4 cup unsalted butter, melted
- 1 large egg
Instructions
- Preheat oven to 400°F (200°C). Grease a 12-cup muffin tin or line with paper liners.
- In a large bowl, whisk together flour, baking powder, salt, and pepper.
- Stir in shredded cheddar cheese and chopped scallions until evenly distributed.
- In a separate bowl, whisk together milk, melted butter, and egg.
- Pour the wet ingredients into the dry ingredients and stir just until combined (do not overmix).
- Divide the batter evenly among the prepared muffin cups, filling each about 2/3 full.
- Bake for 15-18 minutes, or until a toothpick inserted into the center comes out clean.
- Let cool in the pan for 5 minutes, then transfer to a wire rack to cool completely.
Notes
For extra cheesy tops, sprinkle a little extra cheddar on each muffin before baking.
Nutrition
- Calories: 210
- Sugar: 2g
- Fat: 10g
- Carbohydrates: 22g
- Protein: 7g

Tried This Recipe? Leave a Comment!
Did you make this recipe? I’d love to hear how it turned out! Please leave a comment and a rating below. Your feedback helps other home cooks and supports cheerychop.com!
For more delicious inspiration, follow me on Pinterest!