Table of Contents
Cheesecake Factory Chicken Madeira Recipe – Copycat Perfection from My NYC Kitchen
I still remember the first time I tasted the Cheesecake Factory Chicken Madeira. I was fresh out of culinary school in Paris, visiting a friend in New York City, and we went to the Times Square location. That rich, velvety Madeira wine sauce clinging to perfectly seared chicken, topped with tender asparagus and melted mozzarella — it was pure comfort. Growing up in Morocco, my mother always said a good sauce is like a warm embrace. This copycat Cheesecake Factory Chicken Madeira recipe captures that same hug in a bowl, right down to the earthy mushrooms and the sweet depth of Madeira wine. I’ve tested it dozens of times in my own NYC kitchen to make sure every spoonful tastes like the original.
The magic lies in the sauce: a savory reduction of Madeira wine and beef broth, finished with butter and a touch of cream. The chicken gets a light flour dredge and a golden sear, creating a crust that holds onto the sauce. Mushrooms add an umami backbone, while the asparagus brings a fresh snap. When you broil the mozzarella over the chicken and asparagus, it bubbles into delicious golden patches. The aroma — toasty, slightly sweet, deeply savory — will fill your kitchen and make everyone wander in asking, “What’s for dinner?”
I’ve perfected this Cheesecake Factory copycat Chicken Madeira recipe so you can skip the reservation and the wait. My version uses a few chef tricks I picked up in Paris: pounding the chicken to even thickness, deglazing with the wine to capture all the browned bits, and finishing the sauce with a pat of butter for a glossy sheen. One common home-cook mistake is skipping the deglazing step or rushing the sauce reduction — I’ll show you exactly how to avoid that. 💡 mia’s Pro Tip: A dry Madeira (like Sercial) gives the most authentic flavor, but I’ll share other great substitutes, too.
Why This Cheesecake Factory Chicken Madeira Recipe Is the Best
The Flavor Secret: Most copycat recipes skip the proper wine reduction or use a cheap sherry. I use real Madeira — a fortified wine from Portugal that adds a nutty, slightly caramelized sweetness. Growing up, my Moroccan mother taught me to layer flavors slowly, and that’s exactly how this sauce develops. The beef broth amplifies the meatiness, while the cream (optional but recommended) rounds out the edges. The result is a sauce so luxurious you’ll want to spoon it over everything.
Perfected Texture: Chicken breasts can easily turn dry, but I use two techniques from French cuisine: pounding the chicken to an even ½-inch thickness for uniform cooking, and searing over high heat to lock in moisture. The flour dredge creates a thin crust that stays crisp even after the sauce is added. When you slice into the chicken, it should be juicy and tender — not a shred of dryness in sight.
Foolproof & Fast: This recipe comes together in 40 minutes flat, yet feels like a special occasion. The ingredients are straightforward — you can find Madeira in most liquor stores or grocery wine sections — and the steps are simple enough for a weeknight. I’ve even streamlined the assembly by using one skillet for the sauce, then transferring to a baking dish for the broiler. No complicated techniques, no hard-to-find ingredients, just honest, restaurant-quality flavor.
Chicken Madeira Recipe Ingredients
I source most of my ingredients from the Union Square Greenmarket in Manhattan — the cremini mushrooms there are incredible — but for the Madeira wine I always visit my local wine shop in Brooklyn. The key is using ingredients that are fresh and full of flavor. Let’s break down what you’ll need.
Ingredients List
- 2 (8-ounce) boneless, skinless chicken breasts, pounded to 1/2-inch thickness
- Salt and freshly ground black pepper
- 1/2 cup all-purpose flour, for dredging
- 3 tablespoons olive oil
- 8 ounces cremini mushrooms, sliced
- 1 cup Madeira wine
- 1 cup beef broth
- 2 tablespoons unsalted butter
- 1 tablespoon all-purpose flour (for sauce)
- 1/2 cup heavy cream (optional, for a creamier sauce)
- 1 bunch fresh asparagus, trimmed
- 4 slices mozzarella cheese (or fresh mozzarella)
Ingredient Spotlight
Madeira Wine: The star of the show. Madeira is a fortified wine from Portugal, available in dry (Sercial, Verdelho) to sweet styles. For this copycat Cheesecake Factory Chicken Madeira, a dry Madeira works best — it adds depth without being overly sweet. You can find Madeira in most well-stocked liquor stores. If you can’t get it, dry sherry or Marsala wine are great substitutes. Use a brand like Blandy’s for authenticity.
Chicken Breasts: Look for organic, air-chilled breasts. Pounding them ensures they cook evenly and stay tender. I buy mine from the farmers market — the chicken has a much better texture than standard supermarket packs. If you’re watching your budget, regular boneless skinless breasts work fine, just be sure to pound them well.
Cremini Mushrooms: Also called baby bellas, they bring an earthy, meaty flavor that stands up to the Madeira. I slice them about ¼-inch thick so they soften quickly. White button mushrooms will work too, but the sauce won’t be as rich. For a special treat, mix in some shiitakes.
| Original Ingredient | Best Substitution | Flavor / Texture Impact |
|---|---|---|
| Madeira Wine | Dry Sherry or Marsala | Slightly less complexity, but still delicious. Marsala adds a touch more sweetness. |
| Cremini Mushrooms | White Button or Shiitake | White buttons are milder; shiitakes give a deeper, more exotic flavor. |
| Heavy Cream | Whole Milk + 1 tbsp Butter (or omit) | Lighter sauce, not as rich. Omit for a savory, wine-forward sauce. |
| Mozzarella (slices) | Provolone or Monterey Jack | Provolone is sharper; Jack melts beautifully and is milder. |
How to Make Cheesecake Factory Chicken Madeira — Step-by-Step
Ready to cook? Follow these simple steps and you’ll have a restaurant-worthy meal on the table in under an hour. I’ve included my pro tips and common pitfalls so you nail it the first time.
Step 1: Prepare the Chicken
Season chicken breasts generously with salt and pepper on both sides. Place them in a shallow dish with ½ cup flour and dredge lightly, shaking off any excess. This light coating helps create a golden crust.
💡 mia’s Pro Tip: Use a meat pounder or rolling pin. Place chicken between two sheets of plastic wrap and pound to an even ½-inch thickness. This ensures they cook perfectly in the same time.
Step 2: Sear the Chicken
Heat 3 tablespoons olive oil in a large skillet over medium-high heat. Add the chicken breasts and cook for 4–5 minutes per side, until golden brown and cooked through (internal temperature reaches 165°F). Remove chicken to a plate and set aside.
⚠️ Common Mistake to Avoid: Don’t crowd the pan. If your skillet is too small, cook in batches. Overcrowding steams the chicken instead of searing it, and you lose that beautiful crust.
Step 3: Sauté Mushrooms
In the same skillet, add the sliced cremini mushrooms. Cook over medium heat for 3–4 minutes, stirring occasionally, until they release their moisture and turn golden brown. Season with a pinch of salt and pepper.
💡 mia’s Pro Tip: Don’t stir the mushrooms constantly. Let them sit for a minute so they get proper colour – that’s where the flavour lives.
Step 4: Make the Sauce
Pour 1 cup Madeira wine and 1 cup beef broth into the skillet with the mushrooms. Bring to a boil, using a wooden spoon to scrape up all the browned bits from the bottom of the pan. Let the liquid simmer until reduced by half, about 5–7 minutes.
⚠️ Common Mistake to Avoid: Skipping the deglazing step. Those browned bits (fond) are packed with flavour – make sure you dissolve them completely into the liquid for a deep, rich sauce.
Step 5: Finish the Sauce
Reduce heat to low. Whisk in 2 tablespoons unsalted butter and 1 tablespoon flour to thicken slightly. If using, stir in ½ cup heavy cream. Simmer for 1 minute until the sauce is silky and coats the back of a spoon.
💡 mia’s Pro Tip: Whisk the flour into the butter before adding cream to avoid lumps. This classic French beurre manié technique guarantees a smooth sauce every time.
Step 6: Cook the Asparagus
While the sauce simmers, blanch or steam the trimmed asparagus until tender-crisp, about 3–4 minutes. Drain and set aside.
💡 mia’s Pro Tip: Drop the asparagus into boiling salted water for 2 minutes, then transfer to an ice bath. This stops the cooking and keeps the spears bright green.
Step 7: Assemble and Broil
Preheat oven broiler. Place the seared chicken breasts in a baking dish or oven-safe skillet. Top each with a mound of asparagus and a slice of mozzarella cheese. Broil for 1–2 minutes until the cheese melts and is bubbly and golden.
⚠️ Common Mistake to Avoid: Walking away. Broilers work fast – watch closely and remove as soon as the cheese melts. Burning the mozzarella will give a bitter taste.
Step 8: Serve
Spoon the Madeira mushroom sauce generously over the chicken and asparagus. Serve immediately, while the cheese is still stretchy and the sauce is warm.
💡 mia’s Pro Tip: Garnish with freshly cracked black pepper and a sprinkle of chopped parsley for a pop of colour.
| Step | Action | Duration | Key Visual Cue |
|---|---|---|---|
| 1 | Prepare chicken | 5 min | Even ½-inch thickness |
| 2 | Sear chicken | 8–10 min | Golden brown crust |
| 3 | Sauté mushrooms | 3–4 min | Soft and browned |
| 4 | Make sauce (reduce) | 5–7 min | Liquid reduced by half |
| 5 | Finish sauce | 1 min | Silky, coats spoon |
| 6 | Cook asparagus | 3–4 min | Tender-crisp, bright green |
| 7 | Assemble & broil | 1–2 min | Cheese melted and bubbly |
| 8 | Serve | Immediately | Sauced and hot |
Serving & Presentation
Plating this Cheesecake Factory Chicken Madeira is all about showing off that luscious sauce and the golden cheese. I like to serve each chicken breast on a warm dinner plate, spoon the sauce around it (not just on top), and arrange the asparagus neatly alongside. A sprinkle of fresh parsley or thyme adds a fresh green note. In my NYC apartment, I often pair this with a simple side of mashed potatoes or a crusty baguette to soak up every drop of that Madeira sauce.
Growing up in Morocco, we always served rich stews with a side of steamed couscous or flatbread. Here in New York, I’ve adapted that — a bed of steamed rice or buttered egg noodles works beautifully. The sauce is the star, so keep sides neutral. A simple arugula salad with lemon vinaigrette cuts through the richness perfectly.
| Pairing Type | Suggestions | Why It Works |
|---|---|---|
| Side Dish | Mashed potatoes, buttered egg noodles, steamed rice | Absorb the sauce and balance richness |
| Sauce / Dip | Extra Madeira sauce on the side | Let everyone add as much as they like |
| Beverage | Dry red wine (Merlot or Zinfandel), sparkling water with lemon | Red wine complements the Madeira; sparkling water cleanses the palate |
| Garnish | Fresh parsley, cracked black pepper, lemon zest | Adds freshness and visual appeal |
Make-Ahead, Storage & Reheating
As a busy New Yorker, I often prep components of this dish on Sunday for a quick weeknight dinner. The sauce can be made up to two days ahead, and the chicken can be seared earlier in the day. Store them separately, then assemble and broil just before serving. Here’s my tried-and-true storage guide.
| Method | Container | Duration | Reheating Tip |
|---|---|---|---|
| Refrigerator | Airtight container | Up to 3 days | Reheat sauce in a skillet over medium-low, add chicken and asparagus, cover and warm through. Then broil cheese as directed. |
| Freezer | Freezer-safe container | Up to 2 months | Thaw overnight in fridge. Reheat sauce gently, then cook fresh asparagus and assemble. Do not freeze assembled dish – cheese texture suffers. |
| Make-Ahead | Separate containers | Sauce: 2 days ahead; Searing: earlier same day | Keep chicken and sauce separate. Refrigerate sauce, and keep seared chicken at room temp for up to 2 hours before assembly. |
The sauce is the most forgiving component – it actually tastes even better the next day as the flavors meld. If you’re reheating from the fridge, I recommend pulling the chicken out 15 minutes before reheating to take the chill off. Then gently warm the sauce, add the chicken, and let it simmer just until the chicken is heated through. Add the asparagus last to keep it bright. For the final broil, keep a close eye – you just want the cheese to melt, not burn.
Variations & Easy Swaps
| Variation | Key Change | Best For | Difficulty Impact |
|---|---|---|---|
| Chicken Thighs | Use boneless, skinless thighs instead of breasts | Extra juicy and forgiving | Easy – thighs are more tender and can handle longer cooking |
| Gluten-Free | Replace flour with cornstarch or gluten-free all-purpose blend | Celiac-friendly dinner | Easy – gluten-free flour works similarly; whisk cornstarch slurry for sauce |
| Dairy-Free / Vegan | Use vegan butter, omit cream, use dairy-free cheese (or omit cheese) | Plant-based meal | Medium – find a good melting vegan mozzarella; sauce still rich from wine |
Variation: Chicken Thighs
For the juiciest results, swap chicken breasts for boneless skinless thighs. Thighs have more fat, so they stay moist even if you cook them a few minutes extra. Sear them the same way – 5 minutes per side – and they’ll be flavorful and tender. I often do this when I’m cooking for friends who prefer dark meat. The sauce pairs perfectly either way.
Variation: Gluten-Free
To make this Cheesecake Factory copycat Chicken Madeira gluten-free, use a gluten-free all-purpose flour blend for dredging (I like Bob’s Red Mill 1-to-1). For the sauce, skip the flour and instead mix 1 tablespoon cornstarch with 2 tablespoons cold water, then whisk into the reduced wine broth. It thickens beautifully without clumps. The texture will be slightly glossier, but equally delicious.
Variation: Seasonal Asparagus Swap
During fall and winter, when asparagus isn’t at its peak, I swap in broccolini or green beans. Both hold up well under the broiler and offer that same fresh, green contrast. In spring, look for pencil-thin asparagus — they cook in just 2 minutes and taste like sunshine. I often find the best at the Union Square farmers market, reminding me of the fresh produce we had in Morocco.
What is the best substitute for Madeira wine in Cheesecake Factory Chicken Madeira?
The best substitute for Madeira wine is a dry sherry or Marsala wine. Dry sherry (like Fino or Amontillado) brings a similar nuttiness and acidity, while Marsala adds a slightly sweeter, richer note. If you don’t have either, you can try a combination of ¾ cup dry white wine plus ¼ cup brandy or cognac, though the flavor won’t be exactly the same. Always avoid cooking wines – they’re salty and lack complexity. For a non-alcoholic option, use 1 cup beef broth with 1 tablespoon balsamic vinegar and a pinch of brown sugar to mimic the depth and sweetness of Madeira.
How do you get the chicken tender and not dry when making Cheesecake Factory Chicken Madeira?
The key is threefold: pound the chicken to an even ½-inch thickness, sear it over high heat, and don’t overcook. Pounding ensures the chicken cooks uniformly, so you won’t have dry edges and a raw center. Searing over medium-high gives you a golden crust while locking in juices. Use an instant-read thermometer – pull the chicken at 160°F (it will carry over to 165°F). Finally, let the chicken rest for 5 minutes before slicing, and serve it with the sauce immediately. The sauce also helps keep the chicken moist when reheated.
What sides are traditionally served with Cheesecake Factory Chicken Madeira?
At the restaurant, the dish is usually served with a side of steamed asparagus (already on top) and sometimes a scoop of mashed potatoes or rice. At home, I love pairing it with buttery mashed potatoes, fluffy steamed rice, or soft egg noodles. A simple green salad with lemon vinaigrette also cuts through the richness. For bread lovers, warm crusty bread is perfect for soaking up the sauce. In my New York kitchen, I often add a side of roasted broccoli or sautéed spinach for extra greens.
Can Cheesecake Factory Chicken Madeira be made ahead of time and reheated?
Yes, you can make it ahead, but with some careful assembly. The sauce can be made up to 2 days ahead and refrigerated. The chicken can be seared earlier the same day and kept at room temperature for up to 2 hours. When ready to serve, reheat the sauce, add the chicken and asparagus (fresh or blanched), then top with cheese and broil. For full make-ahead meals (assembled and refrigerated), the asparagus can become soggy and the cheese may not melt as nicely. I recommend storing components separately and assembling just before serving for the best texture.
Can I use a different type of mushroom in this Chicken Madeira recipe?
Absolutely. While cremini mushrooms are classic, you can use white button mushrooms for a milder flavor, or shiitake mushrooms for a deeper, earthier taste. A mix of wild mushrooms – oyster, maitake, or chanterelle – would also be wonderful, especially if you find them at a farmers market. Just make sure to slice them evenly so they cook in the same time. The important thing is to brown them well to develop umami, which builds the foundation of the sauce.
Is Cheesecake Factory Chicken Madeira gluten-free?
In its original form, no – the chicken is dredged in flour, and the sauce is thickened with flour. However, it’s easy to make gluten-free. Use a gluten-free all-purpose flour blend for dredging (like Bob’s Red Mill 1-to-1). For the sauce, skip the flour and instead use a cornstarch slurry (1 tablespoon cornstarch mixed with 2 tablespoons cold water) stirred in at the end. Also ensure your beef broth is certified gluten-free, as some brands contain additives. With these swaps, the dish becomes celiac-safe without sacrificing flavor.
What makes the sauce at Cheesecake Factory so rich and flavorful?
The sauce at Cheesecake Factory gets its richness from a good-quality Madeira wine, which is caramelized and reduced with beef broth to concentrate the flavors. They also use a generous amount of butter to give it a velvety mouthfeel, and likely a small amount of cream for extra richness. The mushrooms add umami, and the deglazing step scrapes up all the browned bits from the pan (the fond) which is packed with flavor. At home, the key is to reduce the liquid until it’s syrupy and to whisk in cold butter at the end – that’s the French technique that makes it luscious.
Can I use chicken thighs instead of breasts in this recipe?
Yes, boneless, skinless chicken thighs work wonderfully. They are more forgiving – they stay juicy even if you cook them a few extra minutes. Follow the same steps: pound them to an even thickness, dredge in flour, and sear for 5 minutes per side. The internal temperature for thighs should reach 170°F. The sauce and assembly remain exactly the same. Many people actually prefer thighs because they’re richer and more flavorful. It’s a great swap for a dinner party when you want guaranteed moist chicken.
Can I make this recipe without cream?
Absolutely. The cream is optional and the sauce is still delicious without it. Without cream, the sauce will be a little lighter and more wine-forward, allowing the Madeira and mushroom flavors to shine. To compensate for the lost richness, you can add an extra tablespoon of butter at the end, or stir in a splash of whole milk. If you’re avoiding dairy altogether, use a dairy-free butter alternative. The sauce will still have a beautiful glossy finish from the butter and reduction.
How do I store leftover Cheesecake Factory Chicken Madeira?
Store leftovers in an airtight container in the refrigerator for up to 3 days. For best results, store the sauce separately from the chicken and asparagus. When reheating, warm the sauce in a skillet over low heat, add the chicken and asparagus, and heat gently until warmed through. Avoid microwaving the assembled dish, as the cheese can become rubbery. If you have leftover sauce without the chicken, it freezes beautifully for up to 2 months – just thaw and reheat for another meal.
Share Your Version!
I’d love to see how your Cheesecake Factory Chicken Madeira turns out! Drop a star rating below and leave a comment with any tweaks you made. Did you try the gluten-free version? Use chicken thighs? Snapped a photo? Share it on Instagram or Pinterest and tag @exorecipes – I answer every comment and love seeing your beautiful plates. The one thing I always ask: what’s your favorite side to soak up that amazing Madeira sauce? Tell me in the comments!
From my NYC kitchen to yours — I hope this recipe brings as much warmth to your table as it does to mine. — mia 🧡
Love This Recipe? Save It to Pinterest!
If you enjoyed this Cheesecake Factory Chicken Madeira recipe, don’t let it get lost in your browser tabs! 😄 Pin it now so you can find it again anytime — and explore hundreds more tried-and-tested recipes waiting for you on my Pinterest boards.
👉 Follow mia on Pinterest @exorecipe
📌 Pin this recipe · 🔁 Re-pin your favorites · 💬 Tag me when you make it — I love seeing your creations!

Cheesecake Factory Chicken Madeira Recipe
- Prep Time: 15 minutes
- Cook Time: 25 minutes
- Total Time: 40 minutes
- Yield: 2 servings 1x
- Method: Main course
- Cuisine: American-Italian fusion
Description
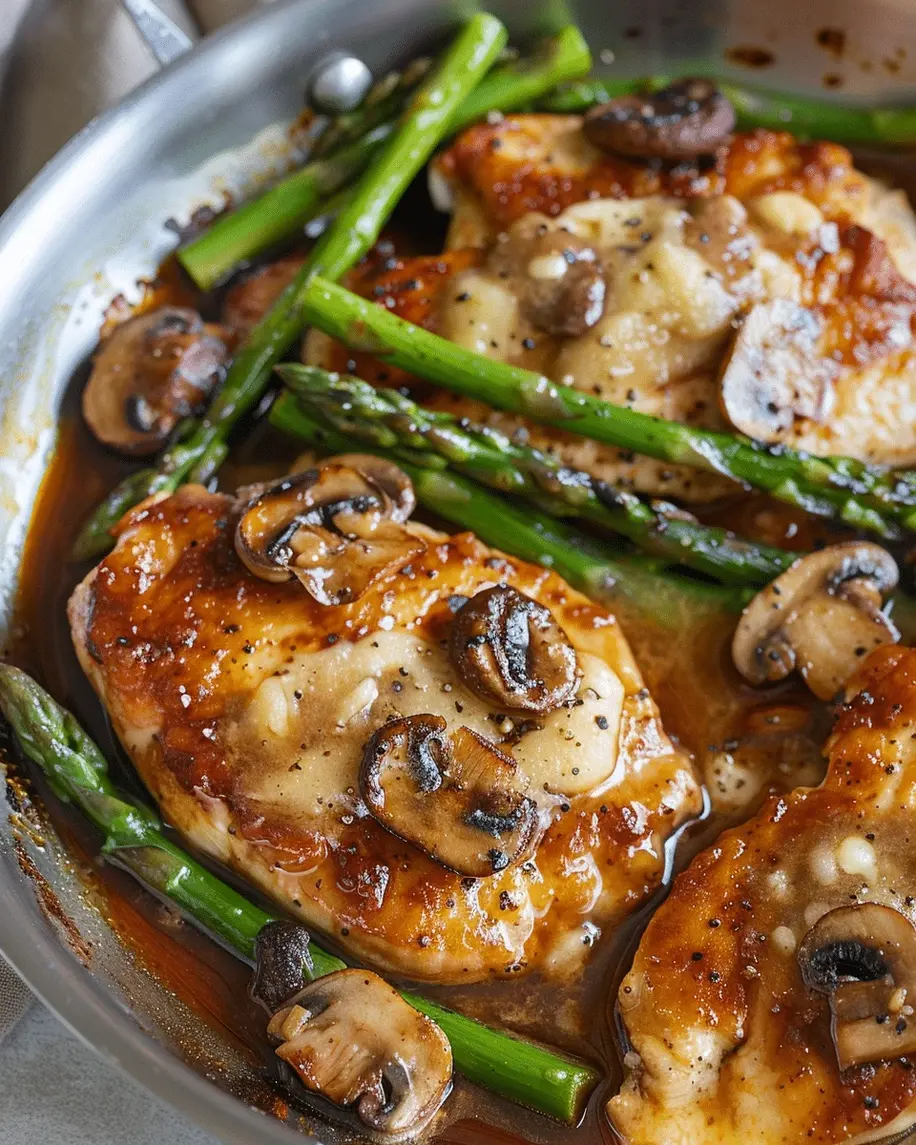
This copycat Cheesecake Factory Chicken Madeira features pan-seared chicken breasts smothered in a rich, savory mushroom and Madeira wine sauce. Serve with asparagus and melted mozzarella for a restaurant-quality meal at home.
Ingredients
- 2 (8-ounce) boneless, skinless chicken breasts, pounded to 1/2-inch thickness
- Salt and freshly ground black pepper
- 1/2 cup all-purpose flour, for dredging
- 3 tablespoons olive oil
- 8 ounces cremini mushrooms, sliced
- 1 cup Madeira wine
- 1 cup beef broth
- 2 tablespoons unsalted butter
- 1 tablespoon all-purpose flour (for sauce)
- 1/2 cup heavy cream (optional, for a creamier sauce)
- 1 bunch fresh asparagus, trimmed
- 4 slices mozzarella cheese (or fresh mozzarella)
Instructions
- 1. Prepare the chicken: Season the chicken breasts with salt and pepper on both sides. Dredge lightly in flour, shaking off excess.
- 2. Sear the chicken: In a large skillet, heat the olive oil over medium-high heat. Cook the chicken breasts for 4–5 minutes per side until golden and cooked through. Remove and set aside.
- 3. Sauté mushrooms: In the same skillet, add the sliced mushrooms and cook for 3–4 minutes until browned and soft. Season with a pinch of salt and pepper.
- 4. Make the sauce: Add the Madeira wine and beef broth to the skillet with the mushrooms. Bring to a boil, scraping up any browned bits from the bottom. Let simmer until the liquid is reduced by half, about 5–7 minutes.
- 5. Finish the sauce: Reduce heat to low. Whisk in the butter and the additional tablespoon of flour to thicken slightly. Stir in heavy cream if using. Simmer for 1 minute.
- 6. Cook the asparagus: While the sauce simmers, blanch or steam the asparagus until tender-crisp, about 3–4 minutes. Drain.
- 7. Assemble: Preheat oven broiler. Place the seared chicken breasts in a baking dish or oven-safe skillet. Top each with a mound of asparagus and a slice of mozzarella cheese. Broil for 1–2 minutes just until cheese melts and is bubbly.
- 8. Serve: Spoon the Madeira mushroom sauce over the top of the chicken and asparagus. Serve immediately.
Notes
For a more authentic Cheesecake Factory version, use a dry Madeira wine (such as Sercial or Verdelho). If you don’t have Madeira, substitute a dry sherry or Marsala wine. The heavy cream is optional but adds richness.
Nutrition
- Calories: 620
- Sugar: 6g
- Fat: 32g
- Carbohydrates: 28g
- Protein: 48g

Tried This Recipe? Leave a Comment!
Did you make this recipe? I’d love to hear how it turned out! Please leave a comment and a rating below. Your feedback helps other home cooks and supports cheerychop.com!
For more delicious inspiration, follow me on Pinterest!