Table of Contents
Cheesy Baked Cauliflower Steaks Recipe – Low-Carb Delight You’ll Love
Why This Cheesy Cauliflower Steaks Recipe Is the Best
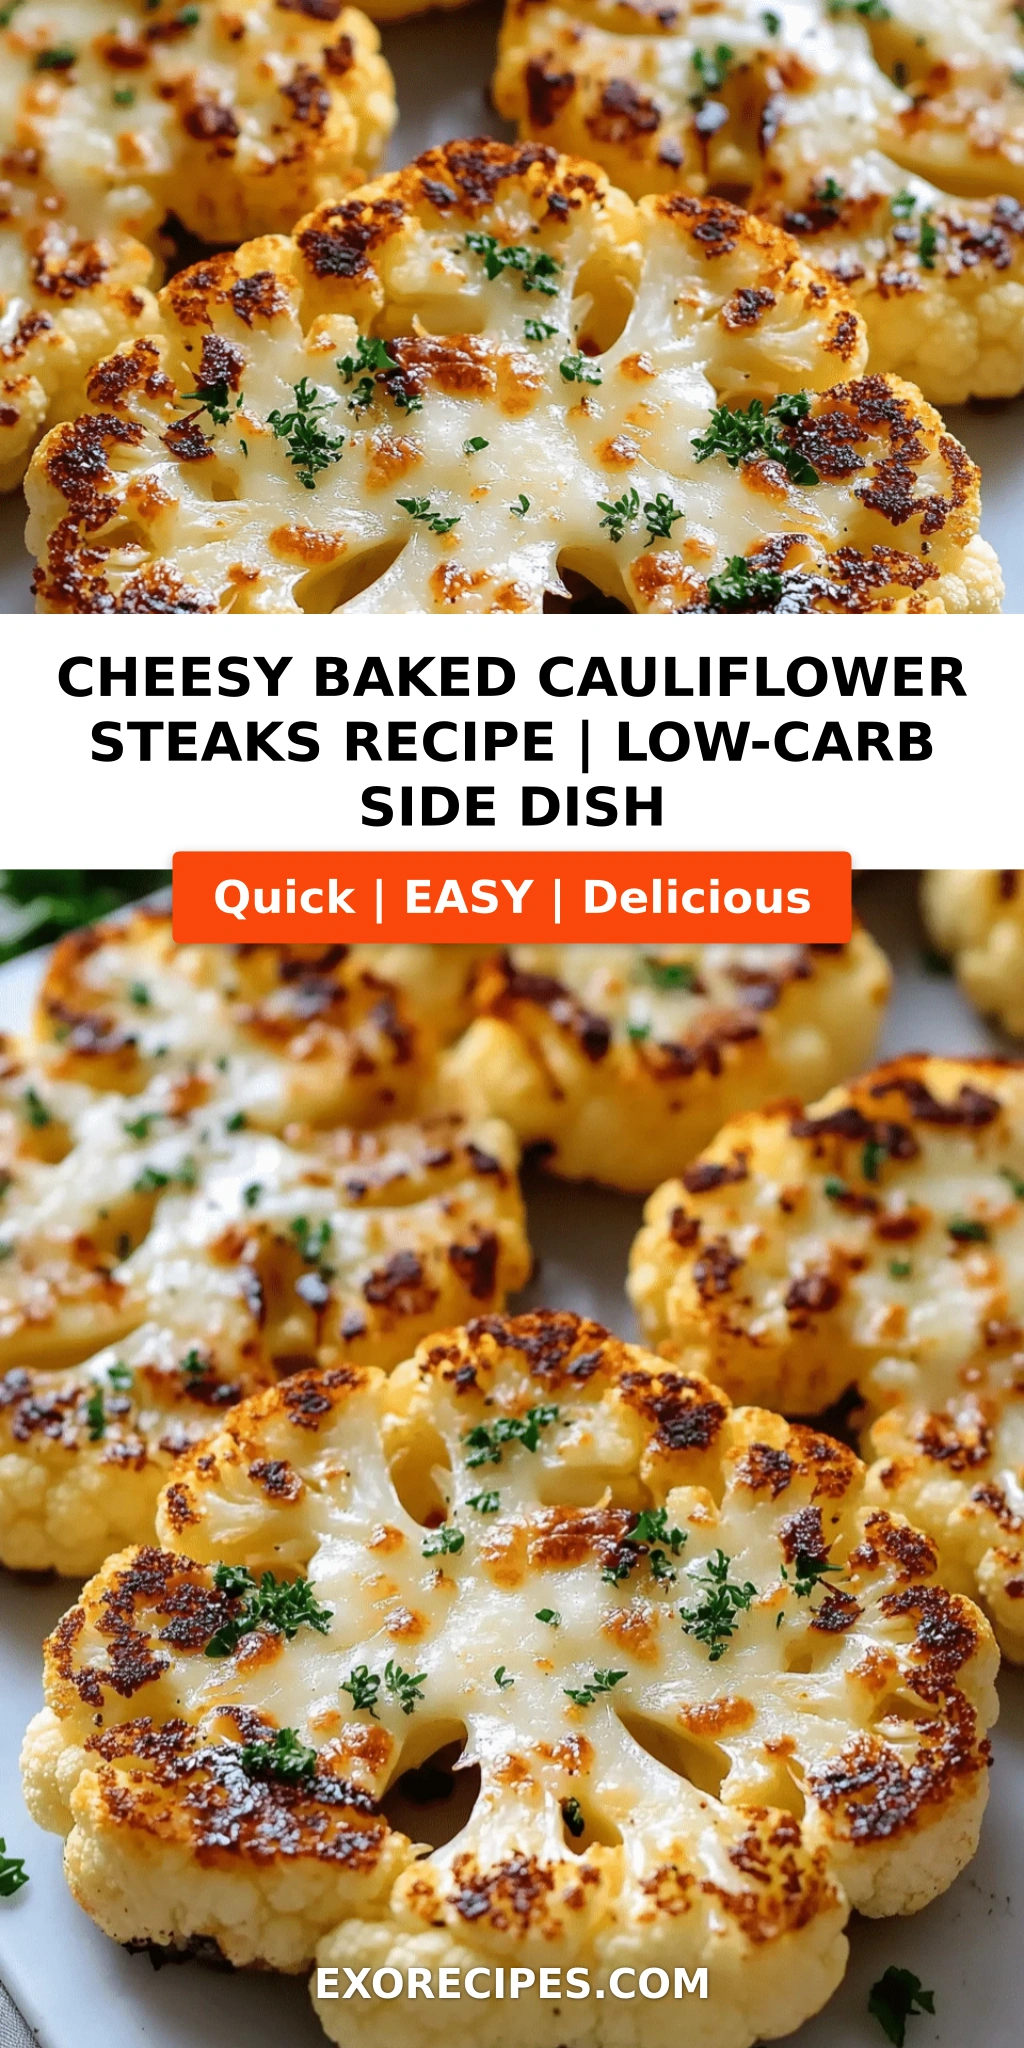
I still remember the first time I made cauliflower steaks in my tiny Parisian apartment — my French chef instructor had taught me to treat vegetables with the same respect as a prime cut of meat. These cheesy baked cauliflower steaks are the result of years of testing: the perfect low-carb cauliflower side dish that doesn’t feel like a compromise. The trick? A two-stage bake that gives you a caramelized exterior and a tender, never-mushy center, topped with a golden blanket of cheddar and Parmesan. Every bite is a little piece of my New York kitchen meeting my Moroccan roots — bold, cheesy, and deeply satisfying.
When you pull these from the oven, the aroma hits you first — nutty, buttery cheese mingling with the natural sweetness of roasted cauliflower. The edges crisp up like the best roasted vegetable you’ve ever had, while the cheese forms a bubbly, bronzed crust. It’s the kind of side dish that steals the spotlight from whatever main you serve it alongside. And the best part? It’s naturally low in carbs, so you can enjoy it on a keto diet without a second thought.
What sets my version apart is a simple but critical step: I brush the cauliflower steaks with olive oil and season them generously before roasting, then flip and finish with cheese. That extra flip ensures both sides caramelize. 💡 mia’s Pro Tip: For an even deeper flavor, add a pinch of smoked paprika — it brings a subtle warmth that reminds me of the spice markets in Marrakech. And the most common mistake? Slicing the cauliflower too thin; aim for 1-inch thickness so the steaks hold their shape.
Baked Cheesy Cauliflower Steaks Ingredients
Every Friday, I head to the Union Square Greenmarket and hunt for the most perfect, dense head of cauliflower. It reminds me of my mother’s souk in Morocco where we’d pick vegetables by smell and feel. For this low carb cauliflower side dish, quality ingredients matter because the flavors are so pure.
Ingredients List
- 1 large head cauliflower, sliced into 1-inch thick steaks
- 2 tablespoons olive oil
- 1 teaspoon garlic powder
- 1/2 teaspoon salt
- 1/4 teaspoon black pepper
- 1 cup shredded cheddar cheese
- 1/4 cup grated Parmesan cheese
- 2 tablespoons chopped fresh parsley (optional)
Ingredient Spotlight
Cauliflower: The star. Look for a firm, white head with tight florets. Avoid any with brown spots. A large head yields about 4-5 steaks; the smaller florets can be chopped and roasted separately for snacking.
Olive oil: Use a good extra-virgin oil for the best flavor. It helps the cauliflower caramelize and carries the seasoning. If you’re dairy-free, you can swap olive oil for avocado oil — it works beautifully.
Cheddar cheese: Sharp cheddar brings the biggest flavor kick. Pre-shredded cheese works, but freshly grated melts more smoothly. For a milder taste, use Monterey Jack.
Parmesan: Adds a salty, nutty depth. Always use real Parmesan (Parmigiano-Reggiano) for that unmistakable umami. In a pinch, Pecorino Romano is an excellent substitute.
| Original Ingredient | Best Substitution | Flavor / Texture Impact |
|---|---|---|
| Cheddar cheese | Gouda or Gruyère | Smokier, creamier; still melts beautifully |
| Parmesan | Pecorino Romano | Saltier, sharper; use slightly less |
| Garlic powder | Fresh minced garlic (1 clove) | Fresher, more pungent; can burn if not watched |
| Olive oil | Avocado oil | Neutral flavor, higher smoke point |
How to Make Cheesy Cauliflower Steaks – Step-by-Step
Making these cheesy baked cauliflower steaks is straightforward, but I’ll guide you through each step so you get perfect results every time.
Step 1: Prepare the Cauliflower
Place the cauliflower head on its stem, and cut vertically into 1-inch thick slabs. You should get 4 to 5 steaks from a large head. The outer florets may fall apart — that’s fine; roast them alongside for a tasty bonus. Discard the tough stem end.
💡 mia’s Pro Tip:
Use a sharp chef’s knife and slice in one smooth motion to avoid crumbling. If the core is too hard, gently rock the knife back and forth.
Step 2: Season and Bake
Preheat oven to 400°F (200°C). Line a baking sheet with parchment paper. Place the steaks on the sheet, brush both sides with olive oil, and sprinkle evenly with garlic powder, salt, and pepper. Bake for 20 minutes, then flip carefully using a spatula and bake another 10 minutes.
⚠️ Common Mistake to Avoid:
Don’t overcrowd the pan. Leave space between steaks so they roast, not steam. If they’re too close, they’ll release moisture and turn mushy.
Step 3: Add Cheese and Finish
Once the steaks are tender and golden, sprinkle cheddar and Parmesan evenly over the tops. Return to the oven for 5–7 minutes, until the cheese is melted and bubbly. For extra browning, switch to broil for 1–2 minutes at the end.
💡 mia’s Pro Tip:
Watch closely under the broiler; cheese can go from golden to burnt in seconds. Remove as soon as it’s bubbly with brown spots.
Step 4: Garnish and Serve
Transfer the steaks to a serving platter and sprinkle with chopped fresh parsley if desired. Serve warm, while the cheese is still stretchy.
| Step | Action | Duration | Key Visual Cue |
|---|---|---|---|
| 1 | Slice cauliflower into 1-inch steaks | 5 min | Steaks hold together, core intact |
| 2 | Season and roast | 30 min | Edges golden, fork-tender |
| 3 | Add cheese and melt | 5–7 min | Cheese bubbly, lightly browned |
| 4 | Garnish and serve | 2 min | Parsley adds fresh color |
Serving & Presentation
I love serving these cheesy cauliflower steaks on a large wooden board, family-style, with extra cheese and a sprinkle of parsley. They pair beautifully with a juicy steak, roasted chicken, or even as a vegetarian main with a side salad. My Moroccan touch: serve with a dollop of harissa-spiked yogurt for a creamy, spicy kick.
In my NYC kitchen, I often plate them alongside a simple arugula salad dressed with lemon vinaigrette — the peppery greens cut through the richness of the cheese. For a full low-carb meal, add grilled salmon or seared chicken thighs.
| Pairing Type | Suggestions | Why It Works |
|---|---|---|
| Side Dish | Grilled ribeye, roasted chicken, baked fish | Rich cheese complements protein; low-carb keeps meal balanced |
| Sauce / Dip | Harissa yogurt, roasted garlic aioli, chimichurri | Adds moisture and contrast to the cheesy crust |
| Beverage | Dry white wine (Sauvignon Blanc), sparkling water with lemon | Acidity cuts through fat; sparkling cleanses palate |
| Garnish | Fresh parsley, chives, za’atar, red pepper flakes | Herbs add freshness; spices give depth |
Make-Ahead, Storage & Reheating
Life gets busy in NYC, so I often prep these steaks ahead. You can slice and season the cauliflower up to 2 days in advance and store in the fridge. When ready to bake, just add a few extra minutes to the cooking time.
| Method | Container | Duration | Reheating Tip |
|---|---|---|---|
| Refrigerator | Airtight container | Up to 4 days | Reheat in 350°F oven for 10 min; avoid microwave (soggy) |
| Freezer | Freezer bag or container, layered with parchment | Up to 3 months | Thaw in fridge; reheat at 375°F, add fresh cheese before final few minutes |
| Make-Ahead | Covered baking dish | 2 days in fridge before baking | Increase bake time by 5-8 min if starting cold |
For the best texture, I always reheat in the oven rather than the microwave. The microwave will soften the crust and make the cauliflower watery. If you’re in a rush, an air fryer at 350°F for 3-4 minutes works beautifully.
Variations & Easy Swaps
| Variation | Key Change | Best For | Difficulty Impact |
|---|---|---|---|
| Moroccan Spiced | Add 1 tsp ras el hanout, 1/2 tsp cumin to seasoning | Warm, exotic flavor | Easy |
| Dairy-Free | Use vegan cheddar shreds and nutritional yeast | Lactose intolerant or vegan | Easy; melt time may vary |
| Spicy Buffalo | Toss roasted steaks in buffalo sauce, then top with blue cheese | Game day appetizer | Easy |
Moroccan Spiced Cauliflower Steaks
This variation is my love letter to my homeland. Replace the garlic powder with 1 teaspoon ras el hanout and 1/2 teaspoon ground cumin. The floral, warm spices transform the dish into something entirely new. I like to top with crumbled feta and fresh mint instead of Parmesan — it’s a flavor combination that always transports me back to my mother’s table in Casablanca.
Dairy-Free Baked Cauliflower Steaks
For a dairy-free version, use your favorite vegan cheddar shreds and a sprinkle of nutritional yeast for that cheesy flavor. The texture will be slightly less creamy, but the cauliflower still roasts beautifully. I’ve tested this with several brands; Follow Your Heart and Violife work particularly well. To boost the savory note, add a pinch of smoked paprika and garlic powder.
Spicy Buffalo Cauliflower Steaks
This twist is perfect for game day. After baking, brush the steaks with your favorite buffalo sauce (I like Frank’s RedHot), then top with crumbled blue cheese and a drizzle of ranch. The cool, tangy dressing balances the heat. Serve as a vegetarian main with celery sticks.
How do you cut cauliflower into steaks without it falling apart?
Start with a large, firm head of cauliflower. Use a sharp chef’s knife and slice straight down through the core, making each “steak” about 1 inch thick. The core holds the steak together, so don’t cut too close to the stem. If pieces do break off, don’t worry — roast them alongside as “florets” and enjoy as a bonus snack. The key is to cut from top to bottom in one clean motion; sawing can cause crumbling.
Can I use a different type of cheese for cheesy baked cauliflower steaks?
Absolutely! While cheddar and Parmesan are my go-to for their sharpness and melt, you can swap in any melting cheese. Gouda adds a smoky sweetness, Monterey Jack is mild and creamy, and Gruyère brings a nutty elegance. For a punch, try pepper jack for heat. Just avoid crumbly cheeses like feta as a main topping (they won’t melt), but you can sprinkle them on after baking as a garnish.
How long should you bake cauliflower steaks to get them tender but not mushy?
The sweet spot is 30 minutes total at 400°F. Bake for 20 minutes, flip, and bake another 10 minutes. This gives the edges a golden caramelization while keeping the inside tender. If your steaks are thicker than 1 inch, add 5–7 minutes. The cauliflower should be easily pierced with a fork but still hold its shape. Overcooking leads to mushiness; undercooking leaves a raw core. Always use a timer.
What can I serve with cheesy baked cauliflower steaks for a full low-carb meal?
These steaks are incredibly versatile. For a complete low-carb meal, pair them with a grilled protein like chicken thighs, steak, or salmon. Add a side of steamed green beans or a fresh arugula salad dressed with lemon vinaigrette. For a vegetarian version, serve with a creamy cauliflower mash and roasted vegetables. I also love them alongside a simple omelet for a hearty brunch.
Can I make cheesy baked cauliflower steaks ahead of time?
Yes! You can slice and season the cauliflower steaks up to 2 days ahead and store them in the fridge in an airtight container. When ready to bake, simply proceed with the recipe — you may need to add 5 extra minutes to the baking time since the steaks will start cold. For fully baked leftovers, reheat in a 350°F oven for about 10 minutes to restore crispness. Avoid the microwave, which makes them soggy.
Is this recipe keto-friendly?
Absolutely! Each serving (one steak) contains only 8g of carbohydrates and 3g of sugar, making it an excellent choice for a keto diet. The high fat content from the cheese and olive oil keeps you satisfied. To reduce carbs even further, skip the optional parsley and ensure you’re using a full-fat cheese. This low carb cauliflower side dish is a staple in my own weekly meal prep.
Can I add other vegetables to the baking sheet?
Definitely! I often add broccoli florets, halved Brussels sprouts, or slices of bell pepper to the same pan. Just keep in mind that different vegetables have different cooking times. Add hardy vegetables like Brussels sprouts at the same time as the cauliflower, but add quicker-cooking items like cherry tomatoes during the last 10 minutes. Use separate piles so you can pull them out when done.
How do I prevent the cheese from burning?
The best way is to add the cheese only during the last 5–7 minutes of baking. If you want extra browning, finish under the broiler for 1–2 minutes, but keep the oven door ajar and watch constantly. Using a block of cheese that you grate yourself (rather than pre-shredded) also gives more control, since pre-shredded cheese often contains anti-caking agents that can burn faster.
Can I use frozen cauliflower for this recipe?
I strongly recommend using fresh cauliflower for steaks. Frozen cauliflower releases a lot of water as it thaws, which will make the steaks soggy and prevent browning. If you only have frozen cauliflower, roast the florets (not steaks) at 425°F for 20-25 minutes, then top with cheese and finish. The texture won’t be the same as a steak, but you’ll still get a tasty low-carb dish.
What is the best way to reheat leftover cheesy cauliflower steaks?
The oven is your best friend here. Preheat to 350°F, place the steaks on a baking sheet, and heat for 8–10 minutes. For a crispier texture, use a toaster oven or air fryer at 350°F for 4–5 minutes. The microwave will soften the crunchy edges and make the cheese rubbery, so I avoid it. If you’re short on time, a hot skillet on the stove over medium heat works too — just press down with a spatula for even reheating.
Share Your Version!
I’d love to see how your cheesy baked cauliflower steaks turn out! Snap a photo and tag me on Instagram or Pinterest @exorecipes — I always reply and reshare my favorites. Leave a star rating and a comment below telling me which variation you tried. Did you go for the Moroccan spices? Or the buffalo kick? Your feedback helps other readers and makes my day!
If you have a question that I didn’t cover in the FAQ, just ask in the comments — I personally read every single one. From my NYC kitchen to yours — I hope this recipe brings as much warmth to your table as it does to mine. — mia 🧡
Love This Recipe? Save It to Pinterest!
If you enjoyed this Cheesy Baked Cauliflower Steaks recipe, don’t let it get lost in your browser tabs! 😄 Pin it now so you can find it again anytime — and explore hundreds more tried-and-tested recipes waiting for you on my Pinterest boards.
👉 Follow mia on Pinterest @exorecipe
📌 Pin this recipe · 🔁 Re-pin your favorites · 💬 Tag me when you make it — I love seeing your creations!

Cheesy Baked Cauliflower Steaks Recipe: A Delicious Low-Carb Side Dish Youll Love
- Prep Time: 10 minutes
- Cook Time: 35 minutes
- Total Time: 45 minutes
- Yield: 4 1x
- Method: Side Dish
- Cuisine: American
Description
These cheesy baked cauliflower steaks are a flavorful and satisfying low-carb side dish, perfect for any meal. They are easy to make and packed with cheesy goodness.
Ingredients
- 1 large head cauliflower, sliced into 1-inch thick steaks
- 2 tablespoons olive oil
- 1 teaspoon garlic powder
- 1/2 teaspoon salt
- 1/4 teaspoon black pepper
- 1 cup shredded cheddar cheese
- 1/4 cup grated Parmesan cheese
- 2 tablespoons chopped fresh parsley (optional)
Instructions
- Preheat oven to 400°F (200°C). Line a baking sheet with parchment paper.
- Place cauliflower steaks on the prepared baking sheet. Brush both sides with olive oil and sprinkle with garlic powder, salt, and pepper.
- Bake for 20 minutes, then flip the steaks and bake for another 10 minutes until tender and golden.
- Sprinkle the cheddar and Parmesan cheeses evenly over the cauliflower steaks.
- Return to the oven and bake for 5-7 minutes until the cheese is melted and bubbly.
- Garnish with chopped parsley if desired. Serve warm.
Notes
For a crispier texture, broil the steaks for 1-2 minutes after adding cheese. Ensure cauliflower steaks are cut evenly for uniform cooking.
Nutrition
- Calories: 220
- Sugar: 3g
- Fat: 16g
- Carbohydrates: 8g
- Protein: 12g
Tried This Recipe? Leave a Comment!
Did you make this recipe? I’d love to hear how it turned out! Please leave a comment and a rating below. Your feedback helps other home cooks and supports cheerychop.com!