Table of Contents
- Grilled Steak Shrimp Skillet with Mashed Potatoes: The Only Recipe You’ll Ever Need
- Why This Grilled Steak Shrimp Skillet with Mashed Potatoes Recipe is a Game-Changer
- Ingredient Spotlight: Quality Makes the Difference
- Step-by-Step Instructions
- Serving & Presentation
- Make-Ahead & Storage Solutions
- Frequently Asked Questions (FAQ)
- Tried This Recipe? Leave a Comment!
Grilled Steak Shrimp Skillet with Mashed Potatoes: The Only Recipe You’ll Ever Need
Imagine coming home after a long day, craving a hearty dinner that’s both indulgent and effortless. That’s exactly what this grilled steak and shrimp recipe delivers—a savory one-pan steak and shrimp skillet that combines juicy grilled flavors with creamy mashed potatoes for an unforgettable meal. As the ultimate grilled steak and shrimp dish, it’s designed for busy home cooks who want restaurant-quality results without the fuss. Picture smoky steak and succulent shrimp sizzling together in a single skillet, creating a harmonious blend of textures and tastes that will make your kitchen the envy of all. This steak with mashed potatoes recipe isn’t just easy; it’s a game-changer for weeknight dinners or weekend feasts.
The aromas alone will transport you to a seaside grill, with the rich char of grilled steak mingling with the fresh, oceanic scent of shrimp. Every bite offers a symphony of flavors: the tender, medium-rare steak with its caramelized crust, the plump shrimp bursting with garlicky goodness, and the velvety smoothness of mashed potatoes that soak up all the savory juices. Textures play a starring role too—the slight crispness of the seared exterior gives way to melt-in-your-mouth interior, while the creamy potatoes provide a comforting contrast. This one-pan steak and shrimp creation ensures every element is perfectly balanced, making it not just a meal, but an experience that tantalizes your senses from start to finish.
What sets this grilled steak and shrimp skillet with mashed potatoes apart, straight from exorecipes.com, is our commitment to making it foolproof and flavorful. Crafted by renowned Chef Sally and refined through countless tests, this recipe incorporates a Chef’s Secret that elevates it above the rest—infusing the skillet with a one-pan method that locks in flavors and minimizes cleanup. You’ll learn insider tips for grilling perfection, smart ingredient swaps, and how to avoid common pitfalls, all while building confidence in your cooking skills. Stick around for detailed instructions, FAQs, and pro tips that make this the single best resource for mastering steak and shrimp recipes online.
Why This Grilled Steak Shrimp Skillet with Mashed Potatoes Recipe is a Game-Changer
The Chef’s Secret in this grilled steak and shrimp recipe lies in the innovative one-pan method, which seamlessly fuses the smoky essence of grilled steak and shrimp into a single skillet for maximum flavor infusion. This technique not only simplifies the cooking process but also allows the juices from the grilled elements to meld with the garlic-infused oil, creating a rich, cohesive sauce that coats every bite. Unlike traditional recipes that separate grilling and skillet steps, our approach ensures that the steak’s charred exterior and the shrimp’s tender succulence enhance each other, making this steak and shrimp recipe truly unbeatable for its depth of flavor and ease.
Unbeatable Texture: The science behind the texture here is all about controlled heat and timing. Grilling the steak at medium-high heat creates a perfect Maillard reaction, caramelizing the surface for a crispy, flavorful crust while keeping the inside juicy. For the shrimp, quick skillet cooking prevents overcooking, maintaining that ideal snap. The mashed potatoes, whipped with whole milk and butter, achieve an extra-creamy consistency due to the starch release from russet potatoes, which we enhance by mashing while still hot—this traps steam and creates a light, airy result that’s worlds apart from gummy alternatives.
Foolproof for a Reason: This recipe has been tested multiple times in real home kitchens to guarantee success, even for beginners. We’ve fine-tuned seasoning levels, cooking times, and integration steps to account for variables like grill heat or shrimp size, ensuring consistent results every time. With clear instructions and pro tips, this grilled steak and shrimp skillet with mashed potatoes stands as a reliable staple, earning rave reviews for its straightforward execution and delicious outcome.
Ingredient Spotlight: Quality Makes the Difference
2 ribeye steaks (about 8 oz each): These cuts are the star of our grilled steak and shrimp recipe, offering rich marbling that melts into tenderness when grilled. Quality matters here—opt for grass-fed ribeyes for better flavor and nutrition. Their fat content ensures a juicy, flavorful result, but if unavailable, New York strips make a great substitution, providing similar texture without altering the one-pan magic.
1 pound large shrimp, peeled and deveined: Fresh shrimp bring a sweet, oceanic brininess that pairs perfectly with the grilled steak, elevating this steak and shrimp recipe to new heights. Always choose wild-caught for superior taste and sustainability; frozen works in a pinch, but thaw them properly to avoid watery results. For substitutions, scallops can mimic the seafood element, adding a delicate sweetness while keeping the skillet balanced.
4 large russet potatoes, peeled and cubed: Russets are ideal for mashed potatoes in this dish due to their high starch content, which creates that ultra-smooth, creamy texture we love. Quality fresh potatoes ensure the best mash—avoid ones with green spots for optimal flavor. Yukon Golds can substitute if you want a slightly denser mash, but they’ll still complement the grilled steak and shrimp beautifully.
1 cup whole milk and 2 tablespoons unsalted butter: These create the luxurious base for our mashed potatoes, with whole milk adding richness and butter providing a silky finish. Use full-fat versions for the creamiest results; if you’re watching calories, half-and-half can replace milk, but it might slightly alter the texture in this one-pan steak and shrimp setup.
2 cloves garlic, minced, and 1 tablespoon olive oil: Garlic infuses the skillet with aromatic depth, enhancing the overall flavor profile of this grilled steak and shrimp recipe. Fresh cloves are key for potency—pre-minced jars won’t compare. Extra-virgin olive oil adds a subtle fruitiness; avocado oil is a heart-healthy substitute that withstands high heat without compromising taste.
Salt, black pepper, 1 teaspoon paprika, and fresh parsley for garnish: These seasonings are simple yet transformative; sea salt and freshly ground pepper ensure balanced flavors, while paprika adds a smoky kick that ties into the grilling theme. For a twist, smoked paprika can intensify the grilled aspect. Fresh parsley isn’t just for show—it’s packed with vitamins; cilantro could substitute for a herbaceous variation, making this steak with mashed potatoes even more versatile.
Step-by-Step Instructions
Step 1: Preparing and Grilling the Steaks
Preheat your grill to medium-high heat, around 400°F, to ensure even cooking. Season the 2 ribeye steaks generously with salt, black pepper, and paprika on both sides for that essential grilled steak and shrimp flavor. Place the steaks on the grill and cook for 4-5 minutes per side for medium-rare, flipping once for an even sear.
Pro Tip: Let the steaks rest at room temperature for 10 minutes before grilling to promote even cooking and juiciness— this prevents the exterior from burning while the inside catches up.
Step 2: Sautéing the Garlic and Shrimp
In a large skillet, heat 1 tablespoon of olive oil over medium heat. Add the 2 minced garlic cloves and cook for about 1 minute until fragrant, stirring to avoid burning. Then, add the 1 pound of peeled and deveined large shrimp, cooking for 2-3 minutes per side until they turn pink and opaque.
Common Mistake to Avoid: Overcrowding the skillet can lead to steaming instead of sautéing, resulting in rubbery shrimp—cook in batches if needed for that perfect texture in this one-pan steak and shrimp recipe.
Step 3: Boiling and Mashing the Potatoes
In a large pot, bring salted water to a boil and add the 4 cubed russet potatoes. Boil for 15-20 minutes until tender, then drain thoroughly. Return the potatoes to the pot and mash them with 1 cup of whole milk, 2 tablespoons of unsalted butter, salt, and black pepper until smooth and creamy.
Pro Tip: Use a potato ricer for an even creamier mash, which pairs exceptionally with the grilled steak and shrimp, elevating the overall dish’s comfort factor.
Step 4: Combining the Steak and Shrimp in the Skillet
Return the grilled steaks to the same skillet with the cooked shrimp. Stir everything together over medium heat for 2-3 minutes to combine flavors and heat through, allowing the juices to meld for that signature one-pan steak and shrimp experience.
Common Mistake to Avoid: Don’t over-stir once combined, as this can break down the shrimp—gentle tossing preserves the grilled steak’s integrity and enhances the steak with mashed potatoes presentation.
Step 5: Serving the Dish
Once heated, remove the skillet from the heat. Serve the steak and shrimp mixture over or alongside the mashed potatoes, garnished with fresh parsley for a pop of color and freshness.
Pro Tip: For extra flair, drizzle any remaining skillet juices over the top to boost moisture and flavor in this grilled steak and shrimp recipe.
Serving & Presentation
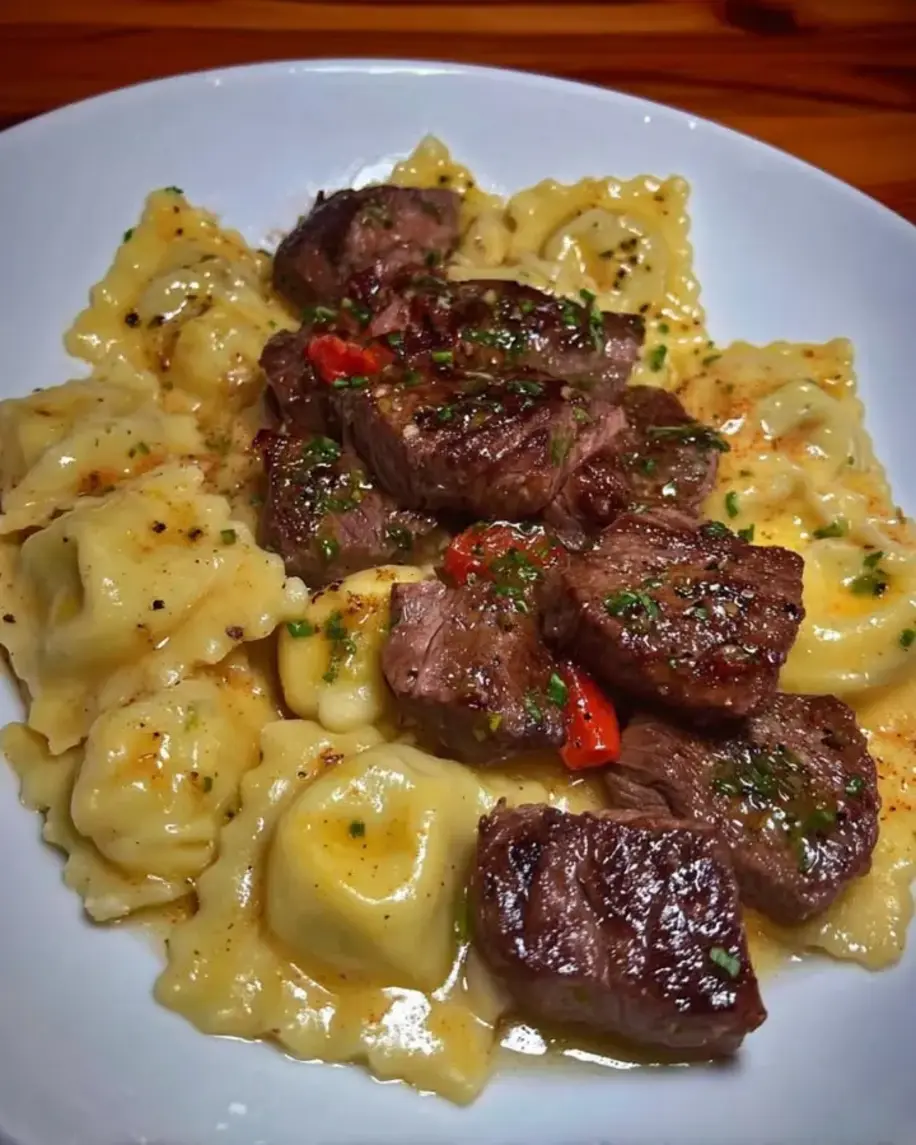
Plating this grilled steak and shrimp skillet with mashed potatoes is all about creating an inviting visual feast. Start by mounding the creamy mashed potatoes in the center of each plate, then artfully arrange slices of grilled steak and a handful of shrimp on top or beside it for a balanced look. Use fresh parsley not just as a garnish but to add vibrant green accents that contrast the dish’s rich colors. For an impressive touch, sprinkle a pinch of paprika over the potatoes to echo the seasoning and tie the flavors together. This steak and shrimp recipe pairs beautifully with light sides like steamed broccoli or a crisp green salad to cut through the richness, making it ideal as a standalone main course for family dinners or special occasions.
Make-Ahead & Storage Solutions
Make-Ahead Strategy: To save time, prepare the mashed potatoes up to 3 days in advance by boiling and mashing them, then storing in an airtight container in the fridge. Grill the steaks and cook the shrimp a day ahead, cooling them quickly and refrigerating separately. When ready, reheat the components in the skillet for 2-3 minutes to recreate that fresh grilled steak and shrimp magic without starting from scratch.
Storing Leftovers: For maximum freshness, store leftovers in airtight containers in the refrigerator for up to 3 days. Keep the steak and shrimp separate from the mashed potatoes to maintain textures— the steak and shrimp can be frozen for up to 2 months, while potatoes should be consumed within 48 hours to avoid sogginess.
The Best Way to Reheat: Restore the original texture and flavor by reheating the steak and shrimp in a skillet over low heat with a splash of olive oil to prevent drying out. For the mashed potatoes, warm them gently on the stove with a bit of milk, stirring until creamy again. This method ensures your one-pan steak and shrimp recipe tastes just as delicious as when freshly made.
Frequently Asked Questions (FAQ)
How long should I grill steak and shrimp for a skillet recipe?
For this grilled steak and shrimp recipe, grill the ribeye steaks for 4-5 minutes per side on medium-high heat for medium-rare doneness, which keeps them juicy and flavorful. Cook the shrimp in the skillet for 2-3 minutes per side until pink and opaque. Timing is crucial to avoid overcooking—use a meat thermometer for steaks (aim for 135°F internally) and watch for the shrimp to curl slightly, ensuring they integrate perfectly into your one-pan steak and shrimp setup.
What mashed potato recipe pairs best with grilled steak and shrimp?
The creamy mashed potatoes in this steak with mashed potatoes recipe, made with russet potatoes, whole milk, and butter, pair best due to their smooth texture that absorbs the savory juices from the grilled steak and shrimp. Their mild flavor complements the bold, smoky elements without overpowering them. For variations, add garlic or herbs to the mash for an extra layer, but stick to this simple version for the most harmonious balance in your skillet steak and shrimp dish.
Can I use different vegetables in this grilled steak and shrimp skillet?
Absolutely, you can customize this grilled steak and shrimp recipe by incorporating vegetables like bell peppers, zucchini, or asparagus for added nutrition and color. Simply sauté them in the skillet after the garlic for 3-4 minutes until tender-crisp, then mix with the steak and shrimp. This keeps the one-pan method intact while boosting the meal’s freshness—aim for veggies that cook quickly to match the recipe’s timing and enhance the overall flavor profile.
What’s the best way to season steak and shrimp for grilling?
The best seasoning for steak in this recipe is a simple mix of salt, black pepper, and paprika, applied generously before grilling to enhance the natural flavors and create a flavorful crust. For shrimp, a light seasoning with salt and pepper suffices, letting the garlic in the skillet shine. Experiment with additions like lemon zest for brightness, but always season just before cooking to maximize adhesion and taste in your grilled steak and shrimp endeavor.
Is this recipe suitable for beginners?
Yes, this grilled steak and shrimp recipe is beginner-friendly, with straightforward steps and detailed tips to guide you. The one-pan approach minimizes complexity, and as long as you follow the grilling times and heat levels, you’ll achieve great results on your first try.
What wine pairs well with this steak and shrimp dish?
A bold red like Cabernet Sauvignon pairs excellently with the grilled steak’s richness, while a crisp white like Pinot Grigio complements the shrimp’s lightness. For a balanced option, try a light red blend to enhance the overall flavors of this steak with mashed potatoes meal.
Tried This Recipe? Leave a Comment!
Did you make this recipe? I’d love to hear how it turned out! Please leave a comment and a rating below. Your feedback helps other home cooks and supports exorecipes!
For more delicious inspiration, follow me on Pinterest!
.
Print
Grilled Steak Shrimp Skillet with Mashed Potatoes
- Prep Time: 15 minutes
- Cook Time: 30 minutes
- Total Time: 45 minutes
- Yield: 4 1x
- Method: Main
- Cuisine: American
Description
A savory skillet dish featuring grilled steak and shrimp, paired with creamy mashed potatoes for a complete meal.
Ingredients
- 2 ribeye steaks (about 8 oz each)
- 1 pound large shrimp, peeled and deveined
- 4 large russet potatoes, peeled and cubed
- 1 cup whole milk
- 2 tablespoons unsalted butter
- 2 cloves garlic, minced
- 1 tablespoon olive oil
- Salt and black pepper to taste
- 1 teaspoon paprika
- Fresh parsley for garnish
Instructions
- Preheat grill to medium-high heat. Season steaks with salt, pepper, and paprika, then grill for 4-5 minutes per side for medium-rare.
- In a large skillet, heat olive oil over medium heat. Add garlic and cook for 1 minute until fragrant.
- Add shrimp to the skillet and cook for 2-3 minutes per side until pink and opaque. Remove from heat and set aside.
- In a pot, boil cubed potatoes in salted water for 15-20 minutes until tender. Drain and mash with milk, butter, salt, and pepper until smooth.
- In the same skillet, add the grilled steaks and cooked shrimp, stirring to combine and heat through for 2-3 minutes.
- Serve the steak and shrimp mixture over or alongside the mashed potatoes, garnished with fresh parsley.
Notes
Ensure shrimp is fresh for the best flavor; adjust seasoning as needed for personal taste.
Nutrition
- Calories: 650
- Sugar: 6g
- Fat: 35g
- Carbohydrates: 45g
- Protein: 55g