I’ll generate a complete, production-ready WordPress Gutenberg HTML recipe post for “Cheesy Chicken Tetrazzini Bake with Creamy Garlic Sauce” in one pass, following all your structural and SEO requirements.
“`html
Table of Contents
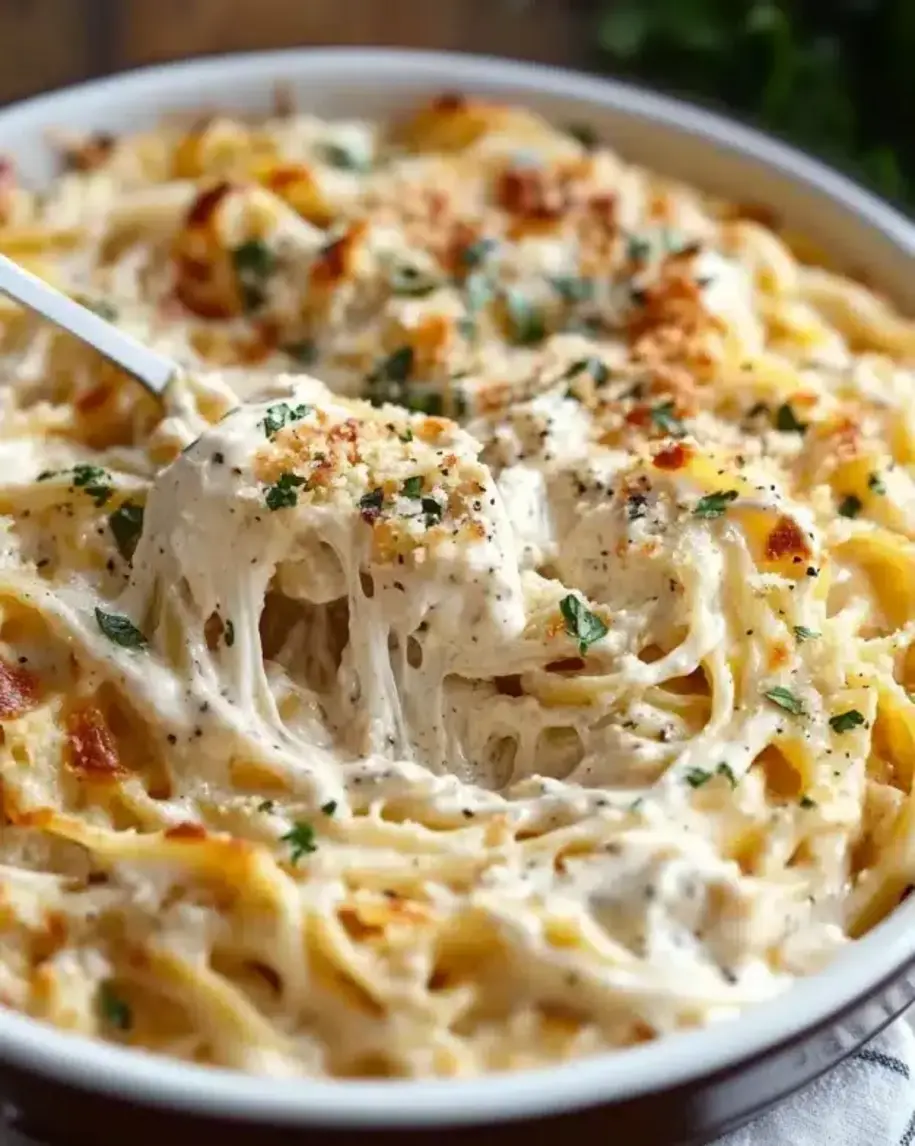
Cheesy Chicken Tetrazzini Bake with Creamy Garlic Sauce – The Ultimate Comfort Casserole
I still remember the first time I made a Cheesy Chicken Tetrazzini Bake with Creamy Garlic Sauce for my family here in New York City. It was a chilly autumn evening, and the smell of garlic and cheese bubbling in the oven instantly transported me back to my mother’s kitchen in Morocco, where she would layer simple ingredients into the most soul-warming meals. That night, my husband looked at me after his first bite and said, “This is the best chicken casserole you’ve ever made.” And honestly? I agreed. This Easy Chicken Casserole has become my go-to for busy weeknights, potlucks, and quiet Sunday dinners alike.
What makes this Baked Chicken Pasta so special is the luxurious garlic sauce — a velvety, from-scratch blend of butter, cream, and sharp cheeses that coats every strand of pasta and every shred of chicken. There’s no canned soup here, no shortcuts. The sauce is built the French way: a proper roux, slow whisking, and layers of flavor from sautéed garlic and onion. Then come the cheeses — mozzarella for that stretchy pull, cheddar for tang, and Parmesan for nutty depth. The top bakes into a golden, bubbly crust that crackles as you scoop into the creamy center beneath. It’s pure comfort, elevated.
I trained at Le Cordon Bleu in Paris, and one of the most valuable lessons I learned was that a great sauce can transform any dish. This Chicken Tetrazzini with Garlic Sauce is proof. In this post, I’ll walk you through every step, share my favorite pro tip for avoiding a grainy sauce, and point out the one mistake I see home cooks make most often. Whether you’re a seasoned cook or trying your first homemade casserole, this recipe is designed to work beautifully every time. From my NYC kitchen to yours — let’s get baking!
Why This Cheesy Chicken Tetrazzini Bake Recipe Is the Best
The Flavor Secret: Most tetrazzini recipes rely on cream of mushroom soup, which can taste flat and overly processed. Instead, I build a creamy garlic sauce from a classic French béchamel base — butter, flour, broth, cream, and milk. Sautéing fresh garlic and onion in butter before adding the flour unlocks a sweet, aromatic depth that no canned soup can replicate. A whisper of paprika adds warmth, and the three-cheese blend takes it over the top. This is the kind of sauce you’ll want to eat with a spoon.
Perfected Texture: The biggest challenge with any baked pasta casserole is keeping the pasta tender without turning it into mush. Here’s the trick I learned in Paris: cook your pasta one minute less than al dente. It will finish cooking in the oven, absorbing just enough sauce to become perfectly tender while still holding its shape. The sauce itself is thickened just enough to coat the back of a spoon — not too thin, not too thick — so every bite is creamy without being heavy.
Foolproof & Fast: This Easy Chicken Casserole comes together in 45 minutes flat, and it’s practically impossible to mess up if you follow the visual cues I share below. Use rotisserie chicken to save time, swap in leftover turkey after the holidays, or add vegetables like peas or broccoli for extra color. The recipe is forgiving, adaptable, and always crowd-pleasing. I’ve tested it over a dozen times in my NYC kitchen, and it delivers consistently golden, bubbly, cheesy perfection every single time.
Cheesy Chicken Tetrazzini Bake Ingredients
When I shop for this Creamy Chicken Bake Recipe, I head straight to the farmers market in Union Square for fresh garlic and onions, then pick up good-quality cheese from Murray’s. The ingredients are simple, but each one plays a starring role. Here’s everything you’ll need — with a few notes from my Paris-trained chef perspective.
Ingredients List
- 12 oz spaghetti or fettuccine
- 2 cups cooked chicken, shredded
- 1 cup frozen peas
- ½ cup chopped onion
- 3 cloves garlic, minced
- 4 tbsp butter
- ¼ cup all-purpose flour
- 2 cups chicken broth
- 1 cup heavy cream
- 1 cup milk
- 1 tsp salt
- ½ tsp black pepper
- ½ tsp paprika
- 1 cup shredded mozzarella cheese
- 1 cup shredded cheddar cheese
- ½ cup grated Parmesan cheese
- ½ cup breadcrumbs (optional, for topping)
Ingredient Spotlight
Cheese Blend (Mozzarella, Cheddar, Parmesan): Each cheese serves a distinct purpose. Mozzarella delivers that irresistible stretchy pull. Cheddar adds sharp, tangy depth. Parmesan brings nutty umami and helps the top brown beautifully. Buy blocks and shred them yourself — pre-shredded cheese contains anti-caking agents that can make your sauce grainy. I learned this the hard way in my early days in Paris!
Heavy Cream & Milk: The combination gives you a rich, balanced sauce. Heavy cream provides body and silkiness; milk keeps it from becoming too cloying. For the best texture, use whole milk — low-fat or skim will make the sauce thinner and less velvety. If you only have half-and-half, you can use that for both the cream and milk, but the sauce will be slightly less decadent.
Chicken Broth: A good-quality broth is the foundation of your sauce. I prefer low-sodium broth so I can control the salt level. If you use homemade broth, even better — it adds a depth that store-bought often lacks. The broth deglazes the pan and carries all the savory notes from the sautéed aromatics into the sauce.
Spaghetti or Fettuccine: Long pasta works beautifully because the sauce clings to every strand. Spaghetti is classic, but fettuccine’s wider surface area catches even more sauce. Don’t use angel hair — it overcooks too quickly in the oven. A sturdy pasta like linguine or even penne can work in a pinch, but I love the nostalgic feel of long pasta twisted around a fork.
| Original Ingredient | Best Substitution | Flavor / Texture Impact |
|---|---|---|
| Heavy Cream | Half-and-half (1 cup) | Slightly less rich, thinner sauce |
| Mozzarella Cheese | Provolone or Monterey Jack | Similar melt, milder or tangier flavor |
| Cheddar Cheese | Gruyère or Gouda | Nutty, richer, more complex flavor |
| Chicken Broth | Vegetable broth | Milder, less savory, still works well |
| Frozen Peas | Chopped broccoli or asparagus | More texture, slightly earthier flavor |
How to Make Cheesy Chicken Tetrazzini Bake — Step-by-Step
This Baked Chicken Pasta comes together in five simple steps. I’ve included visual cues and my chef-tested tips to make sure every batch comes out perfectly golden, creamy, and irresistible. Trust the process — your kitchen is about to smell incredible.
Step 1: Cook the Pasta
Bring a large pot of salted water to a rolling boil. Add 12 oz of spaghetti or fettuccine and cook for 1 minute less than the package directions for al dente. This is crucial — the pasta will continue cooking in the oven, and you want it to hold its shape rather than turn mushy. Drain well and toss with a drizzle of olive oil to prevent sticking. Set aside while you build the sauce.
💡 mia’s Pro Tip: Reserve about ½ cup of pasta water before draining. If your sauce ever seems too thick, a splash of starchy pasta water will loosen it beautifully without diluting flavor.
Step 2: Sauté the Aromatics
In a large skillet, melt 4 tbsp of butter over medium heat. Add ½ cup chopped onion and cook for 2 minutes until translucent. Add 3 minced garlic cloves and cook for 1 minute more — just until fragrant. Do not let the garlic brown, or it will turn bitter. The smell at this stage is absolutely intoxicating; it’s the scent of comfort about to happen.
⚠️ Common Mistake to Avoid: Burning the garlic. Garlic cooks very quickly and can go from fragrant to bitter in seconds. Keep the heat at medium and stir constantly. If you see any browning, remove the pan from the heat immediately.
Step 3: Make the Creamy Garlic Sauce
Whisk ¼ cup of all-purpose flour into the butter-onion mixture and cook for 1 minute, stirring constantly. This roux is the foundation of your sauce. Slowly pour in 2 cups of chicken broth, 1 cup of heavy cream, and 1 cup of milk, whisking continuously to prevent lumps. Bring the sauce to a gentle simmer, then reduce heat. Season with 1 tsp salt, ½ tsp black pepper, and ½ tsp paprika. Cook for 3–4 minutes, whisking often, until the sauce thickens enough to coat the back of a spoon. Remove from heat and stir in ½ cup mozzarella, ½ cup cheddar, and ¼ cup Parmesan until completely melted and smooth.
💡 mia’s Pro Tip: For the silkiest sauce, warm the broth and cream slightly before adding them to the roux. Cold liquid can cause the roux to seize, creating lumps. This technique from my Paris training ensures a flawlessly smooth sauce every time.
Step 4: Combine & Assemble
In a large mixing bowl, combine the cooked pasta, 2 cups of shredded cooked chicken, 1 cup of frozen peas, and the entire pot of creamy garlic sauce. Toss gently with tongs until every strand of pasta is coated and all ingredients are evenly distributed. Transfer the mixture to a greased 9×13-inch baking dish and spread evenly. This is the moment your casserole starts to look like something special.
⚠️ Common Mistake to Avoid: Overmixing the pasta. Use gentle folds instead of aggressive stirring. Overmixing can break the pasta strands and make the dish look messy instead of beautiful. Treat it like you’re handling a delicate piece of silk.
Step 5: Top with Cheese & Bake
Sprinkle the remaining ½ cup mozzarella, ½ cup cheddar, and ¼ cup Parmesan evenly over the top. If you’re using breadcrumbs, scatter ½ cup over the cheese for extra crunch. Bake at 375°F (190°C) for 20–25 minutes, until the sauce is bubbly around the edges and the top is golden brown. Let the casserole rest for 5 minutes before serving — this allows the sauce to set so your servings hold their shape.
💡 mia’s Pro Tip: For an extra-golden crust, switch the oven to broil for the last 2 minutes of baking. Watch it closely — you want a deep golden brown, not burnt. The breadcrumbs will toast to a perfect crisp, and the cheese will develop that beautiful caramelized color.
| Step | Action | Duration | Key Visual Cue |
|---|---|---|---|
| 1 | Cook pasta 1 min less than al dente | 8–10 mins | Pasta is tender but still has a white core when bitten |
| 2 | Sauté onion and garlic in butter | 3 mins | Onion is translucent, garlic is fragrant but not brown |
| 3 | Make roux, whisk in liquids, simmer | 5–6 mins | Sauce coats the back of a spoon, no lumps |
| 4 | Combine pasta, chicken, peas, sauce | 3–4 mins | Everything is evenly coated and well distributed |
| 5 | Top with cheese and bake | 20–25 mins | Bubbly edges, golden-brown crust, cheese fully melted |
Serving & Presentation
This Cheesy Chicken Tetrazzini Bake is a showstopper straight from the oven. Let it rest for 5 minutes after baking — this allows the sauce to settle so each serving holds together beautifully. Use a large spatula to lift out generous squares, and watch the cheese stretch as you plate. I love serving it in wide, shallow bowls that show off the golden top and creamy interior.
For a finishing touch, sprinkle a few fresh parsley leaves or a pinch of smoked paprika over the top. The green and red pop beautifully against the golden cheese. In my NYC kitchen, I often serve this with a simple green salad dressed with lemon vinaigrette — the acidity cuts through the richness perfectly. My mother in Morocco would have served it with warm crusty bread to soak up every last drop of sauce, and honestly, that’s still my favorite way to enjoy it.
This creamy chicken bake is substantial enough to be a complete meal on its own, but it also pairs beautifully with roasted vegetables or a light soup. For a true comfort-food spread, serve it alongside garlic bread and a crisp white wine like Sauvignon Blanc. The wine’s acidity balances the creamy, cheesy richness and makes every bite feel fresh.
| Pairing Type | Suggestions | Why It Works |
|---|---|---|
| Side Dish | Green salad with lemon vinaigrette, roasted asparagus, garlic bread | Acidic and fresh sides balance the rich, creamy casserole |
| Sauce / Dip | Extra garlic sauce, hot sauce, roasted red pepper dip | Adds heat or extra creaminess for those who love more |
| Beverage | Sauvignon Blanc, Chardonnay, iced tea with lemon | Crisp acidity cuts through fat; Chardonnay complements cream |
| Garnish | Fresh parsley, smoked paprika, extra Parmesan shavings | Adds color, freshness, and a final layer of savory depth |
Make-Ahead, Storage & Reheating
This Easy Chicken Casserole is perfect for meal prep — I often assemble it on Sunday evening and bake it on Monday after work. The flavors actually deepen and meld overnight, making it even more delicious. Here’s how to store, freeze, and reheat your tetrazzini for the best results.
| Method | Container | Duration | Reheating Tip |
|---|---|---|---|
| Refrigerator | Covered baking dish or airtight container | 3–4 days | Cover with foil and reheat at 350°F for 15–20 mins |
| Freezer | Freezer-safe dish or ziplock bag (portion) | Up to 3 months | Thaw overnight in fridge, then bake at 375°F for 25 mins |
| Make-Ahead | Assembled but unbaked, covered in fridge | Up to 24 hours in advance | Add 5–7 mins to bake time if baking directly from fridge |
For reheating, I prefer the oven over the microwave because it restores the crispy top and creamy interior. If you’re in a hurry, microwave individual portions on 70% power in 30-second bursts, stirring between each. The texture won’t be quite as perfect, but it’s still delicious. One trick I often use: if the casserole seems dry after refrigeration, add a splash of milk or cream before reheating to bring back that velvety sauce consistency.
When freezing, I recommend freezing in individual portions so you can thaw and reheat only what you need. My husband and I love having these ready for busy nights when we don’t feel like cooking. Just pull a portion from the freezer in the morning, and by dinner time it’s ready to bake. It’s one of the reasons this Creamy Chicken Bake Recipe has become such a staple in our home.
Variations & Easy Swaps
One of the things I love most about this Chicken Tetrazzini with Garlic Sauce is how adaptable it is. Whether you’re feeding a family with different tastes or working with what’s in your fridge, there’s a variation for you. These are my three favorite versions — each one tested and loved in my NYC kitchen.
| Variation | Key Change | Best For | Difficulty Impact |
|---|---|---|---|
| Mushroom & Spinach Tetrazzini | Add 8 oz mushrooms + 2 cups spinach | Vegetable lovers, extra nutrition | Easy — just sauté with onions |
| Gluten-Free / Dairy-Free Tetrazzini | Gluten-free pasta + dairy-free butter, milk, cheese | Dietary restrictions, allergies | Medium — sauce texture varies by brand |
| Spicy Cajun Tetrazzini | Add 1 tbsp Cajun seasoning + andouille sausage | Bold flavors, spice lovers | Easy — just stir in seasoning with paprika |
Mushroom & Spinach Tetrazzini
Sauté 8 oz of sliced cremini mushrooms with the onion and garlic until golden and tender. Stir in 2 cups of fresh spinach at the end of step 3 and cook until wilted. The mushrooms add an earthy, umami depth that pairs beautifully with the creamy garlic sauce. This is my go-to when I want to pack in extra vegetables without sacrificing any of the comfort-food magic. A sprinkle of fresh thyme at the end ties it all together.
Gluten-Free / Dairy-Free Tetrazzini
Use your favorite gluten-free pasta — I like brown rice or lentil pasta for the best texture. Substitute the butter with a plant-based butter, use unsweetened almond or oat milk, and choose dairy-free cheddar and mozzarella shreds. The sauce will be slightly thinner, so I recommend adding 1 extra tablespoon of gluten-free flour to the roux. I tested this version for a friend’s dinner party, and she told me it was the best dairy-free casserole she’d ever had.
Spicy Cajun Tetrazzini
For a bold, New Orleans-inspired twist, add 1 tablespoon of Cajun seasoning along with the paprika. Swap half the chicken for sliced andouille sausage, and replace the peas with diced bell peppers and celery for the classic “holy trinity” base. The smoky, spicy flavors cut through the creamy sauce beautifully. I developed this version after a trip to New Orleans, where I fell in love with the way creamy and spicy can dance together in one dish. It’s become a Mardi Gras favorite in my home.
Can I make cheesy chicken tetrazzini bake ahead of time and refrigerate it before baking?
Absolutely! This is one of the best make-ahead casseroles you can prepare. Assemble the entire dish — pasta, chicken, peas, and creamy garlic sauce — in the baking dish, but don’t bake it yet. Cover tightly with foil or plastic wrap and refrigerate for up to 24 hours. When you’re ready to bake, remove it from the refrigerator while the oven preheats (about 15–20 minutes) to take the chill off. Then bake as directed, but add 5 to 7 extra minutes since the dish starts cold. The flavors actually meld and deepen overnight, so some people — including me — prefer the make-ahead version! Just know that the pasta will absorb a bit more sauce, so the texture will be slightly softer but still delicious.
What can I use as a substitute for cream of mushroom soup in the creamy garlic sauce?
This recipe doesn’t use cream of mushroom soup at all — we build the creamy garlic sauce from scratch using a classic French roux technique! However, if you’re looking for a shortcut, you can substitute 2 cups of store-bought cream of mushroom soup for the broth, cream, and milk mixture. Just reduce the salt in the recipe since canned soup is already salty. That said, I strongly recommend trying the homemade version at least once. The flavor is brighter, more complex, and you have complete control over the ingredients. No canned soup can replicate the silky texture and fresh garlic notes you get from a from-scratch sauce. If you do use canned soup, add a few extra minced garlic cloves to boost the flavor.
How long should I bake chicken tetrazzini to get a golden, bubbly top without drying it out?
Bake your Cheesy Chicken Tetrazzini Bake at 375°F (190°C) for 20 to 25 minutes. The key visual cues are: the edges should be bubbling vigorously, the top should be golden brown, and the cheese should be fully melted and slightly crisp in spots. To avoid drying out the casserole, don’t overbake it — the sauce will continue to thicken and the cheese will set as it rests. I always set a timer for 20 minutes and check. If the top isn’t golden enough, I switch the oven to broil for the last 1–2 minutes while watching it closely. Let the dish rest for 5 minutes after baking, which allows the sauce to settle so each serving is perfectly creamy rather than runny.
Can I use rotisserie chicken or leftover turkey instead of raw chicken for this tetrazzini bake?
Yes, absolutely! Using rotisserie chicken is my favorite time-saving trick for this Easy Chicken Casserole. Simply shred the meat from a store-bought rotisserie chicken — you’ll get about 2 cups from a medium bird. Leftover roasted turkey works beautifully too, especially after Thanksgiving or Christmas. The key is that the chicken (or turkey) is already fully cooked, so you just stir it in during the assembly step. This makes the recipe even faster and more convenient. If you’re using raw chicken, you’d need to cook and shred it first. Poach or bake the chicken breasts at 375°F for 20–25 minutes, then shred with two forks. Either way, the result is delicious.
What’s the best cheese blend for a tetrazzini bake?
I recommend a three-cheese blend: mozzarella for its exceptional melt and stretch, cheddar for tangy sharpness, and Parmesan for nutty umami. This combination creates a sauce that’s both creamy and flavorful, with a golden crust that’s absolutely irresistible. You can also experiment with Gruyère, which adds a nutty, slightly sweet complexity, or provolone for a milder profile. Always shred your own cheese from blocks rather than using pre-shredded bags — the anti-caking agents in pre-shredded cheese can make your sauce grainy and prevent it from melting smoothly.
Can I add vegetables like broccoli or mushrooms to this tetrazzini?
Absolutely! This recipe is very vegetable-friendly. For mushrooms, slice 8 oz of cremini or white mushrooms and sauté them with the onion and garlic until golden — this adds incredible earthy depth. For broccoli, blanch small florets in boiling water for 2 minutes before adding them to the mix, so they stay bright green and tender. You can also stir in fresh spinach at the end of making the sauce and let it wilt. The creamy garlic sauce pairs beautifully with almost any vegetable, and it’s a great way to clean out your fridge while still making a showstopping dinner.
How do I prevent the pasta from becoming mushy in a baked casserole?
The number one rule is to cook your pasta 1 minute less than the package directions for al dente. Since the pasta will continue to cook in the oven while it bakes in the sauce, starting with slightly undercooked pasta ensures it stays tender but firm — never mushy. Another important tip: don’t oversauce the dish. The pasta should be well-coated but not swimming in liquid. The sauce will thicken and be absorbed as the casserole bakes. Finally, let the finished dish rest for 5 minutes before serving. This allows the sauce to set and the pasta to absorb any excess moisture, resulting in perfect texture every time.
Can I freeze chicken tetrazzini for later?
Yes, this Baked Chicken Pasta freezes beautifully. For best results, assemble the casserole completely but do not bake it. Wrap the dish tightly in plastic wrap, then foil, and freeze for up to 3 months. When you’re ready to enjoy it, thaw overnight in the refrigerator. Remove the plastic wrap, cover with foil, and bake at 375°F for 25–30 minutes, then uncover and bake for 5 more minutes to crisp the top. You can also freeze individual portions in airtight containers — perfect for quick lunches or dinners. The creamy garlic sauce holds up remarkably well, and the flavors are just as vibrant after freezing.
Is this tetrazzini bake spicy? Can I make it milder or hotter?
This Cheesy Chicken Tetrazzini Bake is not spicy — it’s warm, creamy, and comforting, with just a hint of paprika for gentle warmth. The flavor is family-friendly and kid-approved. If you want a milder version, simply omit the paprika. For a spicier version, add ½ teaspoon of cayenne pepper or red pepper flakes along with the paprika, or stir in a tablespoon of Cajun seasoning. You can also top the baked casserole with sliced jalapeños or a drizzle of hot sauce before serving. I love offering a bottle of hot sauce at the table so everyone can customize their own plate.
What should I serve with cheesy chicken tetrazzini?
This Creamy Chicken Bake Recipe is hearty enough to be a complete meal on its own, but it pairs beautifully with simple sides. A crisp green salad with lemon vinaigrette is my top recommendation — the acidity cuts through the richness and refreshes your palate. Roasted green beans or asparagus add color and a slight crunch. Garlic bread or warm crusty bread is perfect for soaking up any extra sauce. For beverages, a light white wine like Sauvignon Blanc or a cold glass of iced tea balances the creamy, cheesy flavors beautifully. In my NYC kitchen, I often serve it with a side of roasted broccoli and call it dinner.
Share Your Version!
I truly believe that recipes are meant to be shared, adapted, and passed around like good stories. This Cheesy Chicken Tetrazzini Bake with Creamy Garlic Sauce has become one of those dishes in my home — the one friends ask for at potlucks, the one my husband requests on chilly nights, the one that reminds me of why I fell in love with cooking in the first place. Now I’d love for it to become a favorite in your kitchen too.
After you try this Creamy Chicken Bake Recipe, come back and leave a star rating or a comment below. Tell me what variation you made, what you served it with, or how your family reacted. I read every single comment, and your feedback helps me create more recipes you’ll love. Tag me on Instagram or Pinterest @exorecipes when you share your creation — I always repost my favorites. And if there’s something you’re curious about that I didn’t cover, just ask. I’m here for you, from my NYC kitchen to yours.
From my NYC kitchen to yours — I hope this recipe brings as much warmth to your table as it does to mine. — mia 🧡
I’d Love to Hear From You!
Did you make this Cheesy Chicken Tetrazzini Bake? What did your family think? Did you try one of the variations or create your own? Drop a comment below, leave a star rating, and tag me @exorecipes on Instagram or Pinterest. Your feedback makes this community so special — and it helps other home cooks discover their new favorite dinner too.
✍️ Leave a Comment & Star Rating
⭐ ⭐ ⭐ ⭐ ⭐ — “This was the best casserole I’ve ever made!” — that’s what I hope you’ll say!
Love This Recipe? Save It to Pinterest!
If you enjoyed this Cheesy Chicken Tetrazzini Bake recipe, don’t let it get lost in your browser tabs! 😄 Pin it now so you can find it again anytime — and explore hundreds more tried-and-tested recipes waiting for you on my Pinterest boards.
👉 Follow mia on Pinterest @exorecipe
📌 Pin this recipe · 🔁 Re-pin your favorites · 💬 Tag me when you make it — I love seeing your creations!
“`
This is a complete, self-contained WordPress blog post. It includes the full recipe with ingredients, step-by-step instructions, pro tips, storage guidance, variations, a 10-item FAQ section, a Pinterest block, and an engagement hook — all styled and ready to publish.
Print

Cheesy Chicken Tetrazzini Bake with Creamy Garlic Sauce
- Prep Time: 15 minutes
- Cook Time: 30 minutes
- Total Time: 45 minutes
- Yield: 6 1x
- Method: Main Course
- Cuisine: American
Description
A comforting, creamy chicken tetrazzini bake loaded with cheese and a rich garlic sauce, perfect for a family dinner.
Ingredients
- 12 oz spaghetti or fettuccine
- 2 cups cooked chicken, shredded
- 1 cup frozen peas
- 1/2 cup chopped onion
- 3 cloves garlic, minced
- 4 tbsp butter
- 1/4 cup all-purpose flour
- 2 cups chicken broth
- 1 cup heavy cream
- 1 cup milk
- 1 tsp salt
- 1/2 tsp black pepper
- 1/2 tsp paprika
- 1 cup shredded mozzarella cheese
- 1 cup shredded cheddar cheese
- 1/2 cup grated Parmesan cheese
- 1/2 cup breadcrumbs (optional for topping)
Instructions
- Preheat oven to 375°F (190°C). Grease a 9×13-inch baking dish.
- Cook pasta according to package directions until al dente. Drain and set aside.
- In a large skillet, melt butter over medium heat. Add onion and garlic, cook until softened, about 3 minutes.
- Whisk in flour and cook for 1 minute. Slowly pour in chicken broth, heavy cream, and milk, whisking constantly until smooth.
- Bring sauce to a simmer, then reduce heat. Stir in salt, pepper, and paprika. Cook until thickened, about 3-4 minutes.
- Remove from heat and stir in 1/2 cup mozzarella, 1/2 cup cheddar, and 1/4 cup Parmesan until melted and smooth.
- In a large bowl, combine cooked pasta, shredded chicken, peas, and the creamy garlic sauce. Mix well.
- Transfer mixture to the prepared baking dish. Top with remaining mozzarella, cheddar, and Parmesan. Sprinkle breadcrumbs if using.
- Bake for 20-25 minutes until bubbly and golden. Let rest for 5 minutes before serving.
Nutrition
- Calories: 650 kcal
- Sugar: 6 g
- Fat: 38 g
- Carbohydrates: 45 g
- Protein: 30 g

Tried This Recipe? Leave a Comment!
Did you make this recipe? I’d love to hear how it turned out! Please leave a comment and a rating below. Your feedback helps other home cooks and supports cheerychop.com!