“`html
Table of Contents
Cheesy Chicken Crescent Rolls: The Perfect Comfort Food with a Parisian Twist
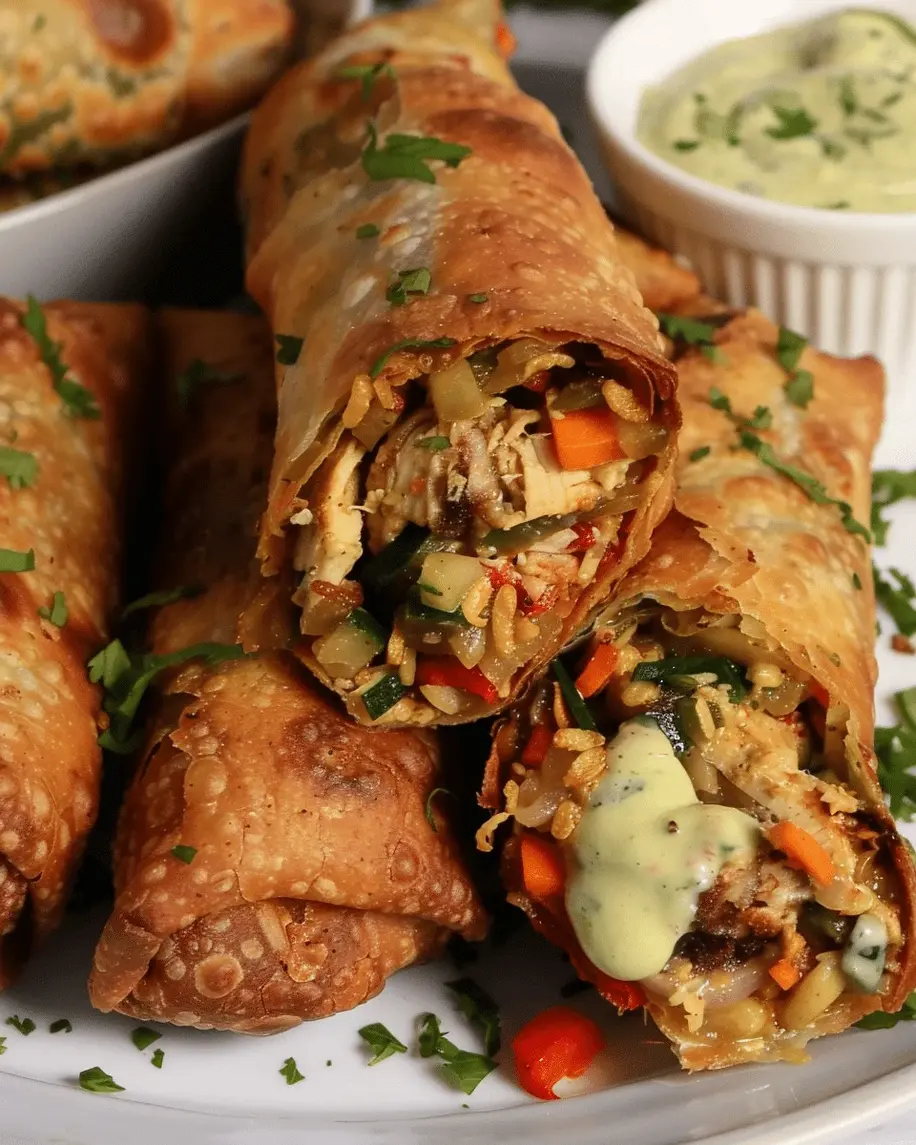
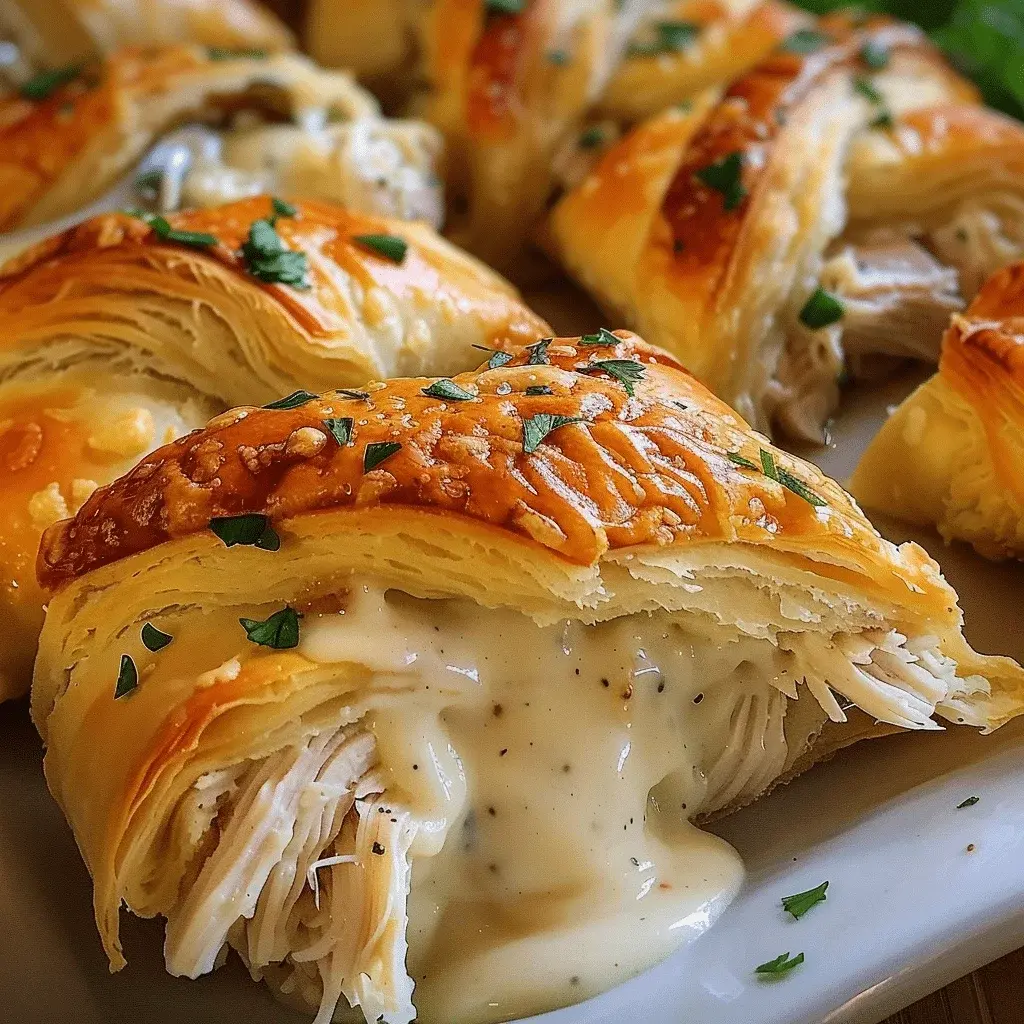
There’s something magical about the moment you pull golden, buttery crescent rolls from the oven — especially when they’re filled with creamy, cheesy chicken and topped with a luscious mozzarella blanket. These Cheesy Chicken Crescent Rolls are my go-to comfort food, whether I’m feeding my family after a long NYC day or bringing a dish to a friend’s potluck. Growing up in Morocco, my mother made a similar savory pastry using warqa dough, but when I moved to Paris for culinary school, I fell in love with the French approach to flaky, laminated dough. This recipe is my love letter to both worlds: the warmth of home‑cooked Moroccan comfort and the precision of French technique. The main keyword for this recipe — Cheesy Chicken Crescent Rolls — captures exactly what you’re getting: a creamy, cheesy filling encased in light, golden dough that shatters with every bite.
Let me paint you a picture: The first bite starts with a gentle crunch from the baked crescent dough, then gives way to a velvety filling of shredded chicken, cream cheese, and sharp cheddar. If you add bacon, a subtle smokiness weaves through each mouthful. The butter‑parsley glaze brushed on top before baking adds a golden sheen and a whisper of herby aroma. Once you pull the tray from the oven, the mozzarella on top is bubbling and slightly browned at the edges — a sight that makes your kitchen smell like the best kind of indulgence. It’s the perfect balance of creamy, savory, and flaky, all in one hand‑held roll.
I’ve tested this recipe dozens of times in my tiny but mighty NYC kitchen, and I’ve perfected a few techniques that guarantee success every single time. Today I’m sharing my secret to avoiding a soggy bottom — a common frustration with crescent roll recipes — and a pro tip for building maximum flavor in the filling. Whether you’re a seasoned cook or someone just starting out, this easy chicken crescent roll recipe will become a staple in your dinner rotation. One warning: they disappear fast. You’ve been warned!
Why This Cheesy Chicken Crescent Rolls Recipe Is the Best
The Flavor Secret: The key is to properly soften the cream cheese and season generously. I learned in Paris that even a simple filling needs layers: salt, pepper, and a touch of garlic powder are non‑negotiable, but the real magic happens when you add the optional bacon. It’s a trick my mother used in her bistilla — a meat or poultry filling laced with subtle salty crunch. Here, the bacon elevates the ordinary chicken filling into something crave‑worthy.
Perfected Texture: The biggest challenge with crescent rolls is preventing a soggy bottom. My solution? Blot the shredded chicken well and make sure the cream cheese is fully incorporated — no cold lumps. That, plus brushing the rolls with butter before adding the topping, creates a barrier that keeps the dough crispy underneath. And I always use parchment paper, which allows air to circulate and prevents sticking.
Foolproof & Fast: With just 15 minutes of prep and 15 minutes in the oven, this recipe fits into the busiest weeknight. The ingredients are all easy to find at any U.S. grocery store — I pick up my crescent dough, cream cheese, and shredded cheese at the Union Square Greenmarket or my local Trader Joe’s. Even if you’ve never made a filled roll before, my detailed instructions and visual cues will guide you to perfect results every time.
Cheesy Chicken Crescent Rolls Ingredients
When I’m shopping for these ingredients in New York, I head to the Chelsea Market for the best organic chicken and artisan cheeses. But truth be told, this recipe works beautifully with everyday supermarket staples — the kind you can grab on your way home. The combination is pure comfort: creamy, cheesy, and wrapped in flaky dough. Let’s look at what you’ll need.
Ingredients List
- 2 cups cooked, shredded chicken (from a rotisserie chicken works great)
- 4 oz cream cheese, softened
- 1/2 cup shredded cheddar cheese
- 1/4 cup cooked and crumbled bacon (optional, but highly recommended)
- 1/4 teaspoon garlic powder
- Salt and pepper to taste
- 1 can (8 oz) refrigerated crescent roll dough
- 1/4 cup melted butter
- 1/2 teaspoon dried parsley
- 1/4 cup shredded mozzarella cheese (for topping)
Ingredient Spotlight
Chicken: The star of the filling. Rotisserie chicken is my shortcut — it’s already cooked and flavorful. If you cook your own, poach boneless skinless breasts in salted water until tender, then shred. The key is to shred while still warm; cold chicken doesn’t mix as evenly with the cream cheese.
Cream Cheese: This is the glue that holds the filling together and adds luxurious creaminess. Always use full‑fat cream cheese for the best texture — low‑fat versions can turn watery. Let it sit on the counter for 20 minutes to soften; a quick microwave blast (10 seconds) also works in a pinch.
Cheddar Cheese: Sharp cheddar brings tang and depth. I prefer a block I grate myself — pre‑shredded cheese often has anti‑caking agents that can make the filling grainy. For a milder version, use Monterey Jack.
Crescent Roll Dough: The shortcut that makes this recipe weeknight‑friendly. I use Pillsbury original, but any brand works. Keep the dough chilled until you’re ready to roll, or it becomes sticky and hard to handle.
Mozzarella Topping: The bubbly, golden crown. Low‑moisture mozzarella melts beautifully without being watery. If you only have fresh mozzarella, pat it dry with paper towels before sprinkling.
| Original Ingredient | Best Substitution | Flavor / Texture Impact |
|---|---|---|
| Cooked chicken | Canned chicken (drained) | Slightly softer texture; less flavor — add extra seasoning |
| Cream cheese | Neufchâtel cheese | Same creaminess, slightly less tang |
| Cheddar cheese | Gouda or pepper jack | Smoky or spicy twist respectively |
| Bacon (optional) | Cooked pancetta or omit | Pancetta gives similar richness; omitting makes it lighter |
How to Make Cheesy Chicken Crescent Rolls — Step-by-Step
Making these rolls is easier than you think. Follow each step, and you’ll be rewarded with golden, bubbly perfection. I’ve included my chef‑tested tips to ensure success — even if it’s your first time working with crescent dough.
Step 1: Preheat and Prep
Preheat your oven to 375°F (190°C). Line a large baking sheet with parchment paper — this is essential to prevent sticking and to promote even browning. Parchment paper is my secret weapon, and I always keep a roll in my NYC kitchen.
⚠️ Common Mistake to Avoid: Using wax paper or skipping the lining. Wax paper will smoke and stick. Always use parchment or a silicone mat.
Step 2: Make the Filling
In a medium bowl, combine the shredded chicken, softened cream cheese, shredded cheddar, crumbled bacon (if using), garlic powder, salt, and pepper. Mix until everything is evenly incorporated. The filling should be thick and creamy, not watery. If you see any liquid from the chicken, blot it with a paper towel.
💡 mia’s Pro Tip: Taste the filling before rolling! Adjust salt and pepper if needed. I like a pinch of smoked paprika for extra depth.
Step 3: Fill and Roll
Unroll the crescent dough on a clean surface and separate along the perforations into 8 triangles. Place a heaping spoonful of filling (about 2 tablespoons) on the wide end of each triangle. Roll up gently, starting at the wide end and tucking in the sides slightly to enclose the filling. Place each roll seam‑side down on the prepared baking sheet, spacing them about 2 inches apart.
⚠️ Common Mistake to Avoid: Overfilling! Too much filling will leak during baking. Stick to a generous but contained spoonful.
Step 4: Butter Glaze and Topping
In a small bowl, mix the melted butter with dried parsley. Using a pastry brush, coat the top of each roll with the butter mixture. Then sprinkle the shredded mozzarella evenly over the tops. The butter helps the cheese brown and creates a delicious crust.
💡 mia’s Pro Tip: For an extra golden finish, add a pinch of garlic powder to the butter before brushing.
Step 5: Bake and Rest
Bake for 12–15 minutes, or until the rolls are deep golden brown and the cheese is bubbly and slightly browned at the edges. Rotate the tray halfway through for even baking. Remove from the oven and let cool on the baking sheet for exactly 5 minutes — this allows the filling to set so the rolls hold their shape when you lift them.
⚠️ Common Mistake to Avoid: Cutting into them immediately. The filling is molten hot and will ooze out. Patience pays off!
| Step | Action | Duration | Key Visual Cue |
|---|---|---|---|
| 1 | Preheat oven & line tray | 5 min | Oven reaches 375°F; parchment in place |
| 2 | Mix filling | 3 min | Creamy, uniform mixture |
| 3 | Fill & roll crescents | 5 min | Neatly rolled, seam down |
| 4 | Brush butter & add cheese | 2 min | Glossy butter coating; cheese scattered |
| 5 | Bake & rest | 12-15 min + 5 min rest | Golden brown, cheese bubbly |
Serving & Presentation
These Cheesy Chicken Crescent Rolls are versatile enough for any occasion. I love serving them straight from the baking sheet on a wooden board — the golden tops and bubbly cheese make a rustic, inviting display. For a fancier presentation, place them on a platter with a sprinkle of fresh parsley or chives and a small bowl of warm marinara or ranch dressing on the side.
In my Moroccan home, my mother would serve a similar dish alongside a bright tomato salad and mint tea. Here in New York, I pair them with a crisp coleslaw or a simple green salad dressed with lemon vinaigrette — the acidity cuts through the richness beautifully. For a heartier meal, pile them next to roasted vegetables or a creamy tomato soup.
💡 mia’s Pro Tip: If you’re serving these at a party, make the rolls slightly smaller by cutting the crescent dough triangles in half lengthwise. You’ll get 16 mini rolls — perfect for appetizers!
| Pairing Type | Suggestions | Why It Works |
|---|---|---|
| Side Dish | Coleslaw, garden salad, roasted broccoli | Adds crunch and freshness; balances richness |
| Sauce / Dip | Ranch, honey mustard, marinara | Enhances flavor; great for dipping |
| Beverage | Iced tea, lemonade, light beer | Refreshing; cuts through the creamy cheese |
| Garnish | Fresh parsley, chives, red pepper flakes | Adds color and a hint of freshness or heat |
Make-Ahead, Storage & Reheating
Between my busy NYC schedule and food blogging, I rely on make‑ahead meals. These crescent rolls are fantastic for meal prep: you can assemble them the night before and bake just before serving. Leftovers (if you have any!) keep well for a few days — but let me tell you, they rarely last more than 24 hours in my apartment.
| Method | Container | Duration | Reheating Tip |
|---|---|---|---|
| Refrigerator | Airtight container | Up to 3 days | Reheat in a 350°F oven for 5–7 minutes |
| Freezer | Freezer‑safe bag, layered with wax paper | Up to 1 month | Thaw overnight in fridge, then reheat at 350°F for 8–10 minutes |
| Make‑Ahead | Baking sheet covered with plastic wrap | Up to 24 hours in advance | Brush with butter and add cheese just before baking; do not thaw |
The best way to reheat leftovers is in the oven — the microwave makes the dough sad and soggy. Pop them on a baking sheet at 350°F for 5–7 minutes and they’ll taste almost fresh‑baked. If reheating from frozen, make sure to thaw overnight in the fridge to keep the texture even.
Variations & Easy Swaps
| Variation | Key Change | Best For | Difficulty Impact |
|---|---|---|---|
| Southwest Chicken & Cheese | Add 1/4 cup corn, 1/4 cup black beans, 1/2 tsp cumin | Tex‑Mex lovers | Easy |
| Gluten‑Free | Use gluten‑free crescent dough (e.g., from Aldi) | Gluten‑free diets | Easy (dough may be a bit more delicate) |
| Mediterranean Twist | Replace cheddar with feta, add spinach & sundried tomatoes | A lighter, brighter flavor | Medium (spinach must be squeezed dry) |
Southwest Chicken & Cheese
Inspired by my love for bold flavors. Add a can of diced green chiles for extra kick, and serve with a dollop of sour cream. This variation reminds me of the vibrant street food stalls I visited in Marrakech — the cumin and corn bring a warm, earthy note that pairs beautifully with the creamy cheese.
Gluten‑Free Variation
I’ve tested this with a popular gluten‑free crescent dough, and the results were surprisingly good. The dough is a bit more fragile, so handle it gently and don’t overfill. The baking time stays the same. For a dairy‑free version too, use vegan cream cheese and shreddable dairy‑free cheddar.
Mediterranean Twist
When I’m craving something lighter, I swap out the cheddar and mozzarella for crumbled feta and a sprinkle of oregano. Add a handful of chopped spinach (squeezed well) and diced sundried tomatoes. The result is a roll that tastes like a Greek spanakopita hybrid — bright, tangy, and incredibly satisfying.
What type of cheese works best for cheesy chicken crescent rolls?
For the filling, I recommend a combination of cream cheese for creaminess and shredded sharp cheddar for tang. For the topping, low‑moisture mozzarella gives the best melt and golden color. If you want to experiment, Monterey Jack or a smoked gouda work beautifully. Avoid soft cheeses like brie — they make the filling too runny.
Can I use canned chicken instead of fresh chicken in this recipe?
Yes, you can absolutely use canned chicken — it’s a great shortcut! Just make sure to drain it very well and flake it before mixing. The texture will be a bit softer, so you might want to add a little extra seasoning (garlic powder and a pinch of smoked paprika) to boost flavor. The rest of the recipe stays the same.
How do you keep crescent rolls from getting soggy on the bottom?
This is one of the most common issues, and I’ve got a simple solution. First, make sure your chicken filling is not overly wet — blot excess moisture from the chicken. Second, avoid overfilling; too much liquid will steam the dough. Third, bake on parchment paper (not foil) and at a high enough temperature (375°F) to crisp the underside. Finally, let the rolls rest on the baking sheet for 5 minutes after baking — the steam escapes and the bottoms firm up.
What can I serve with cheesy chicken crescent rolls for a complete meal?
These rolls are hearty on their own, but they shine alongside a few simple sides. A crisp garden salad with lemon vinaigrette cuts through the richness. For a warmer option, roasted vegetables like broccoli or asparagus are excellent. I also love serving them with a bowl of tomato soup or a creamy corn chowder. For a bigger spread, add a side of baked beans or sweet potato fries.
Can I make these ahead of time and bake later?
Absolutely! Assemble the rolls completely (without the butter and cheese topping), arrange them on the parchment‑lined baking sheet, and cover tightly with plastic wrap. Refrigerate for up to 24 hours. When ready to bake, brush with the butter‑parsley mixture, add the mozzarella, and bake as directed — you may need to add 2–3 extra minutes because the filling is cold. This is perfect for holiday mornings or dinner parties.
Can I freeze unbaked crescent rolls?
Yes, you can freeze the unbaked rolls after assembling but before adding the butter and cheese. Place them on a baking sheet and freeze until solid (about 1 hour), then transfer to a freezer‑safe bag. They’ll keep for up to 1 month. When you’re ready to bake, place them frozen on a parchment‑lined sheet, brush with butter, add cheese, and bake for 15–18 minutes — no need to thaw. Check at the 15‑minute mark for doneness.
How do I reheat leftover crescent rolls without drying them out?
The oven is your best friend. Preheat to 350°F, place the rolls on a baking sheet, and warm for 5–7 minutes. They’ll come out crispy on the outside and warm inside. If you’re in a rush, the air fryer works too: 320°F for 3–4 minutes. Avoid the microwave unless absolutely necessary — it will make the dough chewy and the filling rubbery.
Can I use a different type of dough instead of crescent rolls?
Yes! While crescent rolls are the classic choice, you can swap in puff pastry (thawed) for an extra‑flaky, indulgent version — just cut it into squares or triangles. You can also use pie crust or even homemade biscuit dough. If using puff pastry, increase the baking time by 2–3 minutes and watch for golden layers.
Is this recipe suitable for a low‑carb diet?
The traditional version uses crescent roll dough, which is not low‑carb. However, you can make a keto‑friendly version by using a low‑carb dough substitute (like one made with almond flour and mozzarella — often called “fathead dough”). Follow the same filling recipe, but use a keto‑friendly cheese for the topping. The texture will be different — denser and richer — but still delicious.
What’s the best way to shred chicken for this recipe?
For the best texture, use two forks to shred while the chicken is still warm — it breaks apart more easily. I often buy a rotisserie chicken from the supermarket, which is already cooked and incredibly flavorful. You can also use leftover roasted chicken or even turkey. If you’re using canned chicken, just drain and flake with a fork. Avoid pulsing in a food processor — it makes the chicken too pasty.
Share Your Version!
I can’t wait to see how you make these Cheesy Chicken Crescent Rolls your own! Did you try the Southwest variation? Add a drizzle of ranch on top? Or maybe you made them gluten‑free for a family member? Drop a comment below and let me know — I read every single one, and your feedback helps me create even better recipes.
If you snap a photo, please tag @exorecipes on Instagram or Pinterest — I love scrolling through your kitchen wins. And before you go, would you mind giving this recipe a star rating? It helps other home cooks find this comfort food gem. Now go preheat that oven — you’re about to make something truly wonderful.
From my NYC kitchen to yours — I hope this recipe brings as much warmth to your table as it does to mine. — mia 🧡
Love This Recipe? Save It to Pinterest!
If you enjoyed this Cheesy Chicken Crescent Rolls recipe, don’t let it get lost in your browser tabs! 😄 Pin it now so you can find it again anytime — and explore hundreds more tried-and-tested recipes waiting for you on my Pinterest boards.
👉 Follow mia on Pinterest @exorecipe
📌 Pin this recipe · 🔁 Re-pin your favorites · 💬 Tag me when you make it — I love seeing your creations!
Did you make these Cheesy Chicken Crescent Rolls?
Tag @exorecipes on Instagram or Pinterest and let me see your beautiful creations! I always share my favorites in my stories. 🧡
“`
Print

Cheesy Chicken Crescent Rolls The Perfect Comfort Food for Any Occasion
- Prep Time: 15 minutes
- Cook Time: 15 minutes
- Total Time: 30 minutes
- Yield: 8 rolls 1x
- Method: Appetizer, Main Course
- Cuisine: American
Description
These cheesy chicken crescent rolls are the ultimate comfort food, perfect for any occasion. They feature a creamy chicken filling wrapped in flaky crescent roll dough and topped with a buttery, cheesy sauce.
Ingredients
- 2 cups cooked, shredded chicken
- 4 oz cream cheese, softened
- 1/2 cup shredded cheddar cheese
- 1/4 cup cooked and crumbled bacon (optional)
- 1/4 teaspoon garlic powder
- Salt and pepper to taste
- 1 can (8 oz) refrigerated crescent roll dough
- 1/4 cup melted butter
- 1/2 teaspoon dried parsley
- 1/4 cup shredded mozzarella cheese (for topping)
Instructions
- Preheat oven to 375°F (190°C). Line a baking sheet with parchment paper.
- In a medium bowl, mix together shredded chicken, cream cheese, cheddar cheese, bacon (if using), garlic powder, salt, and pepper until well combined.
- Unroll crescent roll dough and separate into 8 triangles. Place a heaping spoonful of the chicken mixture on the wide end of each triangle.
- Roll up each triangle starting from the wide end, tucking in the sides slightly. Place on the prepared baking sheet.
- In a small bowl, mix melted butter with parsley. Brush the butter mixture over the tops of the crescent rolls.
- Sprinkle mozzarella cheese over the tops of the rolls.
- Bake for 12-15 minutes or until golden brown and cheese is bubbly.
- Remove from oven and let cool for 5 minutes before serving.
Nutrition
- Calories: 310
- Sugar: 3g
- Fat: 20g
- Carbohydrates: 14g
- Protein: 18g

Tried This Recipe? Leave a Comment!
Did you make this recipe? I’d love to hear how it turned out! Please leave a comment and a rating below. Your feedback helps other home cooks and supports cheerychop.com!
For more delicious inspiration, follow me on Pinterest!