Table of Contents
Cheesy Caramelized Onion and Bacon Potato Gratin – The Ultimate Comfort Casserole
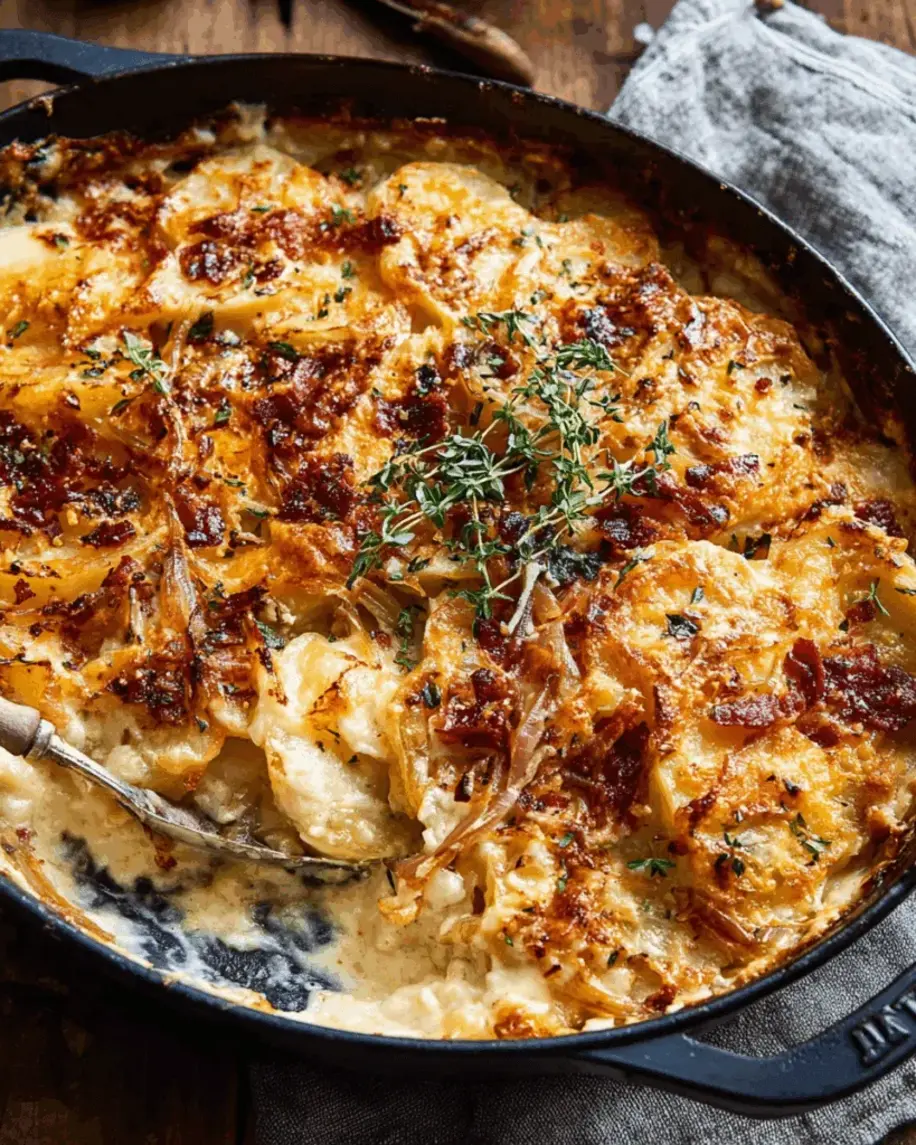
Growing up in Morocco, my mother’s kitchen was a symphony of slow-cooked onions and warm spices. I learned early that patience with onions pays off – the deep, sweet caramelization that takes nearly half an hour was never rushed. Now in New York, I’ve blended that North African soul with classic French technique and the sheer indulgence of this city’s comfort food. This Cheesy Caramelized Onion and Bacon Potato Gratin is my love letter to layered flavors – a creamy potato gratin studded with sweet caramelized onions and crispy bacon, crowned with bubbling Gruyère and cheddar. Every spoonful brings you back to the table.
Imagine: fork-tender Yukon Gold potatoes soaking in a luxurious cream-and-garlic bath, interspersed with ribbons of golden caramelized onions and bits of smoky bacon. The top is a toasty, golden crust of melted cheese with that irresistible pull. The aroma fills your kitchen – warm, buttery, with a hint of thyme. This isn’t just a side dish; it’s a showstopper that could easily steal the spotlight as the main event. I’ve streamlined the process so you can achieve that restaurant-worthy depth without spending all day in the kitchen.
What sets this loaded potato gratin apart? I use a trick I learned in Paris: caramelizing the onions in a mix of butter, olive oil, and rendered bacon fat. That trifecta builds an incredible savory base. Then I layer everything meticulously so every bite has a perfect balance of potato, onion, bacon, and cheese. In this post, I’ll share my pro tip for perfectly even potato slices and the common mistake that makes gratin watery. Let’s make this the best bacon potato gratin recipe you’ll ever try.
Why This Cheesy Bacon Potato Casserole Recipe Is the Best
The Flavor Secret: My Moroccan heritage taught me that caramelization is magic. By cooking the onions slowly with a touch of thyme and a hint of bacon fat, I unlock a sweetness that balances the richness of the cream and cheese. The Gruyère adds a nuttiness that echoes the French alps, while sharp cheddar brings the bold New York edge. This isn’t just cheesy – it’s intelligent layering of flavor.
Perfected Texture: Nothing ruins a gratin like soggy, uneven potatoes. I insist on Yukon Golds because they hold their shape while absorbing the cream beautifully. Slicing them 1/8 inch thick ensures even cooking. My French training taught me to warm the cream mixture before pouring – that small step guarantees the potatoes start cooking immediately, creating a silky, cohesive casserole rather than a weepy mess.
Foolproof & Fast: Even if you’re new to gratins, this one is forgiving. The make-ahead option (see FAQ) means you can prep it the night before a holiday dinner. The step-by-step instructions and visual cues (golden, bubbly, fork-tender) guide you. It’s comfort food that’s both indulgent and reliable – exactly what a busy home cook needs.
Caramelized Onion Potato Gratin Ingredients
Every time I walk through the Union Square Greenmarket, I hunt for the perfect onions – big, firm, sweet ones for caramelizing. Yukon Gold potatoes from upstate New York are my go-to. And I always grab a block of Gruyère from Murray’s Cheese; pre-shredded just won’t melt as smoothly. This ingredient list is simple, but each one plays a crucial role in building the ultimate creamy potato gratin with onions.
Ingredients List
- 6 slices bacon, chopped
- 3 large onions, thinly sliced
- 3 tablespoons unsalted butter
- 1 tablespoon olive oil
- 1 teaspoon salt, divided
- 1/2 teaspoon black pepper, divided
- 1/2 teaspoon dried thyme
- 3 pounds Yukon Gold potatoes, peeled and thinly sliced (about 1/8 inch thick)
- 2 cups shredded Gruyère cheese
- 1 cup shredded sharp cheddar cheese
- 1 1/2 cups heavy cream
- 1/2 cup whole milk
- 2 cloves garlic, minced
- 1/4 cup grated Parmesan cheese
Ingredient Spotlight
Yukon Gold Potatoes: These are the best for gratins. Their medium starch content and buttery flavor give a creamy texture without falling apart. Russets can be used but will break down more; avoid waxy red potatoes. Look for firm, blemish-free potatoes. If you can’t find Yukon Gold, try yellow Finns.
Gruyère Cheese: This Swiss cheese melts like a dream and adds a nutty, slightly salty flavor. It’s the gold standard for potato gratin. If unavailable, substitute with Emmental or Fontina. Avoid pre-shredded cheese – it contains anti-caking agents that affect melting.
Onions: Use large yellow or sweet onions for the best caramelization. They break down into a sweet, jammy layer. Red onions will work but yield a slightly sharper taste. Slice them uniformly thin so they cook evenly.
| Original Ingredient | Best Substitution | Flavor / Texture Impact |
|---|---|---|
| Gruyère cheese | Emmental or Fontina | Slightly less nutty but still melty; Fontina adds more creaminess |
| Heavy cream | Half-and-half + 2 tbsp butter | Less rich; sauce may be slightly thinner |
| Bacon | Smoked turkey bacon or omit for vegetarian | Less smoky flavor; omit completely for vegetarian version |
| Yukon Gold potatoes | Russet potatoes | More starchy; gratin may fall apart more easily, but still tasty |
How to Make Cheesy Caramelized Onion and Bacon Potato Gratin — Step-by-Step
Follow these steps, and you’ll have a golden, bubbly gratin that will wow your family. I’ve added my chef’s secrets and a few pitfalls to avoid along the way.
Step 1: Cook the Bacon and Prepare Onions
In a large skillet over medium heat, cook the chopped bacon until crispy, about 6-8 minutes. Use a slotted spoon to transfer the bacon to a paper towel-lined plate, leaving 2 tablespoons of bacon fat in the skillet. The bacon fat is liquid gold for the onions – don’t discard it!
💡 mia’s Pro Tip: Let the bacon come to room temperature before cooking so it renders more evenly. Chop it into small pieces so you get crunchy bits in every layer.
Step 2: Caramelize the Onions
Add the butter and olive oil to the skillet with the bacon fat. Add the sliced onions, 1/2 teaspoon salt, 1/4 teaspoon pepper, and dried thyme. Cook over medium-low heat, stirring occasionally, for 25-30 minutes until the onions are deeply golden and jammy. The key is low and slow – don’t rush this step. They should be a rich mahogany color.
⚠️ Common Mistake to Avoid: Cooking onions over high heat. You’ll get burnt edges instead of sweet caramelization. If they start to stick, add a tablespoon of water and scrape up the brown bits.
Step 3: Make the Cream Mixture
In a medium saucepan, combine heavy cream, whole milk, minced garlic, remaining 1/2 teaspoon salt, and remaining 1/4 teaspoon pepper. Heat over medium until steaming but not boiling. Remove from heat. Warming the cream ensures the potatoes cook evenly and absorb the liquid better.
💡 mia’s Pro Tip: Add a pinch of nutmeg to the cream – it’s a classic French touch that complements the cheese beautifully.
Step 4: Layer the Gratin
Preheat oven to 375°F (190°C). Grease a 9×13-inch baking dish. Layer one-third of the sliced potatoes in the dish. Top with half the caramelized onions, half the bacon, and one-third of the Gruyère and cheddar cheese. Repeat layers: another third of potatoes, remaining onions, remaining bacon, another third of cheese. Top with remaining potatoes. Pour the warm cream mixture evenly over all. Sprinkle with remaining cheese and Parmesan.
⚠️ Common Mistake to Avoid: Overlapping potatoes too thickly. Keep slices in a single layer as much as possible so they cook evenly. Use a mandoline for consistent 1/8-inch slices.
Step 5: Bake and Rest
Cover the dish with foil and bake for 45 minutes. Remove foil and bake another 20-25 minutes until the potatoes are tender when pierced with a knife and the top is golden and bubbly. Let rest for 10 minutes before serving – this allows the gratin to set so it slices cleanly.
💡 mia’s Pro Tip: For an extra-crispy top, switch the oven to broil for the last 2 minutes. Watch closely to avoid burning.
| Step | Action | Duration | Key Visual Cue |
|---|---|---|---|
| 1 | Cook bacon | 6-8 min | Crispy, browned bits |
| 2 | Caramelize onions | 25-30 min | Deep golden, jammy |
| 3 | Warm cream mixture | 3-4 min | Steaming, not boiling |
| 4 | Layer and pour | 10 min | Even layers, cream reaches top |
| 5 | Bake covered | 45 min | Bubbling around edges |
| 6 | Bake uncovered | 20-25 min | Golden top, fork-tender potatoes |
Serving & Presentation
This gratin is rich and satisfying, so I love serving it alongside a simple green salad with a zesty vinaigrette to cut through the creaminess. It’s the perfect side for roast chicken, steak, or even a holiday turkey. For a main dish, pair it with steamed broccoli or roasted Brussels sprouts. In Morocco, we’d often serve a similar dish with a dollop of yogurt – try a spoonful of crème fraîche on top for a tangy contrast.
Garnish with fresh thyme leaves and a crack of black pepper just before bringing to the table. If you’re entertaining, use a decorative baking dish and serve directly from it – the golden crust is part of the show. I like to let it rest exactly 10 minutes; any longer and the cream sets too firm, any shorter and it’s loose.
| Pairing Type | Suggestions | Why It Works |
|---|---|---|
| Side Dish | Roast chicken, grilled steak, prime rib | Rich gratin complements lean proteins |
| Sauce / Dip | Crème fraîche, sour cream, chimichurri | Tangy sauces cut richness |
| Beverage | Chardonnay, Pinot Noir, hard cider | White wine’s acidity balances cream; red’s fruit complements bacon |
| Garnish | Fresh thyme, chives, cracked black pepper | Adds freshness and color |
Make-Ahead, Storage & Reheating
As a busy NYC-based food blogger, I live for make-ahead dishes. This gratin is a lifesaver for holiday entertaining. You can assemble it entirely (without the final cheese topping) up to 24 hours ahead. Just cover and refrigerate. When you’re ready to bake, add the remaining cheese and Parmesan, then increase the covered baking time by 10-15 minutes to compensate for the cold start.
| Method | Container | Duration | Reheating Tip |
|---|---|---|---|
| Refrigerator | Airtight container or covered dish | 3-4 days | Cover with foil, reheat at 350°F for 15-20 min |
| Freezer | Freezer-safe dish or portioned containers | 2-3 months | Thaw overnight in fridge, then reheat covered at 350°F |
| Make-Ahead | Assembled without final cheese | Up to 24 hours | Add cheese just before baking; add 10-15 min |
To reheat individual portions, microwave on 70% power for 2 minutes, then finish in a toaster oven to crisp the top. If the gratin seems dry after reheating, drizzle a tablespoon of cream or milk over the top before warming. I find that the flavors actually deepen overnight – it’s almost better the next day!
Variations & Easy Swaps
| Variation | Key Change | Best For | Difficulty Impact |
|---|---|---|---|
| Vegetarian | Omit bacon; use 2 tbsp butter instead of bacon fat | Vegetarians | Same |
| Spicy Moroccan Twist | Add 1 tsp harissa paste to cream; top with cilantro | Spice lovers | Easy |
| Dairy-Free / Vegan | Use unsweetened cashew cream, vegan cheddar shreds, and olive oil | Vegan or lactose-intolerant | Medium (requires extra thickening) |
Moroccan Spiced Version
In honor of my roots, I sometimes add a teaspoon of harissa paste (a North African chili paste) to the cream mixture. The warmth of cumin, coriander, and chili pairs beautifully with the caramelized onions. Garnish with fresh cilantro instead of thyme. It’s a subtle kick that transforms this into a truly unique loaded potato gratin side dish.
Gluten-Free / Dairy-Free Version
For a dairy-free gratin, swap the heavy cream and milk for full-fat coconut milk or unsweetened cashew cream, and use vegan cheddar and Parmesan alternatives. The texture will be slightly less firm, but still delicious. Increase the cornstarch slurry (1 tbsp cornstarch + 2 tbsp water) to help the sauce thicken. This version is great for those with dairy sensitivities.
Seasonal Spring Version
When asparagus is in season at the Union Square market, I add a layer of blanched asparagus spears between the potato layers. The bright green and fresh flavor lighten the dish. Substitute Gruyère with a smoky Gouda for a different depth. This is perfect for Easter brunch.
Can I prepare Cheesy Caramelized Onion and Bacon Potato Gratin ahead of time and reheat it?
Absolutely! This gratin is perfect for making ahead. Assemble the entire gratin (without the final cheese topping) in the baking dish, cover tightly with plastic wrap or foil, and refrigerate for up to 24 hours. When you’re ready to bake, remove from the fridge, add the reserved cheese and Parmesan on top, and bake covered at 375°F for 55-60 minutes (adding 10-15 minutes to the usual covered baking time to account for the cold start). Then remove foil and bake until bubbly and golden. The flavors actually meld better overnight – I often prep this the night before Thanksgiving or Christmas dinner. Leftovers can be refrigerated for 3-4 days and reheated in a 350°F oven (covered) for about 15-20 minutes.
What is the best type of cheese to use for this potato gratin recipe?
The best cheese for this Cheesy Caramelized Onion and Bacon Potato Gratin is a combination of Gruyère and sharp cheddar. Gruyère melts superbly and provides a nutty, sophisticated flavor that pairs perfectly with caramelized onions. Sharp cheddar adds a tangy, bold American comfort note that cuts through the richness. If you can’t find Gruyère, substitute with Emmental, Fontina, or even a good quality Swiss cheese. Avoid pre-shredded cheese if possible – it contains anti-caking agents that prevent smooth melting. Always shred your own from a block. For extra decadence, you can add a handful of Parmesan in the topping for a golden crust.
How long should I bake this gratin to get perfectly tender potatoes?
The total baking time for this creamy potato gratin with onions is about 1 hour 10 minutes. You’ll bake it covered with foil for 45 minutes at 375°F (190°C). This steams the potatoes and allows them to cook through evenly without drying out. Then remove the foil and bake for an additional 20-25 minutes until the top is golden and bubbly. The potatoes are done when a sharp knife slides easily into the center of the gratin with no resistance. If your potatoes are sliced thicker than 1/8 inch, you may need to add 5-10 minutes to the covered time. Let the gratin rest for at least 10 minutes after baking – this allows the creamy sauce to thicken so it slices beautifully.
Can I substitute the bacon with another meat or make this dish vegetarian?
Yes, you can easily adapt this bacon potato gratin recipe. For a different meat, try using pancetta, smoked ham, or even cooked Italian sausage. Just brown the meat first and drain excess fat. For a vegetarian version, simply omit the bacon and use 2 tablespoons of unsalted butter instead of the bacon fat when caramelizing the onions. The gratin will still be incredibly flavorful and creamy – the caramelized onions and Gruyère provide plenty of savory depth. If you want a smoky vegetarian touch, add 1/2 teaspoon smoked paprika to the cream mixture. The rest of the recipe remains the same.
Can I freeze Cheesy Caramelized Onion and Bacon Potato Gratin?
Yes, this gratin freezes well. Bake it completely, let it cool to room temperature, then wrap the entire dish tightly in plastic wrap and foil, or portion it into freezer-safe containers. Freeze for up to 2-3 months. To reheat, thaw overnight in the refrigerator, then place covered in a 350°F oven for 25-30 minutes until warmed through. Note that the texture of the potatoes may soften slightly after freezing, but the flavor remains excellent. For best results, I recommend making it fresh or refrigerating (not freezing) if you’ll serve it within a day or two.
What can I serve with this loaded potato gratin side dish?
This loaded potato gratin side dish is incredibly versatile. It pairs beautifully with roasted or grilled meats like chicken, steak, pork chops, or lamb. For a holiday table, serve it alongside roast turkey or prime rib. It also works as a vegetarian main when accompanied by a crisp green salad with a bright vinaigrette (the acidity cuts the richness) and roasted green vegetables like asparagus or Brussels sprouts. For a casual dinner, I love it with a simple pan-seared fish and a squeeze of lemon. Beverage-wise, a dry white wine like Chardonnay or a light Pinot Noir complements the creamy, cheesy flavors.
Why did my potato gratin turn out watery?
A watery potato gratin usually happens for a few reasons. First, the potatoes might have been sliced too thick or unevenly, leading to some parts undercooked while others release too much water. Second, not pre-warming the cream mixture can cause the potatoes to steam rather than bake, making them release excess liquid. Third, slicing the potatoes and leaving them exposed to air can cause oxidation – they release water. My fix: slice potatoes just before layering, warm the cream, and always cover the dish for the first 45 minutes to create steam. Also, Yukon Gold potatoes have less water than russets, so they produce a creamier result. If you find yourself with a watery gratin, you can drain off excess liquid after baking and return it to the oven uncovered for 5 extra minutes to thicken.
Can I use a different type of potato for this recipe?
Yes, but results will vary. Yukon Gold potatoes are my top recommendation because they strike a perfect balance between waxy and starchy – they hold their shape while absorbing the creamy sauce beautifully, and they have a naturally buttery flavor. Russet potatoes (Idaho) will yield a fluffier, more traditional gratin but they are starchier and can break down more easily, potentially making the dish gummy. Waxy potatoes like Red Bliss or new potatoes hold their shape too well and won’t absorb the cream, resulting in a less cohesive casserole. If you only have russets, you can use them – just slice a little thicker (about 3/16 inch) and handle gently to avoid crumbling.
Share Your Version!
I truly believe that the best recipes are the ones we make our own. Did you add a pinch of smoked paprika? Swap in fontina for Gruyère? I’d love to hear how this Cheesy Caramelized Onion and Bacon Potato Gratin turned out in your kitchen. Leave a star rating and a comment below – your feedback helps other home cooks decide to give it a try. And if you snap a photo of your golden, bubbly creation, tag me @exorecipes on Instagram or Pinterest! I personally read every comment and love seeing your gorgeous dishes.
From my NYC kitchen to yours — I hope this recipe brings as much warmth to your table as it does to mine. — mia 🧡
Love This Recipe? Save It to Pinterest!
If you enjoyed this Cheesy Caramelized Onion and Bacon Potato Gratin recipe, don’t let it get lost in your browser tabs! 😄 Pin it now so you can find it again anytime — and explore hundreds more tried-and-tested recipes waiting for you on my Pinterest boards.
👉 Follow mia on Pinterest @exorecipe
📌 Pin this recipe · 🔁 Re-pin your favorites · 💬 Tag me when you make it — I love seeing your creations!

Cheesy Caramelized Onion and Bacon Potato Gratin
- Prep Time: 30 minutes
- Cook Time: 1 hour 10 minutes
- Total Time: 1 hour 40 minutes
- Yield: 8-10 servings 1x
- Method: Side Dish
- Cuisine: American
Description
A decadent and cheesy potato gratin layered with sweet caramelized onions and crispy bacon, perfect for a hearty side dish or comfort food main.
Ingredients
- 6 slices bacon, chopped
- 3 large onions, thinly sliced
- 3 tablespoons unsalted butter
- 1 tablespoon olive oil
- 1 teaspoon salt, divided
- 1/2 teaspoon black pepper, divided
- 1/2 teaspoon dried thyme
- 3 pounds Yukon Gold potatoes, peeled and thinly sliced (about 1/8 inch thick)
- 2 cups shredded Gruyère cheese
- 1 cup shredded sharp cheddar cheese
- 1 1/2 cups heavy cream
- 1/2 cup whole milk
- 2 cloves garlic, minced
- 1/4 cup grated Parmesan cheese
Instructions
- 1. Preheat oven to 375°F (190°C). Grease a 9×13-inch baking dish.
- 2. In a large skillet over medium heat, cook bacon until crispy. Remove with a slotted spoon and drain on paper towels. Reserve 2 tablespoons bacon fat in the skillet.
- 3. Add butter and olive oil to the skillet with the bacon fat. Add onions, 1/2 teaspoon salt, 1/4 teaspoon pepper, and thyme. Cook, stirring occasionally, for 25-30 minutes until deeply caramelized and golden brown. Remove from heat.
- 4. In a medium saucepan, combine heavy cream, milk, minced garlic, remaining 1/2 teaspoon salt, and remaining 1/4 teaspoon pepper. Heat over medium until simmering, then remove from heat.
- 5. Layer one-third of the sliced potatoes in the prepared baking dish. Top with half the caramelized onions, half the bacon, and one-third of the Gruyère and cheddar cheese. Repeat layers: another third of potatoes, remaining onions, remaining bacon, another third of cheese. Top with remaining potatoes.
- 6. Pour the warm cream mixture evenly over the potatoes. Sprinkle with remaining cheese and Parmesan.
- 7. Cover with foil and bake for 45 minutes. Remove foil and bake an additional 20-25 minutes until potatoes are tender and top is golden and bubbly.
- 8. Let rest for 10 minutes before serving. Garnish with fresh thyme if desired.
Notes
To make ahead, assemble the gratin (without the final cheese topping) and refrigerate up to 24 hours. Add cheese topping just before baking, and increase baking time by 10-15 minutes. For a vegetarian version, omit bacon and use 2 tablespoons butter instead of bacon fat.
Nutrition
- Calories: 520 kcal
- Sugar: 6 g
- Fat: 37 g
- Carbohydrates: 32 g
- Protein: 18 g

Tried This Recipe? Leave a Comment!
Did you make this recipe? I’d love to hear how it turned out! Please leave a comment and a rating below. Your feedback helps other home cooks and supports cheerychop.com!