“`html
Table of Contents
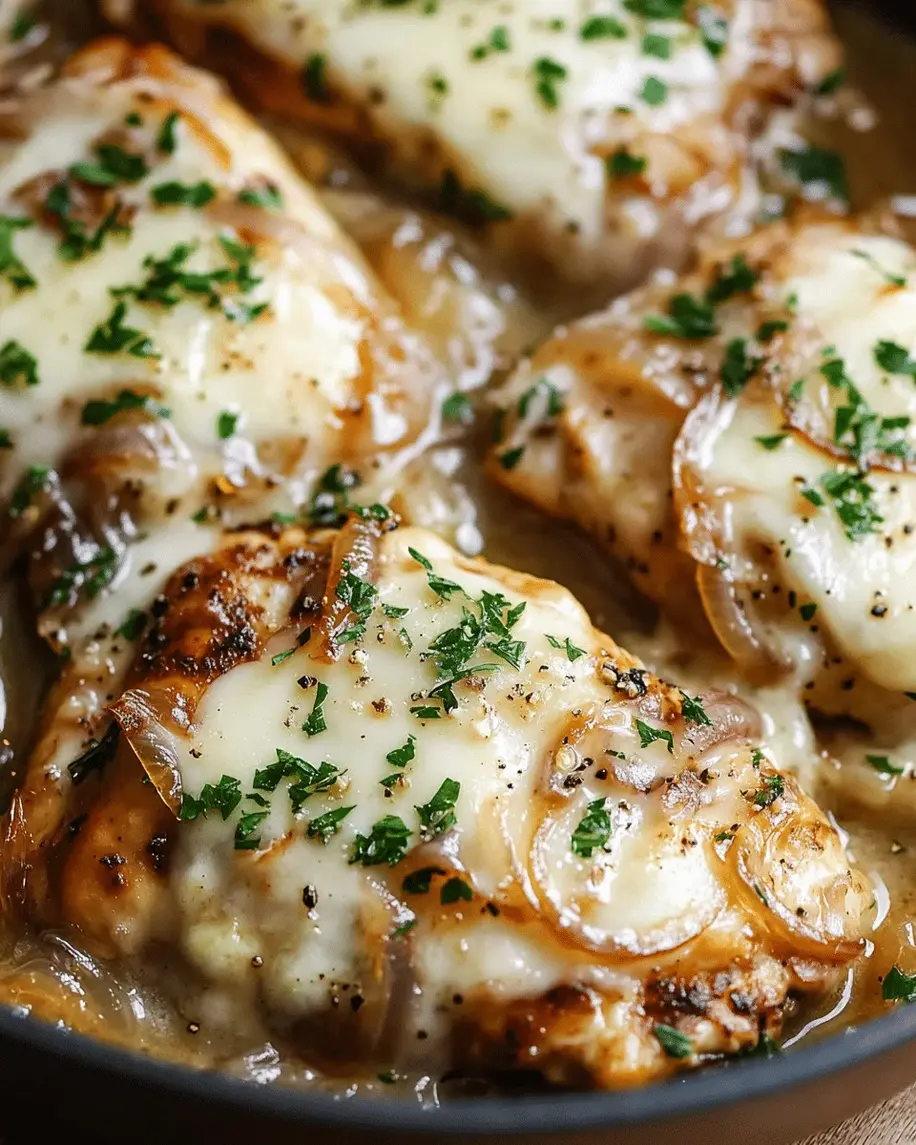
Cheesy French Onion Meatballs with Gruyère and Mozzarella: A Comforting Recipe for Cozy Nights – The Ultimate French Onion Meatballs Recipe
There are some recipes that just feel like a warm hug in a bowl, and this French onion meatballs recipe is exactly that. I still remember the first time I tasted French onion soup at a tiny bistro in Paris during my culinary training — the deeply caramelized onions, the rich beef broth, and that glorious blanket of melted Gruyère. Years later, standing in my NYC kitchen, I knew I had to transform that iconic flavor into something even more heartwarming. These cheesy French onion meatballs combine everything I love about the classic soup with tender, juicy meatballs for the ultimate comfort food experience. The unique angle here is that the meatballs themselves are infused with thyme and Worcestershire, then baked until golden before being nestled in a luscious onion sauce and topped with a gooey blend of Gruyère and mozzarella.
Imagine this: a forkful of tender, seasoned meatball, bathed in a velvety onion sauce that’s been simmered with white wine and beef broth until it’s rich and deeply savory. Then comes the cheese — a golden, bubbly crown of Gruyère that stretches with every bite, accented by the milky softness of mozzarella. The aroma alone will transport you: caramelized onions, garlic, thyme, and melted cheese mingling together like a symphony. The texture is pure perfection — the meatballs stay tender and moist on the inside, while the sauce coats every nook and cranny. I’ve tested this recipe countless times to get that ideal balance between the sweetness of the onions and the savory depth of the broth, with just the right amount of cheese to make it feel indulgent without being heavy.
What sets my version apart is a few small but mighty techniques I picked up along the way — both from my Moroccan mother’s kitchen and my Parisian chef instructors. First, I add a touch of sugar to the onions as they caramelize, which deepens their natural sweetness and speeds up the process without burning. Second, I bake the meatballs before adding them to the sauce rather than simmering them raw in the liquid. This keeps them perfectly tender and prevents them from falling apart. A common mistake I see is skipping the flour roux in the sauce, which is essential for that silky, spoon-coating consistency. Trust me on this one — every step matters, and I’ll walk you through each one so you can nail this easy meatball recipe on your first try.
Why This Cheesy French Onion Meatballs Recipe Is the Best
The flavor secret here is the layering of umami and sweetness. In my Paris training, I learned that patience with onions is everything — you want them amber and jammy, not just translucent. I caramelize three large onions low and slow, then deglaze with a splash of dry white wine that adds brightness and complexity. That French technique, paired with a touch of sugar, creates a base that’s unmistakably French onion soup. Then the Gruyère and mozzarella on top bring that iconic cheesy finish that makes this dish feel like a special occasion, even on a Tuesday night.
The texture is where this recipe truly shines. By baking the meatballs first at 375°F, you get a lightly browned exterior while the inside stays incredibly tender. I use a panade — a mixture of breadcrumbs and milk — which keeps the meatballs moist and prevents them from becoming dense. And because I don’t overcrowd the baking sheet, they brown evenly. The sauce, thickened with a touch of flour, coats the meatballs like a velvet glove, and the cheese melt on top adds that irresistible stretchy, golden finish.
This recipe is also surprisingly foolproof. Whether you’re a seasoned cook or just starting out, the steps are clear and forgiving. The meatball mixture comes together in one bowl, the onions do their thing while you prep, and the whole dish bakes together in under 30 minutes at the end. It’s the kind of comfort food meatballs recipe that impresses without stressing you out. Plus, it’s endlessly adaptable — swap the wine for more broth if you prefer, or use a mix of ground beef and pork for extra richness.
French Onion Meatballs Recipe Ingredients
I love sourcing my ingredients from the Union Square Greenmarket here in NYC — there’s nothing like the sweetness of locally grown onions and the freshness of farm-fresh eggs. But honestly, this recipe works beautifully with standard grocery store staples, which is one of the things I love most about it. A few of these ingredients remind me of my mother’s kitchen in Morocco, especially the way she used fresh herbs and simple staples to create incredible depth of flavor.
Ingredients List
- 1 lb ground beef
- 1/2 cup breadcrumbs
- 1/4 cup milk
- 1 large egg, lightly beaten
- 1/2 cup finely chopped onion
- 2 cloves garlic, minced
- 1 teaspoon salt
- 1/2 teaspoon black pepper
- 1 teaspoon dried thyme
- 1 tablespoon Worcestershire sauce
- 2 tablespoons butter
- 3 large onions, thinly sliced
- 2 cloves garlic, minced (for sauce)
- 1 teaspoon sugar
- 1/4 cup all-purpose flour
- 2 cups beef broth
- 1 cup dry white wine (or additional beef broth*)
- 1 teaspoon dried thyme
- Salt and pepper to taste
- 1 cup shredded Gruyère cheese
- 1/2 cup shredded mozzarella cheese
- Fresh parsley for garnish (optional)
Ingredient Spotlight
Gruyère is the star cheese here — its nutty, slightly sweet flavor is what makes French onion soup so iconic. Look for a block in the deli section of your grocery store and shred it yourself for the best melt. Pre-shredded cheese has anti-caking agents that prevent smooth melting. Ground beef with 80/20 lean-to-fat ratio works best; the fat keeps the meatballs juicy and flavorful. Dry white wine, like a Sauvignon Blanc or Pinot Grigio, adds acidity that balances the richness of the cheese and broth. If you prefer not to use wine, simply replace it with an equal amount of beef broth — the flavor will still be delicious. Thyme is the herb that ties everything together, bringing an earthy, slightly floral note that complements both the beef and the caramelized onions.
| Original Ingredient | Best Substitution | Flavor / Texture Impact |
|---|---|---|
| Gruyère cheese | Swiss cheese or Fontina | Swiss is nutty and melts well; Fontina is creamier |
| Ground beef | Ground pork or half beef, half pork | Pork adds extra richness and tenderness |
| Dry white wine | Additional beef broth + 1 tbsp lemon juice | Slightly less complex but still rich and balanced |
| Worcestershire sauce | Soy sauce + a dash of vinegar | Similar umami depth, slightly less complex |
How to Make Cheesy French Onion Meatballs — Step-by-Step
I promise this recipe is easier than it looks — you’ve got this. Let’s break it down step by step so you can feel confident in the kitchen.
Step 1: Prepare the Meatball Mixture
In a large bowl, combine 1 lb ground beef, 1/2 cup breadcrumbs, 1/4 cup milk, 1 lightly beaten egg, 1/2 cup finely chopped onion, 2 minced garlic cloves, 1 tsp salt, 1/2 tsp black pepper, 1 tsp dried thyme, and 1 tbsp Worcestershire sauce. Mix with your hands or a wooden spoon until just combined — overmixing will make the meatballs dense.
💡 mia’s Pro Tip: Use a light touch when mixing. The panade (breadcrumbs + milk) keeps the meatballs tender, but if you work the mixture too much, the proteins tighten up and you’ll lose that soft texture.
Step 2: Form and Bake the Meatballs
Form the mixture into 1-inch meatballs (about the size of a walnut) and place them on a baking sheet lined with parchment paper. Bake at 375°F (190°C) for 15-18 minutes, until cooked through and lightly browned. They should be firm to the touch but still moist inside.
⚠️ Common Mistake to Avoid: Don’t skip the parchment paper! The meatballs release natural juices, and parchment makes cleanup a breeze while preventing sticking.
Step 3: Caramelize the Onions
While the meatballs bake, melt 2 tbsp butter in a large skillet or Dutch oven over medium heat. Add 3 large thinly sliced onions and cook, stirring occasionally, for 20-25 minutes until deeply caramelized and amber in color. Patience is key here — you want them soft and sweet, not browned too quickly.
💡 mia’s Pro Tip: If the onions start to stick or look dry, add a splash of water or beef broth and scrape up the brown bits from the pan — that’s pure flavor.
Step 4: Build the Sauce
Add 2 minced garlic cloves and 1 tsp sugar to the onions, cook for 1 minute. Sprinkle 1/4 cup flour over the onions and stir, cooking for 2 minutes to remove the raw flour taste. Gradually pour in 2 cups beef broth and 1 cup dry white wine, stirring constantly. Add 1 tsp dried thyme, salt, and pepper to taste. Bring to a simmer and cook until thickened, about 5 minutes.
⚠️ Common Mistake to Avoid: Add the liquid gradually while stirring to prevent lumps. If you dump it all in at once, you’ll end up with a clumpy sauce instead of a silky one.
Step 5: Assemble and Bake
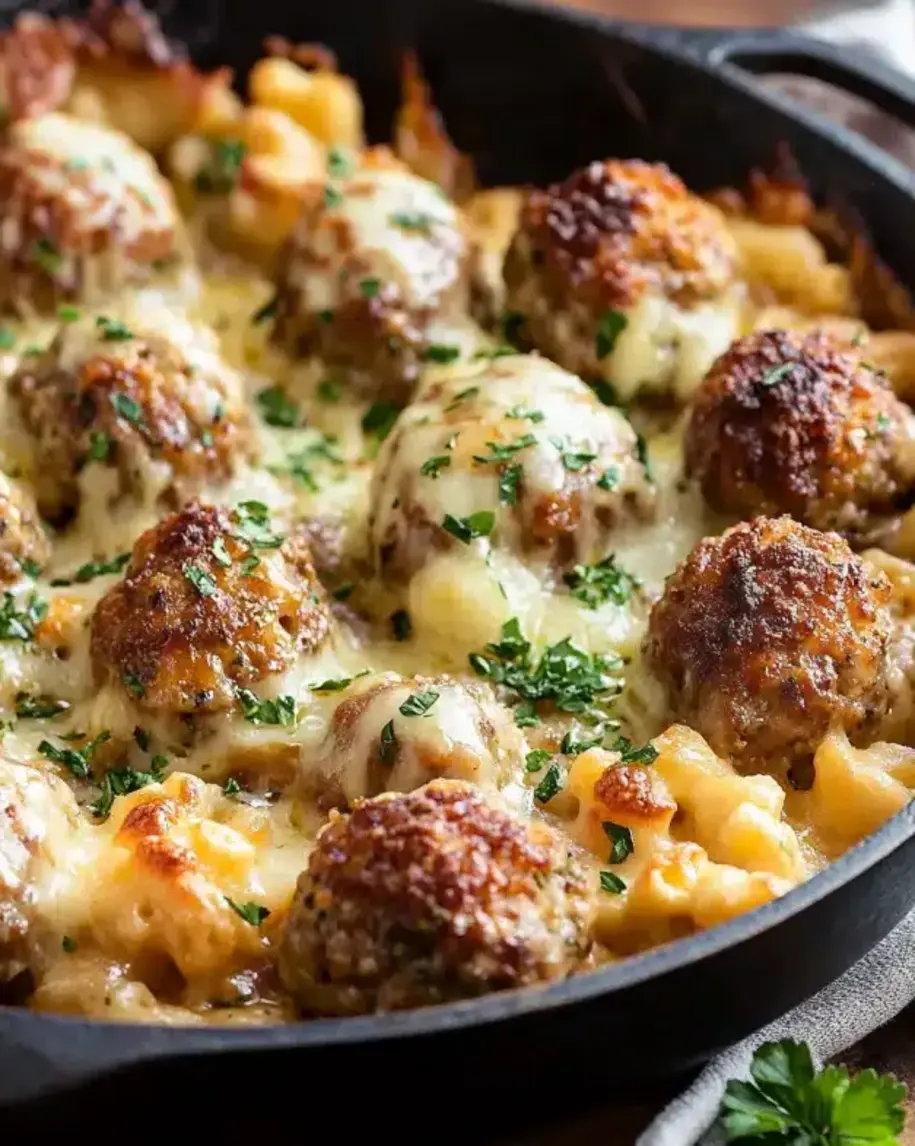
Arrange the cooked meatballs in a 9×13-inch baking dish. Pour the onion sauce over the meatballs, making sure they’re evenly coated. Top with 1 cup shredded Gruyère and 1/2 cup shredded mozzarella. Bake for 15-20 minutes, until the cheese is bubbly, golden, and slightly brown on the edges. Garnish with fresh parsley if desired and serve hot.
💡 mia’s Pro Tip: For extra golden cheese, switch the oven to broil for the last 2 minutes. Watch it closely so it doesn’t burn — the perfect crust is just seconds away.
| Step | Action | Duration | Key Visual Cue |
|---|---|---|---|
| 1 | Mix meatball ingredients | 5 minutes | Uniformly combined, not overmixed |
| 2 | Bake meatballs | 15–18 minutes | Lightly browned, firm to touch |
| 3 | Caramelize onions | 20–25 minutes | Deep amber, soft and sweet |
| 4 | Make sauce | 8–10 minutes | Thickened, coats spoon |
| 5 | Assemble and bake | 15–20 minutes | Cheese bubbly and golden |
Serving & Presentation
I love serving these cheesy French onion meatballs straight from the baking dish, still bubbling and golden, with a sprinkle of fresh parsley on top. The contrast of the deep brown sauce, the golden cheese crust, and the bright green parsley is gorgeous. In my NYC apartment, I set the dish in the center of the table with a stack of warm bowls and let everyone dig in family-style. It feels cozy and communal, just like the dinners I remember in my mother’s kitchen in Morocco.
These meatballs are incredibly versatile — serve them over a bed of egg noodles, with crusty bread for dipping, or even over creamy mashed potatoes to soak up all that luscious sauce. I also love pairing them with a simple green salad dressed with a tangy vinaigrette to cut through the richness. For a French-inspired touch, serve with a glass of dry white wine like Sauvignon Blanc or a light red like Pinot Noir.
| Pairing Type | Suggestions | Why It Works |
|---|---|---|
| Side Dish | Egg noodles, crusty baguette, roasted potatoes | Soaks up the rich onion sauce beautifully |
| Sauce / Dip | Extra sauce from the dish, a drizzle of balsamic | Enhances the savory-sweet balance |
| Beverage | Sauvignon Blanc, Pinot Noir, apple cider | Acidity cuts richness, complements cheese |
| Garnish | Fresh parsley, chives, a pinch of flaky salt | Adds freshness and visual contrast |
Make-Ahead, Storage & Reheating
As a busy NYC food blogger and mom, I rely on make-ahead meals more than I’d like to admit. This baked meatballs with mozzarella recipe is one of my favorites for meal prep because it actually gets better as the flavors meld overnight. Here’s exactly how I store and reheat it so it tastes just as good as the day it was made.
| Method | Container | Duration | Reheating Tip |
|---|---|---|---|
| Refrigerator | Airtight container (with sauce) | 3–4 days | Reheat in oven at 350°F for 15 minutes, or in microwave in 30-sec bursts |
| Freezer | Freezer-safe container or zip-top bag | Up to 3 months | Thaw overnight in fridge; reheat at 350°F for 20 minutes, covered |
| Make-Ahead | Baking dish (unbaked, covered) | Up to 2 days in advance | Assemble meatballs + sauce, refrigerate; add cheese just before baking |
When reheating, the key is to not overdo it, or the cheese can become rubbery. I prefer the oven method because it gently warms the meatballs and melts the cheese back to that gooey perfection. If you’re in a rush, the microwave works fine, but cover the dish with a damp paper towel to keep everything moist. One last tip: if the sauce thickens too much after storing, add a splash of beef broth or water when reheating to bring it back to life.
Variations & Easy Swaps
This recipe is built to be flexible, and I’ve tested several variations in my own kitchen to suit different diets and cravings. Whether you’re gluten-free, dairy-free, or just looking for a fun twist, here are my favorite ways to change it up.
| Variation | Key Change | Best For | Difficulty Impact |
|---|---|---|---|
| Moroccan Spice Twist | Add ras el hanout + cumin to meatballs | Warm, aromatic flavor lovers | Easy |
| Gluten-Free | Use gluten-free breadcrumbs + GF flour in sauce | Gluten-free diets | Easy |
| Dairy-Free | Use dairy-free cheese + olive oil in place of butter | Dairy-free / vegan-friendly | Medium |
Moroccan Spice Twist
Growing up in Morocco, my mother would often blend warming spices like cumin, coriander, and cinnamon into her meat dishes. For this variation, add 1 teaspoon of ras el hanout (a classic Moroccan spice blend) and 1/2 teaspoon of cumin to the meatball mixture. The fragrant, slightly sweet spice pairs beautifully with the caramelized onions and Gruyère, adding a whole new layer of complexity. It’s a subtle shift, but it transports the dish to a place that feels both French and North African — a true reflection of my culinary roots.
Gluten-Free Version
To make this recipe gluten-free, simply swap the breadcrumbs for gluten-free panko or almond flour (panko works best for texture), and use a gluten-free all-purpose flour blend in the sauce. I’ve tested this with both, and the results are nearly identical to the original. The key is to let the sauce simmer for an extra minute or two to ensure the gluten-free flour thickens fully. Serve with gluten-free pasta or crusty gluten-free bread for a complete meal that everyone can enjoy.
Seasonal Vegetable Twist
In the fall, I love adding a handful of sliced mushrooms to the onions while they caramelize — it deepens the umami and makes the dish feel even more hearty. In spring, I’ll toss in some fresh peas or asparagus tips during the last 5 minutes of baking for a pop of color and freshness. This is one of those easy meatball recipes that welcomes improvisation, so use whatever looks good at your local farmers market.
Can I use a different type of cheese if I don’t have Gruyère or mozzarella for the meatballs?
Absolutely! If you don’t have Gruyère, Swiss cheese is the closest substitute — it has that same nutty, slightly sweet flavor and melts beautifully. Fontina is another excellent option; it’s creamier and a bit more mild, but still gives that luscious, stretchy melt. For the mozzarella, you can use provolone, mozzarella di bufala (for extra creaminess), or even a mild cheddar if you want a slightly sharper flavor. Just avoid hard cheeses like Parmesan alone, as they don’t melt as smoothly. I’ve tested all these swaps in my own kitchen, and they all deliver a delicious result.
How do you keep the meatballs from falling apart while cooking in the French onion sauce?
The secret is baking the meatballs before adding them to the sauce. This step firms up the exterior and helps them hold their shape during the final bake. Also, using a panade — a mixture of breadcrumbs and milk — binds the meatballs and keeps them tender without falling apart. Make sure you don’t overmix the meatball mixture, as that can make them dense and more likely to crumble. Finally, let the meatballs rest for 5 minutes after baking before assembling the dish so they set properly.
What is the best way to caramelize the onions for this cheesy meatball recipe?
For the best caramelized onions, start with a large skillet or Dutch oven over medium heat and melt 2 tablespoons of butter. Add your thinly sliced onions and stir to coat. Cook for 20-25 minutes, stirring every 3-4 minutes, until the onions are deeply amber and soft. The key is not to rush — if the heat is too high, they’ll burn before they release their natural sugars. I add a teaspoon of sugar to help the process along and deglaze the pan with a splash of broth or wine if the onions start sticking. Patience is your best friend here, and the reward is a sweet, savory base that makes this dish unforgettable.
Can I prepare cheesy French onion meatballs ahead of time and reheat them?
Yes, and I actually recommend it! The flavors meld and deepen overnight, making the dish even more delicious the next day. You can assemble the meatballs and sauce (without the cheese) up to 2 days in advance, store it covered in the refrigerator, and then add the cheese just before baking. If you’ve already baked the dish, store leftovers in an airtight container in the fridge for 3-4 days. Reheat in a 350°F oven for 15 minutes (or until bubbly) to restore that fresh-baked texture. I don’t recommend microwaving the whole dish if you want to preserve the cheese texture, but it works in a pinch.
What can I use instead of white wine in the sauce?
If you prefer not to use wine, simply substitute an equal amount of beef broth — the sauce will still be rich and savory. For a bit of acidity that wine provides, add 1 tablespoon of lemon juice or apple cider vinegar to the broth. I’ve also used sherry vinegar or even a splash of balsamic in a pinch; just be mindful that balsamic will add a touch of sweetness and darken the color of the sauce. No matter what you choose, the dish will still be wonderfully flavorful.
How do I know when the meatballs are fully cooked?
The easiest way is to use an instant-read thermometer — the internal temperature should reach 160°F (71°C) for ground beef. But visual cues work too: the meatballs should be lightly browned on the outside, firm to the touch, and no longer pink in the center when you cut one open. Since you bake them at 375°F for 15-18 minutes, and then they go back in the oven with the sauce and cheese for another 15-20 minutes, they’ll be fully cooked and tender. Just make sure not to overbake, or they can dry out.
Can I make this recipe with ground turkey or chicken instead of beef?
Yes, you can substitute ground turkey or chicken, but keep in mind that these leaner meats can dry out more easily. To compensate, I recommend using a mix of ground turkey and ground pork (about half and half) or adding an extra tablespoon of olive oil to the meatball mixture. Also, consider reducing the baking time by 2-3 minutes since poultry cooks faster than beef. The flavor will be milder, so you might want to bump up the thyme and Worcestershire sauce slightly. The result is still delicious — just a bit lighter in both flavor and texture.
What side dishes go best with cheesy French onion meatballs?
This dish is incredibly versatile when it comes to sides. My top picks are egg noodles (which soak up the rich onion sauce beautifully), crusty bread for dipping, creamy mashed potatoes, or even a simple bed of rice or quinoa. For a lighter option, serve with a crisp green salad dressed with a tangy vinaigrette to cut through the richness. In my NYC kitchen, I often serve it with roasted green beans or steamed broccoli for a pop of color and nutrition. The key is to choose something that can soak up or complement that incredible sauce — it’s the star of the show alongside the meatballs.
Can I freeze the meatballs without the sauce?
Absolutely! If you want to prep in stages, bake the meatballs as directed, let them cool completely, and freeze them on a baking sheet in a single layer. Once frozen solid, transfer them to a freezer-safe bag or container for up to 3 months. When you’re ready to use them, thaw overnight in the refrigerator, then proceed with making the sauce and assembling the dish. This is a great strategy for busy weeks — you can have the meatballs ready to go and simply make the sauce fresh, which only takes about 30 minutes.
How do I prevent the cheese from becoming rubbery when reheating?
The best way to reheat this dish without compromising the cheese texture is in the oven. Place the meatballs in an oven-safe dish, cover loosely with foil to prevent the cheese from browning too quickly, and reheat at 350°F for 15-20 minutes. Remove the foil for the last 2-3 minutes if you want the cheese to get slightly golden again. If you’re using a microwave, reheat in 30-second bursts at 50% power and cover the dish with a damp paper towel — this helps the cheese soften rather than turn rubbery. In general, gentle heat is the key to preserving that gooey, luscious texture.
Share Your Version!
I absolutely love seeing how you make this recipe your own. Did you add extra garlic? Swap in a different cheese? Serve it over something unexpected? Drop a comment below and let me know how it turned out — your feedback means the world to me and helps other readers discover new twists. If you’re feeling extra proud, snap a photo and tag me on Instagram or Pinterest @exorecipes — I share my favorites in my stories every week!
And here’s a question for you: what’s the one ingredient you always add to your comfort food meatballs that makes them uniquely yours? I’d love to hear your secrets.
From my NYC kitchen to yours — I hope this recipe brings as much warmth to your table as it does to mine. — mia 🧡
Love This Recipe? Save It to Pinterest!
If you enjoyed this Cheesy French Onion Meatballs with Gruyère and Mozzarella recipe, don’t let it get lost in your browser tabs! 😄 Pin it now so you can find it again anytime — and explore hundreds more tried-and-tested recipes waiting for you on my Pinterest boards.
👉 Follow mia on Pinterest @exorecipes
📌 Pin this recipe · 🔁 Re-pin your favorites · 💬 Tag me when you make it — I love seeing your creations!
⭐️ Loved this recipe? Rate it 5 stars below and leave a comment — I read every single one! 🧡
“`
Print

Cheesy French Onion Meatballs with Gruyère and Mozzarella: A Comforting Recipe for Cozy Nights
- Prep Time: 20 minutes
- Cook Time: 45 minutes
- Total Time: 1 hour 5 minutes
- Yield: 6 servings 1x
- Method: Main Course
- Cuisine: French-inspired
Description
These cheesy French onion meatballs combine the rich, savory flavors of French onion soup with tender meatballs, topped with melted Gruyère and mozzarella for the ultimate comfort food.
Ingredients
- For the Meatballs:
- 1 lb ground beef
- 1/2 cup breadcrumbs
- 1/4 cup milk
- 1 large egg, lightly beaten
- 1/2 cup finely chopped onion
- 2 cloves garlic, minced
- 1 teaspoon salt
- 1/2 teaspoon black pepper
- 1 teaspoon dried thyme
- 1 tablespoon Worcestershire sauce
- For the Sauce:
- 2 tablespoons butter
- 3 large onions, thinly sliced
- 2 cloves garlic, minced
- 1 teaspoon sugar
- 1/4 cup all-purpose flour
- 2 cups beef broth
- 1 cup dry white wine (or additional beef broth)
- 1 teaspoon dried thyme
- Salt and pepper to taste
- For Topping:
- 1 cup shredded Gruyère cheese
- 1/2 cup shredded mozzarella cheese
- Fresh parsley for garnish (optional)
Instructions
- Preheat oven to 375°F (190°C).
- In a large bowl, combine ground beef, breadcrumbs, milk, egg, chopped onion, minced garlic, salt, pepper, thyme, and Worcestershire sauce. Mix until just combined.
- Form the mixture into 1-inch meatballs and place on a baking sheet lined with parchment paper.
- Bake for 15-18 minutes, until cooked through and lightly browned. Set aside.
- While meatballs bake, make the sauce: In a large skillet or Dutch oven, melt butter over medium heat. Add sliced onions and cook, stirring occasionally, for 20-25 minutes until deeply caramelized.
- Add minced garlic and sugar to the onions, cook for 1 minute.
- Sprinkle flour over the onions and stir, cooking for 2 minutes.
- Gradually pour in beef broth and white wine, stirring constantly. Add thyme, salt, and pepper. Bring to a simmer and cook until thickened, about 5 minutes.
- Arrange the cooked meatballs in a 9×13-inch baking dish. Pour the onion sauce over the meatballs.
- Top with shredded Gruyère and mozzarella cheeses.
- Bake for 15-20 minutes, until cheese is bubbly and golden.
- Garnish with fresh parsley if desired and serve hot.
Notes
For a richer flavor, use a mix of ground beef and ground pork. You can substitute the white wine with additional beef broth if needed. Serve with crusty bread or over egg noodles.
Nutrition
- Calories: 520 kcal
- Sugar: 8 g
- Fat: 32 g
- Carbohydrates: 21 g
- Protein: 34 g

Tried This Recipe? Leave a Comment!
Did you make this recipe? I’d love to hear how it turned out! Please leave a comment and a rating below. Your feedback helps other home cooks and supports cheerychop.com!
For more delicious inspiration, follow me on Pinterest!