Table of Contents
Cheesy Smoked Sausage and Rice Casserole – One-Pan Comfort Dinner
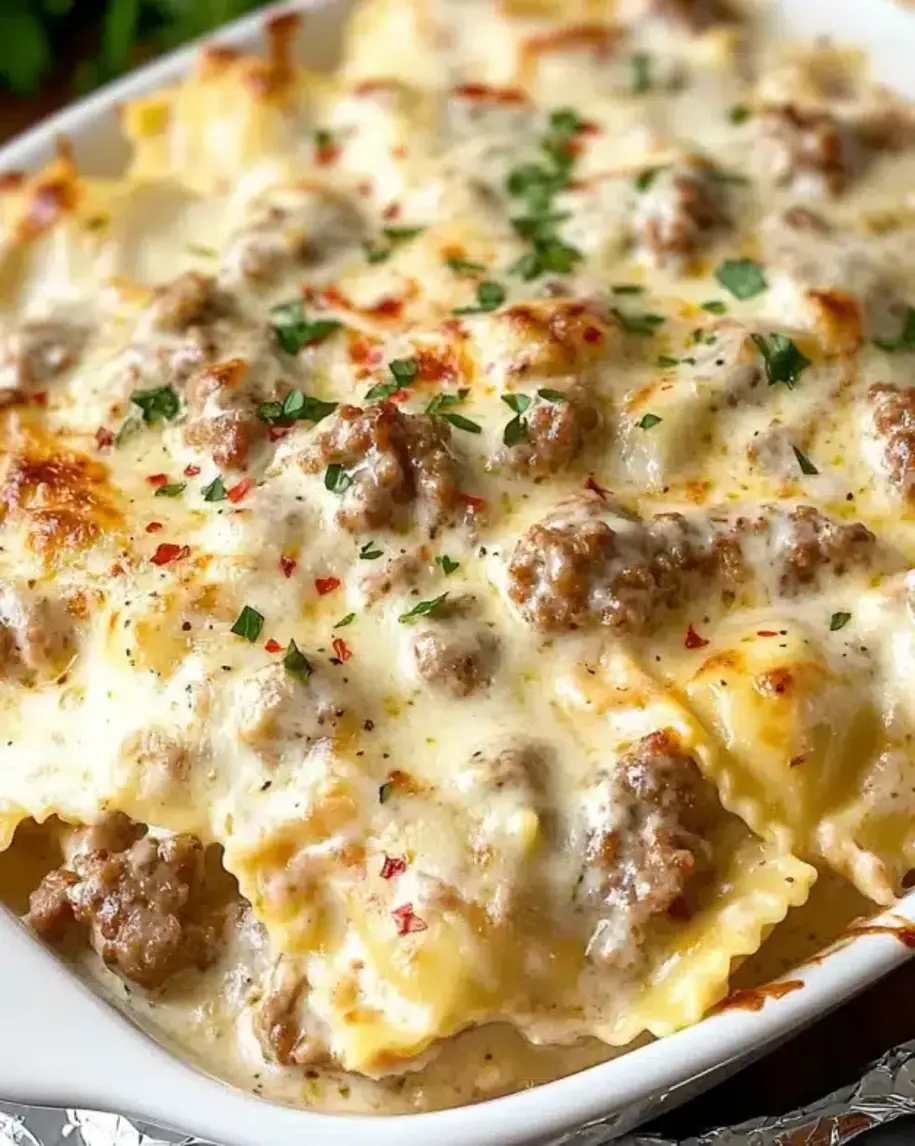
I still remember the first time I tasted smoked sausage in Morocco – my mother had brought it back from the French market in Casablanca, and she simmered it with tomatoes and rice in one big clay pot. That simple, one-pan magic stuck with me. Now, living in New York City, I’ve turned that memory into my go-to smoked sausage and rice casserole. This cheesy sausage rice bake combines the smoky depth of kielbasa with creamy rice and a blanket of melted cheddar – all baked together in a single dish. It’s the kind of meal that fills your kitchen with warmth and your family with smiles, and it’s become my favorite easy smoked sausage dinner on busy weeknights.
Imagine tender slices of sausage, their edges beautifully caramelized from the skillet, nestled into fluffy rice that’s been soaked in a rich, savory broth. Every bite brings a pop of smoky saltiness against a backdrop of creamy, melted cheese. The rice absorbs all the flavor from the chicken soup and the sausage, becoming perfectly tender without turning mushy. A sprinkle of cheddar on top creates a golden, bubbly crust that’s pure comfort. It’s a one-pan wonder that delivers on every level – simple enough for a Tuesday, special enough for Sunday supper.
My version of this one pan sausage casserole comes straight from my Parisian training: I brown the sausage first to build a deep, fond-like flavor, then deglaze with broth to carry that taste into every grain of rice. I also use a trick from my mother’s kitchen – resting the casserole after baking for at least five minutes to let the cheese settle and the rice finish absorbing. One common mistake people make is covering the dish too loosely during the first bake; I’ll show you exactly how to get that perfect, steamy environment. This smoked sausage casserole recipe is both foolproof and company-worthy.
Why This Smoked Sausage and Rice Casserole Recipe Is the Best
The flavor secret is a two-step browning process. I sear the smoked sausage in a hot skillet until the edges are sizzling and dark, then use that same pan to soften the onion and garlic – this locks in all the savory caramelized notes. In Paris, my chef taught me that a well-built fond is the heart of any braised dish, and I apply that here. The result is a deeply layered smoked sausage and rice casserole that never tastes one-dimensional.
Perfected texture comes from the rice-to-liquid ratio and the tight foil cover. I use long-grain white rice and exactly 2 cups of chicken broth plus the cream of chicken soup – that gives the rice enough liquid to plump up without becoming sticky. Covering the dish tightly for the first 25 minutes creates a steamy oven environment that cooks the rice evenly. Then the foil comes off, the cheese goes on, and the last 10 minutes of uncovered baking gives you that irresistible bubbly top.
Foolproof and fast – this recipe is designed for real life. You don’t need to pre-cook the rice or pre-shred the cheese (though shredding your own yields the best melt). The whole dish comes together in one skillet and one baking dish, so cleanup is minimal. Even beginner cooks can nail this cheesy sausage rice bake on their first try because the steps are simple and the oven does most of the work. It’s my most-requested recipe from friends who want a hearty meal without stress.
Smoked Sausage and Rice Casserole Ingredients
I buy my smoked sausage from the Union Square Greenmarket – there’s a butcher there who makes an outstanding kielbasa with just the right amount of garlic and smoke. For the cheese, I prefer a sharp yellow cheddar from Vermont; it melts beautifully and gives that classic orange top. The cream of chicken soup is my shortcut from Paris – my mother would have used a homemade béchamel, but in a busy NYC kitchen, a good quality condensed soup works perfectly and saves time.
Ingredients List
- 1 tablespoon olive oil
- 1 pound smoked sausage, sliced (kielbasa, andouille, or your favorite)
- 1 small onion, diced
- 2 cloves garlic, minced
- 1 cup uncooked white rice (long-grain, not instant)
- 2 cups chicken broth
- 1 can (10.75 ounces) condensed cream of chicken soup
- 2 cups shredded cheddar cheese
- Salt and pepper to taste
Ingredient Spotlight
Smoked Sausage: The star of the show. In US grocery stores, look for fully cooked smoked sausage – kielbasa (Polish-style), andouille (Cajun-style, spicier), or beef smoked sausage all work. For a milder flavor, use turkey smoked sausage. Always slice into coins about ½-inch thick for even browning.
Rice: Long-grain white rice (like Jasmine or American long-grain) is ideal. It holds its shape and stays fluffy. Do NOT use minute rice or instant rice – they will turn mushy because they cook too quickly and become gluey in the casserole.
Cheese: Sharp cheddar gives the best flavor punch. A mix of cheddar and Monterey Jack also melts beautifully. Avoid pre-shredded cheese if possible – the cellulose coating prevents smooth melting. Buy a block and grate it yourself; it only takes two minutes and makes a noticeable difference.
Cream of Chicken Soup: This is your creamy binder. If you want to avoid canned soup, substitute with 1 cup heavy cream + 1 cup chicken broth + 1 tablespoon flour whisked together. The texture will be slightly thinner but still delicious. I prefer the condensed version for its consistent results.
| Original Ingredient | Best Substitution | Flavor / Texture Impact |
|---|---|---|
| Smoked Sausage | Turkey kielbasa or vegan smoked sausage | Lighter flavor, less fat; still smoky |
| White Rice | Brown rice (increase liquid to 2½ cups and bake covered 45 mins) | Nutty, chewier; needs longer cooking time |
| Cheddar Cheese | Monterey Jack, Gruyère, or dairy-free shreds | Milder or nutty; dairy-free melts less |
| Cream of Chicken Soup | 1 cup heavy cream + 1 cup broth + 1 tbsp flour | Richer, creamier; thinner consistency |
How to Make Cheesy Smoked Sausage and Rice Casserole — Step-by-Step
I’ve broken this down into simple steps so you can follow along without any guesswork. Each step includes visual cues to help you know exactly what to look for.
Step 1: Preheat and Prep
Preheat your oven to 375°F (190°C). Grease a 9×13-inch baking dish with butter or nonstick spray. Slice the smoked sausage into ½-inch rounds and dice the onion. Having everything ready before you start cooking makes the process smooth.
💡 mia’s Pro Tip: Use a microplane to mince the garlic – it releases the oils faster and distributes evenly in the dish.
Step 2: Brown the Sausage
Heat 1 tablespoon olive oil in a large skillet over medium-high heat. Add the sausage slices in a single layer (work in batches if needed). Cook for about 5 minutes, flipping once, until both sides are deep golden brown. Use a slotted spoon to transfer the sausage to a plate and set aside. Don’t wipe the pan clean – those browned bits are flavor gold.
⚠️ Common Mistake to Avoid: Overcrowding the pan causes the sausage to steam instead of brown. Cook in batches if your skillet is small.
Step 3: Sauté the Aromatics
Reduce the heat to medium. Add the diced onion to the same skillet and cook, stirring occasionally, until softened – about 3 minutes. Stir in the minced garlic and cook for 30 seconds until fragrant. The onion will pick up the browned bits from the pan.
💡 mia’s Pro Tip: If the pan looks dry, add an extra tablespoon of oil or a splash of broth to loosen the fond.
Step 4: Combine Rice, Liquid, and Sausage
Stir in the uncooked rice, chicken broth, cream of chicken soup, and the reserved cooked sausage. Bring this mixture to a gentle simmer, stirring to combine everything evenly. The soup should be fully incorporated – no lumps.
⚠️ Common Mistake to Avoid: Do not let the mixture boil hard – you just want a gentle simmer to avoid scorching the bottom.
Step 5: Transfer and Cover
Pour the entire mixture into the prepared baking dish. Spread it evenly. Cover the dish tightly with aluminum foil – this is crucial for the rice to steam properly. Make sure the foil is snug around the edges.
💡 mia’s Pro Tip: Spray the inside of the foil with nonstick spray so the cheese won’t stick later, though we remove the foil before adding cheese.
Step 6: Bake (Covered)
Place the covered dish in the preheated oven and bake for 25 minutes. During this time, the rice absorbs the liquid and becomes tender. Do not peek – the steam is what cooks the rice evenly.
⚠️ Common Mistake to Avoid: Opening the oven door repeatedly will lower the temperature and slow down the cooking. Trust the timer.
Step 7: Add Cheese and Finish Baking
After 25 minutes, carefully remove the foil (watch out for the steam). Sprinkle the 2 cups of shredded cheddar evenly over the top. Return the dish to the oven, uncovered, and bake for another 10 minutes, until the cheese is melted, bubbly, and starting to brown around the edges.
💡 mia’s Pro Tip: For an extra golden crust, switch the oven to broil for the last 2 minutes – but watch closely so it doesn’t burn.
Step 8: Rest and Serve
Remove the casserole from the oven and let it rest for at least 5 minutes before serving. This allows the rice to finish absorbing any remaining liquid and the cheese to set slightly, making serving easier. Scoop out portions with a large spoon, enjoying the creamy, cheesy layers underneath.
⚠️ Common Mistake to Avoid: Serving immediately after baking will result in a runny casserole. Patience pays off here.
Quick Cooking Reference
| Step | Action | Duration | Key Visual Cue |
|---|---|---|---|
| 1 | Preheat & prep | 5 min | Oven ready, dish greased |
| 2 | Brown sausage | 5 min | Deep golden edges |
| 3 | Sauté aromatics | 3 min | Onion translucent, garlic fragrant |
| 4 | Combine rice, broth, sausage | 2 min | All ingredients evenly mixed |
| 5 | Transfer & cover | 1 min | Foil tightly sealed |
| 6 | Bake covered | 25 min | Rice tender, liquid mostly absorbed |
| 7 | Add cheese, bake uncovered | 10 min | Cheese melted and bubbly |
| 8 | Rest & serve | 5 min | Casserole holds shape when scooped |
Serving & Presentation
I love serving this casserole family-style, right from the baking dish. Sprinkle a little fresh parsley or chives on top for a pop of green – it contrasts beautifully with the golden cheese. For a Moroccan touch, I sometimes add a pinch of smoked paprika and a few slivers of preserved lemon on the side. The brightness cuts through the richness beautifully.
In New York, I often pair this casserole with a simple side salad of arugula, lemon, and shaved Parmesan – the peppery greens are a great counterbalance. For a more hearty meal, serve it alongside roasted broccoli or green beans. My Parisian chef would have insisted on a glass of dry white wine (like Sauvignon Blanc) – but a cold beer also works wonders with the smoky sausage.
| Pairing Type | Suggestions | Why It Works |
|---|---|---|
| Side Dish | Arugula salad, roasted broccoli, steamed green beans | Adds freshness and crunch to balance richness |
| Sauce / Dip | Sour cream mixed with hot sauce, or a side of chimichurri | Adds tang and brightness; cuts the cheesy richness |
| Beverage | Sauvignon Blanc, light lager, or iced tea with lemon | Clean, crisp drinks contrast smoky, cheesy flavors |
| Garnish | Fresh parsley, chives, smoked paprika, lemon wedges | Adds color, freshness, and a pop of acidity |
Make-Ahead, Storage & Reheating
As a busy NYC food blogger, I rely on make-ahead meals. This casserole is a lifesaver – you can assemble it entirely the night before, cover, and refrigerate. Just add about 10 extra minutes to the covered baking time when going from cold to oven. Leftovers also reheat beautifully, making it perfect for lunch the next day.
| Method | Container | Duration | Reheating Tip |
|---|---|---|---|
| Refrigerator | Airtight container | 3–4 days | Microwave individual portions 1–2 minutes, or reheat in a 350°F oven covered until hot (about 15 minutes) |
| Freezer | Freezer-safe container or wrap tightly with foil and plastic | 2 months | Thaw overnight in fridge, then reheat covered at 350°F for 20–25 minutes |
| Make-Ahead | Assemble in baking dish, cover, refrigerate | Up to 24 hours in advance | Add 10 minutes to covered baking time. Remove from fridge while oven preheats to take the chill off. |
When reheating, I find that adding a splash of milk or cream before warming helps restore the creamy texture that the rice absorbs over time. For the freezer, portion the casserole into individual servings – that way you can grab just what you need. And remember, the cheese will be a little less gooey after freezing, but the flavor stays spot-on.
Variations & Easy Swaps
One of the best things about this smoked sausage casserole recipe is how flexible it is. You can change up the protein, the cheese, even the grain – and still get a delicious, comforting meal. Here are my favorite variations.
| Variation | Key Change | Best For | Difficulty Impact |
|---|---|---|---|
| Spicy Andouille & Pepper Jack | Use andouille sausage + pepper jack cheese + diced jalapeño | Cajun kick lovers | Easy (no extra steps) |
| Dairy-Free / Vegan | Use vegan smoked sausage + dairy-free cheddar shreds + coconut milk instead of soup | Dairy-free or plant-based diets | Medium (sauce may be thinner) |
| Moroccan Spiced | Add 1 tsp ras el hanout, ½ tsp turmeric, use lamb merguez sausage | Exotic flavor twist | Easy (just add spices to the onion) |
Spicy Andouille & Pepper Jack
For heat lovers, swap the kielbasa for andouille sausage (already packed with cayenne and paprika) and use pepper jack cheese instead of cheddar. Add a diced jalapeño with the onion for extra fire. This version is popular at my Super Bowl parties – it’s bold, spicy, and incredibly satisfying. The cheese still melts beautifully, and the smoky-spicy combo is a knockout.
Dairy-Free / Vegan Version
I’ve tested this for a friend who’s lactose intolerant, and it works wonderfully. Use plant-based smoked sausage (I like the Italian-style from Field Roast) and a good dairy-free cheddar that melts (Violife is my go-to). Replace the cream of chicken soup with a can of full-fat coconut milk mixed with 1 tablespoon cornstarch and 1 cup vegetable broth. The texture is a little thinner, but the richness from coconut milk keeps it creamy. Bake as directed – just watch the cheese melt time.
Moroccan Spiced Merguez Version
Inspired by my mother’s kitchen, I sometimes make this with merguez (spicy lamb sausage) and a blend of ras el hanout, turmeric, and a pinch of cinnamon. I add the spices when I sauté the onion, letting them bloom for 30 seconds before adding the garlic. The result is a fragrant, North African–inspired casserole that pairs beautifully with a dollop of harissa yogurt. I love serving it with a side of roasted carrots and a squeeze of lemon – it reminds me of home.
What kind of smoked sausage works best in a cheesy sausage and rice casserole?
For the best flavor, choose a fully cooked smoked sausage with a good smoke profile – I recommend kielbasa (Polish-style, mild and garlicky) or andouille (Cajun-style, spicier with paprika). Both hold up well during baking without turning greasy. You can also use turkey kielbasa for a lighter option. In a pinch, any smoked bratwurst or even hot dogs (though much milder) will work. Just steer clear of raw sausages (like Italian links) – they need different cooking times and won’t provide that deep smoky taste.
Can I use minute rice or instant rice for this smoked sausage casserole?
I do not recommend instant rice or minute rice for this casserole. Those rice varieties are pre-cooked and dehydrated – they will absorb the liquid much faster and become mushy or gluey during the 25-minute covered bake. The recipe is designed for uncooked long-grain white rice, which needs that time and liquid to steam into fluffy, separate grains. If you must use instant rice, reduce the chicken broth to 1½ cups and bake covered for only 15 minutes before adding cheese. The texture will be softer, so manage expectations.
How do I keep the rice from getting mushy in a cheesy smoked sausage casserole?
The secret is the right rice-to-liquid ratio and a tight foil cover. Use exactly 1 cup of uncooked long-grain white rice with 2 cups of chicken broth plus a 10.75-ounce can of condensed cream of chicken soup – that’s the perfect amount of liquid. Do NOT rinse the rice before adding (rinsing removes starch that helps structure, but here we want a little stickiness to bind the casserole, not mush). Also, bake covered for exactly 25 minutes – no longer – then uncover and add cheese. Overbaking or lifting the foil too early can lead to mushy results.
What can I substitute for the cream of chicken soup in this sausage and rice casserole?
If you want to avoid canned soup, you can make a quick homemade substitute: whisk together 1 cup of heavy cream, 1 cup of chicken broth, and 1 tablespoon of all-purpose flour until smooth. Cook this mixture in a small saucepan over medium heat until thickened, about 2 minutes, then use it in place of the condensed soup. Alternatively, use cream of mushroom soup for a different flavor (just ensure it’s condensed). For a dairy-free version, use full-fat coconut milk mixed with 1 tablespoon cornstarch and 1 cup vegetable broth – it will be thinner but still deliciously creamy.
Can I use brown rice instead of white rice in this casserole?
Yes, but you need to adjust the liquid and baking time. Brown rice requires about twice the cooking time to become tender. Increase the chicken broth to 2½ cups and bake covered for 45 minutes instead of 25. After 45 minutes, check the rice – it should be tender. Then add the cheese and bake uncovered for an additional 10 minutes. Expect a nuttier flavor and a chewier texture compared to white rice. The casserole will be slightly less creamy but still delicious and heartier.
How do I make this smoked sausage casserole spicier?
There are several ways to add heat. Use spicy andouille sausage instead of kielbasa, and swap the cheddar for pepper jack cheese. Add a diced jalapeño (with seeds if you like serious heat) when you sauté the onion. You can also stir in ½ teaspoon of cayenne pepper or red pepper flakes with the garlic. For a smoky heat, a teaspoon of chipotle powder works beautifully. If you want to keep it mild for the family, serve hot sauce on the side – my favorite is a vinegar-based Louisiana style with this casserole.
Can I add vegetables to this cheesy sausage and rice casserole?
Absolutely – this casserole is a great vehicle for veggies. Add 1 cup of frozen peas and carrots (thawed) when you combine the rice mixture, or stir in 1 cup of chopped bell pepper with the onion. For a heartier vegetable addition, I love folding in 2 cups of chopped kale or spinach after the first bake, just before adding the cheese – it wilts beautifully under the heat. Diced zucchini or mushrooms (sautéed first to remove excess moisture) also work well. Just keep the total extra volume under 2 cups to avoid upsetting the liquid balance.
Why is my casserole watery or soupy after baking?
A watery casserole usually means one of three things: too much liquid, uncovered baking too early, or insufficient resting time. Double-check your measurements – exactly 2 cups broth plus one can of soup should be perfect. Ensure the foil is tightly sealed during the first 25 minutes – any steam escaping prevents the rice from absorbing liquid properly. Finally, the 5-minute rest after baking is crucial – the rice continues to absorb liquid as it cools. If you still have excess liquid, next time reduce the broth by ¼ cup. Also, avoid using pre-cooked or leftover rice, as it won’t absorb much liquid.
Can I prepare this casserole in a slow cooker instead of the oven?
I don’t recommend a slow cooker for this recipe because the rice needs high, even heat to cook properly. Slow cookers run at a lower temperature and the rice can become mushy or undercooked. If you must use one, brown the sausage and aromatics first, then transfer everything (including the rice, broth, soup, and sausage) to the slow cooker. Cook on high for 2–3 hours, then add the cheese and let it melt with the lid on for 15 minutes. The texture will be softer and more porridge-like, but the flavor is still great. For the best results, the oven method is superior.
How can I make this casserole gluten-free?
To make this casserole gluten-free, you need to replace two ingredients: the cream of chicken soup (which usually contains wheat flour) and the regular chicken broth (some brands add gluten). Use a gluten-free condensed cream of chicken soup (brands like Pacific Foods or Health Valley make them) or make your own by whisking 1 cup heavy cream, 1 cup gluten-free broth, and 1 tablespoon cornstarch or arrowroot powder. For the chicken broth, choose a brand labeled gluten-free (kitchen basics is a solid option). All other ingredients are naturally gluten-free. The casserole will taste just as creamy and delicious.
Share Your Version!
I’d love to see how this smoked sausage and rice casserole turns out in your kitchen! Did you try the spicy andouille version? Or maybe you added a Moroccan twist with ras el hanout and merguez? Leave a star rating and a comment below – your feedback helps other readers know what to expect and often sparks new ideas for me.
Snap a photo of your cheesy, bubbly creation and share it on Instagram or Pinterest. Tag me @exorecipes – I love seeing your recreations and I always reshare my favorites. If you have a question about a substitution or a technique, drop it in the comments and I’ll personally answer within 48 hours. And if you’re wondering what else to serve alongside this casserole – I have a whole section above on pairings, but feel free to ask!
From my NYC kitchen to yours — I hope this recipe brings as much warmth to your table as it does to mine. — mia 🧡
Love This Recipe? Save It to Pinterest!
If you enjoyed this Cheesy Smoked Sausage and Rice Casserole recipe, don’t let it get lost in your browser tabs! 😄 Pin it now so you can find it again anytime — and explore hundreds more tried-and-tested recipes waiting for you on my Pinterest boards.
👉 Follow mia on Pinterest @exorecipe
📌 Pin this recipe · 🔁 Re-pin your favorites · 💬 Tag me when you make it — I love seeing your creations!
What’s your favorite way to make this casserole your own? Let me know in the comments! 💬
⬇️ Don’t forget to rate the recipe below – your stars help me bring you more delicious recipes! ⭐⭐⭐⭐⭐

Cheesy Smoked Sausage and Rice Casserole
- Prep Time: 10 minutes
- Cook Time: 40 minutes
- Total Time: 50 minutes
- Yield: 6 1x
- Method: Main Course
- Cuisine: American
Description
A hearty and cheesy one-dish casserole with smoked sausage, rice, and plenty of cheese.
Ingredients
- 1 tablespoon olive oil
- 1 pound smoked sausage, sliced
- 1 small onion, diced
- 2 cloves garlic, minced
- 1 cup uncooked white rice
- 2 cups chicken broth
- 1 can (10.75 ounces) condensed cream of chicken soup
- 2 cups shredded cheddar cheese
- Salt and pepper to taste
Instructions
- Preheat oven to 375°F (190°C).
- In a large skillet, heat olive oil over medium-high heat. Add sausage slices and cook until browned, about 5 minutes. Remove sausage and set aside.
- In the same skillet, add onion and garlic; cook until softened, about 3 minutes.
- Stir in rice, chicken broth, cream of chicken soup, and cooked sausage. Bring to a simmer.
- Transfer mixture to a greased 9×13-inch baking dish. Cover tightly with foil.
- Bake for 25 minutes, then remove foil. Sprinkle shredded cheese on top.
- Bake uncovered for an additional 10 minutes, until cheese is melted and bubbly. Let rest for 5 minutes before serving.
Notes
For extra flavor, use a smoked sausage like kielbasa or andouille.
Nutrition
- Calories: 480 kcal
- Sugar: 2 g
- Fat: 28 g
- Carbohydrates: 38 g
- Protein: 19 g

Tried This Recipe? Leave a Comment!
Did you make this recipe? I’d love to hear how it turned out! Please leave a comment and a rating below. Your feedback helps other home cooks and supports cheerychop.com!