Table of Contents
Anti Inflammatory Turmeric Chicken Soup with a North African Touch – Warming, Velvety & Healing
Growing up in Morocco, my mother’s kitchen was never without a pot of something fragrant bubbling on the stove. Turmeric was her go-to for everything — from a post-illness broth to a Friday couscous. That deep golden hue and earthy warmth stayed with me through culinary school in Paris and now, in my NYC apartment, I turn to this anti inflammatory turmeric chicken soup whenever I need a hug in a bowl. The unique twist here? A touch of velvety coconut milk and a pinch of Moroccan insight — black pepper isn’t just for heat; it unlocks turmeric’s curcumin so your body actually gets the benefits. This turmeric chicken soup recipe is my personal rewrite of a classic in a way that feels both nourishing and deeply comforting.
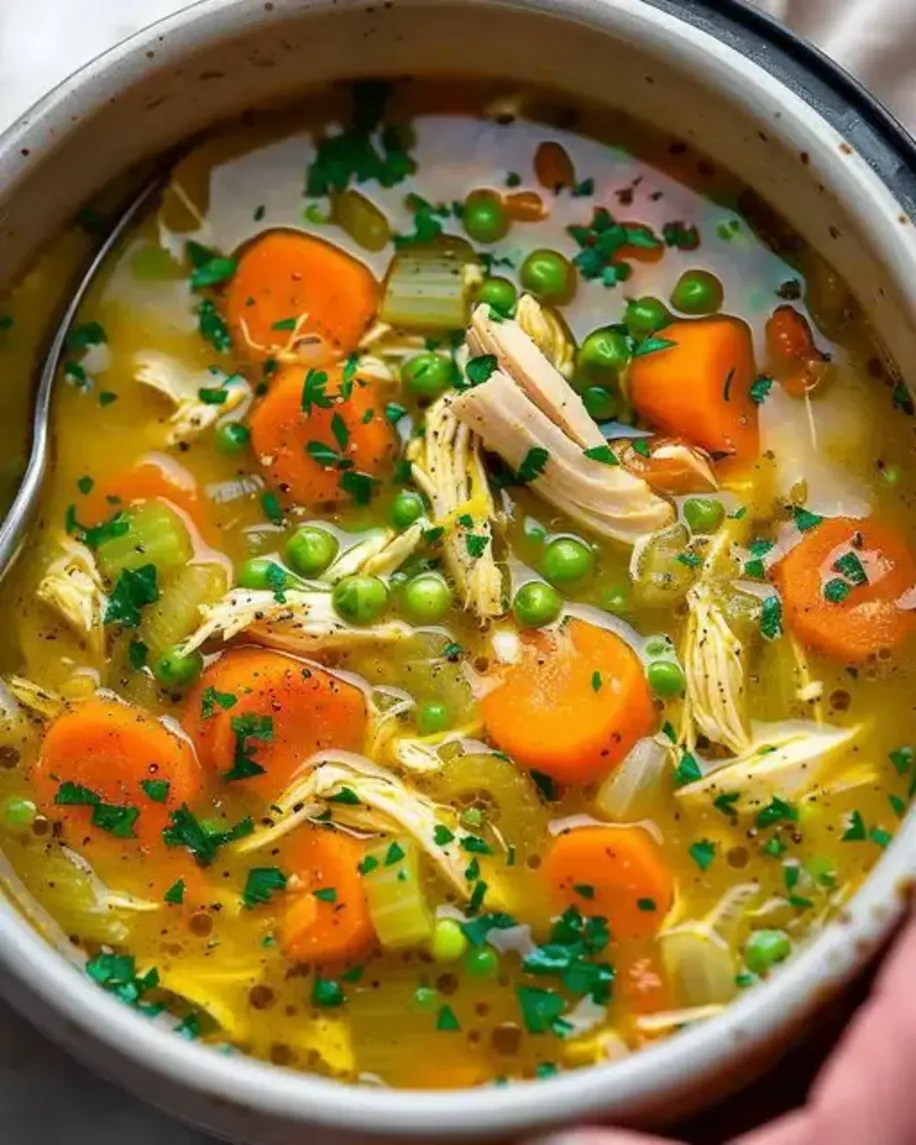
Imagine the aroma — garlic and ginger hitting hot oil, then fresh turmeric staining everything a brilliant mustard yellow. The broth turns silky with coconut milk, cradling tender carrots and shredded chicken. Each spoonful is a gentle wave of warmth: cumin and coriander from the spice cabinet, a subtle kick from cayenne (if you dare), and a bright finish of lime and cilantro. The balance is spot-on — rich but not heavy, healing but not boring. It’s the kind of anti inflammatory soup that makes you want to wrap yourself in a blanket and watch the rain through the window.
I’ve tested this recipe dozens of times — from my Le Creuset pot in Paris to a tiny stove in a Brooklyn walk-up. What I’ve learned is that technique matters almost as much as ingredients. Toasting the spices just a minute (don’t burn them!) releases their essential oils. And never skip the black pepper; it’s non-negotiable. If you’ve ever wondered how to make a healing chicken soup that actually tastes like something you’d crave, this is it. I’ll also share a common mistake home cooks make with turmeric — using it raw instead of cooking it in fat. Let’s fix that.
Why This Anti Inflammatory Turmeric Chicken Soup Recipe Is the Best
The Flavor Secret – Most anti-inflammatory soups taste like medicine. Not this one. My Paris training taught me how to layer flavors: start with a soffritto of onion, then bloom the spices in oil before adding liquid. The coconut milk adds a luxurious creaminess that tames turmeric’s earthiness. A splash of lime at the end cuts through and lifts everything. It’s a turmeric soup for inflammation that you’ll actually look forward to eating.
Perfected Texture – The vegetables soften but never disintegrate because we add them at the right time. The chicken stays shreddable, not dry. And because I finish with fresh herbs and lime off the heat, the soup retains that just-made brightness even the next day. No sad, overcooked soup here.
Foolproof & Fast – This comes together in 45 minutes flat. Perfect for a weeknight when you’re feeling run-down or just craving something real. If you’ve never cooked with fresh turmeric, I’ll walk you through it — and tell you exactly when ground turmeric works just as well.
Anti Inflammatory Turmeric Chicken Soup Ingredients
Every ingredient here serves a purpose — anti-inflammatory, flavor, or texture. I pick up my fresh turmeric at the Union Square Greenmarket in NYC, but your local grocery store will carry it near the ginger. If you can’t find fresh, I’ve got you covered. Let’s talk through what goes in.
Ingredients List
- 1 tablespoon coconut oil or olive oil
- 1 large onion, diced
- 3 cloves garlic, minced
- 1 tablespoon fresh ginger, grated
- 1 tablespoon fresh turmeric, grated (or 1 teaspoon ground turmeric)
- 1 teaspoon ground cumin
- 1 teaspoon ground coriander
- ½ teaspoon black pepper (enhances turmeric absorption)
- ¼ teaspoon cayenne pepper (optional)
- 4 cups chicken broth (low sodium)
- 1 can (13.5 oz) full-fat coconut milk
- 2 medium carrots, sliced
- 2 stalks celery, sliced
- ½ teaspoon sea salt, plus more to taste
- 2 cups cooked chicken, shredded
- 2 tablespoons fresh lime juice
- ¼ cup fresh cilantro, chopped
- 2 tablespoons fresh parsley, chopped
Ingredient Spotlight
Fresh Turmeric – Look for firm, bright orange roots (similar to ginger). It stains everything, so use a microplane and be careful! Its flavor is more floral and less bitter than ground. If using ground, add it with the other spices and use a teaspoon.
Coconut Milk – Full-fat is key for body and richness. Light coconut milk will make the soup thin and watery. I always buy unsweetened — the natural sweetness comes from the carrots.
Black Pepper – I can’t stress this enough: piperine in black pepper increases curcumin absorption by up to 2000%. A mere ½ teaspoon does the job. Don’t skip it.
Cooked Chicken – Leftover rotisserie chicken is perfect. Or poach chicken breasts in the broth before adding vegetables, then shred. That adds even more flavor.
| Original Ingredient | Best Substitution | Flavor / Texture Impact |
|---|---|---|
| Fresh Turmeric | 1 tsp ground turmeric | Slightly less fresh, but workable. Add with dry spices. |
| Coconut Oil | Olive oil or avocado oil | Subtle flavor difference; still works. |
| Full-Fat Coconut Milk | Light coconut milk | Soup will be thinner, less creamy. |
| Chicken Broth | Vegetable broth | Less chicken flavor; still delicious. |
| Fresh Ginger | 1 tsp ground ginger | Less pungent; add early. |
How to Make Anti Inflammatory Turmeric Chicken Soup — Step-by-Step
This comes together quickly. I’ve broken it down into six easy steps. Remember: the black pepper and fat (coconut oil) are your best friends for unlocking turmeric’s power.
Step 1: Sauté the Aromatics
Heat the coconut oil in a large pot over medium heat. Add the diced onion and cook until softened, about 5 minutes. Stir occasionally — you want them translucent, not browned.
💡 mia’s Pro Tip: Don’t rush this step. Sweating the onions slowly builds the sweet foundation of the soup.
Step 2: Build the Spice Base
Add the garlic, ginger, turmeric, cumin, coriander, black pepper, and cayenne (if using). Stir constantly for 1 minute until fragrant. The kitchen will smell amazing.
⚠️ Common Mistake to Avoid: Burning the spices! If the pan is too hot, they’ll turn bitter. Keep heat at medium-low and stir.
Step 3: Add the Broth and Coconut Milk
Pour in the chicken broth and coconut milk. Stir well, scraping up any browned bits from the bottom. Those bits are pure flavor.
💡 mia’s Pro Tip: Use a wooden spatula to deglaze properly — that’s the French way.
Step 4: Simmer the Vegetables
Add the sliced carrots and celery. Bring the soup to a boil, then reduce heat and simmer for 15–20 minutes until vegetables are tender. You should be able to pierce a carrot slice easily with a fork.
⚠️ Common Mistake to Avoid: Boiling too hard can break the coconut milk and make the soup grainy. Keep it at a gentle simmer.
Step 5: Add the Chicken
Stir in the shredded cooked chicken. Simmer for another 5 minutes until heated through. If you want more chicken flavor, you can add the shredded chicken earlier with the vegetables.
💡 mia’s Pro Tip: If using raw chicken, poach it in the broth for 15 minutes before shredding. That infuses the broth beautifully.
Step 6: Final Touches
Remove from heat. Stir in the lime juice, cilantro, and parsley. Season with sea salt to taste. Taste and adjust — maybe more lime, maybe more salt. Ladle into bowls and serve warm. Enjoy!
⚠️ Common Mistake to Avoid: Adding the lime and herbs too early. They need to stay bright, so always add off the heat.
| Step | Action | Duration | Key Visual Cue |
|---|---|---|---|
| 1 | Sauté onion | 5 min | Onion translucent, not brown |
| 2 | Bloom spices | 1 min | Very fragrant; spices coated in oil |
| 3 | Add broth & coconut milk | 1 min | Liquid combined; deglaze pot |
| 4 | Simmer vegetables | 15-20 min | Carrots fork-tender |
| 5 | Add chicken | 5 min | Chicken heated through |
| 6 | Finish off heat | – | Lime, herbs stirred in; color bright |
Serving & Presentation
I love serving this soup in deep, wide bowls so you can see all the golden goodness. Ladle it generously, making sure each bowl gets a good mix of broth, vegetables, and chicken. Garnish with an extra sprinkle of cilantro and a wedge of lime on the side — it adds a pop of color and a fresh hit of acidity right at the table.
In Morocco, we often pair soups like this with crusty bread for dipping. Here in NYC, I go for a thick slice of sourdough from my local bakery. The coconut milk makes it rich enough to stand alone, but if you want a heartier meal, serve it over rice or with a side of naan. A spoonful of Greek yogurt on top would also be lovely (though not traditional).
| Pairing Type | Suggestions | Why It Works |
|---|---|---|
| Side Dish | Crusty sourdough, naan, steamed rice | Soaks up the flavorful broth |
| Sauce / Dip | Greek yogurt, harissa, lime wedges | Adds creaminess or heat |
| Beverage | Green tea, ginger tea, unsweetened iced tea | Complements the anti-inflammatory theme |
| Garnish | Fresh cilantro, parsley, lime zest, red pepper flakes | Brightens flavor and adds visual appeal |
Make-Ahead, Storage & Reheating
As a busy NYC food blogger, I live by meal prep. This soup is a lifesaver — it tastes even better the next day. I make a big batch on Sunday and have lunches ready for the week. Here’s how to store it properly.
| Method | Container | Duration | Reheating Tip |
|---|---|---|---|
| Refrigerator | Airtight glass container | Up to 4 days | Reheat gently on stove or microwave. Add splash of broth if thick. |
| Freezer | Freezer-safe zip-top bag or container | Up to 3 months | Thaw overnight in fridge. Reheat on stovetop, stirring occasionally. |
| Make-Ahead | As directed, omit lime & herbs until serving | Up to 3 days in advance | Add fresh lime and herbs just before serving for brightest flavor. |
One thing I’ve learned from meal-prepping this soup: the coconut milk might separate slightly after freezing. Don’t worry — a good stir while reheating brings it back together. If you prefer a super-smooth texture, give it a quick blitz with an immersion blender before freezing. The flavors only deepen.
Variations & Easy Swaps
| Variation | Key Change | Best For | Difficulty Impact |
|---|---|---|---|
| Hearty Vegetable | Add zucchini, bell pepper, spinach | More nutrients, bulk | Easy |
| Gluten-Free & Dairy-Free | Already compliant; verify broth | Dietary restrictions | None |
| Spicy Moroccan Twist | Add cinnamon stick, chickpeas, preserved lemon | North African flair | Moderate |
Variation 1: Hearty Vegetable Version
Throw in a diced zucchini and a red bell pepper along with the carrots and celery. Add a handful of spinach at the very end. This boosts the fiber and turns it into a full meal. The extra veggies soak up the spiced broth beautifully. If you want it even heartier, toss in a cup of cooked chickpeas.
Variation 2: Gluten-Free & Dairy-Free
Great news — this anti inflammatory turmeric chicken soup is naturally gluten-free (use certified gluten-free broth if sensitive) and dairy-free thanks to the coconut milk. It’s already a safe bet for most dietary needs. Just double-check your spice blends for any hidden gluten, though the ones listed are pure.
Variation 3: Spicy Moroccan Twist
Add a cinnamon stick with the broth, toss in a can of drained chickpeas, and finish with a tablespoon of chopped preserved lemon. This is the version I grew up with — it’s warming, slightly sweet, and incredibly aromatic. The preserved lemon adds a salty, tangy punch that cuts through the richness of the coconut milk.
What is the best way to add turmeric to chicken soup for maximum anti-inflammatory benefits?
The best method is to cook fresh grated turmeric in oil at the start of the recipe. Turmeric’s curcumin is fat-soluble, so sautéing it in coconut oil (or another healthy fat) helps release its compounds. You must also include black pepper — piperine in pepper dramatically increases curcumin absorption. I add both in Step 2, blooming them together. This process ensures you get the most anti-inflammatory power from every spoonful.
Can I use ground turmeric instead of fresh turmeric in an anti-inflammatory chicken soup?
Absolutely. Ground turmeric is a convenient alternative and still delivers anti-inflammatory benefits. Use 1 teaspoon of ground turmeric for every 1 tablespoon of fresh called for. Because ground turmeric is more concentrated and slightly bitter, I recommend adding it at the same time as the other dry spices (cumin, coriander) and cooking it in oil for a minute to bloom. The flavor won’t be as bright as fresh, but the soup will still be deeply golden and healing.
How long should I simmer turmeric chicken soup to preserve its anti-inflammatory properties?
Aim for a total simmer time of 20–30 minutes once the broth and vegetables are in. Curcumin is heat-stable but can degrade with very long cooking over high heat. I simmer gently at medium-low after bringing to a boil. The carrots and celery need about 15–20 minutes to become tender, which is perfect. If you add chicken, the additional 5 minutes doesn’t harm the curcumin. Overcooking (over an hour) might slightly reduce potency, but the soup will still be beneficial.
What other anti-inflammatory ingredients can I add to turmeric chicken soup?
You have a wealth of options! Ginger, garlic, and black pepper are already in the recipe and are fantastic. Add a pinch of cayenne for capsaicin’s anti-inflammatory effects. Leafy greens like spinach or kale (added at the end) bring antioxidants. Mushrooms, especially shiitake, add immune-boosting beta-glucans. You can also stir in a teaspoon of apple cider vinegar for its acetic acid benefits. And don’t forget a cinnamon stick — it’s anti-inflammatory and adds a lovely depth.
Is this anti-inflammatory turmeric chicken soup suitable for a detox diet?
Yes, this soup is gentle and supportive for a detox. It’s made with whole, nutrient-dense ingredients — vegetables, healthy fats, lean protein, and spices known for their anti-inflammatory and antioxidant properties. The coconut oil and coconut milk provide medium-chain triglycerides that support metabolism, while the turmeric and ginger aid digestion. It’s also free of processed foods, dairy, and gluten. Use low-sodium broth and avoid sea salt if you’re on a strict detox. It’s a perfect meal to reset without feeling deprived.
How can I make this turmeric chicken soup more filling?
To turn this soup into a hearty main dish, add cooked chickpeas, white beans, or lentils. Stir in a cup of cooked quinoa or brown rice for extra fiber and protein. You can also bulk up the vegetables — chopped zucchini, bell pepper, or sweet potato work beautifully. For a creamier, more satisfying texture, blend a portion of the soup with an immersion blender before adding the chicken. Serve with a side of crusty bread or naan to round it out.
Can I make this anti-inflammatory soup in a slow cooker or Instant Pot?
Yes! For a slow cooker, sauté the aromatics and bloom the spices on the stove first, then transfer everything except the chicken, lime, and herbs to the slow cooker. Cook on low for 6–8 hours or high for 3–4 hours. Add the shredded chicken in the last 30 minutes. For an Instant Pot, use the Sauté function for the aromatics and spices, then add broth, coconut milk, and vegetables. Pressure cook on high for 5 minutes with a quick release. Stir in chicken (pre-cooked or shredded rotisserie) and finish with lime and herbs. The flavors will be a bit different — more melded in the slow cooker, brighter in the IP.
What is the best type of chicken to use for anti-inflammatory turmeric chicken soup?
I prefer using boneless, skinless chicken thighs for their richer flavor and tenderness, but shredded rotisserie chicken (organic, if possible) is my go-to for convenience. If you want the broth extra nourishing, start with bone-in chicken pieces (like thighs or drumsticks), simmer them in the broth for 30 minutes before removing the meat, then shred and return it. That gives you a bone-broth-like depth. Avoid skinless chicken breast if you can — it can dry out quickly. Dark meat stays moist and adds healthy fats.
How do I reduce the turmeric taste in anti-inflammatory chicken soup if it’s too strong?
If the turmeric flavor is overwhelming, a few tweaks can balance it. Add a splash more coconut milk to mellow the earthiness. A teaspoon of honey or maple syrup can counteract bitterness. Increase the lime juice — acidity cuts through strong flavors. You can also stir in a dollop of plain Greek yogurt or additional chicken broth to dilute. Next time, use slightly less turmeric (fresh or ground) and increase the ginger and garlic, which complement without overpowering. Remember that the flavor mellows as the soup sits overnight.
Can I make this anti-inflammatory turmeric chicken soup vegan?
Absolutely. Replace the chicken with chickpeas (2 cups) and use vegetable broth instead of chicken broth. The rest of the ingredients are already plant-based. Chickpeas add protein and fiber, and they soak up the turmeric-coconut broth beautifully. For extra umami, add a tablespoon of miso paste or a few chopped shiitake mushrooms. The texture will be slightly different — less shreddy, more chunky — but equally comforting and anti-inflammatory.
Share Your Version!
I’d love to see how this anti inflammatory turmeric chicken soup turns out in your kitchen! Did you add extra vegetables, spice it up with more cayenne, or try my Moroccan twist with preserved lemon? Drop a star rating and a comment below — your feedback helps me create recipes that really work for you. And if you snap a photo, tag me on Instagram or Pinterest @exorecipe — I personally read every comment and love seeing your beautiful golden bowls.
One question I always love to hear: what’s your go-to anti-inflammatory ingredient that I didn’t include here? I’m always experimenting, and your ideas might end up in my next recipe!
From my NYC kitchen to yours — I hope this recipe brings as much warmth to your table as it does to mine. — mia 🧡
Love This Recipe? Save It to Pinterest!
If you enjoyed this Anti Inflammatory Turmeric Chicken Soup recipe, don’t let it get lost in your browser tabs! 😄 Pin it now so you can find it again anytime — and explore hundreds more tried-and-tested recipes waiting for you on my Pinterest boards.
👉 Follow mia on Pinterest @chefrecipes2
📌 Pin this recipe · 🔁 Re-pin your favorites · 💬 Tag me when you make it — I love seeing your creations!
💬 Loved this recipe? Share your thoughts!
Did you try the Anti Inflammatory Turmeric Chicken Soup? Leave a comment below with your twist! Did you add your own favorite anti-inflammatory spices? I read every reply and can’t wait to hear how it went.

ANTI INFLAMMATORY TURMERIC CHICKEN SOUP
- Prep Time: 15 minutes
- Cook Time: 30 minutes
- Total Time: 45 minutes
- Yield: 4 1x
- Method: Main Course
- Cuisine: American
Description
A comforting and nourishing chicken soup packed with anti-inflammatory ingredients like turmeric, ginger, and garlic. Perfect for supporting your immune system.
Ingredients
- 1 tablespoon coconut oil or olive oil
- 1 large onion, diced
- 3 cloves garlic, minced
- 1 tablespoon fresh ginger, grated
- 1 tablespoon fresh turmeric, grated (or 1 teaspoon ground turmeric)
- 1 teaspoon ground cumin
- 1 teaspoon ground coriander
- 1/2 teaspoon black pepper (enhances turmeric absorption)
- 1/4 teaspoon cayenne pepper (optional)
- 4 cups chicken broth (low sodium)
- 1 can (13.5 oz) full-fat coconut milk
- 2 medium carrots, sliced
- 2 stalks celery, sliced
- 1/2 teaspoon sea salt, plus more to taste
- 2 cups cooked chicken, shredded
- 2 tablespoons fresh lime juice
- 1/4 cup fresh cilantro, chopped
- 2 tablespoons fresh parsley, chopped
Instructions
- Heat the coconut oil in a large pot over medium heat. Add the diced onion and cook until softened, about 5 minutes.
- Add the garlic, ginger, turmeric, cumin, coriander, black pepper, and cayenne (if using). Stir and cook for 1 minute until fragrant.
- Pour in the chicken broth and coconut milk. Stir well, scraping up any browned bits from the bottom.
- Add the sliced carrots and celery. Bring the soup to a boil, then reduce heat and simmer for 15–20 minutes until vegetables are tender.
- Stir in the shredded cooked chicken. Simmer for another 5 minutes until heated through.
- Remove from heat. Stir in the lime juice, cilantro, and parsley. Season with sea salt to taste.
- Ladle into bowls and serve warm. Enjoy!
Notes
This soup keeps well in the refrigerator for up to 4 days. For a dairy-free and gluten-free option, the recipe is already compliant. The black pepper is crucial as it helps the body absorb curcumin from turmeric more effectively.
Nutrition
- Calories: 385
- Sugar: 6 g
- Fat: 24 g
- Carbohydrates: 16 g
- Protein: 28 g

k">
Tried This Recipe? Leave a Comment!
Did you make this recipe? I’d love to hear how it turned out! Please leave a comment and a rating below. Your feedback helps other home cooks and supports cheerychop.com!
For more delicious inspiration, follow me on Pinterest!