“`html
Table of Contents
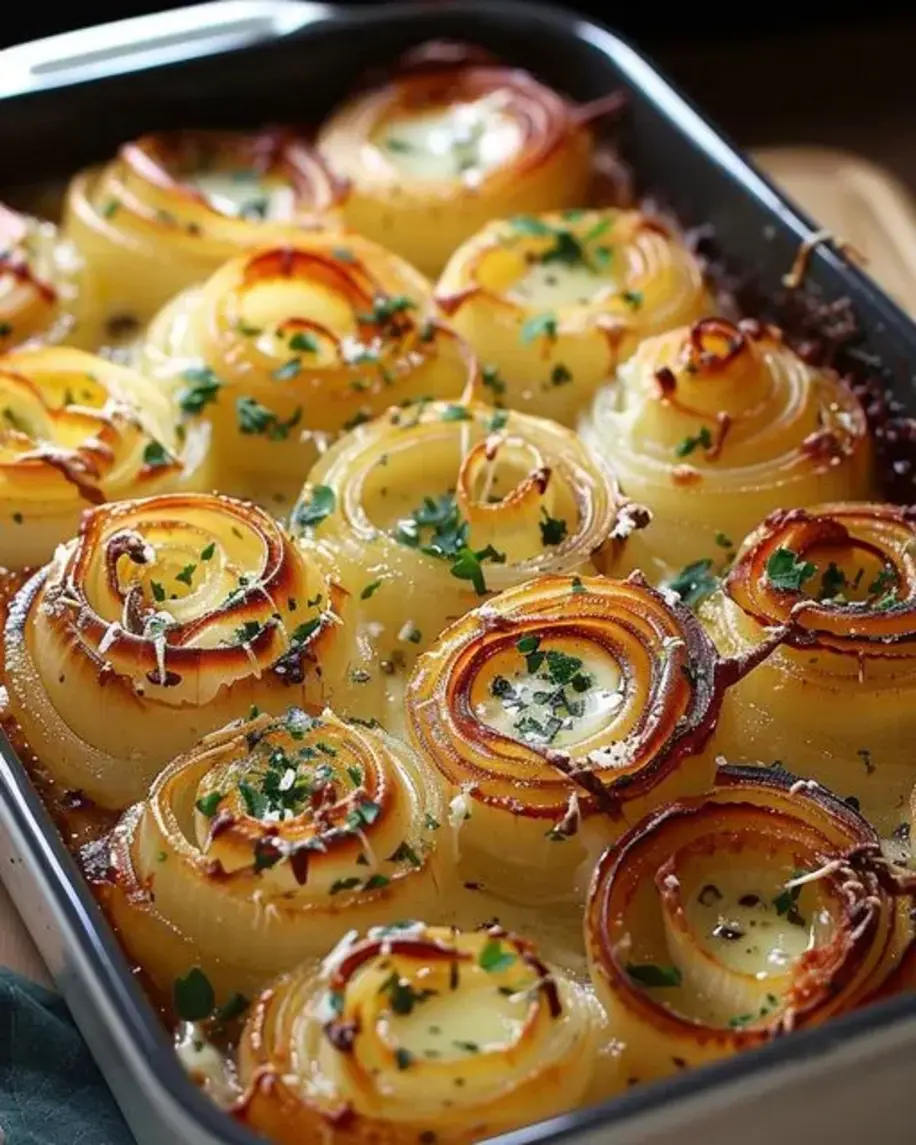
Cheesy Vidalia Onion Delight Recipe – A Rich, Golden Casserole with Caramelized Sweet Onions
Every time I walk through the Union Square Greenmarket in early spring and see those flat, golden-brown Vidalia onions piled high, I’m transported straight back to my mother’s kitchen in Morocco. She would caramelize onions slowly, patiently, until they were jammy and sweet, then spoon them over everything from lamb tagine to simple flatbreads. This Cheesy Vidalia Onion Delight recipe is my love letter to that memory — except now I’ve layered in the French training I received in Paris, where I learned that a little bit of patience (and the right cheese blend) can turn humble onions into something truly spectacular. The key? Caramelizing the Vidalia onions first to unlock their natural sugars, then baking them in a luscious cream-and-cheese sauce until bubbly and golden. It’s the kind of Vidalia onion casserole that steals the show at any holiday table or weeknight dinner.
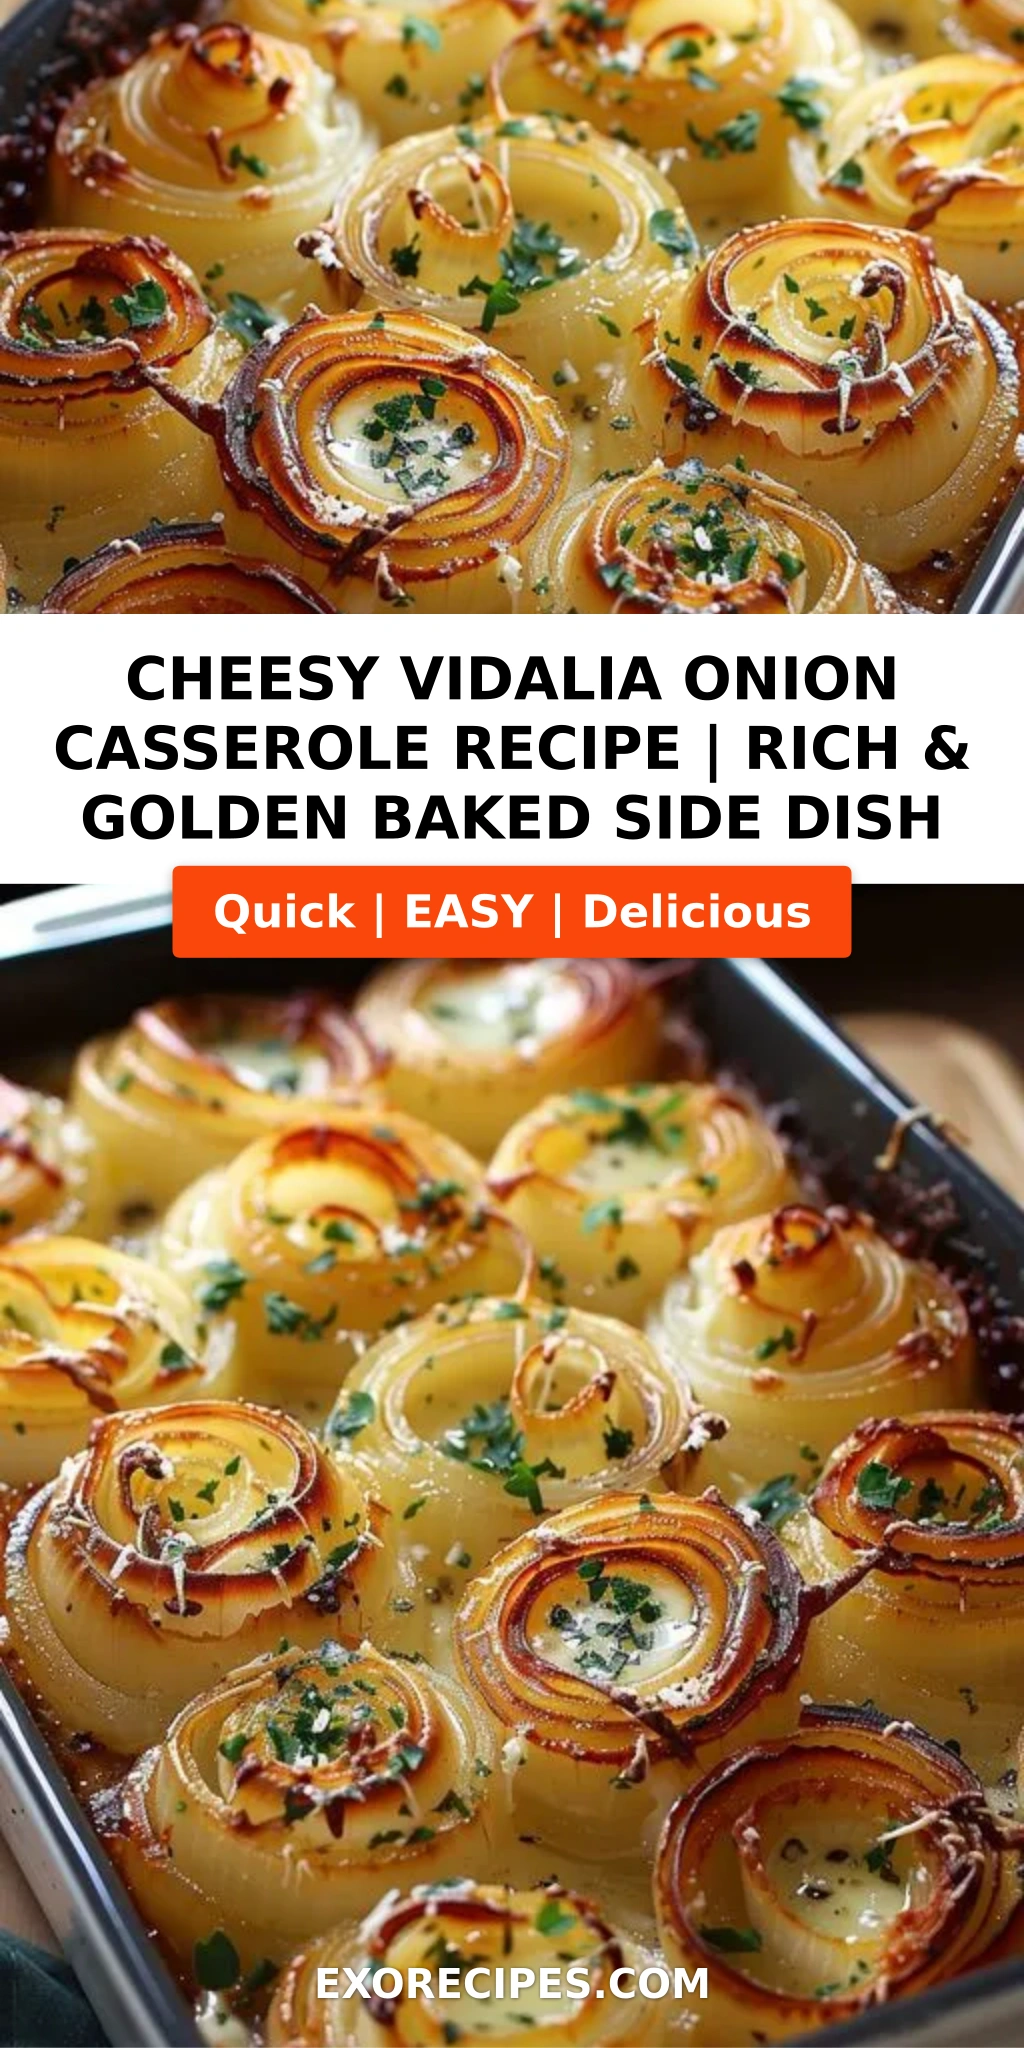
Imagine this: fork-tender, sweet onion ribbons swimming in a rich, velvety sauce made from heavy cream, sharp cheddar, and nutty Parmesan. The top bakes into a crispy, golden-brown crust that gives way to a silky, luscious center beneath. The aroma alone — butter, caramelized onions, and melted cheese — will have everyone wandering into the kitchen asking, “What’s for dinner?” The sweetness of the Vidalias is key here; they’re famously mild and sugary, which means they caramelize beautifully without turning bitter. A pinch of paprika adds just a whisper of warmth and a beautiful blush of color. This baked Vidalia onions dish is comfort food at its finest, but with a chef’s touch that makes it feel special enough for company.
I’ve tested this one-pan wonder at least a dozen times in my tiny NYC kitchen, and I’m thrilled to share my perfected version with you. The secret? A quick stovetop caramelization before the oven — that extra step is what transforms this from a good easy onion side dish into a great one. In this post, I’ll walk you through every detail: how to slice the onions for the best texture, which cheese blend gives the creamiest melt, and one common mistake that can make your casserole watery (and exactly how to avoid it). Plus, I’m sharing three easy variations including a dairy-free option and a Moroccan-spiced twist. Let’s make some magic with those gorgeous Vidalia onions!
Why This Cheesy Vidalia Onion Delight Recipe Is the Best
The Flavor Secret — Most onion casseroles skip the caramelization step, but that’s where all the magic happens. By taking 15 minutes to slowly cook the sliced Vidalias in butter, you’re coaxing out their natural sweetness and building a deep, savory foundation that no amount of cheese can fake. I learned this technique during my pastry training in Paris, of all places — caramelizing onions for a savory tarte Tatin. That same patience transforms this Vidalia onion casserole into something truly memorable. The duo of cheddar and Parmesan adds sharpness and umami that balances the sweetness perfectly.
Perfected Texture — Nobody wants a soggy, watery casserole. My method calls for cooking the onions just until they’re softened and lightly caramelized — not stewed. Then the cream-and-cheese mixture pours over the top and bakes into a luscious, custard-like sauce. The cheese on top forms a golden, crispy crust that contrasts beautifully with the tender onions underneath. Every forkful gives you that satisfying crunch-then-melt experience that keeps you going back for more.
Foolproof & Fast — Despite the chef-level results, this recipe is genuinely approachable for any home cook. You don’t need any special equipment (a skillet and a baking dish are all you need), and the steps are straightforward. I’ve designed this easy onion side dish to be forgiving: slightly thicker onion slices? No problem. Want to prep it a day ahead? Absolutely. Whether you’re a seasoned cook or just starting out, this recipe will make you look like a pro.
Cheesy Vidalia Onion Delight Recipe Ingredients
I picked up these Vidalia onions at the Grand Army Plaza Greenmarket in Brooklyn last weekend — they’re in peak season from April through June, and their sweetness is unmatched. When I was training in Paris, my chef always said, “The quality of your ingredients is the only non-negotiable,” and that’s never been truer than with this dish. Here’s everything you’ll need for the best Cheesy Vidalia Onion Delight recipe.
Ingredients List
- 4 large Vidalia onions, sliced (about ¼-inch thick)
- 2 tablespoons butter (salted or unsalted both work)
- 1 cup shredded cheddar cheese (sharp or medium — I prefer sharp for more flavor)
- ½ cup grated Parmesan cheese (freshly grated is best)
- 1 cup heavy cream
- ½ teaspoon salt
- ¼ teaspoon black pepper (freshly ground)
- ¼ teaspoon paprika (smoked or sweet — both work beautifully)
Ingredient Spotlight
Vidalia Onions — These are the star of the show. Vidalias are a type of sweet onion grown in specific counties in Georgia, and they’re prized for their low sulfur content, which makes them mild and sweet even when raw. When cooked, they become jammy and almost candy-like without any bitterness. If you can’t find Vidalias, look for another sweet onion variety like Walla Walla or Maui. You want onions that feel heavy for their size with crisp, tight skins — avoid any that feel soft or have green sprouts.
Cheddar Cheese — I use sharp cheddar because it stands up to the sweetness of the onions and adds a tangy depth. For the best melt, buy a block and shred it yourself at home — pre-shredded cheese contains anti-caking agents that can make the sauce grainy. Medium cheddar works too, but you’ll lose a bit of that punch. For a more adult flavor, try a well-aged white cheddar.
Parmesan Cheese — This is my secret weapon for the golden top. Parmesan adds a salty, nutty note that cheddar alone can’t provide, and it helps create that irresistible crispy crust. Always use real Parmigiano-Reggiano if your budget allows — it melts differently than the stuff in the green can. I buy a wedge every week at Eataly in the Flatiron district and grate it fresh as needed.
Heavy Cream — The cream creates a rich, velvety sauce that binds everything together. Don’t substitute with milk or half-and-half here, or the sauce will be thin and won’t set properly. If you need a lighter option, you can use a combination of ½ cup heavy cream and ½ cup whole milk — but the texture won’t be quite as luxurious.
| Original Ingredient | Best Substitution | Flavor / Texture Impact |
|---|---|---|
| Vidalia onions | Walla Walla or Maui sweet onions | Similar sweetness; slightly less tender but still excellent |
| Sharp cheddar | Gruyère or Gouda | Gruyère adds nutty depth; Gouda gives a creamier, milder melt |
| Parmesan | Pecorino Romano or Asiago | Pecorino is saltier and sharper; Asiago is milder and creamier |
| Heavy cream | ½ cup heavy cream + ½ cup whole milk | Lighter texture, slightly less rich, still creamy |
How to Make Cheesy Vidalia Onion Delight — Step-by-Step
Trust me when I say this is one of those recipes that looks and tastes far more complicated than it actually is. Here’s exactly how to make this Cheesy Vidalia Onion Delight recipe, with all my chef-tested tips along the way.
Step 1: Preheat and Prep
Preheat your oven to 375°F (190°C). Grease a 9×13-inch baking dish with a little butter or non-stick spray. Set it aside while you work on the onions.
💡 mia’s Pro Tip: Place your baking dish on a sheet pan before pouring in the cream mixture — this catches any accidental spills and makes transferring to the oven much easier.
Step 2: Caramelize the Onions
In a large skillet, melt 2 tablespoons of butter over medium heat. Add the sliced Vidalia onions and cook, stirring occasionally, for about 15 minutes, until they are softened, translucent, and just starting to turn golden at the edges. You’re not looking for deep brown caramelization here — just a gentle softening and light color.
⚠️ Common Mistake to Avoid: Don’t rush this step with high heat! Medium heat is essential. If you cook the onions too fast, they’ll brown on the outside but stay crunchy inside, and you’ll lose that silky texture.
Step 3: Layer the Onions
Spread the caramelized onions evenly in the prepared baking dish. Use a spatula to create an even layer — this ensures every bite gets the same amount of cheesy goodness.
💡 mia’s Pro Tip: If you want extra depth, deglaze the skillet with a splash of dry white wine (about ¼ cup) after removing the onions, let it reduce for 30 seconds, then pour that over the onions before adding the cheese mixture. It’s optional but absolutely delicious.
Step 4: Mix the Cheese Sauce
In a small bowl, whisk together the shredded cheddar, grated Parmesan, heavy cream, salt, pepper, and paprika. Pour this mixture evenly over the onions, making sure to cover as much surface area as possible.
⚠️ Common Mistake to Avoid: Don’t skip the paprika! It’s not just for color — it adds a subtle warmth that brightens the whole dish. Use smoked paprika for a deeper, almost bacon-like note.
Step 5: Bake to Golden Perfection
Bake for 20-25 minutes, until the sauce is bubbly and the top is golden brown and slightly crispy. The cheese should be melted and starting to brown in spots.
💡 mia’s Pro Tip: For an extra-crispy top, switch the oven to broil for the last 2-3 minutes. Watch it carefully — it can go from golden to burnt very quickly!
Step 6: Rest and Serve
Let the casserole cool for at least 5 minutes before serving. This allows the sauce to set slightly so it doesn’t run all over the plate. Serve warm and watch it disappear.
⚠️ Common Mistake to Avoid: Don’t skip the resting time! If you serve it straight from the oven, the sauce will be too runny. Those 5 minutes make all the difference.
| Step | Action | Duration | Key Visual Cue |
|---|---|---|---|
| 1 | Preheat oven and prep dish | 5 minutes | Oven at 375°F, dish greased |
| 2 | Caramelize onions in butter | 15 minutes | Onions softened, translucent, slightly golden |
| 3 | Spread onions in dish | 2 minutes | Even layer in 9×13 dish |
| 4 | Mix and pour cheese sauce | 3 minutes | Sauce covers onions evenly |
| 5 | Bake | 20-25 minutes | Bubbly, golden top, cheese melted |
| 6 | Rest and serve | 5 minutes | Sauce slightly set, not runny |
Serving & Presentation
This baked Vidalia onions dish is beautiful right out of the oven — all bubbly and golden on top. I like to serve it family-style, straight from the baking dish, with a large spoon so everyone can scoop up some of that cheesy goodness. For individual portions, use a wide spatula to lift each serving carefully, keeping the golden crust intact on top. A sprinkle of fresh thyme or chives adds a lovely pop of green and a fresh note that cuts through the richness.
In my NYC kitchen, I pair this with a simple roasted chicken or pan-seared pork chops when I want a hearty dinner. It also makes a killer side for holiday meals — think Thanksgiving or Easter — because it can be prepped ahead and baked just before serving. For a vegetarian main, serve it alongside a crisp green salad dressed with lemon vinaigrette and some crusty bread to soak up every last drop of sauce.
💡 mia’s Pro Tip: For an elegant brunch side, serve this along with a frittata or quiche and a glass of crisp Sauvignon Blanc. The acidity in the wine cuts through the richness of the cheese and cream beautifully.
| Pairing Type | Suggestions | Why It Works |
|---|---|---|
| Main Dish | Roasted chicken, grilled pork chops, pan-seared steak | Rich, savory meats balance the sweet, creamy casserole |
| Side Dish | Simple green salad, roasted asparagus, steamed green beans | Fresh, bright vegetables contrast the richness |
| Beverage | Sauvignon Blanc, Chardonnay, dry Riesling, light lager | Acidity and bubbles cut through the creamy cheese |
| Garnish | Fresh thyme, chives, parsley, or a pinch of flaky sea salt | Adds freshness, color, and a pop of flavor |
Make-Ahead, Storage & Reheating
As a busy cook in New York City, I rely on make-ahead dishes that save me time without sacrificing flavor. This easy onion side dish is one of my favorites to prep on a Sunday and enjoy throughout the week. The flavors actually deepen overnight as the onions soak up the cheesy sauce, so leftovers are often even better the next day.
| Method | Container | Duration | Reheating Tip |
|---|---|---|---|
| Refrigerator | Airtight container or covered baking dish | Up to 4 days | Reheat at 350°F for 15 minutes, or in microwave in 30-second bursts |
| Freezer | Freezer-safe container or tightly wrapped dish | Up to 2 months | Thaw overnight in fridge, then reheat at 350°F for 20 minutes |
| Make-Ahead | Assemble in baking dish, cover, refrigerate | Up to 24 hours in advance | Add 5-10 minutes to baking time if baking from cold |
To reheat from the refrigerator, I prefer using the oven because it helps re-crisp that golden top. Just pop the dish into a 350°F oven for about 15 minutes, or until bubbly and hot throughout. If you’re in a hurry, the microwave works too — just know the top won’t be as crispy. For frozen casserole, thaw it overnight in the refrigerator first, then reheat as directed. I don’t recommend freezing the unbaked casserole because the cream sauce can separate during thawing.
⚠️ Common Mistake to Avoid: When reheating, don’t use high heat! Gentle, even reheating prevents the cream sauce from breaking and keeps the texture silky. If the top starts browning too quickly, tent the dish loosely with foil.
Variations & Easy Swaps
| Variation | Key Change | Best For | Difficulty Impact |
|---|---|---|---|
| Moroccan Spiced Twist | Add 1 tsp cumin, ½ tsp cinnamon, and ¼ tsp cayenne | Adventurous palates, special dinners | Easy (just add spices) |
| Gluten-Free / Dairy-Free | Use dairy-free butter, coconut cream, and vegan cheese | Dietary restrictions, allergy-friendly | Easy (swap ingredients) |
| Herb & Garlic Lovers | Add 3 minced garlic cloves and 2 tbsp mixed fresh herbs (thyme, rosemary, sage) | Garlic lovers, holiday meals | Easy (add with onions) |
Moroccan Spiced Twist
This is my favorite variation — a nod to my childhood in Morocco. While the onions are caramelizing, add 1 teaspoon of ground cumin, ½ teaspoon of cinnamon, and ¼ teaspoon of cayenne pepper. The cumin adds an earthy warmth, the cinnamon brings out the natural sweetness of the Vidalias, and the cayenne gives a gentle kick. Finish with a handful of toasted slivered almonds and a sprinkle of fresh cilantro before serving. It’s the kind of Vidalia onion casserole that would make my mother proud.
Gluten-Free / Dairy-Free Option
This recipe is naturally gluten-free, so that part is easy. For a dairy-free version, substitute the butter with a high-quality vegan butter (I like Miyoko’s), use full-fat coconut cream instead of heavy cream, and pick a vegan cheddar-style shred that melts well (Violife or Follow Your Heart work great). The texture will be slightly less rich, but still creamy and delicious. Add an extra pinch of salt and a squeeze of lemon juice to brighten the flavors — the acidity helps balance the coconut.
Herb & Garlic Lovers
For a more savory, aromatic version, add 3 finely minced garlic cloves to the skillet along with the onions for the last 5 minutes of caramelization. Then stir in 2 tablespoons of mixed fresh herbs — thyme, rosemary, and sage are my favorites. The garlic becomes sweet and mellow as it cooks, while the herbs add a fragrant, woodsy note that pairs beautifully with the cheese. This version is especially lovely at Thanksgiving alongside roasted turkey.
What is the best way to slice Vidalia onions for Cheesy Vidalia Onion Delight?
For this Cheesy Vidalia Onion Delight recipe, I recommend slicing the onions about ¼-inch thick — not too thin and not too thick. If you slice them too thin (less than ⅛ inch), they’ll dissolve into the sauce and lose their texture. If you slice them too thick (over ½ inch), they won’t soften enough during the caramelization and baking time, and you’ll end up with crunchy onions instead of tender ones. Use a sharp chef’s knife and slice through the root end last to hold the onion together. You want even, uniform slices so they cook at the same rate. A mandoline slicer set to ¼ inch works great if you have one, but a steady hand and a good knife are all you really need.
Can I use a different type of onion if I don’t have Vidalia onions?
Absolutely! While Vidalia onions are ideal because of their low sulfur content and high sugar content, you can substitute other sweet onion varieties like Walla Walla or Maui onions with excellent results. If you can’t find sweet onions at all, you can use yellow onions — but add a teaspoon of sugar to the skillet when caramelizing to compensate for the lower natural sweetness. Red onions will work too, but they’ll turn the sauce a slightly pinkish color and have a milder flavor. I don’t recommend white onions for this recipe, as they tend to be sharper and more pungent, which can overpower the delicate cheese sauce.
How long should I bake Cheesy Vidalia Onion Delight for the perfect golden top?
Bake this Cheesy Vidalia Onion Delight recipe at 375°F for 20-25 minutes, or until the sauce is bubbly around the edges and the top is golden brown. Every oven is a little different, so start checking at 20 minutes. You’re looking for the cheese to be fully melted and starting to brown in spots, with the cream sauce visibly bubbling along the sides of the dish. For an extra-crispy, deep golden crust, switch the oven to broil for the final 2-3 minutes — but keep a close eye on it, because the top can go from perfectly golden to burnt in seconds. If the top is browning too quickly but the center isn’t bubbly yet, tent the dish loosely with foil and continue baking.
What cheeses work best in Cheesy Vidalia Onion Delight besides cheddar?
Great question! While sharp cheddar is my go-to for this Vidalia onion casserole, there are several other cheeses that work beautifully. Gruyère is my top substitute — it melts like a dream and adds a nutty, slightly sweet flavor that pairs wonderfully with caramelized onions. Gouda (especially smoked Gouda) adds a creamy, rich texture and a subtle smokiness. Fontina is another excellent choice for its superb melting qualities and mild, buttery flavor. For a more adventurous blend, try a combination of half Gouda and half Parmesan. Avoid using only mozzarella, as it can become stringy and lacks the sharpness that balances the sweetness of the onions. Whichever cheese you choose, always grate it fresh from a block for the best melt.
Can I prep Cheesy Vidalia Onion Delight the night before?
Yes, this is one of my favorite make-ahead tricks! You can assemble the entire Cheesy Vidalia Onion Delight recipe up to 24 hours in advance. Simply caramelize the onions, spread them in the baking dish, pour the cheese sauce over the top, cover tightly with plastic wrap or foil, and refrigerate. When you’re ready to bake, remove it from the fridge while the oven preheats (about 20 minutes), then bake as directed, adding 5-10 minutes to the baking time since you’re starting from cold. The flavors actually meld and deepen overnight, making this a fantastic option for holiday entertaining. I wouldn’t recommend freezing the unbaked casserole, though — the cream sauce can separate during thawing.
How do I prevent my Cheesy Vidalia Onion Delight from being watery?
A watery casserole is usually the result of not caramelizing the onions long enough or using too much cream. Here are my tips: First, cook the onions over medium heat for the full 15 minutes until they’ve released most of their moisture and are starting to lightly caramelize. If you skip this step, the onions will release water into the dish during baking and make the sauce thin. Second, use full-fat heavy cream — lighter alternatives like milk or half-and-half have more water content and won’t thicken properly. Third, let the baked casserole rest for 5 minutes before serving — this allows the sauce to set slightly. Finally, make sure your cheese is freshly grated; pre-shredded cheese contains anti-caking agents that can interfere with the sauce’s texture.
Can I add protein to make this a main dish?
Absolutely! This baked Vidalia onions dish can easily become a hearty main course. I love adding cooked, crumbled bacon or pancetta — just cook it first, set it aside, and use a tablespoon of the rendered fat in place of some of the butter for extra flavor. Stir the cooked meat into the onions before adding the cheese sauce. Diced cooked ham or shredded rotisserie chicken also work wonderfully. For a vegetarian protein boost, add a can of drained and rinsed chickpeas or some cooked white beans along with the onions. If you’re adding protein, you may want to increase the seasoning slightly — an extra pinch of salt and pepper helps everything come together. Serve with a side salad and crusty bread for a complete meal.
What can I serve with Cheesy Vidalia Onion Delight for a complete meal?
This Cheesy Vidalia Onion Delight recipe is versatile enough to pair with many dishes. For a simple weeknight dinner, I serve it alongside roasted chicken thighs or pan-seared pork chops with a side of steamed green beans or a simple arugula salad with lemon vinaigrette. For holidays, it’s a beautiful side to roast turkey, prime rib, or baked ham. If you’re serving it as a vegetarian main, pair it with a hearty lentil salad or roasted vegetables and some crusty bread to soak up the sauce. Wine-wise, a crisp Sauvignon Blanc or an unoaked Chardonnay cuts through the richness beautifully. For beer lovers, a light lager or pilsner is a refreshing counterpoint.
Share Your Version!
I’d love to see how this Cheesy Vidalia Onion Delight recipe turns out in your kitchen! Did you try one of the variations — maybe the Moroccan spiced twist with cumin and cinnamon, or the herb and garlic version? Or did you create your own spin with a different cheese blend or add a protein? Drop a star rating and a comment below to tell me about it. Your feedback helps other readers know what to expect and inspires me to keep developing new recipes for you!
Snap a photo of your golden, bubbly casserole and share it on Instagram or Pinterest with the hashtag #CheesyVidaliaOnionDelight — and make sure to tag me @exorecipes so I can see your creation! I personally love resharing reader versions on my stories. And here’s a question I’d love your answer to: What’s your go-to holiday side dish — is it a classic green bean casserole, or does this cheesy onion bake just become your new tradition?
From my NYC kitchen to yours — I hope this recipe brings as much warmth to your table as it does to mine. — mia 🧡
Love This Recipe? Save It to Pinterest!
If you enjoyed this Cheesy Vidalia Onion Delight recipe, don’t let it get lost in your browser tabs! 😄 Pin it now so you can find it again anytime — and explore hundreds more tried-and-tested recipes waiting for you on my Pinterest boards.
👉 Follow mia on Pinterest @exorecipe
📌 Pin this recipe · 🔁 Re-pin your favorites · 💬 Tag me when you make it — I love seeing your creations!
“`
Print
Cheesy Vidalia Onion Delight
- Prep Time: 10 minutes
- Cook Time: 40 minutes
- Total Time: 50 minutes
- Yield: 6 servings 1x
- Method: Side Dish
- Cuisine: American
Description
A rich, cheesy casserole featuring sweet Vidalia onions, baked to golden perfection.
Ingredients
- 4 large Vidalia onions, sliced
- 2 tablespoons butter
- 1 cup shredded cheddar cheese
- 1/2 cup grated Parmesan cheese
- 1 cup heavy cream
- 1/2 teaspoon salt
- 1/4 teaspoon black pepper
- 1/4 teaspoon paprika
Instructions
- Preheat oven to 375°F (190°C).
- In a large skillet, melt butter over medium heat. Add sliced onions and cook until softened and lightly caramelized, about 15 minutes.
- Spread the caramelized onions evenly in a greased 9×13-inch baking dish.
- In a small bowl, mix cheddar cheese, Parmesan cheese, heavy cream, salt, pepper, and paprika. Pour over the onions.
- Bake for 20-25 minutes, until bubbly and golden on top.
- Let cool for 5 minutes before serving.
Nutrition
- Calories: 340
- Sugar: 6g
- Fat: 28g
- Carbohydrates: 12g
- Protein: 10g
Tried This Recipe? Leave a Comment!
Did you make this recipe? I’d love to hear how it turned out! Please leave a comment and a rating below. Your feedback helps other home cooks and supports cheerychop.com!
For more delicious inspiration, follow me on Pinterest!