Scrambled Eggs with Mushrooms: Easy, Nutritious, and Delicious Recipe

mushroom scrambled eggs, scrambled eggs and mushrooms recipe, mushroom and egg breakfast, easy scrambled eggs, mushroom egg skillet

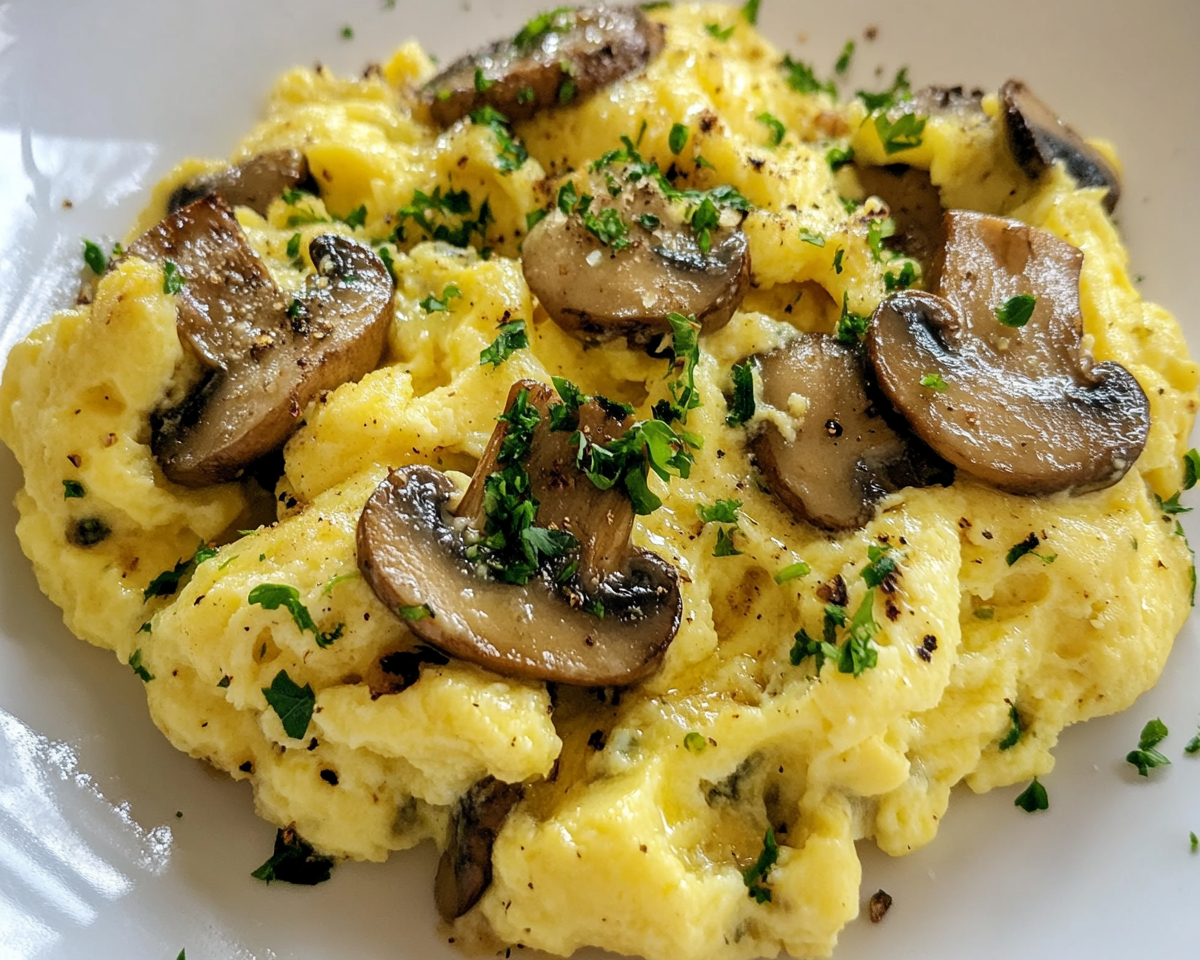
Scrambled Eggs with Mushrooms: A Hearty Breakfast Delight

Introduction

Scrambled eggs with mushrooms is a timeless breakfast dish combining the creamy, fluffy texture of eggs with the rich, earthy flavor of mushrooms. This dish is not only delicious but also packed with nutrients, making it a perfect choice for any meal of the day. Whether you’re cooking for yourself or hosting a brunch, this versatile recipe will surely impress.

To explore other comforting breakfast options, check out Sheet Pan Pancakes for a delightful and easy-to-make morning treat.


Why Combine Eggs and Mushrooms?

Eggs and mushrooms are a match made in culinary heaven. The creamy texture of eggs complements the earthy umami of mushrooms, creating a balanced flavor profile. Mushrooms are rich in antioxidants, fiber, and vitamins, while eggs provide high-quality protein and essential nutrients like choline and vitamin D.

For more ideas on creating quick and healthy breakfasts, explore Pancake Muffins, a perfect complement to your morning table.


Ingredients for Scrambled Eggs with Mushrooms

Core Ingredients

  • Eggs: The base of the dish, providing protein and a creamy texture.
  • Mushrooms: Any variety works, but white button, cremini, or shiitake are popular choices.
  • Butter or Oil: To sauté the mushrooms and add richness.
  • Milk or Cream: Optional, for creamier eggs.
  • Seasonings: Salt, pepper, and herbs like parsley or thyme.

Optional Additions

  • Garlic or onions for added flavor.
  • Spinach or kale for a nutritional boost.
  • Cheese (cheddar, feta, or parmesan) for a creamy finish.

How to Make Scrambled Eggs with Mushrooms

1. Preparing the Mushrooms

  • Clean the mushrooms by wiping them with a damp cloth or brushing off dirt.
  • Slice them thinly for even cooking.

2. Cooking the Mushrooms

  • Heat a skillet over medium heat with butter or oil.
  • Add mushrooms and sauté until golden brown, about 5-7 minutes.
  • Season with salt and pepper and set aside.

3. Scrambling the Eggs

  • In a bowl, whisk eggs with a splash of milk or cream for extra fluffiness.
  • Pour the eggs into the skillet over low heat.
  • Stir gently and continuously for soft, creamy eggs.

4. Combining and Serving

  • Fold the sautéed mushrooms into the eggs.
  • Serve hot with garnishes like fresh herbs or grated cheese.

Tips for Perfect Scrambled Eggs

  • Always cook on low heat to prevent overcooking.
  • Use a non-stick pan to avoid sticking and ensure even cooking.
  • Stir continuously for creamy, soft eggs.

Variations and Customizations

Protein Additions

  • Add diced ham, bacon, or smoked salmon for a protein-packed meal.

Vegetarian Options

  • Include additional vegetables like bell peppers, zucchini, or tomatoes.

Vegan Scrambled Eggs

  • Replace eggs with tofu crumbles seasoned with turmeric and nutritional yeast for a plant-based alternative.

Serving Suggestions

  • Serve with crusty bread, toast, or bagels for a hearty breakfast.
  • Pair with avocado slices or a side salad for a balanced meal.
  • Complement the dish with a refreshing drink like orange juice or coffee.

FAQs

Can I use canned mushrooms?

Yes, but fresh mushrooms provide a better texture and flavor.

What’s the best way to clean mushrooms?

Avoid washing mushrooms under running water. Instead, wipe them with a damp cloth to prevent them from becoming waterlogged.

Can I make this dish ahead of time?

Scrambled eggs are best served fresh, but you can store leftovers in an airtight container for up to 2 days.

How do I prevent eggs from sticking to the pan?

Use a non-stick pan and enough butter or oil. Stir continuously while cooking over low heat.


Internal Linking Suggestions

  1. Link to “Perfect Scrambled Eggs Recipe” with anchor text: Master the art of making perfect scrambled eggs.
  2. Link to “Beginner-Friendly Mushroom Recipes” with anchor text: Explore beginner-friendly ways to cook mushrooms.
  3. Link to “Quick Breakfast Ideas” with anchor text: Discover quick and healthy breakfast recipes.

External Links and Recommended Anchor Text

  1. Health Benefits of Mushrooms
    Anchor Text: Explore the health benefits of mushrooms.
  2. How to Clean Mushrooms Properly
    Anchor Text: Learn the best way to clean mushrooms.
  3. Nutritional Value of Eggs
    Anchor Text: Discover the nutritional value of eggs.

Conclusion

Scrambled eggs with mushrooms is a versatile, nutritious, and delicious dish that can be customized to suit any taste or dietary preference. Whether enjoyed as a quick breakfast or a gourmet brunch, this recipe is sure to become a staple in your kitchen. For more inspiration, visit Elevate Breakfast with Sheet Pan Pancakes to complement your meal.

Taco Soup with Ground Beef: Easy, Hearty, and Delicious Recipe

ground beef taco soup, beef taco soup recipe, hearty taco soup, easy taco soup, one-pot taco soup, Mexican taco soup

Taco Soup with Ground Beef: A Hearty One-Pot Delight

Introduction

Taco Soup with Ground Beef is a deliciously hearty meal that brings together the zest of tacos and the comforting warmth of soup. Perfect for busy weeknights, this dish is a lifesaver for those who crave a simple yet satisfying recipe. Not only is it easy to prepare, but it also offers a chance to incorporate a variety of healthy ingredients. Whether you’re meal-prepping for the week or hosting a casual family dinner, this soup is sure to be a hit.

To explore other comforting soup recipes, check out Crockpot Potato Soup with Hashbrowns, which pairs wonderfully with cold evenings.


Why Ground Beef is Ideal for Taco Soup

Ground beef is a popular choice for taco soup because of its rich flavor and versatility. It’s easy to cook, absorbs seasoning well, and provides the hearty texture that makes this soup stand out. Moreover, ground beef is widely available and pairs perfectly with classic taco ingredients like beans, corn, and tomatoes.

For more inspiration, you might enjoy this guide to slow-cooker recipes like Crock-Pot Baked Ziti.


Ingredients for Taco Soup

Core Ingredients

  • Ground Beef: The star protein of the dish.
  • Taco Seasoning: A blend of spices that creates the signature taco flavor.
  • Beans: Black, kidney, or pinto beans add protein and texture.
  • Corn: Provides sweetness and balance.
  • Diced Tomatoes: Fire-roasted tomatoes bring a smoky depth.
  • Onions and Garlic: Essential for a flavorful base.
  • Beef Broth: Enhances the soup’s savory notes.

Optional Toppings

  • Shredded cheddar cheese
  • Sour cream or Greek yogurt
  • Sliced avocado
  • Tortilla strips or chips
  • Fresh cilantro

For another comforting, beef-centric recipe, check out the No-Peek Beef Tips.


Step-by-Step Instructions

1. Preparing the Ingredients

  • Dice onions and garlic.
  • Rinse and drain the beans.
  • Gather spices for homemade taco seasoning if preferred.

2. Cooking the Ground Beef

  • Heat a large pot over medium heat.
  • Add ground beef and cook until browned. Remove excess grease for a leaner soup.
  • Stir in diced onions and garlic, cooking until translucent.

3. Building the Soup

  • Add taco seasoning and mix well to coat the beef.
  • Stir in beans, corn, tomatoes, and beef broth.
  • Bring to a boil, then reduce heat to simmer for 20-30 minutes.

4. Serving

  • Ladle into bowls and top with cheese, sour cream, and avocado.
  • Serve with cornbread or tortilla chips for a complete meal.

Nutritional Benefits

Taco soup is packed with protein, fiber, and vitamins, making it as nutritious as it is flavorful. Using lean ground beef and low-sodium ingredients can further enhance its health benefits.

For a low-carb alternative, skip the beans and corn, and substitute with zucchini or cauliflower.


Customizations and Variations

Make It Your Own

  • Swap ground beef for ground turkey or chicken for a lighter version.
  • Use plant-based crumbles or extra beans for a vegetarian option.
  • Adjust the spice level with fresh jalapeños or mild taco seasoning.

Cooking Methods

  • Slow Cooker: Add all ingredients to the crockpot and cook on low for 6-8 hours.
  • Instant Pot: Brown the beef using the sauté function, then pressure cook for 15 minutes.

For more creative spins on tacos, try Fusion Cheesy Taco Stuffed Pasta Shells.


Tips for Perfect Taco Soup

  • Freshness Counts: Use fresh garlic and onions for the best flavor.
  • Homemade Taco Seasoning: Create your own spice blend to control sodium and flavor intensity.
  • Storage Tips: Taco soup tastes even better the next day. Store in airtight containers for up to 5 days, or freeze for up to 3 months.

Explore more meal-prep ideas like Cowboy Cornbread Casserole for inspiration.


FAQs

Can I make taco soup in advance?

Yes! This soup stores well and tastes better as the flavors meld over time.

What beans work best for taco soup?

Black, kidney, or pinto beans are all great options. Use a mix for added variety.

Is taco soup spicy?

It depends on the taco seasoning. For a milder version, use less chili powder or swap for a mild seasoning mix.


Internal Linking Suggestions

  • Link to “Chicken Taco Soup” with anchor text: Discover another flavorful taco soup variation.
  • Link to “8 Cans Taco Soup” with anchor text: Learn how to simplify taco soup with canned ingredients.

Conclusion

Taco Soup with Ground Beef is a versatile and satisfying meal that’s perfect for any occasion. Packed with bold flavors and wholesome ingredients, it’s sure to become a family favorite. Whether you’re a seasoned cook or a beginner, this recipe is straightforward and adaptable, making it a must-have in your recipe rotation. For more ideas, dive into The Ultimate Taco Casserole and expand your culinary adventures.

Strawberry Crunch Cheesecake: A Delicious No-Bake Dessert Recipe

strawberry shortcake cheesecake, no-bake strawberry cheesecake, strawberry crunch dessert, creamy strawberry cheesecake, strawberry cookie crust cheesecake

Strawberry Crunch Cheesecake: A Perfect Dessert for Every Occasion

Strawberry Crunch Cheesecake is a stunning dessert that combines the creamy texture of cheesecake with the nostalgic flavors of strawberry shortcake ice cream bars. It’s a no-bake treat that’s easy to make, visually appealing, and sure to impress your family and friends.

For more no-bake inspirations, check out No-Bake Banana Pudding Cheesecake.


What is Strawberry Crunch Cheesecake?

This dessert layers a buttery graham cracker crust, rich cream cheese filling, and a vibrant strawberry crunch topping. Inspired by the classic strawberry shortcake ice cream bar, this cheesecake is a mix of creamy, crunchy, and fruity flavors.

To learn more about cheesecake history and techniques, explore Serious Eats Cheesecake Guide.


Key Ingredients You’ll Need

For the Crust

  • Graham crackers or golden Oreos
  • Unsalted butter, melted
  • Granulated sugar

For the Filling

  • Cream cheese, softened
  • Heavy cream or whipped topping
  • Powdered sugar
  • Vanilla extract

For the Crunch Topping

  • Freeze-dried strawberries
  • Golden Oreos or shortbread cookies
  • Unsalted butter

Step-by-Step Instructions

1. Making the Crust

  • Crush graham crackers or Oreos in a food processor.
  • Mix with melted butter and sugar.
  • Press into a springform pan and chill in the refrigerator.

2. Preparing the Cheesecake Filling

  • Beat cream cheese until smooth.
  • Gradually add powdered sugar and vanilla extract.
  • Fold in whipped topping for a light texture.

3. Crafting the Strawberry Crunch Topping

  • Blend freeze-dried strawberries and cookies into fine crumbs.
  • Mix with melted butter for a crumbly texture.

4. Assembling the Cheesecake

  • Spread the cheesecake filling over the crust.
  • Sprinkle the strawberry crunch topping evenly.
  • Chill for at least 4 hours or overnight.

For a similar no-bake experience, try Easy No-Bake Banana Split Cheesecake.


Flavor Variations

Chocolate Strawberry Crunch Cheesecake

  • Add a chocolate layer to the crust or topping.

Lemon Strawberry Crunch Cheesecake

  • Add lemon zest and juice to the filling for a tangy twist.

Vegan Version

  • Use dairy-free cream cheese and coconut cream.

Serving and Presentation

  • Cutting Perfect Slices: Use a hot knife for clean cuts.
  • Decorating Tips: Garnish with fresh strawberries or whipped cream.
  • Pairing Ideas: Serve with a glass of sparkling rosé or iced tea.

FAQs

Can I Freeze Strawberry Crunch Cheesecake?

Yes, freeze in an airtight container for up to 2 months.

What’s the Best Pan to Use?

A springform pan works best for easy removal and presentation.

Can I Make This Gluten-Free?

Absolutely! Use gluten-free cookies for the crust and topping.

How Do I Store Leftovers?

Store in the refrigerator for up to 5 days in an airtight container.

Is It Possible to Add a Chocolate Drizzle?

Yes, a drizzle of melted chocolate adds a decadent touch.


Internal Linking Opportunities


Nutritional Information

Each slice (assuming 12 servings):

  • Calories: ~320
  • Protein: 4g
  • Fat: 20g
  • Carbohydrates: 35g

Conclusion

Strawberry Crunch Cheesecake is a dessert that combines visual appeal with mouthwatering flavors. Its creamy filling, crunchy topping, and effortless preparation make it ideal for gatherings or a weeknight treat. For more delicious dessert ideas, visit ExoRecipes.

Butterfinger Balls: A No-Bake Treat for Every Occasion

no-bake Butterfinger dessert, chocolate Butterfinger balls, peanut butter candy balls, Butterfinger treat recipe, bite-sized Butterfinger desserts, easy holiday treats

Butterfinger Balls: A Bite-Sized Delight

Butterfinger Balls are the perfect combination of crunchy, creamy, and chocolatey goodness. Made with crushed Butterfinger candy bars, peanut butter, and graham cracker crumbs, these no-bake treats are quick to make and even quicker to disappear at parties and holiday gatherings.

For similar no-bake ideas, explore The Ultimate Comfort Food: Crockpot Potato Soup with Hashbrowns to expand your comfort food recipe collection.


What Are Butterfinger Balls?

These bite-sized desserts feature a delicious filling of peanut butter, crushed Butterfinger candy, and graham cracker crumbs coated in melted chocolate. Their easy preparation and rich flavor make them a hit for any occasion. Whether you’re planning a holiday party or just craving a quick dessert, Butterfinger Balls are your go-to option.

For insights into chocolate melting techniques, check out Serious Eats’ Melting Chocolate Guide.


Ingredients You’ll Need

Key Ingredients

  • Butterfinger Candy Bars: Crushed for a crunchy texture.
  • Peanut Butter: Creamy works best, but crunchy adds extra texture.
  • Graham Cracker Crumbs: For structure and flavor.
  • Powdered Sugar: Sweetens the filling.
  • Chocolate: Melting chocolate or almond bark for coating.

Optional Additions

  • Crushed pretzels for a salty kick.
  • White chocolate for drizzling.
  • Sprinkles for festive flair.

Step-by-Step Instructions

1. Preparing the Filling

  • In a mixing bowl, combine peanut butter, powdered sugar, and graham cracker crumbs.
  • Add crushed Butterfinger candy and mix until well combined.

2. Rolling the Balls

  • Scoop the mixture and roll into 1-inch balls.
  • Place on a parchment-lined baking sheet.

3. Melting the Chocolate

  • Melt chocolate or almond bark in a microwave-safe bowl or double boiler.
  • Dip each ball into the melted chocolate using a fork or toothpick.

4. Adding the Final Touches

  • Place the coated balls on the baking sheet.
  • Sprinkle with crushed Butterfinger candy or sprinkles.
  • Let the balls set at room temperature or refrigerate until firm.

Flavor Variations

1. White Chocolate Butterfinger Balls

  • Replace the chocolate coating with white chocolate for a sweeter taste.

2. Salty-Sweet Butterfinger Balls

  • Add crushed pretzels to the filling for a unique flavor twist.

3. Holiday-Themed Butterfinger Balls

  • Use red and green sprinkles or drizzle colored white chocolate for festive decor.

Serving Suggestions

  • For Parties: Arrange on a platter with other bite-sized treats.
  • As Gifts: Package in decorative boxes or bags with ribbons.
  • For Snacks: Serve chilled for a refreshing treat.

For more snack ideas, check out Homemade Garlic Breadsticks.


FAQs

Can I Make These in Advance?

Yes, Butterfinger Balls can be made up to 3 days ahead and stored in an airtight container.

Can I Freeze Butterfinger Balls?

Absolutely! Freeze them in a single layer and transfer to a freezer bag for up to 2 months.

What’s the Best Way to Crush Butterfinger Candy?

Use a food processor or place the candies in a zip-top bag and crush with a rolling pin.

Can I Make These Gluten-Free?

Yes! Substitute graham cracker crumbs with gluten-free alternatives.

Can I Use Dark Chocolate Instead?

Definitely. Dark chocolate adds a rich, less sweet flavor to balance the filling.


Nutritional Information

Each serving (2 balls):

  • Calories: ~120
  • Fat: 6g
  • Carbohydrates: 15g
  • Protein: 2g

Internal Linking Opportunities


Conclusion

Butterfinger Balls are a must-try for dessert lovers. Their combination of chocolate, peanut butter, and the iconic Butterfinger crunch makes them a favorite for every occasion. Whether you’re a beginner or a seasoned baker, this no-bake recipe is foolproof and fun to customize.

For more creative dessert recipes, explore ExoRecipes.

Creamy Sausage Alfredo Soup: The Ultimate Comfort in a Bowl

sausage Alfredo soup, creamy Alfredo sausage soup, sausage and spinach Alfredo soup, Italian sausage soup, rich Alfredo soup, hearty creamy sausage soup

Creamy Sausage Alfredo Soup: Comfort in a Bowl

When you think of hearty comfort food, Creamy Sausage Alfredo Soup stands out as the perfect blend of indulgence and warmth. This dish combines the creamy essence of Alfredo sauce with the rich flavor of savory sausage, creating a meal that’s easy to make and sure to impress.

For more creamy comfort food inspirations, try The Ultimate Comfort Food: Crockpot Potato Soup with Hashbrowns.


What Makes This Soup a Crowd Favorite?

Creamy Sausage Alfredo Soup is:

  • Rich and Flavorful: A velvety broth enriched with cream and parmesan.
  • One-Pot Convenience: Perfect for busy weeknights or meal prep.
  • Versatile: Easy to adapt with vegetables, pasta, or low-carb alternatives.

To master the art of creamy soups, check out Serious Eats’ Creamy Soups Guide.


Ingredients You’ll Need

Main Ingredients

  • Sausage: Italian sausage (spicy or mild)
  • Cream Base: Heavy cream, parmesan, and butter
  • Broth: Chicken or vegetable
  • Aromatics: Onion, garlic, and Italian herbs
  • Optional Additions: Spinach, mushrooms, or diced tomatoes

Optional Carbs

  • Small pasta (e.g., ditalini, shells)
  • Cauliflower rice for a low-carb option

Step-by-Step Instructions

1. Preparing the Sausage

  • Brown the sausage in a soup pot until fully cooked.
  • Remove excess grease to keep the soup light.

2. Building the Alfredo Base

  • Sauté onions and garlic in butter.
  • Stir in chicken broth and heavy cream.
  • Gradually whisk in shredded parmesan until melted.

3. Adding Vegetables

  • Incorporate spinach, mushrooms, or other vegetables.
  • Let simmer for a few minutes to soften the veggies.

4. Optional Pasta or Rice

  • Add uncooked pasta and let it cook in the broth.
  • For a low-carb version, stir in cauliflower rice in the last 5 minutes.

Flavor Variations

1. Spicy Sausage Alfredo

  • Use hot Italian sausage and red chili flakes for a kick.

2. Vegetarian Alfredo Soup

  • Swap sausage for plant-based crumbles and use veggie broth.

3. Loaded Alfredo Soup

  • Top with crispy bacon bits, extra cheese, or a dollop of sour cream.

Serving Suggestions

Pair this soup with:

  • Garlic Bread: Perfect for dipping.
  • Side Salad: A fresh green salad complements the richness.
  • Beverages: White wine or sparkling water.

For a perfect side, try Homemade Garlic Breadsticks.


FAQs

Can I Make This Soup Ahead?

Yes, it tastes even better the next day! Store in an airtight container in the fridge.

How Do I Prevent the Cream from Curdling?

Simmer on low heat and avoid boiling after adding the cream.

Can I Freeze Creamy Sausage Alfredo Soup?

Yes, but the texture may slightly change. Reheat on low and whisk to restore consistency.

What’s the Best Sausage for This Soup?

Italian sausage offers the best flavor, but you can use smoked or chicken sausage for variety.


Nutritional Information

Each serving (assuming 6 servings):

  • Calories: ~420
  • Protein: 18g
  • Carbs: 15g
  • Fat: 32g

Internal Linking Opportunities

Related Recipes from ExoRecipes:


Conclusion

Creamy Sausage Alfredo Soup is a dish that combines the best of hearty, creamy, and comforting flavors. Whether you’re looking for an easy weeknight meal or a dish to impress, this recipe is sure to deliver. For more comforting soup ideas, explore ExoRecipes.