Table of Contents
Baked Lemon Garlic Cod with Butter Sauce – Quick & Elegant 25-Minute Dinner
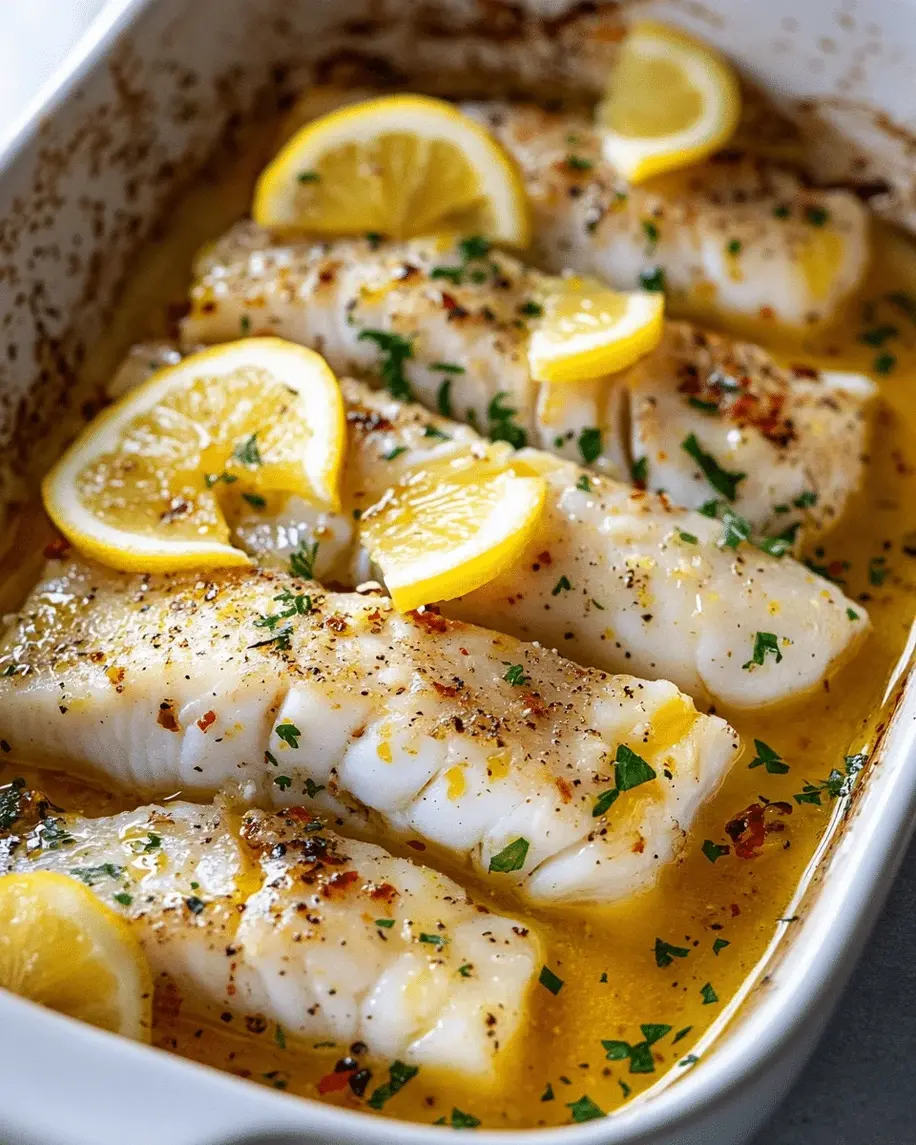
I still remember the first time I made this baked lemon garlic cod for a weeknight dinner in my tiny NYC apartment. The aroma of garlic sizzling in butter, the bright burst of lemon — it instantly transported me back to my mother’s kitchen in Morocco, where she would prepare fish with a similar simplicity, though with her own North African spice blend. This baked lemon garlic cod is my French-trained, New York-honed version: minimal ingredients, maximum flavor. It’s the kind of dish that feels fancy enough for a dinner party but comes together in under 30 minutes — perfect for a busy weeknight when you still want something wholesome.
When that golden butter sauce meets the delicate cod, something magical happens. The fish becomes impossibly tender, flaking apart at the gentle touch of a fork. Each bite carries the tang of fresh lemon, the warmth of garlic, and a subtle hint of oregano that whispers of Mediterranean shores. I love how the red pepper flakes (optional but highly recommended) add just a whisper of heat, balanced by the richness of the butter. This easy cod recipe is my go-to when I need a healthy, crowd-pleasing meal that looks like I spent hours in the kitchen.
What sets my version apart? I’ve taken the classic French technique of beurre blanc — a delicate butter sauce — and simplified it for the home cook. No whisking over a double boiler; just pour the herbed lemon butter over the fish and let the oven do the work. The key is patting the cod completely dry before seasoning, a trick I learned at Le Cordon Bleu in Paris. That ensures the butter sauce clings beautifully and the fish stays moist, never watery. And here’s a tip my mother taught me: always use room-temperature butter for the sauce so it emulsifies smoothly. Avoid the common mistake of using cold butter, which can separate and leave you with a greasy mess.
Why This Baked Lemon Garlic Cod Recipe Is the Best
The Flavor Secret: The combination of fresh lemon zest and juice with high-quality unsalted butter creates a sauce that’s both bright and luxurious. I add a pinch of red pepper flakes for a gentle warmth — a nod to the Moroccan spice palette I grew up with. The oregano brings an earthy note that anchors the lemon.
Perfected Texture: By baking at 400°F, the cod cooks evenly without drying out. The butter sauce keeps the exterior moist while the interior stays flaky. I always tell my readers: the fish is done when it flakes easily with a fork and is opaque all the way through. That’s your cue — no more, no less.
Foolproof & Fast: This recipe requires only one baking dish and 15 minutes in the oven. It’s practically impossible to overcook if you follow the visual cues. Even if you’re new to cooking fish, this healthy baked cod will make you feel like a pro. Plus, it’s naturally low-carb and packed with protein.
Baked Lemon Garlic Cod Ingredients
Whenever I shop for cod at the Union Square Greenmarket here in New York, I look for fillets that are firm, translucent, and smell clean — like the ocean, not fishy. The rest of the ingredients I always have on hand: good butter (I love Plugrà), fresh lemons, and garlic. This simple list is what makes this lemon garlic cod recipe so accessible.
Ingredients List
- 4 (6 oz each) cod fillets
- Salt and freshly ground black pepper to taste
- 4 tablespoons unsalted butter, melted
- 3 cloves garlic, minced
- 2 tablespoons fresh lemon juice
- 1 teaspoon lemon zest
- 1/2 teaspoon dried oregano
- 1/4 teaspoon red pepper flakes (optional)
- 2 tablespoons chopped fresh parsley for garnish
- Lemon slices for serving (optional)
Ingredient Spotlight
Cod: Look for wild-caught Pacific cod or Atlantic cod. The fillets should be about 1 inch thick for even cooking. If you can only find frozen, thaw overnight in the fridge and pat very dry.
Butter: Unsalted is essential so you can control the salt level. European-style butter (like Kerrygold) has a higher butterfat content, which makes the sauce richer. If you use salted butter, reduce added salt by half.
Lemon: Always use fresh lemon juice and zest. Bottled juice lacks brightness. I zest the lemon before juicing — the zest contains aromatic oils that perfume the dish beautifully.
Garlic: Fresh garlic cloves are non-negotiable. Minced garlic from a jar can taste bitter. I like to use a microplane to grate the garlic — it melts right into the butter.
| Original Ingredient | Best Substitution | Flavor / Texture Impact |
|---|---|---|
| Cod | Haddock or halibut | Similar flake, slightly firmer |
| Unsalted butter | Olive oil (for dairy-free) | Less rich, more Mediterranean |
| Fresh lemon | Lime or white wine + vinegar | Brightness changes; lime is more floral |
| Oregano | Dried thyme or Italian seasoning | Earthier or more complex |
How to Make Baked Lemon Garlic Cod – Step-by-Step
Follow these simple steps and you’ll have restaurant-quality baked cod with butter sauce in no time. I’ve included pro tips and common mistakes so you nail it on the first try.
Step 1: Preheat and Prep
Preheat your oven to 400°F (200°C). Lightly grease a 9×13-inch baking dish with butter or line it with parchment paper for easy cleanup. Pat the cod fillets dry with paper towels — this is crucial for browning. Season both sides generously with salt and pepper.
💡 mia’s Pro Tip: Drying the fish is the most important step. Any excess moisture will steam the fish instead of allowing the butter sauce to cling and caramelize.
Step 2: Make the Butter Sauce
In a small bowl, whisk together the melted unsalted butter, minced garlic, fresh lemon juice, lemon zest, dried oregano, and red pepper flakes (if using). Make sure the butter isn’t too hot — you want it just warm so the garlic doesn’t cook and turn bitter.
⚠️ Common Mistake to Avoid: Don’t let the butter boil. If it’s sizzling, let it cool for a minute before adding the garlic. Boiling butter can make the garlic bitter and the sauce grainy.
Step 3: Assemble
Place the seasoned cod fillets in the prepared baking dish, leaving a little space between each. Pour the butter mixture evenly over the fillets, making sure to coat the tops. You can use a brush to spread the sauce if needed.
💡 mia’s Pro Tip: Spoon some of the butter mixture over the sides of the fish too — that ensures the edges stay moist and flavorful.
Step 4: Bake
Bake for 12-15 minutes, depending on the thickness of your fillets. The fish is done when it flakes easily with a fork and is opaque throughout. Do not overbake — cod can go from perfect to dry in one minute.
⚠️ Common Mistake to Avoid: Using a fork to test too early. Wait until the 12-minute mark, then gently press a fork into the thickest part. If it resists, give it 1-2 more minutes.
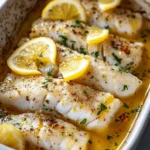
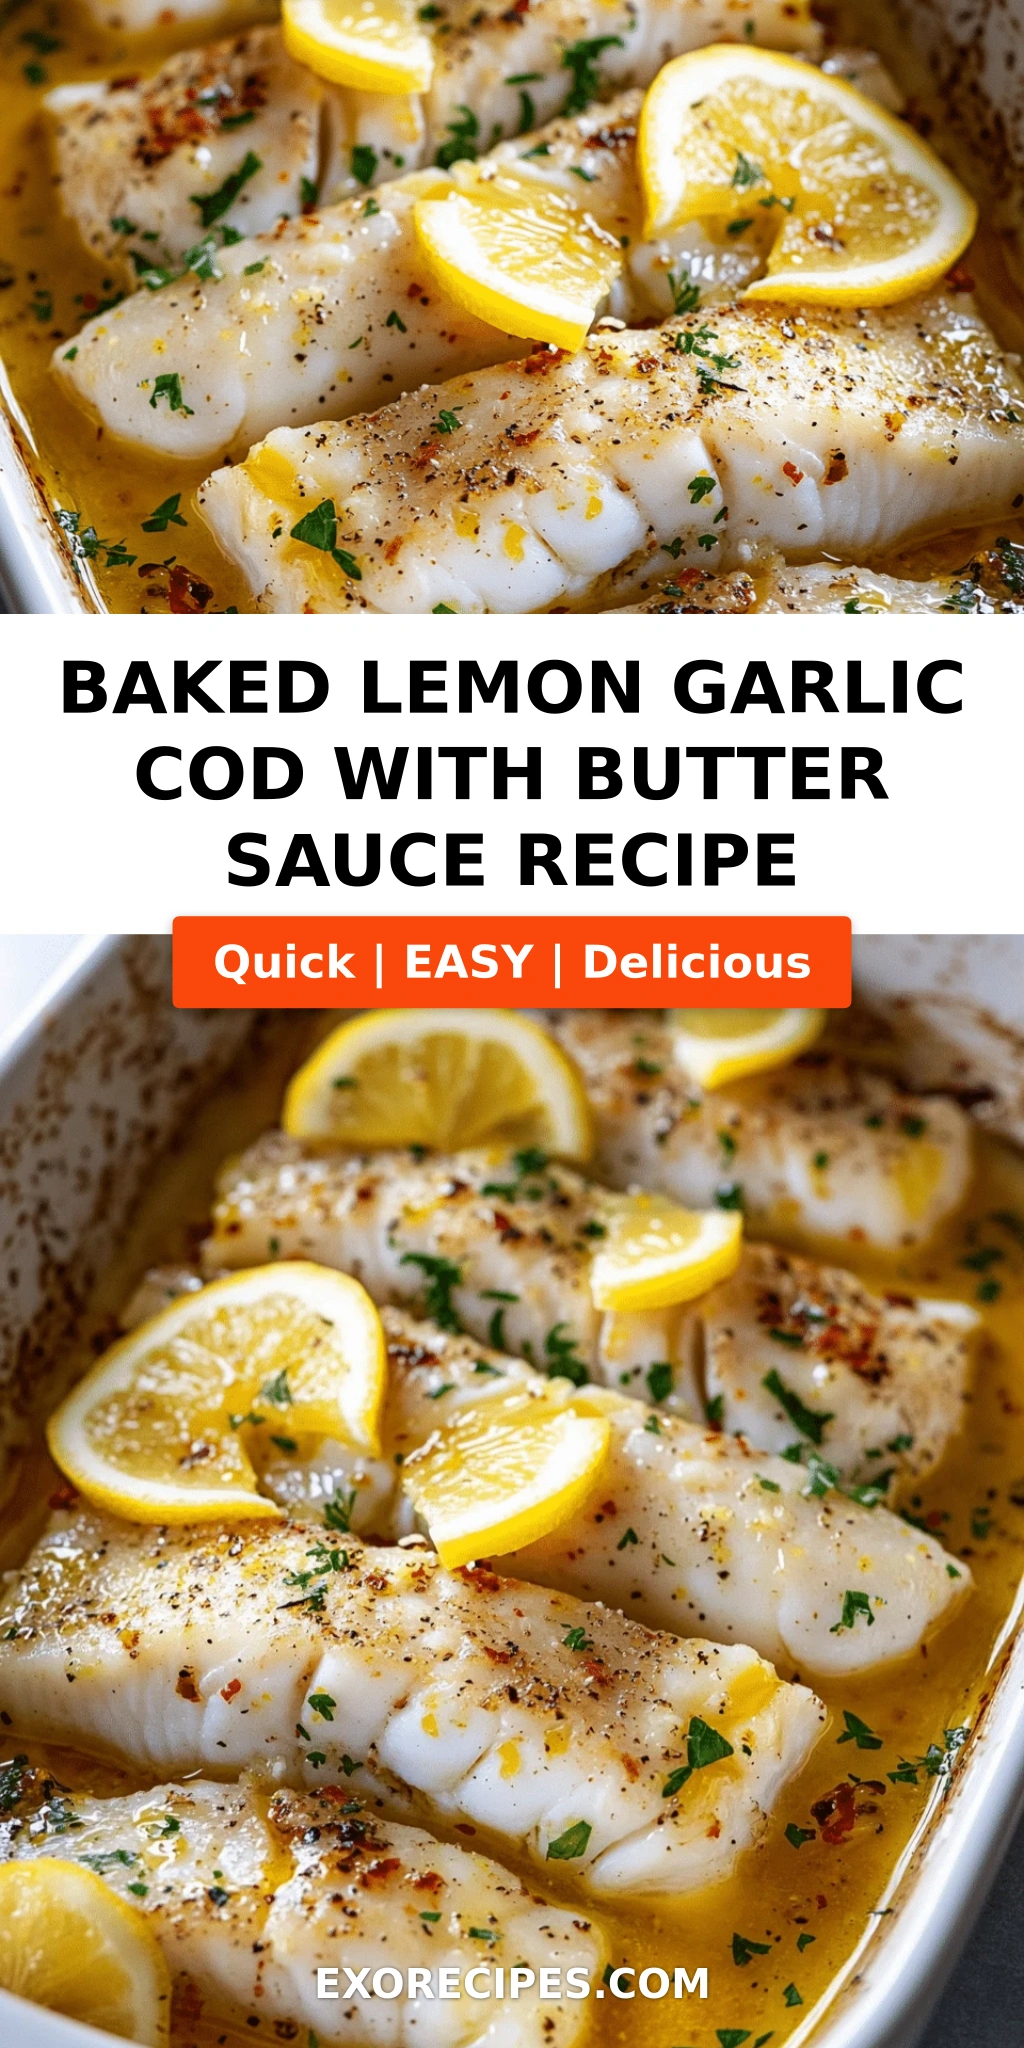
Step 5: Garnish and Serve
Remove from oven and let rest for 1 minute. Garnish with fresh chopped parsley and, if desired, lemon slices. Serve immediately while the butter sauce is still warm and glossy.
💡 mia’s Pro Tip: For an extra pop of color and flavor, sprinkle a little lemon zest right before serving. It brightens the dish and makes it look beautiful.
| Step | Action | Duration | Key Visual Cue |
|---|---|---|---|
| 1 | Preheat & season | 5 min | Fish patted dry |
| 2 | Mix sauce | 3 min | Butter melted, garlic fragrant |
| 3 | Assemble | 2 min | Sauce evenly coated |
| 4 | Bake | 12-15 min | Fish opaque, flakes easily |
| 5 | Garnish & serve | 2 min | Parsley bright green |
Serving & Presentation
This baked cod is beautiful on its own, but I love to plate it with extra lemon slices and a sprinkle of fresh parsley. The golden butter sauce pooled around the fish is practically a sauce in itself. I often serve it with a side of steamed asparagus or a simple arugula salad dressed with lemon vinaigrette — the peppery greens cut through the buttery richness beautifully.
When I’m feeling nostalgic for Morocco, I add a side of couscous with raisins and toasted almonds. The sweetness and texture are a wonderful contrast. And if I want a French touch, I’ll serve it with haricots verts tossed in brown butter. For a classic NYC dinner, roasted baby potatoes are always a hit.
Pro tip from my Paris training: When plating, spoon a little sauce over the top of the fish, then place a lemon slice on the side. The visual of bright yellow against the white fish and green parsley is simple elegance.
| Pairing Type | Suggestions | Why It Works |
|---|---|---|
| Side Dish | Roasted asparagus, arugula salad, couscous, roasted potatoes | Light sides complement delicate fish; starches soak up sauce |
| Sauce / Dip | Extra lemon butter, tzatziki, chermoula | Adds creaminess or Moroccan flair |
| Beverage | Dry white wine (Sauvignon Blanc), sparkling water with lemon | Acidity cuts through butter |
| Garnish | Lemon slices, fresh dill, capers | Brightens presentation, adds flavor |
Make-Ahead, Storage & Reheating
As a busy New York food blogger, I often meal prep this recipe for the week. Cooked cod keeps surprisingly well when stored properly, and the flavors meld even more the next day. Here’s how to store and reheat so it stays moist.
| Method | Container | Duration | Reheating Tip |
|---|---|---|---|
| Refrigerator | Airtight container | Up to 2 days | Reheat in a 300°F oven for 8-10 min, covered with foil |
| Freezer | Freezer-safe bag or container | Up to 2 months | Thaw in fridge overnight; reheat as above |
| Make-Ahead | Baking dish with sauce | 1 day in advance | Assemble but don’t bake; refrigerate, then add 5 extra min baking time |
For reheating, I avoid the microwave at all costs — it turns the delicate cod rubbery. Instead, place the fillets in a covered oven-safe dish with a splash of water or extra butter, and warm gently at 300°F. The key is low and slow. If the sauce seems separated, whisk in a tiny bit of warm water to bring it back together.
Another trick from my restaurant days: if you have leftover sauce, you can use it as a dressing for a warm grain bowl the next day. Just toss with quinoa, roasted vegetables, and some fresh herbs — no waste!
Variations & Easy Swaps
This recipe is incredibly flexible. Here are three ways to change it up based on what you have on hand or your dietary needs.
| Variation | Key Change | Best For | Difficulty Impact |
|---|---|---|---|
| Moroccan Chermoula Twist | Replace butter with olive oil, add cumin, coriander, paprika, cilantro | Bold, North African flavors | Easy |
| Dairy-Free / Paleo | Use avocado oil or ghee instead of butter | Dairy-free, paleo, whole30 | Easy |
| Herb Crusted | Add panko breadcrumbs mixed with herbs on top before baking | Extra crunch | Easy |
Moroccan Chermoula Twist
For a taste of my childhood, substitute the butter with 4 tablespoons of extra-virgin olive oil and add 1 teaspoon each of ground cumin, coriander, and paprika, plus a handful of fresh cilantro. The chermoula paste is then spread over the cod before baking. This version is dairy-free and packed with the warm spices of North Africa — my mother would approve.
Dairy-Free / Paleo
Simply swap the butter for ghee (if you tolerate dairy) or avocado oil. Ghee gives a similar nutty richness, while avocado oil keeps it lighter. I’ve tested both and they work beautifully. The nutritional profile changes slightly — avocado oil has healthy monounsaturated fats — but the cod stays just as moist.
Herb Crusted
This is a fun twist I learned from a chef friend in Paris: mix 1/4 cup panko breadcrumbs with 1 tablespoon melted butter and 1 teaspoon dried dill. Sprinkle the crumb mixture over the buttered cod before baking. The top becomes golden and crispy while the fish stays tender. It adds a lovely textural contrast that’s perfect for dinner parties.
How long should you bake lemon garlic cod in the oven to keep it flaky?
For perfectly flaky baked cod, bake at 400°F (200°C) for 12 to 15 minutes. The exact time depends on the thickness of your fillets — aim for about 10 minutes per inch of thickness. The fish is done when it flakes easily with a fork and is opaque throughout. Overbaking is the biggest enemy of flaky cod, so start checking at the 12-minute mark. If your fillets are thinner than 1 inch, reduce the time to 8-10 minutes. Always let the fish rest for 1 minute after removing from the oven; the residual heat finishes the cooking gently.
What can I substitute for butter in a lemon garlic cod sauce?
You can substitute the butter with extra-virgin olive oil (for a Mediterranean twist), ghee (if you tolerate dairy but want that rich feel), or avocado oil (for a neutral flavor). Each substitution changes the flavor slightly. Olive oil adds fruity notes and pairs beautifully with lemon and garlic. Ghee provides a nutty richness similar to butter but with the milk solids removed. Avocado oil has a high smoke point and a clean taste, making it ideal for baking. For a lighter option, you can also use a combination of olive oil and vegetable broth, though the sauce will be less luxurious.
Should I cover the cod while baking to prevent it from drying out?
No, you should not cover the cod while baking for this recipe. Leaving it uncovered allows the butter sauce to reduce slightly and concentrate in flavor, and it helps the top of the fish develop a light, appealing crust. The high moisture content of the cod and the butter sauce keep the fish moist even without a cover. If you cover the dish, the fish will steam rather than bake, resulting in a softer texture and a watery sauce. However, if your fillets are very thin (less than 3/4 inch), you can loosely tent with foil for the first 8 minutes, then uncover for the last 5 to allow the sauce to thicken.
What side dishes go best with baked lemon garlic cod and butter sauce?
Light, fresh sides complement this dish beautifully. I love serving it with roasted asparagus or green beans, a simple arugula salad with lemon vinaigrette, or herbed rice pilaf. For a starchier option, roasted baby potatoes or creamy polenta are wonderful for soaking up the butter sauce. If you want a Moroccan touch, try couscous with raisins and toasted almonds. The key is to choose sides that are not overly heavy — you want the cod to remain the star. Steamed broccoli, sautéed spinach, or zucchini noodles also work well for a low-carb meal.
Can I use frozen cod for this baked lemon garlic cod recipe?
Yes, you can use frozen cod, but proper thawing is essential. Thaw the fillets overnight in the refrigerator — never at room temperature. Once thawed, pat them extremely dry with paper towels to remove all excess moisture. Frozen fish releases more water during cooking, so drying is even more critical to avoid a watery sauce. Also, frozen cod may be a bit thinner or thinner than fresh, so reduce the baking time by 2-3 minutes and check for doneness early. I recommend using fresh cod when possible for the best texture and flavor.
Is baked lemon garlic cod healthy?
Absolutely! This recipe is packed with lean protein (28g per serving) and healthy fats from the butter. It’s low in carbohydrates (only 2g) and sugar-free, making it suitable for low-carb, keto, and diabetic-friendly diets. Cod is an excellent source of selenium, vitamin B12, and omega-3 fatty acids. The butter adds richness but in moderate amounts — 12g of fat per serving, much of which is from the healthy butterfat. You can make it even lighter by substituting half the butter with olive oil. Overall, it’s a balanced, nutrient-dense meal that’s quick to prepare.
Can I add vegetables to the baking dish with the cod?
Yes, you can add quick-cooking vegetables like asparagus spears, cherry tomatoes, or thinly sliced zucchini to the baking dish. Just toss them in a little olive oil, salt, and pepper, and arrange them around the cod. Keep in mind that the vegetables may release moisture, so pat them dry and don’t overcrowd the dish. Root vegetables like potatoes or carrots take longer to cook and are better roasted separately. For a one-pan meal, add the vegetables at the same time as the cod and adjust cooking time if needed — typically vegetables will be done in the same 12-15 minute window.
How do I know when baked cod is fully cooked?
The best way to tell is by using a fork. Gently insert the tines into the thickest part of the fillet and twist slightly. If the fish flakes easily into large, opaque pieces, it’s done. The internal temperature should be 145°F (63°C) when checked with an instant-read thermometer. The flesh will turn from translucent to white and firm. Avoid overcooking — cod can become dry and rubbery if left in the oven too long. Remember that the fish will continue to cook for a minute after you take it out, so remove it when it’s just opaque at the center.
Can I use lime instead of lemon for this baked cod?
Yes, lime is an excellent substitute for lemon. It will give the dish a slightly different, more floral and tart flavor profile that works wonderfully with garlic and butter. Use fresh lime juice and zest in the same quantities. I particularly enjoy this swap in summer when limes are abundant. If you want a more tropical twist, you can also add a splash of coconut milk to the butter sauce — that’s a variation I tried during a trip to the Caribbean and it was fantastic. Just reduce the butter by 1 tablespoon and add 2 tablespoons of coconut milk.
What if I don’t have fresh parsley for garnish?
No worries! Fresh dill, chives, or even cilantro work beautifully as alternatives. Dill pairs wonderfully with fish and lemon — use the same amount. Chives add a mild oniony freshness, and cilantro gives a bright, slightly peppery note. If you have no fresh herbs at all, a sprinkle of paprika or a few capers can add color and flavor. The garnish is not just for looks; it adds a final layer of freshness that lifts the rich butter sauce. But the recipe is still delicious without it.
Share Your Version!
I’d love to see how this baked lemon garlic cod turns out in your kitchen! Did you add your own twist? Did you try the Moroccan chermoula variation? Please leave a star rating and a comment below — it helps other readers know what to expect and it brings me so much joy to hear from you.
If you snap a photo of your dish, share it on Instagram or Pinterest and tag @exorecipes. I always repost my favorites to my stories. And here’s my question for you: what’s one ingredient you always add to fish that surprises people? I love learning new flavor combinations from this community.
From my NYC kitchen to yours — I hope this recipe brings as much warmth to your table as it does to mine. — mia 🧡
Love This Recipe? Save It to Pinterest!
If you enjoyed this Baked Lemon Garlic Cod with Butter Sauce recipe, don’t let it get lost in your browser tabs! 😄 Pin it now so you can find it again anytime — and explore hundreds more tried-and-tested recipes waiting for you on my Pinterest boards.
👉 Follow mia on Pinterest @exorecipe
📌 Pin this recipe · 🔁 Re-pin your favorites · 💬 Tag me when you make it — I love seeing your creations!
💬 Did you make this recipe? I’d love to hear your feedback!
Leave a star rating ⭐⭐⭐⭐⭐ and a comment below — it helps me create more recipes you’ll love. Plus, your review helps other home cooks find this healthy baked cod recipe. Thanks, friend! — mia 🧡
Baked Lemon Garlic Cod with Butter Sauce
- Prep Time: 10 minutes
- Cook Time: 15 minutes
- Total Time: 25 minutes
- Yield: 4 1x
- Method: Main Dish
- Cuisine: American
Description
This Baked Lemon Garlic Cod with Butter Sauce is a quick and elegant dinner. Tender cod fillets are baked to perfection with a zesty lemon garlic butter sauce. Ready in under 30 minutes, it’s a healthy and delicious meal the whole family will love.
Ingredients
- 4 (6 oz each) cod fillets
- Salt and freshly ground black pepper to taste
- 4 tablespoons unsalted butter, melted
- 3 cloves garlic, minced
- 2 tablespoons fresh lemon juice
- 1 teaspoon lemon zest
- 1/2 teaspoon dried oregano
- 1/4 teaspoon red pepper flakes (optional)
- 2 tablespoons chopped fresh parsley for garnish
- Lemon slices for serving (optional)
Instructions
- Preheat oven to 400°F (200°C). Lightly grease a baking dish or line with parchment paper.
- Pat cod fillets dry with paper towels. Season both sides with salt and pepper.
- In a small bowl, whisk together melted butter, minced garlic, lemon juice, lemon zest, oregano, and red pepper flakes (if using).
- Place the cod fillets in the prepared baking dish. Pour the butter mixture evenly over the fillets.
- Bake for 12-15 minutes, or until the fish flakes easily with a fork and is opaque throughout.
- Remove from oven and garnish with fresh parsley. Serve immediately with lemon slices if desired.
Notes
For best results, use fresh cod fillets. If using frozen, thaw completely and pat dry before cooking. The cooking time may vary slightly depending on thickness. Leftovers can be refrigerated for up to 2 days.
Nutrition
- Calories: 220
- Sugar: 0g
- Fat: 12g
- Carbohydrates: 2g
- Protein: 28g
Tried This Recipe? Leave a Comment!
Did you make this recipe? I’d love to hear how it turned out! Please leave a comment and a rating below. Your feedback helps other home cooks and supports cheerychop.com!