Table of Contents
Beef Tenderloin Crostini Recipe: A Delicious Appetizer for Every Occasion – Garlic-Rubbed Crostini with Creamy Horseradish & Perfectly Seared Beef
When I first moved to New York City after my years at Le Cordon Bleu in Paris, I found myself standing in a tiny kitchen in the West Village, desperately missing the warmth of my mother’s kitchen in Morocco. That’s where this Beef Tenderloin Crostini Recipe was born — a beautiful collision of worlds. My mother taught me that the best appetizers come from simplicity and love, while my French training drilled in the importance of technique. This easy beef appetizer combines the elegance of seared tenderloin with the rustic charm of garlic-rubbed baguette, finished with a creamy horseradish sauce that wakes up every single taste bud. Every time I make these tenderloin crostini, I think of my mother’s hands shaping bread and my chef instructor’s voice counting sear times. This recipe is my American dream on a plate.
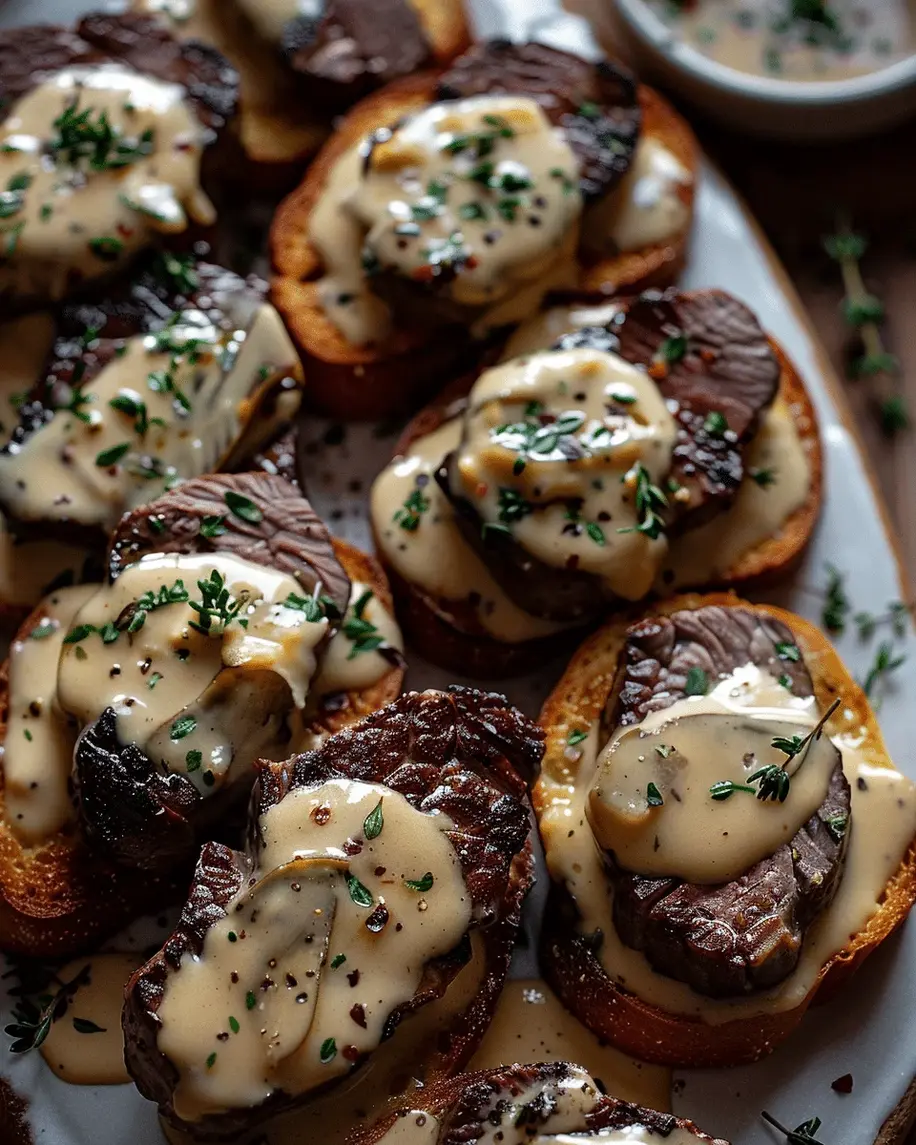
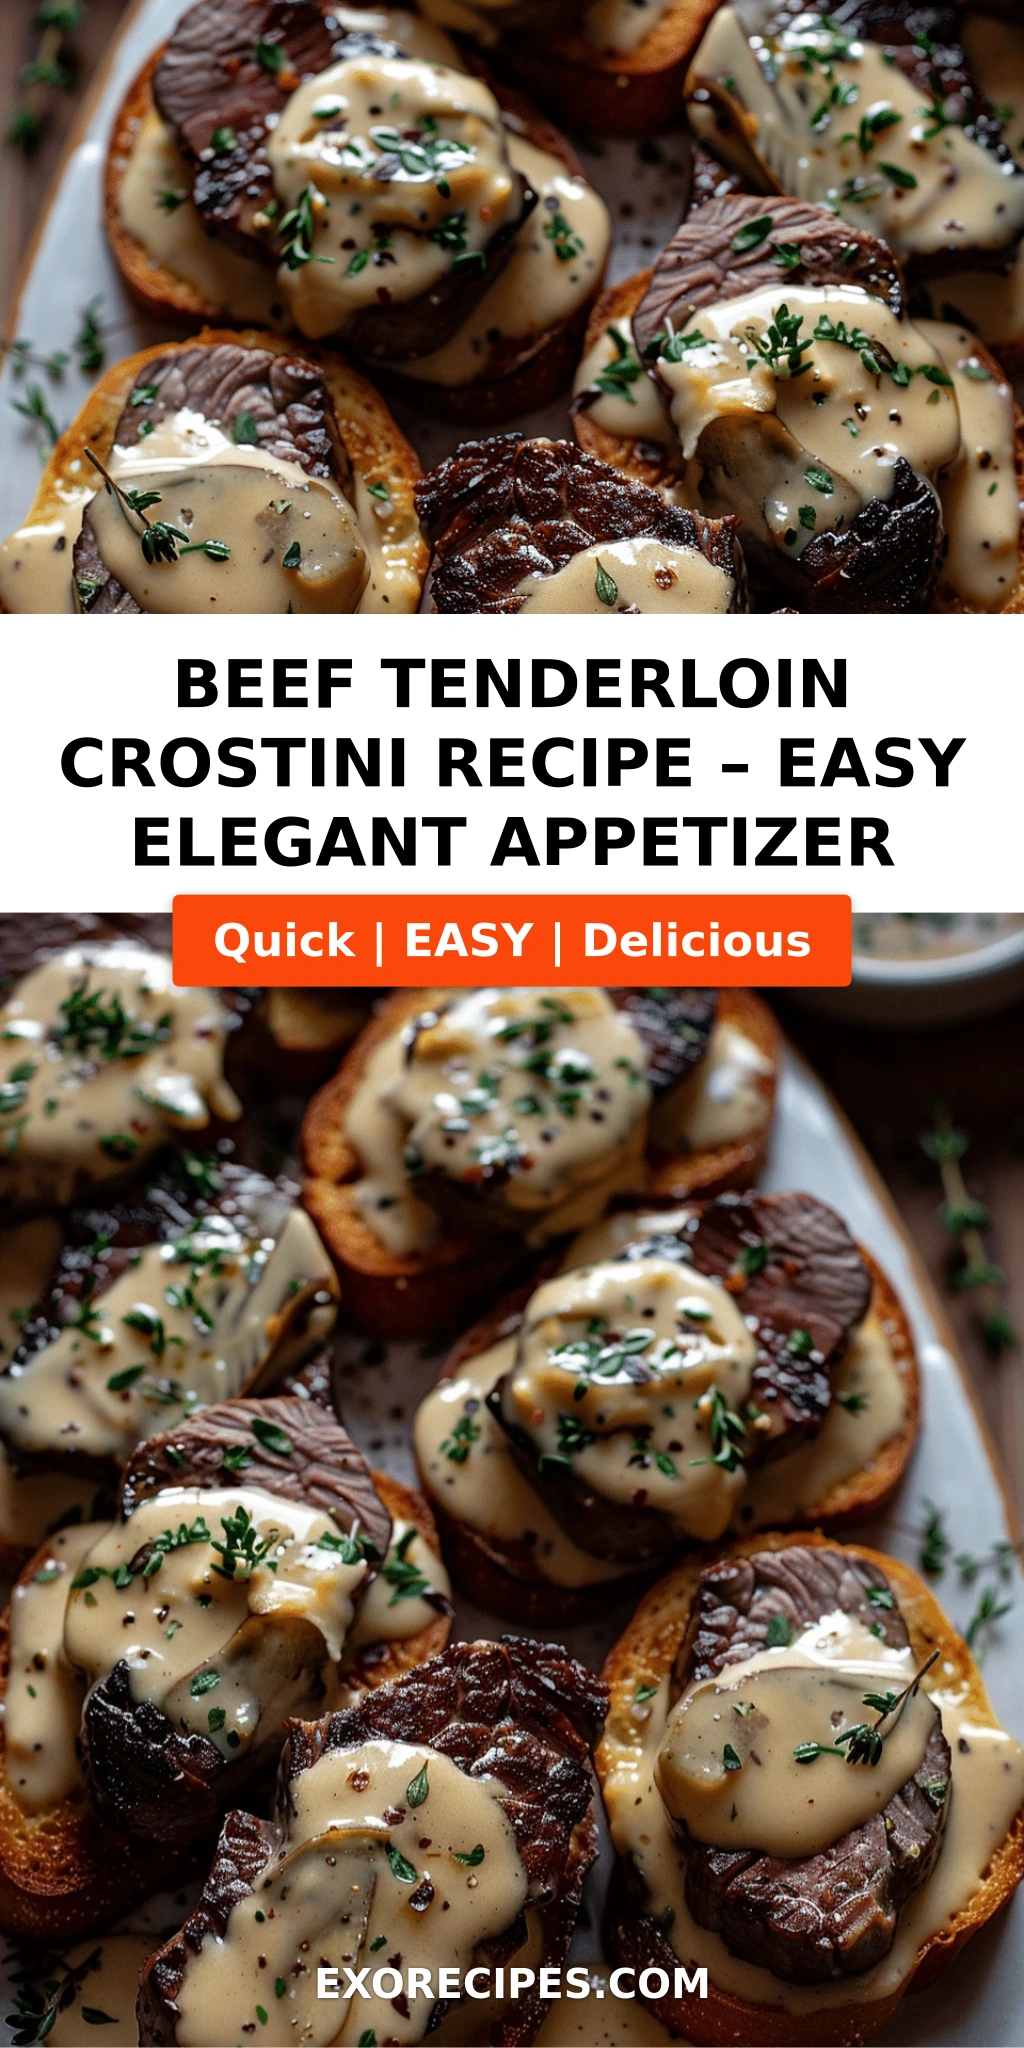
Imagine this: a perfectly toasted baguette round, still warm and crisp, with a faint whisper of raw garlic. On top rests a thin slice of medium-rare beef tenderloin — deep brown on the outside, jewel-red at the center, so tender it practically melts. A swipe of cool, tangy horseradish cream cuts through the richness, while fresh chives and parsley add a bright, herbal finish. The textures alone are a symphony: crunch, creaminess, tenderness, and little pops of fresh herbs. The aroma that fills your kitchen when that beef hits the hot skillet is absolutely intoxicating — it’s the kind of smell that makes guests wander into the kitchen asking, “What is that?” These crostini toppings aren’t just delicious; they’re a conversation starter.
What makes my version of this beef appetizer ideas truly special is the double-garlic move I picked up from a little bistro in the 6th arrondissement in Paris. Most recipes just rub the toast with garlic, but I also add a tiny pinch of sea salt on the cut garlic clove before rubbing — it acts as an abrasive and releases more essential oils. It’s a small detail, but it transforms the flavor of every single crostini. I’ve tested this Beef tenderloin crostini recipe at countless dinner parties, holiday gatherings, and even a few Super Bowl spreads, and it never fails to disappear first. 💡 mia’s Pro Tip: The number one mistake I see home cooks make is not letting the beef rest long enough after roasting. Patience is not just a virtue here — it’s the difference between juicy perfection and a puddle of lost flavor.
Why This Beef Tenderloin Crostini Recipe Is the Best
The Flavor Secret: The magic of this easy beef appetizer lies in the balance between the rich, buttery beef and the sharp, creamy horseradish sauce. Growing up in Morocco, my mother always added a touch of acidity to rich meats — preserved lemons, a squeeze of orange, something bright. In this recipe, I honor that instinct by using fresh horseradish (not just the jarred stuff) and a splash of lemon juice in the cream. It cuts through the fat of the tenderloin and makes each bite clean and craveable. The garlic-rubbed crostini add a savory backbone that ties everything together. This isn’t just another crostini toppings recipe — it’s a little piece of my heritage on a slice of baguette.
Perfected Texture: Texture is everything when it comes to tenderloin crostini, and I’ve perfected every layer. The baguette is toasted just until golden — not too dark, not too pale — so it holds up to the toppings without shattering. The beef is seared at high heat to develop a deep brown crust, then roasted low and slow to a perfect medium-rare. The resting period (non-negotiable, I promise!) allows the juices to redistribute so every slice is uniformly tender. The horseradish cream is whipped until light and airy, making it easy to spread without weighing down the crostini. Each component is designed to complement the others in texture as well as flavor.
Foolproof & Fast: Despite how impressive these look on a platter, this Beef tenderloin crostini recipe is surprisingly approachable for home cooks. The total time is just 40 minutes, and most of that is hands-off roasting and toasting. You can prep the sauce and slice the baguette a day ahead, then simply sear and assemble when your guests arrive. I’ve taught this recipe in my NYC cooking classes to everyone from college students to seasoned home cooks, and every single person walks away feeling like a pro. The key is following the temperatures and resting times — I’ll walk you through every step so you can nail it on your first try.
Beef Tenderloin Crostini Recipe Ingredients
I picked up the habit of sourcing ingredients at NYC farmers markets from my time in Paris, where every neighborhood had its own weekly market. For this recipe, I head to the Union Square Greenmarket for fresh chives and parsley, and I grab my baguette from a little French bakery on Bleecker Street. The beef tenderloin I get from a trusted butcher in Chelsea Market — well-marbled and trimmed, ready to go. Every ingredient here is simple but chosen with intention. Let me walk you through what you’ll need.
Ingredients List
- 1 baguette, sliced into 1/2-inch rounds
- 3 tablespoons olive oil, divided
- 1 clove garlic, halved
- 1 pound beef tenderloin, trimmed
- 1 teaspoon kosher salt
- 1/2 teaspoon black pepper
- 1/2 cup sour cream
- 2 tablespoons prepared horseradish
- 1 tablespoon fresh chives, chopped
- 1 tablespoon fresh parsley, chopped
Ingredient Spotlight
Beef Tenderloin: This is the star of the show, so quality matters. Look for center-cut tenderloin, which is the most uniform in thickness and will cook evenly. At the grocery store, choose a piece that’s deep red with fine marbling — that fat equals flavor and tenderness. If you can, buy from a butcher and ask for it trimmed of silverskin. One tested substitution I love is using a well-trimmed sirloin steak if tenderloin is out of budget; it’s slightly less tender but still delicious when sliced thin against the grain.
Baguette: A good baguette makes all the difference in this easy beef appetizer. You want one that’s a day or two old — fresh baguette can be too soft and will soak up oil rather than getting crisp. Look for a baguette with a sturdy crust and tight crumb. If you can’t find a baguette, ciabatta or a crusty sourdough sliced into similar-sized rounds works beautifully. Avoid soft sandwich bread at all costs; it won’t hold up to the toppings.
Horseradish: Prepared horseradish (the kind in a jar) is what I use here for consistency, but if you can find fresh horseradish root and grate it yourself, the heat level is incredible. My mother never used horseradish in Morocco — we used something similar called “harissa” for heat — but I discovered it in Paris and fell in love. For a milder version, use half the amount. For a completely different vibe, swap in whole-grain mustard or a Dijon aioli. Each brings its own personality to these crostini toppings.
| Original Ingredient | Best Substitution | Flavor / Texture Impact |
|---|---|---|
| Beef Tenderloin | Sirloin steak (trimmed) | Slightly less tender but still juicy; slice thinner |
| Baguette | Crusty sourdough or ciabatta | More rustic texture; slightly different crunch |
| Sour Cream | Greek yogurt (full-fat) | Tangier, lighter; thicker consistency |
| Prepared Horseradish | Whole-grain mustard or Dijon aioli | Milder heat; different complexity |
| Fresh Chives | Green onion tops (thinly sliced) | Slightly stronger onion flavor; similar visual appeal |
How to Make Beef Tenderloin Crostini — Step-by-Step
I’ve broken this down into five simple steps that any home cook can follow. Take your time, especially with the beef searing and resting — that’s where the magic really happens. Let’s make some beautiful crostini together.
Step 1: Prepare the Crostini
Preheat your oven to 400°F (200°C). Arrange the baguette slices in a single layer on a baking sheet. Brush both sides lightly with 2 tablespoons of olive oil using a pastry brush — this ensures even browning. Toast for 5-7 minutes, flipping halfway, until the bread is golden and crisp on the outside but still slightly soft in the center. As soon as they come out of the oven, take the halved garlic clove and rub it firmly over the surface of each warm toast. You’ll smell the garlic immediately — that’s the signal that you’ve done it right.
💡 mia’s Pro Tip: Add a tiny pinch of flaky sea salt to the cut side of the garlic clove before rubbing. The salt acts as an abrasive and helps release more of the garlic’s natural oils, giving you a deeper, more aromatic flavor on every crostini.
Step 2: Sear and Roast the Beef
Season the beef tenderloin generously on all sides with 1 teaspoon kosher salt and 1/2 teaspoon black pepper. Let it sit at room temperature for 10-15 minutes — this helps the beef cook more evenly. Heat the remaining 1 tablespoon of olive oil in a heavy skillet (cast iron is ideal) over high heat until it shimmers. Carefully place the tenderloin in the pan and sear without moving it for 2-3 minutes per side, until a deep brown crust forms. Transfer the seared beef to a baking dish and roast at 400°F for 20-25 minutes for medium-rare (internal temperature of 130-135°F). Remove from the oven and let rest on a cutting board for exactly 10 minutes — set a timer, please!
⚠️ Common Mistake to Avoid: Skipping the rest period. If you slice the beef immediately after roasting, all those precious juices will run out onto the cutting board instead of staying in the meat. Ten minutes of patience gives you tender, juicy slices every single time.
Step 3: Make the Horseradish Sauce
While the beef rests, make the sauce. In a small mixing bowl, combine 1/2 cup sour cream and 2 tablespoons prepared horseradish. Stir until smooth and well blended. Taste and adjust — if you want more heat, add another teaspoon of horseradish. If you prefer a milder touch, stir in an extra tablespoon of sour cream. I like to add a squeeze of lemon juice (about 1 teaspoon) to brighten it up, though it’s not listed in the main ingredients — it’s my little secret. Cover and refrigerate until ready to use. This sauce can be made up to 2 days ahead.
💡 mia’s Pro Tip: For an even richer sauce, substitute half the sour cream with crème fraîche. It adds a subtle nuttiness that pairs beautifully with the beef. I learned this trick at a bistro in Paris where they served it with roast beef — I’ve never gone back.
Step 4: Assemble the Crostini
Spread a small spoonful of the horseradish cream onto each garlic-rubbed crostini. Use the back of the spoon to spread it evenly, leaving a small border around the edge so it looks polished. Slice the rested beef tenderloin into very thin rounds — aim for about 1/4-inch thick. If you have a sharp carving knife, use it; a dull knife will tear the tender meat. Place a slice of beef on top of each sauced crostini, slightly curling it for visual appeal. Arrange the assembled crostini on a serving platter.
⚠️ Common Mistake to Avoid: Overloading the crostini. One slice of beef per toast is perfect. Too much meat makes the crostini top-heavy and messy to eat. Remember, great beef appetizer ideas are about balance — each bite should include bread, sauce, and beef in harmony.
Step 5: Serve and Garnish
Sprinkle the chopped fresh chives and parsley over the assembled crostini. The green herbs against the deep brown beef and pale cream sauce create a beautiful presentation. Serve immediately while the crostini are still crisp and the beef is at room temperature (not cold from the fridge). If you’re serving at a party, arrange them on a wooden board or slate platter for maximum visual impact. I like to place a small bowl of extra horseradish cream on the side for guests who want an extra kick.
💡 mia’s Pro Tip: For the prettiest presentation, use a mix of flat-leaf parsley and chervil if you can find it. The chervil has a delicate, almost anise-like flavor that adds an unexpected layer. I buy mine at the Union Square market and it makes these crostini look like they came from a caterer.
| Step | Action | Duration | Key Visual Cue |
|---|---|---|---|
| 1 | Toast baguette slices with olive oil | 5-7 mins | Golden brown edges, still slightly soft center |
| 2 | Sear beef on all sides, then roast | 2-3 mins per side + 20-25 mins roast | Deep brown crust, internal temp 130-135°F |
| 3 | Mix sour cream and horseradish | 2 mins | Smooth, pale cream with speckles of horseradish |
| 4 | Assemble: sauce, then beef slice | 5 mins | Even layer of sauce, beef curling slightly |
| 5 | Garnish with fresh herbs | 1 min | Bright green herbs scattered evenly |
Serving & Presentation
These Beef Tenderloin Crostini are best served as a passed appetizer at cocktail parties, holiday gatherings, or even as a first course for a fancy dinner. I love arranging them on a long wooden board or a marble slab — the contrast of the warm toast, the deep red beef, and the creamy white sauce is absolutely gorgeous. For a touch of NYC flair, I sometimes add a few microgreens or edible flowers on top. In Morocco, my mother would have garnished with fresh mint and a drizzle of pomegranate molasses — that sweet-tart note is incredible here too, though it strays from the classic.
For wine pairings, I recommend a medium-bodied red like a Pinot Noir or a Beaujolais. The earthy, fruity notes complement the beef without overwhelming the horseradish. If you prefer white wine, a full-bodied Chardonnay with a touch of oak works beautifully. And for my non-alcoholic friends, a sparkling water with a splash of cranberry and a rosemary sprig makes a festive mocktail that cuts through the richness of the crostini.
One of my favorite ways to serve these is on a large platter with a few small bowls of extra toppings on the side — maybe some caramelized onions, a dollop of extra horseradish cream, and a pile of arugula. Guests can customize their own, and it makes the spread feel interactive and abundant. This easy beef appetizer always steals the show, and I can’t tell you how many times someone has asked me for the recipe before they’ve even finished eating.
| Pairing Type | Suggestions | Why It Works |
|---|---|---|
| Side Dish | Mixed greens with vinaigrette, roasted asparagus, or truffle fries | Light, acidic sides balance the richness of the beef |
| Sauce / Dip | Extra horseradish cream, Dijon mustard, or balsamic reduction | Adds heat, tang, or sweetness to complement the beef |
| Beverage | Pinot Noir, Beaujolais, or sparkling water with cranberry | Red wine’s fruitiness enhances beef; bubbles cleanse the palate |
| Garnish | Fresh chives, parsley, microgreens, or edible flowers | Adds color, freshness, and a delicate herbal note |
Make-Ahead, Storage & Reheating
In my busy NYC life, I’m all about smart meal prep. These beef tenderloin crostini are actually perfect for making ahead in parts. I often roast the beef the day before, slice it, and store it separately from the crostini and sauce. Then, just before guests arrive, I toast the bread, rub it with garlic, and assemble everything in minutes. It’s a lifesaver for holiday entertaining when you’re juggling a million things at once.
| Method | Container | Duration | Reheating Tip |
|---|---|---|---|
| Refrigerator | Airtight container, components separate | Up to 3 days | Reheat beef slices gently in a warm skillet 30 sec per side; re-toast bread at 350°F for 3-4 mins |
| Freezer | Sealed freezer bag, beef only (cooked) | Up to 2 months | Thaw overnight in fridge; reheat gently in skillet; do not freeze assembled crostini |
| Make-Ahead | Sauce in jar, beef wrapped, bread uncut | Up to 2 days in advance | Slice baguette and store in paper bag; assemble just before serving for maximum crispness |
The most important rule: never assemble the crostini more than 30 minutes before serving. The bread will absorb moisture from the sauce and beef, turning from crisp to soggy. If you’re bringing these to a party, transport the components separately and assemble on-site. I’ve learned this the hard way more than once in my NYC catering days — soggy crostini are a tragedy we can all avoid! The good news is that the beef tenderloin actually tastes even better the next day, as the seasoning has more time to penetrate the meat.
Variations & Easy Swaps
One of the things I love most about this easy beef appetizer is how versatile it is. Over the years, I’ve developed several variations that reflect different parts of my culinary journey — from the spice markets of Marrakech to the bistros of Paris and the farmers markets of NYC. Here are some of my favorite twists on this Beef tenderloin crostini recipe.
| Variation | Key Change | Best For | Difficulty Impact |
|---|---|---|---|
| Moroccan Spiced | Add ras el hanout, harissa aioli, and mint | Adventurous palates, fusion-themed parties | Same difficulty |
| Gluten-Free | Use gluten-free baguette or cucumber rounds | Gluten-free guests, low-carb options | Same difficulty |
| Herb-Crusted Twist | Coat beef in fresh herbs before searing | Garden-fresh flavor, spring gatherings | Same difficulty |
Variation 1: Moroccan Spiced Crostini
This variation is a nod to my Moroccan roots and it’s absolutely stunning. Before searing the beef, coat it with a dry rub of ras el hanout (a North African spice blend available at specialty stores or online), cumin, and a touch of cinnamon. Replace the horseradish cream with a harissa aioli — mix 1/4 cup mayonnaise with 1-2 tablespoons harissa paste and a squeeze of lemon. Garnish with fresh mint instead of chives and a sprinkle of toasted sesame seeds. The warm, aromatic spices pair beautifully with the seared beef, and the harissa adds a smoky, fruity heat that’s totally addictive. This is my personal favorite when I’m feeling nostalgic for my mother’s cooking.
Variation 2: Gluten-Free Version
For my gluten-free friends, this variation works like a charm. Instead of baguette, use thick slices of a good gluten-free boule or batard — look for one with a sturdy crust. Alternatively, for a low-carb option, use thick cucumber rounds as the base. The cucumber version is light, refreshing, and perfect for summer parties. Simply salt the cucumber rounds lightly and let them sit on paper towels for 10 minutes to draw out excess moisture. Then pat dry, spread the horseradish cream, and top with the beef. The flavors are slightly different but equally delicious, and I’ve served this at NYC gatherings where no one missed the bread.
Variation 3: Herb-Crusted Twist
This variation came from a trip to the Union Square Greenmarket where I bought way too many herbs. Finely chop a mixture of fresh rosemary, thyme, and parsley, then press the seasoned beef tenderloin into the herbs before searing. The herbs form a fragrant, dark crust that adds incredible depth. For the sauce, swap the horseradish for a garlic-herb aioli — mix 1/2 cup mayonnaise with 1 minced garlic clove, 1 tablespoon lemon juice, and 1 tablespoon each of chopped chives and parsley. This version feels lighter and brighter, perfect for spring and summer entertaining. The herb crust also gives the beef a beautiful, rustic appearance that looks stunning on a platter.
What is the best cut of beef tenderloin to use for crostini appetizers?
For this beef tenderloin crostini recipe, the best cut is center-cut beef tenderloin, sometimes labeled as “chateaubriand” at the butcher counter. This section is the most uniform in thickness, which means it cooks evenly from end to end. It’s also the most tender part of the tenderloin, with fine, even marbling that keeps the meat juicy during roasting. If you’re at a standard US grocery store, look for a pre-trimmed tenderloin roast in the meat section. I recommend buying a 1-pound piece for this recipe — it yields about 16 thin slices, perfect for a crowd. Avoid the tail end of the tenderloin, which is thinner and can overcook quickly. If you’re unsure, ask your butcher to trim and center-cut it for you; they’ll know exactly what you need.
How should I cook the beef tenderloin for crostini to keep it tender and rare?
The key to tender, rare beef tenderloin is a two-step process: a hard sear on the stovetop followed by a gentle roast in the oven. Start by bringing the beef to room temperature for 15 minutes — this helps it cook evenly. Season generously with kosher salt and pepper. Heat a cast-iron skillet over high heat until it’s smoking hot, add a tablespoon of olive oil, and sear the beef for 2-3 minutes per side until a deep brown crust forms. Then transfer to a 400°F oven and roast for 20-25 minutes. For medium-rare, pull it at 130-135°F internal temperature. The most crucial step is resting the beef for a full 10 minutes before slicing. This allows the juices to redistribute throughout the meat rather than spilling onto your cutting board. Slice thinly against the grain for maximum tenderness.
What are good substitutes for horseradish cream or aioli on beef tenderloin crostini?
There are several delicious substitutes if you want to switch up the sauce on this beef tenderloin crostini recipe. Whole-grain mustard is my top pick — it has a similar tangy heat but with a more rustic texture and a lovely pop of mustard seeds. Dijon aioli (mayonnaise mixed with Dijon mustard and a touch of garlic) is another excellent choice; it’s creamy, slightly sharp, and pairs beautifully with beef. For a completely different direction, try a balsamic reduction — simmer 1/2 cup balsamic vinegar until syrupy, then drizzle over the assembled crostini. The sweet-tart notes cut through the richness of the beef beautifully. If you want to keep it creamy but skip the horseradish, a blue cheese dressing or a simple garlic butter spread works wonderfully. Each alternative brings its own personality to these crostini toppings.
Can I make beef tenderloin crostini ahead of time and reheat them before serving?
You can absolutely prep components of this easy beef appetizer ahead of time, but I don’t recommend fully assembling the crostini in advance. The bread will absorb moisture from the sauce and beef and become soggy. Instead, here’s my tested make-ahead plan: Roast and slice the beef up to 2 days ahead and store it in an airtight container in the refrigerator. Make the horseradish cream up to 2 days ahead and keep it chilled. Slice the baguette and store it in a paper bag at room temperature. When you’re ready to serve, toast the baguette slices, rub them with garlic, spread the sauce, top with beef slices (bring them to room temperature first for best flavor), and garnish. If you need to reheat the beef, warm the slices gently in a dry skillet over medium heat for 30 seconds per side — don’t microwave it, or you’ll lose that beautiful medium-rare texture.
What wine pairs well with beef tenderloin crostini?
A medium-bodied red wine is the classic choice for this beef tenderloin crostini recipe, and for good reason. Pinot Noir is my personal favorite — its bright cherry and earthy notes complement the seared beef without overpowering the horseradish cream. A good Beaujolais Cru (like Morgon or Fleurie) is another fantastic option; it’s lighter than most reds but has enough structure to stand up to the meat. For a white wine lover, a full-bodied, oaked Chardonnay works surprisingly well — the buttery notes echo the richness of the beef, while the acidity cuts through the cream. If you’re serving a crowd, a dry rosé is a safe and crowd-pleasing choice that bridges red and white preferences. For a non-alcoholic option, I love a sparkling water with a splash of cranberry juice and a sprig of rosemary — it’s festive, refreshing, and cleanses the palate between each rich bite.
How thinly should I slice the beef tenderloin for crostini?
For the perfect crostini bite, slice the rested beef tenderloin into pieces about 1/4-inch thick. This is thin enough that the beef is easy to bite through without pulling the entire slice off the toast, but thick enough that you still get a satisfying, meaty texture. If you slice too thin (less than 1/8 inch), the beef can become dry and lose its presence on the crostini. If you slice too thick (more than 1/2 inch), it becomes difficult to eat neatly and throws off the balance of bread, sauce, and meat. Use a very sharp carving knife and slice against the grain — this shortens the muscle fibers and makes each bite noticeably more tender. I recommend letting the beef rest fully before slicing, and using a smooth, single-pass cutting motion rather than sawing back and forth, which can tear the delicate meat.
Can I use a different type of bread instead of baguette for crostini?
Absolutely! While a classic baguette gives you the ideal crisp-to-chewy texture for this beef tenderloin crostini recipe, several other breads work beautifully. Crusty sourdough is my favorite alternative — it has a more pronounced tang that stands up well to the rich beef and creamy horseradish. Slice it into 1/2-inch rounds and toast the same way. Ciabatta is another great option; its open crumb gets wonderfully crisp in the oven, though you may need to cut larger slices in half for a more appetizer-friendly size. For a gluten-free option, look for a sturdy gluten-free boule or batard. I’ve also used thick cucumber rounds as a low-carb base, which adds a refreshing crunch — just salt them first to draw out excess moisture. Avoid soft sandwich bread, brioche, or anything too airy, as it won’t hold up to the toppings.
How do I prevent the crostini from getting soggy?
Soggy crostini are the enemy of any great appetizer, and I’ve learned a few tricks to keep them perfectly crisp. First, make sure your baguette slices are toasted until they’re golden and dry — under-toasted bread will absorb moisture immediately. Second, assemble the crostini no more than 30 minutes before serving. If you’re prepping for a party, keep the toasted bread, sauce, and sliced beef separate and assemble just before guests arrive. Third, use a thin, even layer of the horseradish cream — too much sauce will soak into the bread. I also recommend letting the beef come to room temperature before assembling; cold beef can cause condensation that makes the bread soggy. If you’re transporting these to a gathering, bring all components separately and assemble on-site. These small steps make a huge difference in delivering crisp, beautiful crostini every time.
What’s the best way to season beef tenderloin for crostini?
For this beef tenderloin crostini recipe, simple seasoning is best because the beef’s natural flavor should shine. Start with a generous coating of kosher salt and freshly cracked black pepper — use about 1 teaspoon of salt and 1/2 teaspoon of pepper per pound of meat. Apply the seasoning at least 15 minutes before cooking, or ideally up to an hour ahead if you have time. This allows the salt to penetrate into the meat, seasoning it from within rather than just sitting on the surface. For the searing step, make sure your pan is hot enough that the salt and pepper create a beautiful dark crust — that crust is where so much flavor lives. If you want to add extra depth, you can incorporate garlic powder (1/2 teaspoon) or a pinch of smoked paprika into the seasoning mix. But truly, with quality beef tenderloin, salt and pepper are all you need to create an unforgettable appetizer.
Can I make this recipe dairy-free?
Yes, you can easily make this beef tenderloin crostini recipe dairy-free with a few simple swaps. For the horseradish cream sauce, replace the sour cream with a full-fat coconut cream or a dairy-free sour cream alternative (many brands are now available at US grocery stores). The coconut cream version will have a slightly different flavor profile — it’s a bit sweeter and more tropical — but it pairs surprisingly well with the horseradish and beef. Alternatively, use a dairy-free Greek-style yogurt alternative, which gives a closer texture to traditional sour cream. For the crostini, simply use a dairy-free baguette (most traditional French baguettes are dairy-free, but check the label). The beef itself is naturally dairy-free, so no changes needed there. The rest of the ingredients — olive oil, garlic, fresh herbs — are all dairy-free. These swaps make this easy beef appetizer accessible to guests with dairy sensitivities without sacrificing any of the flavor.
Share Your Version!
I absolutely love hearing how my recipes turn out in your kitchen. If you make this Beef Tenderloin Crostini Recipe, please come back and leave a star rating and a comment below — tell me what variation you tried, what wine you paired it with, or how your guests reacted when you walked out with that beautiful platter. Did you try the Moroccan spiced version? The herb-crusted twist? Did you figure out a cool new crostini toppings combination I haven’t thought of? I want to know every detail!
Snap a photo of your gorgeous crostini and share it on Instagram or Pinterest. Tag @exorecipes so I can see your creation — I personally read every comment and love sharing my readers’ photos on my stories. It honestly makes my day to see that something I created in my little NYC kitchen is being made in homes all over the country. If you have any questions at all — whether it’s about the perfect doneness of the beef, a substitution you’re considering, or how to double this easy beef appetizer for a bigger party — just ask in the comments. I’m here for you, from my kitchen to yours.
From my NYC kitchen to yours — I hope this recipe brings as much warmth to your table as it does to mine. — mia 🧡
Love This Recipe? Save It to Pinterest!
If you enjoyed this Beef Tenderloin Crostini Recipe, don’t let it get lost in your browser tabs! 😄 Pin it now so you can find it again anytime — and explore hundreds more tried-and-tested recipes waiting for you on my Pinterest boards.
👉 Follow mia on Pinterest @exorecipe
📌 Pin this recipe · 🔁 Re-pin your favorites · 💬 Tag me when you make it — I love seeing your creations!

Beef Tenderloin Crostini Recipe: A Delicious Appetizer for Every Occasion
- Prep Time: 15 minutes
- Cook Time: 25 minutes
- Total Time: 40 minutes
- Yield: 16 1x
- Method: Appetizer
- Cuisine: American
Description
These elegant Beef Tenderloin Crostini are the perfect appetizer for any gathering. Tender, seasoned beef is served atop crisp, garlic-rubbed baguette slices with a creamy horseradish sauce.
Ingredients
- 1 baguette, sliced into 1/2-inch rounds
- 3 tablespoons olive oil, divided
- 1 clove garlic, halved
- 1 pound beef tenderloin, trimmed
- 1 teaspoon kosher salt
- 1/2 teaspoon black pepper
- 1/2 cup sour cream
- 2 tablespoons prepared horseradish
- 1 tablespoon fresh chives, chopped
- 1 tablespoon fresh parsley, chopped
Instructions
- Preheat oven to 400°F (200°C). Arrange baguette slices on a baking sheet and brush with 2 tablespoons olive oil. Toast for 5-7 minutes until golden. Rub each toast with cut garlic clove.
- Season beef tenderloin with salt and pepper. Heat remaining 1 tablespoon oil in a skillet over high heat. Sear beef for 2-3 minutes per side until browned. Transfer to a baking dish and roast to desired doneness (about 20-25 minutes for medium-rare). Let rest 10 minutes, then slice thinly.
- In a small bowl, mix sour cream and horseradish. Spread a small amount on each crostini.
- Top each crostini with a slice of beef. Garnish with chives and parsley.
- Serve immediately.
Notes
For best results, use well-marbled beef tenderloin. The horseradish sauce can be made a day ahead and refrigerated.
Nutrition
- Calories: 290 kcal
- Sugar: 1 g
- Fat: 18 g
- Carbohydrates: 10 g
- Protein: 22 g
Tried This Recipe? Leave a Comment!
Did you make this recipe? I’d love to hear how it turned out! Please leave a comment and a rating below. Your feedback helps other home cooks and supports cheerychop.com!