EASY STUFFED BELL PEPPERS

easy-stuffed-bell-peppers

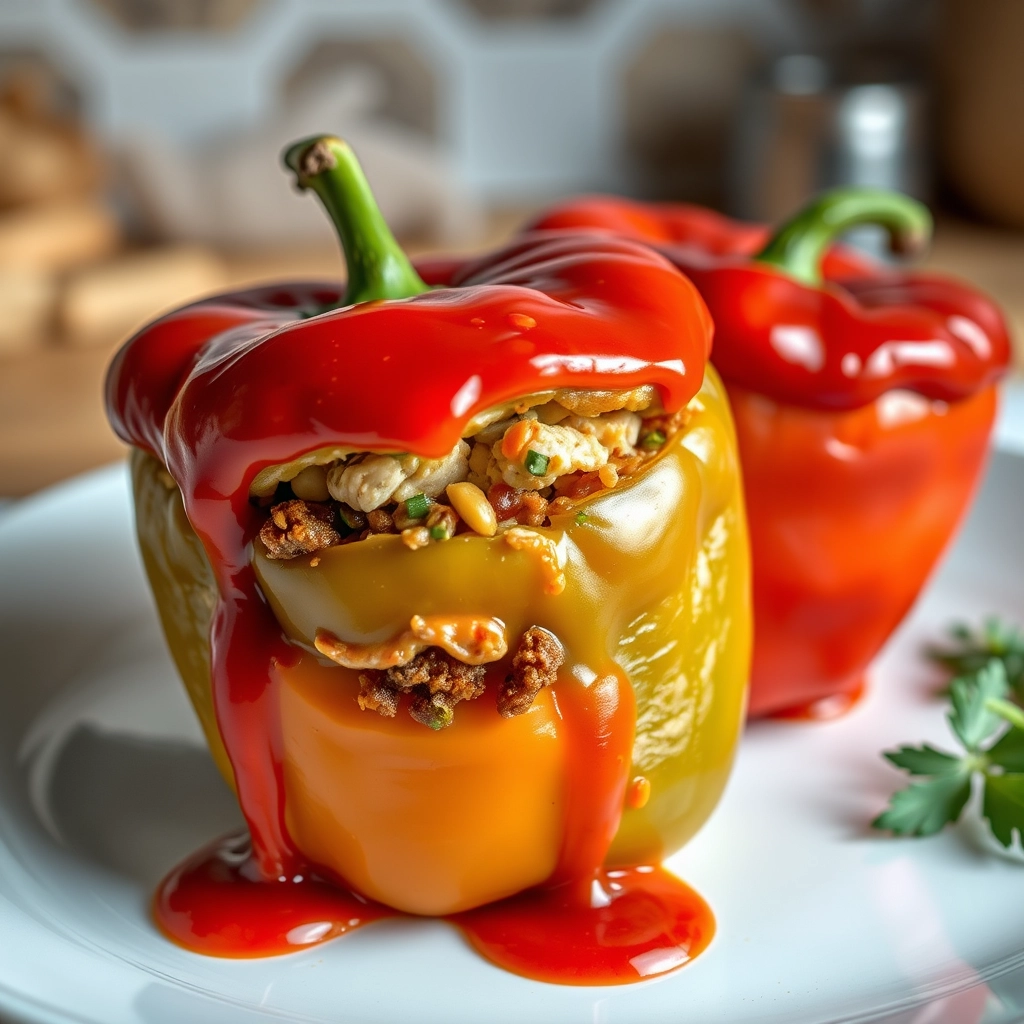
Easy Stuffed Bell Peppers: A Cozy Weeknight Savior

There’s something so comforting about a dish that feels like a hug—especially on those evenings when the day has been long, and the couch is calling your name. That’s exactly what these Easy Stuffed Bell Peppers are for me. I remember the first time I made them—it was a chilly autumn night, and I had a handful of colorful peppers sitting in my fridge, begging to be turned into something warm and satisfying. With a little rice, some ground beef, and a sprinkle of cheese, I created a meal that’s become a staple in our home. Simple, hearty, and packed with flavor, these stuffed peppers are the kind of dish that makes weeknight cooking feel effortless (and maybe even a little magical).
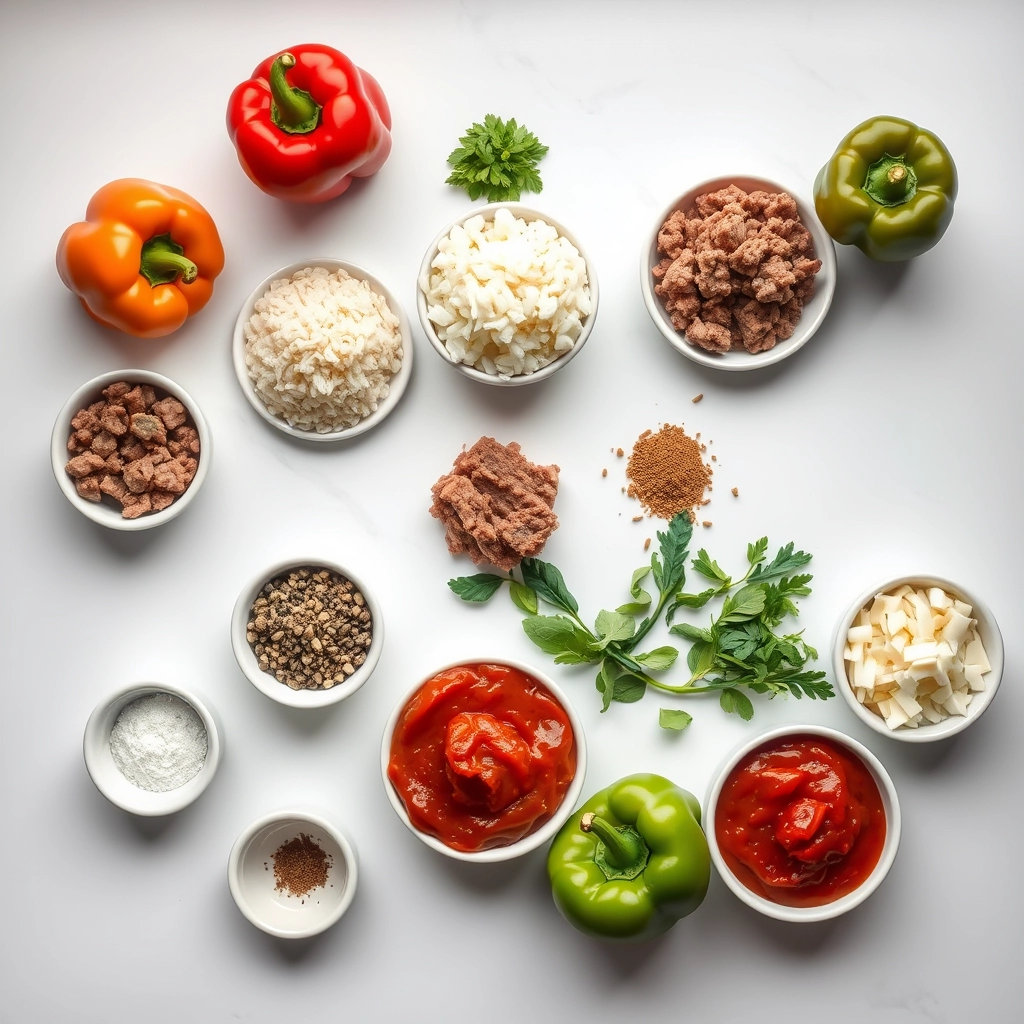
What You’ll Need

Gather these ingredients, and let’s make something delicious together:

  • 4 large bell peppers – Any color works, but I love the sweetness of red or yellow ones. They’re like little edible bowls!
  • 1 lb ground beef – Lean or regular, whatever you prefer. You could also swap in ground turkey or plant-based crumbles for a lighter twist.
  • 1 cup cooked rice – White, brown, or even quinoa—whatever you have on hand. Day-old rice works perfectly here.
  • 1 small onion, diced – The humble onion adds such depth of flavor. Don’t skip it!
  • 2 cloves garlic, minced – Because everything tastes better with garlic.
  • 1 (15 oz) can diced tomatoes – I like the ones with Italian seasoning for extra flavor, but plain works too.
  • 1 tsp dried oregano – A little herbaceous magic.
  • 1 tsp smoked paprika – This adds a subtle warmth that makes the filling irresistible.
  • 1 cup shredded cheese – Mozzarella, cheddar, or a blend—go with your favorite melty variety.
  • Salt and pepper to taste – The essentials!

Let’s Get Cooking

Now, let’s turn these simple ingredients into a meal that’ll have everyone asking for seconds. Here’s how to make it happen:

  1. Prep the peppers. Slice the tops off the bell peppers and remove the seeds and membranes. If they’re a bit wobbly, you can trim a tiny bit off the bottom to help them sit flat—just be careful not to cut through! I like to give the insides a quick rinse to make sure no stray seeds are hiding.
  2. Par-cook the peppers. Place them in a baking dish and pop them in a 375°F oven for about 10 minutes while you prepare the filling. This softens them just enough so they’re tender but still hold their shape.
  3. Brown the beef. In a large skillet over medium heat, cook the ground beef until it’s no longer pink, breaking it up as it cooks. Drain any excess fat—unless you love that richness, in which case, leave a little in for flavor!
  4. Sauté the aromatics. Add the diced onion to the skillet and cook until it’s soft and translucent, about 3-4 minutes. Toss in the garlic and stir for another 30 seconds—just until it’s fragrant. (Pro tip: Don’t let the garlic brown too much, or it’ll turn bitter.)
  5. Bring it all together. Stir in the cooked rice, diced tomatoes, oregano, smoked paprika, salt, and pepper. Let everything simmer together for a few minutes so the flavors can mingle. Taste and adjust the seasoning—this is your chance to make it perfect!

At this point, your kitchen should smell absolutely heavenly. Now comes the fun part—stuffing those peppers!

Pro Tips, Variations, and Substitutions

Stuffed bell peppers are wonderfully versatile, so don’t be afraid to get creative! Here are some ideas to make them your own:

  • Protein Swap: Ground turkey, chicken, or even plant-based crumbles work just as well as beef.
  • Cheese Lover’s Twist: Swap cheddar for mozzarella, pepper jack, or feta for a different flavor profile.
  • Grain-Free Option: Skip the rice and add quinoa, cauliflower rice, or extra veggies like zucchini.
  • Spice It Up: Add a pinch of cayenne, diced jalapeños, or a dash of smoked paprika for extra heat.
  • Vegetarian-Friendly: Use lentils or black beans instead of meat for a hearty plant-based version.

What to Serve With Stuffed Bell Peppers

These colorful peppers are a meal on their own, but they pair beautifully with a few simple sides:

  • A crisp green salad with a tangy vinaigrette
  • Garlic bread or warm crusty rolls
  • Roasted potatoes or a light quinoa salad
  • A dollop of sour cream or fresh avocado slices for extra creaminess

Storage and Reheating Tips

Leftovers? No problem! Stuffed bell peppers keep well and taste just as delicious the next day.

  • Refrigerator: Store in an airtight container for up to 3–4 days.
  • Freezer: Wrap cooled peppers individually in foil and freeze for up to 3 months. Thaw in the fridge before reheating.
  • Reheating: Warm in the oven at 350°F (175°C) for 15–20 minutes or microwave for 2–3 minutes until heated through.

Frequently Asked Questions

Can I make stuffed bell peppers ahead of time?
Absolutely! Assemble them, cover, and refrigerate for up to 24 hours before baking. Add a few extra minutes to the cooking time if they go into the oven cold.

Do I have to pre-cook the rice?
Yes, the rice should be cooked before stuffing the peppers to ensure it softens properly in the oven. Leftover rice works great here!

How do I keep the peppers from getting soggy?
Blanching them briefly before stuffing helps, but you can also bake them uncovered for the last 10 minutes to crisp up the tops.

Can I use mini bell peppers?
Definitely! Mini peppers make adorable appetizers—just reduce the baking time to 20–25 minutes.

Final Thoughts

Stuffed bell peppers are one of those comforting dishes that feel like a warm hug on a plate. Whether you stick to the classic recipe or put your own spin on it, they’re sure to become a family favorite. The best part? They’re as fun to make as they are to eat—so grab those peppers, get stuffing, and enjoy every delicious bite!

Print
clock clock iconcutlery cutlery iconflag flag iconfolder folder iconinstagram instagram iconpinterest pinterest iconfacebook facebook iconprint print iconsquares squares iconheart heart iconheart solid heart solid icon

Easy Stuffed Bell Peppers

  • Author: Trusted Blog

Description

A simple and delicious recipe for bell peppers stuffed with a flavorful mixture of ground beef, rice, and seasonings.


Ingredients

Scale

For the Crust:

  • 4 large bell peppers (any color)
  • 1 lb ground beef
  • 1 cup cooked rice
  • 1 small onion, diced
  • 2 cloves garlic, minced
  • 1 can (15 oz) tomato sauce
  • 1 tsp salt
  • 1/2 tsp black pepper
  • 1 tsp dried oregano
  • 1 cup shredded cheese (cheddar or mozzarella)

Instructions

1. Prepare the Crust:

  1. Preheat oven to 375°F (190°C). Cut the tops off the bell peppers and remove seeds and membranes.
  2. In a skillet, brown the ground beef over medium heat. Drain excess fat.
  3. Add diced onion and minced garlic to the skillet. Cook until onion is translucent.
  4. Stir in cooked rice, tomato sauce, salt, pepper, and oregano. Simmer for 5 minutes.
  5. Stuff the bell peppers with the beef and rice mixture. Place in a baking dish.
  6. Top each pepper with shredded cheese. Cover with foil and bake for 25 minutes.
  7. Remove foil and bake for an additional 5 minutes until cheese is bubbly and golden.

Notes

You can customize the seasonings to taste.

Cheesy Garlic Chicken Wraps

cheesy-garlic-chicken-wraps

Cheesy Garlic Chicken Wraps: The Ultimate Comfort Food Hug

There’s something about a warm, cheesy wrap that feels like a cozy blanket on a rainy day—or in my case, a much-needed pick-me-up after a whirlwind week of school runs and deadlines. Last Thursday, as I stood in my kitchen with a craving for something indulgent yet simple, these Cheesy Garlic Chicken Wraps came to life. The aroma of garlic butter sizzling in the pan alone was enough to make my little ones peek in, noses twitching like curious bunnies. By the time the cheese melted into golden gooeyness, we were all gathered around the stove, forks at the ready. And just like that, a new family favorite was born.

Ingredients You’ll Need (and Why You’ll Love Them)

  • 2 boneless, skinless chicken breasts – Tender, lean, and the perfect protein canvas for all that garlicky goodness. I like to slice them thinly for quicker cooking.
  • 3 cloves garlic, minced – Because life’s too short for timid flavors. Fresh is best here—trust me.
  • 2 tbsp butter – The rich base that’ll make your kitchen smell like a French bistro.
  • 1 tsp smoked paprika – A whisper of warmth and depth. If you don’t have smoked, regular paprika will do, but the smokiness is *chef’s kiss*.
  • 1 cup shredded mozzarella – The meltiest, stretchiest hug for your chicken. A blend of cheddar and mozzarella works wonders too.
  • 4 large flour tortillas – Soft, pliable, and ready to cradle all that cheesy goodness. For a crispier bite, try lightly toasting them first.
  • Handful of fresh spinach or arugula – A pop of green for balance (and to pretend we’re being virtuous).
  • Salt & pepper to taste – The unsung heroes of every great dish.

Let’s Make the Magic Happen

Step 1: Start by butterflying your chicken breasts—slice them horizontally so they cook evenly and stay juicy. Season both sides generously with salt, pepper, and that glorious smoked paprika. If you’ve got time, let them sit for 10 minutes to soak up the flavors (but no stress if you’re hangry—I’ve been there).

Step 2: Melt the butter in a large skillet over medium heat. Add the minced garlic and let it sizzle for just 30 seconds until fragrant (but not browned—burnt garlic is a tragedy we shall avoid). This is when your kitchen starts smelling like heaven.

Step 3: Add the chicken to the skillet, letting it sear for about 4-5 minutes per side until golden and cooked through. Pro tip: Resist the urge to move it around too much! Letting it sit ensures a beautiful crust. Once done, transfer the chicken to a cutting board and slice it into tender strips.

Step 4: Now, the fun part—assembly! Lay out your tortillas and divide the chicken strips evenly among them. Sprinkle each with a generous handful of mozzarella (this is no time for restraint) and a few leaves of spinach. The residual heat from the chicken will start melting the cheese dreamily.

Pro Tips, Variations, and Substitutions

These Cheesy Garlic Chicken Wraps are wonderfully adaptable to suit your tastes or what you have on hand. Here are some ideas to make them your own:

  • Protein Swap: Not a chicken fan? Try ground turkey, shredded beef, or even black beans for a vegetarian twist.
  • Cheese Choices: While mozzarella melts beautifully, cheddar, pepper jack, or even feta can add exciting flavor variations.
  • Wrap Alternatives: Use whole wheat tortillas for extra fiber, or lettuce leaves for a low-carb option.
  • Extra Veggies: Sneak in some spinach, bell peppers, or mushrooms for added nutrition.
  • Spice It Up: Add a pinch of red pepper flakes or a dash of hot sauce for those who like it spicy.

What to Serve With Cheesy Garlic Chicken Wraps

These wraps are satisfying on their own, but they pair beautifully with:

  • A crisp green salad with lemon vinaigrette
  • Roasted sweet potato wedges
  • Fresh vegetable sticks with ranch dip
  • A bowl of tomato soup for cozy comfort
  • Sweet corn on the cob in summer months

Storage and Reheating Tips

These wraps taste best fresh, but here’s how to enjoy leftovers:

  • Refrigeration: Store assembled wraps tightly wrapped in foil or plastic for up to 2 days.
  • Freezing: Freeze before cooking (without fresh veggies) for up to 1 month. Thaw overnight before heating.
  • Reheating: Warm in a 350°F oven for 10-15 minutes until heated through. The microwave works in a pinch but may soften the tortilla.
  • Make-Ahead: Prep the chicken filling up to 3 days ahead for quick assembly.

Frequently Asked Questions

Can I make these wraps ahead for meal prep?

Absolutely! Prepare the filling and store separately from tortillas. Assemble just before eating to prevent soggy wraps.

How can I make these wraps gluten-free?

Simply use your favorite gluten-free tortillas and double-check that your garlic sauce ingredients are GF.

What’s the best way to prevent the wraps from falling apart?

Don’t overfill them, and be sure to fold in the sides before rolling tightly. A quick toast in the pan helps seal them too.

Can I use pre-cooked chicken?

Yes! Rotisserie chicken works wonderfully here – just shred it and mix with the garlic sauce.

Final Thoughts

There’s something so comforting about pulling apart a warm, cheesy wrap and seeing that stretchy melted cheese. These Cheesy Garlic Chicken Wraps have become a regular in our meal rotation because they’re just as perfect for busy weeknights as they are for casual weekend lunches. Whether you stick to the classic recipe or try one of the fun variations, I hope these wraps bring as much joy to your table as they do to mine. Don’t forget to have napkins ready – the best meals are often the messiest!

Print
clock clock iconcutlery cutlery iconflag flag iconfolder folder iconinstagram instagram iconpinterest pinterest iconfacebook facebook iconprint print iconsquares squares iconheart heart iconheart solid heart solid icon

Cheesy Garlic Chicken Wraps

  • Author: Trusted Blog

Description

Delicious and easy-to-make chicken wraps loaded with cheese and garlic flavor.


Ingredients

Scale

For the Crust:

  • 2 boneless, skinless chicken breasts
  • 4 large flour tortillas
  • 1 cup shredded mozzarella cheese
  • 1/2 cup grated parmesan cheese
  • 3 cloves garlic, minced
  • 2 tbsp butter, melted
  • 1 tsp dried oregano
  • 1/2 tsp salt
  • 1/4 tsp black pepper
  • 1 tbsp olive oil
  • 1/2 cup chopped fresh parsley

Instructions

1. Prepare the Crust:

  1. Preheat oven to 375°F (190°C).
  2. Cut chicken breasts into thin strips. Season with salt and pepper.
  3. Heat olive oil in a pan over medium heat. Cook chicken until no longer pink, about 6-8 minutes. Remove from heat.
  4. In a small bowl, mix melted butter, minced garlic, and oregano.
  5. Brush tortillas with garlic butter mixture, leaving a 1-inch border.
  6. Divide cooked chicken, mozzarella, and parmesan among tortillas. Sprinkle with parsley.
  7. Roll up tortillas tightly and place seam-side down on a baking sheet.
  8. Bake for 10-12 minutes until cheese is melted and tortillas are golden.
  9. Let cool for 2 minutes before serving.

Notes

You can customize the seasonings to taste.

Easy Beef and Noodles

easy-beef-and-noodles

Easy Beef and Noodles: A Bowl of Comfort on Busy Nights

There’s something about a steaming bowl of beef and noodles that feels like a warm hug after a long day. I remember my grandmother stirring a pot of this simple, savory dish on chilly evenings, the aroma of tender beef and buttery noodles filling her tiny kitchen. Life moves fast these days, but this recipe—passed down with a few of my own tweaks—still brings that same cozy comfort in under an hour. Whether you’re juggling work, kids, or just craving a no-fuss meal that tastes like home, this one’s for you.

What You’ll Need

Gather these simple ingredients—most might already be in your pantry or fridge! Here’s what makes this dish sing:

  • 1 lb stew beef or chuck roast, cubed – Trim off excess fat, but don’t go lean-crazy; a little marbling keeps the meat juicy.
  • 1 yellow onion, diced – The sweet caramelization is key for depth of flavor.
  • 2 cloves garlic, minced – Because what’s a savory dish without garlic?
  • 4 cups beef broth – Homemade if you have it, but a good-quality store-bought works too.
  • 2 tablespoons Worcestershire sauce – Our secret umami booster!
  • 1 teaspoon dried thyme – Earthy and warm, it pairs perfectly with beef.
  • 12 oz wide egg noodles – The classic choice, but feel free to swap with pappardelle or even homemade pasta if you’re feeling fancy.
  • 2 tablespoons butter – For richness and that silky finish.
  • Salt and pepper to taste – Season as you go—trust your tastebuds.

Let’s Get Cooking

This recipe is as forgiving as it is delicious. Here’s how to bring it all together:

  1. Brown the beef: Heat a large pot or Dutch oven over medium-high heat. Pat the beef cubes dry (this ensures a good sear!), then season generously with salt and pepper. Add a drizzle of oil and sear the beef in batches until deeply browned—about 3-4 minutes per side. Don’t rush this step! Those crispy bits equal flavor gold.
  2. Sweat the aromatics: Reduce the heat to medium and toss in the diced onion, stirring until translucent and fragrant, about 5 minutes. Add the garlic and thyme, stirring for just 30 seconds to wake up their flavors without burning.
  3. Simmer to tenderness: Return the beef to the pot and pour in the beef broth and Worcestershire sauce. Scrape up any browned bits from the bottom—that’s free flavor! Bring to a gentle boil, then reduce heat to low, cover, and let it simmer for 30-40 minutes until the beef is fork-tender. (Tip: If you’re short on time, a pressure cooker cuts this step to 15 minutes!)

At this point, your kitchen will smell like a cozy bistro, and the hardest part is waiting. But trust me, the tender beef and rich broth are worth every minute. Stay tuned for the final steps—where buttery noodles and a few finishing touches turn this humble dish into a weeknight superstar!

Pro Tips, Variations, and Substitutions

This easy beef and noodles recipe is wonderfully adaptable to suit your tastes or what you have on hand. Here are some ways to make it your own:

  • Protein swap: Try using ground turkey or shredded chicken instead of beef for a lighter version.
  • Vegetable boost: Stir in mushrooms, bell peppers, or spinach for extra nutrition and color.
  • Creamier sauce: Add a splash of heavy cream or a dollop of sour cream at the end for extra richness.
  • Gluten-free option: Use your favorite gluten-free noodles and ensure your broth is gluten-free.
  • Slow cooker method: Brown the beef first, then combine all ingredients in a slow cooker on low for 4-6 hours.

What to Serve With Beef and Noodles

This comforting dish pairs beautifully with:

  • A crisp green salad with vinaigrette to cut through the richness
  • Buttered dinner rolls or crusty bread for soaking up the sauce
  • Steamed green beans or roasted carrots for a pop of color
  • A glass of red wine or iced tea, depending on the season

Storage and Reheating Tips

Leftovers (if you’re lucky enough to have any!) store beautifully:

  • Store in an airtight container in the refrigerator for 3-4 days.
  • For longer storage, freeze for up to 3 months. Thaw overnight in the refrigerator before reheating.
  • Reheat gently on the stovetop with a splash of broth to loosen the sauce.
  • Microwave in 30-second intervals, stirring between each, until heated through.

Frequently Asked Questions

Can I use egg noodles instead of the noodles listed?
Absolutely! Egg noodles are a classic choice for this dish and will work beautifully.

What if my sauce is too thin?
Let it simmer uncovered for a few extra minutes to thicken, or mix 1 tablespoon cornstarch with 2 tablespoons cold water and stir it in.

Can I make this ahead of time?
Yes! Prepare the dish through step 4, then refrigerate. When ready to serve, gently reheat and add the noodles.

Is this recipe kid-friendly?
Most kids love this comforting dish! For picky eaters, you can reduce the seasonings slightly or serve the components separately.

Final Thoughts

There’s something so comforting about a steaming bowl of beef and noodles that just feels like home. Whether you’re cooking for a busy weeknight dinner or preparing a meal to share with loved ones, this recipe is sure to satisfy. The best part? It leaves plenty of room for your personal touch – maybe an extra sprinkle of herbs from your garden or that special ingredient your family always loves. However you make it, I hope this dish brings warmth and joy to your table. Happy cooking!

Print
clock clock iconcutlery cutlery iconflag flag iconfolder folder iconinstagram instagram iconpinterest pinterest iconfacebook facebook iconprint print iconsquares squares iconheart heart iconheart solid heart solid icon

Easy Beef and Noodles

  • Author: Trusted Blog

Description

A comforting and hearty dish featuring tender beef and egg noodles in a rich, savory sauce.


Ingredients

Scale

For the Crust:

  • 1 lb beef stew meat, cubed
  • 2 cups egg noodles, uncooked
  • 4 cups beef broth
  • 1 small onion, diced
  • 2 cloves garlic, minced
  • 1 tbsp Worcestershire sauce
  • 1 tsp dried thyme
  • 1 tsp dried rosemary
  • Salt and pepper to taste
  • 2 tbsp olive oil

Instructions

1. Prepare the Crust:

  1. Heat olive oil in a large pot over medium-high heat. Add the beef cubes and brown on all sides, about 5 minutes.
  2. Add the diced onion and minced garlic to the pot. Cook until the onion is translucent, about 3 minutes.
  3. Pour in the beef broth, Worcestershire sauce, thyme, and rosemary. Bring to a boil, then reduce heat to low and simmer for 20 minutes.
  4. Add the egg noodles to the pot and cook according to package instructions, about 8-10 minutes, until tender.
  5. Season with salt and pepper to taste. Serve hot.

Notes

You can customize the seasonings to taste.

Beef Enchilada Casserole

beef-enchilada-casserole

Beef Enchilada Casserole: A Cozy, Cheesy Hug in Every Bite

There’s something magical about the way a bubbling casserole fills the kitchen with warmth—especially on those evenings when the wind howls outside, and all you crave is a dish that feels like a hug. This Beef Enchilada Casserole is my go-to for those nights. It’s layers of tender beef, melty cheese, and smoky enchilada sauce, all baked into a comforting masterpiece. No rolling tortillas required! Just hearty, messy, delicious layers that come together with minimal fuss. It’s the kind of meal that makes everyone at the table lean in for seconds—and maybe even thirds.

Gathering Your Ingredients: A Symphony of Flavor

Before we dive into the cooking, let’s talk ingredients. This recipe is flexible, so feel free to tweak it to your taste—but here’s what makes it sing:

  • Ground beef (1 lb): I prefer 85% lean for the perfect balance of flavor and tenderness. If you’re feeling adventurous, ground turkey or chicken works too!
  • Yellow onion (1 medium): Diced finely—it’ll melt into the beef, adding sweetness and depth.
  • Garlic (3 cloves): Minced. Because what’s a cozy dish without garlic’s warm embrace?
  • Enchilada sauce (2 cups): Homemade or store-bought—I won’t judge! Just pick one with a smoky, rich flavor.
  • Corn tortillas (10-12): Slightly stale ones work best—they hold up better in the casserole.
  • Shredded cheese (3 cups): A mix of Monterey Jack and sharp cheddar is my dream team, but use what you love.
  • Black beans (1 can, drained): For a little extra protein and texture.
  • Spices (1 tbsp chili powder, 1 tsp cumin, 1/2 tsp smoked paprika): These bring the warmth and earthiness that make this dish unforgettable.
  • Fresh cilantro & sour cream (for serving): Because every great casserole deserves a fresh, creamy finish.

Let’s Get Layering: The Cozy Assembly

Now, the fun part! This casserole comes together like a delicious puzzle—layer by layer, with plenty of room for love (and cheese). Here’s how:

  1. Brown the beef: In a large skillet over medium heat, cook the ground beef with the diced onion until the beef is no longer pink and the onions are soft and translucent. Add the garlic and spices, stirring until fragrant—about 1 minute. Drain any excess grease, then stir in half the enchilada sauce and the black beans. Let it simmer for 2-3 minutes, just to let the flavors marry.
  2. Prep your baking dish: Lightly grease a 9×13-inch baking dish. Spread a thin layer of enchilada sauce on the bottom—this keeps the tortillas from sticking and adds extra flavor.
  3. First layer: Arrange half the tortillas in the dish, overlapping slightly. Don’t worry about perfection—rustic is charming! Spoon half the beef mixture over the tortillas, then sprinkle with a generous handful of cheese.
  4. Repeat: Add another layer of tortillas, the remaining beef mixture, and another mountain of cheese. Finish with a final drizzle of enchilada sauce—because we believe in saucy goodness.

At this point, your kitchen should smell like a Mexican cantina in the best possible way. Now, just pop it in the oven (covered with foil) at 375°F for 20 minutes, then uncover and bake for another 10 until the cheese is gloriously golden and bubbly. But we’ll get to that in the next half—trust me, the wait is worth it!

Pro Tips for the Perfect Beef Enchilada Casserole

This casserole is wonderfully forgiving, but a few extra touches can take it from good to amazing:

  • Toast your spices: Lightly toast the cumin and chili powder in a dry pan before adding to the beef for deeper flavor.
  • Warm your tortillas: Briefly microwave corn tortillas wrapped in a damp towel to prevent cracking when layering.
  • Rest before serving: Let the casserole sit 10 minutes after baking – it slices cleaner and the flavors meld beautifully.

Delicious Variations & Substitutions

This recipe is a canvas for creativity! Try these twists:

  • Protein swap: Ground turkey, shredded chicken, or black beans for a vegetarian version.
  • Cheese lovers: Add a layer of pepper jack or crumbled queso fresco between tortillas.
  • Extra veggies: Sautéed bell peppers, zucchini, or spinach mixed into the beef filling.
  • Spice level: Adjust with mild or hot enchilada sauce, or add diced jalapeños.

What to Serve With Your Enchilada Casserole

This hearty dish pairs perfectly with:

  • Cooling sides: Mexican crema, guacamole, or a crisp cabbage slaw
  • Classic accompaniments: Cilantro lime rice, charro beans, or warm flour tortillas
  • For drinks: A cold Mexican beer, horchata, or tangy margaritas

Storage & Reheating Tips

Leftovers taste even better the next day! Here’s how to keep them perfect:

  • Refrigerate: Store covered for 3-4 days.
  • Freeze: Portion and freeze for up to 3 months (thaw overnight before reheating).
  • Reheat: 350°F oven for 20 minutes (covered) or microwave individual portions with a damp paper towel to prevent drying.

Frequently Asked Questions

Can I use flour tortillas instead of corn?
Yes! Flour tortillas create a softer texture. Reduce baking time by 5 minutes as they brown faster.

How can I make this gluten-free?
Use certified GF corn tortillas and check your enchilada sauce labels. Most major brands are naturally gluten-free.

Why is my casserole watery?
This usually means the sauce wasn’t reduced enough. Next time, simmer your sauce 5 extra minutes or blot tortillas with a paper towel before layering.

Can I assemble this ahead?
Absolutely! Prep up to 24 hours in advance, cover, and refrigerate. Add 10-15 minutes to baking time if going straight from fridge to oven.

Final Thoughts

There’s something magical about how simple ingredients transform into this comforting, flavor-packed casserole. Whether it’s a busy weeknight dinner or the star of your next potluck, this beef enchilada casserole is guaranteed to bring everyone to the table with smiles. The best part? That first bite of melty cheese, tender beef, and just-right spice that tastes like a warm hug. Don’t be surprised when requests for seconds – and the recipe – start coming your way!

Print
clock clock iconcutlery cutlery iconflag flag iconfolder folder iconinstagram instagram iconpinterest pinterest iconfacebook facebook iconprint print iconsquares squares iconheart heart iconheart solid heart solid icon

Beef Enchilada Casserole

  • Author: Trusted Blog

Description

A delicious and easy-to-make layered casserole with all the flavors of traditional beef enchiladas.


Ingredients

Scale

For the Crust:

  • 1 lb ground beef
  • 1 small onion, diced
  • 1 packet taco seasoning
  • 1 can (10 oz) red enchilada sauce
  • 6 corn tortillas, cut into quarters
  • 1 can (15 oz) black beans, drained and rinsed
  • 1 cup shredded cheddar cheese
  • 1 cup shredded Monterey Jack cheese
  • 1/2 cup sour cream
  • 1/4 cup chopped fresh cilantro

Instructions

1. Prepare the Crust:

  1. Preheat oven to 375°F (190°C).
  2. In a skillet over medium heat, cook ground beef and onion until beef is browned. Drain excess fat.
  3. Stir in taco seasoning and 1/4 cup water. Simmer for 5 minutes.
  4. Spread 1/4 cup enchilada sauce in the bottom of a 9×13 baking dish.
  5. Layer half the tortilla pieces, half the beef mixture, half the black beans, and half the cheeses. Repeat layers.
  6. Pour remaining enchilada sauce over the top and spread evenly.
  7. Bake uncovered for 25-30 minutes until bubbly and cheese is melted.
  8. Let cool for 5 minutes before serving. Top with sour cream and cilantro.

Notes

You can customize the seasonings to taste.

Honey Glazed Salmon

honey-glazed-salmon

The Sweet Simplicity of Honey Glazed Salmon

There’s something magical about a dish that feels both indulgent and effortless—like the kind of meal you can whip up on a busy weeknight but still serve with pride to guests. That’s exactly how I feel about honey glazed salmon. I first fell in love with this recipe during a cozy dinner at my aunt’s house years ago. The way the sticky-sweet glaze caramelized on the tender salmon, the hint of garlic and lemon cutting through the richness—it was love at first bite. Since then, it’s become my go-to when I want something quick, healthy, and utterly satisfying. And today, I’m sharing my tried-and-true version with you.

Ingredients You’ll Need

Gathering the right ingredients is half the battle, but luckily, this recipe keeps things simple with pantry staples and a few fresh touches:

  • 4 salmon fillets (about 6 oz each) – Look for wild-caught if possible; the flavor is richer and more nuanced.
  • 3 tbsp honey – Use local honey if you can—it adds a lovely floral note.
  • 2 tbsp soy sauce – This brings the perfect salty depth to balance the sweetness.
  • 1 tbsp olive oil – A good glug for cooking and a bit of richness.
  • 2 cloves garlic, minced – Because garlic makes everything better.
  • 1 tbsp lemon juice – Freshly squeezed, please! It brightens the whole dish.
  • 1 tsp Dijon mustard – A little secret weapon for tang and depth.
  • ½ tsp black pepper – Freshly cracked is ideal.
  • Pinch of red pepper flakes (optional) – For those who like a gentle kick.
  • Fresh parsley or dill, for garnish – A sprinkle of green makes it pretty and fresh.

Let’s Get Cooking: Step-by-Step

Now, onto the fun part! This recipe comes together in under 30 minutes, but the flavors taste like you spent hours. Here’s how to make it:

  1. Prep the salmon. Pat the fillets dry with a paper towel—this helps the glaze stick better. Season lightly with a pinch of salt and pepper on both sides.
  2. Make the glaze. In a small bowl, whisk together the honey, soy sauce, olive oil, minced garlic, lemon juice, Dijon mustard, black pepper, and red pepper flakes (if using). Taste and adjust—you might want a touch more honey or lemon depending on your preference.
  3. Marinate (just a little!). Place the salmon in a shallow dish and pour half of the glaze over it, turning to coat. Let it sit for 10 minutes—no longer, or the acidity in the lemon juice will start to “cook” the fish.
  4. Heat the pan. While the salmon marinates, heat a large skillet (I love using cast iron for this) over medium-high heat. A quick tip: Make sure the pan is nice and hot before adding the salmon to get that beautiful sear.

And just like that, we’re halfway to honey-glazed perfection! The next steps—searing, glazing, and serving—are where the magic really happens. But I’ll save those for the second half of this post. For now, take a moment to savor the aroma of garlic and honey mingling in your kitchen. Trust me, it’s the best kind of anticipation.

Honey Glazed Salmon: A Sweet and Savory Delight

There’s something magical about the way honey caramelizes on salmon, creating a sticky-sweet glaze that’s impossible to resist. Whether you’re cooking for a weeknight dinner or impressing guests, this honey glazed salmon recipe is a guaranteed crowd-pleaser. Below, I’ve included some pro tips, serving suggestions, and answers to common questions to help you make the most of this dish.

Pro Tips, Variations, and Substitutions

Every home cook has their own twist on a classic, and honey glazed salmon is no exception. Here are some ways to make it your own:

  • Swap the honey: If you prefer a deeper flavor, try maple syrup or agave nectar instead of honey. For a touch of smokiness, add a teaspoon of bourbon or whiskey to the glaze.
  • Spice it up: A pinch of red pepper flakes or a dash of sriracha in the glaze adds a subtle kick.
  • Citrus boost: A squeeze of fresh lemon or orange juice brightens the glaze beautifully.
  • Alternative proteins: This glaze works wonderfully on chicken or shrimp if salmon isn’t your thing.

What to Serve with Honey Glazed Salmon

This dish pairs beautifully with a variety of sides. Here are a few of my favorites:

  • Roasted vegetables: Asparagus, Brussels sprouts, or sweet potatoes complement the sweetness of the glaze.
  • Grains: Quinoa, rice, or couscous soak up the extra glaze and add heartiness.
  • Fresh salads: A crisp arugula salad with a light vinaigrette balances the richness of the salmon.

Storage and Reheating Tips

Leftovers? No problem! Here’s how to keep your honey glazed salmon tasting fresh:

  • Storage: Place cooled salmon in an airtight container and refrigerate for up to 2 days.
  • Reheating: To avoid drying out the salmon, gently warm it in a covered skillet over low heat with a splash of water or broth. Alternatively, microwave at 50% power for short intervals.
  • Freezing: While possible, the texture may change slightly. If freezing, wrap tightly and use within 1 month.

Frequently Asked Questions

Can I use frozen salmon?

Absolutely! Just thaw it completely in the refrigerator before cooking to ensure even glazing.

How do I know when the salmon is done?

The salmon should flake easily with a fork and reach an internal temperature of 145°F (63°C).

Can I make the glaze ahead of time?

Yes! The glaze can be prepared up to 3 days in advance and stored in the fridge. Just warm it slightly before brushing onto the salmon.

What if I don’t have soy sauce?

Coconut aminos or tamari make great substitutes, or you can use a pinch of salt for a simpler version.

Final Thoughts

Honey glazed salmon is one of those dishes that feels both indulgent and wholesome—a perfect balance of sweet, savory, and satisfying. Whether you’re cooking for yourself or sharing with loved ones, I hope this recipe brings warmth and joy to your table. Happy cooking, and may every bite be as delightful as the last!

Print
clock clock iconcutlery cutlery iconflag flag iconfolder folder iconinstagram instagram iconpinterest pinterest iconfacebook facebook iconprint print iconsquares squares iconheart heart iconheart solid heart solid icon

Honey Glazed Salmon

  • Author: Trusted Blog

Description

A delicious and easy-to-make honey glazed salmon that’s perfect for a weeknight dinner.


Ingredients

Scale

For the Crust:

  • 4 salmon fillets (6 oz each)
  • 1/4 cup honey
  • 2 tablespoons soy sauce
  • 1 tablespoon olive oil
  • 1 teaspoon minced garlic
  • 1/2 teaspoon ground ginger
  • 1/4 teaspoon black pepper
  • 1 tablespoon lemon juice
  • 1 tablespoon chopped fresh parsley (for garnish)

Instructions

1. Prepare the Crust:

  1. Preheat oven to 375°F (190°C). Line a baking sheet with parchment paper.
  2. In a small bowl, whisk together honey, soy sauce, olive oil, garlic, ginger, black pepper, and lemon juice.
  3. Place salmon fillets on the prepared baking sheet. Brush each fillet generously with the honey glaze.
  4. Bake for 12-15 minutes, or until salmon flakes easily with a fork. Baste with remaining glaze halfway through cooking.
  5. Garnish with chopped parsley and serve immediately.

Notes

You can customize the seasonings to taste.