No-Bake Peanut Butter Pie Recipe

No-Bake Peanut Butter Pie Recipe: The Only Recipe You’ll Ever Need

Imagine craving a decadent dessert but dreading the oven’s heat on a sweltering summer day—this is where the No-Bake Peanut Butter Pie Recipe truly shines. As a busy home cook, I often turn to this effortless treat to satisfy sweet tooths without breaking a sweat. With its extra creamy texture from a perfectly blended filling, this No-Bake Peanut Butter Pie Recipe is a game-changer for anyone seeking a foolproof dessert that delivers rich, peanutty bliss in just minutes of prep. Sourced from exorecipes.com, it’s designed for beginners and pros alike, promising a pie that’s as simple as it is irresistible. You’ll learn insider tips, substitutions, and why this version stands out among countless others online.

The No-Bake Peanut Butter Pie Recipe tantalizes the senses with its velvety smooth filling, where creamy peanut butter melds seamlessly with softened cream cheese and a hint of vanilla, creating a luxurious mouthfeel that’s hard to resist. Picture the satisfying crunch of the graham cracker crust contrasting against the silken layers, releasing aromas of toasted nuts and sweet butter as you slice into it. Each bite bursts with nutty richness, balanced by a subtle sweetness that lingers, making it the ultimate comfort food for peanut butter enthusiasts. The extra creamy consistency ensures every forkful feels indulgent, almost like a gourmet treat from a high-end bakery.

What sets this No-Bake Peanut Butter Pie Recipe apart at exorecipes.com is our commitment to thorough testing and expert insights from Chef Mia, ensuring it’s the most reliable resource you’ll find. We’ve fine-tuned every detail, from ingredient swaps to chilling techniques, to make it extra creamy and consistently perfect. In this post, you’ll discover the Chef’s Secret for achieving that dreamy texture, step-by-step guidance to avoid common pitfalls, and answers to your burning questions. Whether you’re hosting a party or enjoying a quiet night in, this recipe will boost your kitchen confidence and become your go-to for no-bake desserts.

Prep Time: 20 minutes
Cook Time: 0 minutes
Total Time: 4 hours 20 minutes (including chilling)
Servings: 1 9-inch pie

Why This No-Bake Peanut Butter Pie Recipe is a Game-Changer

The Chef’s Secret to this No-Bake Peanut Butter Pie Recipe lies in its extra creamy filling, achieved by blending high-quality creamy peanut butter with softened cream cheese and a precise amount of milk. This technique creates an emulsion that locks in moisture, making the pie ultra-smooth and velvety, far superior to standard versions that can turn out grainy. By gradually incorporating the milk while beating, we ensure a homogenous mixture that prevents separation, elevating the overall texture to professional levels.

For unbeatable texture, the science is simple: the fat content in the peanut butter and cream cheese binds with the powdered sugar to form a stable, airy filling. This extra creamy base contrasts beautifully with the crunchy graham cracker crust, providing a delightful mouthfeel that keeps the pie from being overly dense. We’ve tested this No-Bake Peanut Butter Pie Recipe multiple times to confirm its consistency, adjusting ratios to achieve the perfect balance of creaminess without sogginess.

This recipe is foolproof for a reason—it’s been refined through real kitchen trials to guarantee success every time. Whether you’re a novice or a seasoned baker, the straightforward steps and detailed tips make this No-Bake Peanut Butter Pie Recipe accessible and reliable, ensuring your dessert turns out extra creamy and impressive, no matter the occasion.

Ingredient Spotlight: Quality Makes the Difference

Graham cracker crumbs form the foundation of this No-Bake Peanut Butter Pie Recipe, providing a crunchy base that contrasts the extra creamy filling. Use fresh, finely ground crumbs for the best texture, as stale ones can make the crust brittle. Quality matters because high-quality crumbs absorb the butter evenly, creating a sturdy yet crumbly layer. For substitutions, try crushed digestive biscuits if you’re out of graham crackers, but note that they may add a slightly sweeter note to your peanut butter pie.

Sugar plays a key role in sweetening the crust and balancing the nutty flavors in this No-Bake Peanut Butter Pie Recipe. Opt for granulated sugar to ensure it dissolves properly and doesn’t leave a gritty feel. Why quality matters: Using pure cane sugar avoids any artificial aftertaste, enhancing the overall extra creamy profile. A tested substitution is coconut sugar for a lower-glycemic option, which will impart a subtle caramel undertone without overpowering the peanut butter’s richness.

Unsalted butter, melted, binds the crust together in this No-Bake Peanut Butter Pie Recipe, adding a rich flavor and helping it set in the fridge. Choose high-fat, European-style butter for superior creaminess, as it melts evenly and contributes to the pie’s decadent texture. Quality is crucial to prevent the crust from becoming oily; always use unsalted to control sodium levels. For dairy-free swaps, coconut oil works beautifully, maintaining that extra creamy consistency while keeping the recipe vegan-friendly.

Creamy peanut butter is the star of this No-Bake Peanut Butter Pie Recipe, delivering that signature nutty taste and contributing to the extra creamy filling. Select natural peanut butter without added oils for a purer flavor and better texture, as hydrogenated versions can make the pie too oily. It acts as an emulsifier, blending seamlessly with other ingredients. If allergies are a concern, almond butter is a great substitute, though it will introduce a milder, nuttier profile to your no-bake pie.

Powdered sugar sweetens and thickens the filling in this No-Bake Peanut Butter Pie Recipe, ensuring a smooth, lump-free result. Use sifted powdered sugar to avoid any grittiness, which can ruin the extra creamy mouthfeel. Quality matters because finely milled sugar dissolves instantly, creating a silky base. For a lower-sugar alternative, try erythritol, but adjust quantities as it may affect the pie’s firmness during chilling.

Vanilla extract adds depth and aroma to this No-Bake Peanut Butter Pie Recipe, enhancing the extra creamy filling with warm notes. Always go for pure extract over imitation for authentic flavor that complements the peanut butter without overwhelming it. It helps mask any potential bitterness. A reliable substitution is almond extract for a twist, but use half the amount to prevent it from dominating the pie’s profile.

Cream cheese provides the rich, tangy base for the extra creamy filling in this No-Bake Peanut Butter Pie Recipe. Ensure it’s full-fat and softened to room temperature for easy blending and a velvety texture. Quality cream cheese prevents lumps and adds stability. For a dairy-free version, opt for cashew-based cream cheese, which mimics the creaminess while keeping the pie’s structure intact.

Milk thins the filling to the perfect consistency in this No-Bake Peanut Butter Pie Recipe, making it extra creamy and easy to spread. Whole milk works best for richness, but any full-fat version will do. Quality ensures no watery results; always use fresh milk. Lactose-free alternatives like almond milk are ideal for substitutions, though you may need to add a touch more to achieve the same creamy texture.

Whipped cream, for topping, adds a light, airy finish to this No-Bake Peanut Butter Pie Recipe, enhancing its extra creamy appeal. Freshly whipped cream offers the best flavor and stability, so avoid store-bought if possible. It provides visual and textural contrast. For a vegan swap, use coconut whipped cream, which maintains the fluffy topping while aligning with dairy-free diets.

Step-by-Step Instructions

Step 1: Preparing the Crust

In a medium bowl, combine 1 1/2 cups graham cracker crumbs, 1/4 cup sugar, and 6 tablespoons melted unsalted butter. Mix thoroughly until the ingredients form a wet, sandy texture that holds together when pressed. Press this mixture firmly and evenly into the bottom and sides of a 9-inch pie dish using the back of a spoon or a flat-bottomed glass for a compact base. Refrigerate for at least 30 minutes to allow it to set properly.

Pro Tip: For the best results, chill the pie dish in the freezer for the first 10 minutes to speed up setting and prevent the crust from crumbling when you add the filling.

Step 2: Making the Filling

In a large mixing bowl, beat 8 ounces of softened cream cheese, 1 cup creamy peanut butter, 1 cup powdered sugar, and 1 teaspoon vanilla extract together until fully combined and creamy, about 2-3 minutes with an electric mixer. Gradually pour in 1/2 cup milk while continuing to beat on low speed until the mixture is smooth and lump-free. Once ready, pour the filling over the chilled crust and use a spatula to smooth the top evenly.

Common Mistake to Avoid: Don’t add all the milk at once, as this can cause curdling; add it slowly to maintain the extra creamy texture and ensure a silky finish.

Step 3: Chilling the Pie

Place the assembled pie in the refrigerator and let it chill for at least 4 hours, or until the filling is firm and set. This step is crucial for the flavors to meld and for the extra creamy consistency to develop fully.

Pro Tip: Cover the pie with plastic wrap before chilling to prevent it from absorbing odors from the fridge, which could affect the peanut butter’s natural taste.

Step 4: Serving the Pie

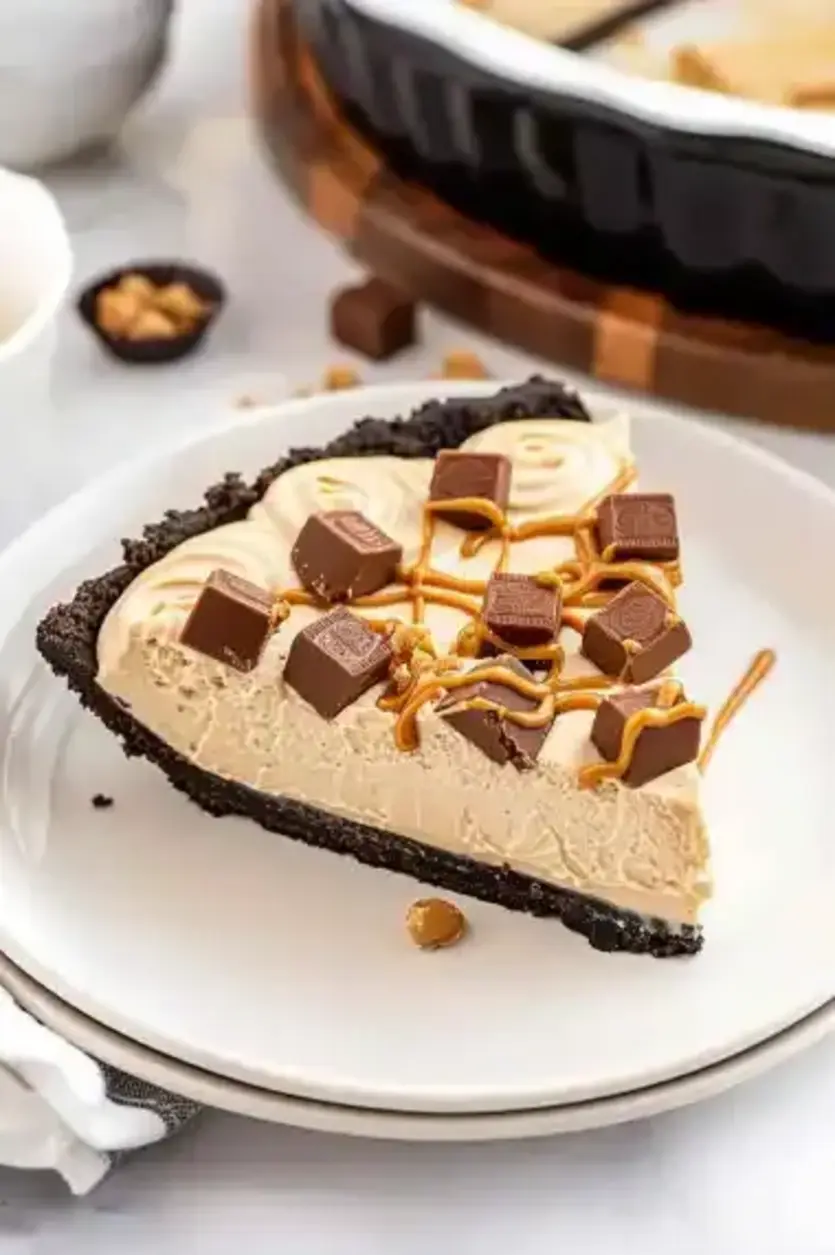
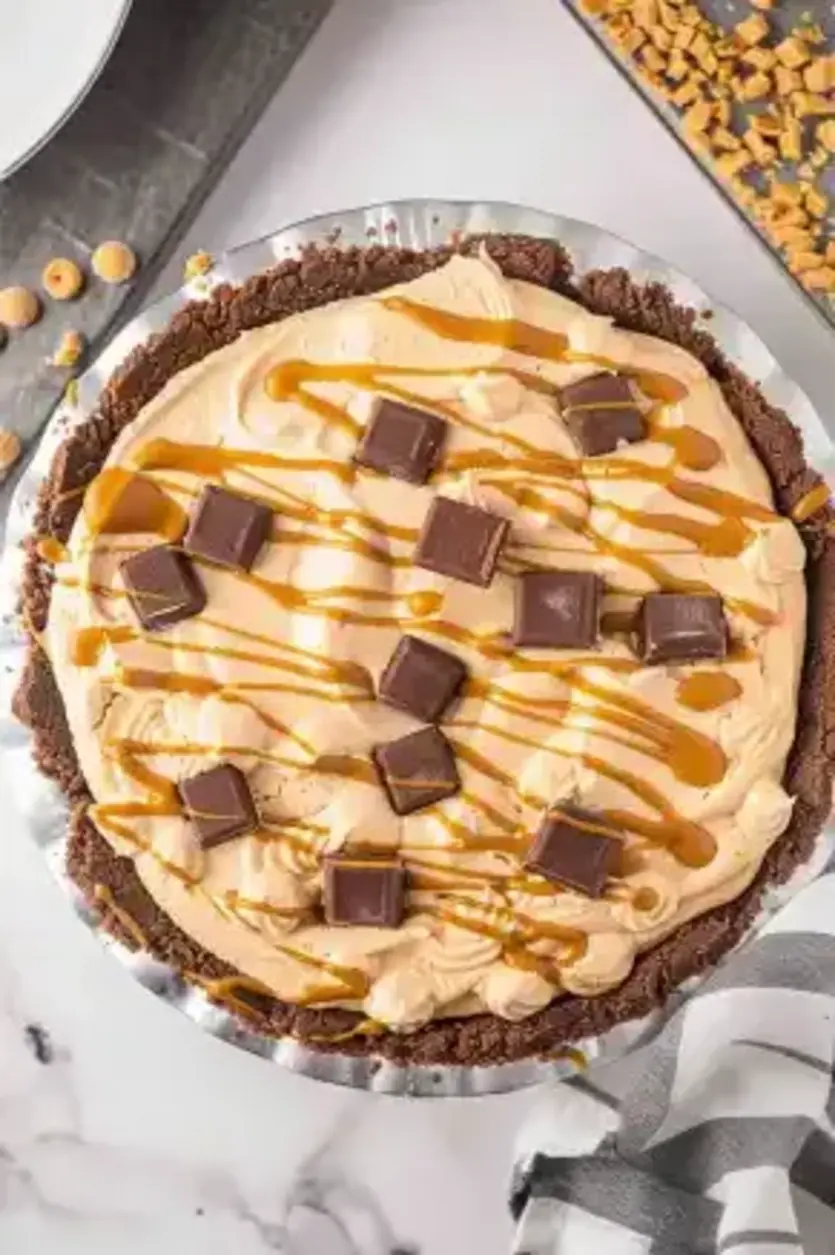
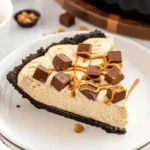
Remove the pie from the refrigerator and garnish with whipped cream, a drizzle of chocolate syrup if desired, and a sprinkle of chopped peanuts for added crunch. Slice and serve chilled to maintain the extra creamy texture and fresh flavors.

Common Mistake to Avoid: Wait until just before serving to add garnishes, as moisture from the whipped cream can make the crust soggy if added too early.

Serving & Presentation

Elevate your No-Bake Peanut Butter Pie Recipe with creative plating by using a sharp knife dipped in hot water for clean slices, revealing the extra creamy layers. For impressive garnishes, try a swirl of chocolate syrup in artistic patterns or a scattering of toasted peanuts for contrast. Pair this peanut butter pie with fresh fruit like sliced bananas or strawberries to balance the richness, or serve it alongside a light vanilla ice cream for a decadent twist. As a dessert course, it complements casual family dinners or elegant parties, making it versatile for any occasion.

Make-Ahead & Storage Solutions

For make-ahead strategies, prepare the crust up to 3 days in advance and store it covered in the refrigerator; make the filling the day before and keep it in an airtight container, then assemble just before chilling for up to 24 hours ahead. This ensures your No-Bake Peanut Butter Pie Recipe stays extra creamy without compromising texture.

To store leftovers, cover the pie tightly with plastic wrap or transfer slices to an airtight container and refrigerate for up to 5 days; for longer storage, freeze the pie (ungarnished) for up to 2 months, wrapped in foil. The best way to reheat is to thaw in the refrigerator overnight and let it come to room temperature for 10-15 minutes, restoring the original extra creamy consistency without melting the filling.

Frequently Asked Questions (FAQ)

Finished recipe photo

How do you make chocolate cake moist and fluffy?

While this question relates to chocolate cake, the principles can apply to desserts like our No-Bake Peanut Butter Pie Recipe. To make chocolate cake moist and fluffy, use ingredients like oil instead of butter for better moisture retention, and avoid overmixing the batter to preserve air pockets. For our pie, ensuring the filling is extra creamy involves similar care, like gradual milk addition.

Can I substitute oil for butter in chocolate cake?

Yes, you can substitute oil for butter in chocolate cake recipes for a moister result, as oil doesn’t solidify like butter. In the context of our No-Bake Peanut Butter Pie Recipe, this isn’t directly applicable, but if adapting for a baked version, oil could work in the crust for a softer texture—however, we recommend sticking to butter for the best crunch.

How long does it take to bake a chocolate cake from scratch?

Baking a chocolate cake from scratch typically takes 25-40 minutes at 350°F (175°C), depending on the recipe and pan size. Since our No-Bake Peanut Butter Pie Recipe requires no baking, it saves time with just chilling, making it an ideal alternative for quick desserts in under 5 hours total.

What are some good serving ideas for chocolate cake at a party?

For chocolate cake at a party, serve it with fresh berries, whipped cream, or a scoop of ice cream for contrast. Similarly, for our No-Bake Peanut Butter Pie Recipe, you could adapt by pairing it with coffee or tea to enhance the extra creamy flavors, making it a crowd-pleaser just like cake.

Can I make this No-Bake Peanut Butter Pie Recipe vegan?

Absolutely! To make this No-Bake Peanut Butter Pie Recipe vegan, substitute the cream cheese with a plant-based version like cashew or tofu-based cream cheese, use dairy-free milk such as almond or oat milk, and opt for a vegan whipped cream topping. Ensure your peanut butter is free of honey, and the crust can stay the same or use vegan butter for full compliance.

What’s the best way to store this pie for later?

The best way to store this No-Bake Peanut Butter Pie Recipe is in the refrigerator, covered, for up to 5 days. For longer-term storage, freeze it for up to 2 months, and thaw in the fridge overnight to maintain the extra creamy texture.

Can I use crunchy peanut butter instead?

Yes, you can use crunchy peanut butter for added texture in this No-Bake Peanut Butter Pie Recipe, but it may make the filling less extra creamy. If you do, reduce the amount slightly to avoid overpowering the smooth base, and ensure it’s well-blended for the best results.

Print
clock clock iconcutlery cutlery iconflag flag iconfolder folder iconinstagram instagram iconpinterest pinterest iconfacebook facebook iconprint print iconsquares squares iconheart heart iconheart solid heart solid icon

No-Bake Peanut Butter Pie Recipe

  • Author: Chef mia
  • Prep Time: 20 minutes
  • Cook Time: 0 minutes
  • Total Time: 4 hours 20 minutes (including chilling)
  • Yield: 1 9-inch pie 1x
  • Method: Dessert
  • Cuisine: American

Description

Dive into the effortless world of no-bake desserts with this creamy, dreamy No-Bake Peanut Butter Pie! Perfectly blending the rich flavors of peanut butter with a crunchy graham cracker crust, this pie is topped with luscious whipped cream and a decadent chocolate drizzle. It’s an absolute must-try for peanut butter lovers and a delightful treat that promises to steal the show at any gathering. The best part? Noovenrequired!


Ingredients

Scale
  • 1 1/2 cupsgraham cracker crumbs
  • 1/4 cupsugar
  • 6 tbspunsalted butter, melted
  • 1 cupcreamy peanut butter
  • 1 cuppowdered sugar
  • 1 tspvanilla extract
  • 8 ozcream cheese, softened
  • 1/2 cupmilk
  • Whipped cream, for topping
  • Chocolate syrup, for drizzling (optional)
  • Chopped peanuts, for garnish (optional)

Instructions

  1. Prepare the Crust:Mix graham cracker crumbs, sugar, and melted butter until well blended. Press firmly into a 9-inch pie dish and refrigerate to set for 30 minutes.
  2. Mix graham cracker crumbs, sugar, and melted butter until well blended. Press firmly into a 9-inch pie dish and refrigerate to set for 30 minutes.
  3. Make the Filling:In a large bowl, beat cream cheese, peanut butter, powdered sugar, and vanilla extract until creamy. Gradually add milk, beating until smooth. Pour over the crust and smooth the top.
  4. In a large bowl, beat cream cheese, peanut butter, powdered sugar, and vanilla extract until creamy. Gradually add milk, beating until smooth. Pour over the crust and smooth the top.
  5. Chill:Refrigerate the pie for at least 4 hours or until firm.
  6. Refrigerate the pie for at least 4 hours or until firm.
  7. Serve:Garnish with whipped cream, drizzle with chocolate syrup, and sprinkle chopped peanuts, if using. Serve chilled.
  8. Garnish with whipped cream, drizzle with chocolate syrup, and sprinkle chopped peanuts, if using. Serve chilled.

Notes

Cream Cheese: Ensure the cream cheese is at room temperature to avoid lumps in your filling.Chilling Time: Extend chilling time for a firmer setting.Substitution Tip: For a dairy-free version, use suitable substitutes for cream cheese, whipped cream, and milk.


Nutrition

  • Calories: 450
  • Sugar: 28
  • Fat: 30
  • Carbohydrates: 38
  • Protein: 10

Conclusion

This no-bake peanut butter pie is a creamy, indulgent dessert that’s perfect for satisfying sweet cravings with minimal effort, featuring rich peanut butter flavors in every bite. Its simple preparation makes it ideal for quick treats or gatherings, allowing you to skip the oven and dive straight into the fun. For a delightful variation, try topping it with crushed nuts or drizzling chocolate sauce before serving.

Easy Valentine’s Day Cake

Easy Valentine’s Day Cake: The Only Recipe You’ll Ever Need

Imagine surprising your sweetheart with a freshly baked Easy Valentine’s Day Cake that looks as stunning as it tastes, all without spending hours in the kitchen. This simple yet delightful recipe transforms a basic box mix into a heartfelt masterpiece, perfect for busy couples or families celebrating love. With our Box Mix Magic approach, you’ll achieve a moist, vibrant red cake that’s effortlessly romantic and ready in under an hour, making it the ultimate go-to for your Easy Valentine’s Day Cake needs. This foolproof method ensures every bite is packed with flavor, proving that homemade treats don’t have to be complicated. Let’s dive into why this Easy Valentine’s Day Cake will become your new tradition for February 14th.

The allure of this Easy Valentine’s Day Cake lies in its irresistible sensory appeal. Picture the soft, tender crumb yielding to your fork, releasing a burst of vanilla-infused sweetness with just a hint of red velvet essence from the food coloring. The aroma of baking fills your home with warm, comforting notes of vanilla and a subtle buttery richness, evoking memories of cherished celebrations. Once frosted, the cake boasts a creamy, velvety topping that melts on the tongue, balanced by the fresh tang of optional berries, creating a harmonious blend of textures and flavors that’s both indulgent and refreshing. It’s a treat that not only satisfies your sweet tooth but also adds a visual pop with its festive red hue.

What sets our Easy Valentine’s Day Cake recipe apart on exorecipes.com is its blend of simplicity and expert guidance, drawing from Chef Mia’s proven techniques. This version isn’t just another cake recipe; it’s been meticulously tested for consistent results, incorporating a special “Chef’s Secret” that elevates ordinary ingredients into something extraordinary. You’ll learn insider tips on achieving the perfect texture, smart substitutions, and creative twists to make this your signature dessert. Whether you’re a novice baker or a seasoned pro, this comprehensive guide ensures success, turning your kitchen into a hub of romantic innovation. Stick around for detailed steps, FAQs, and more to master this Easy Valentine’s Day Cake like a pro.

Prep Time: 15 minutes
Cook Time: 25 minutes
Total Time: 40 minutes
Servings: 1 heart-shaped cake

Why This Easy Valentine’s Day Cake Recipe is a Game-Changer

The Chef’s Secret: At the heart of this Easy Valentine’s Day Cake is our “Box Mix Magic” technique, which elevates a standard cake mix by incorporating vanilla extract and red food coloring at just the right moments. This simple addition infuses the batter with deeper flavor and a vibrant hue, transforming it from everyday to extraordinary. By whisking in the vanilla extract early, you enhance the cake’s aroma and moisture, while the red food coloring ensures that signature Valentine’s vibe without overpowering the taste—it’s all about balance for a truly memorable dessert.

Unbeatable Texture: The science behind this Easy Valentine’s Day Cake’s texture comes from using room-temperature ingredients, as noted in the recipe details. The softened butter in the frosting creates a smooth, airy consistency, while the cake mix’s structure, combined with oil and eggs, locks in moisture for a fluffy yet dense crumb. This prevents the common issue of dry cakes by ensuring even baking, resulting in a tender bite that’s neither too crumbly nor overly heavy—perfect for slicing and sharing.

Foolproof for a Reason: This Easy Valentine’s Day Cake has been tested multiple times in real home kitchens to guarantee success, even for beginners. With clear instructions and built-in tips, it minimizes errors like overbaking or uneven frosting, making it a reliable choice for holiday baking. Readers rave about its consistency, turning it into the go-to recipe for stress-free celebrations.

Ingredient Spotlight: Quality Makes the Difference

For the box of your favorite vanilla or red velvet cake mix, this is the foundation of our Easy Valentine’s Day Cake, providing a quick base that saves time while delivering reliable results. Choose a high-quality brand with no artificial preservatives for better flavor and texture; it acts as the canvas for your creativity, absorbing the vanilla extract and food coloring seamlessly. If you’re opting for substitutions, try a gluten-free cake mix to accommodate dietary needs without sacrificing the cake’s moist structure.

Ingredients required by the cake mix, such as water, oil, and eggs, are essential for binding and moisture in this Easy Valentine’s Day Cake. Eggs, in particular, add richness and help create a tender crumb—always use fresh, large eggs at room temperature for optimal rise. Quality matters here because fresh oil prevents greasiness, and if substituting, consider unsweetened applesauce for a lighter version, which maintains the cake’s fluffiness while reducing fat content.

One teaspoon of vanilla extract brings a warm, aromatic depth to your Easy Valentine’s Day Cake, enhancing the overall flavor profile. Opt for pure vanilla extract over imitation for a more authentic taste that elevates the cake from good to irresistible. If you’re out, almond extract can substitute in a pinch, but use half the amount to avoid overpowering the subtle sweetness.

Red food coloring is key for that festive, romantic look in this Easy Valentine’s Day Cake, turning the batter into a eye-catching red shade. Choose gel-based coloring for vibrant results with less liquid, which keeps the cake’s texture intact. For a natural alternative, beet juice powder works wonders, providing a similar hue without synthetic additives, though it may slightly alter the flavor—start with a small amount and adjust.

For the frosting, start with 1/2 cup of unsalted butter, softened, which forms the creamy base of your Easy Valentine’s Day Cake. High-quality, European-style butter ensures a richer taste and smoother consistency; let it soften naturally for easy whipping. If dairy-free, a plant-based butter substitute like coconut oil-based spread can replace it, maintaining the frosting’s spreadability and flavor.

Two cups of powdered sugar in the frosting provide sweetness and structure for this Easy Valentine’s Day Cake. Sift it first to avoid lumps, enhancing the silky texture—choose organic options for a cleaner taste. For a low-sugar version, powdered erythritol is a great substitute, though it may make the frosting less firm, so add a bit more for stability.

One teaspoon of vanilla extract in the frosting echoes the cake’s flavors, adding a layer of complexity. As with the cake batter, pure extract is best for authenticity; if needed, substitute with vanilla bean paste for visible specks and intensified aroma, which can make your Easy Valentine’s Day Cake even more visually appealing.

Two tablespoons of milk help achieve the perfect frosting consistency for this Easy Valentine’s Day Cake, making it easy to spread. Use whole milk for creaminess, but if lactose-free, almond or oat milk works seamlessly, ensuring the frosting remains glossy and not too thick.

Optional pink or red food coloring for the frosting adds a playful touch to your Easy Valentine’s Day Cake. Gel coloring is ideal for intensity; for natural swaps, use fruit-based powders like hibiscus for a subtle pink, which won’t affect the taste but will enhance the thematic presentation.

Decorations like heart-shaped sprinkles bring fun and festivity to this Easy Valentine’s Day Cake, adding a crunchy contrast to the soft layers. Choose nonpareils for their vibrant colors and even distribution; if unavailable, edible glitter or crushed candy can substitute for a similar sparkling effect.

Fresh strawberries or raspberries serve as a fresh, tangy garnish for your Easy Valentine’s Day Cake, balancing the sweetness with natural acidity. Select ripe, seasonal berries for the best flavor and texture; if out of season, frozen and thawed options work, but pat them dry to prevent sogginess on the cake.

Step-by-Step Instructions

Step 1: Preparing the Cake

Preheat your oven as per the cake mix instructions, typically around 350°F, and grease and flour a heart-shaped cake pan to ensure easy release. In a large bowl, mix the cake mix with the required ingredients like water, oil, and eggs according to the package directions for a smooth batter.

Pro Tip: Always measure ingredients precisely to avoid a dense cake—use a kitchen scale for accuracy and let eggs reach room temperature for better incorporation.

Step 2: Creating the Batter

Add 1 teaspoon of vanilla extract and red food coloring to the batter, mixing until evenly colored. Pour the batter into the prepared pan, ensuring it’s level for even baking as directed on the package, then let it cool on a wire rack once baked.

Common Mistake to Avoid: Overmixing the batter can lead to a tough cake; stop stirring once combined to keep it light and airy.

Step 3: Making the Frosting

In a separate bowl, whip the 1/2 cup of softened unsalted butter until creamy, then gradually add 2 cups of powdered sugar, 1 teaspoon of vanilla extract, and 2 tablespoons of milk, beating until smooth. Adjust with optional food coloring for the desired shade.

Pro Tip: Sift the powdered sugar before adding it to prevent clumps, resulting in a professional, silky frosting.

Step 4: Decorating the Cake

Once the cake is fully cooled, frost it evenly with the prepared frosting, then add heart-shaped sprinkles and fresh strawberries or raspberries for a festive touch.

Common Mistake to Avoid: Frosting a warm cake can cause it to melt and slide off; always wait until it’s completely cool for a neat finish.

Serving & Presentation

Elevate your Easy Valentine’s Day Cake by plating it on a romantic, heart-shaped stand for an instant wow factor. Add a ring of fresh strawberries and raspberries around the base for a pop of color and natural sweetness, contrasting the cake’s rich frosting. For an impressive garnish, drizzle a light chocolate sauce or dust with edible rose petals to enhance the thematic appeal. This cake pairs beautifully with a light sparkling wine or a simple cup of coffee, making it ideal as a standalone dessert or a sweet finish to a romantic dinner.

Make-Ahead & Storage Solutions

Make-Ahead Strategy: Prepare the cake batter and bake the cake up to 2 days in advance; once cooled, wrap it tightly in plastic wrap and store at room temperature. For the frosting, mix it fresh on the day of serving to maintain its texture, or prepare it 1 day ahead and refrigerate in an airtight container, allowing it to come to room temperature before use.

Storing Leftovers: Store any remaining Easy Valentine’s Day Cake in an airtight container at room temperature for up to 2 days, or refrigerate for up to 5 days to preserve freshness—cover it well to avoid drying out. For longer storage, freeze individual slices wrapped in foil and placed in a freezer bag for up to 3 months.

The Best Way to Reheat: To restore the original texture and flavor, thaw frozen slices in the refrigerator overnight, then warm in a 300°F oven for 5-10 minutes. Avoid microwaving, as it can make the cake rubbery; instead, let it come to room temperature for the best results.

Finished recipe photo

Frequently Asked Questions (FAQ)

How can I make my Easy Valentine’s Day Cake moist and tender?

To achieve a moist and tender Easy Valentine’s Day Cake, ensure all ingredients like eggs and butter are at room temperature before mixing, as this helps them incorporate evenly. Use the exact amounts of oil and water specified in the cake mix, and avoid overbaking by checking for doneness a few minutes early with a toothpick. Adding an extra teaspoon of vanilla extract can enhance moisture, but the key is in the cooling process—let it rest on a wire rack to prevent sogginess.

What are the best ingredient substitutions for this Easy Valentine’s Day Cake, like using gluten-free flour?

For substitutions in this Easy Valentine’s Day Cake, swap the cake mix for a gluten-free version to accommodate dietary needs, ensuring it’s a 1:1 substitute for the best results. If you want to reduce sugar, use a sugar-free cake mix or replace powdered sugar in the frosting with a powdered sweetener like erythritol. For dairy-free options, substitute milk in the frosting with almond milk and use plant-based butter; these changes maintain the cake’s texture while keeping it delicious and inclusive.

How long does it take to bake this Easy Valentine’s Day Cake?

Baking this Easy Valentine’s Day Cake typically takes about 25 minutes at the temperature specified on your cake mix package, usually 350°F. Factors like oven accuracy and pan size can vary this slightly, so start checking at 20 minutes with a toothpick for doneness to ensure it’s perfectly baked without drying out.

What are some creative serving suggestions for this Easy Valentine’s Day Cake?

Get creative with serving this Easy Valentine’s Day Cake by cutting it into heart-shaped slices and pairing it with a fresh fruit salad for a lighter contrast. For a romantic twist, serve with a dollop of whipped cream and a sprinkle of cocoa powder, or layer it in a trifle with yogurt and berries for a fun, shareable dessert. It’s also delightful as a breakfast treat with coffee, adding a sweet start to your day.

Can I make this recipe vegan?

Yes, you can adapt this Easy Valentine’s Day Cake to be vegan by using a vegan cake mix and substituting eggs with a flaxseed mixture (1 tablespoon flaxseed meal mixed with 3 tablespoons water per egg). For the frosting, swap butter and milk with vegan alternatives like coconut oil and almond milk, ensuring a creamy result while keeping the festive spirit intact.

What if I don’t have a heart-shaped pan?

If you don’t have a heart-shaped pan, use a round or square one instead for this Easy Valentine’s Day Cake—just adjust the baking time slightly as needed. After baking, use cookie cutters to shape portions into hearts, or simply decorate the top with heart motifs using frosting for the same charming effect.

Print
clock clock iconcutlery cutlery iconflag flag iconfolder folder iconinstagram instagram iconpinterest pinterest iconfacebook facebook iconprint print iconsquares squares iconheart heart iconheart solid heart solid icon

Easy Valentine’s Day Cake

  • Author: Chef mia
  • Prep Time: 15 minutes
  • Cook Time: 25 minutes
  • Total Time: 40 minutes
  • Yield: 1 heart-shaped cake 1x
  • Method: Dessert
  • Cuisine: American

Description

There’s nothing like a homemade treat to make Valentine’s Day extra special, and my Easy Valentine’s Day Cake is just the ticket! This delicious and simple cake is perfect for sharing with your loved ones, creating a moment to cherish over every single slice. Decorate it to your heart’s content and watch as it brings smiles and sweetness to your celebration!


Ingredients

Scale
  • 1box of your favorite vanilla or red velvet cake mix
  • Ingredients required by the cake mix (typically water, oil, and eggs)
  • 1 teaspoonof vanilla extract
  • Red food coloring
  • For the frosting:1/2 cupunsalted butter, softened2 cupspowdered sugar1 teaspoonvanilla extract2 tablespoonsmilkOptional pink or red food coloring
  • 1/2 cupunsalted butter, softened
  • 2 cupspowdered sugar
  • 1 teaspoonvanilla extract
  • 2 tablespoonsmilk
  • Optional pink or red food coloring
  • Decorations (optional):Heart-shaped sprinklesFresh strawberries or raspberries
  • Heart-shaped sprinkles
  • Fresh strawberries or raspberries

Instructions

  1. Prepare the Cake: Preheat yourovenas per the cake mix instructions. Grease and flour a heart-shaped cake pan.
  2. Mix the cake ingredients in a large bowl according to the package instructions. Add vanilla extract and red food coloring to achieve the desired color.
  3. Pour the batter into the prepared pan and bake as directed. Once baked, let it cool on awire rack.
  4. Make the Frosting: Whip the butter, gradually add powdered sugar, vanilla, and milk until smooth. Adjust color with food coloring if used.
  5. Decorate: Frost the cooled cake and add sprinkles and berries for a festive touch.

Notes

For a perfect cake, ensure all ingredients are at room temperature. To make the cake a day ahead, simply wrap it up and frost before serving.


Nutrition

  • Calories: .350
  • Sugar: 25
  • Fat: 15
  • Carbohydrates: 50
  • Protein: 3

Conclusion

This Easy Valentine’s Day Cake is a simple yet heartwarming dessert that captures the essence of the holiday with its moist texture and sweet, romantic flavors, perfect for sharing with loved ones. Whether you’re baking for a special date night or a family gathering, this cake comes together quickly to add a touch of sweetness to your celebrations. For a fun variation, try topping it with fresh strawberries or chocolate shavings to enhance the taste, and serve it warm for the best experience.

Chocolate Covered Strawberry Cookies

Chocolate Covered Strawberry Cookies: The Only Recipe You’ll Ever Need

Imagine transforming the classic elegance of chocolate-covered strawberries into a warm, chewy cookie that’s perfect for any occasion—whether it’s a romantic date night or a family gathering. These Chocolate Covered Strawberry Cookies combine rich chocolate and fresh strawberry flavors in a way that creates an irresistible fresh strawberry infusion, making them stand out from ordinary chocolate chip cookies. As the ultimate treat for strawberry lovers, this recipe promises a burst of fruity goodness wrapped in a soft, decadent bite. With just 15 minutes of prep, you’ll be baking up a storm and delighting your taste buds in no time, proving why this is the best Chocolate Covered Strawberry Cookies recipe on the web.

Sink your teeth into the luxurious texture of these cookies, where the buttery dough meets gooey chocolate chips and juicy strawberry pieces, offering a perfect balance of crisp edges and a tender, chewy center. The aroma of baking chocolate mingles with the sweet, tart notes of fresh strawberries, filling your kitchen with an inviting scent that evokes summer picnics and cozy evenings alike. Each bite delivers a symphony of flavors: the deep, velvety cocoa powder pairs harmoniously with the bright, natural sweetness of strawberries, creating a moist and flavorful experience that’s simply unforgettable.

What sets this Chocolate Covered Strawberry Cookies recipe from exorecipes.com apart is our commitment to making it foolproof and innovative, inspired by Chef Mia’s expertise. We’ve tested this recipe multiple times to ensure every step leads to cookie perfection, including a special “Chef’s Secret” that enhances the fresh strawberry infusion for maximum flavor without sogginess. You’ll learn insider tips, common pitfalls to avoid, and creative twists that make this the most comprehensive guide available. Whether you’re a novice baker or a seasoned pro, this resource will boost your confidence and deliver stunning results every time.

Prep Time: 15 minutes
Cook Time: 15 minutes
Total Time: 30 minutes
Servings: 24 cookies

Why This Chocolate Covered Strawberry Cookies Recipe is a Game-Changer

The Chef’s Secret lies in the fresh strawberry infusion technique, where we toss finely chopped strawberries in a tablespoon of flour before folding them into the dough. This simple step prevents excess moisture from making the cookies soggy, ensuring they remain chewy and flavorful—a key differentiator from standard chocolate strawberry cookies. By enhancing the strawberries’ natural juices, this method amplifies the fruit’s vibrancy, creating a harmonious blend that elevates the overall taste and texture.

Unbeatable Texture: The combination of softened unsalted butter, granulated sugar, and brown sugar in this Chocolate Covered Strawberry Cookies recipe creates a science-backed chewy base. The sugars caramelize during baking, locking in moisture while the baking soda provides a slight lift, resulting in cookies that are soft yet structured. This ensures a delightful contrast between the melted chocolate chips and the tender strawberry bits, making each cookie irresistible.

Foolproof for a Reason: We’ve refined this recipe through rigorous testing to guarantee success, even for beginner bakers. Every measurement and step has been optimized to avoid common issues like overbaking or uneven mixing, making it the most reliable Chocolate Covered Strawberry Cookies guide online. With clear instructions and tips, you’ll achieve consistent, delicious results that outshine any other version.

Ingredient Spotlight: Quality Makes the Difference

All-purpose flour serves as the foundation of these Chocolate Covered Strawberry Cookies, providing structure and a tender crumb. Using high-quality, unbleached flour ensures better gluten development for a chewy texture without toughness—opt for a reputable brand to avoid inconsistencies. If you’re gluten-free, substitute with a 1:1 gluten-free flour blend, but note it may slightly alter the cookie’s softness.

Baking soda acts as the leavening agent, giving these cookies their perfect rise and slight crispiness. A fresh box is crucial for optimal reaction with acidic ingredients like brown sugar, ensuring your Chocolate Covered Strawberry Cookies bake evenly. For a lower-sodium option, you can replace it with an equal amount of potassium bicarbonate, though this might affect the texture slightly.

Salt enhances the flavors in these Chocolate Covered Strawberry Cookies, balancing the sweetness and highlighting the chocolate and strawberry notes. Always use fine sea salt for precise measurement; it’s superior to table salt for its mineral content. If you’re watching your sodium intake, reduce it by half and compensate with a pinch of potassium chloride, but taste as you go to maintain balance.

Unsalted butter, softened to room temperature, is essential for creaming with sugars to create a light, airy dough in these Chocolate Covered Strawberry Cookies. High-fat European-style butter elevates the richness and mouthfeel—choose organic if possible. For a dairy-free version, swap with coconut oil, which will add a subtle tropical twist but keep the cookies vegan-friendly.

Granulated sugar and packed light brown sugar work together to sweeten and moisten the dough, with brown sugar adding a caramel-like depth to these Chocolate Covered Strawberry Cookies. Opt for organic cane sugar to avoid additives; if substituting, use coconut sugar for brown sugar to maintain moisture, though it will impart a slight molasses flavor.

A large egg binds the ingredients and adds richness, contributing to the chewy texture of these Chocolate Covered Strawberry Cookies. Fresh, room-temperature eggs incorporate more easily; for vegan bakers, replace with a flax egg (1 tablespoon ground flaxseed mixed with 3 tablespoons water) to achieve similar binding without compromising the structure.

Vanilla extract infuses a warm, aromatic note that complements the chocolate and strawberries in these Chocolate Covered Strawberry Cookies. Always choose pure extract over imitation for authentic flavor—it’s worth the investment. If you’re out, almond extract can substitute in a 1:1 ratio for a nutty variation, enhancing the recipe’s versatility.

Unsweetened cocoa powder delivers the intense chocolate flavor that defines these Chocolate Covered Strawberry Cookies. High-quality Dutch-processed cocoa ensures a smoother, less acidic taste; sift it to avoid lumps. For a deeper chocolate experience, swap with black cocoa, but use it sparingly as it intensifies the color and bitterness.

Semisweet chocolate chips provide gooey pockets of chocolate in these Chocolate Covered Strawberry Cookies, melting perfectly during baking. Choose chips with at least 50% cacao for balance; if dairy-free is needed, opt for vegan chocolate chips to keep the recipe inclusive.

Fresh strawberries are the star of this Chocolate Covered Strawberry Cookies recipe, offering a burst of tartness and moisture. Select ripe, in-season berries for the best flavor and texture; always pat them dry after chopping to prevent sogginess, and there’s no direct substitute, but freeze-dried strawberries can mimic the effect in a pinch.

Step-by-Step Instructions

Step 1: Preheat the Oven

Start by preheating your oven to 350°F (175°C) and lining your baking sheets with parchment paper to ensure even heat distribution and easy cleanup. This step is crucial for achieving the perfect bake on your Chocolate Covered Strawberry Cookies.

Pro Tip: Use a reliable oven thermometer to verify the temperature, as inaccuracies can lead to underbaked or overly crisp cookies, preserving the fresh strawberry infusion.

Step 2: Whisk Dry Ingredients

In a medium bowl, whisk together 1 cup all-purpose flour, 1/2 teaspoon baking soda, and 1/4 teaspoon salt until fully combined. This mixture forms the base of your dough, providing structure for the Chocolate Covered Strawberry Cookies.

Common Mistake to Avoid: Don’t over-whisk, as this can activate the gluten too early and make the cookies tough—mix just until blended to maintain a tender texture.

Step 3: Cream the Butter and Sugars

In a larger bowl, use an electric mixer to cream 1/2 cup softened unsalted butter with 1/2 cup granulated sugar and 1/2 cup packed light brown sugar until the mixture is light and fluffy, about 2-3 minutes. Then, beat in 1 large egg and 1 teaspoon vanilla extract until smooth.

Pro Tip: Ensure the butter is at room temperature for even creaming; this step is key to the airy texture that highlights the fresh strawberry infusion in your Chocolate Covered Strawberry Cookies.

Step 4: Combine Mixtures

Gradually add 1/2 cup unsweetened cocoa powder to the creamed mixture, followed by the flour mixture, mixing on low speed until everything is well combined and forms a cohesive dough for your Chocolate Covered Strawberry Cookies.

Common Mistake to Avoid: Add the dry ingredients slowly to prevent overmixing, which could make the dough tough—stop as soon as it’s incorporated to keep the cookies chewy.

Step 5: Prepare and Fold in Strawberries

Toss 1 cup finely chopped fresh strawberries in 1 tablespoon all-purpose flour to coat them lightly, then gently fold them into the dough along with 1 cup semisweet chocolate chips until evenly distributed.

Pro Tip: Pat the strawberries dry before tossing; this enhances the fresh strawberry infusion and ensures your Chocolate Covered Strawberry Cookies don’t become too moist.

Step 6: Scoop and Shape Cookies

Drop tablespoonfuls of dough onto the prepared baking sheets, spacing them about 2 inches apart to allow for spreading during baking.

Common Mistake to Avoid: Overcrowding the sheets can cause uneven baking, so use multiple sheets if needed to get perfectly shaped Chocolate Covered Strawberry Cookies.

Step 7: Bake the Cookies

Bake the cookies for 12-15 minutes, or until they are set but still soft in the center. Let them cool on the sheets for 5 minutes, then transfer to a wire rack to cool completely.

Pro Tip: Check for doneness by gently pressing the center—they should be soft but hold their shape, locking in the fresh strawberry infusion for the best Chocolate Covered Strawberry Cookies.

Serving & Presentation

Elevate your Chocolate Covered Strawberry Cookies with creative plating by arranging them on a rustic wooden board alongside fresh strawberry slices and a drizzle of melted chocolate for a visually stunning display. For an impressive garnish, sprinkle with a touch of powdered sugar or crushed freeze-dried strawberries to enhance the fresh strawberry infusion without overpowering the flavors. These cookies pair beautifully with a scoop of vanilla ice cream for a decadent dessert, or serve them as a complementary treat to afternoon tea, coffee, or even a light fruit salad, making them versatile for both casual snacking and special occasions in American cuisine.

Make-Ahead & Storage Solutions

For a Make-Ahead Strategy, prepare the dough up to 3 days in advance by mixing all ingredients except the strawberries, then refrigerate it in an airtight container; add the strawberries just before baking to preserve their freshness and maintain the fresh strawberry infusion. When storing leftovers, keep the baked Chocolate Covered Strawberry Cookies in an airtight container at room temperature for up to 3 days, or refrigerate for up to a week to extend shelf life—use parchment paper between layers to prevent sticking. For freezing, wrap cookies individually and store in a freezer-safe bag for up to 2 months. The Best Way to Reheat is in a 300°F oven for 5 minutes to restore their original chewy texture and vibrant flavors, avoiding microwaving which can make them soggy.

Frequently Asked Questions (FAQ)

Finished recipe photo

How do you make classic chocolate chip cookies from scratch?

To make classic chocolate chip cookies from scratch, start by preheating your oven and whisking together flour, baking soda, and salt. Cream butter and sugars, add an egg and vanilla, then mix in the dry ingredients followed by chocolate chips. Scoop and bake at 350°F for 10-12 minutes. This method ensures a chewy texture, and you can adapt it for variations like our Chocolate Covered Strawberry Cookies by incorporating fresh fruit.

Can you substitute butter with margarine in chocolate chip cookies?

Yes, you can substitute butter with margarine in chocolate chip cookies, but it may affect the flavor and texture. Margarine has a higher water content, which can make cookies spread more and become cakier rather than chewy. For the best results in recipes like Chocolate Covered Strawberry Cookies, use a high-quality margarine with similar fat content, and reduce the liquid in the recipe if needed to maintain the fresh strawberry infusion.

How long does it take to bake a batch of chocolate chip cookies?

Baking a batch of chocolate chip cookies typically takes 10-15 minutes at 350°F, depending on your oven and cookie size. For our Chocolate Covered Strawberry Cookies, it’s about 12-15 minutes to achieve a soft center while preserving the fresh strawberry flavors—always check for doneness to avoid overbaking.

What are some creative serving ideas for chocolate chip cookies?

Creative serving ideas for chocolate chip cookies include crumbling them over ice cream for a sundae, using them as a base for cookie sandwiches with frosting, or pairing with fresh fruit like strawberries for a twist, much like in our Chocolate Covered Strawberry Cookies. You can also dip them in melted chocolate or serve with a side of whipped cream for added indulgence.

Can children help make Chocolate Covered Strawberry Cookies?

Absolutely! Children can assist with measuring ingredients, mixing the dough, or chopping strawberries under supervision, making it a fun family activity. This hands-on experience can teach them about baking while ensuring the fresh strawberry infusion turns out perfectly.

What’s the best way to store Chocolate Covered Strawberry Cookies for freshness?

The best way to store Chocolate Covered Strawberry Cookies is in an airtight container at room temperature for up to 3 days. For longer storage, refrigerate them for a week or freeze for up to 2 months, then reheat gently to maintain their chewy texture and strawberry flavors.

Can I make this recipe gluten-free?

Yes, you can make this Chocolate Covered Strawberry Cookies recipe gluten-free by substituting the all-purpose flour with a 1:1 gluten-free flour blend. Ensure the blend includes xanthan gum for proper texture, and note that it might slightly alter the chewiness, so test a small batch first to perfect the fresh strawberry infusion.

Print
clock clock iconcutlery cutlery iconflag flag iconfolder folder iconinstagram instagram iconpinterest pinterest iconfacebook facebook iconprint print iconsquares squares iconheart heart iconheart solid heart solid icon

Chocolate Covered Strawberry Cookies

  • Author: Chef mia
  • Prep Time: 15 minutes
  • Cook Time: 15 minutes
  • Total Time: 30 minutes
  • Yield: 24 cookies 1x
  • Method: Dessert
  • Cuisine: American

Description

Dive into a delightful fusion of flavors with our Chocolate Covered Strawberry Cookies! This recipe brings the elegance of chocolate-covered strawberries into a warm, chewy cookie that’s absolutely irresistible. Perfect for special occasions or a sweet treat to brighten your day, these cookies are sure to enchant anyone who tries them. Let’s bake a batch and fill the kitchen with love and the scent of chocolate and strawberries!


Ingredients

Scale
  • 1 cupall-purpose flour
  • 1/2 teaspoonbaking soda
  • 1/4 teaspoonsalt
  • 1/2 cupunsalted butter, softened
  • 1/2 cupgranulated sugar
  • 1/2 cuppacked light brown sugar
  • 1large egg
  • 1 teaspoonvanilla extract
  • 1/2 cupunsweetened cocoa powder
  • 1 cupsemisweet chocolate chips
  • 1 cupfresh strawberries, finely chopped
  • 1 tablespoonall-purpose flour (for strawberries)

Instructions

  1. Preheat yourovento 350°F (175°C) and line baking sheets withparchment paper.
  2. In a bowl,whisktogether the flour, baking soda, and salt.
  3. In a larger bowl, cream the butter with both sugars until light and fluffy. Beat in the egg and vanilla.
  4. Gradually mix in cocoa powder and the flour mixture until well combined.
  5. Toss strawberries in 1 tablespoon flour and fold them into the batter along with chocolate chips.
  6. Drop tablespoonfuls of dough onto prepared sheets, spacing them apart.
  7. Bake for 12-15 minutes, until cookies are set but still soft. Cool on the sheet for 5 minutes, then transfer to a rack.

Notes

For a vegan version, substitute butter with coconut oil and the egg with a flax egg.To avoid strawberries from creating too much moisture in the dough, make sure they are patted dry after chopping.


Nutrition

  • Calories: 150
  • Sugar: 12
  • Fat: 7
  • Carbohydrates: 21
  • Protein: 2

Conclusion

These Chocolate Covered Strawberry Cookies are a delightful blend of rich chocolate and fresh strawberry flavors, perfect for satisfying your sweet cravings or impressing guests at any gathering. With their irresistible gooey centers and crisp edges, they capture the essence of a classic treat that’s both indulgent and easy to make at home. For a fun serving tip, pair them with a glass of cold milk or arrange them on a platter for a romantic date night; if you’re feeling creative, try swapping the strawberries for raspberries for a tangy twist.

Red Velvet Macarons with Cream Cheese Frosting

Red Velvet Macarons with Cream Cheese Frosting: The Only Recipe You’ll Ever Need

Welcome to the ultimate guide for crafting exquisite Red Velvet Macarons with Cream Cheese Frosting, right here on exorecipes.com. Imagine transforming your kitchen into a Parisian patisserie with these elegant, perfectly textured macarons that boast vibrant red shells and a velvety smooth interior, making them the star of any dessert table. Whether you’re a novice baker or a seasoned pro, this recipe solves the common frustration of finicky macarons by delivering foolproof steps for consistent results every time. Red Velvet Macarons with Cream Cheese Frosting aren’t just treats; they’re a decadent fusion of French tradition and bold American flavors, guaranteed to impress at parties or intimate gatherings.

Picture the sensory delight of biting into a Red Velvet Macaron with Cream Cheese Frosting: the initial crisp shell gives way to a tender, chewy center infused with subtle cocoa notes and a burst of rich, red velvet essence. The cream cheese frosting adds a creamy, tangy contrast that balances the sweetness, creating a harmonious blend of textures and tastes. Aromas of vanilla and cocoa fill the air as these macarons bake, evoking the warmth of a cozy bakery. This recipe’s impeccable texture—achieved through precise techniques—ensures your macarons have that signature foot and delicate crumb, making every bite an indulgent experience that lingers on the palate.

What sets this Red Velvet Macarons with Cream Cheese Frosting recipe apart on exorecipes.com is our commitment to excellence, drawing from Chef Mia’s expertise and rigorous testing for reliability. You’ll discover insider tips, like the “Chef’s Secret” for achieving flawless shells, that elevate this version above the rest. By the end of this post, you’ll gain the confidence to master macaron baking, complete with detailed explanations, ingredient spotlights, and troubleshooting advice. Trust us—this is more than a recipe; it’s your gateway to baking success and creating memorable moments with every batch.

Prep Time: 30 minutes
Cook Time: 15 minutes
Total Time: 45 minutes
Servings: About 20 macarons

Why This Red Velvet Macarons with Cream Cheese Frosting Recipe is a Game-Changer

The Chef’s Secret: What truly sets this Red Velvet Macarons with Cream Cheese Frosting recipe apart is the incorporation of red gel food coloring at the precise moment during the meringue stage, ensuring vibrant, even color without disrupting the batter’s consistency. This technique, combined with a gentle folding method, creates impeccably textured macarons that are both visually stunning and structurally perfect. By adding just the right amount of cocoa powder, we enhance the velvety depth while maintaining that signature light, airy shell—elevating this dessert from ordinary to extraordinary and making it a standout on exorecipes.com.

Unbeatable Texture: The science behind these macarons lies in the careful balance of ingredients and resting time. The egg whites, beaten to stiff peaks with cream of tartar, trap air for that essential foot and chewy interior. Almond flour provides a nutty base that absorbs moisture evenly, preventing cracking during baking at 150°C (300°F). This results in a crisp exterior and soft center, thanks to the precise ratio of powdered sugar to almond flour, which stabilizes the structure and ensures your Red Velvet Macarons with Cream Cheese Frosting have professional-quality texture every time.

Foolproof for a Reason: We’ve tested this recipe multiple times to guarantee success, addressing common pitfalls like over-mixing or improper resting. With clear instructions and pro tips, even beginners can achieve perfect results, making this the most reliable Red Velvet Macarons with Cream Cheese Frosting guide online. Its straightforward process minimizes waste and maximizes flavor, turning your baking sessions into confident, enjoyable endeavors on exorecipes.com.

Ingredient Spotlight: Quality Makes the Difference

Almond flour is the foundation of flawless macaron shells in this Red Velvet Macarons with Cream Cheese Frosting recipe. Sourced from finely ground blanched almonds, it provides a neutral, nutty flavor and essential fat content that contributes to the shells’ tender texture. Quality matters here—opt for blanched almond flour without skins for a smoother finish, as any impurities can lead to lumpy batter. If you’re dealing with a nut allergy, a tested substitution is sunflower seed flour in the same quantity, though it may slightly alter the color; use it as a 1:1 swap for almond flour to maintain the recipe’s integrity.

Powdered sugar plays a crucial role in sweetening and stabilizing the macaron shells for Red Velvet Macarons with Cream Cheese Frosting. It’s what gives these treats their signature sweetness and helps absorb excess moisture for that perfect crispness. Always choose sifted, high-quality powdered sugar to avoid grittiness; cheaper brands with cornstarch can affect the texture. For a refined sugar alternative, coconut sugar can be powdered and used in a 1:1 ratio, but note it will introduce a subtle caramel note, potentially enhancing the cocoa undertones in your macarons.

Egg whites, at room temperature, are vital for creating the meringue base in Red Velvet Macarons with Cream Cheese Frosting, as they whip up to stiff peaks that hold air for the shells’ rise. Fresh, high-quality egg whites ensure better volume and stability, reducing the risk of deflated macarons. If you need a substitution for dietary reasons, aquafaba (the liquid from canned chickpeas) works as a vegan alternative in the same amount, but you’ll need to add a stabilizer like xanthan gum to mimic the binding properties and achieve similar results.

Cocoa powder adds the rich, velvety essence to these Red Velvet Macarons with Cream Cheese Frosting, infusing a deep chocolate flavor without overwhelming the delicacy. Choose unsweetened, Dutch-processed cocoa for its smooth, dark profile that enhances the red hue from the food coloring. Quality cocoa makes a difference in intensity, so avoid generic brands. For a substitution, carob powder can be used 1:1 for a caffeine-free option, though it will be milder and slightly sweeter, altering the traditional red velvet taste slightly.

Red gel food coloring is key to achieving the iconic vibrant red shade in Red Velvet Macarons with Cream Cheese Frosting without thinning the batter. Its concentrated form ensures color intensity with minimal liquid, preserving the macarons’ texture. Always select a trusted brand for food-safe dyes; liquid food coloring can be substituted, but use it sparingly (about half the amount) to prevent excess moisture that might cause cracking.

For the cream cheese frosting, cream cheese provides the tangy, creamy backbone that perfectly complements the sweet shells in Red Velvet Macarons with Cream Cheese Frosting. Opt for full-fat, block-style cream cheese for the richest flavor and stable consistency. If you’re looking for a lighter option, Greek yogurt can replace it 1:1, but strain it first to remove excess liquid, ensuring your frosting holds its shape without becoming runny.

Unsalted butter in the frosting offers a smooth, rich mouthfeel and helps balance the sweetness in Red Velvet Macarons with Cream Cheese Frosting. High-quality, European-style butter with higher fat content yields a creamier result. For a dairy-free swap, plant-based butter like those made from avocados can be used in the same quantity, though it might make the frosting slightly softer, so chill it longer for the best texture.

Vanilla extract rounds out the flavors in the cream cheese frosting for Red Velvet Macarons with Cream Cheese Frosting, adding a warm, aromatic depth. Pure vanilla extract is preferred for its authentic taste, enhancing the overall dessert. If unavailable, vanilla bean paste can substitute 1:1 for a more intense flavor with visible specks, or almond extract for a nutty twist, but use half the amount to avoid overpowering the cream cheese.

Step-by-Step Instructions

Step 1: Preparing the Shells

Start by sifting 100 grams of almond flour, 100 grams of powdered sugar, and 1 tablespoon of cocoa powder into a large bowl to ensure a lump-free mixture. This step removes any larger particles that could ruin the smooth texture of your macarons. In a separate bowl, beat 75 grams of room-temperature egg whites with 1/2 teaspoon of cream of tartar using an electric mixer on medium speed until foamy. Gradually add 75 grams of granulated sugar, continuing to beat until stiff peaks form, then mix in the red gel food coloring until the batter reaches a vibrant red shade.

Pro Tip: Always sift your dry ingredients twice for extra smoothness; this prevents air pockets and ensures your Red Velvet Macarons with Cream Cheese Frosting have that professional shine.

Step 2: Folding and Piping

Once your meringue is ready, gently fold the sifted dry ingredients into the egg whites in three batches, using a spatula to make broad, careful strokes. Fold just until the batter flows like lava—over-mixing can deflate it. Transfer the batter to a piping bag fitted with a round tip and pipe 1-inch circles onto lined baking sheets, spacing them about 1 inch apart. Let the piped macarons rest at room temperature for 30 minutes until a skin forms on the surface.

Common Mistake to Avoid: Don’t over-fold the batter, as this can lead to flat macarons; stop when the mixture is homogeneous to maintain the structure for perfect Red Velvet Macarons with Cream Cheese Frosting.

Step 3: Baking

Preheat your oven to 150°C (300°F). Once the macarons have rested and formed a skin, bake them one sheet at a time for about 15 minutes, rotating the pan halfway through for even cooking. The shells should lift easily from the liner when done. Allow them to cool completely on the baking sheets before handling.

Pro Tip: Use a digital thermometer to check your oven’s accuracy, as slight temperature variations can affect the feet of your Red Velvet Macarons with Cream Cheese Frosting—aim for consistent heat.

Step 4: Making the Frosting

In a mixing bowl, beat 100 grams of softened cream cheese and 50 grams of softened unsalted butter with an electric mixer on medium speed until smooth and creamy. Gradually add 150 grams of sifted powdered sugar and 1 teaspoon of vanilla extract, beating until the frosting is fluffy and well combined. Scrape down the sides of the bowl as needed to ensure even mixing.

Common Mistake to Avoid: Ensure your cream cheese and butter are fully softened to avoid lumps in the frosting; cold ingredients can result in a grainy texture for your Red Velvet Macarons with Cream Cheese Frosting.

Step 5: Assembly

After the macaron shells have cooled, match them into pairs of similar sizes. Pipe a small amount of the cream cheese frosting onto the flat side of one shell, then gently sandwich it with its pair. Press lightly to spread the frosting evenly without cracking the shells. Place the assembled macarons in an airtight container and refrigerate for at least 24 hours to allow the flavors to mature.

Pro Tip: Refrigerate the filled macarons overnight for the best flavor development, as this maturation process enhances the texture and taste of your Red Velvet Macarons with Cream Cheese Frosting.

Serving & Presentation

Elevate your Red Velvet Macarons with Cream Cheese Frosting by presenting them on a tiered platter for a visually stunning display at afternoon teas or holiday gatherings. Dust the tops with a light sprinkle of powdered sugar or cocoa powder for added elegance, and consider garnishing with edible flowers or a drizzle of melted white chocolate to enhance their vibrant red color. These macarons pair beautifully with a cup of freshly brewed coffee or chamomile tea, balancing their richness with a refreshing counterpart.

For complementary sides, serve alongside fresh fruit like raspberries or strawberries to cut through the sweetness, or incorporate them into a dessert platter with other French-inspired treats such as éclairs or madeleines. This makes Red Velvet Macarons with Cream Cheese Frosting an ideal finale to a multi-course meal, adding a touch of sophistication to brunches or romantic dinners.

Make-Ahead & Storage Solutions

Make-Ahead Strategy: Prepare the macaron shells up to 3 days in advance by following the baking steps, then store them in an airtight container at room temperature. Make the cream cheese frosting the day before and refrigerate it; simply bring it to room temperature and re-whip before assembling to keep flavors fresh for your Red Velvet Macarons with Cream Cheese Frosting.

Storing Leftovers: Store assembled macarons in an airtight container in the refrigerator for up to 5 days to maintain their texture; for longer storage, freeze them for up to 2 months by wrapping individually in plastic wrap first. This prevents moisture buildup that could soften the shells.

The Best Way to Reheat: To restore the original crispness, let refrigerated macarons sit at room temperature for 20-30 minutes before serving. For frozen ones, thaw in the fridge overnight and then bring to room temperature—avoid microwaving to preserve the delicate texture of your Red Velvet Macarons with Cream Cheese Frosting.

Frequently Asked Questions (FAQ)

Finished recipe photo

How long does it take to make Red Velvet Macarons with Cream Cheese Frosting?

This recipe for Red Velvet Macarons with Cream Cheese Frosting has a prep time of 30 minutes, cook time of 15 minutes, and a total time of about 45 minutes, plus an additional 30 minutes resting time and 24 hours for maturation. The process is straightforward, but the resting and chilling steps are crucial for achieving the best texture, making it a rewarding project for any baking enthusiast.

What are some good ingredient substitutions for Red Velvet Macarons with Cream Cheese Frosting?

For Red Velvet Macarons with Cream Cheese Frosting, you can substitute almond flour with sunflower seed flour for nut-free options, or use aquafaba instead of egg whites for a vegan version—adjust by adding a stabilizer like xanthan gum. In the frosting, swap cream cheese with Greek yogurt for a lighter twist, and opt for plant-based butter if needed, though these changes might slightly alter the texture and flavor, so test in small batches.

How can I make Red Velvet Macarons with Cream Cheese Frosting less sweet?

To reduce sweetness in Red Velvet Macarons with Cream Cheese Frosting, decrease the powdered sugar in the frosting by 20-30 grams and balance it with a touch more cream cheese or a dash of lemon juice for tanginess. For the shells, you can slightly reduce the granulated sugar, but be cautious as it affects the meringue stability—taste as you go and adjust based on your preference for a less sugary result.

What are the best serving suggestions for Red Velvet Macarons with Cream Cheese Frosting?

Red Velvet Macarons with Cream Cheese Frosting shine as a standalone dessert or paired with beverages like coffee or tea to enhance their flavors. Serve them at room temperature on a decorative platter for events, or incorporate into gift boxes for holidays; they also complement cheese platters or fresh fruit salads, adding a pop of color and elegance to any occasion.

Can I make this recipe gluten-free?

Yes, this Red Velvet Macarons with Cream Cheese Frosting recipe is naturally gluten-free, as it relies on almond flour and cocoa powder rather than wheat-based ingredients. Always double-check that your powdered sugar and other add-ins are certified gluten-free to avoid cross-contamination, making it a safe and delicious option for those with gluten sensitivities.

What equipment do I need for Red Velvet Macarons with Cream Cheese Frosting?

Essential equipment includes a stand mixer or electric hand mixer for beating the meringue, a fine-mesh sieve for sifting, piping bags with round tips, and baking sheets lined with parchment paper. Accurate measuring tools are key for precision, ensuring your Red Velvet Macarons with Cream Cheese Frosting turn out perfectly every time.

Print
clock clock iconcutlery cutlery iconflag flag iconfolder folder iconinstagram instagram iconpinterest pinterest iconfacebook facebook iconprint print iconsquares squares iconheart heart iconheart solid heart solid icon

Red Velvet Macarons with Cream Cheese Frosting

  • Author: Chef mia
  • Prep Time: 30 minutes
  • Cook Time: 15 minutes
  • Total Time: 45 minutes
  • Yield: About 20 macarons 1x
  • Method: Desserts
  • Cuisine: French

Description

Dive into the world of baking with these stunning Red Velvet Macarons with Cream Cheese Frosting. These little jewels are the perfect blend of elegance and decadence, featuring vibrant red, velvety smooth shells filled with a dreamy cream cheese frosting. They’re not just desserts; they’re a celebration of flavors that promise to dazzle your taste buds and charm your guests!


Ingredients

Scale
  • Macaron Shells:100 gramsalmond flour100 gramspowdered sugar75 gramsegg whites (room temperature)75 gramsgranulated sugar1/2 teaspooncream of tartar1 tablespooncocoa powderRed gel food coloring
  • 100 gramsalmond flour
  • 100 gramspowdered sugar
  • 75 gramsegg whites (room temperature)
  • 75 gramsgranulated sugar
  • 1/2 teaspooncream of tartar
  • 1 tablespooncocoa powder
  • Red gel food coloring
  • Cream Cheese Frosting:100 gramscream cheese (softened)50 gramsunsalted butter (softened)150 gramspowdered sugar (sifted)1 teaspoonvanilla extract
  • 100 gramscream cheese (softened)
  • 50 gramsunsalted butter (softened)
  • 150 gramspowdered sugar (sifted)
  • 1 teaspoonvanilla extract

Instructions

  1. Prepare the Shells: Sift almond flour, powdered sugar, and cocoa powder. Beat egg whites with cream of tartar until foamy, then add granulated sugar until stiff peaks form. Incorporate food coloring.
  2. Fold and Pipe: Fold dry ingredients into the egg whites in batches. Pipe onto lined baking sheets and let rest for 30 minutes.
  3. Bake: Bake at 150°C (300°F) for about 15 minutes.
  4. Make the Frosting: Beat cream cheese and butter, then gradually add powdered sugar and vanilla.
  5. Assembly: Match cooled shells for size, and pipe frosting on one shell before sandwiching with another.

Notes

Ensure ingredients like egg whites are at room temperature for best results.Gel food coloring is preferred to keep the batter’s consistency perfect.Let macarons mature in the fridge overnight in an airtight container for flavors to develop beautifully.


Nutrition

  • Calories: .150
  • Sugar: 12
  • Fat: 8
  • Carbohydrates: 18
  • Protein: 3

Conclusion

These Red Velvet Macarons with Cream Cheese Frosting offer a delightful blend of rich, cocoa-infused cookies and a tangy, creamy filling that captures the classic red velvet essence, making them perfect for romantic occasions or elegant gatherings. The vibrant red color and smooth texture create a visually stunning and irresistibly delicious treat that will impress your guests. For a serving tip, pair them with a cup of coffee or tea to enhance the flavors, and try a variation by swapping the red food coloring for other hues to match different holidays or events.

Raspberry Rose Chocolate Cupcakes

Raspberry Rose Chocolate Cupcakes: The Only Recipe You’ll Ever Need

Imagine biting into a Raspberry Rose Chocolate Cupcakes that transports you to a blooming garden, where rich chocolate meets the tart burst of raspberries and a subtle rose infusion that makes every bite unforgettable. As a home baker, you’ve likely searched for the perfect cupcake recipe that balances indulgence with elegance, and this Raspberry Rose Chocolate Cupcakes recipe from exorecipes.com delivers just that. With its unique whisper of rose elevating the classic chocolate base, these cupcakes are not just a treat—they’re a sophisticated dessert that will impress at any gathering. Crafted by Chef Mia, this recipe promises moist, flavorful results that stand out from the ordinary, making it the ultimate choice for your baking adventures.

The allure of these Raspberry Rose Chocolate Cupcakes lies in their captivating sensory profile. Picture the deep, velvety chocolate that melts on your tongue, contrasted by the fresh, vibrant raspberry tang that adds a juicy brightness. The subtle rose infusion weaves through like a gentle perfume, enhancing the overall aroma without overpowering the other flavors. Each cupcake boasts a tender, crumbly texture that gives way to a creamy buttercream frosting, creating a harmonious blend of soft and smooth elements. The result is a dessert that’s visually stunning and irresistibly aromatic, with the floral notes lingering just long enough to leave you craving more.

What sets this Raspberry Rose Chocolate Cupcakes recipe apart on exorecipes.com is our commitment to authenticity and excellence, drawing from Chef Mia’s expertise to ensure every detail is perfected. We’ve tested this recipe multiple times to guarantee foolproof results, incorporating the Chef’s Secret for that subtle rose infusion that transforms ordinary cupcakes into extraordinary ones. In this post, you’ll discover not only step-by-step guidance but also insider tips on ingredients, storage, and creative presentations, empowering you to bake with confidence and achieve bakery-quality results right at home.

Prep Time: 20 minutes
Cook Time: 22 minutes
Total Time: 42 minutes
Servings: 18 cupcakes

Why This Raspberry Rose Chocolate Cupcakes Recipe is a Game-Changer

The Chef’s Secret in this Raspberry Rose Chocolate Cupcakes recipe lies in the subtle rose infusion, achieved through just the right amount of rose water in the buttercream, which adds a delicate, floral elegance that sets it apart from standard chocolate cupcakes. This unique angle doesn’t just enhance flavor—it’s a technique that balances the richness of cocoa with the freshness of raspberries, creating a sophisticated profile that’s rarely found in home baking. By incorporating rose water gradually, we ensure it whispers through the frosting without overwhelming, making these cupcakes a standout dessert for special occasions.

Unbeatable Texture: The science behind the perfect texture starts with the combination of buttermilk and boiling water in the batter, which creates a moist, tender crumb. Buttermilk adds acidity that reacts with baking powder for a gentle rise, while boiling water intensifies the cocoa’s depth, resulting in cupcakes that are fluffy yet decadent—avoid over-mixing to prevent gluten development, which could make them tough.

Foolproof for a Reason: This recipe has been rigorously tested to deliver consistent results every time, accounting for variables like ingredient temperatures and baking times. Whether you’re a novice or expert, the clear instructions and tips ensure success, making Raspberry Rose Chocolate Cupcakes a reliable go-to for impressing guests or satisfying sweet cravings.

Ingredient Spotlight: Quality Makes the Difference

For the cupcakes, all-purpose flour serves as the foundational structure, providing the necessary gluten for a light, airy rise without making the batter dense. Opt for unbleached flour to avoid any chemical aftertaste, as it allows the chocolate flavors to shine. If you’re out of all-purpose flour, a 1:1 substitution with cake flour can work, but it may result in a softer texture—perfect for those seeking extra tenderness.

Unsweetened cocoa powder is the heart of these Raspberry Rose Chocolate Cupcakes, delivering that intense, rich chocolate base that pairs beautifully with the fruity elements. Choose high-quality, Dutch-processed cocoa for a smoother, less acidic flavor that enhances the overall balance; inferior options can make the cupcakes bitter. For a gluten-free alternative, simply swap with an equal amount of gluten-free cocoa powder blend, ensuring it’s finely ground for even incorporation.

Buttermilk adds moisture and a subtle tang that activates the baking powder, contributing to the cupcakes’ soft, springy texture. Fresh buttermilk is ideal for the best results, as it helps create that tender crumb—skimping on quality might lead to dry cupcakes. A great substitution is mixing ¾ cup of milk with 1 tablespoon of lemon juice or vinegar, letting it sit for 5 minutes to mimic the acidity and ensure the batter rises properly.

For the Raspberry Rose Buttercream, unsalted butter, softened, is crucial for a creamy, spreadable frosting that holds its shape. Using high-fat butter ensures a luxurious mouthfeel without greasiness—room-temperature butter whips up lighter. If substituting, you can use vegetable shortening, but it may alter the flavor slightly, so stick to butter for the authentic taste.

Powdered sugar, sifted, sweetens and stabilizes the buttercream, giving it that silky smoothness. Sifting prevents lumps, which is key for a professional finish in your Raspberry Rose Chocolate Cupcakes. If you need a lower-sugar option, try confectioners’ sugar alternatives, but they might affect the frosting’s firmness—always test a small batch first.

Rose water infuses a subtle, exotic floral note that defines the unique angle of these cupcakes, elevating them from simple chocolate treats to aromatic delights. High-quality, food-grade rose water is essential to avoid an artificial taste; too much can overpower, so measure precisely. For a non-alcoholic swap, rose extract works, but use half the amount to maintain that whisper of rose without intensity.

Raspberry puree, strained, brings a vibrant, fresh fruitiness that cuts through the richness, making the buttercream irresistible. Fresh or frozen raspberries work best for a pure flavor—straining removes seeds for a smooth texture. If raspberries are unavailable, a strained strawberry puree can substitute, though it will shift the flavor profile slightly.

Step-by-Step Instructions for Raspberry Rose Chocolate Cupcakes

Step 1: Preheat the Oven

Start by setting your oven to 350°F (175°C) and lining a muffin tin with cupcake liners to ensure even baking and easy removal. This step is crucial for achieving the perfect rise and preventing sticking. Measure all ingredients beforehand to streamline the process.

Pro Tip: Always use an oven thermometer to verify the temperature, as inaccuracies can lead to underbaked or dry cupcakes—aim for precise heat to lock in moisture from the start.

Step 2: Mix Dry Ingredients

In a large bowl, whisk together 1 ½ cups all-purpose flour, ¾ cup unsweetened cocoa powder, 1 ½ teaspoons baking powder, and ½ teaspoon salt until fully combined and free of lumps. This creates a uniform base that ensures even distribution of leavening agents.

Common Mistake to Avoid: Over-whisking can incorporate too much air, leading to tough cupcakes; mix just until blended to maintain a tender texture.

Step 3: Blend Wet Ingredients

In a separate bowl, beat 2 large eggs with 1 cup granulated sugar until the mixture is fluffy and pale yellow, about 2-3 minutes. Then, add ½ cup canola oil and 2 teaspoons vanilla extract, mixing on medium speed until fully incorporated for a smooth, emulsified batter.

Pro Tip: Use room-temperature eggs for better volume and incorporation; cold eggs can cause the batter to curdle, affecting the final moistness of your Raspberry Rose Chocolate Cupcakes.

Step 4: Combine Mixtures

Alternately add the dry ingredients and ¾ cup buttermilk to the wet mixture, starting and ending with the dry ingredients, and mix on low speed. Once combined, stir in ½ cup boiling water until the batter is smooth and pourable, which helps dissolve the cocoa for deeper flavor.

Common Mistake to Avoid: Adding all the liquids at once can make the batter too thin; alternate as directed to prevent over-mixing and ensure a consistent rise.

Step 5: Bake the Cupcakes

Pour the batter into the lined muffin tin, filling each cup about ¾ full to allow for proper rising. Bake in the preheated oven for 20-22 minutes, or until a toothpick inserted in the center comes out clean. Let the cupcakes cool in the tin for 5 minutes before transferring to a wire rack.

Pro Tip: Rotate the tin halfway through baking for even heat distribution, especially in uneven ovens, to achieve uniformly baked Raspberry Rose Chocolate Cupcakes.

Step 6: Prepare the Buttercream

In a mixing bowl, beat 1 cup softened unsalted butter until creamy, about 2 minutes. Gradually add 4 cups sifted powdered sugar, then mix in 2 tablespoons rose water and ¼ cup strained raspberry puree until smooth. If desired, add a few drops of pink food coloring for a vibrant hue.

Common Mistake to Avoid: Adding powdered sugar too quickly can create lumps; sift it first and add gradually while mixing to keep the buttercream silky and easy to pipe.

Step 7: Decorate the Cupcakes

Once the cupcakes are completely cooled, frost them generously with the prepared buttercream using a piping bag or spatula. Garnish with fresh raspberries or edible rose petals for an elegant finish, enhancing the visual appeal and subtle rose infusion.

Pro Tip: Chill the buttercream for 10 minutes before piping to make it firmer, ensuring your Raspberry Rose Chocolate Cupcakes look professionally decorated.

Serving & Presentation for Raspberry Rose Chocolate Cupcakes

Elevate your Raspberry Rose Chocolate Cupcakes with creative plating by arranging them on a tiered stand for a dessert table centerpiece, allowing the vibrant colors to pop. Garnish each one with a fresh raspberry and a sprinkle of edible rose petals or a light dusting of powdered sugar for an Instagram-worthy touch. For complementary pairings, serve these cupcakes alongside a light herbal tea to amplify the rose notes, or pair with a sparkling wine for celebrations. They also shine as an after-dinner treat following a fresh salad or grilled chicken, providing a sweet contrast to savory meals.

Make-Ahead & Storage Solutions for Raspberry Rose Chocolate Cupcakes

Make-Ahead Strategy: Prepare the cupcake batter up to 24 hours in advance by mixing the dry and wet ingredients separately, then combining and refrigerating the batter; bake fresh when needed. The buttercream can be made 3 days ahead—store it in an airtight container in the fridge and let it soften at room temperature before using.

Storing Leftovers: Once cooled and frosted, store Raspberry Rose Chocolate Cupcakes in an airtight container at room temperature for up to 2 days, or refrigerate for up to 5 days to maintain freshness—the floral notes stay vibrant longer in the fridge. For freezing, wrap unfrosted cupcakes individually in plastic wrap and freeze for up to 3 months; thaw in the fridge overnight.

The Best Way to Reheat: To restore the original texture, let refrigerated cupcakes sit at room temperature for 30 minutes, or warm them in a 300°F oven for 5-7 minutes. For frozen ones, thaw first, then reheat gently to avoid drying out, preserving that moist chocolate crumb and creamy buttercream.

Finished recipe photo

Frequently Asked Questions (FAQ)

How do you make chocolate chip cookies chewy?

While this question relates to cookies rather than Raspberry Rose Chocolate Cupcakes, the principle of achieving chewiness can apply to baking in general. To make chocolate chip cookies chewy, use melted butter instead of softened, incorporate brown sugar for moisture, and avoid over-baking—pull them out when the edges are golden but the center is still soft. In the context of cupcakes, ensuring your batter has adequate fats like oil can contribute to a similar moist texture.

Can you substitute butter with oil in chocolate chip cookies?

Yes, you can substitute butter with oil in chocolate chip cookies for a softer texture, but it will change the flavor slightly. Use a 1:1 ratio of neutral oil like canola for butter, as it keeps the cookies moist without the richness of dairy. For Raspberry Rose Chocolate Cupcakes, substituting oil in the batter works well, as seen in this recipe, but stick to butter in the frosting for creaminess.

How long do you bake chocolate chip cookies for?

Baking time for chocolate chip cookies typically ranges from 8-12 minutes at 375°F, depending on size and desired doneness—remove them when the edges are golden. Relating this to Raspberry Rose Chocolate Cupcakes, our recipe bakes for 20-22 minutes at 350°F, emphasizing the importance of checking with a toothpick for perfect results.

What are some creative ways to serve chocolate chip cookies?

Serve chocolate chip cookies warm with a scoop of ice cream for a decadent twist, or crumble them over yogurt for a breakfast treat. You could also sandwich them with frosting for cookie sandwiches. For Raspberry Rose Chocolate Cupcakes, try serving them as mini desserts at parties or pairing with fresh fruit for a themed floral display.

Can I make this recipe vegan?

Absolutely, you can adapt Raspberry Rose Chocolate Cupcakes for a vegan version by swapping eggs with flax eggs (1 tablespoon ground flaxseed mixed with 3 tablespoons water per egg), using plant-based milk mixed with vinegar for buttermilk, and opting for vegan butter in the frosting. Ensure your cocoa powder is vegan-friendly, and you’ll have a delightful, inclusive treat.

What’s the best way to store homemade cupcakes?

For optimal freshness, store homemade cupcakes like these Raspberry Rose Chocolate Cupcakes in an airtight container at room temperature for up to 2 days, or refrigerate for up to 5 days. If freezing, wrap them tightly to prevent freezer burn, and thaw slowly for the best texture.

Print
clock clock iconcutlery cutlery iconflag flag iconfolder folder iconinstagram instagram iconpinterest pinterest iconfacebook facebook iconprint print iconsquares squares iconheart heart iconheart solid heart solid icon

Raspberry Rose Chocolate Cupcakes

  • Author: Chef mia
  • Prep Time: 20 minutes
  • Cook Time: 22 minutes
  • Total Time: 42 minutes
  • Yield: 18 cupcakes 1x
  • Method: Dessert
  • Cuisine: American

Description

Dive into a world of indulgence with my Raspberry Rose Chocolate Cupcakes! Each cupcake is a lovingly crafted symphony of rich chocolate, vibrant raspberry, and a whisper of rose, making them a perfect treat for any celebration or just a sweet end to your day. Get ready to fall in love with these little bites of heaven!


Ingredients

Scale
  • For the Cupcakes:1 ½ cupsall-purpose flour¾ cupunsweetened cocoa powder1 ½ tspbaking powder½ tspsalt2large eggs1 cupgranulated sugar½ cupcanola oil2 tspvanilla extract¾ cupbuttermilk½ cupboiling water
  • 1 ½ cupsall-purpose flour
  • ¾ cupunsweetened cocoa powder
  • 1 ½ tspbaking powder
  • ½ tspsalt
  • 2large eggs
  • 1 cupgranulated sugar
  • ½ cupcanola oil
  • 2 tspvanilla extract
  • ¾ cupbuttermilk
  • ½ cupboiling water
  • For the Raspberry Rose Buttercream:1 cupunsalted butter, softened4 cupspowdered sugar, sifted2 tbsprose water¼ cupraspberry puree (strained)Optional: Pink food coloring
  • 1 cupunsalted butter, softened
  • 4 cupspowdered sugar, sifted
  • 2 tbsprose water
  • ¼ cupraspberry puree (strained)
  • Optional: Pink food coloring

Instructions

  1. Preheat theOven: Set yourovento 350°F (175°C) and line amuffin tinwith cupcake liners.
  2. Mix Dry Ingredients:Whisktogether flour, cocoa, baking powder, and salt in a bowl.
  3. Blend Wet Ingredients: In a separate bowl, beat eggs and sugar until fluffy. Add oil and vanilla, mixing well.
  4. Combine Mixtures: Alternately add dry ingredients and buttermilk to the wet mix, beginning and ending with dry ingredients. Stir in boiling water until smooth.
  5. Bake: Pour batter into liners, filling each ¾ full. Bake for 20-22 minutes. Let cool.
  6. Prepare Buttercream: Beat butter until creamy. Gradually add powdered sugar, then rose water and raspberry puree. Add color if using.
  7. Decorate: Frost cooled cupcakes and garnish as desired with fresh raspberries or edible rose petals.

Notes

Ensure all ingredients are at room temperature for the best results.If the buttercream is too thick, add a little milk; if too thin, add more powdered sugar.


Nutrition

  • Calories: .320
  • Sugar: 25
  • Fat: 16
  • Carbohydrates: 40
  • Protein: 3

Conclusion

These Raspberry Rose Chocolate Cupcakes blend the tart freshness of raspberries with the subtle floral essence of rose and the indulgent richness of chocolate, creating a sophisticated treat that’s perfect for any celebration or sweet craving. Whether you’re hosting a gathering or enjoying a quiet moment, this recipe offers a delightful balance of flavors that will impress your guests. For a tasty variation, try swapping the raspberries for blackberries or adding a dusting of powdered sugar before serving.