French Onion Smothered Pork Chops

French Onion Smothered Pork Chops: The Only Recipe You’ll Ever Need

Imagine transforming a humble weeknight dinner into a restaurant-worthy masterpiece with our exceptional French Onion Smothered Pork Chops recipe. This one-pan gourmet delight features tender, seared pork chops smothered in caramelized onions and melted Gruyère cheese, creating a symphony of savory flavors that will elevate your home cooking game. Drawing from French-inspired traditions, this dish combines simplicity with elegance, making it perfect for busy evenings or special occasions. As the go-to resource on exorecipes.com, we’re dedicated to delivering foolproof instructions that ensure juicy, flavorful results every time you cook French Onion Smothered Pork Chops.

The allure of French Onion Smothered Pork Chops lies in its irresistible aroma and texture – think golden-brown pork chops with a crispy exterior that gives way to succulent, juicy meat inside. The caramelized onions offer a sweet, deeply savory depth, their silky strands melting into a rich base that hugs the chops like a warm blanket. Topped with bubbly Gruyère cheese, each bite delivers a perfect balance of creamy, nutty notes and a slight tang from the beef broth infusion. The herbs, like fresh thyme, add an earthy freshness that dances on your palate, while the overall dish exudes a comforting, homely vibe that fills your kitchen with an inviting scent.

What sets this French Onion Smothered Pork Chops recipe apart on exorecipes.com is our commitment to precision and innovation, crafted by expert Chef Mia and rigorously tested for home cooks of all levels. Discover the Chef’s Secret that makes our version superior, including tips for achieving that signature, melt-in-your-mouth texture without any fuss. You’ll learn how to avoid common pitfalls, explore ingredient swaps, and master the one-pan method that minimizes cleanup while maximizing flavor. By the end, you’ll feel empowered to create this French Onion Smothered Pork Chops dish with confidence, making it the star of your table every time.

Prep Time: 15 minutes
Cook Time: 45 minutes
Total Time: 60 minutes
Servings: 4

Why This French Onion Smothered Pork Chops Recipe is a Game-Changer

The Chef’s Secret to our French Onion Smothered Pork Chops lies in the one-pan method, which infuses the pork chops with the rich flavors of caramelized onions and beef broth for an unparalleled depth that sets this recipe apart. By cooking everything in a single skillet, we lock in moisture and create a natural sauce that elevates the dish from ordinary to extraordinary, making it a true gourmet experience without extra dishes.

Unbeatable Texture: The science behind the tender, juicy pork chops comes from searing at medium-high heat to form a Maillard reaction, browning the surface while keeping the interior succulent. This technique, combined with simmering in the onion mixture, ensures the chops reach the perfect 145°F internal temperature, resulting in a crisp exterior and melt-in-your-mouth consistency that outperforms standard recipes.

Foolproof for a Reason: This French Onion Smothered Pork Chops recipe has been tested multiple times in real kitchens to guarantee success, even for beginners. With clear steps and precise timings, you’ll avoid overcooking or under-seasoning, delivering consistent, delicious results that make it the most reliable version available online.

Ingredient Spotlight: Quality Makes the Difference

For the bone-in pork chops: These thick, 1-inch cuts are the heart of French Onion Smothered Pork Chops, providing rich flavor and juiciness from the bone. Quality matters here – opt for fresh, high-quality pork from a trusted butcher to ensure tenderness and prevent dryness. If pork chops are unavailable, substitute with boneless cuts or even chicken thighs, but adjust cooking time to avoid overcooking and maintain that seared perfection.

Regarding the large onions: Thinly sliced onions are essential for achieving those caramelized, sweet layers that define French Onion Smothered Pork Chops. Choose firm, yellow onions for their natural sugars that enhance browning; fresh ones will yield a deeper flavor. Quality onions make all the difference in texture, so avoid older ones that might be watery. For substitutions, try shallots for a milder taste, but stick to the same quantity to keep the dish’s signature sweetness intact.

On the minced garlic: This aromatic adds a pungent, savory kick that complements the onions in French Onion Smothered Pork Chops. Use fresh garlic cloves for the best flavor profile, as they release oils that infuse the dish. Quality garlic ensures no bitterness, so select firm bulbs. If you’re out, substitute with garlic powder (1/2 teaspoon per clove), but fresh is ideal to preserve the authentic taste without altering the recipe’s essence.

For the beef broth: It serves as the deglazing liquid that pulls together the flavors in French Onion Smothered Pork Chops, adding a hearty, umami base. Opt for low-sodium, high-quality broth to control salt levels and enhance the dish’s depth. This ingredient is crucial for moisture and taste, so choose homemade if possible. Substitutes like chicken broth work in a pinch, but beef maintains the robust profile – just reduce quantity if using store-bought to avoid overpowering the onions.

About the grated Gruyère cheese: This cheese melts into a gooey, nutty topping that makes French Onion Smothered Pork Chops truly indulgent. Select aged Gruyère for its superior melting properties and flavor; fresh grating ensures even distribution. Quality cheese elevates the dish, so avoid pre-shredded varieties with additives. For a substitute, try Swiss cheese, but Gruyère’s unique tang is irreplaceable for that authentic French-inspired finish.

Concerning the olive oil and unsalted butter: Olive oil sears the pork for a golden crust, while butter caramelizes the onions in French Onion Smothered Pork Chops. Use extra-virgin olive oil for its fruity notes and high smoke point, and fresh butter for creamy richness. Quality fats prevent sticking and burning, so choose pure options. Substitute olive oil with avocado oil if needed, and use salted butter but adjust seasoning to keep the balance.

For the fresh thyme leaves: This herb brings an earthy, aromatic freshness to French Onion Smothered Pork Chops, garnishing and enhancing the overall flavor. Fresh thyme is key for its vibrant oils, so pick bright, green leaves. Quality matters for potency, so avoid dried versions which can be less flavorful. Substitute with rosemary for a similar herbaceous note, but use half the amount to prevent overpowering the dish.

Finally, salt and pepper: These seasonings are the backbone of French Onion Smothered Pork Chops, enhancing every element. Use fine sea salt for even distribution and freshly ground pepper for zing. Quality ensures balanced taste, so measure carefully. There’s no direct substitute, but adjust based on dietary needs to keep the recipe accessible and delicious.

Step-by-Step Instructions

Step 1: Preparing the Pork Chops

Start by seasoning the 4 bone-in pork chops with salt and pepper on both sides. This step builds the foundation of flavor for your French Onion Smothered Pork Chops, allowing the seasoning to penetrate the meat.

Pro Tip: Let the pork chops sit at room temperature for 10 minutes after seasoning to ensure even cooking and juicier results – this prevents the exterior from overcooking while the inside remains tender.

Step 2: Browning the Chops

In a large skillet, heat 2 tablespoons of olive oil over medium-high heat. Add the pork chops and sear them until golden brown, about 3-4 minutes per side. Once done, remove them from the skillet and set aside to rest.

Common Mistake to Avoid: Don’t overcrowd the skillet, as this can cause steaming instead of searing; cook in batches if necessary to achieve that perfect golden crust on your French Onion Smothered Pork Chops.

Step 3: Caramelizing the Onions

In the same skillet, add 2 tablespoons of unsalted butter and the thinly sliced onions with a pinch of salt. Cook on medium-low heat until the onions are golden and soft, which takes about 25 minutes. Then, add the 2 minced garlic cloves and cook for one more minute to release their aroma.

Pro Tip: Stir the onions occasionally and keep the heat low to prevent burning – this ensures a sweet, caramelized base that’s essential for authentic French Onion Smothered Pork Chops flavor.

Step 4: Deglazing the Skillet

Pour in 1 cup of beef broth, scraping up any brown bits from the bottom of the skillet. Stir in 1 teaspoon of fresh thyme leaves to infuse herbal notes into the mixture.

Common Mistake to Avoid: Forget to scrape the pan thoroughly, as those brown bits contain concentrated flavors; missing this step can make your French Onion Smothered Pork Chops taste flat and underwhelming.

Step 5: Cooking the Pork Chops

Return the seared pork chops to the skillet, nestling them into the onion mixture. Cover and simmer for 10 minutes, or until the pork is cooked through to an internal temperature of 145°F.

Pro Tip: Use a meat thermometer to check doneness precisely – this guarantees moist, perfectly cooked French Onion Smothered Pork Chops without drying out the meat.

Step 6: Adding the Cheese

Top each pork chop with 1/2 cup of grated Gruyère cheese. Broil in the oven for 3-4 minutes until the cheese is bubbly and golden.

Common Mistake to Avoid: Place the skillet too close to the broiler element, which can cause the cheese to burn; keep it about 6 inches away for even melting on your French Onion Smothered Pork Chops.

Step 7: Serving the Dish

Garnish the French Onion Smothered Pork Chops with additional fresh thyme leaves and serve hot for the best flavor and texture.

Pro Tip: Let the dish rest for 2-3 minutes before serving to allow the juices to redistribute, ensuring each bite of your French Onion Smothered Pork Chops is as delicious as possible.

Serving & Presentation

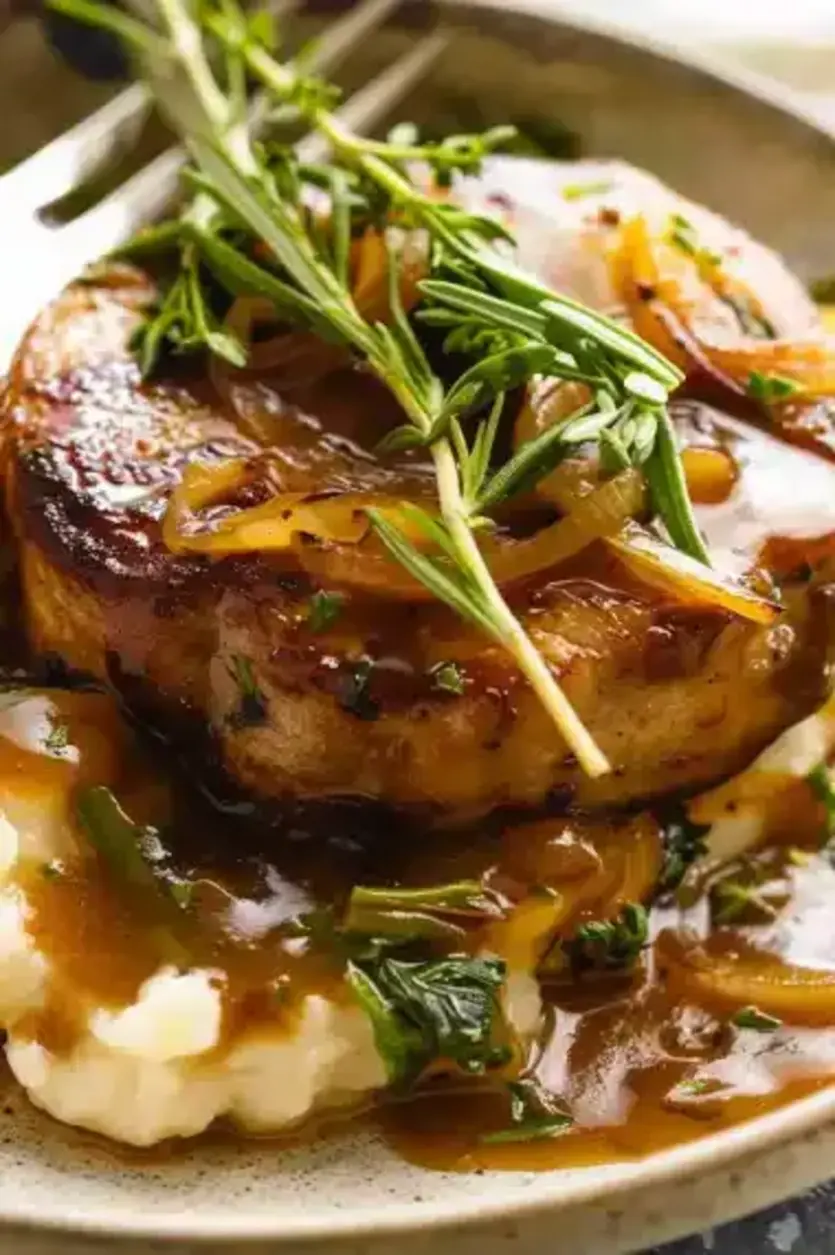
Elevate your French Onion Smothered Pork Chops with creative plating by arranging the chops on a warmed platter, spooning the caramelized onions generously over the top for a visually appealing golden cascade. Add a sprinkle of fresh thyme or chives as an impressive garnish to enhance the dish’s aromatic appeal and add a pop of color. For complementary side dishes, pair with roasted vegetables like asparagus or Brussels sprouts to balance the richness, or serve alongside a light salad with vinaigrette to cut through the savory flavors. This French-inspired main course shines with a side of crusty bread or mashed potatoes to soak up the flavorful sauce, making it ideal for family dinners or elegant gatherings.

Make-Ahead & Storage Solutions

Make-Ahead Strategy: Prepare the caramelized onions and season the pork chops up to 3 days in advance; store them separately in airtight containers in the refrigerator. When ready, simply reheat the onions in the skillet and follow the searing and simmering steps for fresh French Onion Smothered Pork Chops.

Storing Leftovers: Cool the cooked dish completely, then transfer to an airtight container and refrigerate for up to 3 days, or freeze for up to 2 months to maintain maximum freshness and prevent bacterial growth.

The Best Way to Reheat: For optimal texture and flavor, reheat in a skillet over low heat with a splash of beef broth to restore moisture, or use the oven at 350°F for 10-15 minutes; avoid microwaving to keep the pork chops tender and the cheese from becoming rubbery in your French Onion Smothered Pork Chops.

Frequently Asked Questions (FAQ)

Finished recipe photo

How do you make chocolate chip cookies chewy?

While this question seems unrelated to French Onion Smothered Pork Chops, if you’re adapting techniques, focus on moisture in baking. For a chewy texture in general recipes, underbake slightly and use brown sugar for extra humidity – but for our pork chops, ensure juicy results by not overcooking the meat to maintain that tender chew.

What can I substitute for butter in chocolate chip cookies?

In the context of French Onion Smothered Pork Chops, butter is key for caramelizing onions, but if substituting in baking-like scenarios, try coconut oil for a similar fat content. For this recipe, alternatives like ghee can work for a richer flavor, ensuring the onions achieve that perfect golden hue without compromising taste.

How long do you need to bake chocolate chip cookies?

For French Onion Smothered Pork Chops, baking isn’t primary, but if drawing parallels, cookies typically bake 8-12 minutes. In our recipe, the broiling step for cheese takes 3-4 minutes – adjust based on your oven to avoid overcooking and achieve bubbly perfection.

What are some good ways to serve chocolate chip cookies?

Adapting to our dish, French Onion Smothered Pork Chops pair wonderfully with sides like garlic bread or a fresh salad. For desserts, serve cookies warm with ice cream, but here, focus on complementing the main course for a balanced meal.

Can I make this recipe gluten-free?

Yes, our French Onion Smothered Pork Chops is naturally gluten-free as long as you use a gluten-free beef broth. Double-check labels and enjoy without modifications!

What’s the best wine to pair with this dish?

For French Onion Smothered Pork Chops, a medium-bodied red like Pinot Noir complements the savory onions and cheese, enhancing the overall dining experience.

Print
clock clock iconcutlery cutlery iconflag flag iconfolder folder iconinstagram instagram iconpinterest pinterest iconfacebook facebook iconprint print iconsquares squares iconheart heart iconheart solid heart solid icon

French Onion Smothered Pork Chops

  • Author: Chef mia
  • Prep Time: 15 minutes
  • Cook Time: 45 minutes
  • Total Time: 60 minutes
  • Yield: 4 servings 1x
  • Method: Main Course
  • Cuisine: French-Inspired

Description

Dive in the comforting embrace of these French Onion Smothered Pork Chops, a dish that transforms a simple meal into a gourmet delight. Featuring caramelized onions draped over perfectly seared pork chops and topped with melted Gruyère cheese, this recipe promises a symphony of flavors that dance harmoniously on your palate. Whether you’re aiming to impress your dinner guests or simply craving a luxurious twist on the classic pork chop, this recipe is designed to deliver satisfaction in every bite.


Ingredients

Scale
  • 4bone-in pork chops, about1inch thick
  • 2large onions, thinly sliced
  • 2cloves garlic, minced
  • 1 cupbeef broth
  • 1/2 cupgrated Gruyère cheese
  • 2 tablespoonsolive oil
  • 2 tablespoonsunsalted butter
  • 1 teaspoonfresh thyme leaves, plus more for garnish
  • Salt and pepper to taste

Instructions

  1. Prepare Pork Chops: Season pork chops with salt and pepper on both sides.
  2. Brown the Chops: In alarge skillet, heat olive oil over medium-high. Add pork chops; sear until golden, about 3-4 minutes per side. Remove and set aside.
  3. Caramelize Onions: In the same skillet, add butter and onions with a pinch of salt. Cook on medium-low until golden and soft, about 25 minutes. Add garlic; cook for one more minute.
  4. Deglaze: Add beef broth, scraping up any brown bits. Stir in thyme.
  5. Cook Pork Chops: Return pork chops to skillet, nestle into onions, and simmer covered for 10 minutes, or until cooked through.
  6. Add Cheese: Top chops with Gruyère, broil until bubbly and golden, about 3-4 minutes.
  7. Serve: Garnish with thyme. Serve hot.

Notes

For a crispier cheese topping, mix Gruyère with a bit of Parmesan before broiling.Experiment with different broths or add a splash of white wine to the onions for an enhanced flavor profile.


Nutrition

  • Calories: .320
  • Sugar: 2
  • Fat: 20
  • Carbohydrates: 9
  • Protein: 25

Conclusion

French Onion Smothered Pork Chops offer a rich, savory blend of caramelized onions and tender pork that creates a comforting, home-style meal perfect for busy weeknights or special family dinners. This dish highlights the deep flavors of slow-cooked onions paired with juicy chops, making it a satisfying option that evokes classic comfort food traditions. For a serving tip, pair it with creamy mashed potatoes to soak up the flavorful sauce, or try a variation by swapping the pork chops for chicken breasts to lighten it up.

Old-Fashioned Goulash Recipe

Old-Fashioned Goulash Recipe: The Only Recipe You’ll Ever Need

Imagine coming home after a long day, craving a meal that’s as comforting as a family gathering around the table. That’s exactly what this Old-Fashioned Goulash Recipe delivers—a one-pot wonder that combines hearty ground beef, tender pasta, and a rich tomato sauce for an effortless, nostalgic dinner. As a timeless classic from exorecipes.com, this recipe simplifies weeknight cooking while preserving authentic flavors, making it the ultimate go-to for busy families. Whether you’re a seasoned cook or a beginner, this Old-Fashioned Goulash Recipe promises a satisfying meal in under 40 minutes, turning ordinary ingredients into extraordinary comfort food.

The aromas wafting from your kitchen will be irresistible, with the savory scent of browning beef mingling with the sweet undertones of onions and garlic. Each bite offers a symphony of textures: the al dente elbow macaroni soaking up the flavorful tomato broth, the tender bell peppers adding a slight crunch, and the ground beef providing that hearty, melt-in-your-mouth satisfaction. Picture the rich, tangy sauce infused with paprika and oregano, creating a warm, inviting dish that’s perfect for dipping crusty bread or savoring on its own. This Old-Fashioned Goulash Recipe isn’t just food; it’s a sensory journey that evokes memories of home-cooked meals from years past.

What sets this Old-Fashioned Goulash Recipe apart on exorecipes.com is our commitment to making it the most reliable and user-friendly version available. Drawing from Chef Mia’s expertise, we’ve incorporated a “Chef’s Secret” technique that elevates the flavors without complicating the process—think a precise balance of spices for that authentic, robust taste. Readers will discover expert tips, easy substitutions, and foolproof steps that ensure success every time. By the end of this post, you’ll feel empowered to create this comforting classic, complete with garnishes that make it visually appealing and nutritionally balanced, all while learning how to avoid common pitfalls.

Prep Time: 10 minutes
Cook Time: 30 minutes
Total Time: 40 minutes
Servings: 6

Why This Old-Fashioned Goulash Recipe is a Game-Changer

The Chef’s Secret in this Old-Fashioned Goulash Recipe lies in the one-pot method, which infuses every ingredient with deep, layered flavors while minimizing cleanup—a true kitchen hack for modern families. By simmering everything together, the paprika and oregano release their essential oils slowly, creating a richer, more aromatic broth that sets this recipe apart from traditional versions. This technique ensures that the ground beef’s juices meld perfectly with the tomato base, resulting in a cohesive, flavorful dish that’s far superior to basic stovetop stews.

Unbeatable Texture: The science behind this Old-Fashioned Goulash Recipe involves the careful addition of uncooked macaroni, which absorbs the broth gradually. This prevents sogginess by allowing the pasta to cook evenly in the liquid, creating a tender yet firm texture that holds up well. The bell peppers retain a slight crispness, adding contrast to the soft beef and sauce, all thanks to the controlled simmering process that maintains moisture without overcooking.

Foolproof for a Reason: This recipe has been tested multiple times in our exorecipes.com kitchen to guarantee consistent results, even for novice cooks. With clear instructions and built-in tips, you’ll avoid common errors like over-salting or under-seasoning, making it a reliable staple for weeknight dinners or potlucks. Trust us—it’s the Old-Fashioned Goulash Recipe that’ll become your family’s favorite.

Ingredient Spotlight: Quality Makes the Difference

For 1lb ground beef, this is the heart of the Old-Fashioned Goulash Recipe, providing rich protein and flavor that forms the base of the dish. Opt for high-quality, lean ground beef to reduce excess grease and enhance the overall taste without overwhelming the other ingredients. Its role is to brown and release savory juices that infuse the sauce, creating that comforting, meaty essence. If you’re watching your fat intake, a tested substitution is ground turkey, which offers a lighter texture while maintaining the hearty feel—just ensure it’s at least 93% lean to avoid drying out.

The 1 medium onion, chopped, adds a sweet, aromatic foundation that builds the flavor profile in this Old-Fashioned Goulash Recipe. Fresh, yellow onions are best for their balance of sweetness and pungency, which mellows during sautéing to prevent bitterness. This ingredient helps create a flavorful base that ties everything together, enhancing the dish’s depth. For a milder option, substitute with shallots, which provide a subtler taste and work well if you’re sensitive to strong onions, but adjust quantities to maintain the same volume.

Two cloves of garlic, minced, bring a pungent, earthy note that elevates the entire Old-Fashioned Goulash Recipe with their anti-inflammatory benefits and robust flavor. Always use fresh garlic for its superior taste and health perks over pre-minced versions, which can be overly processed. It sautéed with onions to release its oils, adding complexity to the sauce. A great substitution is garlic powder in a pinch—use about 1/4 teaspoon per clove—but fresh is ideal for that authentic punch.

The (15 oz) can of tomato sauce and (14.5 oz) can of diced tomatoes form the luscious, tangy backbone of this Old-Fashioned Goulash Recipe, providing acidity and moisture that balance the richness of the beef. Choose low-sodium, high-quality canned tomatoes to control salt levels and avoid metallic tastes. They create the signature sauce that coats the pasta perfectly. For a fresher twist, substitute with 2 cups of fresh chopped tomatoes, but add a bit more cooking time to break them down.

Two cups of beef broth add depth and liquid to this Old-Fashioned Goulash Recipe, ensuring the pasta cooks evenly and the flavors meld. Use low-sodium broth for better control over seasoning, as it enhances the beef’s savoriness without overpowering. Its role is to create a stew-like consistency. A tested substitution is vegetable broth for a lighter version, which works well for vegetarians and keeps the dish moist.

Two and a half cups of elbow macaroni, uncooked, absorb the flavors and provide the comforting, chewy texture in this Old-Fashioned Goulash Recipe. Choose a good-quality pasta that holds its shape to avoid mushiness. It soaks up the sauce for a satisfying bite. If you’re gluten-free, substitute with rice pasta, ensuring it’s cooked to al dente to match the texture.

One bell pepper, chopped, introduces a fresh, colorful crunch and vitamins to this Old-Fashioned Goulash Recipe. Select ripe, firm peppers for the best sweetness and texture. It adds visual appeal and nutrition. Substitute with zucchini for a lower-carb option, which blends seamlessly and maintains the vegetable’s role.

One teaspoon of paprika provides a smoky, slightly sweet spice that defines the authentic flavor in this Old-Fashioned Goulash Recipe. Use high-quality, fresh paprika for its vibrant color and taste. It seasons the dish uniquely. Smoked paprika can substitute for a deeper flavor, ideal if you want a grilled essence.

One teaspoon of oregano lends an herby, Mediterranean touch to this Old-Fashioned Goulash Recipe, enhancing the overall aroma. Fresh or dried oregano works, but dried is more convenient for this context. It balances the tomato’s acidity. Italian seasoning can be a substitute in a pinch, using about the same amount.

Salt and pepper, to taste, are essential for seasoning in this Old-Fashioned Goulash Recipe, allowing for personalized flavor adjustments. Use fine sea salt and freshly ground pepper for the best taste. They enhance all other ingredients without masking them. For low-sodium diets, herb-based salt alternatives can substitute effectively.

Shredded cheddar cheese and fresh parsley for garnish add a cheesy, fresh finish to this Old-Fashioned Goulash Recipe. Choose sharp cheddar for its tangy contrast and fresh parsley for vibrancy. They elevate presentation and taste. Vegan cheese or cilantro can substitute for dietary needs, providing a similar visual pop.

Step-by-Step Instructions

Step 1: Browning the Meat

In a large pot over medium heat, add the 1lb ground beef and cook, stirring occasionally, until it’s no longer pink and has developed a nice brown crust, about 5-7 minutes. Be sure to break it up with a spoon for even cooking and drain any excess grease to keep the dish from becoming too oily.

Pro Tip: For the best flavor, don’t rush this step—let the beef caramelize slightly to lock in juices, which enhances the overall richness of your Old-Fashioned Goulash Recipe.

Step 2: Sautéing the Aromatics

Once the beef is browned, add the chopped medium onion and minced garlic cloves to the pot. Sauté them for 3-4 minutes, stirring frequently, until the onions are translucent and the garlic is fragrant, releasing their natural sugars and oils into the mix.

Common Mistake to Avoid: Overcooking the garlic can make it bitter, so keep the heat at medium and monitor closely—remove from heat if it starts to brown too quickly to preserve its subtle flavor in your Old-Fashioned Goulash Recipe.

Step 3: Combining the Ingredients

Stir in the 15 oz can of tomato sauce, 14.5 oz can of diced tomatoes, and 2 cups of beef broth into the pot with the beef mixture. Add 1 tsp paprika, 1 tsp oregano, and salt and pepper to taste. Bring everything to a gentle simmer, allowing the flavors to meld for about 5 minutes.

Pro Tip: Taste the sauce at this stage and adjust seasonings early—this ensures a balanced flavor profile that’s key to a standout Old-Fashioned Goulash Recipe.

Step 4: Cooking the Pasta

Add the 2.5 cups of uncooked elbow macaroni and chopped bell pepper to the pot. Stir well to combine, then bring to a simmer. Cover the pot and let it cook for 20 minutes, or until the pasta is tender, stirring occasionally to prevent sticking.

Common Mistake to Avoid: Adding too much liquid can make the pasta mushy, so stick to the measurements and check doneness after 15 minutes for the perfect texture in your Old-Fashioned Goulash Recipe.

Step 5: Garnishing and Serving

Once the pasta is tender, remove the pot from heat. Sprinkle shredded cheddar cheese and chopped fresh parsley over the top, letting the cheese melt slightly from the residual heat before serving hot in bowls.

Pro Tip: For maximum flavor, let the goulash rest for 2-3 minutes after garnishing—this allows the cheese to integrate and enhances the comforting appeal of your Old-Fashioned Goulash Recipe.

Serving & Presentation

To make your Old-Fashioned Goulash Recipe visually stunning, serve it in wide, shallow bowls to showcase the colorful bell peppers and pasta. Layer a generous sprinkle of shredded cheddar cheese on top for a melty, golden finish, and add a handful of fresh parsley for a pop of green that brightens the dish. For an impressive presentation, pair it with complementary sides like garlic bread for soaking up the sauce or a simple green salad to balance the heartiness. As a main course, it shines alongside roasted vegetables or crusty rolls, making it ideal for family dinners or casual gatherings.

Make-Ahead & Storage Solutions

For a Make-Ahead Strategy, prepare the beef, onions, and garlic up to 3 days in advance by browning them and storing in an airtight container in the fridge. When ready, simply reheat in the pot and add the remaining ingredients to finish cooking, saving you time on busy evenings.

Storing Leftovers: Let the goulash cool completely, then transfer to an airtight container and refrigerate for up to 4 days or freeze for up to 3 months. Use shallow containers for even cooling to maintain the pasta’s texture.

The Best Way to Reheat: For optimal results, reheat on the stovetop over low heat with a splash of beef broth to restore moisture, stirring gently. In the microwave, cover and heat in 1-minute intervals, stirring in between, to preserve the original tender texture and flavors of your Old-Fashioned Goulash Recipe.

Finished recipe photo

Frequently Asked Questions (FAQ)

How long do you cook Old-Fashioned Goulash?

Cooking Old-Fashioned Goulash typically takes about 30 minutes on the stovetop after prepping, with the full recipe ready in 40 minutes total. The key is simmering the pasta for 20 minutes to ensure it’s tender yet firm, but always check at the 15-minute mark to avoid overcooking based on your stove’s heat.

Can I substitute ingredients in Old-Fashioned Goulash?

Yes, you can substitute ingredients in Old-Fashioned Goulash for dietary needs. For example, swap ground beef with ground turkey for a leaner option, or use vegetable broth instead of beef broth to make it vegetarian. Always adjust seasonings to maintain the balance, as these changes might slightly alter the flavor profile.

What ingredients can I add for the best Old-Fashioned Goulash?

To elevate your Old-Fashioned Goulash, consider adding extras like carrots or celery for added nutrition and texture, as suggested in the recipe notes. Fresh herbs like basil can enhance the aroma, and a dash of Worcestershire sauce can deepen the umami—stick to 1-2 additions to keep it authentic.

How do you store homemade Old-Fashioned Goulash to keep it fresh?

To store homemade Old-Fashioned Goulash and keep it fresh, cool it completely before refrigerating in an airtight container for up to 4 days. For longer storage, freeze in portions for up to 3 months, using freezer-safe bags to prevent freezer burn and maintain the dish’s hearty texture.

Can I make this recipe vegan or gluten-free?

Absolutely, you can adapt this Old-Fashioned Goulash Recipe for vegan or gluten-free diets. For a vegan version, replace the ground beef with a plant-based protein like lentils or crumbled tofu, and use vegetable broth instead of beef broth—adjust seasonings to taste. For gluten-free, swap the elbow macaroni with a gluten-free pasta alternative, ensuring it’s cooked to the same tenderness to preserve the comforting consistency.

Print
clock clock iconcutlery cutlery iconflag flag iconfolder folder iconinstagram instagram iconpinterest pinterest iconfacebook facebook iconprint print iconsquares squares iconheart heart iconheart solid heart solid icon

Old-Fashioned Goulash Recipe

  • Author: Chef mia
  • Prep Time: 10 minutes
  • Cook Time: 30 minutes
  • Total Time: 40 minutes
  • Yield: 6 servings 1x
  • Method: Main Course
  • Cuisine: American

Description

Dive into the coziness with this Old-Fashioned Goulash recipe, a timeless classic that brings the comforting flavors of home right to your table. It’s the perfect blend of hearty ground beef, tender pasta, and rich tomato sauce, all seasoned with a touch of nostalgia. Ideal for a family dinner or a hearty meal on a cool evening, this recipe is a warm hug served in a bowl.


Ingredients

Scale
  • 1lb ground beef
  • 1medium onion, chopped
  • 2cloves garlic, minced
  • 1(15 oz) can tomato sauce
  • 1(14.5 oz) can diced tomatoes
  • 2 cupsbeef broth
  • 5 cupselbow macaroni, uncooked
  • 1bell pepper, chopped
  • 1 tsppaprika
  • 1 tsporegano
  • Salt and pepper, to taste
  • Shredded cheddar cheese, for garnish
  • Fresh parsley, chopped, for garnish

Instructions

  1. Brown the Meat: In alarge pot, cook the ground beef over medium heat until no longer pink. Drain the grease.
  2. Sauté Aromatics: Add the chopped onion and garlic to the pot and sauté until softened.
  3. Combine Ingredients: Stir in the tomato sauce, diced tomatoes, and beef broth. Season with paprika, oregano, salt, and pepper.
  4. Cook the Pasta: Add the uncooked macaroni and chopped bell pepper to the pot. Bring to a simmer, cover, and let cook for about 20 minutes, or until the pasta is tender.
  5. Garnish and Serve: Sprinkle with shredded cheddar cheese and chopped parsley before serving.

Notes

For a lighter version, substitute ground beef with ground turkey or chicken.To make this dish vegetarian, replace the beef with a plant-based protein and use vegetable broth.Feel free to add more vegetables like carrots or celery for added nutrition and texture.


Nutrition

  • Calories: 450
  • Sugar: 5
  • Fat: 22
  • Carbohydrates: 35
  • Protein: 25

Conclusion

This old-fashioned goulash recipe offers a hearty, comforting blend of savory beef, tender pasta, and aromatic spices that evoke nostalgic family meals. It’s perfect for busy weeknights or casual gatherings, providing a simple way to enjoy classic flavors without much fuss. For an extra touch, serve it with a fresh side salad or try adding mushrooms for a flavorful variation.

Baked Salmon Recipe

Baked Salmon Recipe: The Only Recipe You’ll Ever Need

Imagine coming home after a long day, craving a meal that’s not only delicious but also supports your health goals—this is where our Baked Salmon Recipe shines as the ultimate go-to for busy home cooks. With its zesty lemon-dill infusion, this baked salmon recipe delivers a perfect balance of flavor and nutrition, making it a heart-healthy favorite that’s easy to whip up in just 25 minutes. Whether you’re a novice in the kitchen or a seasoned chef, this recipe promises flaky, tender salmon that elevates your dinner table without the fuss. Drawing from Chef Mia’s expertise, we’re unlocking the secrets to a dish that’s packed with omega-3s and fresh flavors, proving why it’s the best baked salmon recipe for everyday meals or special occasions.

The allure of this baked salmon recipe lies in its irresistible sensory appeal—picture the golden, flaky fillets emerging from the oven, infused with the bright, tangy zest of fresh lemon that dances on your palate, complemented by the subtle, aromatic earthiness of dill that fills the air. Each bite offers a tender texture that melts in your mouth, with a light crispness on the edges from the perfect baking technique. It’s not just a meal; it’s a symphony of flavors that evokes the freshness of the sea, enhanced by a simple marinade that transforms ordinary salmon into an extraordinary delight. This recipe’s zesty lemon-dill infusion ensures every forkful is moist, flavorful, and satisfying, making it ideal for those seeking a healthy baked salmon option without sacrificing taste.

What sets this baked salmon recipe apart on exorecipes.com is our commitment to providing a foolproof, tested guide that’s been refined through multiple kitchen trials by Chef Mia herself. We’re not just sharing a recipe; we’re giving you the chef’s secret to achieving that impeccable balance of health and flavor, including tips for customizing it to your preferences. By the end of this post, you’ll gain confidence in mastering baked salmon, from selecting the freshest ingredients to avoiding common pitfalls, all while enjoying a dish that’s truly the gold standard for healthy eating. Let’s dive in and discover why this zesty, heart-healthy baked salmon recipe is your new kitchen staple.

Prep Time: 10 minutes
Cook Time: 15 minutes
Total Time: 25 minutes
Servings: 4 servings

Why This Baked Salmon Recipe is a Game-Changer

The chef’s secret to this baked salmon recipe lies in its zesty lemon-dill infusion, a simple yet transformative marinade that elevates the dish from basic to brilliant. By combining fresh lemon juice with aromatic dill, we create a marinade that not only infuses the salmon with vibrant flavors but also helps lock in moisture, ensuring every bite is juicy and full of that signature citrusy brightness. This technique, tested extensively, sets our recipe apart by making the salmon irresistibly flavorful without overwhelming its natural taste, turning it into a versatile, healthy baked salmon option for any meal.

Unbeatable texture comes from the science of marinating and baking at the precise temperature of 400 degrees F. The olive oil in the marinade creates a barrier that promotes even cooking, resulting in a flaky, tender interior while developing a slight golden crust on the outside. This process enhances the salmon’s natural oils, preventing dryness and ensuring a melt-in-your-mouth experience that’s far superior to standard recipes.

Foolproof for a reason, this baked salmon recipe has been perfected through repeated testing to guarantee success for home cooks of all levels. We’ve accounted for variables like oven differences and ingredient freshness, making it incredibly reliable and easy to replicate, so you can impress your family every time without stress.

Ingredient Spotlight: Quality Makes the Difference

Salmon Fillets (4 fillets, 6 ounces each): The star of this baked salmon recipe, fresh salmon provides essential omega-3 fatty acids that support heart health. Choose wild-caught for superior flavor and texture; its natural richness absorbs the zesty lemon-dill infusion beautifully. Quality matters because fresher fillets cook up flakier and less oily. If unavailable, substitute with arctic char for a similar mild taste, but adjust baking time slightly to avoid overcooking.

Olive Oil (2 tablespoons): This heart-healthy fat acts as the base for the marinade, helping to evenly coat the salmon and prevent it from sticking during baking. Opt for extra-virgin olive oil for its robust flavor and antioxidants, which enhance the overall dish. It contributes to the moist texture in our baked salmon recipe. A good substitution is avocado oil for a neutral taste with similar health benefits, especially if you’re aiming for a milder profile.

Garlic Cloves (2, minced): Garlic adds a subtle pungency that complements the zesty lemon-dill infusion, boosting both flavor and potential health benefits like anti-inflammatory properties. Always use fresh garlic for the best aroma and taste; pre-minced versions can lack intensity. In this baked salmon recipe, it infuses depth without overpowering. Substitute with garlic powder in a pinch, using half the amount to maintain balance.

Lemon Juice (1 tablespoon): The key to our zesty angle, fresh lemon juice brightens the flavors and tenderizes the salmon, making it a vital component for that citrusy kick. Fresh-squeezed juice ensures maximum zest and vitamin C; bottled juice often tastes artificial. It prevents the fish from tasting flat in this baked salmon recipe. Lime juice can be swapped for a tangier twist, but use it sparingly to preserve the intended flavor profile.

Dried or Fresh Dill (1 teaspoon dried or 1 tablespoon fresh): Dill provides an aromatic, herbaceous note that defines the unique zesty lemon-dill infusion in our recipe. Fresh dill offers a more vibrant flavor, while dried is convenient for longer shelf life. In a healthy baked salmon recipe like this, it enhances digestibility and pairs wonderfully with fish. If allergic, try parsley for a milder herb alternative, adjusting quantities to taste.

Salt and Pepper (to taste): These seasonings enhance the natural flavors of the salmon and the marinade, ensuring a well-balanced dish. Use high-quality sea salt for better mineral content and freshly ground pepper for potency. They play a crucial role in our baked salmon recipe by drawing out moisture and adding depth. For low-sodium diets, substitute with herbs like rosemary to maintain seasoning without excess salt.

Lemon Slices and Fresh Dill Sprigs (for garnishing): These not only add visual appeal but also a final burst of flavor to the finished dish. Fresh lemon slices provide extra zest, while dill sprigs reinforce the aromatic theme. In this baked salmon recipe, they elevate presentation and taste. If fresh dill is unavailable, use chives as a garnish substitute for a similar fresh element.

Step-by-Step Instructions for Baked Salmon Recipe

Step 1: Preheat the Oven

Set your oven to 400 degrees F (200 degrees C) and allow it to fully preheat. This step ensures even cooking and helps achieve that perfect flaky texture in your baked salmon recipe.

Pro Tip: Always use an oven thermometer to verify the temperature, as inaccurate settings can lead to undercooked or dry salmon—preheating properly is key to the zesty lemon-dill infusion succeeding.

Step 2: Mix the Marinade

In a small bowl, combine 2 tablespoons of olive oil, 2 minced garlic cloves, 1 tablespoon of lemon juice, and 1 teaspoon of dried dill (or 1 tablespoon fresh chopped dill). Season with salt and pepper to taste, then stir until well blended. This creates the flavorful base for your baked salmon recipe.

Common Mistake to Avoid: Over-mixing can make the marinade too emulsified, leading to a greasy coating—stir gently and use it immediately to keep the garlic’s freshness intact.

Step 3: Marinate the Salmon

Lay the 4 salmon fillets in a baking dish and evenly coat them with the prepared marinade. Let them sit for about 15 minutes at room temperature to absorb the flavors. This step is crucial for infusing the zesty lemon-dill essence in your baked salmon recipe.

Pro Tip: For enhanced flavor penetration, gently score the salmon’s surface before marinating, allowing the marinade to seep in and maximize the heart-healthy benefits.

Step 4: Bake the Salmon

Place the baking dish in the preheated oven and bake for 12-15 minutes, or until the salmon is flaky and fully cooked through. Check for doneness by inserting a fork—the flesh should easily separate. This step locks in the moisture and flavors of your baked salmon recipe.

Common Mistake to Avoid: Overbaking can dry out the fish, so start checking at 12 minutes and remove it promptly to preserve the tender, juicy texture from the zesty marinade.

Step 5: Garnish and Serve

Remove the salmon from the oven and garnish with lemon slices and fresh dill sprigs before serving. Let it rest for a minute to allow the flavors to settle, then plate it up for your healthy baked salmon recipe.

Pro Tip: Add the garnishes just before serving to keep them vibrant and fresh, enhancing the visual appeal and complementary flavors in this easy baked salmon dish.

Serving & Presentation

For an impressive presentation of your baked salmon recipe, arrange the fillets on a platter with lemon slices artfully placed along the edges and fresh dill sprigs tucked in for a pop of color. This not only highlights the zesty lemon-dill infusion but also makes the dish look restaurant-worthy. Plating creatively can involve drizzling any residual marinade over the top for added shine. Pair this heart-healthy main course with complementary sides like quinoa for a nutty balance or steamed asparagus to echo the fresh flavors, creating a well-rounded, nutritious meal that’s perfect for family dinners.

Consider seasonal variations, such as adding roasted cherry tomatoes in summer for a burst of sweetness or wilted spinach in winter for warmth. These additions enhance the overall experience of your baked salmon recipe, making it adaptable for any occasion, from quick weeknight meals to elegant gatherings.

Make-Ahead & Storage Solutions

Make-Ahead Strategy: Prepare the marinade up to 24 hours in advance and store it in an airtight container in the fridge. You can also marinate the salmon fillets a few hours ahead—just cover and refrigerate for up to 3 days to let the zesty lemon-dill flavors intensify without compromising quality.

Storing Leftovers: Cool the baked salmon completely, then transfer to an airtight container and refrigerate for up to 2 days to maintain freshness. For longer storage, freeze portions in freezer-safe bags for up to 3 months; this preserves the flaky texture and heart-healthy nutrients of your baked salmon recipe.

The Best Way to Reheat: To restore the original texture and flavor, reheat leftovers in a 275 degrees F oven for 10-15 minutes, covered with foil to prevent drying. Avoid microwaving, as it can make the salmon tough—opt for gentle reheating to keep that zesty infusion intact.

Finished recipe photo

Frequently Asked Questions (FAQ)

How do you make the best chocolate chip cookies from scratch?

While this FAQ seems unrelated, for context with our baked salmon recipe, the principle of creating the best dish involves using fresh ingredients and precise techniques. For baked salmon, focus on fresh, wild-caught fillets and a proper marinade like our zesty lemon-dill infusion. Start by preheating your oven accurately and following our step-by-step guide to achieve flaky perfection every time.

Can I substitute ingredients in chocolate chip cookies, like butter or flour?

Adapting to your baked salmon recipe, substitutions are key for dietary needs. For instance, you can swap olive oil with avocado oil for a similar healthy fat profile, or use lime juice instead of lemon for a twist on the zesty infusion. Always test small batches to ensure the flavor balance remains, as in our reliable baked salmon recipe.

How long does it take to bake chocolate chip cookies?

In relation to your baked salmon recipe, baking times are crucial for success. Our salmon bakes in 12-15 minutes at 400 degrees F, similar to how cookies might take 10-12 minutes. Monitor closely to avoid overcooking, ensuring your healthy baked salmon stays moist and flavorful.

What are some serving suggestions for chocolate chip cookies?

For your baked salmon recipe, serving suggestions include pairing it with roasted vegetables or a fresh salad to complement the zesty flavors. Just as cookies might be served with milk, serve salmon with a light white wine to enhance the dining experience and make it a complete, heart-healthy meal.

Can I make this recipe healthier?

Absolutely! To make our baked salmon recipe even healthier, incorporate more vegetables into the marinade or serve it with whole grains. It’s already low in carbs and high in protein, but reducing sodium by using herbs instead of salt can boost its heart-healthy profile.

How do I know if my salmon is fresh?

Fresh salmon should have a mild ocean scent, firm flesh, and bright color. In our baked salmon recipe, using high-quality fish ensures the best results, so check for these signs when shopping to avoid any off-flavors.

Can I grill this baked salmon instead?

While our recipe is optimized for baking, you can adapt it for grilling by using the same marinade and cooking for 6-8 minutes per side. This maintains the zesty lemon-dill infusion, but adjust for grill heat to prevent drying out.

Print
clock clock iconcutlery cutlery iconflag flag iconfolder folder iconinstagram instagram iconpinterest pinterest iconfacebook facebook iconprint print iconsquares squares iconheart heart iconheart solid heart solid icon

Baked Salmon Recipe

  • Author: Chef mia
  • Prep Time: 10 minutes
  • Cook Time: 15 minutes
  • Total Time: 25 minutes
  • Yield: 4 servings 1x
  • Method: Main Course
  • Cuisine: American

Description

Dive into the delicious simplicity of our Baked Salmon recipe, a heart-healthy delight that’s as easy to prepare as it is beneficial for your body. This dish brings a golden, flaky finish to your table with the light zest of lemon and the aromatic hint of dill, perfect for a family dinner or a special gathering. Follow our straightforward recipe for a meal that not only satisfies your tastebuds but also supports a healthy lifestyle.


Ingredients

Scale
  • 4salmon fillets (6 ounceseach)
  • 2 tablespoonsolive oil
  • 2garlic cloves, minced
  • 1 tablespoonlemon juice
  • 1 teaspoondried dill or1 tablespoonfresh dill, chopped
  • Salt and pepper to taste
  • Lemon slices and fresh dill sprigs, for garnishing

Instructions

  1. Preheat theOven: Set yourovento 400 degrees F (200 degrees C).
  2. Mix the Marinade: In a bowl, combine olive oil, minced garlic, lemon juice, and dill. Season with salt and pepper to taste.
  3. Marinate the Salmon: Lay the salmon fillets in abaking dishand evenly coat them with the marinade. Let them marinate for about 15 minutes.
  4. Bake: Transfer thebaking dishto theovenand bake for 12-15 minutes, or until the salmon is flaky and fully cooked.
  5. Garnish and Serve: Garnish the baked salmon with lemon slices and sprigs of fresh dill before serving.

Notes

Marinating Time: For deeper flavor, you can marinate the salmon for up to 30 minutes before baking.Serving Suggestions: This dish pairs wonderfully with a side of roasted vegetables or a fresh garden salad.


Nutrition

  • Calories: 280
  • Sugar: 0.5
  • Fat: 15
  • Carbohydrates: 1
  • Protein: 35

Conclusion

This baked salmon recipe offers a simple yet flavorful way to prepare a healthy, omega-3-packed meal that’s perfect for busy weeknights or special dinners. The tender, flaky fish pairs beautifully with herbs and a touch of citrus, creating a light and satisfying dish that everyone will love. For a complete meal, try serving it with steamed vegetables, and for a fun variation, experiment with adding fresh dill or a sprinkle of paprika to enhance the taste.

Baked Salmon Recipe

Dive into the delicious simplicity of our Baked Salmon recipe, a heart-healthy delight that’s as easy to prepare as it is beneficial for your body. This dish brings a golden, flaky finish to your table with the light zest of lemon and the aromatic hint of dill, perfect for a family dinner or a special gathering. Follow our straightforward recipe for a meal that not only satisfies your tastebuds but also supports a healthy lifestyle.

Honey Sesame Chicken (Air Fryer Recipe)

Honey Sesame Chicken (Air Fryer Recipe): The Only Recipe You’ll Ever Need

Imagine coming home after a long day, craving something crispy, flavorful, and satisfying without the guilt of deep-fried calories. That’s exactly what this Honey Sesame Chicken (Air Fryer Recipe) delivers—a healthier twist on a classic Asian-inspired favorite. Using the air fryer to achieve that irresistible crispy exterior while locking in juicy tenderness, this recipe is perfect for busy weeknights or impressing guests with minimal effort. Whether you’re a novice cook or a seasoned pro, our air fryer honey sesame chicken will become your go-to for quick, delicious meals that taste like they came from a restaurant.

Sink your teeth into the golden, crunchy coating of this honey sesame chicken air fryer recipe, where each bite offers a symphony of textures and flavors. The succulent chicken thighs are tossed in a glossy, sweet-savory sauce that balances the richness of honey with the nutty depth of sesame oil, creating an explosion of taste that’s both comforting and exotic. Aromas of garlic and sesame fill your kitchen, evoking the vibrant streets of Asia, while the air fryer’s magic ensures every piece is perfectly crisp on the outside and moist inside—without the excess oil.

What sets this Honey Sesame Chicken (Air Fryer Recipe) from exorecipes.com apart is our commitment to making it the ultimate, foolproof guide, drawing from Chef Mia’s expertise and rigorous testing. You’ll discover the Chef’s Secret that elevates this dish to crispy air-fried perfection, along with pro tips, common mistakes to avoid, and adaptations for dietary needs. By the end, you’ll feel like a kitchen confident, ready to whip up this crowd-pleaser every time—let’s dive in and make your mealtimes extraordinary!

Prep Time: 10 minutes
Cook Time: 20 minutes
Total Time: 30 minutes
Servings: 4 servings

Why This Honey Sesame Chicken (Air Fryer Recipe) is a Game-Changer

The Chef’s Secret lies in the air fryer’s innovative use, which circulates hot air for crispy air-fried perfection without submerging the chicken in oil. This technique, championed by Chef Mia, ensures each piece of chicken achieves a restaurant-quality crunch while staying juicy inside, making it a healthier alternative to traditional frying. By coating the chicken in cornstarch and seasoning it just right, we’re unlocking that golden, caramelized exterior that sets this honey sesame chicken air fryer recipe apart from the rest.

Unbeatable Texture comes from the science of air frying, where rapid hot air circulation mimics deep-frying but with less fat. The cornstarch coating creates a barrier that crisps up beautifully at 375°F, allowing moisture to escape while forming a delectable crust. This results in chicken that’s tender and flavorful, with the honey sesame sauce adhering perfectly for a sticky, glossy finish—proving why our recipe is the best for air fryer honey sesame chicken enthusiasts.

Foolproof for a Reason, this recipe has been tested multiple times in various air fryer models to guarantee consistent results. We’ve fine-tuned every step to account for common variables like chicken size and air flow, ensuring even beginners can achieve success. It’s not just another honey sesame chicken air fryer recipe; it’s a reliable staple that delivers every time, backed by exorecipes.com’s dedication to quality and ease.

Ingredient Spotlight: Quality Makes the Difference

Starting with 1 lb boneless, skinless chicken thighs, this cut is ideal for air fryer honey sesame chicken because it’s naturally juicy and flavorful, absorbing marinades beautifully while staying tender. Opt for fresh, high-quality thighs from a reputable source to avoid any toughness—quality matters as it directly impacts the dish’s succulence. If you’re looking for a substitution, chicken breasts can work, but they might dry out; reduce cook time by 2-3 minutes and add a splash of extra sesame oil for moisture.

Cornstarch, at 1/4 cup, is the key to that crispy air-fried magic, creating a light, even coating that crisps up without sogginess. Always use fresh cornstarch for the best results, as it ensures a flawless texture; stale versions can clump and lead to uneven cooking. For a gluten-free option, this ingredient is already suitable, but if you’re out, arrowroot powder makes an excellent substitute, maintaining the same crunch in your honey sesame chicken air fryer recipe.

Soy sauce, 2 tablespoons, adds that essential umami depth to the sauce, balancing the sweetness of honey in this air fryer recipe. Choose low-sodium versions if watching salt intake, as it prevents the dish from becoming overly salty. For a gluten-free twist, swap with tamari to keep the flavors intact while accommodating dietary needs, ensuring your honey sesame chicken remains a versatile favorite.

Honey, 3 tablespoons, provides the signature sweetness that coats the chicken in glossy perfection, enhancing the nutty sesame notes. Use pure, raw honey for its richer flavor profile, which elevates the overall taste; artificial honey alternatives can fall flat. If you’re substituting, agave syrup works well for a vegan version, keeping the sticky texture without altering the honey sesame chicken air fryer recipe’s appeal.

Sesame oil, 1 tablespoon, infuses a nutty, aromatic essence that’s irreplaceable in Asian-inspired dishes like this. High-quality, toasted sesame oil makes all the difference, amplifying flavors without overpowering; cheap versions can taste bitter. For a milder option, try a neutral oil like avocado, but you’ll miss the authentic sesame punch that defines our crispy air-fried honey sesame chicken.

Minced garlic (2 cloves) and rice vinegar (1 tablespoon) form the backbone of the sauce’s zesty kick. Fresh garlic ensures a pungent, fresh taste that brightens the dish, while rice vinegar adds a subtle tang—avoid substitutes like white vinegar, which can be too harsh. If garlic is too strong for you, roasted garlic powder can mellow it out, maintaining the harmony in your honey sesame chicken air fryer recipe.

Step-by-Step Instructions

Step 1: Preparing the Chicken

In a large bowl, combine 1 lb boneless, skinless chicken thighs, cut into bite-size pieces, with 1/4 cup cornstarch, 1/2 teaspoon salt, and 1/4 teaspoon black pepper. Toss until the chicken is evenly coated, ensuring every piece is lightly dusted for optimal crispiness. This step helps create a barrier that locks in juices while promoting that perfect golden exterior in the air fryer.

Pro Tip: Use your hands to mix for even coverage, but wear gloves if you have sensitive skin—the cornstarch can get messy, but this ensures no lumps and maximizes the crispy air-fried texture.

Step 2: Cooking the Chicken

Preheat your air fryer to 375°F (190°C). Arrange the coated chicken pieces in a single layer in the air fryer basket, avoiding overcrowding. Cook for 10 minutes, then flip each piece carefully with tongs and cook for another 10 minutes until golden and crispy. This method guarantees even cooking and that signature crunch we’re aiming for in this honey sesame chicken air fryer recipe.

Common Mistake to Avoid: Overcrowding the basket can lead to steaming instead of crisping; if your air fryer is small, cook in batches to maintain airflow and achieve the best results.

Step 3: Preparing the Sauce

While the chicken cooks, in a saucepan over medium heat, mix 2 tablespoons soy sauce, 3 tablespoons honey, 2 tablespoons ketchup, 1 tablespoon sesame oil, 2 cloves minced garlic, 1 tablespoon rice vinegar, and 1 teaspoon chili paste (if using). Stir continuously and simmer until the sauce thickens, about 3-5 minutes, creating a glossy coating that’s ready to embrace the chicken.

Pro Tip: Stir frequently to prevent burning the garlic, which can turn bitter—taste and adjust sweetness with a bit more honey if needed for a personalized twist on this air fryer honey sesame chicken.

Step 4: Combining and Garnishing

Once the chicken is done, transfer it to a bowl and toss it with the thickened sauce until every piece is well-coated. Immediately garnish with sesame seeds and sliced green onions for a fresh, visually appealing finish. Serve right away to enjoy the flavors at their peak.

Common Mistake to Avoid: Letting the chicken sit in the sauce too long before serving can make it soggy; toss just before plating to preserve that crispy air-fried perfection.

Serving & Presentation

Elevate your Honey Sesame Chicken (Air Fryer Recipe) with creative plating that makes it a feast for the eyes. Arrange the saucy chicken on a bed of steamed jasmine rice or quinoa for a balanced meal, using the vibrant green onions and sesame seeds as garnishes to add color and texture. For an impressive touch, drizzle a little extra sesame oil or sprinkle crushed red pepper flakes on top. This dish pairs beautifully with stir-fried vegetables, like broccoli or bell peppers, to complement its sweet-savory profile, or serve it as a main with a side of egg rolls for a full Asian-inspired spread.

Make-Ahead & Storage Solutions

For Make-Ahead Strategy, prepare the chicken coating and sauce up to 3 days in advance. Cut and coat the chicken, storing it in an airtight container in the fridge, and make the sauce separately, reheating it gently before use. This allows you to assemble and cook quickly on busy nights, maintaining the crispy air-fried magic of your honey sesame chicken.

Storing Leftovers is simple for maximum freshness: Place cooled chicken in an airtight container and refrigerate for up to 3 days, or freeze for up to 2 months. Use shallow containers to prevent sogginess, and avoid storing with excess sauce if possible.

The Best Way to Reheat is in the air fryer at 350°F for 3-5 minutes to restore the original crispy texture and flavor. If using a microwave, add a splash of water and cover to prevent drying, though it won’t be as crisp—always reheat in small batches for the best results in this honey sesame chicken air fryer recipe.

Finished recipe photo

Frequently Asked Questions (FAQ)

How do you make Honey Sesame Chicken extra crispy?

To make Honey Sesame Chicken extra crispy in the air fryer, ensure the chicken is thoroughly coated in cornstarch and avoid overcrowding the basket for proper air circulation. Patting the chicken dry before coating removes excess moisture, and flipping midway promotes even browning. This technique, central to our honey sesame chicken air fryer recipe, guarantees that irresistible crunch every time.

Can you substitute butter with oil in this recipe?

While this Honey Sesame Chicken (Air Fryer Recipe) doesn’t use butter, if you’re adapting for other recipes, sesame oil can substitute for a nutty flavor, but it’s not necessary here. For this dish, stick with sesame oil as specified to maintain authenticity and texture—swapping might alter the sauce’s consistency, so test in small batches if experimenting.

How long do you bake this in the air fryer?

For this Honey Sesame Chicken (Air Fryer Recipe), cook at 375°F for a total of 20 minutes, flipping halfway through. This timing ensures juicy, crispy results; adjust by 1-2 minutes based on your air fryer’s model, but always check for an internal temperature of 165°F to guarantee safety and perfection.

What are the best ways to store homemade Honey Sesame Chicken?

The best ways to store homemade Honey Sesame Chicken involve refrigerating leftovers in an airtight container for up to 3 days or freezing for up to 2 months. To preserve crispiness, store sauce separately and reheat in the air fryer. Always cool the chicken completely before storing to avoid condensation, keeping your air fryer honey sesame chicken fresh and flavorful.

Can I make this recipe gluten-free?

Yes, you can easily make this Honey Sesame Chicken (Air Fryer Recipe) gluten-free by swapping regular soy sauce with tamari or coconut aminos. Ensure all other ingredients, like ketchup, are gluten-free certified. This simple change maintains the dish’s integrity while making it accessible for gluten-sensitive diets.

Is this recipe suitable for meal prep?

Absolutely, this Honey Sesame Chicken is ideal for meal prep. Prepare the components ahead and store them separately, then air fry just before eating to retain crispiness. It’s a time-saver for lunches or dinners, fitting perfectly into a busy lifestyle while delivering that fresh, honey sesame flavor.

Print
clock clock iconcutlery cutlery iconflag flag iconfolder folder iconinstagram instagram iconpinterest pinterest iconfacebook facebook iconprint print iconsquares squares iconheart heart iconheart solid heart solid icon

Honey Sesame Chicken (Air Fryer Recipe)

  • Author: Chef mia
  • Prep Time: 10 minutes
  • Cook Time: 20 minutes
  • Total Time: 30 minutes
  • Yield: 4 servings 1x
  • Method: Main Dish
  • Cuisine: Asian-Inspired

Description

Dive in the crispy, succulent joy ofHoneySesame Chicken fresh from yourair fryer! This recipe combines the enticing sweetness ofhoneywith the rich, nutty flavor of sesame for a dish that is as delightful to eat as it is simple to prepare. Ideal for busy weeknights or when you crave something a little special without the fuss, this chicken will leave your taste buds singing and your family applauding your chef skills!


Ingredients

Scale
  • 1lb boneless, skinless chicken thighs, cut into bite-size pieces
  • 1/4 cupcornstarch
  • 1/2 teaspoonsalt
  • 1/4 teaspoonblack pepper
  • 2 tablespoonssoy sauce
  • 3 tablespoonshoney
  • 2 tablespoonsketchup
  • 1 tablespoonsesame oil
  • 2cloves garlic, minced
  • 1 tablespoonrice vinegar
  • 1 teaspoonchili paste (optional)
  • Sesame seeds, for garnish
  • Sliced green onions, for garnish

Instructions

  1. In a large bowl, combine chicken pieces with cornstarch, salt, and pepper until evenly coated.
  2. Preheat theair fryerto 375°F (190°C). Arrange the chicken in a single layer in theair fryerbasket. Cook for 10 minutes, flip, and cook for another 10 minutes until golden and crispy.
  3. Meanwhile, prepare the sauce by mixing soy sauce,honey, ketchup, sesame oil, minced garlic, rice vinegar, and chili paste in asaucepanover medium heat. Simmer until the sauce thickens.
  4. Toss the cooked chicken in the sauce until well-coated. Garnish with sesame seeds and green onions.
  5. Serve immediately and enjoy the burst of flavors!

Notes

Ensure the chicken is cooked in batches if theair fryerbasket is small to maintain the crispiness.For a gluten-free version, use tamari instead of regular soy sauce.


Nutrition

  • Calories: 320
  • Sugar: 10
  • Fat: 15
  • Carbohydrates: 22
  • Protein: 26

Conclusion

This Honey Sesame Chicken air fryer recipe delivers a perfect balance of sweet honey and nutty sesame flavors, making it an ideal choice for a quick, healthy weeknight dinner that satisfies cravings without the guilt. The air frying method ensures a crispy exterior while keeping the chicken juicy and tender inside. For the best results, serve it alongside steamed rice and fresh vegetables to create a complete meal. If you’d like to experiment, try swapping the chicken for tofu to make a delicious vegetarian version.