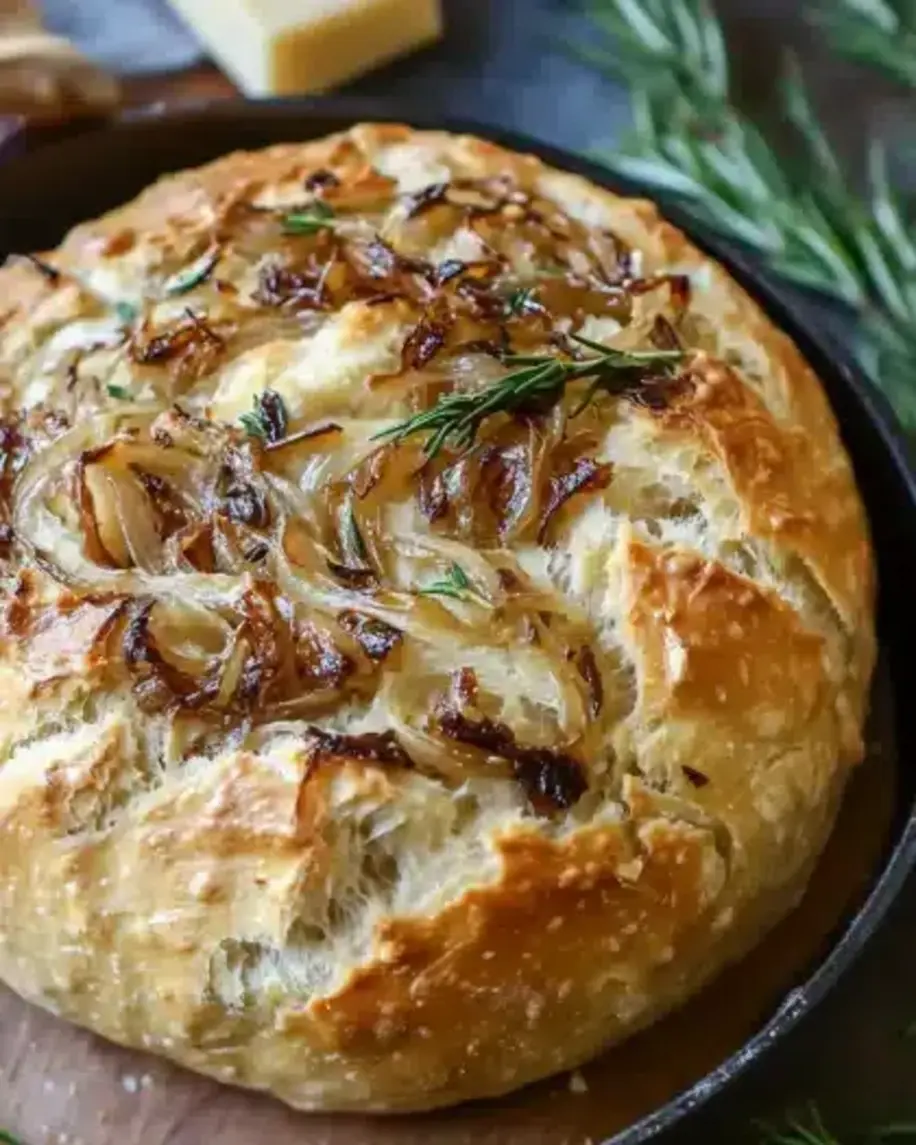
Easy Maple Frosted Apple Blondies Recipe

easy-maple-frosted-apple-blondies

Introduction

Is there anything more comforting than the smell of baked apples and warm spices filling your kitchen? Honestly, that aroma instantly transports me to crisp autumn days and cozy gatherings. If you crave that feeling but want a simpler treat than a pie, you have found your new favorite dessert. These Maple Frosted Apple Blondies deliver all the nostalgic flavor in one incredibly easy, handheld bar. Furthermore, they come together in just one bowl, meaning you spend less time cleaning and more time enjoying.

So what exactly are Maple Frosted Apple Blondies? Essentially, they are a soft, cake-like bar cookie bursting with tender apple pieces and warm cinnamon. Unlike a traditional brownie, a blondie base uses brown sugar for a rich, caramel-like flavor that perfectly complements the fruit. We then crown this spiced apple square with a velvety, homemade maple frosting. This combination matters because it captures the essence of fall in every single bite. Consequently, this recipe fits our blog’s mission to provide approachable, from-scratch baking that delivers huge flavor without complicated steps. Whether you are an experienced baker or just starting out, this recipe guides you to a guaranteed success. For another fantastic one-bowl baking project, our popular One Bowl Cinnamon Crumb Cake follows a similar, stress-free philosophy. This dessert truly shines as the perfect ending to a weeknight meal or as the star of your holiday dessert spread. Moreover, it is an excellent make-ahead option, as the flavors meld and improve overnight. For more inspiration on using seasonal apples, explore our complete guide to Classic Apple Pie and all its variations.

Why I Love This Recipe

This recipe holds a special place in my heart because it originated from a happy baking accident. I initially wanted to make apple bars but realized I had no cream cheese for my usual frosting. I quickly whipped up a simple glaze with maple syrup instead, and the result was a revelation. The pure maple flavor cut through the sweetness and added a deep, almost earthy note that made the entire dessert feel more sophisticated. Now, I intentionally make these Maple Frosted Apple Blondies for every potluck and family event because they consistently receive the most enthusiastic compliments. They remind me that the best recipes often come from a little improvisation and a lot of love.

Health and Nutrition

Why it’s good for your body

Maple Frosted Apple Blondies offer a surprisingly wholesome treat. For instance, apples provide a solid dose of soluble fiber, which actively supports healthy digestion and helps you feel full longer. Furthermore, this fiber also contributes to stable blood sugar levels, preventing those sharp energy spikes and crashes.

Additionally, using pure maple syrup instead of refined sugar introduces beneficial antioxidants and minerals like manganese and zinc. These compounds actively fight oxidative stress in your body. Consequently, you get a delicious dessert that does more than just satisfy your sweet tooth.

Moreover, the recipe often incorporates whole wheat flour, which adds extra fiber and nutrients compared to all-purpose flour. This choice makes every bite of Maple Frosted Apple Blondies more satisfying and nutrient-dense. Ultimately, you can enjoy a dessert that feels indulgent while still providing genuine nutritional value from real food ingredients.

How it fits in a healthy lifestyle

These blondies perfectly fit into a balanced approach to eating. You can absolutely enjoy them as a mindful dessert or a satisfying afternoon snack without any guilt. Think of them as a smarter choice that aligns with your wellness goals, especially when you practice portion control.

If you follow a specific dietary plan, you can easily adapt this recipe. For example, you can use a gluten-free flour blend to make it celiac-friendly. You can also explore using natural sweeteners to suit your preferences, much like the options we discuss in our guide to healthy baking substitutions. This flexibility makes Maple Frosted Apple Blondies a fantastic treat for almost everyone.

Print
clock clock iconcutlery cutlery iconflag flag iconfolder folder iconinstagram instagram iconpinterest pinterest iconfacebook facebook iconprint print iconsquares squares iconheart heart iconheart solid heart solid icon

Maple Frosted Apple Blondies

  • Author: Chef Mia

Description

Soft, chewy blondies packed with fresh apple chunks and topped with a creamy maple frosting.


Ingredients

Scale

For the Crust:

  • 1 cup all-purpose flour
  • 1/2 teaspoon baking powder
  • 1/4 teaspoon salt
  • 1/2 cup unsalted butter, melted
  • 3/4 cup brown sugar
  • 1 large egg
  • 1 teaspoon vanilla extract
  • 1 cup finely chopped apple
  • 1/2 cup chopped walnuts (optional)
  • 2 cups powdered sugar
  • 1/4 cup pure maple syrup
  • 2 tablespoons milk
  • 1/4 teaspoon cinnamon

Instructions

1. Prepare the Crust:

  1. Preheat oven to 350°F (175°C). Grease an 8×8 inch baking pan.
  2. In a medium bowl, whisk together flour, baking powder, and salt.
  3. In a large bowl, mix melted butter and brown sugar until smooth. Beat in egg and vanilla.
  4. Gradually stir dry ingredients into wet mixture until just combined. Fold in chopped apple and walnuts if using.
  5. Spread batter evenly into prepared pan. Bake for 25-30 minutes or until a toothpick comes out clean. Cool completely.
  6. For frosting, whisk powdered sugar, maple syrup, milk, and cinnamon until smooth. Spread over cooled blondies. Let set before slicing.

Notes

You can customize the seasonings to taste.

How to Prepare This Dish

Steps and time-saving tips

First, preheat your oven to 350°F and line your baking pan with parchment paper. Meanwhile, whisk your melted butter and brown sugar together in a large bowl until the mixture becomes smooth and glossy. Next, vigorously beat in the eggs and vanilla extract; this step is crucial for creating that perfect, chewy texture. Gently fold in the flour, cinnamon, and salt until the dry ingredients just disappear into the batter. Finally, stir in your finely chopped apples and any nuts you desire. Spread this beautiful, spiced batter evenly into your prepared pan. For a major time-saving tip, use a box grater to quickly shred cold butter if you forgot to melt it. Another great trick is to use a stand mixer for the initial creaming, but always switch to a spatula for folding to avoid overmixing. Bake your Maple Frosted Apple Blondies for about 30 minutes, or until the edges turn a lovely golden brown. Let the pan cool completely on a wire rack before you even think about adding the frosting.

Mistakes I’ve made and learned from

I have absolutely learned the hard way that impatience ruins these Maple Frosted Apple Blondies. My biggest mistake was slathering on the maple frosting while the base was still warm, which created a melty, soupy mess instead of a beautiful, creamy layer. Now, I never skip the complete cooling step. Another common error I made was overmixing the batter after adding the flour, which resulted in a tougher, cakier bar instead of the dense, fudgy texture we all love. I also once used an overly juicy apple variety, which made the final product a bit soggy. Thankfully, I now know that choosing the best apples for baking makes a world of difference. If you find your frosting is too thin, don’t worry, it’s an easy fix! Just add a little more powdered sugar, a tablespoon at a time. For more guidance on getting your frostings just right, my post on frosting consistency tips covers all the common pitfalls and solutions.

rc="https://exorecipes.com/wp-content/uploads/2025/08/easy-maple-frosted-apple-blondies-recipe.webp" />

Cultural Connection and Variations

Where this recipe comes from

We often trace the roots of a recipe back to a specific place, but Maple Frosted Apple Blondies tell a more seasonal story. They capture the essence of a crisp autumn day in the Northeast, where apple picking is a cherished family ritual. Consequently, home bakers always seek delicious new ways to use their bushels of fruit. This treat beautifully marries the classic, soft blondie base with the tart sweetness of fresh apples. Moreover, the maple frosting adds a distinctly North American twist, drawing on a tradition of tapping trees that long predates European settlement.

Different regions put their own spin on similar concepts. For instance, in the UK, you might find a more traditional apple cake topped with a simple glaze. Meanwhile, in France, a tarte tatin offers a more elegant, caramelized presentation. Some families stir in chopped nuts for extra crunch, while others add a pinch of nutmeg to enhance the warm spice profile. Ultimately, the beauty of these bars lies in their adaptability. Every baker infuses their Maple Frosted Apple Blondies with a little personal history, making each batch uniquely comforting.

ays-cooking">How it fits in today’s cooking

This recipe absolutely thrives in modern kitchens. It perfectly fits our love for seasonal, comforting desserts that feel both nostalgic and new. Furthermore, today’s bakers appreciate its versatility. You can easily make these blondies ahead of time for a busy week, or you can serve them as a show-stopping finale for a festive dinner party. They bridge the gap between everyday treat and special occasion dessert with effortless grace.

Many contemporary cooks also enjoy adapting the recipe to suit different dietary needs. For example, they might use a fantastic gluten-free flour blend to make it accessible to everyone. Others might explore using different apple varieties to alter the sweetness and texture. This dessert also pairs wonderfully with other fall favorites. Serving a warm blondie alongside a scoop of homemade pumpkin spice ice cream creates an unforgettable autumnal experience. Ultimately, it remains a beloved staple because it delivers so much cozy flavor in every single bite.

Taste and Texture

What makes it delicious

These Maple Frosted Apple Blondies deliver a symphony of cozy autumn flavors. First, you experience the rich, buttery base that is incredibly soft and chewy. Then, pockets of tender, sweet apple and warming cinnamon create a fragrant and comforting aroma. The real star, however, is the velvety maple frosting; its deep, caramel-like sweetness perfectly complements the spiced apple chunks. Ultimately, each bite of these Maple Frosted Apple Blondies offers a delightful contrast between the dense, moist bar and the smooth, creamy frosting that melts in your mouth.

r">Boosting the flavor

For an even more decadent treat, consider a few simple twists. Firstly, fold a handful of toasted walnuts into the batter for a satisfying crunch that contrasts the soft apples. Alternatively, a sprinkle of flaky sea salt on top of the frosting enhances the maple’s sweetness beautifully. If you adore that warm spice profile, a dash of nutmeg or cardamom will amplify the cozy feeling. For a truly next-level experience, serve a warm square à la mode with a scoop of vanilla bean ice cream. Explore more ways to enhance your baking with our guide on creating your own signature spice blends. Furthermore, if you find yourself with extra apples, our collection of stunning apple recipes offers plenty of delicious inspiration.

Tips for Success

Best practices for results

Always use room temperature ingredients, for instance, to ensure your batter comes together smoothly and evenly. Furthermore, make sure you properly drain any excess liquid from your grated apple to prevent soggy blondies. Use a light-colored metal pan for ideal heat distribution, consequently promoting a perfect bake. Chill your Maple Frosted Apple Blondies before slicing, as this guarantees clean, beautiful squares every single time.

>Mistakes to avoid

Avoid overmixing the batter once you add the dry ingredients, otherwise you risk developing too much gluten and creating a tough texture. Moreover, do not skip lining your pan with parchment paper, as this crucial step is the easiest way to guarantee easy removal. If your frosting seems too thin, simply reference our guide on fixing frosting consistency for a quick solution. Similarly, ensure your blondies cool completely before frosting them to prevent a melted, messy top layer; this is a key principle we emphasize in our baking science 101 article.

Serving and Pairing Suggestions

How to serve this dish

Present your Maple Frosted Apple Blondies warm for a truly comforting experience. For a beautiful finish, drizzle extra maple glaze over the top just before serving. Additionally, a light dusting of cinnamon or a few thin apple slices makes a gorgeous, festive garnish. These blondies truly shine at holiday gatherings or as a special weekend brunch treat. Finally, serve them on a rustic wooden board to create a cozy, inviting atmosphere for your guests.

What goes well with it

A hot mug of spiced chai tea makes a perfect companion, as its warm spices echo the autumnal flavors in the Maple Frosted Apple Blondies. For a decadent dessert pairing, consider a scoop of vanilla bean ice cream; its cool creaminess creates a wonderful contrast with the soft, warm bars. Moreover, a freshly brewed pot of our classic Pumpkin Spice Latte enhances the cozy, seasonal spirit of this dessert. Ultimately, you can also balance the sweetness with a lighter side, such as our refreshing Autumn Kale Salad, for a delightful brunch spread.

rc="https://s3-placid.s3.eu-central-1.amazonaws.com/production/rest-images/rawp1noeia0hh/int-e3f12750545c85bc14ab82c7a2eb6317-gzzio8rb.jpg" />

What is the best type of apple to use in Maple Frosted Apple Blondies?

For the best texture and flavor, use a firm, tart apple variety like Granny Smith or Honeycrisp. These apples hold their shape during baking and provide a pleasant contrast to the sweet, rich maple frosting on your blondies. Avoid very soft apples like Red Delicious, as they can become mushy.

Can I make Maple Frosted Apple Blondies ahead of time?

Absolutely! These blondies are an excellent make-ahead dessert. You can bake them and store the unfrosted bars in an airtight container at room temperature for up to 2 days, or freeze them for a month. Simply add the maple frosting just before serving for the best texture.

ank-math-faq-item"> How do I store leftover Maple Frosted Apple Blondies?

Store any leftover Maple Frosted Apple Blondies in a single layer in an airtight container. Because of the perishable dairy in the frosting, it’s best to keep them in the refrigerator where they will stay fresh for up to 5 days. Let them come to room temperature for about 15 minutes before serving for the best flavor.

Can I substitute the maple syrup in the frosting?

For an authentic flavor, pure maple syrup is highly recommended as it defines the character of these blondies. In a pinch, you could use honey, but the taste will be noticeably different. Avoid using pancake syrup, as it often contains artificial flavors and corn syrup that will alter the taste and texture of your frosting.

Easy Honey Mustard Baked Salmon Recipe

easy-honey-mustard-baked-salmon

Introduction

Do you ever crave a restaurant-quality dinner that you can actually make on a busy weeknight without any stress? You are certainly not alone. Moreover, we all need a meal that feels both incredibly special and surprisingly simple to prepare. This dream becomes a delicious reality with a perfectly prepared fillet of Honey Mustard Baked Salmon. It is the ultimate solution for a nutritious, flavorful, and utterly satisfying meal that will have everyone at your table asking for seconds.

Honey Mustard Baked Salmon is a culinary classic for a very good reason. It features a tender, flaky salmon fillet coated in a vibrant, tangy-sweet glaze that caramelizes beautifully in the oven. This dish matters because it perfectly balances gourmet taste with undeniable ease, making it an ideal choice for both regular weeknights and impressive dinner parties. Furthermore, it aligns perfectly with our blog’s mission to deliver approachable, healthy, and delicious recipes that real people can successfully make. The magic of this Honey Mustard Baked Salmon lies in its simple sauce; a powerful combination of whole grain mustard, smooth Dijon, raw honey, and a hint of lemon juice that creates a complex flavor profile which complements the rich salmon without overpowering it. Consequently, you get a meal that is packed with omega-3 fatty acids and protein, proving that healthy eating does not have to be boring. If you are looking for another fantastic way to prepare this versatile fish, our guide on how to cook salmon covers all the essential methods. This recipe for Honey Mustard Baked Salmon truly embodies our philosophy that the best meals are both nourishing and a joy to eat. For a complete meal, pair it with a simple side; our incredibly popular garlic herb roasted potatoes are the perfect companion to this flavorful main course.

Why I Love This Recipe

This Honey Mustard Baked Salmon recipe holds a special place in my heart because it was the first meal I ever confidently cooked for my now-husband when we were dating. I remember wanting to make something that looked impressive but was secretly foolproof, and this dish delivered completely. The look on his face after that first bite, a mix of surprise and delight, is a core memory for me. Now, we make this Honey Mustard Baked Salmon at least twice a month because it consistently delivers incredible flavor and brings back those happy early memories every single time.

Health and Nutrition

Why it’s good for your body

This Honey Mustard Baked Salmon delivers a powerful nutritional punch. First and foremost, salmon serves as a top-tier source of omega-3 fatty acids. Consequently, these essential fats powerfully support brain function and actively reduce inflammation throughout your body. Moreover, they significantly promote heart health by helping to lower blood pressure and balance cholesterol levels.

Additionally, the honey mustard glaze does more than just add flavor. For instance, honey provides natural antioxidants, while mustard contributes its own anti-inflammatory properties. Therefore, this combination not only tastes incredible but also boosts the meal’s overall health profile. Furthermore, salmon is packed with high-quality protein, which is absolutely vital for building and repairing muscle tissue.

Beyond that, you will find a wealth of essential vitamins and minerals in every serving. Specifically, you get a substantial dose of Vitamin D for bone health and B vitamins for sustained energy production. Ultimately, choosing this Honey Mustard Baked Salmon means you are enjoying a meal that is as nutritious as it is delicious. Finally, its rich nutrient profile makes it a fantastic choice for supporting your overall well-being.

How it fits in a healthy lifestyle

This Honey Mustard Baked Salmon seamlessly fits into almost any healthy eating plan. It naturally aligns with a gluten-free lifestyle, making it a safe and satisfying option for those with sensitivities. For anyone focused on heart health, the omega-3s in salmon are a celebrated superstar, actively working to support cardiovascular function.

If you are managing your weight, the high protein content helps you feel full and satisfied longer, which can prevent unnecessary snacking. It is also an excellent choice for a high-protein diet, providing the necessary building blocks for muscle recovery after a workout. Fitting this dish into your weekly rotation is a simple strategy for eating well without sacrifice.

Pair your salmon with a side of roasted asparagus for a fiber-rich meal, or serve it over a bed of quinoa salad for extra plant-based protein. This flexibility makes it perfect for a quick weeknight dinner or for meal prepping a healthy lunch for the week ahead.

Print
clock clock iconcutlery cutlery iconflag flag iconfolder folder iconinstagram instagram iconpinterest pinterest iconfacebook facebook iconprint print iconsquares squares iconheart heart iconheart solid heart solid icon

Honey Mustard Baked Salmon

  • Author: Chef Mia

Description

A simple yet elegant baked salmon dish with a sweet and tangy honey mustard glaze that caramelizes beautifully in the oven.


Ingredients

Scale

For the Crust:

  • 4 (6 oz) salmon fillets
  • 1/4 cup Dijon mustard
  • 2 tablespoons honey
  • 1 tablespoon olive oil
  • 1 clove garlic, minced
  • 1/2 teaspoon paprika
  • Salt and black pepper to taste
  • Fresh parsley for garnish

Instructions

1. Prepare the Crust:

  1. Preheat oven to 400°F (200°C). Line a baking sheet with parchment paper.
  2. In a small bowl, whisk together Dijon mustard, honey, olive oil, minced garlic, paprika, salt, and pepper.
  3. Place salmon fillets on the prepared baking sheet. Brush the honey mustard mixture evenly over the top of each fillet.
  4. Bake for 12-15 minutes, or until salmon flakes easily with a fork and the glaze is caramelized.
  5. Garnish with fresh parsley before serving.

Notes

You can customize the seasonings to taste.

How to Prepare This Dish

Steps and time-saving tips

First, preheat your oven to 400°F and line a baking sheet with parchment paper for effortless cleanup. Pat your salmon fillets completely dry with paper towels; this crucial step helps the skin get beautifully crisp. Meanwhile, whisk together the honey, Dijon mustard, a splash of olive oil, and a squeeze of lemon juice in a small bowl. Consequently, you will create a perfectly balanced, glossy glaze. Generously season the fillets with salt and pepper, then place them skin-side down on your prepared baking sheet. Next, spoon the honey mustard mixture over the top of each piece, spreading it into an even layer with the back of your spoon. Importantly, let the salmon bake for about 12-15 minutes, depending on thickness. For a quick time-saving tip, you can mix the glaze directly in a measuring cup to minimize dishes. Finally, check for doneness by gently flaking the thickest part with a fork; it should be opaque and moist. Let the salmon rest for a couple of minutes before serving to allow the juices to redistribute. Ultimately, this process delivers a restaurant-quality meal with minimal effort on any busy weeknight.

and-learned-from">Mistakes I’ve made and learned from

I have definitely learned a few lessons the hard way with this Honey Mustard Baked Salmon. Initially, I used to skip patting the fillets dry, which resulted in a steamed, rather than baked, texture and a sadly diluted glaze that just slid right off. Now, I never skip that simple paper towel step. Another common error was overbaking, which can turn this luxurious fish dry and chalky in mere minutes. I finally invested in an instant-read thermometer to take the guesswork out of it, ensuring my salmon is perfectly flaky every single time. For more guidance on getting fish just right, my post on seafood cooking times breaks down all the specifics. Furthermore, I once made the glaze far too acidic by using straight lemon juice without the balancing sweetness of honey, a true palate-puckering experience! Getting that sweet-tangy ratio correct is everything. If you’re looking for more ways to master simple sauces, my guide on sauce basics has you completely covered.

Cultural Connection and Variations

Where this recipe comes from

This particular Honey Mustard Baked Salmon recipe feels like a cozy culinary handshake between continents. Many cultures, from the Nordic fjords to the Pacific Northwest, cherish salmon as a centerpiece. However, they each bring their own signature twist. For instance, my family’s version leans on a sharp Dijon for its base, a nod to French culinary elegance. Conversely, my friend’s Swedish grandmother always adds a generous spoonful of fresh dill to her marinade. Meanwhile, across the Atlantic, a British pub might serve its version with a malt vinegar glaze for that characteristic tang.

Personally, this dish a

nchors our family’s weekly rotation. It’s our go-to for a fast, yet special, weeknight dinner. I always remember my aunt preparing her legendary Honey Mustard Baked Salmon for festive gatherings. She would insist on using local honey from her neighbor’s hives. Consequently, the entire meal tasted like a celebration of our community. This simple act taught me that food truly connects us to people and place.

How it fits in today’s cooking

This classic dish absolutely thrives in modern kitchens. Busy home cooks love it because it delivers immense flavor with minimal effort. Furthermore, its high protein and healthy fat profile align perfectly with today’s nutritional goals. Many people now adapt the recipe to fit specific diets; for example, they might substitute sugar-free maple syrup for honey. You can easily pair this salmon with a light simple arugula salad for a quick lunch.

Its versatility also makes it a star for entertaining. Ultimately, it feels both gourmet and approachable. You often find it as the main course for holiday feasts or elegant dinner parties. Additionally, its preparation is wonderfully simple, leaving you more time to enjoy with your guests. For a truly show-stopping meal, serve it alongside some garlic herb dinner rolls. This combination guarantees a memorable and delicious experience for everyone at your table.

>Taste and Texture

What makes it delicious

This Honey Mustard Baked Salmon delivers a perfect harmony of sweet and savory in every single bite. The honey caramelizes beautifully in the oven, creating a glossy, slightly sticky glaze that packs a flavorful punch. Meanwhile, the mustard provides a gentle, tangy kick that cuts through the richness. You get a wonderfully flaky and tender texture from the salmon that simply melts in your mouth. Additionally, the aroma that fills your kitchen is absolutely irresistible, blending sweet honey with sharp, fragrant mustard. Ultimately, the contrast between the sweet glaze and the savory, moist fish makes this dish a true standout.

Boosting the flavor

For an extra layer of flavor, consider adding a sprinkle of smoked paprika or a pinch of cayenne pepper to the honey mustard mix. Furthermore, topping the finished dish with fresh, chopped herbs like dill or parsley introduces a bright, fresh element that complements the sauce beautifully. Alternatively, a squeeze of fresh lemon juice just before serving can heighten all the other flavors. If you want to turn this into a complete meal, consider serving it alongside a simple, elegant side. For instance, our perfect Roasted Asparagus makes a fantastic pairing. Finally, a creamy sauce can take it to the next level; our easy Lemon Dill Sauce drizzled over top is a game-changer.

Tips for Success

Best practices for results

Pat the salmon fillets completely dry with a paper towel before applying the marinade. This crucial step helps the honey mustard mixture cling to the fish instead of sliding off. Furthermore, always let your Honey Mustard Baked Salmon marinate for at least twenty minutes. Consequently, the flavors will penetrate deeply into the fish for a more delicious result. For the best texture, use a digital meat thermometer to check for doneness. Finally, allow the salmon to rest for five minutes after baking so the juices can redistribute.

Mistakes to avoid

Avoid baking your salmon in a cold oven. Always preheat your oven first so the fish cooks evenly from the moment it goes in. Otherwise, you might end up with a piece that is overcooked on the outside and undercooked within. Many home cooks also overbake their fish, which results in a dry and tough texture. Instead, pull the Honey Mustard Baked Salmon from the oven when it is just opaque and flakes easily. For more guidance, our article on perfect baked salmon covers internal temperatures in detail. Additionally, do not use a metallic bowl to mix your marinade if it contains acidic ingredients like mustard and lemon juice. Instead, opt for a glass or ceramic dish to prevent any metallic aftertaste, a tip we also share in our guide to common marinade mistakes.

Serving and Pairing Suggestions

How to serve this dish

Impress your guests by plating your Honey Mustard Baked Salmon on a beautiful white platter. For a final touch, arrange fresh lemon wedges and a sprinkle of finely chopped parsley or dill around the fillets. This simple garnish adds a vibrant pop of color and freshness that makes the dish look absolutely restaurant-quality. Furthermore, this elegant presentation makes it perfect for a special date night or a holiday gathering. Alternatively, you can serve it family-style right from the baking sheet for a more casual weeknight dinner. Ultimately, the glossy, caramelized glaze of the Honey Mustard Baked Salmon always makes it the star of the table.

h-it">What goes well with it

For a light and healthy meal, pair your Honey Mustard Baked Salmon with a crisp side salad. A simple arugula salad with a lemon vinaigrette beautifully cuts through the richness of the glaze. Additionally, you will love serving it alongside a hearty portion of our perfect garlic herb roasted potatoes; their crispy exterior and fluffy interior soak up the delicious sauce wonderfully. Finally, a chilled glass of unoaked Chardonnay or a crisp Pinot Grigio complements the savory-sweet flavors of the salmon perfectly. For a non-alcoholic option, try sparkling water with a squeeze of fresh lime. Moreover, a slice of our famous lemon pound cake makes for a wonderfully zesty and sweet dessert to follow this fantastic meal.

What temperature should salmon be baked at?

For perfect Honey Mustard Baked Salmon, bake it at 400°F (200°C). This high temperature ensures a flaky, tender interior while helping the honey mustard glaze caramelize beautifully on the outside. Cooking at this heat typically takes 12-15 minutes for a standard fillet.

ank-math-faq-item"> How do you know when baked salmon is done?

Honey Mustard Baked Salmon is done when it flakes easily with a fork and has an internal temperature of 145°F (63°C). The flesh will change from a translucent dark pink to an opaque light pink. You can also check by gently pressing the top; it should feel firm but still give slightly.

Can I use Dijon mustard instead of yellow mustard for honey mustard sauce?

Absolutely, Dijon mustard is an excellent substitute and will create a more complex, tangy flavor profile for your Honey Mustard Baked Salmon. Dijon blends seamlessly with honey, creating a sophisticated glaze that complements the richness of the fish. Many chefs actually prefer Dijon for its smoother texture and depth of flavor.

What sides go well with honey mustard salmon?

Classic pairings for Honey Mustard Baked Salmon include roasted asparagus, garlic mashed potatoes, or a fresh quinoa salad. The sweet and tangy notes of the glaze also pair wonderfully with roasted sweet potatoes or a simple arugula salad. These sides balance the flavors and create a complete, satisfying meal.

div>

Easy Rosemary Garlic Pull Apart Bread Recipe

easy-rosemary-garlic-pull-apart-bread

Introduction

Is there anything more comforting than the smell of fresh bread baking in your oven? Honestly, I think not. That warm, herbal aroma of rosemary and garlic completely transforms a kitchen into the heart of the home. Today, we are making the ultimate shareable comfort food: Rosemary Garlic Pull Apart Bread. This recipe promises not only incredible flavor but also a truly fun and interactive baking experience that will absolutely wow everyone at your table.

Rosemary Garlic Pull Apart Bread is a savory, soft, and fluffy yeast bread. Bakers cut the dough into small pieces, coat them in a luxurious herb-infused butter, and then layer them in a pan. As the bread bakes, the pieces fuse together into one glorious loaf. However, the magic truly happens when you serve it. Guests simply pull apart soft, steaming chunks of bread, making it the ultimate centerpiece for any gathering. This recipe matters because it demystifies yeast breads. It proves that you can create something stunningly impressive without any advanced pastry skills. Furthermore, the process is as enjoyable as the final product. This recipe fits our blog’s mission perfectly because we champion approachable recipes that deliver restaurant-quality results. If you want to explore another fantastic bread recipe, our Easy Homemade Focaccia is a wonderful place to start. The combination of fragrant rosemary and pungent garlic is a classic for a very good reason. It is a timeless pairing that evokes a sense of rustic, hearty warmth. Ultimately, this Rosemary Garlic Pull Apart Bread is more than a side dish. It is an event that encourages conversation and connection over good food. For a perfect pairing, consider serving it alongside a cozy meal like our Creamy Tuscan Chicken.

Why I Love This Recipe

This Rosemary Garlic Pull Apart Bread holds a special place in my heart because it was the first bread I ever mastered. I remember the immense pride I felt pulling that golden, fragrant loaf from my oven for a family dinner. The look of pure joy on everyone’s faces as they dug in and started pulling off pieces is a core memory for me. Now, I make it for every potluck and holiday because it never fails to create a moment of shared happiness and deliciousness.

Health and Nutrition

Why it’s good for your body

Rosemary Garlic Pull Apart Bread offers more than just incredible flavor. For instance, fresh rosemary provides powerful antioxidants that help combat inflammation. Additionally, garlic contains allicin, a compound known for its immune-boosting properties. Consequently, each savory bite supports your body’s natural defenses.

This bread also delivers a comforting source of energy. Moreover, the carbohydrates from the flour fuel your daily activities. Furthermore, when you enjoy Rosemary Garlic Pull Apart Bread, you benefit from the healthy fats in the olive oil, which promote heart health. Therefore, this recipe transforms a simple indulgence into a more mindful choice.

Ultimately, you can feel good about sharing this homemade bread. In fact, making it yourself allows you to control the quality of ingredients, avoiding unnecessary preservatives. So, while you savor the aromatic blend of herbs, your body reaps the rewards. Rosemary Garlic Pull Apart Bread truly is a tasty way to nourish yourself.

How it fits in a healthy lifestyle

Enjoying Rosemary Garlic Pull Apart Bread fits perfectly into a balanced approach to eating. Think of it as a flavorful accompaniment to a nutrient-rich meal rather than the main event. Pair a single serving with a large Mediterranean Quinoa Bowl or a hearty vegetable soup to create a satisfying and well-rounded plate. This way, you get the comforting taste of fresh bread alongside a powerful punch of vitamins and fiber.

For those mindful of their diet, moderation is your best tool. You can absolutely savor this bread while working towards your wellness goals. Baking it at home empowers you to make simple swaps, like using whole wheat flour for added fiber or reducing salt without sacrificing taste. Remember, a healthy lifestyle embraces all foods. If you’re looking for another gut-friendly option that incorporates fresh herbs, you might also love our Easy Homemade Tzatziki as a light dip or spread.

Print
clock clock iconcutlery cutlery iconflag flag iconfolder folder iconinstagram instagram iconpinterest pinterest iconfacebook facebook iconprint print iconsquares squares iconheart heart iconheart solid heart solid icon

Rosemary Garlic Pull Apart Bread

  • Author: Chef Mia

Description

A savory, aromatic bread with layers of garlic and rosemary butter that pull apart easily for sharing.


Ingredients

Scale

For the Crust:

  • 3 cups all-purpose flour
  • 1 packet (2 1/4 tsp) active dry yeast
  • 1 cup warm milk
  • 2 tbsp sugar
  • 1 tsp salt
  • 1/2 cup melted butter
  • 4 cloves garlic, minced
  • 2 tbsp fresh rosemary, chopped

Instructions

1. Prepare the Crust:

  1. Combine warm milk, sugar, and yeast; let sit 5 minutes until foamy.
  2. Mix flour and salt in a bowl, add yeast mixture, and knead into a smooth dough. Let rise 1 hour.
  3. Mix melted butter, garlic, and rosemary. Roll dough into small balls, coat in butter mixture, and layer in a greased loaf pan. Let rise 30 minutes.
  4. Bake at 350°F (175°C) for 25-30 minutes until golden. Cool slightly before serving.

Notes

You can customize the seasonings to taste.

s-dish">How to Prepare This Dish

Steps and time-saving tips

First, whisk together your warm milk, yeast, and a pinch of sugar in a large bowl. Let this mixture sit for about five minutes until it becomes frothy. Meanwhile, melt your butter and finely chop the fresh rosemary. Combine the flour and salt in a separate bowl. Pour the yeast mixture, melted butter, and rosemary into the dry ingredients. Stir everything together with a wooden spoon until a shaggy dough forms. Turn the dough out onto a lightly floured surface and knead it for a solid five to seven minutes. You want the dough to feel smooth and elastic. Place the dough back into a greased bowl, cover it with a clean towel, and let it rise in a warm spot for roughly one hour, or until it has doubled in size. This is a great time to prepare your garlic butter filling. Simply mix softened butter with minced garlic, parsley, and a bit of salt. Punch the risen dough down and roll it out into a large rectangle on your floured counter. Spread the garlic butter mixture evenly over the entire surface. Cut the dough into small squares and stack them loosely into your greased loaf pan. Let the pan sit for a second, shorter rise of about 30 minutes. Finally, bake your Rosemary Garlic Pull Apart Bread until it is golden brown and your kitchen smells incredible.

Mistakes I’ve made and learned from

I have absolutely rushed the first rise in my excitement to get this bread baking. The result was a disappointingly dense loaf that didn’t have that amazing pull-apart texture. Now, I always wait for the dough to truly double in size, no matter how long it takes. Another common error was using butter that was too cold for the filling. It tore the delicate dough and created a huge mess instead of lovely, distinct layers. Ensuring your butter is properly softened makes the spreading process so much easier and leads to a better final product. For more on getting dough consistency just right, my guide on common baking mistakes covers this in detail. Also, if your yeast mixture doesn’t foam, your bread won’t rise properly. This usually means your liquid was too hot and killed the yeast. For a deeper dive into working with yeast, check out my tips for working with yeast to ensure success every time.

n-and-variations">Cultural Connection and Variations

Where this recipe comes from

Pull apart breads tell a beautiful story of community and sharing. While many cultures boast their own version, the combination of rosemary and garlic feels deeply rooted in the rustic kitchens of the Mediterranean. Imagine Italian nonnas and Provençal home cooks tearing into a warm, fragrant loaf at the center of a large family table. Their versions might use a classic focaccia dough or even incorporate olives and sun-dried tomatoes. Conversely, this style of bread also finds a cozy home in American potlucks and holiday gatherings, where its interactive, shareable nature makes everyone feel included.

In my own family, we always prepare this recipe for big Sunday dinners. My aunt, however, adds a unique twist by weaving sharp cheddar cheese into the layers. Some Brazilian cooks might add a touch of catupiry cheese, while a German variation could feature caraway seeds alongside the rosemary. Ultimately, the magic of this Rosemary Garlic Pull Apart Bread lies in its adaptability. It warmly welcomes these personal and regional touches, creating a new story with every bake.

How it fits in today’s cooking

This bread perfectly fits our modern desire for food that is both comforting and Instagram-worthy. Furthermore, its simple, mix-and-assemble process makes it ideal for contemporary home bakers who want impressive results without professional skills. You can easily adapt this Rosemary Garlic Pull Apart Bread for a weeknight treat or a festive centerpiece. For instance, many cooks now use a stand mixer to simplify the dough preparation, saving precious time for other tasks.

It seamlessly transitio

ns from a summer barbecue side to the star of a cozy winter soup night. Moreover, this recipe pairs wonderfully with so many dishes. For a perfect pairing, consider serving it alongside a hearty creamy tomato bisque. If you have a sweet tooth, you can even apply the same pull-apart technique to create a stunning dessert, like a decadent cinnamon roll pull apart bread. Ultimately, its enduring appeal proves that some traditions only get better with time.

Taste and Texture

What makes it delicious

This Rosemary Garlic Pull Apart Bread greets you with an incredibly fragrant aroma first. Fresh rosemary and roasted garlic create a savory, herbaceous scent that fills your kitchen. As you pull apart a soft piece, you experience a wonderful contrast. The exterior boasts a slightly crisp, golden crust that gives way to an impossibly soft, fluffy, and chewy interior. Each buttery layer melts in your mouth, delivering bursts of savory garlic and earthy rosemary. Ultimately, the warm, savory, and comforting flavors make this Rosemary Garlic Pull Apart Bread utterly irresistible.

Boosting the flavor

Fortunately, you can easily elevate this already delicious bread with a few creative twists. For a richer, deeper flavor, try swapping the fresh garlic for a teaspoon of roasted garlic powder. Similarly, a sprinkle of grated parmesan cheese or a drizzle of truffle oil over the top before baking adds a luxurious, savory note. Furthermore, serving it with a side of marinara sauce for dipping transforms it into a crowd-pleasing appetizer. For a complete meal, pair it with a fresh, crisp salad like our Classic Caesar Salad. Alternatively, a cup of our Creamy Tomato Basil Soup makes for the ultimate comforting combination.

rc="https://exorecipes.com/wp-content/uploads/2025/08/easy-rosemary-garlic-pull-apart-bread.webp" />

Tips for Success

Best practices for results

Always use fresh rosemary for the most vibrant flavor in your Rosemary Garlic Pull Apart Bread. Furthermore, make sure your milk is warm but not hot to properly activate the yeast. Gently warm your butter and garlic together to infuse the fat before brushing it on the dough. Additionally, use a sharp knife or bench scraper to cut the dough squares cleanly for the best rise. Finally, always let the baked bread rest for a few minutes before pulling it apart.

Mistakes to avoid

Avoid using old yeast, as this will prevent your dough from rising properly. Consequently, your bread will turn out dense. Instead, always proof your yeast in warm liquid to ensure it is active. Moreover, do not overwork the dough when adding the flour, or you will develop too much gluten. For more guidance, our article on common baking mistakes covers this in detail. Also, resist the urge to underbake the loaf; the top should be a deep golden brown. If you are unsure about doneness, use a thermometer to check that the internal temperature reaches 190°F. For perfect results every time, follow our complete guide to yeast bread basics.

g-suggestions">Serving and Pairing Suggestions

How to serve this dish

Present your freshly baked Rosemary Garlic Pull Apart Bread right in its warm baking dish for a wonderfully rustic and inviting tablescape. Moreover, place a small bowl of high-quality olive oil or a flavored dipping oil alongside it for a truly interactive experience. For special occasions like holiday gatherings, you can easily elevate this dish by scattering fresh rosemary sprigs and a few whole garlic cloves around the platter. Ultimately, this beautiful presentation makes the Rosemary Garlic Pull Apart Bread a stunning centerpiece that guests will adore.

What goes well with it

This savory bread pairs exceptionally well with a rich, creamy soup for dipping. For instance, try it with our classic Creamy Tomato Basil Soup; the bright acidity beautifully cuts through the garlic and herb richness. Alternatively, serve it as a spectacular starter before a main course. Subsequently, it makes the perfect accompaniment to a cozy meal like our hearty One Pot Chicken Marsala. Finally, a crisp, chilled glass of Sauvignon Blanc or a light-bodied Pinot Noir wonderfully complements the aromatic herbs in every pull.

math-faq-block">
Can I make Rosemary Garlic Pull Apart Bread ahead of time?

Yes, you can prepare this bread ahead of time. After assembling the dough pieces in the pan, cover it tightly and refrigerate for up to 24 hours. When you’re ready, let the pan sit at room temperature for 30 minutes before baking your Rosemary Garlic Pull Apart Bread.

What is the best way to reheat pull apart bread?

The best way to reheat Rosemary Garlic Pull Apart Bread is to wrap it in foil and warm it in a 350°F (175°C) oven for 10-15 minutes. For a crispier top, you can unwrap it for the last few minutes of heating. Avoid the microwave, as it will make the bread soft and chewy instead of warm and crispy.

Can I use dried rosemary instead of fresh?

You can substitute dried rosemary, but use only one-third the amount of fresh called for, as dried herbs have a more concentrated flavor. For the best flavor, we highly recommend using fresh rosemary in your Rosemary Garlic Pull Apart Bread, as it provides a brighter, more aromatic quality.

ank-math-faq-item"> What can I serve with garlic rosemary bread?

This savory bread pairs wonderfully with pasta dishes, soups like tomato or minestrone, and salads. It also makes a fantastic appetizer on its own or served alongside a dipping oil with balsamic vinegar and grated Parmesan cheese.

Best Pumpkin Snickerdoodles Recipe

best-pumpkin-snickerdoodles-recipe

Introduction

Is there anything more comforting than the scent of warm spices and pumpkin wafting through your kitchen? Honestly, that aroma instantly signals the arrival of cozy sweaters and crisp autumn air. Furthermore, it promises a deliciously soft and chewy treat that perfectly captures the season’s spirit. Today, we’re taking that iconic fall feeling and rolling it into one irresistible cookie. Get ready to fall head over heels for the ultimate autumnal bake: these spectacular Pumpkin Snickerdoodles.

So, what exactly are Pumpkin Snickerdoodles? Essentially, they are the beloved, cinnamon-sugar coated classic cookie we all adore, but with a wonderfully moist and flavorful twist from pumpkin puree and warm baking spices. This simple addition transforms the entire experience. The pumpkin not only contributes its signature earthy sweetness but also creates an incredibly soft, cake-like texture that makes these cookies truly special. Moreover, this recipe matters because it seamlessly bridges the gap between timeless tradition and seasonal innovation. Everyone recognizes a snickerdoodle, but the pumpkin version feels like a exciting and delicious upgrade. Consequently, it fits our blog’s tone perfectly, as we always strive to share approachable recipes that feel both familiar and new. For more classic inspiration that everyone should master, consider our perfect Classic Chocolate Chip Cookies. This particular recipe, however, delivers all the nostalgic joy of baking with a heartwarming dose of autumn. Ultimately, it’s a simple yet impressive cookie that is absolutely perfect for sharing. Whether you’re looking for a fun baking project or the ideal treat to bring to a fall gathering, these Pumpkin Snickerdoodles will undoubtedly become a seasonal staple in your home. For another fantastic pumpkin-based dessert that highlights the versatility of this ingredient, you must try our incredibly popular Pumpkin Cheesecake Bars.

Why I Love This Recipe

This recipe holds a special place in my heart because it truly marks the official start of fall in my home. Every year, as soon as the leaves begin to turn, my family starts asking for them. I love how the simple act of making these Pumpkin Snickerdoodles fills the entire house with the most incredible aroma of cinnamon and pumpkin, creating an instant sense of warmth and comfort. Seeing the joy on my kids’ faces when they get to roll the dough in that cinnamon-sugar mixture is a memory I cherish each season. They are my absolute go-to cookie for welcoming autumn, and that first warm, chewy bite never fails to make me smile.

Health and Nutrition

Why it’s good for your body

These Pumpkin Snickerdoodles offer a delightful twist on a classic cookie with some impressive nutritional perks. First and foremost, pumpkin puree packs a powerful punch of beta-carotene, which your body converts into immune-boosting Vitamin A. Furthermore, this key ingredient adds a significant amount of dietary fiber, which actively supports healthy digestion and helps you feel satisfied. Consequently, you can enjoy a sweet treat that contributes to your overall wellness.

Moreover, the warming spices like cinnamon and nutmeg do more than just create that iconic cozy flavor. In fact, cinnamon possesses natural anti-inflammatory properties and may help regulate blood sugar levels. Therefore, each bite of these Pumpkin Snickerdoodles delivers more than just taste; it provides functional benefits. Additionally, when you compare them to many other holiday cookies, these spiced delights often contain less sugar overall, making them a smarter choice. Ultimately, you are treating yourself to a dessert that thoughtfully combines flavor and function in every single bite.

How it fits in a healthy lifestyle

Enjoying Pumpkin Snickerdoodles fits perfectly into a balanced approach to eating. Think of them not as a forbidden treat but as a mindful indulgence you can savor. You can easily make them a part of your day by pairing one with a protein source, like a handful of almonds or a glass of milk, for a more satisfying snack that keeps your energy stable. This strategy helps prevent overindulgence while still letting you enjoy the flavors you love.

For those with specific dietary needs, you can adapt this recipe to suit your goals. You can use a 1:1 gluten-free flour blend to make them celiac-friendly without sacrificing texture. If you are exploring more ways to incorporate wholesome ingredients into your desserts, our guide on healthy baking substitutions is a fantastic resource. Remember, a healthy lifestyle is all about balance and finding joy in your food. For another great recipe that uses similar warm spices in a nutritious way, check out our popular vegan pumpkin bread.

Print
clock clock iconcutlery cutlery iconflag flag iconfolder folder iconinstagram instagram iconpinterest pinterest iconfacebook facebook iconprint print iconsquares squares iconheart heart iconheart solid heart solid icon

Pumpkin Snickerdoodles

  • Author: Chef Mia

Description

Soft, chewy cookies with warm pumpkin spice flavor and a classic snickerdoodle cinnamon-sugar coating.


Ingredients

Scale

For the Crust:

  • 2 3/4 cups all-purpose flour
  • 2 tsp cream of tartar
  • 1 tsp baking soda
  • 1/2 tsp salt
  • 1 cup unsalted butter, softened
  • 1 1/2 cups granulated sugar
  • 3/4 cup pumpkin puree
  • 1 large egg
  • 2 tsp vanilla extract
  • 2 tsp pumpkin pie spice
  • 1/3 cup granulated sugar (for rolling)
  • 1 tbsp ground cinnamon (for rolling)

Instructions

1. Prepare the Crust:

  1. Preheat oven to 350°F (175°C). Line baking sheets with parchment paper.
  2. Whisk together flour, cream of tartar, baking soda, salt, and pumpkin pie spice in a medium bowl.
  3. Cream butter and 1 1/2 cups sugar until light and fluffy. Beat in pumpkin puree, egg, and vanilla until well combined.
  4. Gradually mix in dry ingredients until just combined. Chill dough for 30 minutes.
  5. Mix remaining 1/3 cup sugar with cinnamon in a small bowl. Scoop dough, roll into balls, and coat in cinnamon-sugar mixture.
  6. Place on prepared baking sheets and bake for 10-12 minutes until edges are set. Cool on wire racks.

Notes

You can customize the seasonings to taste.

How to Prepare This Dish

Steps and time-saving tips

First, grab a large bowl and whisk together your dry ingredients. Meanwhile, use a stand mixer with a paddle attachment to cream the softened butter and both sugars until the mixture becomes light and fluffy. Next, beat in the pumpkin puree, egg, and vanilla until everything is just combined. Gradually add your flour mixture to the wet ingredients on a low speed. However, be careful not to overmix the dough. Consequently, your cookies will stay wonderfully soft. For a major time-saving tip, simply cover the bowl with plastic wrap and chill the dough for at least 30 minutes. Meanwhile, you can clean up and preheat your oven to 350°F. Furthermore, prepare your cinnamon-sugar coating in a small bowl. Then, roll tablespoon-sized portions of dough into balls before rolling them generously in the spiced sugar. Finally, place them on a parchment-lined baking sheet, flatten them slightly, and bake for 10-12 minutes. Let the cookies cool on the sheet for five minutes before moving them. This final step ensures they set perfectly.

and-learned-from">Mistakes I’ve made and learned from

I once rushed the chilling process for my Pumpkin Snickerdoodles, and the result was a flat, disappointing puddle. Chilling the dough is absolutely non-negotiable because it prevents the cookies from spreading too much in the oven. Another common error I’ve made is using expired baking soda, which left my cookies dense and lacking their signature lift. Now, I always test my leavening agents to ensure they’re active, a crucial tip I picked up while perfecting my classic chocolate chip cookies. Getting the baking time just right is also key; overbaking will rob them of their soft, cake-like texture. For more guidance on achieving that perfect bake every time, my post on essential baking tools covers the oven thermometer that changed everything for me. Trust me, learning these lessons the hard way means your batch will turn out perfectly.

Cultural Connection and Variations

Where this recipe comes from

We can trace the classic snickerdoodle back to 19th-century New England, where German and Dutch settlers baked their simple, cinnamon-sugar cookies. Their recipe relied on cream of tartar for that signature tang and chewy texture. Generations later, someone had a brilliant, cozy idea. They folded rich pumpkin puree and warm baking spices into that beloved dough, creating the ultimate fall hybrid. This twist gave us the glorious Pumpkin Snickerdoodles we adore today.

Families often put thei

r own stamp on this treat. For instance, some bakers in the Midwest might add a handful of oats for a heartier bite. Others might swap the cinnamon in the roll for gingerbread spice around the holidays. My grandmother always insisted on chilling her dough overnight. She claimed it developed a deeper flavor, and honestly, she was absolutely right. Her method created a cookie that was crisp at the edges and magically soft in the center.

This spirit of adaptation makes the recipe so personal. Whether you add a dash of nutmeg or a pinch of cardamom, you are continuing a beautiful tradition of baking innovation. Every batch of Pumpkin Snickerdoodles tells its own little story.

How it fits in today’s cooking

This cookie perfectly bridges nostalgia and modern food trends. Its warm spices and pumpkin base absolutely scream autumn, making it a staple for seasonal gatherings and holiday cookie swaps. Furthermore, today’s bakers love how easily it adapts to different dietary needs. You can often find fantastic gluten-free or vegan versions that lose none of the classic charm.

We also see it starring

in new culinary roles beyond the dessert plate. For example, crumbled Pumpkin Snickerdoodles make an incredible pie crust or a topping for morning yogurt. Their spiced flavor profile pairs wonderfully with a cup of coffee or as a sweet ending to a hearty meal. In fact, they are the perfect follow-up to a cozy dinner like this Slow Cooker Beef Stew.

Ultimately, this cookie earns its place in contemporary kitchens because it delivers comfort and joy. It’s a simple pleasure that fits right into our busy lives, much like whipping up a quick batch of Easy Banana Bread. You get that satisfying, homemade taste without any fuss, and that is a timeless win.

Taste and Texture

What makes it delicious

These Pumpkin Snickerdoodles deliver a uniquely cozy experience. Initially, your nose catches the warm, fragrant aroma of cinnamon and pumpkin spice. Then, your teeth sink into a cookie that is wonderfully soft and pillowy with a slightly chewy center. The classic snickerdoodle tang from the cream of tartar beautifully cuts through the sweet, earthy pumpkin puree. Ultimately, the rich, spiced flavor and tender crumb make every bite of these Pumpkin Snickerdoodles completely irresistible.

r">Boosting the flavor

For an even more decadent treat, consider a few simple twists. First, roll your dough balls in coarse sparkling sugar along with the cinnamon spice mix for a delightful crunchy exterior. Alternatively, a simple cream cheese glaze drizzled on top adds a tangy, creamy contrast that complements the warm spices perfectly. If you love that pumpkin flavor, try using our homemade pumpkin pie spice blend for a deeper, more aromatic profile. Furthermore, serving them slightly warm amplifies all the cozy flavors, making them an exceptional dessert. For another fantastic way to use seasonal flavors, explore our popular apple cinnamon muffins recipe. Finally, a small sprinkle of flaky sea salt right after baking enhances every single note in these autumnal cookies, a trick we often use in our best fall baking recipes.

Tips for Success

Best practices for results

Always chill your dough for at least one hour, as this step prevents your Pumpkin Snickerdoodles from spreading too thin in the oven. For a wonderfully soft and chewy texture, use parchment paper on your baking sheets. Additionally, measure your flour correctly by spooning it into the cup and leveling it off to avoid dense cookies. Finally, roll your dough balls generously in the cinnamon-sugar mixture for that classic, crackly snickerdoodle finish every time.

>Mistakes to avoid

A common error involves using melted butter, which can sadly make your cookies greasy and flat. Instead, always cream room-temperature butter with sugar to incorporate air for a perfect lift. Furthermore, avoid overmixing your dough once you add the dry ingredients, as this can develop too much gluten and lead to a tough cookie. For more guidance on this crucial technique, see our post on how to cream butter and sugar. Also, do not over-bake your Pumpkin Snickerdoodles; they will continue to set on the hot pan after you pull them from the oven. If your baked goods often turn out dry, our tips for keeping cookies moist and chewy can help you achieve the ideal softness.

Serving and Pairing Suggestions

How to serve this dish

For a truly stunning presentation, arrange your warm Pumpkin Snickerdoodles on a rustic wooden board or a vintage cake stand. Moreover, a light dusting of extra cinnamon sugar just before serving adds a beautiful sparkle and an extra burst of flavor. These cookies absolutely shine during autumn gatherings; consequently, consider them for your holiday cookie swap or as a sweet ending to a Thanksgiving feast. Finally, serve them alongside a small bowl of whipped cream for dipping, turning a simple cookie into an interactive dessert experience.

What goes well with it

A hot mug of spiced chai tea makes a perfect companion, as its warm notes beautifully echo the cozy spices in every Pumpkin Snickerdoodle. Alternatively, a glass of cold milk remains a classic pairing that wonderfully balances the cookie’s soft, spiced sweetness. For an ultimate dessert spread, serve these snickerdoodles with a slice of our rich Chocolate Cake; the combination of chocolate and pumpkin spice is simply unforgettable. Furthermore, a scoop of our homemade Vanilla Ice Cream sandwiched between two cookies creates an irresistible ice cream sandwich that everyone will love.

rc="https://s3-placid.s3.eu-central-1.amazonaws.com/production/rest-images/rawp1noeia0hh/int-c01b1e0fe91de049451ac6d158739dcd-23obgnjn.jpg" />

What is the difference between a snickerdoodle and a pumpkin snickerdoodle?

The main difference is the addition of pumpkin puree and warm pumpkin pie spices. A classic snickerdoodle is a soft, chewy sugar cookie rolled in cinnamon sugar, while a pumpkin snickerdoodle incorporates pumpkin for a moist, cake-like texture and a flavor that perfectly complements the traditional cinnamon-sugar coating. This seasonal twist makes Pumpkin Snickerdoodles a fall favorite.

Why are my pumpkin snickerdoodles cakey and not chewy?

The pumpkin puree adds significant moisture, which can lead to a more cake-like texture. For a chewier cookie, ensure you are not over-measuring your pumpkin puree and consider chilling your dough for at least an hour before baking. Chilling solidifies the fat, preventing the cookies from spreading too much and resulting in a denser, chewier Pumpkin Snickerdoodle.

ank-math-faq-item"> Can I use fresh pumpkin instead of canned for pumpkin snickerdoodles?

Yes, you can absolutely use homemade pumpkin puree. The key is to ensure it has a similar thick consistency to canned puree. If your fresh pumpkin puree is too watery, strain it through a cheesecloth to remove excess liquid. Using the right consistency will prevent your Pumpkin Snickerdoodles from becoming too wet or cakey.

How do you store pumpkin snickerdoodle cookies to keep them soft?

Store your completely cooled cookies in an airtight container at room temperature. Placing a piece of bread or a single slice of apple in the container can help maintain a soft, chewy texture by introducing just the right amount of moisture. Properly stored, your Pumpkin Snickerdoodles will stay deliciously soft for several days.

Perfect Cheesy Scalloped Potatoes Recipe

perfect-cheesy-scalloped-potatoes

Introduction

Is there any side dish more comforting than a bubbling dish of creamy, cheesy potatoes? Honestly, we think not. Whether you are gathering the family for a holiday feast or simply craving some serious comfort food on a chilly evening, this classic dish always delivers. Furthermore, it promises to transform your ordinary meal into something truly memorable. Without a doubt, These Cheesy Scalloped Potatoes are perfection on a plate.

So what exactly makes this recipe so special? Essentially, These Cheesy Scalloped Potatoes are perfection because they masterfully balance a rich, velvety cheese sauce with layers of tender, thinly sliced potatoes. Consequently, every single bite delivers an incredible harmony of texture and flavor that simply outshines any boxed or hurried version. This dish matters because it acts as the ultimate culinary hug; it is the star of the potluck and the quiet hero of Sunday supper. Moreover, it fits our blog’s cozy, approachable tone perfectly, as we always champion from-scratch cooking that feels both rewarding and completely doable. For another fantastic side dish that pairs beautifully, consider our classic Garlic Herb Dinner Rolls. Ultimately, this recipe provides a foolproof path to a side dish that will genuinely have everyone asking for seconds. In fact, mastering this recipe means you will always have a show-stopping option ready for any occasion. Additionally, the method we use ensures the sauce never breaks or becomes grainy, which is a common frustration. Therefore, you can confidently serve These Chezy Scalloped Potatoes knowing they are perfection in every sense.

Why I Love This Recipe

This recipe holds a special place in my heart because it reminds me of my grandmother’s kitchen. She always made a huge pan for every family gathering, and the sight of that golden, cheesy crust coming out of the oven signaled that everyone was truly together. I love that I can now recreate that same feeling of warmth and celebration for my own family. These Cheesy Scalloped Potatoes are perfection not just in taste, but in their incredible power to bring people around the table, much like our beloved Ultimate Creamy Macaroni and Cheese. Making this dish fills my home with the same incredible aroma and guarantees that everyone leaves the table completely happy and satisfied.

Health and Nutrition

Why it’s good for your body

These Cheesy Scalloped Potatoes are perfection deliver a surprising number of nutritional benefits. Fundamentally, potatoes provide a fantastic source of complex carbohydrates, which your body converts into steady, long-lasting energy. Moreover, they offer a healthy dose of potassium, an essential mineral that supports proper nerve function and helps regulate blood pressure. Additionally, this dish includes calcium and protein from the dairy, which are crucial for maintaining strong bones and supporting muscle repair.

Furthermore, the cheese and milk contribute valuable fats that your brain needs to function optimally. Consequently, this comforting meal does more than just satisfy your taste buds; it actively fuels your body’s daily operations. These Cheesy Scalloped Potatoes are perfection also bring a feeling of fullness and satisfaction, which can help prevent overeating later. Therefore, you can enjoy this classic dish knowing it contributes positively to your overall nutrient intake.

Finally, when you prepare them at home, you control the ingredients, avoiding excessive sodium and preservatives often found in pre-made versions. Ultimately, These Cheesy Scalloped Potatoes are perfection represent a wholesome, energy-dense choice for a comforting meal.

How it fits in a healthy lifestyle

You can absolutely enjoy this dish as part of a balanced diet. Think of it as a nourishing centerpiece that you can pair with lighter sides. For instance, serving a robust portion of a simple green salad or some steamed green beans alongside it creates a perfectly rounded meal. This approach balances the richness of the potatoes with fresh, fibrous vegetables.

If you follow a gluten-free lifestyle, you will love that this recipe naturally fits your needs without any modifications. For those mindful of heart health, you can easily adapt it by using a lower-fat cheese and milk blend. The key is portion awareness and pairing it wisely with other foods. For more ideas on building a balanced plate, explore our guide on meal prepping for beginners. Remember, healthy eating is about the overall pattern of your choices, not any single food. If you’re looking for other satisfying and nutritious side dishes, our roasted root vegetables are another fantastic option to rotate into your weekly menu.

Print
clock clock iconcutlery cutlery iconflag flag iconfolder folder iconinstagram instagram iconpinterest pinterest iconfacebook facebook iconprint print iconsquares squares iconheart heart iconheart solid heart solid icon

These Cheesy Scalloped Potatoes are perfection

  • Author: Chef Mia

Description

Creamy, cheesy layers of thinly sliced potatoes baked to golden perfection with a rich, savory sauce.


Ingredients

Scale

For the Crust:

  • 4 large russet potatoes, peeled and thinly sliced
  • 2 cups shredded sharp cheddar cheese
  • 1/2 cup grated Parmesan cheese
  • 3 cups heavy cream
  • 4 cloves garlic, minced
  • 1 teaspoon salt
  • 1/2 teaspoon black pepper
  • 1/4 teaspoon nutmeg
  • 2 tablespoons butter, for greasing

Instructions

1. Prepare the Crust:

  1. Preheat oven to 375°F (190°C). Grease a 9×13 inch baking dish with butter.
  2. In a medium saucepan, combine heavy cream, garlic, salt, pepper, and nutmeg. Heat over medium until warm but not boiling.
  3. Layer half of the potato slices in the baking dish. Pour half of the cream mixture over the potatoes and sprinkle with half of the cheddar and Parmesan cheeses.
  4. Repeat with remaining potatoes, cream mixture, and cheeses.
  5. Cover with foil and bake for 45 minutes. Remove foil and bake for another 20-25 minutes until top is golden and potatoes are tender.
  6. Let rest for 10 minutes before serving.

Notes

You can customize the seasonings to taste.

s-dish">How to Prepare This Dish

Steps and time-saving tips

First, gather your ingredients and preheat your oven to 375°F. Meanwhile, grab your mandoline slicer for perfectly uniform potato slices. This simple step guarantees even cooking and a beautiful final presentation for These Cheesy Scalloped Potatoes are perfection. Next, focus on the creamy sauce. Melt butter in a saucepan over medium heat, then whisk in the flour to create a smooth roux. Gradually pour in the warm milk, whisking constantly until the sauce thickens beautifully. Turn off the heat and stir in most of your shredded cheese until it melts into a velvety, luxurious sauce. Season this cheesy base generously with salt, pepper, and a pinch of nutmeg for that classic, comforting flavor.

Now, begin assembling your masterpiece in a greased baking dish. Start with a thin layer of the cheese sauce on the bottom. Then, create a single, even layer of potato slices. After that, spoon more sauce over the potatoes and sprinkle a little cheese. Honestly, just repeat this process, building layers until you use all your ingredients. Finally, top the entire dish with the remaining cheese for that irresistible golden-brown crust. Cover the dish with foil and bake for 45 minutes. Then, remove the foil and continue baking for another 20-30 minutes until the top is bubbly and gorgeously browned. For the best results, let the dish rest for 15 minutes before serving; this allows the sauce to set perfectly.

Mistakes I’ve made and learned from

I have absolutely ruined a batch by using cold milk straight from the fridge; it caused the roux to seize up into tiny, floury lumps instead of a smooth sauce. Now, I always gently warm my milk in the microwave first, which makes for a perfectly silky base every single time. Another classic error of mine was impatience—I’d skip the mandoline and slice by hand, resulting in wildly uneven pieces. Consequently, some potatoes would be mushy while others were still unpleasantly crunchy. Trust me, taking that extra minute to use the right tool is a complete game-changer for achieving the ideal texture. I also learned the hard way that not letting These Cheesy Scalloped Potatoes are perfection rest leads to a soupy mess on the plate. This experience taught me the importance of resting time for saucy dishes, much like I discuss in my guide on why ingredient temperature matters for baking success. Furthermore, choosing the right cheese is crucial; a pre-shredded bag often contains anti-caking agents that prevent proper melting. For a truly exceptional result, always block cheese and shred it yourself, a principle that applies to many recipes like the ultimate three cheese baked ziti.

rc="https://exorecipes.com/wp-content/uploads/2025/08/perfect-cheesy-scalloped-potatoes-recipe.webp" />

Cultural Connection and Variations

Where this recipe comes from

My grandmother first showed me how to make this dish on a chilly autumn afternoon. Consequently, the scent of baking potatoes and sharp cheddar instantly transports me back to her warm kitchen. She called it scalloped potatoes, but her version always included a generous, almost decadent, amount of cheese. In truth, her recipe for These Cheesy Scalloped Potatoes are perfection came from a tattered church cookbook, a true testament to its community-approved deliciousness.

Different regions, however, put their own spin on this classic. For instance, in France, the dish becomes Gratin Dauphinois, which traditionally forbids cheese in favor of cream and garlic. Meanwhile, across parts of the American Midwest, you might find a crunchy breadcrumb topping or a sprinkle of paprika for color. Some families even layer in ham or thinly sliced onions for extra heartiness. Ultimately, every variation shares that same comforting soul.

My family, therefore, a

lways insists on extra-sharp Vermont cheddar for a bold flavor. This simple choice makes our version uniquely ours. We know our recipe for These Cheesy Scalloped Potatoes are perfection because it never fails to gather everyone around the table, eager for a taste.

How it fits in today’s cooking

This dish absolutely remains a cornerstone of comfort food. Furthermore, it seamlessly fits into both holiday feasts and simple weeknight dinners. Modern cooks often adapt it for their busy schedules; for example, many use a mandoline for perfectly even slices or prepare it ahead of time for easy baking. It’s the ultimate make-ahead side dish that never disappoints.

Its versatility is truly its strength. You can easily pair these potatoes with a robust main course, like a perfectly cooked prime rib for a special occasion. Conversely, they also complement simpler, everyday meals. For a lighter spring gathering, you might even serve them alongside a fresh roasted asparagus. Ultimately, this timeless recipe continues to earn its place on our tables, proving that true comfort food never goes out of style.

>Taste and Texture

What makes it delicious

These Cheesy Scalloped Potatoes are perfection, offering a truly decadent experience. Each forkful delivers incredibly creamy and tender potato slices that simply melt in your mouth. Meanwhile, the top bakes into a golden-brown, crisp crust that provides a satisfying crunch. Furthermore, the rich, nutty Gruyère and sharp cheddar cheese sauce is deeply savory and fragrant, with a gentle hint of garlic and onion that fills your kitchen with an irresistible aroma. Ultimately, the luxurious, velvety sauce perfectly coats every single slice, creating a harmonious and comforting bite. You will find that These Cheesy Scalloped Potatoes are perfection because of this magical contrast between the soft interior and the crisp, cheesy top.

Boosting the flavor

You can easily elevate this classic dish with a few creative twists. For instance, try mixing in a handful of crispy, crumbled bacon or diced ham for a smoky, savory punch that contrasts beautifully with the creamy sauce. Alternatively, stir a tablespoon of whole grain mustard or a pinch of smoked paprika into the cheese sauce for a warm, complex depth of flavor. Moreover, a final sprinkle of fresh chopped chives or parsley right before serving adds a bright, fresh note that cuts through the richness. For a perfect pairing that complements these flavors, consider serving it alongside a juicy main course. Similarly, a crisp, tangy side salad provides a refreshing contrast that makes every bite of potatoes even more satisfying.

Tips for Success

Best practices for results

First, always slice your potatoes uniformly to guarantee they cook at the same rate. Consequently, you will achieve a perfectly tender texture throughout your dish. Furthermore, shred your own cheese from a block for a smoother, creamier sauce that clings to every slice. Always warm your milk or cream before adding it to the roux to prevent a grainy sauce and ensure a silky consistency. Finally, allow your masterpiece to rest for a full ten minutes before serving so the sauce can properly set. Following these steps ensures These Cheesy Scalloped Potatoes are perfection every single time.

Mistakes to avoid

A common error involves rushing the cooking process; however, baking at too high a temperature will cause the sauce to break or the top to burn before the potatoes soften. Instead, keep the heat moderate and steady for the best results. Additionally, many home cooks forget to season between the layers, which results in a bland final dish. Therefore, be generous with your seasoning as you build the casserole. For more guidance on building flavor, explore our guide on balancing flavors in savory bakes. Moreover, do not skip the step of greasing your baking dish, otherwise, you might end up with a frustrating cleanup situation. For a seamless release and easy serving, consider the tips in our article on preparing the perfect non-stick pan.

Serving and Pairing Suggestions

How to serve this dish

First, always serve these cheesy scalloped potatoes are perfection piping hot directly from the oven. For a beautiful presentation, garnish the top with a sprinkle of fresh chopped chives or parsley. Moreover, a simple dusting of paprika adds a lovely color contrast. This dish truly shines as the star of any holiday table or a comforting Sunday supper. Finally, consider serving it in the baking dish for a rustic, family-style feel that encourages everyone to dig in.

h-it">What goes well with it

These cheesy scalloped potatoes are perfection alongside a juicy main course. For instance, a perfectly cooked Garlic Herb Pork Tenderloin creates a classic and satisfying meal. Alternatively, a simple roasted chicken allows the rich, creamy potatoes to truly stand out. Furthermore, a crisp, acidic side salad provides a necessary refreshing contrast to the dish’s decadence. For a lighter option, our Lemon Herb Asparagus brings a bright, tangy flavor that cuts through the richness beautifully.

What is the secret to creamy scalloped potatoes?

The secret lies in a perfectly balanced cheese sauce and thinly sliced potatoes. Using a combination of heavy cream and a good melting cheese, like gruyere or sharp cheddar, creates the rich, luxurious base that makes These Cheesy Scalloped Potatoes are perfection. Allowing the sauce to thicken slightly before baking is also a key step for creaminess.

ank-math-faq-item"> How do you keep scalloped potatoes from being watery?

To prevent watery scalloped potatoes, pat your thinly sliced potatoes completely dry with a paper towel before assembling. Also, ensure your sauce is adequately thick so it coats the potatoes rather than creating excess liquid. This technique is essential for achieving the dense, creamy texture that makes These Cheesy Scalloped Potatoes are perfection.

What is the best cheese to use for cheesy scalloped potatoes?

A blend of cheeses works best for maximum flavor and creaminess. A combination of sharp cheddar for its tang and gruyere or fontina for their excellent melting qualities is highly recommended. This melty, flavorful cheese blend is what takes this dish from good to perfection.

Can you make scalloped potatoes ahead of time?

Yes, you can assemble the dish a day in advance, cover it tightly, and keep it refrigerated until you’re ready to bake. Let it sit at room temperature for about 30 minutes before putting it in the oven. You may need to add a few extra minutes to the baking time since it will be starting from cold.

div>