“`html
Table of Contents
Butternut Squash Ravioli with Sage Brown Butter Sauce – Easy Fall Comfort from Scratch
I still remember the first time I made butternut squash ravioli from scratch — it was a chilly October afternoon in my tiny Paris kitchen, and the scent of roasted squash filled every corner of my apartment. That moment, standing over a pot of boiling water with flour dusted on my apron, I felt the magic of making something truly special with my own hands. This Butternut Squash Ravioli with Sage Brown Butter Sauce is that same magic, recreated for your home kitchen. The velvety squash filling, made silky with ricotta and a whisper of nutmeg, is tucked into tender homemade pasta, then drizzled with a nutty, aromatic brown butter sauce that takes it over the top. It’s a classic fall dish that feels luxurious but is genuinely approachable — and I’m going to show you exactly how to make it.
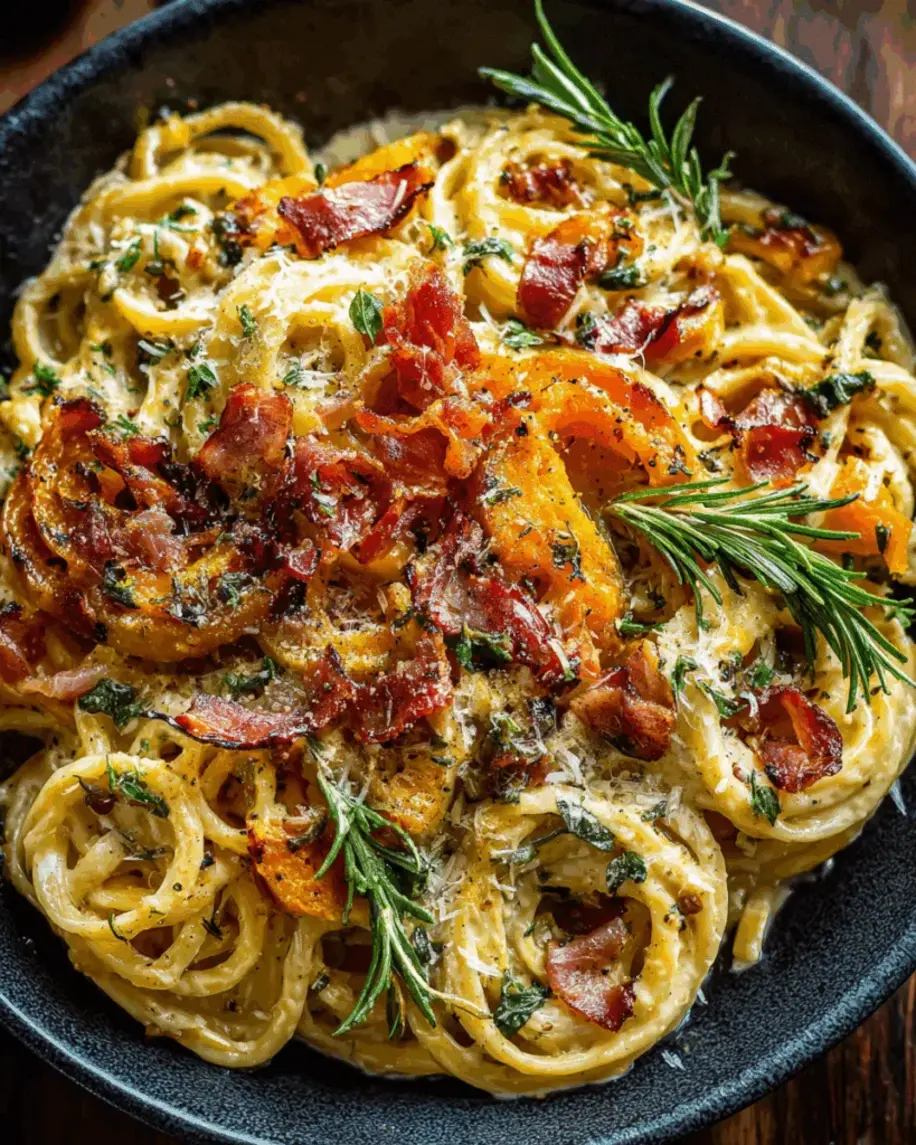
Imagine cutting into a perfectly cooked ravioli — the pasta is tender but sturdy, giving way to a luscious, golden-orange filling that’s rich, slightly sweet, and kissed with warm spices. Now imagine that ravioli bathed in a sauce where butter has been gently cooked until it turns the color of hazelnuts, releasing a toasty, caramel-like aroma, while fresh sage leaves crisp up around the edges, adding their earthy, slightly peppery note. Each bite is a study in contrasts: the soft, creamy filling against the al dente pasta, the rich butter against the fragrant sage. It’s the kind of dish that makes you close your eyes while you chew — and that’s exactly what I want for you.
What makes my version different? I trained at Le Cordon Bleu in Paris and spent years perfecting pasta from scratch, but I’ve also carried the warm, spirited flavors of my Moroccan upbringing into this dish. My mother taught me that the best cooking comes from patience and intuition — and that’s the heart of this recipe. I roast the squash until it’s deeply caramelized, then blend it with just the right amount of ricotta for creaminess without heaviness. The pasta dough is simple but forgiving, and I’ll share my trick for rolling it thin without tearing. One common mistake people make is overfilling the ravioli — less truly is more here. 💡 mia’s Pro Tip: Let the roasted squash cool completely before mixing the filling — this prevents the ricotta from breaking and keeps the texture silky.
Why This Butternut Squash Ravioli Recipe Is the Best
The flavor secret starts with the squash. Instead of boiling or steaming, I roast the butternut squash cut-side down in a hot oven until the edges caramelize and the flesh becomes intensely sweet and concentrated. This step, inspired by French roasting techniques, deepens the natural sugars and gives the filling a complexity you just can’t get from canned puree. Then I add a touch of nutmeg — a spice I fell in love with in Paris — and a hint of Parmesan for savory depth. The result is a filling that’s velvety, balanced, and absolutely unforgettable.
Texture is everything in homemade pasta. I’ve tested this dough dozens of times to get the perfect ratio of flour to egg — not too sticky, not too stiff. The key is resting the dough for at least 30 minutes, which relaxes the gluten and makes rolling smooth and easy. When you bite into these ravioli, the pasta should be tender but with a satisfying chew, never doughy or heavy. I also recommend rolling the dough to about 1/16 inch thick — thin enough to see your hand through it, but sturdy enough to hold the filling.
This recipe is foolproof for beginners because I’ve broken every step down with clear visual cues. The dough comes together in one bowl, the filling requires no special equipment, and the sauce takes just 3 minutes. I’ve made this with my own kids in my NYC apartment on a busy Tuesday night, and it works. Start with a small batch — 4 servings — and you’ll feel like a pasta pro by the time you’re done. Plus, the ravioli freeze beautifully, so you can make a double batch and have gourmet dinners ready in minutes.
Butternut Squash Ravioli Ingredients
I source my butternut squash from the Union Square Greenmarket in Manhattan, where the fall harvest is absolutely stunning. In my mother’s kitchen in Morocco, we would have used a similar winter squash called “garaa” — the principle is the same: choose a squash that feels heavy for its size and has a deep orange color. For this homemade ravioli recipe, every ingredient has a purpose, and I’ll show you how to pick the best ones at your local grocery store.
Ingredients List
- For the Pasta:
- 2 cups all-purpose flour (plus extra for dusting)
- 3 large eggs (preferably room temperature)
- 1 tablespoon olive oil
- 1/2 teaspoon salt
- For the Filling:
- 1 small butternut squash (about 2 lbs), halved and seeded
- 2 tablespoons olive oil (for roasting)
- 1/2 cup ricotta cheese (whole milk preferred)
- 1/4 cup grated Parmesan cheese
- 1/4 teaspoon ground nutmeg (freshly grated is best)
- 1/2 teaspoon salt
- 1/4 teaspoon black pepper
- For the Sauce:
- 1/2 cup unsalted butter (1 stick)
- 10–12 fresh sage leaves
- Salt and pepper to taste
- Grated Parmesan for serving
Ingredient Spotlight
Butternut Squash: The heart of this dish. Look for a squash with a long neck (more usable flesh) and few blemishes. It should feel heavy and have a matte, not shiny, skin. One medium squash (about 2 lbs) yields roughly 1 1/2 cups of mashed flesh — perfect for this recipe. For a shortcut, you can substitute 1 1/2 cups of frozen butternut squash puree (thawed and well-drained), though the flavor won’t be quite as caramelized.
Fresh Sage: Sage and brown butter are a classic pair for good reason — the herb’s slightly peppery, earthy flavor stands up to the nutty richness of the butter. Look for sage leaves that are vibrant green and fragrant, not wilted. If you can’t find fresh sage, dried sage works in a pinch (use about 1 teaspoon, crumbled), but the texture and aroma won’t be the same.
Ricotta Cheese: Whole milk ricotta gives the filling a luxurious creaminess. I recommend Galbani or any brand that’s thick and not watery. Before mixing, drain the ricotta in a fine-mesh sieve for 15 minutes to remove excess moisture — this prevents the filling from making the pasta soggy. For a dairy-free version, use a high-quality cashew-based ricotta alternative.
All-Purpose Flour: King Arthur or Gold Medal work beautifully for this pasta dough. The moderate protein content (around 11–12%) gives the right balance of tenderness and strength. Do not substitute bread flour — it will make the dough too tough. For a gluten-free option, use a 1:1 gluten-free flour blend that contains xanthan gum, and add 1 extra egg yolk for moisture.
| Original Ingredient | Best Substitution | Flavor / Texture Impact |
|---|---|---|
| Fresh Butternut Squash | Frozen butternut squash puree (thawed, drained) | Less caramelized, slightly less sweet; still good |
| Fresh Sage | Dried sage (1 tsp crumbled) or fresh thyme (2 tsp) | Dried sage is milder; thyme adds lemon-herb notes |
| Whole Milk Ricotta | Cashew ricotta or well-drained cottage cheese | Cashew version is nuttier; cottage cheese is tangier |
| All-Purpose Flour | 1:1 gluten-free flour blend + 1 extra egg yolk | Dough is more delicate; handle gently |
How to Make Butternut Squash Ravioli — Step-by-Step
Making homemade ravioli is one of the most rewarding things you can do in the kitchen — and it’s easier than you think. Follow these steps, and you’ll have pillowy, restaurant-quality Butternut Squash Ravioli with Sage Brown Butter Sauce on your table in just over an hour.
Step 1: Make the Pasta Dough
On a clean countertop or in a large bowl, pile 2 cups of all-purpose flour and create a well in the center. Crack 3 large eggs into the well, add 1 tablespoon olive oil and 1/2 teaspoon salt. Using a fork, gently whisk the eggs while gradually incorporating flour from the sides of the well. Continue until a shaggy, slightly sticky dough forms. Knead the dough for 8–10 minutes, pushing it with the heel of your hand and folding it over itself, until it becomes smooth and elastic. Wrap tightly in plastic wrap and rest at room temperature for 30 minutes.
💡 mia’s Pro Tip: If the dough feels too dry, add 1 teaspoon of water at a time. If too sticky, dust with a little extra flour. The rested dough should feel like a soft earlobe — that’s the perfect texture.
Step 2: Roast the Squash and Make the Filling
Preheat your oven to 400°F (200°C). Halve the butternut squash lengthwise and scoop out the seeds. Rub the cut sides with 2 tablespoons olive oil and place cut-side down on a baking sheet lined with parchment. Roast for 40–45 minutes, until the flesh is fork-tender and the edges are caramelized. Let cool slightly, then scoop the flesh into a bowl and mash with a fork or potato masher. Add 1/2 cup ricotta, 1/4 cup grated Parmesan, 1/4 teaspoon nutmeg, 1/2 teaspoon salt, and 1/4 teaspoon pepper. Mix until smooth and well combined. Set aside.
⚠️ Common Mistake to Avoid: Don’t overmix the filling — it should be creamy but still have a little texture. Overmixing can make it gummy.
Step 3: Assemble the Ravioli
Divide the rested dough into 4 portions. Keep the pieces you’re not working with covered under a damp towel. On a floured surface, roll one portion into a thin sheet about 1/16 inch thick — you should be able to see the outline of your hand through it. Place teaspoon-sized dollops of filling about 2 inches apart on the lower half of the sheet. Brush a little water around each dollop. Fold the top half of the dough over the filling, pressing gently around each mound to seal. Use a fluted pastry wheel or a sharp knife to cut the ravioli into individual squares. Place them on a floured baking sheet and repeat with remaining dough.
💡 mia’s Pro Tip: To prevent sticking, dust the baking sheet generously with semolina flour or cornmeal — it acts like tiny ball bearings under the ravioli.
Step 4: Cook the Ravioli
Bring a large pot of generously salted water to a rolling boil. Gently drop the ravioli into the water in batches — do not overcrowd. Cook for 3–4 minutes, or until the ravioli float to the surface and the pasta is tender but still al dente. Drain carefully using a slotted spoon or spider. Reserve about 1/2 cup of pasta cooking water before draining.
⚠️ Common Mistake to Avoid: Boiling the ravioli too vigorously can cause them to tear. Keep the water at a gentle boil, not a raging one.
Step 5: Make the Sage Brown Butter Sauce
In a large skillet (big enough to hold the ravioli later), melt 1/2 cup unsalted butter over medium heat. Add 10–12 fresh sage leaves. Cook, swirling the pan occasionally, until the butter turns a deep golden-brown color and smells wonderfully nutty, about 2–3 minutes. The sage leaves will become crisp and fragrant. Season with a pinch of salt and pepper. Remove from heat.
💡 mia’s Pro Tip: Watch the butter carefully — it can go from golden to burnt in seconds. As soon as you see brown specks forming and the foam subsides, it’s ready. Remove from the heat immediately.
Step 6: Toss and Serve
Add the drained ravioli to the skillet with the brown butter sauce. Gently toss to coat, adding a splash of the reserved pasta water if the sauce seems too thick. The water helps emulsify the butter into a silky coating. Serve immediately in warm bowls, topped with a generous shower of grated Parmesan and a few extra crispy sage leaves.
⚠️ Common Mistake to Avoid: Don’t rinse the ravioli after draining — the starch on the surface helps the sauce cling to each piece.
| Step | Action | Duration | Key Visual Cue |
|---|---|---|---|
| 1 | Make pasta dough | 10 min knead + 30 min rest | Smooth, elastic, springs back when poked |
| 2 | Roast squash & make filling | 40–45 min roast + 5 min mix | Fork-tender, caramelized edges |
| 3 | Assemble ravioli | 15–20 min | Sealed edges, no air bubbles |
| 4 | Cook ravioli | 3–4 min per batch | Floats to surface, tender to bite |
| 5 | Make brown butter sauce | 2–3 min | Golden-brown specks, nutty aroma |
| 6 | Toss and serve | 2 min | Evenly coated, glossy sauce |
Serving & Presentation
This Butternut Squash Ravioli with Sage Brown Butter Sauce is a showstopper on any table. I like to serve it in wide, shallow bowls — the kind you’d find in a rustic trattoria in Florence. Arrange the ravioli in a single layer, then spoon the remaining brown butter and sage leaves over the top. Finish with a generous cloud of freshly grated Parmesan and a twist of black pepper. A few extra crispy sage leaves arranged on top add beauty and aroma.
In my NYC apartment, I often pair this dish with a simple arugula salad dressed with lemon and shaved Parmesan — the peppery greens offset the richness of the pasta beautifully. For a heartier meal, serve it alongside roasted Brussels sprouts with balsamic glaze or a slice of crusty sourdough to mop up every drop of sauce. A crisp Pinot Grigio or a light Chianti makes an excellent wine pairing.
When I make this for friends, I sometimes add a Moroccan touch — a sprinkle of toasted pine nuts and a few pomegranate arils on top. The pops of sweetness and crunch take the dish to another level. However you serve it, this is a meal that feels special enough for a dinner party but cozy enough for a quiet Tuesday night.
| Pairing Type | Suggestions | Why It Works |
|---|---|---|
| Side Dish | Arugula salad with lemon; roasted Brussels sprouts; sautéed spinach with garlic | Bright, acidic greens cut the richness of the brown butter |
| Sauce / Dip | Extra brown butter with crispy sage; balsamic reduction drizzle | Enhances the nutty, savory profile |
| Beverage | Pinot Grigio, Chianti, or sparkling water with lemon | Crisp acidity balances the butter and squash sweetness |
| Garnish | Toasted pine nuts, pomegranate arils, fresh thyme leaves | Adds texture, color, and a burst of flavor |
Make-Ahead, Storage & Reheating
As a busy New York City food blogger and mom, I’m all about smart meal prep. This Butternut Squash Ravioli recipe is perfect for making ahead — I often assemble a double batch on Sunday, then cook fresh ravioli during the week when cravings hit. The filling can be made up to 3 days in advance, and the assembled ravioli freeze beautifully for up to 3 months.
| Method | Container | Duration | Reheating Tip |
|---|---|---|---|
| Refrigerator | Airtight container, layered with parchment | Up to 3 days | Reheat in a skillet with a splash of water or broth over medium heat, covered, for 3–4 min |
| Freezer | Freezer bag, ravioli first frozen in a single layer on a baking sheet | Up to 3 months | Cook frozen directly in boiling water — add 1–2 min to cooking time. Do not thaw first. |
| Make-Ahead | Filling in a sealed container; pasta dough wrapped in plastic | Filling: 3 days; dough: 1 day | Assemble ravioli just before cooking for best texture |
To reheat already-cooked ravioli, I gently warm them in a nonstick skillet with a pat of butter and a tablespoon of pasta water or broth. Cover the pan and cook over low heat for 3–4 minutes, shaking occasionally — this restores the silky sauce without drying out the pasta. If the sauce seems thin, let it simmer uncovered for 1 minute to thicken.
One more tip from my NYC kitchen: if you’re freezing the ravioli, dust them generously with semolina or cornmeal before freezing to prevent sticking. I also like to freeze them in portions — 12 to 16 ravioli per bag — so I can grab exactly what I need for a quick dinner.
Variations & Easy Swaps
One of the things I love most about this homemade ravioli recipe is how easily it adapts. Whether you’re cooking for dietary needs or just want to play with new flavors, here are my favorite variations — each tested in my own kitchen.
| Variation | Key Change | Best For | Difficulty Impact |
|---|---|---|---|
| Moroccan Spice Twist | Add 1/2 tsp cinnamon + 1/4 tsp cumin to filling; garnish with toasted almonds | Adventurous palates, fall dinner parties | Easy — just adds spices |
| Gluten-Free Version | Use 1:1 gluten-free flour blend + 1 extra egg yolk | Gluten-free guests, Celiac-friendly | Medium — dough is more delicate |
| Dairy-Free / Vegan | Use cashew ricotta, vegan butter + 1 tbsp miso for depth, omit Parmesan | Dairy-free or vegan diets | Medium — sub ingredients change texture |
Moroccan Spice Twist
This variation is near and dear to my heart — it brings the warmth of my mother’s kitchen in Morocco right into this Italian classic. Add 1/2 teaspoon of cinnamon and 1/4 teaspoon of cumin to the squash filling. The cinnamon enhances the natural sweetness of the butternut, while cumin adds a subtle, earthy warmth that pairs beautifully with the brown butter. Finish with a sprinkle of toasted slivered almonds and a drizzle of honey over the top. It’s unexpected, memorable, and absolutely delicious.
Gluten-Free Version
I developed this version for a gluten-sensitive friend, and it works surprisingly well. Use a high-quality 1:1 gluten-free flour blend that contains xanthan gum (I like Bob’s Red Mill). Add an extra egg yolk to compensate for the lack of gluten structure. The dough will be more delicate, so handle it gently and roll between two sheets of parchment or plastic wrap. Cook the ravioli a little more gently — 4–5 minutes at a gentle simmer — and be careful not to overcrowd the pot. The texture is slightly more tender than traditional pasta, but still satisfying.
Dairy-Free / Vegan Version
For a dairy-free take, substitute the ricotta with a thick cashew-based ricotta (Kite Hill makes an excellent one) and use a high-quality vegan butter for the sauce. To mimic the savory depth of Parmesan, add 1 tablespoon of white miso paste to the filling — it adds umami without dairy. For the sauce, vegan butter browns beautifully, and fresh sage still crisps up perfectly. Top with a vegan Parmesan-style shred or nutritional yeast for a cheesy flavor. This version is lighter but still deeply satisfying.
Can you use frozen butternut squash for homemade ravioli filling?
Yes, you can absolutely use frozen butternut squash for the filling, and it works well as a time-saver. Thaw the squash completely, then drain it thoroughly in a fine-mesh sieve or press it with paper towels to remove as much moisture as possible — excess water is the enemy of a good ravioli filling because it can make the pasta soggy. Keep in mind that frozen squash is typically steamed before freezing, so it won’t have the same deep caramelized flavor as oven-roasted squash. To boost the flavor, I recommend sautéing the thawed, drained squash in a pan with a little butter or olive oil over medium-high heat for 5–7 minutes until it starts to brown slightly. Then proceed with the ricotta, Parmesan, and spices as written. It’s a great shortcut that still delivers a delicious result.
What can I substitute for sage in brown butter sauce?
If you don’t have fresh sage, don’t worry — there are several excellent substitutions that work beautifully in brown butter sauce. Fresh thyme is my top pick: use about 2 teaspoons of fresh thyme leaves (or 1 teaspoon dried) and add them to the butter as it browns. Thyme has a slightly lemony, earthy flavor that complements the nutty brown butter wonderfully. Another great option is fresh rosemary — use 1 small sprig, removed before serving, for a piney, aromatic note. Dried sage works too, but use it sparingly (about 1 teaspoon crumbled) since dried herbs are more concentrated. For a completely different but delicious twist, try adding a few strips of lemon zest and a pinch of red pepper flakes — the brightness and heat cut through the richness of the butter and pair beautifully with the sweet squash filling.
How do you keep butternut squash ravioli from getting soggy?
Soggy ravioli is usually caused by excess moisture in the filling or undercooked pasta. Here are my tried-and-true tips: First, roast the squash instead of boiling it — roasting drives off moisture and concentrates flavor. Second, drain the ricotta in a fine-mesh sieve for at least 15 minutes before mixing it into the filling. Third, make sure the filling is completely cool before assembling the ravioli — warm filling releases steam that can soften the pasta from the inside. Fourth, seal the ravioli edges well by pressing firmly with your fingers or a fork, and avoid overfilling — about 1 teaspoon per ravioli is plenty. Finally, cook the ravioli in generously salted water at a gentle boil, and drain them well before adding to the sauce. If you’re making them ahead, dust the tray with semolina or cornmeal to absorb any surface moisture.
Should you brown the butter before or after adding the sage?
Add the sage leaves to the butter as it browns, not after. Here’s why: when the sage cooks in the butter from the start, the leaves slowly crisp up and release their essential oils directly into the fat, infusing every drop of butter with that wonderful earthy, slightly peppery sage flavor. Start by melting the butter over medium heat, then add the sage leaves immediately. Swirl the pan occasionally as the butter foams and then subsides. In about 2–3 minutes, the butter will turn a deep golden-brown color and smell nutty and toasty, and the sage leaves will be crisp and fragrant. If you add the sage after the butter is already browned, the leaves won’t crisp properly and the flavor won’t infuse as deeply. One important tip: have your cooked ravioli ready nearby so you can toss them right away — the sauce is best when it’s fresh and hot.
How thin should I roll the pasta dough for ravioli?
For perfect ravioli, roll the pasta dough to about 1/16 inch thick — thin enough that you can see the silhouette of your hand through it, but not so thin that it becomes translucent and tears easily. If you’re using a pasta machine, this is typically the second-to-last setting (usually setting 6 or 7 on most machines). If you’re rolling by hand, aim for a uniform thickness by applying even pressure and rotating the dough as you roll. A good test is to lay a sheet of dough over your hand — you should be able to see the outline of your fingers clearly. Remember that the pasta will cook and puff slightly, so a thin sheet gives you a tender, delicate wrapper that contrasts beautifully with the creamy filling. If the dough feels sticky as you roll, dust lightly with flour, but don’t overdo it — too much flour can make the pasta dry and brittle.
Can I make Butternut Squash Ravioli without a pasta machine?
Absolutely — you don’t need a pasta machine to make excellent homemade ravioli. A rolling pin and a little elbow grease are all you need. The key is to rest the dough for a full 30 minutes (or even 1 hour) before rolling, which relaxes the gluten and makes the dough much easier to roll out thinly. Work on a large, clean countertop and roll from the center outward, turning the dough 90 degrees frequently to maintain an even shape. Roll until you can see your hand through the dough — it takes a bit of effort, but it’s very satisfying. I learned to roll pasta by hand in my Paris culinary school, and there’s something meditative about it. If the dough springs back as you roll, let it rest for 5 more minutes and try again. A long, tapered rolling pin (the French style without handles) gives you the most control. Dust sparingly with flour as needed.
How do I prevent ravioli from sticking together during cooking?
Ravioli sticking together is a common frustration, but it’s easy to prevent with a few simple steps. First, make sure your cooking water is generously salted — about 1 tablespoon of salt per 4 quarts of water. Salted water helps season the pasta and also reduces stickiness. Second, use a large enough pot so the ravioli have room to move freely — I recommend a 6- to 8-quart pot for 4 servings. Third, stir the water gently after adding the ravioli, and continue stirring occasionally during the first minute of cooking. Fourth, do not overcrowd the pot — cook in batches if necessary. Fifth, add a splash of olive oil to the cooking water if you’re worried about sticking, though this is optional. Finally, have your sauce ready before you cook the ravioli so you can toss them immediately after draining — ravioli left sitting in a colander will clump together as they cool.
Can I use wonton wrappers instead of homemade pasta for this recipe?
Yes, you can use wonton wrappers as a shortcut, and it’s a great option when you’re short on time. Wonton wrappers are essentially thin egg pasta squares, so they work very well for ravioli. Look for round or square wonton wrappers in the refrigerated section of your grocery store — Nasoya and Twin Dragon are common brands. To assemble, place a teaspoon of filling in the center of one wrapper, brush the edges with water, and press a second wrapper on top (or fold one wrapper over if using squares). Cook them for just 2–3 minutes, as wonton wrappers are thinner than fresh pasta. The texture will be slightly more delicate and less chewy than homemade pasta, but the flavor is still wonderful. This hack has saved me many busy weeknights. Just be sure not to overfill, and seal the edges well to prevent leakage.
What is the best way to reheat leftover butternut squash ravioli?
The best way to reheat leftover ravioli without drying them out is in a skillet on the stovetop. Place the ravioli in a nonstick skillet over medium-low heat with a splash of water, broth, or milk (about 2 tablespoons per serving) and a pat of butter. Cover the pan and cook for 3–4 minutes, shaking the pan gently every minute, until the ravioli are heated through and the sauce has become silky again. If the sauce seems thin, remove the lid and let it simmer for 30 seconds to thicken. I don’t recommend microwaving ravioli — the microwave tends to make the pasta rubbery and the filling can explode. If you’re reheating frozen cooked ravioli, you can drop them directly into boiling water for 2–3 minutes, then drain and toss with a little fresh butter or sauce. This method restores the texture closest to freshly made.
How many ravioli should I serve per person?
For a main course serving, I recommend 6 to 8 ravioli per person, depending on their size and what else you’re serving alongside. This recipe makes about 24 to 32 ravioli total (depending on how generous your teaspoon-sized dollops are), which is perfect for 4 servings. If you’re serving the ravioli as a first course or appetizer, 3 to 4 per person is plenty. I like to make a few extra because they never last long — and any leftovers make a fantastic lunch the next day. When I’m hosting a dinner party, I often count on 8 ravioli per person and pair them with a substantial salad and crusty bread. If you’re making smaller, bite-sized ravioli, you may want to increase the count to 10–12 per serving. The key is to make them uniformly sized so they cook evenly.
Share Your Version!
I absolutely love seeing how this recipe comes to life in your kitchen. Did you try the Moroccan spice twist? Did you use wonton wrappers as a shortcut? Did your kids help you roll the pasta dough? Drop a comment below and let me know how it went — your feedback helps me create better recipes, and it inspires the whole community. If you’re sharing on Instagram or Pinterest, tag me @exorecipes and use the hashtag #miasKitchen — I personally read every tag and love to feature your photos!
One question I’d love you to answer: What’s your favorite way to make this Butternut Squash Ravioli with Sage Brown Butter Sauce your own? Did you add a pinch of cinnamon? Swap the sage for rosemary? I’m genuinely curious — and your idea might end up in a future recipe!
From my NYC kitchen to yours — I hope this recipe brings as much warmth to your table as it does to mine. — mia 🧡
Love This Recipe? Save It to Pinterest!
If you enjoyed this Butternut Squash Ravioli with Sage Brown Butter Sauce recipe, don’t let it get lost in your browser tabs! 😄 Pin it now so you can find it again anytime — and explore hundreds more tried-and-tested recipes waiting for you on my Pinterest boards.
👉 Follow mia on Pinterest @exorecipe
📌 Pin this recipe · 🔁 Re-pin your favorites · 💬 Tag me when you make it — I love seeing your creations!
“`
Print

Butternut Squash Ravioli with Sage Brown Butter Sauce
- Prep Time: 45 minutes
- Cook Time: 20 minutes
- Total Time: 1 hour 5 minutes
- Yield: 4 1x
- Method: Main Course
- Cuisine: Italian
Description
Homemade butternut squash ravioli tossed in a nutty sage brown butter sauce. A classic fall comfort dish that is easier than it looks.
Ingredients
- For the Pasta:
- 2 cups all-purpose flour
- 3 large eggs
- 1 tablespoon olive oil
- 1/2 teaspoon salt
- For the Filling:
- 1 small butternut squash (about 2 lbs), halved and seeded
- 2 tablespoons olive oil
- 1/2 cup ricotta cheese
- 1/4 cup grated Parmesan cheese
- 1/4 teaspoon ground nutmeg
- 1/2 teaspoon salt
- 1/4 teaspoon black pepper
- For the Sauce:
- 1/2 cup unsalted butter
- 10–12 fresh sage leaves
- Salt and pepper to taste
- Grated Parmesan for serving
Instructions
- Make the pasta dough: On a clean surface, pile the flour and make a well in the center. Crack the eggs into the well, add olive oil and salt. Using a fork, gradually incorporate the flour into the eggs until a shaggy dough forms. Knead for 8-10 minutes until smooth. Wrap in plastic and rest for 30 minutes.
- Prepare the filling: Preheat oven to 400°F (200°C). Rub cut sides of squash with olive oil and place cut-side down on a baking sheet. Roast for 40-45 minutes until tender. Scoop out flesh and mash. In a bowl, combine mashed squash, ricotta, Parmesan, nutmeg, salt, and pepper. Mix well.
- Assemble the ravioli: Roll out pasta dough into thin sheets (about 1/16 inch thick). Place teaspoon-sized dollops of filling about 2 inches apart on one sheet. Brush edges with water, place second sheet on top, press around each mound to seal. Cut into individual ravioli with a knife or pastry wheel.
- Cook the ravioli: Bring a large pot of salted water to a boil. Cook ravioli in batches for 3-4 minutes, until they float and are tender. Drain carefully.
- Make the sauce: In a large skillet, melt butter over medium heat. Add sage leaves and cook until butter turns golden brown and smells nutty, about 2-3 minutes. Season with salt and pepper.
- Serve: Gently toss the cooked ravioli in the brown butter sauce. Serve immediately with grated Parmesan on top.
Notes
For best results, use fresh sage. Ravioli can be frozen on a baking sheet, then transferred to a freezer bag for up to 3 months. Cook frozen ravioli without thawing, adding 1-2 minutes to cooking time.
Nutrition
- Calories: 520
- Sugar: 8g
- Fat: 32g
- Carbohydrates: 45g
- Protein: 14g

Tried This Recipe? Leave a Comment!
Did you make this recipe? I’d love to hear how it turned out! Please leave a comment and a rating below. Your feedback helps other home cooks and supports cheerychop.com!
For more delicious inspiration, follow me on Pinterest!