
Table of Contents
Creamy Pasta Salad: A Moroccan-Parisian Twist – The Ultimate Cold Side
I remember the first time I made my creamy pasta salad for a Brooklyn potluck. I was nervous — bringing a classic American side to a table full of bold flavors. But as soon as I drizzled my dressing, a whisper of apple cider vinegar and a touch of sugar that I learned from my Parisian chef, everything clicked. This is the best creamy pasta salad because it’s not just another mayonnaise-coated bowl of noodles. It’s a carefully balanced, cold pasta salad with creamy dressing that honors every single ingredient. Growing up in Morocco, we dressed salads with bright acidity and fresh herbs. Later, in Paris, I mastered the art of sauce work — the secret to a dressing that clings beautifully without being heavy.
Imagine cold, tender elbow macaroni, each piece coated in a silky, tangy cream sauce. With every bite, you get the sweet pop of thawed peas and the salty, smoky crunch of thick-cut bacon. Freshly grated Parmesan melts into the dressing, adding a nutty depth that store-bought shreds can’t touch. The whole thing is finished with a whisper of garlic and onion powder — nothing overwhelming, just a gentle hum of savory flavor. The result is a creamy macaroni salad that’s rich but never greasy, indulgent but perfectly balanced with a bright, clean finish. It’s the kind of dish that disappears fast at a summer barbecue.
What sets my easy creamy pasta salad apart is my approach to the dressing. In Paris, I was taught that a great sauce is about synergy — every element has a role. Here, the mayonnaise provides rich body, the olive oil adds a silky mouthfeel, and the apple cider vinegar cuts through it all with a sharp tang. A tiny bit of sugar rounds everything out. My mom would call it a harmony. I also insist on rinsing the pasta in cold water immediately after cooking — a simple step that stops the cooking process and cools the noodles so the dressing doesn’t wilt. This is the only best creamy pasta salad recipe you’ll ever need.
Why This Creamy Pasta Salad Recipe Is the Best
The Flavor Secret: The balance in this creamy pasta salad recipe comes from my French training — we call it “assaisonnement” — the art of seasoning every layer. The dressing is a perfect emulsion of mayonnaise, olive oil, and apple cider vinegar, with just a touch of sugar to soften the acidity. This isn’t a bland salad; it’s a flavor bomb that still lets the bacon and Parmesan shine.
Perfected Texture: I learned in Paris that texture is everything. That’s why I cook the pasta only to al dente — it holds up against the creamy dressing and stays firm even after a day in the fridge. The peas are thawed but not cooked, so they remain bright and tender. And the bacon is chopped into small, crisp pieces that provide a satisfying crunch in every forkful. No mushy noodles here.
Foolproof & Fast: This easy creamy pasta salad is perfect for beginners and busy cooks alike. The entire process takes just 25 minutes of active time. You can prep everything while the pasta cooks, and the only real wait is an hour of chilling (if you can resist it). It’s the kind of recipe I make on a busy Monday and take to a Saturday picnic — it actually gets better with time.
Creamy Pasta Salad Ingredients
I pick up almost all these ingredients at the Union Square Greenmarket here in NYC. The bacon from a small farm in Pennsylvania, the peas frozen from last summer’s harvest, and the Parmesan from a cheese stand run by a woman from Parma who explains how to grate it just right. These simple, fresh elements come together to create the perfect creamy macaroni salad.
Ingredients List
- 12 oz small pasta noodles (elbows or shells)
- 2 cups frozen peas (thawed)
- 12 oz thick cut bacon (cooked and chopped)
- 1/2 cup freshly grated Parmesan cheese
- 3/4 cup mayonnaise
- 2 tablespoons olive oil
- 1 tablespoon apple cider vinegar
- 1 teaspoon granulated sugar (adjust to taste)
- 1 teaspoon salt (adjust to taste)
- 1/2 teaspoon garlic powder
- 1/2 teaspoon onion powder
- 1/4 teaspoon black pepper
Ingredient Spotlight
Small pasta noodles like elbows or small shells are ideal. They catch the creamy dressing in every crevice, making each bite flavorful. I prefer a sturdy shape that doesn’t break apart easily.
The bacon must be thick-cut and cooked until very crispy. You want a solid crunch that contrasts the soft pasta and peas. If you’re in a rush, pre-cooked bacon can work, but the texture will be less satisfying.
Mayonnaise is the base of our dressing. I use a full-fat mayo — it creates the silkiness this cold pasta salad with creamy dressing needs. For a lighter version, you can use half Greek yogurt, but the texture will be tangier and less rich.
| Original Ingredient | Best Substitution | Flavor / Texture Impact |
|---|---|---|
| Mayonnaise | Greek yogurt + mayo (1:1) | Tangier, lighter, less rich |
| Thick-cut bacon | Turkey bacon or ham | Less fat, less smoky, milder crunch |
| Parmesan cheese | Pecorino Romano | Saltier, sharper, similar melt |
| Frozen peas | Fresh peas or chopped broccoli | Firmer texture, different sweetness |
How to Make Creamy Pasta Salad – Step-by-Step
Let me show you how to make this creamy pasta salad in a few simple steps. I’ve tested this dozens of times to make it as foolproof as possible.
Step 1: Cook the Pasta
Cook the pasta noodles in a large pot of salted water according to the package directions, until just al dente — about 8 to 10 minutes for most small shapes. Drain well in a colander, then rinse thoroughly under cold running water until the pasta is completely cool. This stops the cooking and rinses away surface starch, which helps the dressing cling better without becoming gummy.
💡 mia’s Pro Tip: Rinse with cold water until the pasta feels cool to the touch — not just until it runs cold. Warm pasta will melt the mayo dressing.
Step 2: Prep the Add-Ins
While the pasta cooks, make sure your peas are fully thawed — just hold them under warm water for a minute if needed, then drain. Your bacon should be cooked until very crispy, then chopped into small pieces. Grate your Parmesan finely from a block — the pre-grated stuff in a can won’t melt as smoothly. Set everything aside.
⚠️ Common Mistake to Avoid: Don’t add hot bacon directly to the salad! It will wilt the dressing and make everything greasy. Let it cool completely first.
Step 3: Make the Creamy Dressing
In a small bowl, combine the mayonnaise, olive oil, apple cider vinegar, granulated sugar, salt, garlic powder, onion powder, and black pepper. Whisk vigorously until the dressing is smooth and emulsified — about 30 seconds. Taste and adjust the sugar and salt to your liking. The dressing should be creamy, tangy, and just slightly sweet.
💡 mia’s Pro Tip: Whisk in the oil slowly, drizzling as you go, to create a stronger emulsion — that’s what gives this cold pasta salad with creamy dressing its silky texture.
Step 4: Assemble the Salad
Add the cooled pasta, thawed peas, chopped bacon, and grated Parmesan to a large mixing bowl. Pour the dressing over the top. Using a rubber spatula, fold everything together gently but thoroughly until every piece of pasta and every pea is evenly coated in the creamy dressing.
⚠️ Common Mistake to Avoid: Don’t overmix! Constant stirring can break up the pasta and turn the salad mushy. Fold only until combined.
Step 5: Chill and Serve
Cover the bowl with a lid or plastic wrap and place it in the refrigerator for at least 1 to 2 hours. Chilling allows the flavors to meld and the dressing to fully coat every piece. If you’re in a hurry, you can serve it immediately, but it’s truly best chilled. Before serving, give it a quick stir and taste for seasoning — you may want a pinch more salt.
💡 mia’s Pro Tip: If the salad looks dry after chilling, stir in a tablespoon of cold milk or extra mayo to revive the creaminess. Pasta absorbs dressing over time.
| Step | Action | Duration | Key Visual Cue |
|---|---|---|---|
| 1 | Cook & rinse pasta | 8–10 mins | Pasta is firm but tender; cold to touch |
| 2 | Prep add-ins | 5–10 mins | Peas thawed; bacon crispy; cheese grated |
| 3 | Whisk dressing | 1–2 mins | Smooth, emulsified, pale yellow |
| 4 | Assemble | 2–3 mins | Everything evenly coated, no dry spots |
| 5 | Chill | 1–2 hours | Dressing thickens slightly; flavors meld |
Serving & Presentation
This creamy pasta salad is the perfect side dish for any cookout, potluck, or weeknight dinner. I love piling it into a large, shallow serving bowl so every colorful ingredient is visible — the green peas, the golden pasta, the speckled bacon. For a touch of Moroccan flair, I sometimes sprinkle a little smoked paprika on top and add a few fresh mint leaves. For a Parisian presentation, I serve it alongside a simple green salad with vinaigrette.
It’s incredibly versatile. Serve it cold next to grilled chicken, burgers, or hot dogs at a summer barbecue. Or pair it with a glass of crisp white wine and a slice of crusty bread for a light lunch. The creaminess of the dressing makes it feel indulgent, but the apple cider vinegar keeps everything bright and balanced. My NYC friends love it straight out of the bowl as a main dish on hot days.
| Pairing Type | Suggestions | Why It Works |
|---|---|---|
| Side Dish | Grilled chicken, burgers, hot dogs | Creamy contrast to smoky, charred proteins |
| Salad / Fresh Element | Green salad, sliced tomatoes | Acidic vinaigrette cuts the richness |
| Beverage | Crisp white wine, lemonade, iced tea | Clean acidity balances the creamy dressing |
| Garnish | Smoked paprika, fresh mint, chives | Adds color, aroma, and a flavor pop |
Make-Ahead, Storage & Reheating
This is my go-to make-ahead salad for the week. I often prep it on Sunday and enjoy it for lunches or quick dinners through Wednesday. The creamy dressing actually gets better as the flavors have time to meld, but I do add a little extra mayo before serving if it seems dry, because pasta absorbs moisture in the fridge.

Tried This Recipe? Leave a Comment!
Did you make this recipe? I’d love to hear how it turned out! Please leave a comment and a rating below. Your feedback helps other home cooks and supports cheerychop.com!
For more delicious inspiration, follow me on Pinterest!
Easy Chicken Taco Soup Recipe (35 Minutes)

Table of Contents
Easy Chicken Taco Soup with Creamy Rotel Broth – Ready in 35 Minutes
I still remember the first time I made a version of this chicken taco soup back in my tiny Paris apartment, trying to recreate the warmth of my mother’s Moroccan harira but with a Tex-Mex twist. Now, living in New York City, this easy chicken taco soup recipe has become my go-to for busy weeknights and cozy weekend dinners. The unique angle here? That luscious, creamy broth made with softened cream cheese and spicy Rotel tomatoes — it’s a game-changer that turns a simple soup into something truly indulgent. You get the smoky depth of chili powder and cumin, the tangy kick of green chilies, and a velvety finish that will have everyone asking for seconds.
As the soup simmers, your kitchen fills with the most incredible aroma — a blend of toasted spices, sweet corn, and earthy black beans. Each spoonful is a harmony of textures: tender shredded chicken, pop of corn, and creamy broth that coats your tongue. I love how the red bell pepper adds a subtle sweetness and a beautiful pop of color against the deep red broth. My French training taught me to layer flavors carefully, so instead of just dumping everything in, I build the base with sautéed onions and bloom the spices before adding the liquid. It’s a small step that makes a huge difference.
This isn’t just another chicken taco soup recipe. I’ve fine-tuned it to work perfectly in 35 minutes — faster than delivery, and so much more satisfying. Whether you’re new to cooking or a seasoned home chef, the process is foolproof. I’ll also show you a crucial trick for softening the cream cheese so it melts silky smooth without any lumps. And I’ll warn you about the one mistake I see people make: adding the cream cheese when the soup is too hot, which can cause it to curdle. Trust me, in my NYC kitchen, I’ve tested this every which way, and this method never fails.
Why This Chicken Taco Soup Recipe Is the Best
The real star here is the broth, and I’m not just talking about flavor. In my Paris culinary school days, I learned that a great sauce or soup depends on the perfect emulsion. The softened cream cheese, when whisked in gently, creates a stable, luxurious base that doesn’t break or separate. This is my secret weapon — not a drop of heavy cream, but full-fat cream cheese for richness and body. The Rotel tomatoes bring acidity and heat, balancing the fat perfectly. It’s a technique I adapted from a classic French velouté, but with a bold Southwestern soul.
Texture is everything in soup, and this one hits all the notes. The black beans stay firm but tender, the corn provides little bursts of sweetness, and the chicken is shredded into fine, bite-sized strands that soak up all that creamy goodness. By simmering the soup before adding the cream cheese and chicken, I let the vegetables soften and meld together, so every spoonful feels cohesive. The final seasoning — just salt and pepper — lets the layers you’ve built shine. It’s not overcomplicated, just balanced.
What makes this recipe foolproof? First, it uses rotisserie chicken, so you skip the step of cooking raw protein. Second, the timing is forgiving: you can let it simmer a little longer if you’re busy prepping toppings. And third, the ingredient list is flexible—I’ll show you easy swaps that still work beautifully. Whether you’re a beginner or a busy parent, this easy chicken taco soup recipe will become your new favorite. It’s one of those meals that tastes like you spent hours, but you didn’t.
Chicken Taco Soup Ingredients
When I shop for this slow cooker chicken taco soup-inspired stovetop version, I head straight to my local NYC farmers market for the freshest produce—like red bell peppers from a small upstate farm. But I also rely on pantry staples that deliver big flavor. Here’s exactly what you need to make this chicken taco soup with black beans a success.
Ingredients List
- 1 tablespoon olive oil
- 1/2 medium onion (chopped)
- 3 cups chicken broth (low-sodium preferred)
- 2 (10 ounce) cans Ro-tel diced tomatoes & green chilies (with juices)
- 1 (14 ounce) can black beans (drained & rinsed)
- 1 (12 ounce) can corn (drained)
- 1/2 red bell pepper (chopped)
- 1 tablespoon chili powder
- 1 teaspoon garlic powder
- 1 teaspoon ground cumin
- 1 teaspoon smoked paprika
- 8 ounces cream cheese (I used Philly), softened, see note
- 2 cups cooked/rotisserie chicken, shredded
- Salt & pepper (to taste)
- Toppings (optional): shredded Mexican cheese blend, avocado, cilantro, tortilla strips, etc.
Ingredient Spotlight
Let’s talk about the key ingredients. The Rotel tomatoes (diced tomatoes with green chilies) are the backbone of this healthy chicken taco soup—they add acidity, heat, and a bit of texture. I always buy the original style. For the cream cheese, full-fat is non-negotiable for that silky sauce; low-fat can break or taste grainy. And the smoked paprika? That’s my secret from a trip to Spain—it adds a subtle wood-fired depth that elevates the whole dish.
| Method | Container | Duration | Reheating Tip |
|---|---|---|---|
| Refrigerator | Airtight container | Up to 4 days | Serve cold or at room temp; stir in 1 tbsp milk to revive creaminess |
| Original Ingredient | Best Substitution | Flavor / Texture Impact |
|---|---|---|
| Rotel (10 oz can) | 1 can diced tomatoes + 1 small can green chilies | Slightly less integrated; still good |
| Full-fat cream cheese | Neufchâtel (⅓ less fat) — must soften well | Slightly thinner sauce, but still creamy |
| Smoked paprika | 1 tsp sweet paprika + ¼ tsp liquid smoke | Similar smoky flavor; liquid smoke is strong |
| Rotisserie chicken | 2 boneless skinless chicken breasts, cooked & shredded | Slightly drier; add 1 extra tbsp olive oil |
How to Make Chicken Taco Soup — Step-by-Step
Making this easy chicken taco soup recipe is a breeze. The key is to soften the cream cheese to room temperature before you start—trust me, it makes all the difference. Here’s how to do it right.
Step 1: Sauté the Onion
Heat 1 tablespoon of olive oil in a large soup pot over medium-high heat. Add the chopped 1/2 medium onion and sauté for 5 minutes until it’s soft and translucent. This builds the aromatic base.
💡 mia’s Pro Tip: Don’t rush this step! The caramelized bits on the bottom of the pot add deep flavor. Let the onion get a little golden for extra complexity.
Step 2: Combine Broth and Vegetables
Add all remaining soup ingredients except the cream cheese, chicken, and salt & pepper: 3 cups chicken broth, 2 cans Rotel (with juices), 1 can black beans (drained), 1 can corn (drained), 1/2 red bell pepper, 1 tablespoon chili powder, 1 teaspoon garlic powder, 1 teaspoon ground cumin, and 1 teaspoon smoked paprika. Stir to combine.
⚠️ Common Mistake to Avoid: Adding the beans without rinsing them first. The starchy liquid can make your soup murky and overly thick.
Step 3: Simmer and Blend Flavors
Increase heat to high, bring to a boil, then reduce to a gentle simmer (uncovered) for exactly 5 minutes. This allows the spices to bloom and the vegetables to soften. While it simmers, prep your toppings — dice avocado, chop cilantro, and shred the cheese.
💡 mia’s Pro Tip: Taste the broth after 5 minutes. If you want more heat, add a pinch of cayenne. If you want it smokier, add another ½ teaspoon smoked paprika.
Step 4: Melt the Cream Cheese
Cut the softened 8 ounces cream cheese into smaller pieces (about 1-inch cubes). Add them to the pot and stir gently until fully incorporated. This takes about 2 minutes. Don’t rush — keep the heat low so the cream cheese melts smoothly.
⚠️ Common Mistake to Avoid: Adding cold cream cheese directly into a boiling soup. It will seize up and form lumps. Always soften it first and cut it small.
Step 5: Add Chicken and Warm Through
Stir in the 2 cups shredded cooked chicken. Let the soup simmer for 5-7 minutes, stirring occasionally, until the chicken is heated through. The broth should be creamy and slightly thickened.
💡 mia’s Pro Tip: If you’re using rotisserie chicken, remove the skin and shred it by hand. This gives you uneven, perfect bite-sized pieces that hold onto the sauce.
Step 6: Season and Serve
Season with salt and pepper to taste. Ladle into bowls and garnish with your favorite toppings—shredded Mexican cheese, avocado slices, fresh cilantro, and crunchy tortilla strips.
| Step | Action | Duration | Key Visual Cue |
|---|---|---|---|
| 1 | Sauté onion | 5 mins | Soft and translucent, slightly golden |
| 2 | Combine broth & vegetables | 2 mins | All ingredients well mixed |
| 3 | Simmer | 5 mins | Broth bubbling gently |
| 4 | Melt cream cheese | 2-3 mins | Smooth, no lumps |
| 5 | Add chicken | 5-7 mins | Chicken evenly distributed |
| 6 | Season & serve | 1 min | Bubble-watching for the right consistency |
Serving & Presentation
Serving this chicken taco soup is half the fun. I love to set up a little DIY taco soup bar at home, especially when I have guests. Start with a generous ladle of the creamy soup in a warm bowl, then let everyone customize their toppings: sharp shredded Mexican cheese, creamy avocado chunks, fresh cilantro leaves, and crispy tortilla strips. A squeeze of lime juice over the top brightens everything beautifully.
For a complete meal, pair this soup with something crunchy. I often serve it alongside warm cornbread or crusty sourdough from my NYC bakery. In the summer, I’ll make a simple avocado and tomato salad with a cilantro-lime vinaigrette. And honestly, a cold Mexican beer or a spicy Michelada is the perfect beverage to cut through the richness.
| Pairing Type | Suggestions | Why It Works |
|---|---|---|
| Side Dish | Cornbread, tortilla chips, or a green salad | Absorbs broth and adds crunch |
| Sauce / Dip | Sour cream mixed with lime juice, hot sauce | Adds tangy, cool contrast |
| Beverage | Mexican lager, Michelada, or iced tea | Cuts richness and refresh the palate |
| Garnish | Cilantro, avocado, lime wedges, tortilla strips | Adds freshness, texture, and visual appeal |
Make-Ahead, Storage & Reheating
In my NYC lifestyle, meal prep is essential. This healthy chicken taco soup is perfect for making on Sunday to enjoy all week. The flavors actually deepen overnight as the spices meld together, making it even more delicious the next day. Here’s how to store it properly.
| Method | Container | Duration | Reheating Tip | ||||||||||||||||||||||||||||||||||||||||||||||||||||||||||||||||||||||||||||||||||||||||||||||||||||||||||||||||||||||||||||||||||||||||||||||||||||||||||||||||
|---|---|---|---|---|---|---|---|---|---|---|---|---|---|---|---|---|---|---|---|---|---|---|---|---|---|---|---|---|---|---|---|---|---|---|---|---|---|---|---|---|---|---|---|---|---|---|---|---|---|---|---|---|---|---|---|---|---|---|---|---|---|---|---|---|---|---|---|---|---|---|---|---|---|---|---|---|---|---|---|---|---|---|---|---|---|---|---|---|---|---|---|---|---|---|---|---|---|---|---|---|---|---|---|---|---|---|---|---|---|---|---|---|---|---|---|---|---|---|---|---|---|---|---|---|---|---|---|---|---|---|---|---|---|---|---|---|---|---|---|---|---|---|---|---|---|---|---|---|---|---|---|---|---|---|---|---|---|---|---|---|---|---|---|
| Refrigerator | Airtight container | 4-5 days | Reheat gently on stovetop over low heat, stirring occasionally. Add a splash of broth if too thick. | ||||||||||||||||||||||||||||||||||||||||||||||||||||||||||||||||||||||||||||||||||||||||||||||||||||||||||||||||||||||||||||||||||||||||||||||||||||||||||||||||
 Tried This Recipe? Leave a Comment!Did you make this recipe? I’d love to hear how it turned out! Please leave a comment and a rating below. Your feedback helps other home cooks and supports cheerychop.com! For more delicious inspiration, follow me on Pinterest! One Pot Ground Beef Orzo with Tomato Cream Sauce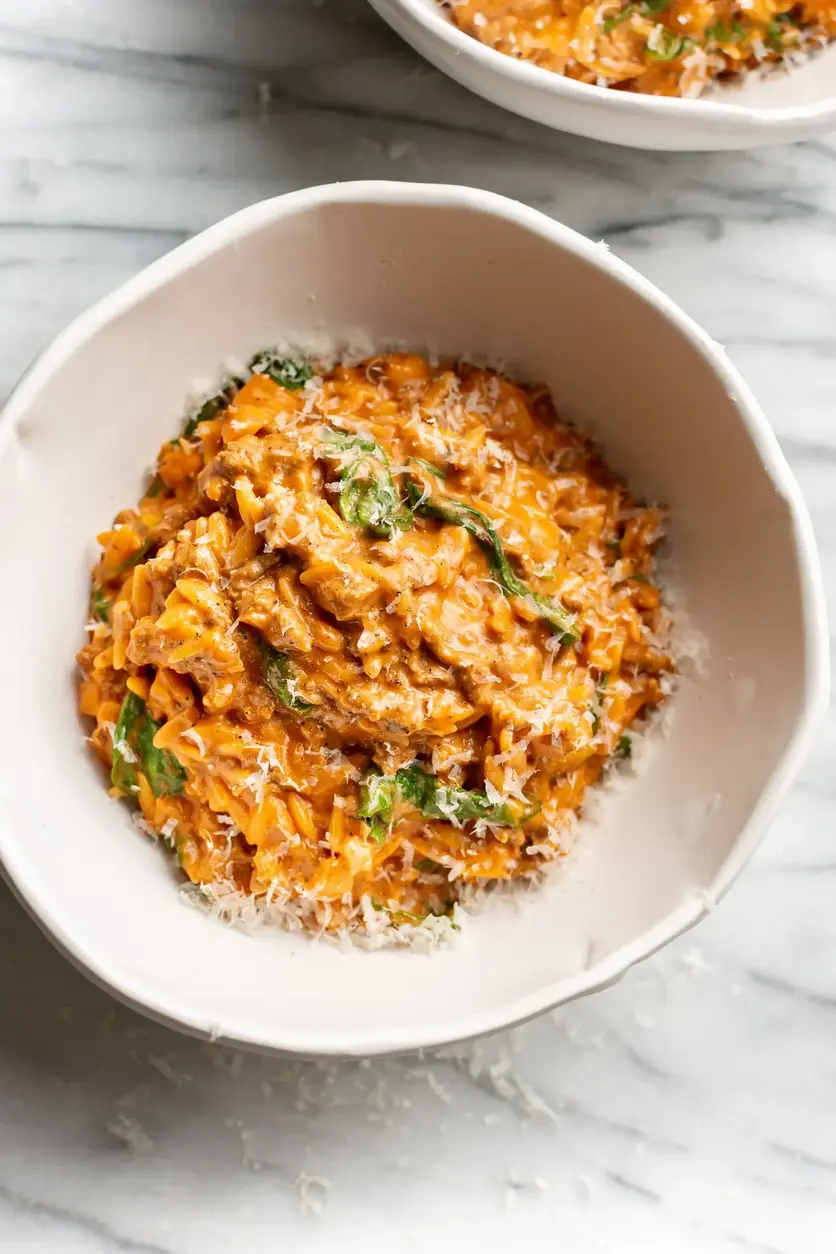
Table of ContentsGround Beef Orzo with Tomato Cream Sauce – Creamy One-Pot Comfort in 30 MinutesThere are some dinners that just feel like a warm hug, and this ground beef orzo recipe with tomato cream sauce is exactly that. I still remember the first time I made a version of this for my family in our tiny NYC apartment—the smell of garlic and onions sizzling with beef took me straight back to my mother’s kitchen in Morocco. She’d often make a simple one-pot dish with whatever was on hand, and that resourcefulness is something I carry with me every day. This one pot ground beef orzo recipe is my love letter to those nights, elevated with a touch of French finesse from my training in Paris. The secret? A perfectly balanced tomato cream sauce that clings to every grain of orzo without making it mushy—a technique I perfected over years of testing. Imagine this: tender orzo swimming in a silky, rose-colored sauce that’s rich with tomato, savory with beef, and luxuriously creamy from a splash of heavy cream. Each spoonful is a little symphony—the earthy sweetness of the tomato sauce mingles with the subtle heat of red pepper flakes, while the parmesan adds a nutty, salty finish. The baby spinach wilts into the sauce, adding a pop of green and a whisper of freshness. It’s the kind of dish that makes you close your eyes and savor the moment, whether you’re eating it straight from the pot (no judgment here!) or serving it up for a cozy weeknight dinner. What sets this easy ground beef pasta apart is the technique I learned at Le Cordon Bleu: building flavor in layers. We brown the beef deeply for maximum umami, then toast the orzo briefly with garlic and spices before adding the liquid. This method ensures the pasta cooks perfectly in the sauce, absorbing all that goodness without turning into a starchy mess. Plus, it’s a true one-pot wonder—minimal cleanup, maximum reward. I’ll share my pro tip for preventing the orzo from sticking and a common mistake to avoid so you nail it on your first try. Trust me, this creamy tomato pasta will become a regular in your rotation. Why This Ground Beef Orzo Recipe Is the BestThe flavor secret here is the trifecta of my culinary background: the aromatic base of onion and garlic from my Moroccan roots, the technique of toasting the orzo (a French method to deepen nuttiness), and the bold, hearty finish with Worcestershire sauce—a staple in New York kitchens. This combination creates a sauce that’s complex yet approachable, with a depth that makes you think it simmered for hours. It’s the kind of meal that feels special but is secretly simple, perfect for busy weeknights when you need something satisfying without the fuss. Texture is everything in a pasta dish, and I’ve nailed it here. The trick is to cook the orzo gently—just a bubble, not a rolling boil—so it releases its starch slowly, thickening the sauce naturally. The cream adds richness without making it heavy, and the parmesan at the end creates a creamy, almost velvety finish. I’ve tested this with different pasta shapes, but orzo is my favorite because its tiny, rice-like shape catches every bit of the sauce. It’s a textural dream: tender pasta, soft spinach, and juicy beef in every bite. This foolproof one pot ground beef orzo recipe is designed for beginners and pros alike. The steps are straightforward, the ingredients are pantry-friendly, and the entire dish comes together in 30 minutes—from the moment you start browning the beef to the final stir of spinach. I’ve made it countless times after long days at the farmers market or a late shift testing recipes, and it never fails to deliver comfort. Plus, it’s endlessly customizable: swap the spinach for kale, add mushrooms, or make it dairy-free with coconut cream. Truly, this is the one-pot recipe you’ll make on repeat. Ground Beef Orzo Recipe IngredientsI love sourcing my ingredients from the Union Square Greenmarket on Saturday mornings—especially the fresh spinach and grass-fed beef from a local farm. But this recipe is flexible enough that you can find everything at your regular grocery store. My mother always taught me to use the best quality ingredients you can afford, and that advice has never steered me wrong. Here’s what you’ll need to make this creamy, comforting dish. Ingredients List
Ingredient SpotlightLean ground beef is the star here—it provides rich flavor and protein without making the dish greasy. Look for 85/15 or 90/10 for best results. If you use higher fat content, just drain some fat after browning. Orzo pasta is the perfect shape for this sauce; its small size cooks quickly and absorbs the creamy tomato base beautifully. For the best texture, choose a brand that’s made from durum wheat semolina. Heavy cream adds that luscious, silky consistency; for a lighter version, you can substitute half-and-half (though the sauce will be thinner). Fresh baby spinach is a last-minute addition that wilts perfectly into the hot sauce—always choose bright, crisp leaves without wilting.
How to Make Ground Beef Orzo — Step-by-StepDon’t worry—this one pot ground beef orzo recipe is as simple as it gets. Just follow these steps, and you’ll have a dinner that tastes like it took hours. I’ve added my chef’s tips along the way to make sure every step is foolproof. Step 1: Brown the BeefAdd the ground beef to a soup pot or Dutch oven and break it up a little with your spoon. Cook it over medium-high heat for 5-6 minutes without stirring. This allows a nice brown crust to form—that’s where the flavor lives! 💡 mia’s Pro Tip: Don’t crowd the pan. If your pot is too small, the beef will steam instead of brown. Use a wide pot for the best sear. Step 2: Add AromaticsAdd the onion and stir, breaking the beef into small pieces. Cook for another 5 minutes. If there’s a lot of excess fat, spoon some out—leave a little for flavor. This step builds the savory foundation. ⚠️ Common Mistake to Avoid: Skipping the browning step. If you stir the beef constantly, you’ll miss out on that deep, meaty flavor. Let it sit and get golden. Step 3: Toast the OrzoStir in the garlic, red pepper flakes, Italian seasoning, and orzo. Cook for about a minute until the orzo smells nutty and aromatic. This toasting step is a game-changer—it seals the pasta so it doesn’t get mushy. 💡 mia’s Pro Tip: Use a wooden spoon to stir constantly during this step. The orzo can burn quickly, so watch it closely! Step 4: Add Liquids and SimmerStir in the tomato sauce, beef broth, cream, and Worcestershire sauce. Once it starts to bubble, reduce the heat to medium or medium-low so it gently bubbles. Cook for 10 minutes, stirring often to prevent sticking. ⚠️ Common Mistake to Avoid: Boiling too vigorously. A rolling boil will cause the liquid to reduce too quickly and the orzo to cook unevenly. A gentle bubble is your friend. Step 5: Finish with Parmesan and SpinachTake the pot off the heat, stir in the parmesan and spinach, and cover for 3-5 minutes. The residual heat will wilt the spinach and thicken the sauce beautifully. Season with salt and pepper before serving. 💡 mia’s Pro Tip: For the best texture, use freshly grated parmesan—pre-shredded has anti-caking agents that can make the sauce grainy.
Serving & PresentationI love serving this ground beef orzo with tomato cream sauce in big, shallow bowls so you can see all the beautiful layers. Top it with an extra sprinkle of parmesan, a crack of black pepper, and a few fresh basil leaves if you have them—it adds a pop of color and freshness that brightens the dish. In our NYC home, we often pair it with a simple green salad dressed with lemon vinaigrette to cut through the richness, or a slice of crusty sourdough for sopping up every last bit of sauce. This dish is perfect on its own as a main course, but I also love it as a side to grilled chicken or roasted vegetables. If you’re feeling fancy, serve it with a dollop of labneh or Greek yogurt on top—a nod to my Moroccan roots where creamy yogurt is a staple. For a truly satisfying meal, pair it with a glass of medium-bodied red wine like a Chianti or a fruity Zinfandel. It’s the kind of comfort food that feels both rustic and elegant, just like the best of New York’s food scene.
Make-Ahead, Storage & ReheatingAs a busy food blogger and mom in New York, I live by meal prep—and this ground beef orzo recipe is one of my favorites to make ahead. It actually tastes even better the next day as the flavors meld together. For my weekday lunches, I pack it in glass containers and simply reheat when hunger strikes. Here’s how to store and reheat it perfectly.
|