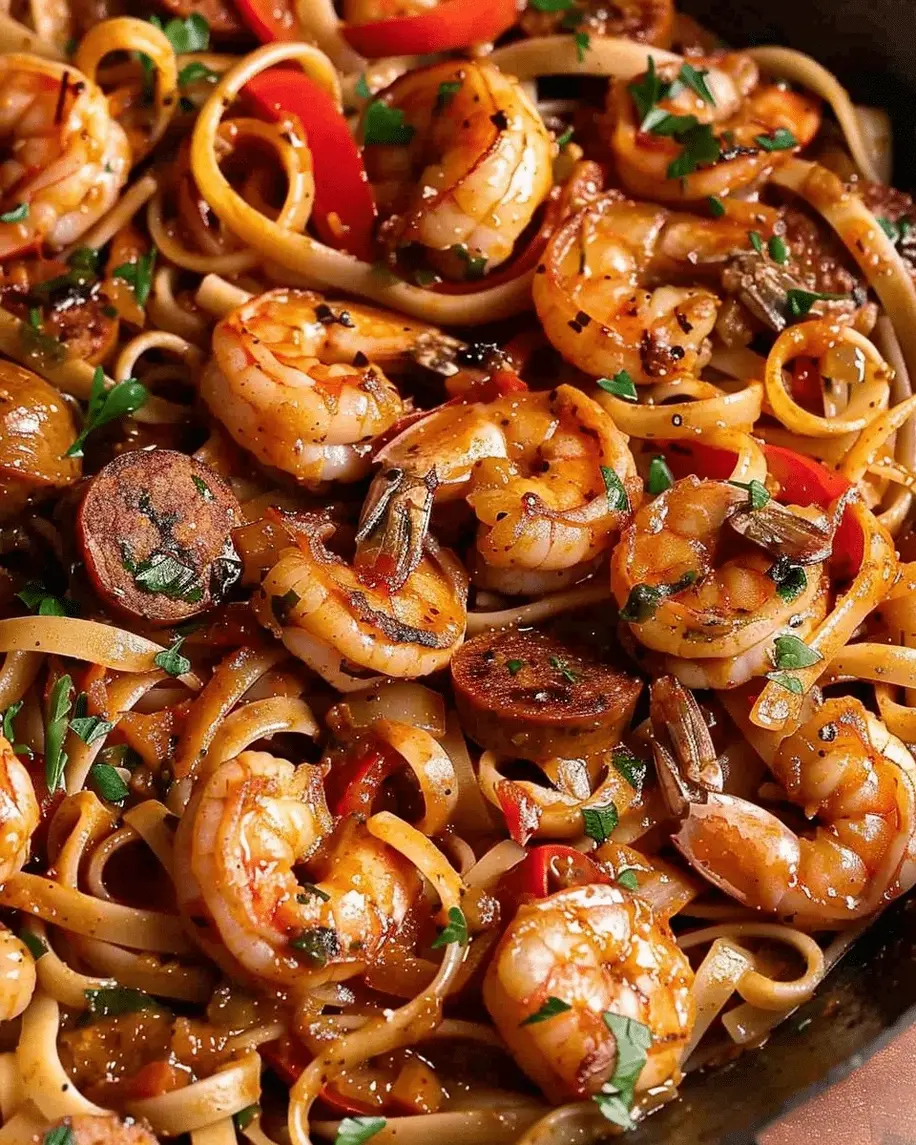
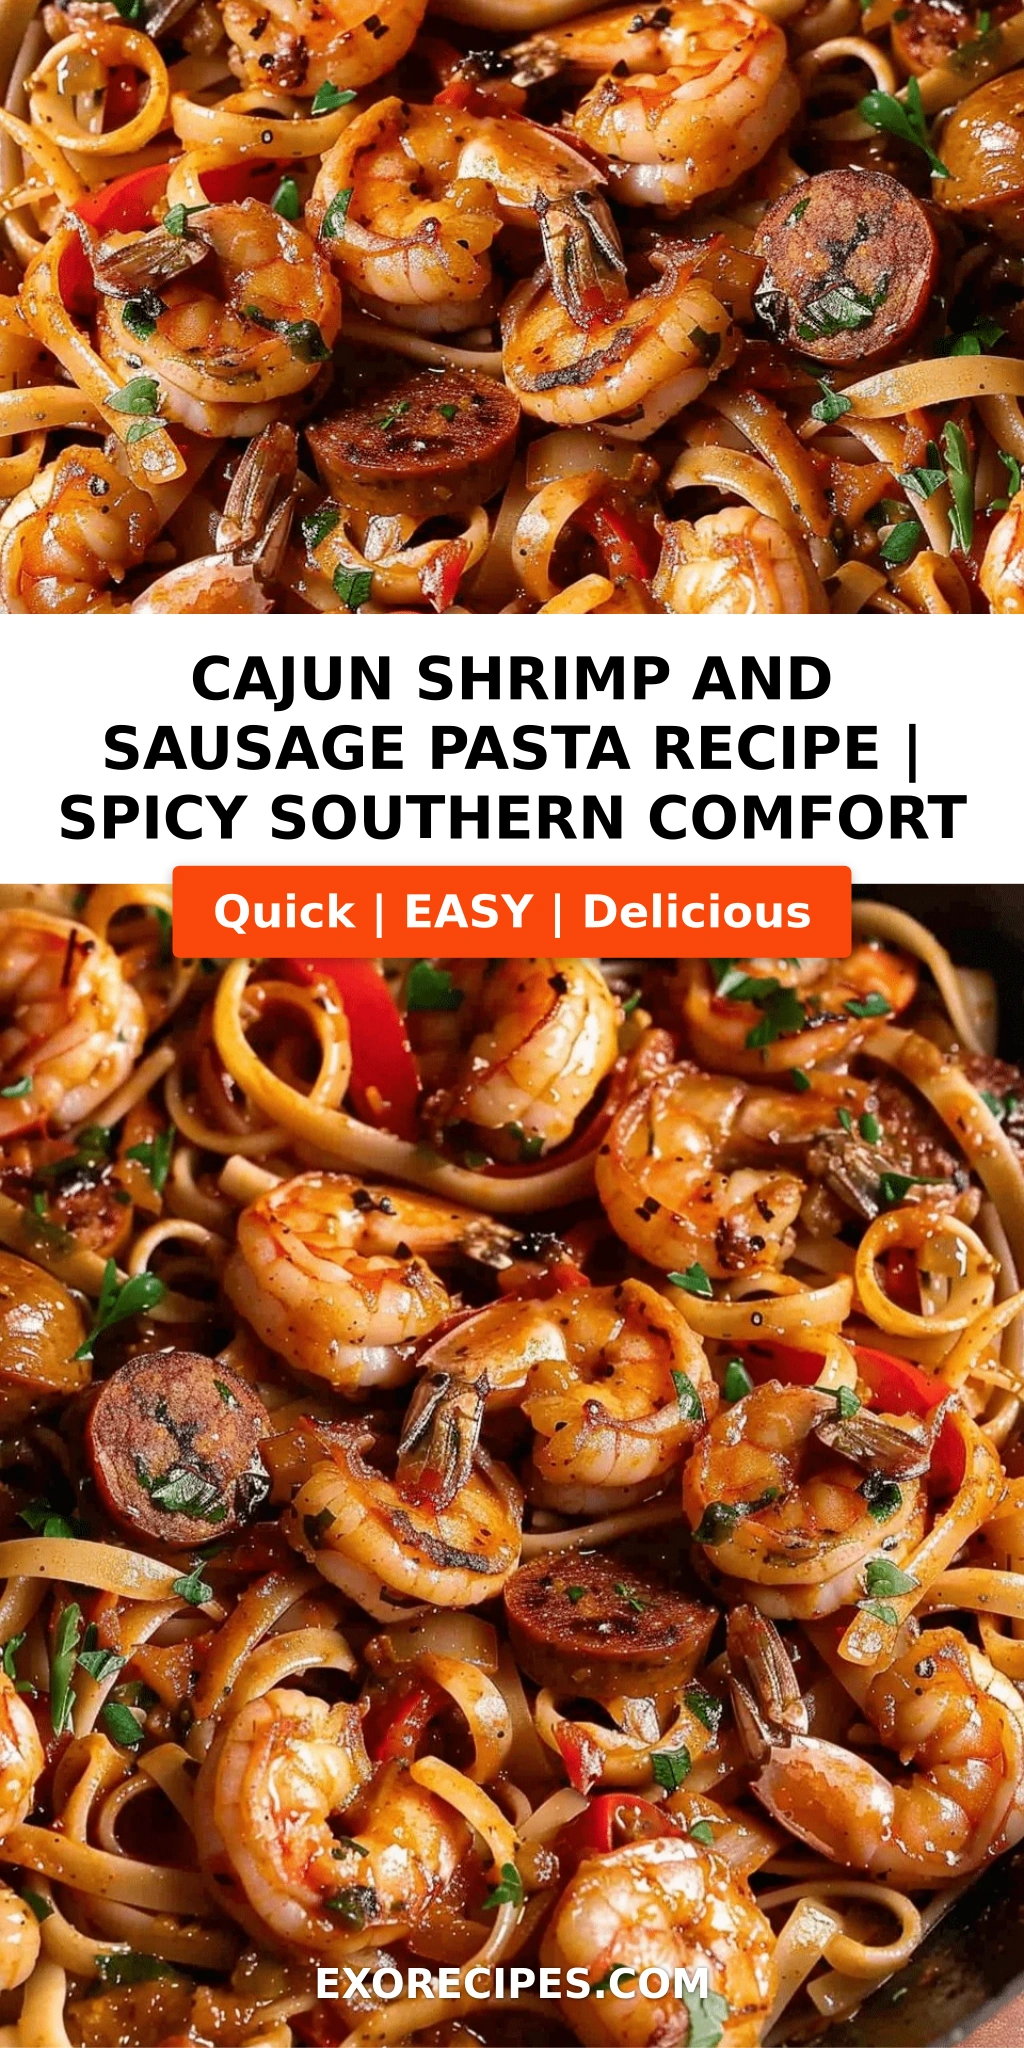
Sticky Sweet Spicy Firecracker Ground Chicken Recipe

Low Carb Firecracker Ground Chicken: A Sticky, Sweet, and Spicy Weeknight Wonder

⚖️
Difficulty
Easy
⏲️
Prep Time
10 mins
🕒
Cook Time
15 mins
⏱️
Total Time
25 mins
🍽️
Servings
4

Growing up in Morocco, the concept of “firecracker chicken” wasn’t exactly on our dinner table, but the love for bold, layered flavors and a good kick of spice? Absolutely! I remember my mother meticulously layering aromatic spices into her tagines, building flavors that sang. Now, in my NYC kitchen, I’ve taken that same spirit of creating impactful dishes and applied it to this incredible low carb firecracker ground chicken recipe. It’s got that irresistible sticky, sweet, and spicy coating, but I’ve cleverly swapped out traditional brown sugar for Swerve Brown Sugar, making it totally guilt-free and perfect for those watching their carb intake.

The aroma alone as this dish cooks is enough to draw everyone to the kitchen – first, the fragrant chili oil sizzles as the ground chicken browns, then the sweet and spicy notes of the firecracker sauce hit, caramelizing beautifully around every crumbly piece of meat. The texture is divine: perfectly cooked ground chicken, tender and juicy, coated in a glossy, syrupy sauce that clings to it with tantalizing stickiness. It’s truly a dance for the senses, reminiscent of the vibrant street food scenes in New York, where every bite is an explosion of flavor.

What sets my version apart is that it doesn’t sacrifice a single bit of flavor or satisfaction, even while keeping the carbs low. I’ve spent years perfecting the balance of heat from the buffalo sauce and red pepper flakes, with the sweetness from the Swerve brown sugar and a touch of tang from apple cider vinegar. This isn’t just a low-carb alternative; it’s a star dish in its own right—a sticky, sweet, and spicy sensation that’s faster than takeout, and one of my favorite ground chicken recipes for a quick weeknight meal. I’ll even share my secret for getting that perfect syrupy sauce, and some common mistakes to avoid!

Why This Firecracker Ground Chicken Recipe Is the Best

As a chef trained in Paris and seasoned by the culinary melting pot of NYC, I understand the importance of making every ingredient count. This low carb firecracker ground chicken recipe is a testament to that philosophy. My secret lies in the careful balance of the firecracker sauce, where the Swerve brown sugar mimics the caramel notes of traditional brown sugar without the carbs, and the vinegar cuts through the richness, creating a dynamic flavor profile that’s both comforting and exciting. It’s a dish that brings global flavors right into your home kitchen.

Achieving the perfect texture with ground meat can sometimes be tricky. The key here is not to overcook the chicken while also ensuring a beautiful caramelization on the outside. My method of browning first, then mincing, ensures that each piece of ground chicken develops a rich depth of flavor and a slightly crispy edge before it gets glazed in that glorious sticky sauce. This technique, a nod to the precision I learned in culinary school, makes all the difference in creating a dish that feels restaurant-worthy.

This recipe isn’t just delicious; it’s designed for efficiency, making it one of my favorite low carb chicken recipes. It’s incredibly foolproof and fast, perfect for those bustling weeknights when you want something satisfying without spending hours in the kitchen. The ingredients are simple and readily available, and the steps are straightforward enough for even a novice cook. I’ve streamlined the process to deliver maximum flavor with minimal effort, ensuring a delicious and healthy meal is always within reach.

Low Carb Firecracker Ground Chicken Ingredients

Cooking in New York City means I have access to incredible fresh ingredients, from local farmers’ markets to specialty stores. But for this low carb firecracker ground chicken, I wanted to use items that are easy to find anywhere, so you can whip this up no matter where you are! I picked up my ground chicken from a fantastic butcher in Chelsea, but your local grocery store will work just fine.

Ingredients List

  • 1 lb Ground Chicken (92/8)
  • 1/2 Tbsp (8g) Chili Oil
  • 1/2 C (96g) Swerve Brown Sugar
  • 1/4 C (60g) Buffalo Sauce
  • 2 Tbsp (30g) Cider or Rice Vinegar
  • 1 tsp Ground Ginger
  • 1 tsp Garlic Powder
  • 1/2 tsp Kosher Salt
  • 1/2 tsp Black Pepper
  • 1/2 tsp Red Pepper Flakes (adjust to taste)

Ingredient Spotlight

Ground Chicken (92/8): I prefer 92/8 ground chicken because it has enough fat for flavor without being greasy, creating the perfect base for our low carb firecracker ground chicken. When selecting ground chicken, look for packaging that shows a good pink color and avoid any that look gray or discolored. If you can only find leaner chicken, add a tiny bit more chili oil or a neutral oil like avocado oil to ensure it doesn’t dry out. You could also substitute with ground turkey for a similar lean profile, though the flavor will be slightly milder.

Swerve Brown Sugar: This is the hero ingredient that makes this dish low-carb without compromising on that irresistible sweet, sticky firecracker glaze. It behaves just like regular brown sugar in terms of caramelization and flavor, with a rich, molasses-like depth. You can usually find Swerve or similar erythritol-based brown sugar substitutes in the baking aisle or specialty diet section of larger supermarkets. If you don’t need a low-carb option, regular light brown sugar can be used as a 1:1 substitute, but be mindful it will significantly increase the carb count.

Chili Oil: For me, chili oil is more than just heat; it’s depth of flavor. The best chili oils have fragrant spices infused into them, providing a beautiful foundation for browning the chicken. I often make my own using techniques I learned in France, infusing neutral oil with dried chilies and aromatics. If you’re buying it, look for one with visible chili flakes or sediment for maximum flavor. A simple substitution would be a neutral oil like canola or vegetable oil combined with extra red pepper flakes, but you’ll lose some of that aromatic complexity.

Buffalo Sauce: This gives our firecracker sauce its signature tangy, spicy kick. I recommend using a classic Buffalo sauce brand like Frank’s RedHot for the most authentic flavor profile. Check the label for low-carb varieties if you’re strict with your diet, as some brands might contain added sugars. If you don’t have Buffalo sauce, you can create a similar flavor by combining hot sauce (like Tabasco) with a little melted butter and a dash of vinegar, but the exact balance will need some tasting and adjusting.

Cider or Rice Vinegar: The vinegar is crucial for balancing the sweetness and heat, adding a bright, zesty tang to the firecracker sauce. Apple cider vinegar offers a slightly fruity note, while rice vinegar is milder and cleaner. Use whichever you prefer or have on hand. In a pinch, white wine vinegar could work, but it has a sharper flavor, so start with a smaller amount and taste as you go. The acidity is key to lifting the entire dish.

Original IngredientBest SubstitutionFlavor / Texture Impact
Ground ChickenGround Turkey or Lean Ground PorkSimilar texture, slightly different flavor profile. May need a little extra oil if very lean.
Swerve Brown SugarErythritol-based brown sugar substitute or regular light brown sugarMaintains low-carb profile with erythritol; regular brown sugar will add carbs but provide classic sweetness.
Chili OilNeutral oil (canola, avocado) + extra red pepper flakesLoses some aromatic depth but retains heat and aids in browning.
Buffalo SauceHot sauce (e.g., Tabasco) + a dash of melted butter and vinegarAchieves similar heat and tang, but may require flavor adjustments to match Buffalo profile.
Cider or Rice VinegarWhite Wine Vinegar (start with less)Sharper flavor, adjust to taste to maintain balance.

Low Carb Firecracker Ground Chicken

How to Make Low Carb Firecracker Ground Chicken — Step-by-Step

Don’t let the name “firecracker” intimidate you; this low carb ground chicken recipe is surprisingly quick and simple, designed for success even on your busiest days.

Step 1: Brown the Chicken

Heat a large skillet over medium-high heat. Add the chili oil, then carefully place the ground chicken in the skillet, breaking it into 2-3 large pieces. Allow it to brown undisturbed for about 3-4 minutes per side to develop a beautiful crust. Once browned, mince the chicken with a spatula or wooden spoon, breaking it into smaller, even pieces, and continue to cook until fully opaque and no pink remains.

💡 mia’s Pro Tip: Resist the urge to break up the chicken too soon! Allowing it to brown in larger pieces first creates more flavorful, caramelized bits, similar to a technique I learned for searing meats in Paris. This depth of flavor is what makes your low carb firecracker chicken sing.

Step 2: Whisk the Firecracker Sauce

While the chicken is cooking, grab a small mixing bowl. Add the Swerve brown sugar, Buffalo sauce, cider or rice vinegar, ground ginger, garlic powder, kosher salt, black pepper, and red pepper flakes. Whisk everything together until the sugar is dissolved and the sauce is smooth and well combined. Give it a little taste and adjust the spiciness or sweetness to your liking. This is your chance to customize!

⚠️ Common Mistake to Avoid: Don’t wait until the last minute to make your sauce! Whisking it ahead of time ensures all the flavors meld and the Swerve brown sugar fully dissolves, preventing any grainy texture in your final low carb chicken recipe masterpiece.

Step 3: Thicken the Sauce

Once the chicken is fully cooked and no longer pink, pour the prepared firecracker sauce directly into the skillet with the ground chicken. Stir well to coat all the chicken evenly. Reduce the heat to medium-low and let the sauce simmer, stirring occasionally, for 3-5 minutes, or until it has thickened and become syrupy, clinging beautifully to the chicken. It should look glossy and inviting.

💡 mia’s Pro Tip: If your sauce isn’t thickening as much as you’d like, you can make a quick slurry with 1/2 teaspoon of xanthan gum (for low carb) or cornstarch mixed with 1 tablespoon of cold water, then slowly stir it into the simmering sauce. It will thicken almost instantly, giving you that perfect sticky glaze.

Step 4: Serve and Garnish

Remove the skillet from the heat. Spoon your delicious low carb firecracker ground chicken over your favorite base, such as cauliflower rice or a crisp salad. For an authentic touch and a pop of color, garnish generously with sliced scallions and a sprinkle of toasted sesame seeds. The fresh green of the scallions and the nutty crunch of the sesame seeds complete this dish beautifully.

⚠️ Common Mistake to Avoid: Over-garnish! While scallions and sesame seeds add flavor and visual appeal, too much can overpower the delicate balance of the firecracker chicken itself. A light sprinkling is all you need for an elegant finish.

StepActionDurationKey Visual Cue
1Brown the chicken in chili oil7-8 minsChicken forms a golden crust, then is fully opaque.
2Whisk sauce ingredients3 minsSauce is smooth, sugar dissolved.
3Simmer chicken in sauce3-5 minsSauce becomes glossy and thick, clinging to chicken.
4Serve and garnish1 minScallions are bright green, sesame seeds toasted.

Serving & Presentation

Serving this low carb firecracker ground chicken is where you can truly make it your own! I adore it spooned over a bed of fluffy cauliflower rice, which perfectly soaks up all that incredible sticky sauce. For an extra pop of color and freshness, a sprinkle of vibrant green scallions (I always keep a bunch in my NYC fridge!) and a dash of toasted sesame seeds are non-negotiable. The nutty crunch of the seeds provides a fantastic contrast to the tender chicken and sweet-spicy sauce.

Growing up, presentation was always key in my mother’s Moroccan kitchen, even for everyday meals. A beautifully arranged plate makes the food taste even better, don’t you agree? Consider serving it in a wide, shallow bowl to allow the colors to shine. If you’re looking for different accompaniments, a simple green salad with a light vinaigrette or some steamed low-carb vegetables like broccoli or green beans would be excellent choices, adding a fresh counterpoint to the richness of the chicken.

Think of it as a complete meal in one pan, but with endless possibilities for creative pairing. In NYC, we’re all about those exciting flavor combinations! I often pair this with a cool, crisp cucumber salad to provide a refreshing balance to the heat. It’s comforting, satisfying, and looks absolutely stunning on the plate, ready for any weeknight or casual gathering.

Pairing TypeSuggestionsWhy It Works
Side DishCauliflower rice, steamed broccoli, quick cucumber saladAbsorbs sauce, adds freshness & fiber, low carb options.
Sauce / DipPlain Greek yogurt, cooling avocado cremaOffers a creamy, cooling contrast to the spice.
BeverageIced green tea, sparkling water with lime, crisp dry white wineRefreshes the palate and balances the sweet-spicy notes.
GarnishSliced fresh scallions, toasted sesame seeds, chopped cilantroAdds fresh flavor, texture, and visual appeal.

Make-Ahead, Storage & Reheating

Living in the hustle and bustle of NYC, meal prep is my secret weapon to staying on track with healthy eating throughout the week. This low carb firecracker ground chicken is a fantastic candidate for making ahead, as its flavors actually deepen a bit overnight in the fridge. I often make a double batch on Sunday, portion it out, and then have delicious, ready-to-eat meals for days. It’s truly a lifesaver when my schedule gets hectic!

MethodContainerDurationReheating Tip
RefrigeratorAirtight container3-4 daysMicrowave on medium heat, stirring occasionally, or reheat in a skillet over medium-low heat until warmed through. Add a splash of water if needed to loosen sauce.
FreezerFreezer-safe bag or container2-3 monthsThaw overnight in the refrigerator; reheat as above. Ensure it’s fully thawed before reheating to avoid uneven cooking.
Make-AheadSeparate components in airtight containersSauce up to 1 week, cooked chicken 3-4 daysCook chicken, prepare sauce, store separately. Combine and simmer sauce with chicken just before serving for freshest taste.

When reheating, whether from the fridge or freezer, the key is to do it gently. Overheating can dry out the ground chicken and cause the sauce to seize up. I usually opt for a quick reheat in a skillet over medium-low heat, adding a tablespoon or two of water or chicken broth if the sauce seems too thick – it helps bring back that lovely saucy consistency without diluting the flavor.

If you’re using a microwave, reheat in short bursts (30-60 seconds) and stir between each, ensuring even warming. This method keeps the chicken juicy and the sauce perfectly coated. This recipe truly stands up well to reheating, making it one of my go-to low carb chicken recipes for easy and delicious meal prep.

Variations & Easy Swaps

VariationKey ChangeBest ForDifficulty Impact
Beef FirecrackerSwap ground chicken for ground beef (80/20 or 85/15)Heartier meal, deeper umami flavor.No change
Gluten-Free / Dairy-FreeEnsure Buffalo sauce is GF/DF certifiedDietary restrictions, ensures safety for allergies.No change
Thai-Inspired FirecrackerAdd lime juice, fish sauce, and a touch of peanut butterTangier, more complex Southeast Asian flavor profile.Slightly more complex flavor layering

Beef Firecracker Variation

If you’re a red meat lover, this recipe is incredibly adaptable. You can easily swap the ground chicken for ground beef (80/20 or 85/15 works beautifully). The beef will add a deeper, richer umami flavor to the firecracker sauce, making for a heartier meal. Just make sure to drain any excess fat after browning the beef before adding the sauce, as beef can render more fat than chicken.

Gluten-Free / Dairy-Free Firecracker

Good news for those with dietary restrictions – this low carb firecracker ground chicken is largely gluten-free and dairy-free as is! The key is to check your Buffalo sauce carefully, as some brands may contain gluten or dairy. Most popular brands like Frank’s RedHot Original are naturally GF/DF, but always double-check the label. Using chili oil instead of butter also keeps it dairy-free. It’s a naturally accommodating recipe!

Thai-Inspired Firecracker

To give this dish a vibrant Thai twist, I sometimes add a squeeze of fresh lime juice, a teaspoon of fish sauce, and a hint of a low-carb peanut butter powder into the sauce. The lime brightens everything up, the fish sauce adds incredible depth, and the peanut butter gives it a creamy, nutty richness—a flavor combination that always reminds me of the exciting culinary discoveries I make exploring Asian markets in Queens, NYC. These additions complement the sweet and spicy base perfectly without adding many carbs.

What is a good low-carb substitute for brown sugar in firecracker sauce?

For a truly delicious low-carb firecracker sauce, Swerve Brown Sugar is my absolute top recommendation. It’s an erythritol-based sweetener that closely mimics the taste and texture of traditional brown sugar, including that moist, slightly molasses-like flavor. This is crucial for achieving that sticky, sweet glaze without spiking blood sugar or adding unnecessary carbs. You’ll find it caramelizes beautifully, just like regular brown sugar, making it perfect for this low carb firecracker ground chicken recipe. Other granulated erythritol or monk fruit sweeteners could work, but Swerve Brown Sugar specifically delivers the best brown sugar experience for savory applications like this.

How can I make this ground chicken recipe less spicy for kids?

To reduce the heat for younger palates or those sensitive to spice, the easiest adjustment is to significantly reduce or completely omit the red pepper flakes. Additionally, you can swap out the Buffalo sauce for a milder hot sauce, or even a blend of ketchup and a little apple cider vinegar to maintain the tangy-sweet profile without the intense heat. When I’m cooking for a mixed crowd, I often make the sauce with less spice and then offer extra chili oil or red pepper flakes on the side for adults to customize their own portions. This way, everyone can enjoy this delicious low carb firecracker ground chicken to their liking!

What are some low-carb side dishes to serve with firecracker chicken?

Since this low carb firecracker ground chicken is so flavorful, you want a side that complements without competing. My go-to is always cauliflower rice – it’s light, fluffy, and soaks up all that amazing sticky sauce beautifully. Other fantastic low-carb options include steamed or roasted broccoli, green beans sautéed with garlic, or a crisp side salad with a simple vinaigrette. For an even more refreshing contrast, a quick cucumber and red onion salad made with a little rice vinegar and sesame oil would be delightful. These sides ensure your meal remains balanced and delicious.

Can I make this recipe ahead of time and reheat it without it getting dry?

Absolutely, this low carb firecracker ground chicken is fantastic for meal prep! To avoid dryness, store it in an airtight container in the refrigerator for up to 3-4 days. When reheating, I highly recommend using a skillet over medium-low heat. Add a splash of water or low-carb chicken broth (about 1-2 tablespoons) to the pan with the chicken. This moisture helps to rehydrate the chicken and “wake up” the sauce, bringing it back to that perfectly syrupy consistency without drying out the meat. Stir frequently until warmed through, and it will taste almost as good as freshly made!

Can I use other ground meats for this firecracker recipe?

Yes, you certainly can! While my recipe specifically features ground chicken for a lighter, low-carb option, this firecracker sauce is incredibly versatile. You could easily substitute ground turkey, which would yield a very similar lean profile and texture. Ground pork would also work wonderfully, adding a slightly richer flavor and more fat, which might mean draining some after browning. Even ground beef would be delicious for a heartier meal, just ensure to drain off any excess fat before adding the sauce. The key is that sticky-sweet-spicy sauce, which pairs well with almost any ground meat. Experiment and see what you love!

Share Your Version!

I truly hope you adore this low carb firecracker ground chicken as much as I do! It brings a burst of flavor and excitement to any mealtime, proving that healthy eating never has to be boring. I’d be absolutely thrilled to hear how it turns out for you.

Please leave a star rating and a comment below to let me know your thoughts – I read every single one! Did you make any fun variations? What low-carb sides did you serve it with? Don’t forget to snap a photo and share your culinary creation on Instagram or Pinterest. Tag @exorecipes so I can see your beautiful dish and celebrate with you! What’s your favorite way to add a bit of ‘firecracker’ to your weeknight dinners?

From my NYC kitchen to yours — I hope this recipe brings as much warmth to your table as it does to mine. — mia 🧡

📌

Love This Recipe? Save It to Pinterest!

If you enjoyed this Low Carb Firecracker Ground Chicken recipe, don’t let it get lost in your browser tabs! 😄 Pin it now so you can find it again anytime — and explore hundreds more tried-and-tested recipes waiting for you on my Pinterest boards.

👉 Follow mia on Pinterest @chefrecipes2

📌 Pin this recipe · 🔁 Re-pin your favorites · 💬 Tag me when you make it — I love seeing your creations!

Print

clock clock iconcutlery cutlery iconflag flag iconfolder folder iconinstagram instagram iconpinterest pinterest iconfacebook facebook iconprint print iconsquares squares iconheart heart iconheart solid heart solid icon

Firecracker Ground Chicken

  • Author: Chef Mia

Description

Ground chicken cooked in chili oil and tossed with a sticky sweet and spicy firecracker sauce.


Ingredients

Scale
  • 1 lb Ground Chicken (92/8)
  • 1/2 Tbsp (8g) Chili Oil
  • 1/2 C (96g) Swerve Brown Sugar
  • 1/4 C (60g) Buffalo Sauce
  • 2 Tbsp (30g) Cider or Rice Vinegar
  • 1 tsp Ground Ginger
  • 1 tsp Garlic Powder
  • 1/2 tsp Kosher Salt
  • 1/2 tsp Black Pepper
  • 1/2 tsp Red Pepper Flakes

Instructions

  1. Heat a skillet over medium-high heat with the chili oil. Brown both sides of the chicken, about 3-4 minutes per side, before mincing and fully cooking.
  2. While the chicken cooks, whisk the remaining ingredients together in a mixing bowl.
  3. Once the chicken is fully cooked, add the sauce to the pan and cook until thick and syrupy.
  4. Serve with scallions and toasted sesame seeds over rice or cauliflower rice.


Nutrition

  • Calories: 185 calories
  • Fat: 11 grams fat
  • Carbohydrates: 0 grams carbohydrates
  • Protein: 22 grams protein


Low Carb Firecracker Ground Chicken

Crispy Bang Bang Chicken with Homemade Sauce

Bang Bang Chicken with Crispy Panko Crust – Your New Favorite Spicy Chicken Recipe

⚖️
Difficulty
Medium
⏲️
Prep Time
20 mins
🕒
Cook Time
25 mins
⏱️
Total Time
45 mins
🍽️
Servings
4

Growing up in Morocco, cooking was a daily ritual, a symphony of spices and fresh ingredients. My culinary training in Paris taught me precision and the art of classic sauces. Now, living in the vibrant, melting-pot food scene of New York City, I love taking those foundations and giving them an exciting, modern twist. That’s exactly what I’ve done with this incredible Bang Bang Chicken recipe, which features a signature crispy panko crust. It’s a dish that perfectly embodies the boldness I adore about NYC’s food landscape: crunchy, creamy, and with just the right kick. If you’re searching for an easy bang bang chicken recipe that truly delivers on flavor and texture, you’ve found it!

Imagine biting into perfectly cooked chicken tenderloins, each piece encased in a golden, gloriously crispy panko crust that shatters delicately. Then, your palate is greeted by my homemade bang bang sauce recipe – a luscious, creamy, sweet-and-spicy concoction that clings beautifully to every crevice. The aroma alone is enough to transport you; the sweet chili and Sriracha mingling with the subtle garlic powder from the chicken batter creates an intoxicating fragrance that will make your kitchen the envy of the block. It’s a dance of textures and temperatures, with the warm, tender chicken contrasting with the cool, vibrant sauce.

What sets my version apart is twofold: the meticulous attention to achieving that perfectly crispy panko crust, a technique I honed over years of perfecting fried dishes, and the balanced complexity of the homemade bang bang sauce. While many recipes opt for a quick whisk, I’ll show you how a few simple considerations can elevate your sauce from good to unforgettable. I’ll even share mia’s Pro Tip for ensuring your chicken stays ultra-crispy, alongside a common mistake to avoid that often leads to a soggy result. Trust me, with my guidance, this spicy chicken recipe will become a staple in your home.

Why This Bang Bang Chicken Recipe Is the Best

My version of Bang Bang Chicken stands out because it marries bold flavors with a superior texture. The secret lies in the double-dredging technique and the addition of cornstarch to the batter, creating an incredibly light yet durable coating. This isn’t just fried chicken; it’s a crispy masterpiece. My French culinary training taught me the importance of a well-balanced sauce, and this bang bang sauce is no exception – it’s creamy, sweet, and spicy, hitting all the right notes without overpowering the crispy chicken.

The perfected texture comes from using panko breadcrumbs, known for their larger, flakier texture compared to regular breadcrumbs, which translates to an extra-crispy exterior. I also make sure the oil temperature is just right, ensuring a quick fry that cooks the chicken through while developing that irresistible golden-brown crunch. Each piece is tender and juicy on the inside, a beautiful contrast to the crisp outside, making every bite satisfying.

This recipe is surprisingly foolproof and fast, especially for eager home cooks. While deep-frying might sound intimidating, I’ve broken it down into simple, manageable steps, including specific temperature guidance. Even if you’re new to frying, my clear instructions and tips will help you achieve restaurant-quality results in under an hour. It’s a fantastic weeknight meal that tastes like you spent hours in the kitchen!

Bang Bang Chicken Recipe Ingredients

When I head to the farmers market here in NYC, I’m always looking for the freshest ingredients, and for this bang bang chicken recipe, quality makes a difference. The tenderloins should be plump, and the fresh parsley really brightens the dish. My mother always said, “Good food starts with good ingredients,” and I live by that philosophy, even when whipping up fun, spicy dishes like this one.

Ingredients List

  • 1 cup (232 g) mayonnaise
  • ½ cup (132 g) Thai sweet chili sauce
  • 1 teaspoon Sriracha, (or more to taste)
  • 2 tablespoons honey
  • 1 ½ pounds boneless skinless chicken tenderloins
  • 1 cup (245 g) buttermilk
  • ¾ cup (94 g) all-purpose flour
  • ½ cup (64 g) cornstarch
  • 1 large egg, (room temperature)
  • 1 tablespoon Sriracha
  • ½ teaspoon garlic powder
  • ½ teaspoon kosher salt
  • ¼ teaspoon black pepper
  • teaspoon cayenne pepper, (optional)
  • 2 cups (216 g) panko breadcrumbs, (plain)
  • canola oil, (for frying)
  • parsley, (chopped, for garnish)

Ingredient Spotlight

Mayonnaise: This is the creamy backbone of your bang bang sauce. I recommend a good quality, full-fat mayo for the best richness and emulsification. Brand matters here; a well-made mayonnaise will hold the sauce together beautifully. If you’re out of traditional mayo, a Greek yogurt alternative can work in a pinch for creaminess, but it will add a slight tang and reduce the richness, so you might need to adjust the honey to balance it.

Thai Sweet Chili Sauce: Essential for that signature sweet and tangy foundation of the bang bang sauce. Look for a brand with a good balance of sweet, heat, and garlic. It’s widely available in the international aisle of most US supermarkets. If you absolutely can’t find it, a mix of apricot jam and a touch of rice vinegar could offer a similar sweet-sour profile, though it won’t have the same depth of chili flavor.

Chicken Tenderloins: I prefer tenderloins for their even cooking and consistent texture, making them perfect for this easy bang bang chicken. They’re also less prone to drying out than breasts. When selecting, look for plump, pale pink pieces. If you only have chicken breasts, cut them into 1-inch thick strips of similar size to ensure even cooking, though they might require slightly less frying time.

Buttermilk: This acidic ingredient is crucial for tenderizing the chicken and helping the batter adhere. It gives the chicken a moist, flavorful interior. If you don’t have buttermilk, you can easily make your own by adding 1 tablespoon of white vinegar or lemon juice to a measuring cup, then filling it with regular milk to the 1-cup line. Let it sit for 5 minutes until it curdles slightly before using.

Panko Breadcrumbs: These Japanese breadcrumbs are non-negotiable for that extra crispy panko crust. They are lighter and flakier than traditional breadcrumbs, preventing the chicken from becoming heavy or greasy. You can find them in most grocery stores, usually next to regular breadcrumbs. Avoid substituting with standard fine breadcrumbs, as they will result in a denser, less crispy crust.

Original IngredientBest SubstitutionFlavor / Texture Impact
MayonnaiseGreek YogurtSlightly tangier, less rich, adjust honey.
Thai Sweet Chili SauceApricot jam + Rice VinegarLacks chili depth, but offers sweet-sour.
Chicken TenderloinsChicken Breast (cut into strips)May cook faster, can be slightly drier.
ButtermilkMilk + Vinegar/Lemon (for DIY buttermilk)Same tenderizing effect.
Panko BreadcrumbsCrushed CornflakesDifferent texture, still crispy, but not as light.

Bang Bang Chicken

How to Make Bang Bang Chicken — Step-by-Step

Making perfect crispy Bang Bang Chicken is simpler than you might think, and I’m here to guide you through each step to ensure a delicious outcome every time.

Step 1: Prepare the Bang Bang Sauce

In a small bowl, combine 1 cup (232 g) mayonnaise, ½ cup (132 g) Thai sweet chili sauce, 1 teaspoon Sriracha (or more to your heat preference), and 2 tablespoons honey. Whisk all the ingredients together until the sauce is smooth and thoroughly combined. Cover and refrigerate until ready to use, allowing the flavors to meld.

💡 mia’s Pro Tip: For an extra smooth sauce, use an immersion blender or a mini food processor. This creates a beautifully emulsified sauce with a silky texture that clings perfectly to the chicken.

Step 2: Marinate and Batter the Chicken

In a medium mixing bowl, whisk together 1 cup (245 g) buttermilk, ¾ cup (94 g) all-purpose flour, ½ cup (64 g) cornstarch, 1 large room-temperature egg, 1 tablespoon Sriracha, ½ teaspoon garlic powder, ½ teaspoon kosher salt, ¼ teaspoon black pepper, and if you like a little extra heat, ¼ teaspoon cayenne pepper. Add the 1 ½ pounds boneless skinless chicken tenderloins to the batter and toss to ensure each piece is fully coated. Let it sit for at least 15 minutes, or up to 30 minutes in the refrigerator, to allow the buttermilk to work its magic.

⚠️ Common Mistake to Avoid: Don’t skip the buttermilk! It’s essential for both tenderizing the chicken and allowing the panko coating to adhere properly. Without it, your chicken might be dry, and the crust less secure.

Step 3: Coat the Chicken with Panko

Pour 2 cups (216 g) plain panko breadcrumbs onto a shallow plate or a wide, shallow dish. Working one piece at a time, remove the chicken from the batter, gently shaking off any excess. Dredge the chicken thoroughly in the panko, pressing lightly to ensure the breadcrumbs adhere completely to all sides. Arrange the coated chicken pieces on a clean plate. Repeat this process with all remaining chicken pieces. Set aside while you prepare your frying oil.

Step 4: Fry the Chicken Tenderloins

To a large, sturdy skillet or Dutch oven, add about an inch of canola oil. Heat the oil over medium-high heat until it reaches a consistent temperature of 365°F (185°C). Use a cooking thermometer to monitor this carefully. Working in batches to avoid overcrowding the pan (which can lower oil temperature and lead to soggy chicken), carefully add the coated chicken pieces. Cook for about 2-3 minutes on each side, or until the chicken is golden brown and reaches an internal temperature of 165°F (74°C) as verified with an instant-read thermometer. Remove fried chicken and transfer to a paper towel-lined plate to drain any excess oil. Ensure the oil returns to 365°F before adding the next batch.

💡 mia’s Pro Tip: The oil temperature is critical! Too low, and your chicken will absorb too much oil and be greasy. Too high, and the outside will burn before the inside is cooked. A reliable thermometer is your best friend here. French technique emphasizes precision, and this is where it truly shines.

Step 5: Toss and Serve

Once all the chicken is fried, transfer it to a large serving plate. Drizzle liberally with the prepared bang bang sauce. For that extra touch of freshness and vibrant color, sprinkle with freshly chopped parsley. Serve warm and enjoy your homemade easy bang bang chicken!

StepActionDurationKey Visual Cue
1Prepare the Bang Bang Sauce5 minutesSmooth, creamy, well-combined sauce.
2Marinate and Batter Chicken15-30 minutesChicken evenly coated in thick batter.
3Coat Chicken with Panko10 minutesChicken fully covered in panko, pressed to adhere.
4Fry Chicken Tenderloins2-3 mins per side (per batch)Golden brown, internal temp 165°F.
5Toss and Serve2 minutesChicken coated in sauce, garnished with parsley.

Serving & Presentation

Serving this Bang Bang Chicken is all about celebrating its vibrant flavors and textures. I love to arrange the golden, crispy chicken artfully on a platter, then cascade the luscious bang bang sauce generously over the top. The contrast of the creamy, orange-hued sauce against the golden chicken is visually striking. A flourish of freshly chopped parsley adds a pop of green and a touch of brightness, echoing the fresh herbs I always reach for in my Moroccan kitchen. For an elevated touch, you could even add a sprinkle of toasted sesame seeds, a nod to Asian-inspired flavors, or some thinly sliced scallions.

For me, food is an experience, and presentation is key, a lesson deeply ingrained during my time in Paris. I often serve this dish family-style, with individual bowls of extra sauce for dipping – because who doesn’t love more of that incredible homemade bang bang sauce?

This spicy chicken recipe pairs wonderfully with a variety of sides. In my NYC kitchen, I often opt for something fresh and crisp to balance the richness. Think a simple steamed jasmine rice to soak up every drop of sauce, or a refreshing cucumber and avocado salad with a light vinaigrette. If you want to lean into a more substantial meal, consider some stir-fried noodles or a quick sauté of snap peas and bell peppers. The versatility of bang bang chicken means it can be the star of a casual weeknight dinner or a show-stopping dish for entertaining.

Pairing TypeSuggestionsWhy It Works
Side DishSteamed Jasmine Rice, Stir-fried Noodles, Cucumber SaladBalances spice, soaks up sauce, offers fresh crispness.
Sauce / DipExtra Bang Bang Sauce, Sweet Chili Sauce, RanchAllows for individual customization of flavor intensity.
BeverageIced Tea, Ginger Ale, Light LagerRefreshing counterpoint to the rich and spicy flavors.
GarnishFresh Parsley, Toasted Sesame Seeds, Thinly Sliced ScallionsAdds color, fresh aroma, and textural contrast.

Make-Ahead, Storage & Reheating

Living in the hustle and bustle of NYC, I’ve mastered the art of efficient meal prep without sacrificing flavor. This Bang Bang Chicken is surprisingly adaptable for make-ahead options, allowing you to enjoy that crispy goodness even on your busiest days. Planning ahead means less stress and more enjoyment of your home-cooked meals!

MethodContainerDurationReheating Tip
RefrigeratorAirtight container (chicken and sauce separate)3-4 daysReheat chicken in oven/air fryer, then toss with fresh sauce.
FreezerFreezer-safe bag/container (un-sauced chicken)2-3 monthsThaw overnight. Re-fry or bake from frozen until crispy, then sauce.
Make-AheadBatter/Panko prep for chicken. Sauce alone.1 day in advance (chicken un-fried), 5 days (sauce)Fry fresh for best crispness. Store sauce separately.

For the best experience, I recommend making the bang bang sauce recipe up to 5 days in advance and storing it covered in the refrigerator; the flavors deepen beautifully. The chicken itself is best when fried fresh, but you can certainly batter and bread the tenderloins a few hours ahead of time and keep them chilled until you’re ready to fry.

If you have leftovers of the fried chicken (without the sauce), the absolute best way to reheat them is in an air fryer at 375°F (190°C) for 5-7 minutes, or in a conventional oven at 400°F (200°C) for 10-15 minutes, until crispy and heated through. Avoid the microwave, as it will make the beautiful panko crust soggy. Once reheated, toss immediately with fresh bang bang sauce for that delectable experience.

Variations & Easy Swaps

Part of the joy of cooking, for me, is adapting a recipe to suit different tastes or dietary needs. This Bang Bang Chicken recipe is incredibly versatile, and you can easily tweak it to become your own masterpiece, much like how a classic tagine in Morocco can take on endless variations depending on the day’s market finds.

VariationKey ChangeBest ForDifficulty Impact
Air Fryer Bang Bang ChickenAir frying instead of deep fryingHealthier option, less oil, easy cleanup.Easier
Gluten-Free Bang Bang ChickenGluten-free flour and pankoDietary restriction, very minimal flavor change.No Change
Honey-Garlic Bang Bang ChickenAdjust Sriracha, add more garlic powderMilder spice, stronger aromatic notes.No Change

Air Fryer Bang Bang Chicken

If you’re looking to cut down on oil or simply prefer a less hands-on cooking method, an air fryer is a fantastic alternative. After coating the chicken in panko, lightly spritz or brush the pieces with oil. Air fry at 375°F (190°C) for 15-20 minutes, flipping halfway through, until golden and cooked through. The result is still beautifully crispy, though the texture will be slightly different from deep-fried. This method still allows you to enjoy that amazing homemade bang bang sauce with a lighter touch.

Gluten-Free Bang Bang Chicken

Making this recipe gluten-free is very straightforward! Simply swap the all-purpose flour for a good quality gluten-free all-purpose flour blend (one that contains xanthan gum works best for structure), and ensure you use certified gluten-free panko breadcrumbs. I’ve tested this, and the crispiness and flavor remain remarkably similar, allowing everyone to enjoy this delightful spicy chicken recipe without compromise.

Honey-Garlic Bang Bang Chicken

For those who prefer a milder heat or a richer, sweeter flavor profile, consider adjusting the Sriracha down to ½ teaspoon in both the sauce and the chicken batter. Then, increase the garlic powder in the batter to 1 teaspoon and add 1-2 cloves of minced fresh garlic to the sauce. This creates a wonderfully aromatic, slightly less spicy version of Bang Bang Chicken that still delivers on that irresistible sweet and savory balance, reminiscent of some of the delightful sweet and savory preparations I learned in Paris.

What is Bang Bang sauce made of?

The classic Bang Bang sauce, and my delicious homemade version, is a creamy, sweet, and spicy concoction. It typically consists of a base of mayonnaise, which provides that smooth, rich texture. To that, we add Thai sweet chili sauce for its characteristic balance of sweetness and mild heat, alongside Sriracha for an extra kick of spice. A touch of honey rounds out the flavors, adding another layer of sweetness that perfectly complements the warmth from the chilis. It’s a simple yet incredibly flavorful combination that creates that signature “bang” in Bang Bang Chicken.

How do you make Bang Bang Chicken less spicy?

To reduce the spice level in your Bang Bang Chicken, you have a few easy adjustments. The Sriracha is the primary source of heat in both the sauce and the chicken batter. You can reduce or even omit the Sriracha from the sauce entirely, starting with just ¼ teaspoon or a dash, then tasting and adjusting. Similarly, in the chicken batter, you can remove the optional cayenne pepper and cut the Sriracha to ½ teaspoon or less. The Thai sweet chili sauce still offers a pleasant, mild warmth without being overpowering, ensuring your dish remains flavorful yet friendly to sensitive palates.

Can I make Bang Bang Chicken in an air fryer?

Absolutely, you can make a fantastic Air Fryer Bang Bang Chicken! After you’ve coated your chicken tenderloins in the panko breadcrumbs, lightly spray or brush them with a neutral oil like canola or avocado oil. Arrange them in a single layer in your air fryer basket, ensuring not to overcrowd. Air fry at 375°F (190°C) for about 15-20 minutes, flipping halfway through, until the chicken is golden brown, crispy, and cooked to an internal temperature of 165°F (74°C). This method yields a wonderfully crispy result with significantly less oil, making it a great lighter alternative!

What do you serve with Bang Bang Chicken?

Bang Bang Chicken is incredibly versatile and pairs well with many sides! A classic choice is steamed jasmine rice, as its neutral flavor and fluffy texture perfectly complement the rich, spicy sauce. For something lighter, I often serve it with a crisp, refreshing cucumber and avocado salad, or a simple side of quick-sautéed snap peas or broccoli. If you’re looking for more of a full meal, stir-fried noodles or a quinoa salad can also be delicious accompaniments, providing different textures and flavors to round out the dish. Don’t forget a sprinkle of fresh parsley for garnish!

Can I prepare the chicken ahead of time?

Yes, you can certainly do some prep work ahead of time to make serving Bang Bang Chicken even quicker! The bang bang sauce can be made up to 5 days in advance and stored in an airtight container in the refrigerator; the flavors often deepen beautifully. For the chicken, you can batter and bread the tenderloins several hours before frying, keeping them covered and refrigerated. This allows for a fresh fry right before serving, ensuring maximum crispness. However, I don’t recommend frying the chicken too far in advance, as the panko crust will lose its crispness over time, especially if sauced.

Why is my fried chicken not crispy?

There are a few key reasons why fried chicken might not turn out as crispy as desired, which I’ve learned to avoid in my years of cooking. One major culprit is incorrect oil temperature: if the oil is too cool, the chicken will absorb too much oil and become soggy instead of crisp. Conversely, if it’s too hot, the exterior can burn before the interior cooks through. Overcrowding the pan is another common mistake, as it drastically lowers the oil temperature. Lastly, ensure your panko breadcrumbs are fresh and you’ve pressed them firmly onto the chicken; they’re essential for that superior crunchy crust.

What kind of oil is best for frying chicken?

For deep frying chicken, I always recommend using a neutral-flavored oil with a high smoke point. Canola oil is my go-to choice, as it’s readily available, affordable, and has a mild flavor that won’t interfere with the delicious taste of the chicken and sauce. Other excellent options include vegetable oil, sunflower oil, or grapeseed oil. Avoid oils with lower smoke points like olive oil, as they can burn and impart an off-flavor to your food. The key is an oil that can withstand the high heat necessary for a perfectly crispy fry.

Share Your Version!

I truly hope this Bang Bang Chicken recipe brings a burst of flavor and excitement to your table, just as it does to mine! There’s nothing I love more than seeing what you create in your kitchens.

Did you make it? Please leave a star rating and a comment below to let me know how it turned out – your feedback truly inspires me. And if you snap a photo, be sure to share it on Instagram or Pinterest and tag @exorecipe so I can see your delicious creation! What’s your favorite way to serve this crispy chicken?

From my NYC kitchen to yours — I hope this recipe brings as much warmth to your table as it does to mine. — mia 🧡

📌

Love This Recipe? Save It to Pinterest!

If you enjoyed this Bang Bang Chicken recipe, don’t let it get lost in your browser tabs! 😄 Pin it now so you can find it again anytime — and explore hundreds more tried-and-tested recipes waiting for you on my Pinterest boards.

👉 Follow mia on Pinterest @chefrecipes2

📌 Pin this recipe · 🔁 Re-pin your favorites · 💬 Tag me when you make it — I love seeing your creations!

Print

clock clock iconcutlery cutlery iconflag flag iconfolder folder iconinstagram instagram iconpinterest pinterest iconfacebook facebook iconprint print iconsquares squares iconheart heart iconheart solid heart solid icon

Bang Bang Chicken

  • Author: Chef Mia

Description

Bang Bang Chicken is panko-crusted chicken tenderloins deep-fried to a crispy golden brown, drizzled with homemade bang bang sauce.


Ingredients

Scale
  • 1 cup (232 g) mayonnaise
  • ½ cup (132 g) Thai sweet chili sauce
  • 1 teaspoon Sriracha, (or more to taste)
  • 2 tablespoons honey
  • 1 ½ pounds boneless skinless chicken tenderloins
  • 1 cup (245 g) buttermilk
  • ¾ cup (94 g) all-purpose flour
  • ½ cup (64 g) cornstarch
  • 1 large egg, (room temperature)
  • 1 tablespoon Sriracha
  • ½ teaspoon garlic powder
  • ½ teaspoon kosher salt
  • ¼ teaspoon black pepper
  • teaspoon cayenne pepper, (optional)
  • 2 cups (216 g) panko breadcrumbs, (plain)
  • canola oil, (for frying)
  • parsley, (chopped, for garnish)

Instructions

  1. In a small bowl, combine the mayonnaise, Thai sweet chili sauce, Sriracha, and honey. Mix well and set aside.
  2. In a medium mixing bowl add buttermilk, flour, cornstarch, egg, sriracha, garlic powder, salt, pepper, and cayenne pepper. Whisk to combine. Add chicken tenders and toss to coat.
  3. Add Panko to a shallow plate.
  4. Working one piece at a time, remove the chicken from the batter, gently shaking off any excess batter. Dredge the chicken in the panko, pressing slightly to adhere. Set on a clean plate. Repeat with the remaining chicken pieces. Set aside while you heat the oil.
  5. To a large skillet, add about an inch of oil. Heat oil over medium-high heat until it reaches a temperature of 365°F.
  6. Working in batches, being careful not to overcrowd the pan, add chicken and cook until browned (about 2-3 minutes on each side), or until the chicken reaches an internal temperature of 165°F. Repeat with the remaining chicken tenderloins, making sure the oil is 365°F before adding more chicken.
  7. Transfer the chicken to a paper towel-lined plate to drain slightly before adding it to a serving plate.
  8. Toss the chicken with the bang bang sauce, top with chopped parsley, and serve warm.


Nutrition

  • Calories: 1415 kcal


Bang Bang Chicken

Easy Vegan Smoky Black Eyed Pea Soup Recipe

Smoky Black Eyed Pea Soup with Collard Greens – A Vegan Southern Classic

⚖️
Difficulty
Easy
⏲️
Prep Time
15 mins
🕒
Cook Time
60 mins
⏱️
Total Time
75 mins
🍽️
Servings
6-8

Growing up in Morocco, my mother’s kitchen was always filled with the aroma of cumin, coriander, and hearty legumes simmering away to perfection. While black eyed peas weren’t a staple in our particular region, the soulfulness of a well-made bean stew is something I carry with me to this day. There’s a magic to transforming simple ingredients into something deeply satisfying, and that’s precisely what I’ve aimed for with this smoky black eyed pea soup. It’s my plant-based tribute to the classic Southern comfort, packing in incredible flavor without any meat, and making it perfect for a healthy start to the year or a cozy meal anytime.

Imagine stepping into your kitchen and being greeted by the warm, earthy scent of smoked paprika mingling with sautéed aromatics – onion, carrot, and celery. The collard greens slowly wilting into the rich, tomato-infused broth add a touch of bittersweetness and vibrant color, while the black eyed peas themselves offer a creamy, tender bite. This vegetarian black eyed pea soup is a symphony of textures and flavors; the subtle tang of diced tomatoes, the herbal notes of thyme and basil, and of course, that unmistakable smoky essence that makes your palate sing. It’s like a warm hug in a bowl, a dish that feels both exotic and familiar at the same time, much like my journey from Paris to NYC.

This easy black eyed pea soup is more than just a recipe; it’s a celebration of simple, wholesome ingredients elevated through careful technique. I’ve perfected this version to ensure it delivers maximum smoky flavor and heartiness, all while keeping it vegan, gluten-free, and incredibly easy to make in one pot. You’ll discover my secret for achieving that deep smoky taste without bacon, and I’ll share a crucial pro tip on when to add your greens for perfect tenderness. Plus, I’ll highlight a common mistake that can lead to bland soup, so yours turns out vibrant and delicious every time.

Why This Smoky Black Eyed Pea Soup Recipe Is the Best

The secret to this smoky black eyed pea soup lies in a blend of techniques I’ve refined over years. My experience in Parisian culinary schools taught me the foundational importance of building flavor layers. Here, we start by blooming the smoked paprika with the aromatics, creating a rich, profound base that permeates the entire soup. This particular kind of paprika, a staple from my mother’s Moroccan kitchen, provides that deep, ‘slow-cooked’ smoky essence that typically comes from bacon, making this a truly satisfying vegetarian black eyed pea soup.

Achieving the perfect texture in a soup like this is paramount. You want the black eyed peas to be tender, never mushy, and the collard greens to be soft but still retain a slight bite. My method ensures that both elements are cooked to perfection. The long, gentle simmer allows the peas to absorb all the wonderful flavors, while adding the collard greens towards the end prevents them from becoming overcooked and losing their vitality. It’s a small detail, but it makes all the difference, transforming a simple ingredient into a textural delight.

I’ve designed this recipe to be foolproof and genuinely easy, making it accessible even for novice cooks. Everything comes together in one pot, minimizing cleanup and fuss. The steps are straightforward, and the ingredients are readily available, whether you’re shopping at a bustling NYC market or your local grocery store. It’s the perfect easy black eyed pea soup for a busy weeknight, yet sophisticated enough to impress guests, proving that wholesome, delicious food doesn’t have to be complicated.

Smoky Black Eyed Pea Soup Ingredients

The beauty of this smoky black eyed pea soup is how simple, yet flavorful, the ingredients are. I love finding fresh, seasonal produce at the Union Square Greenmarket here in NYC, but these pantry staples are accessible anywhere. My mother always taught me to source the best quality dried beans and spices, which truly makes a difference in the final dish.

Ingredients List

  • 1 lb. black eyed peas, soaked see notes (or 3 cans (14oz), drained and rinsed)
  • 2 tablespoon olive oil or 1/3 cup water
  • 1 yellow onion, diced
  • 2 large carrots, diced
  • 2 celery ribs, sliced
  • 3 garlic cloves, minced
  • 1 tablespoon smoked paprika
  • 1 teaspoon EACH thyme, basil, and oregano
  • 1 teaspoon EACH garlic + onion powder
  • 1/2 1 teaspoon red pepper flakes, optional
  • 1 can (28oz.) diced tomatoes, with the juices
  • 2 3 cups collard greens, chopped
  • 6 cups low-sodium vegetable broth
  • 1/2 1 teaspoon EACH salt + pepper, or to taste

Ingredient Spotlight

Black Eyed Peas: These legumes are the star, providing a creamy texture and earthy flavor. For dried peas, soaking overnight is ideal for quicker cooking and better digestion, a trick I learned from traditional North African cooking. If short on time, canned black eyed peas work beautifully; just make sure to rinse them thoroughly to reduce sodium and any metallic taste. They’re found in the dried bean or canned goods aisle of any US grocery store.

Smoked Paprika: This is our secret weapon for that deep, rich smoky flavor in this vegetarian black eyed pea soup. Unlike regular paprika, smoked paprika is made from peppers that have been dried and smoked over oak fires, imparting an incredible aroma. It’s readily available in the spice aisle. Don’t confuse it with sweet or hot paprika; look specifically for “smoked paprika” or “pimentón ahumado.” If you can’t find it, a tiny pinch of liquid smoke (1/4 tsp) combined with regular sweet paprika can work in a pinch, but the flavor won’t be quite as nuanced.

Collard Greens: These hearty greens add a lovely bitterness and texture, complementing the richness of the soup. They’re packed with nutrients and handle long cooking times well. Look for fresh, dark green leaves without yellowing or wilting, typically found in the produce section. If collard greens aren’t available, kale or even Swiss chard can be swopped in. Kale will hold its shape a bit more, while Swiss chard will wilt faster, so adjust cooking times accordingly. My mother would often use various wild greens depending on what was available, reflecting the adaptability of good home cooking.

Diced Tomatoes: A can of diced tomatoes brings acidity and a touch of sweetness, balancing the savory and smoky notes. The juices are important as they add to the broth’s depth. Opt for fire-roasted diced tomatoes if you want an extra layer of smoky flavor. San Marzano diced tomatoes are my favorite for their sweet, balanced taste, a quality I appreciated during my culinary training in Paris. If you don’t have diced, crushed tomatoes can be used, but the texture will be smoother.

Original IngredientBest SubstitutionFlavor / Texture Impact
Black Eyed Peas (dried)Canned Black Eyed PeasFaster cooking, slightly softer texture. Rinse well to remove excess sodium.
Smoked PaprikaSweet Paprika + small amount of liquid smokeLess intense smoky depth; liquid smoke can be overpowering if too much is used.
Collard GreensKale or Swiss ChardKale is heartier, holds shape more. Swiss chard wilts quicker, has milder flavor.
Diced TomatoesCrushed Tomatoes or Tomato PassataSmoother texture; passata offers greater sweetness. Adjust liquid as needed.

Smoky Black Eyed Pea Soup

How to Make Smoky Black Eyed Pea Soup — Step-by-Step

Making this hearty soup is truly a breeze, I promise! Just follow these steps, and you’ll have a warming bowl of deliciousness in no time.

Step 1: Sauté the Aromatics

In a large Dutch oven or heavy-bottomed pot, heat the olive oil or water over medium heat. Add the diced yellow onion, carrots, and celery, and sauté for 7-10 minutes until they soften and become fragrant. Next, stir in the minced garlic, smoked paprika, thyme, basil, oregano, garlic powder, onion powder, and red pepper flakes (if using). Cook for another 1-2 minutes, stirring constantly, until the spices are wonderfully fragrant. This step is crucial for building the flavor base of your smoky black eyed pea soup.

💡 mia’s Pro Tip: Toasting the spices with the aromatics helps to release their essential oils, intensifying their flavor and creating a much deeper, richer base for your soup. Don’t rush this step – it’s where the magic begins!

Step 2: Simmer the Soup to Perfection

Add the black-eyed peas (soaked or canned), diced tomatoes with their juices, and vegetable broth to the pot. Bring the mixture to a boil, then reduce the heat to low, cover, and let it simmer. If using canned black-eyed peas, simmer for about 20 minutes. If using pre-soaked dried peas, you’ll need about 1 hour to 1 hour and 15 minutes, or until the peas are tender. Towards the end of the simmering time, about 5-10 minutes before the soup is done, stir in the chopped collard greens. They will wilt beautifully into the broth. Season generously with salt and pepper to taste.

⚠️ Common Mistake to Avoid: Don’t add salt too early, especially if using dried beans. Salting beans too soon can toughen their skins and prevent them from cooking evenly. Wait until the beans are almost tender before adjusting the seasoning.

Step 3: Finish and Serve

Once the collard greens are tender and the black-eyed peas are cooked through, your smoky black eyed pea soup is ready. Serve hot in bowls. A squeeze of fresh lemon juice over each serving bowl adds a lovely brightness that cuts through the richness and enhances all the flavors – a classic French technique for balancing dishes. This soup pairs perfectly with a slice of my slightly sweet vegan cornbread for a truly comforting meal.

StepActionDurationKey Visual Cue
1Sauté Aromatics & Toast Spices7-12 minutesOnions translucent, spices fragrant
2Simmer Black Eyed Peas & Greens20 min (canned) / 60-75 min (dried)Peas tender, greens wilted and soft
3Season and Serve2 minutesFlavors balanced, lemon adds brightness

Serving & Presentation

Serving this smoky black eyed pea soup is an art in itself, bringing out its comforting Southern charm with a touch of my NYC flair. I love to ladle generous portions into deep, rustic bowls, allowing the vibrant colors of the collard greens and the rich broth to shine. For an elevated presentation, a swirl of extra virgin olive oil or a drizzle of a spicy cashew cream can add a beautiful sheen and extra richness. A sprinkle of fresh chopped parsley or cilantro provides a fresh, aromatic finish that really brightens the whole dish, much like the fresh herbs my mother always used in our Moroccan tagines.

Don’t forget the squeeze of fresh lemon! It’s such a simple addition but elevates the entire flavor profile, cutting through the richness and bringing a delightful zing. This technique, taught to me during my pastry classes in Paris, reminds me that even savory dishes benefit from a hint of acidity for balance. For textural contrast, consider a spoonful of crunchy toasted pumpkin seeds or even some homemade croutons. This easy black eyed pea soup is incredibly versatile, making it a joy to present beautifully.

When it comes to pairings, this soup is a natural companion to something warm and bready. My preference is a slightly sweet vegan cornbread, as it perfectly soaks up the savory broth and adds a comforting, wholesome element. Alternatively, a crusty baguette (perhaps from a local NYC bakery) or a robust whole-grain bread would be fantastic. For a complete meal, a simple side salad with a light vinaigrette can provide a refreshing counterpoint to the soup’s richness.

Pairing TypeSuggestionsWhy It Works
Side DishVegan Cornbread, Crusty Bread, Simple Green SaladCornbread offers a sweet contrast, crusty bread is perfect for dipping, fresh salad adds lightness.
Sauce / DipSpicy Cashew Cream, Vegan Sour Cream, Harissa SwirlAdds creaminess and a tangy or spicy kick, enriching the soup’s texture and flavor.
BeverageCrisp White Wine (Sauvignon Blanc), Iced Tea, Sparkling Water with MintWine’s acidity complements richness; tea/water are refreshing cleansing palates.
GarnishFresh Parsley, Cilantro, Toasted Pumpkin Seeds, Lemon WedgesAdds freshness, contrasting texture, and brightens the overall flavor profile.

Make-Ahead, Storage & Reheating

This smoky black eyed pea soup is an absolute dream for meal prepping, which is essential for my busy life here in NYC! I often make a big batch on a Sunday, and it keeps me nourished throughout the week. Like many hearty stews, it often tastes even better the next day as the flavors have more time to meld and deepen.

MethodContainerDurationReheating Tip
RefrigeratorAirtight containerUp to 6 daysGently reheat on stovetop over medium-low heat, stirring occasionally. Add a splash of broth if too thick.
FreezerFreezer-safe containerUp to 2-3 monthsThaw overnight in the refrigerator, then reheat as above. For faster reheating, microwave on medium power, stirring every few minutes.
Make-AheadCook entirely, cool, then store3-4 days in advancePrepare soup completely, let cool before storing. Reheat individual portions as desired.

When reheating this vegetarian black eyed pea soup, sometimes the broth can thicken slightly. Don’t worry! Just add a splash of vegetable broth or even water until it reaches your desired consistency. I prefer reheating it slowly on the stovetop, allowing all those lovely flavors to re-awaken, but a microwave works just fine for a quick meal. Just be sure to stir it halfway through to ensure even heating.

For me, having a container of this southern black eyed pea soup in the fridge is like having a little taste of comfort readily available. It’s truly a nourishing, satisfying meal that stands the test of time, reflecting the robust and resilient nature of good home cooking, whether it’s from Morocco, Paris, or right here in my New York kitchen.

Variations & Easy Swaps

While this smoky black eyed pea soup is perfect as is, I love to experiment with flavors and adapt recipes to whatever I have on hand or what the season offers. Here are a few ways to switch things up:

VariationKey ChangeBest ForDifficulty Impact
Spicy KickAdd extra red pepper flakes or a dash of hot sauce.Those who love a fiery flavor.No change.
Creamy CoconutStir in a can of full-fat coconut milk at the end.Adding richness and a subtle tropical note.No change.
Root Vegetable BoostAdd diced sweet potato or butternut squash.Heartiness and additional nutrients.Slight increase in prep time.

Spicy Smoky Black Eyed Pea Soup

For those who like a bit of heat, consider doubling the red pepper flakes or adding a chopped jalapeño or serrano pepper along with the garlic. Another fantastic way to introduce spice is to stir in a teaspoon of harissa paste (a nod to my Moroccan roots!) or a dash of your favorite hot sauce right before serving. The heat beautifully complements the smoky flavor, creating a dynamic and exciting take on the soup.

Creamy Coconut Curry Black Eyed Pea Soup

This variation adds an incredible richness and a subtle, beautiful aroma. Simply stir in one can of full-fat coconut milk along with the collard greens during the last 5-10 minutes of simmering. For an extra layer of flavor, add 1-2 tablespoons of red curry paste along with the smoked paprika in step 1. The creamy coconut balances the smokiness and turns this into a lusciously comforting meal, reminiscent of some of the international influences I find in NYC’s diverse culinary scene.

Hearty Root Vegetable Smoky Black Eyed Pea Soup

To add more substance and a touch of sweetness, incorporate diced sweet potatoes or butternut squash. Add them along with the black eyed peas and broth, allowing them to simmer until tender. This makes the soup even more robust and satisfying, especially during colder months. You can buy pre-diced squash from your local grocery store to save on prep time, a little trick I often use when rushing between segments and classes.

How do you make black eyed pea soup taste smoky without using bacon?

Achieving a deep smoky flavor without bacon is simpler than you might think! My go-to secret is using generous amounts of smoked paprika. This special spice, made from peppers smoked over oak fires, imparts that authentic, rich smoky essence. When you bloom it in oil with the aromatics (onions, carrots, celery) at the beginning of cooking, its flavor deepens and permeates the entire soup. You can also add a tiny dash of liquid smoke, but be very careful not to overdo it, as a little goes a very long way!

Can I use canned black eyed peas instead of dried for this soup?

Absolutely, yes! Canned black eyed peas are a fantastic shortcut, especially when you’re short on time but still craving a delicious, hearty meal. Make sure to drain and rinse them thoroughly under cold water before adding them to the soup. This helps to reduce excess sodium and washes away the canning liquid. If using canned, your cooking time for the simmering step will be significantly shorter – usually around 20 minutes – since the beans are already cooked.

How long does it take to cook smoky black eyed pea soup in a slow cooker?

A slow cooker is a wonderful way to make this smoky black eyed pea soup even easier! After sautéing your aromatics and toasting your spices on the stovetop (this step is still key for deep flavor, in my opinion, even for slow cooking), transfer everything to your slow cooker. Add the black eyed peas, tomatoes, and broth. Cook on low for 6-8 hours or on high for 3-4 hours, until the peas are tender. Add the collard greens during the last 30 minutes to an hour of cooking to ensure they don’t get overly mushy.

What are good side dishes to serve with black eyed pea soup?

This southern black eyed pea soup is incredibly versatile and pairs beautifully with a variety of sides. For a traditional Southern feel, my slightly sweet vegan cornbread is an absolute must, perfect for soaking up every drop of that flavorful broth. Alternatively, a crusty baguette or a hearty whole-grain bread would be lovely. A fresh, crisp green salad with a bright vinaigrette provides a nice contrast to the richness of the soup. For an extra touch, a spoonful of rice or quinoa mixed into your bowl makes it even more substantial.

Can I make this black eyed pea soup spicier?

Absolutely! I love a soup with a bit of a kick. To make this smoky black eyed pea soup spicier, you can increase the amount of red pepper flakes specified in the recipe. Another great option is to add a finely diced jalapeño or serrano pepper along with the other aromatics in the initial sautéing step. For a Moroccan-inspired heat, a teaspoon or two of harissa paste stirred in near the end of cooking adds a fantastic depth of flavor and a satisfying warmth.

Is this black eyed pea soup suitable for freezing?

Yes, this black eyed pea soup freezes beautifully, making it an excellent option for meal prep! Once the soup has cooled completely, transfer it to freezer-safe containers or heavy-duty freezer bags, leaving a little headspace to allow for expansion. It will keep well in the freezer for up to 2-3 months. When you’re ready to enjoy it, simply thaw it overnight in the refrigerator and then gently reheat it on the stovetop, adding a splash of broth if needed to restore its original consistency.

What if I don’t have collard greens?

No collard greens? No problem! While collards provide a unique flavor and texture, you can easily substitute other hearty greens. Kale is an excellent choice; choose curly or Lacinato kale and chop it well. Spinach or Swiss chard also work, but they will wilt much faster, so you should add them during the very last few minutes of cooking. The key is to use a sturdy green that can stand up to simmering without completely disintegrating, maintaining that lovely green color and slight chew.

How can I thicken my black eyed pea soup if it’s too thin?

If your soup turns out thinner than you prefer, there are a few simple ways to thicken it. You can scoop out about 1 cup of the soup, blend it with an immersion blender or in a regular blender until smooth, and then stir it back into the pot. The blended peas will add a natural creaminess and thickness. Alternatively, you can make a cornstarch slurry by whisking 1 tablespoon of cornstarch with 2 tablespoons of cold water, then stirring it into the simmering soup and cooking for a few more minutes until it thickens.

Can I add other vegetables to this smoky black eyed pea soup?

Absolutely! This easy black eyed pea soup is very adaptable to adding more vegetables. Diced sweet potatoes, butternut squash, bell peppers, or even green beans would be delicious additions. Just be mindful of their cooking times. Heartier vegetables like root vegetables should be added with the black eyed peas and broth so they have enough time to soften. More delicate vegetables, like bell peppers or green beans, can be added halfway through the simmering process.

Why soak dried black eyed peas, and is it necessary?

Soaking dried black eyed peas isn’t strictly necessary if you have enough time for longer cooking, but it is highly recommended. Soaking significantly reduces the cooking time, making the peas tender faster. It also helps with digestion by breaking down some of the complex sugars that can cause gas. For this recipe, if you skip soaking, just be aware that the simmering time for the dried peas will be closer to 1.5-2 hours, and you’ll need to add more water or broth as the soup cooks.

Share Your Version!

I truly hope this smoky black eyed pea soup brings warmth and joy to your table, just as it does to mine. I pour my heart into developing these recipes, blending everything I’ve learned from my mother’s kitchen in Morocco, my culinary training in Paris, and the vibrant food scene here in NYC.

If you try this recipe, please let me know what you think! Leave a star rating and a comment below – your feedback means the world to me. And if you snap a photo of your beautiful creation, share it on Instagram or Pinterest and tag @exorecipes. I absolutely love seeing your culinary adventures! Tell me, what’s your favorite thing to serve alongside a hearty bowl of this vegan southern black eyed pea soup?

From my NYC kitchen to yours — I hope this recipe brings as much warmth to your table as it does to mine. — mia 🧡

📌

Love This Recipe? Save It to Pinterest!

If you enjoyed this Smoky Black Eyed Pea Soup recipe, don’t let it get lost in your browser tabs! 😄 Pin it now so you can find it again anytime — and explore hundreds more tried-and-tested recipes waiting for you on my Pinterest boards.

👉 Follow mia on Pinterest @chefrecipes2

📌 Pin this recipe · 🔁 Re-pin your favorites · 💬 Tag me when you make it — I love seeing your creations!

Print

clock clock iconcutlery cutlery iconflag flag iconfolder folder iconinstagram instagram iconpinterest pinterest iconfacebook facebook iconprint print iconsquares squares iconheart heart iconheart solid heart solid icon

Black Eyed Pea Soup

  • Author: Chef Mia

Description

Savory and hearty, this Black Eyed Pea Soup with collards is an easy one-pot meal made 100% vegan, gluten-free, and low-fat. It’s a healthy way to bring the new year and enjoy to your heart’s content!


Ingredients

Scale
  • 1 lb. black eyed peas, soaked see notes (or 3 cans (14oz), drained and rinsed)
  • 2 tablespoon olive oil or 1/3 cup water
  • 1 yellow onion, diced
  • 2 large carrots, diced
  • 2 celery ribs, sliced
  • 3 garlic cloves, minced
  • 1 tablespoon smoked paprika
  • 1 teaspoon EACH thyme, basil, and oregano
  • 1 teaspoon EACH garlic + onion powder
  • 1/2 1 teaspoon red pepper flakes, optional
  • 1 can (28oz.) diced tomatoes, with the juices
  • 2 3 cups collard greens, chopped
  • 6 cups low-sodium vegetable broth
  • 1/2 1 teaspoon EACH salt + pepper, or to taste

Instructions

  1. In a large dutch oven, heat oil or water over medium heat, add onion, carrots, and celery, saute for 7 10 minutes. Add the garlic, smoked paprika, thyme, basil, oregano, and garlic & onion powder, cook until fragrant, about 1 2 minutes.
  2. Add the black-eyed peas, tomatoes, and vegetable broth, bring to a boil, cover, reduce heat to low, and simmer for 20 minutes (for canned) to 1 1/4 hours (for soaked), or until beans are tender. Before soup is done, about 5 10 minutes ahead, stir in the collard greens. Season with plenty of salt and pepper.
  3. We love adding a squeeze of lemon over the top of our serving bowls for brightness. And this slightly sweet Vegan Cornbread is the perfect accompaniment to this savory soup!
  4. Serves 6 8
  5. Leftovers can be kept in the refrigerator for up to 6 days. For longer storage, freeze for up to 2 3 months. Let thaw before reheating.


Nutrition

  • Calories: 348 calories
  • Sugar: 13.2 g
  • Fat: 3.9 g
  • Carbohydrates: 62 g
  • Protein: 20.5 g


Smoky Black Eyed Pea Soup

ph">For more delicious inspiration, follow me on Pinterest!

Easy Vegan Sweet Potato Black Bean Chili Recipe

Sweet Potato Black Bean Chili (Easy + Vegan) – A Hearty One-Pot Meal

⚖️
Difficulty
Easy
⏲️
Prep Time
15 mins
🕒
Cook Time
40 mins
⏱️
Total Time
55 mins
🍽️
Servings
4

Growing up in Morocco, chili wasn’t exactly on our family menu, but the fragrant spices and hearty textures always resonated with my mother’s cooking. After I moved to New York City and discovered this American classic, I knew I had to put my own spin on it. This Sweet Potato Black Bean Chili is a perfect example of blending comfort food with a healthy, plant-based approach. It’s an easy vegan chili recipe that bursts with flavor and satisfies everyone around my table, even the most dedicated meat-eaters!

Imagine walking into your kitchen on a crisp evening, and being enveloped by the sweet, earthy aroma of sautéed onions and garlic, mingling with the warming embrace of cumin and chili powder. Then, as the fire-roasted tomatoes and sweet potatoes slowly simmer, the flavors deepen and meld into a rich, savory broth. The vibrant orange of the sweet potatoes against the deep black beans creates a visual feast, reminiscent of the colorful tagines I learned to perfect in my Parisian culinary school days. Every spoonful offers a delightful interplay of creamy beans, tender sweet potato, and a subtle kick from the green chilies.

What sets my version apart, making it the best vegetarian chili? It’s all about layering flavors from the start and letting the ingredients shine. I’ve refined this easy black bean chili to maximize depth with minimal effort – a true one-pot wonder. Stick around, and I’ll share my pro tip for intensifying the spice blend, and a common mistake to avoid that can leave your chili tasting flat. You’ll be surprised how quickly this recipe comes together!

Why This Sweet Potato Black Bean Chili Recipe Is the Best

The secret to this chili’s incredible depth lies in how we approach the spices. Inspired by Moroccan traditions, I toast the chili powder, cumin, and oregano directly in the pot with the sautéed aromatics. This blooming technique, a practice I observed countless times in my mother’s kitchen, awakens their essential oils and infuses the entire dish with a much richer, more complex flavor profile than simply adding them with the liquids. It’s a small step that makes a monumental difference, taking this vegan chili recipe from good to truly exceptional.

Achieving the perfect texture in a chili is crucial, and that’s where my culinary training in Paris really kicks in. We’re looking for tender but not mushy sweet potatoes, and beans that hold their shape but yield easily. The trick is to dice your sweet potatoes to a consistent size – about ½-inch cubes – and add them early enough with the liquids. This allows them to slow-cook and absorb all the delicious flavors of the broth without falling apart. Plus, a slight askew lid during simmering promotes gentle evaporation, concentrating the chili’s body to a robust thickness.

Forget daunting ingredient lists or complicated processes; this is truly an easy black bean chili. I designed it to be a lifesaver on busy weeknights, relying mostly on pantry staples you likely already have. From a single pot, you’ll create a nourishing meal with minimal cleanup. My NYC lifestyle demands efficiency without compromising on flavor, and this recipe delivers a hearty, cozy dish that feels gourmet but is totally approachable for any home cook. It’s proof that healthy sweet potato recipes can be both simple and deeply satisfying.

Sweet Potato Black Bean Chili Ingredients

One of the things I adore about this chili is how it celebrates simple, wholesome ingredients. Living in NYC, I’m lucky to have access to amazing farmers’ markets where I pick up fresh, vibrant sweet potatoes, but quality canned goods work beautifully too. This recipe is a nod to my roots, where every ingredient, no matter how humble, is treated with respect to bring out its best flavor.

Ingredients List

  • 1 tablespoon olive oil or ¼ cup water (for water saute)
  • 1 medium onion, diced
  • 2-3 garlic cloves, minced
  • 1 ½ tablespoons chili powder
  • 1 tablespoon cumin
  • 1 teaspoon dried oregano
  • 1 teaspoon EACH garlic + onion powder, optional (for good measure)
  • 1 teaspoon pink salt, or to taste
  • 1 large sweet potato (about 1 lb.), diced (with or without skin)
  • 2 cans (15 oz) black beans, drained and rinsed
  • 1 can (15 oz) fire-roasted diced tomatoes (with juices) or 1 ½ cups diced fresh tomatoes
  • 1 can (6 oz) tomato paste
  • 1 can (4oz) diced green chilies
  • 2 cups water or vegetable broth
  • Optional Garnishes: diced avocado, cilantro, tortilla strips, diced onion and/or jalapeno, a dollop of vegan sour cream

Ingredient Spotlight

Sweet Potatoes: These aren’t just for sweetness; they add a wonderful creaminess and body to the chili as they break down slightly during cooking. When selecting at your local grocery store, look for firm, unblemished sweet potatoes. Their natural sugars caramelize beautifully, giving this vegan chili recipe its signature cozy taste. If you prefer, regular potatoes or butternut squash can be used, though the flavor profile will be less sweet and earthy, and slightly starchier.

Black Beans: The backbone of this easy black bean chili, providing protein and a rich, substantial texture. Canned black beans are perfectly fine – just remember to drain and rinse them thoroughly to remove excess sodium and improve digestibility. I often find great organic options at my local NYC health food stores. For a different texture, pinto beans or kidney beans can be substituted, though black beans offer a unique creaminess.

Fire-Roasted Diced Tomatoes: These are a game-changer! The fire-roasting process adds a subtle smokiness and depth that canned plain diced tomatoes simply can’t replicate, giving this sweet potato black bean chili another layer of complex flavor. They’re readily available in most American supermarkets. If you can’t find them, regular diced tomatoes will work, but you might want to add a pinch of smoked paprika to compensate for the lost smoky note.

Chili Powder & Cumin: These are the dynamic duo that defines the chili’s flavor. Chili powder provides a robust, earthy base, while cumin adds warmth and a distinctive aromatic quality, reminiscent of some North African spice blends. Quality spices make all the difference, so ensure yours are fresh. If you’re out, a blend of paprika, oregano, and a touch of cayenne can mimic chili powder, but it’s best to stick to dedicated chili powder for authenticity.

Original IngredientBest SubstitutionFlavor / Texture Impact
Sweet PotatoButternut squash or regular potatoLess sweet; squash adds nuttiness, potato adds starchiness.
Black BeansPinto beans or kidney beansSimilar texture, slightly different earthy flavor profile.
Fire-Roasted Diced TomatoesRegular diced tomatoes + pinch of smoked paprikaLess smokiness without fire-roasting; paprika helps compensate.
Green ChiliesDiced jalapeño (remove seeds for less heat)Fresher, brighter heat; less “canned” flavor; more pronounced spice.

Sweet Potato Black Bean Chili (Easy + Vegan)

How to Make Sweet Potato Black Bean Chili — Step-by-Step

You’re just a few simple steps away from a delicious, comforting bowl of homemade sweet potato black bean chili! Follow along, and I promise you’ll have a fantastic meal with ease.

Step 1: Sauté Aromatics

In a large pot or Dutch oven, heat the olive oil (or water for a water sauté) over medium heat. Add the diced onions and cook gently until they are soft and slightly browned at the edges, which should take about 5-6 minutes. This browning develops a foundational sweetness. Next, add the minced garlic and cook for just 1 minute more until fragrant, being careful not to burn it. Then, stir in the chili powder, cumin, oregano, and optional garlic and onion powder. Cook for another minute, stirring constantly, until the spices are wonderfully fragrant – you’ll notice a magical transformation in the aroma.

💡 mia’s Pro Tip: The “blooming” of spices by cooking them in oil for a minute before adding liquids is a technique I learned early on. It truly unlocks their full aromatic potential, giving your sweet potato black bean chili incredible depth. Don’t skip it!

Step 2: Simmer and Cook

Now, it’s time to bring everything together! Add the drained and rinsed black beans, diced tomatoes (with their juices), tomato paste, diced sweet potato, diced green chilies, and vegetable broth (or water) to the pot. Stir everything thoroughly to combine, ensuring the tomato paste is dissolved and all ingredients are well distributed. Bring the mixture to a gentle boil, then immediately reduce the heat to low, cover the pot slightly askew (just a small gap for steam to escape), and let it simmer for 30-40 minutes. Stir occasionally to prevent sticking. The chili is ready when your sweet potatoes are fork-tender. If the chili becomes thicker than you prefer, simply add a splash more water or broth.

⚠️ Common Mistake to Avoid: Don’t overcook your sweet potatoes until they’re complete mush! While some breakdown adds to the chili’s body, you want them tender but still holding their shape for a pleasant textural contrast in your easy black bean chili. Check for tenderness around the 30-minute mark.

Step 3: Serve and Garnish

Once your sweet potato black bean chili has reached its perfect tenderness and consistency, it’s ready to be served! Ladle generous portions into bowls. Now comes the fun part – garnishes! Offer a variety of toppings like diced avocado, fresh cilantro, crunchy tortilla strips, a sprinkle of diced red onion or jalapeño for a fresh bite, or a dollop of creamy vegan sour cream. Each addition enhances the experience. I also love to suggest my easy Cilantro Lime Cashew Sour Cream for an extra special touch.

StepActionDurationKey Visual Cue
1Sauté onions, garlic & bloom spices6-7 minutesOnions soft/browned, spices fragrant
2Add remaining ingredients & simmer30-40 minutesSweet potatoes fork-tender, chili thickened
3Serve & garnishImmediateWarm, fragrant, ready for toppings

Serving & Presentation

Plating this sweet potato black bean chili is an opportunity to add a touch of NYC flair, even to a rustic dish. I like to ladle the warm, steaming chili into beautiful, colorful bowls – much like the vibrant pottery you might find in a Moroccan souk. The contrast of the rich reddish-brown chili with bright green garnishes like fresh cilantro and creamy avocado slices makes for a truly appealing presentation. Never underestimate the power of visual appeal!

While the chili is perfectly satisfying on its own, I often serve it with some fresh, warm corn tortillas, a side of fluffy quinoa, or even cornbread straight from the oven. These additions complement the robust flavors of the chili beautifully, offering different textures and ways to soak up every last drop of that savory broth. Think of it as a culinary canvas, ready for your personal touch – a concept I truly embraced during my time mastering French techniques.

My favorite way to enjoy this vegan chili recipe is piled high with a medley of fresh, vibrant toppings. A dollop of homemade Cilantro Lime Cashew Sour Cream adds a tangy creaminess, while a sprinkle of diced red onion provides a crisp, piquant counterpoint. And for a truly elevated experience, a few slices of fresh jalapeño bring a delightful heat. It’s all about making each spoonful an exciting, complex bite!

Pairing TypeSuggestionsWhy It Works
Side DishCornbread, brown rice, quinoaAbsorbs flavors, adds heartiness and different textures.
Sauce / DipVegan sour cream, Cashew Lime Cilantro Cream, hot sauceAdds creaminess, tang, or a spicy kick to balance rich flavors.
BeverageCrisp lager, dry rosé, iced green teaRefreshing contrast to the chili’s warmth and spice.
GarnishAvocado, cilantro, tortilla strips, red onion, jalapeñoAdds fresh crunch, vibrant color, and contrasting textures & flavors.

Make-Ahead, Storage & Reheating

Living in the fast-paced environment of NYC, knowing how to meal prep and store dishes is essential. This sweet potato black bean chili is a superstar in that department – it tastes even better the next day as the flavors deepen and meld. I often make a double batch on Sunday, and it fuels my week, saving me precious time without sacrificing flavor or nutrition. It’s truly one of my go-to healthy sweet potato recipes for convenient, delicious eating.

MethodContainerDurationReheating Tip
RefrigeratorAirtight container5-6 daysGently reheat on stovetop over medium-low heat; add splash of broth if needed.
FreezerFreezer-safe containers or bags2-3 monthsThaw overnight in fridge, then reheat as above. Can also reheat from frozen on stovetop (low heat with lid) or microwave.
Make-AheadAirtight containerUp to 3 days in advancePrepare entirely, then cool completely before storing. Reheat just before serving and add fresh garnishes.

When reheating this vegan chili recipe, a low and slow approach is key. This prevents the sweet potatoes and beans from becoming mushy. If the chili has thickened considerably in the fridge, don’t hesitate to stir in a little extra vegetable broth or water to bring it back to your desired consistency. A pinch of fresh seasoning post-reheat, like a dash of chili powder or a squeeze of lime, can also brighten the flavors.

For individual servings, the microwave works in a pinch, but for best results, spoon your desired amount into a small saucepan and reheat on the stovetop. This allows for even heating and helps maintain the integrity of all those wonderful textures. I always garnish fresh again after reheating – a little extra avocado or cilantro makes it taste like it was just made!

Variations & Easy Swaps

VariationKey ChangeBest ForDifficulty Impact
Spicy & SmokyAdd chipotle powder, smoked paprika, fresh jalapeños.Heat seekers, deep flavor.Minor increase (sourcing ingredients).
Grain-BoostedFold in cooked quinoa or farro in the last 15 mins.Extra protein and fiber.Minor increase (cooking grain separately).
Green Chili FiestaSwap black beans for cannellini, add poblano peppers and lime.Brighter, lighter, zestier.Minor increase (pepper prep).

Spicy & Smoky Chili Variation

For those who love a bit more heat and a deeper, smoky flavor, this variation of the sweet potato black bean chili is for you. Introduce a teaspoon of smoked paprika and a ½ teaspoon of chipotle powder along with the other dry spices. For an extra kick, add one finely diced jalapeño (seeds removed for moderate heat, left in for a fiery punch) when you sauté the onions. This brings a robust, complex warmth reminiscent of the smoky spices often found in North African stews.

Gluten-Free & Dairy-Free Chili

This easy black bean chili is already naturally gluten-free and dairy-free, which makes it perfect for a wide range of dietary needs! To maintain gluten-free status, ensure your vegetable broth is certified gluten-free. For a truly rich, creamy, and dairy-free topping, my Cilantro Lime Cashew Sour Cream is an absolute must-try. It provides that luxurious mouthfeel you might miss, without any dairy, and I can tell you from countless tests in my NYC kitchen, it truly elevates every spoonful.

Seasonal Harvest Chili

Embrace the bounty of the seasons by adding other vegetables to your sweet potato black bean chili. In the fall, I might incorporate diced butternut squash alongside the sweet potatoes for an even richer, nuttier flavor. In the summer, I love tossing in fresh corn kernels or diced bell peppers from the Union Square Greenmarket in NYC during the last 10 minutes of simmering for a burst of color and sweetness. These additions make it even more hearty and nutritious, a perfect healthy sweet potato recipe any time of year.

How can I make this sweet potato black bean chili in a slow cooker or Instant Pot?

This sweet potato black bean chili adapts beautifully to both a slow cooker and Instant Pot. For a slow cooker, sauté the onions, garlic, and spices on the stovetop first (this crucial step shouldn’t be skipped for flavor!). Then, transfer them to the slow cooker along with all remaining ingredients. Cook on low for 6-8 hours or on high for 3-4 hours, until the sweet potatoes are tender. For an Instant Pot, use the sauté function directly in the pot for onions, garlic, and spices. Add the rest of the ingredients, secure the lid, and cook on high pressure for 15 minutes, then allow a natural pressure release for 10 minutes before quick releasing any remaining pressure. Your easy black bean chili will be ready in no time!

What are some good substitutes for black beans in this vegan chili recipe?

If black beans aren’t your favorite, or if you simply want to change things up, several excellent alternatives can be used in this vegan chili recipe. Pinto beans are a fantastic choice, offering a creamy texture and mild, earthy flavor that blends well with the chili spices. Kidney beans would also work, providing a slightly firmer bite and classic chili feel. For a lighter touch, great northern beans or cannellini beans could be used, though they have a more subtle flavor. Just ensure you drain and rinse any canned beans thoroughly before adding them to the pot to minimize excess sodium.

How long does this easy sweet potato chili last in the refrigerator or freezer?

This easy sweet potato chili is perfect for meal prepping! In the refrigerator, it will keep beautifully for 5-6 days when stored in an airtight container. The flavors actually deepen and become even more robust overnight, making it a fantastic leftover lunch or quick dinner. For longer storage, this chili freezes exceptionally well. Portion it into freezer-safe containers or heavy-duty freezer bags, leaving a little headspace for expansion, and it will stay fresh for 2-3 months. Just thaw overnight in the refrigerator before reheating gently on the stovetop or in the microwave.

What toppings do you recommend for serving this vegan sweet potato chili?

Ah, toppings! This is where you can truly customize your sweet potato black bean chili and make it your own. I love adding a variety to each bowl. Creamy diced avocado provides a lovely contrast to the chili’s warmth, while a generous sprinkle of fresh cilantro adds a bright, herbaceous note. For crunch, don’t forget tortilla strips or crushed tortilla chips. If you enjoy a bit more heat and texture, finely diced red onion or thinly sliced fresh jalapeños are wonderful. And, for that classic chili finish, a dollop of vegan sour cream or my homemade Cilantro Lime Cashew Sour Cream is simply divine.

Can I add other vegetables to this healthy sweet potato black bean chili?

Absolutely! This healthy sweet potato black bean chili is quite versatile, and adding more vegetables is a great way to boost its nutritional value and flavor complexity. You could stir in a cup of fresh or frozen corn during the last 10-15 minutes of simmering. Diced bell peppers (any color!) added with the onions would bring a subtle sweetness and vibrant color. For a heartier green, a handful of chopped spinach or kale can be wilted into the chili right before serving. Just ensure any harder vegetables, like carrots or celery, are diced small and added early with the sweet potatoes to ensure they cook through properly.

Share Your Version!

I poured my heart into perfecting this easy vegan chili recipe, and I truly hope it brings a little bit of my NYC kitchen warmth into your home. If you make it, I’d be absolutely thrilled to hear from you! Please consider leaving a star rating and a comment below – your feedback means the world to me and helps other home cooks discover this delicious recipe.

Even better, if you snap a photo of your magnificent Sweet Potato Black Bean Chili, share it on Instagram or Pinterest and tag @exorecipes! I genuinely love seeing your culinary creations and how you make my recipes your own. Did you add a Moroccan spice twist or a special NYC market find? Tell me what made your chili unique!

From my NYC kitchen to yours — I hope this recipe brings as much warmth to your table as it does to mine. — mia 🧡

📌

Love This Recipe? Save It to Pinterest!

If you enjoyed this Sweet Potato Black Bean Chili (Easy + Vegan) recipe, don’t let it get lost in your browser tabs! 😄 Pin it now so you can find it again anytime — and explore hundreds more tried-and-tested recipes waiting for you on my Pinterest boards.

👉 Follow mia on Pinterest @chefrecipes2

📌 Pin this recipe · 🔁 Re-pin your favorites · 💬 Tag me when you make it — I love seeing your creations!

Print

clock clock iconcutlery cutlery iconflag flag iconfolder folder iconinstagram instagram iconpinterest pinterest iconfacebook facebook iconprint print iconsquares squares iconheart heart iconheart solid heart solid icon

Sweet Potato Black Bean Chili

  • Author: Chef Mia
  • Yield: 4 1x

Description

This Sweet Potato Black Bean Chili recipe is hearty and flavorful and easy to make using mostly pantry staples. It’s a quick and healthy savory plant-based chili everyone will love! Recipe inspired by my Sweet Potato Quinoa Chili.


Ingredients

Scale
  • 1 tablespoon olive oil or ¼ cup water (for water saute)
  • 1 medium onion, diced
  • 23 garlic cloves, minced
  • 1 ½ tablespoons chili powder
  • 1 tablespoon cumin
  • 1 teaspoon dried oregano
  • 1 teaspoon EACH garlic + onion powder, optional (for good measure)
  • 1 teaspoon pink salt, or to taste
  • 1 large sweet potato (about 1 lb.), diced (with or without skin)
  • 2 cans (15 oz) black beans, drained and rinsed
  • 1 can (15 oz) fire-roasted diced tomatoes (with juices) or 1 ½ cups diced fresh tomatoes
  • 1 can (6 oz) tomato paste
  • 1 can (4oz) diced green chilies
  • 2 cups water or vegetable broth
  • diced avocado
  • cilantro
  • tortilla strips
  • diced onion and/or jalapeno
  • a dollop of vegan sour cream

Instructions

  1. In a large pot or dutch oven, heat oil over medium heat. Add onions, cook until soft and edges browned, about 5-6 minutes. Add garlic, cook 1 minute more. Add the chili powder, cumin, oregano, garlic & onion powder, cook 1 minute more (or until fragrant).
  2. Add the beans, diced tomatoes, tomato paste, sweet potato, green chilies, and vegetable broth, stir until combined. Bring to a boil, reduce heat, cover slightly askew and cook for 30-40 minutes, stirring occasionally. Chili is ready when sweet potatoes are tender. Add additional water if chili is too thick for your liking.
  3. Serve with optional garnishes. You may also like to top it with this easy Cilantro Lime Cashew Sour Cream.
  4. Serves 4 generously
  5. Leftovers can be kept in an airtight container in the refrigerator for up to 5-6 days. To keep longer, store in the freezer, in freezer-safe containers, for up to 2-3 months.


Nutrition

  • Calories: 318 calories
  • Sugar: 12.3 g
  • Fat: 1.9 g
  • Carbohydrates: 62.9 g
  • Protein: 17.1 g


Sweet Potato Black Bean Chili (Easy + Vegan)

Easy Creamy Spicy Black Bean Soup Recipe

Spicy Black Bean Soup with Creamy Finish – The Ultimate Weeknight Comfort

⚖️
Difficulty
Easy
⏲️
Prep Time
15 mins
🕒
Cook Time
30 mins
⏱️
Total Time
45 mins
🍽️
Servings
6

Growing up in Morocco, my mother’s kitchen was always a symphony of spices and simmering pots, many of them bubbling with hearty stews and warming soups. While this spicy black bean soup might seem a world away from North African tagines, it embodies that same spirit of comfort and deep flavor. My version, which I perfected during my culinary school days in Paris, brings a touch of creamy elegance to a classic, making it feel both rustic and refined. It’s truly an easy black bean soup, but with a secret weapon: a creamy finish created by blending a portion of the soup, adding a luxurious texture that truly makes it special. This vegetarian black bean soup is absolutely perfect for a brisk New York City evening when you need something hearty, flavorful, and quick.

The first spoonful of this soup is an experience in itself. You’re met with the earthy depth of black beans, followed by a symphony of spices – the warmth of chili powder, the gentle hum of paprika, and then the delightful kick from cayenne and red pepper flakes. The bell pepper, onion, and celery, cooked just right, provide a foundational sweetness and aroma, a technique I learned is crucial for building layers of flavor. And that creamy texture? It’s not from heavy cream, but from the beans themselves, expertly blended to create a velvety mouthfeel that clings to the palate, reminiscent of the rich sauces we’d spend hours perfecting in my Parisian training.

What sets mia’s spicy black bean soup recipe apart is this balance of bold flavor and elegant texture. I’ve taken a straightforward concept and elevated it to something truly memorable, without making it complicated. It’s proof that a simple, budget-friendly meal can still feel gourmet. I’ll even share my secret to getting that perfect creamy consistency without any added dairy, and a pro tip for ensuring your spices are at their most aromatic. But be warned: there’s a common mistake in simmering that can dull your flavors – don’t worry, I’ll guide you past it!

Why This Spicy Black Bean Soup Recipe Is the Best

My approach to this spicy black bean soup isn’t just about throwing ingredients into a pot; it’s about drawing on my Moroccan heritage and French culinary education to maximize every flavor. The secret lies in blooming the spices – chili powder, cayenne, paprika, oregano, and cumin – in olive oil before adding the liquids. This technique, something I observed my mother always doing, unleashes their full aromatic potential, infusing the entire soup with a deep, complex warmth that simply can’t be achieved if you add them later. It’s the foundation for that incredible, robust spicy flavor.

The texture of this black bean soup is paramount for me, which is why I incorporate a partial blend. Instead of a thin, watery broth, we’re aiming for a luxurious, creamy finish. By pureeing about half of the soup and then stirring it back in, you get that restaurant-quality silkiness without needing to add cream or coconut milk. This technique, which echoes the precision in French sauce work, ensures a satisfying mouthfeel that’s rich and comforting, allowing the natural starch of the black beans to create a wonderfully thick base.

This recipe is designed to be foolproof and fast, making it genuinely easy black bean soup for even the busiest weeknights. I’ve streamlined the steps so you can have a deeply flavorful, healthy meal on the table in under an hour. The ingredients are accessible and affordable, often found in any NYC grocery store or farmers’ market. Even if you’re new to cooking, my clear instructions and pro tips will guide you to a delicious outcome, proving that gourmet flavors don’t require hours in the kitchen.

Spicy Black Bean Soup Ingredients

When I head to my local Union Square Greenmarket or even my neighborhood grocery store here in NYC, I always look for the freshest produce. For this spicy black bean soup, simple, good quality ingredients make all the difference. It reminds me of the vibrant markets back home in Morocco, where the produce was always the star.

Ingredients List

  • 1 tablespoon olive oil
  • 1 onion (chopped (I use a yellow onion))
  • 1 bell pepper (chopped)
  • 2 jalapeno peppers (chopped)
  • 1 celery rib (chopped)
  • 1 medium carrot (peeled and chopped)
  • 4 garlic cloves (chopped)
  • 1 tablespoon chili powder
  • 1 teaspoon cayenne
  • 1 teaspoon paprika
  • 1 teaspoon oregano
  • 1/2 teaspoon cumin
  • 1/2 teaspoon spicy red pepper flakes (or more to taste!)
  • Salt and pepper to taste
  • 2 cans (15 ounces each black beans, drained and rinsed)
  • 2 cups chicken broth (vegetable broth is good, too)
  • Juice from 1 small lime
  • FOR GARNISH: Sliced peppers (spicy chili flakes, fresh chopped parsley, crumbly white cheese, or whatever else you prefer) (optional)

Ingredient Spotlight

Black Beans: These are the heart and soul of our soup. When selecting canned black beans, look for low-sodium options if available to better control the seasoning. Always rinse them thoroughly to remove excess sodium and any canning liquid. If you prefer to cook your own dried beans, they’ll add an even richer, earthier flavor, though it will extend your cooking time. Just be sure to cook them until very tender.

Jalapeño Peppers: These provide the defining “spicy” kick for our black bean soup. When chopping, remember most of the heat comes from the seeds and ribs. For a milder soup, remove them entirely. For extra heat, leave some in! In a pinch, you can substitute with a serrano pepper for more heat, or a milder green chile for less. Just be mindful of the heat level changing.

Spices (Chili Powder, Cayenne, Cumin, etc.): The blend of spices creates such a wonderful depth of flavor. Fresh, vibrant spices are key! If your spices have been sitting in the cupboard for years, they’ve likely lost their potency. Replace them every 6-12 months for the best results. For a different flavor profile, you could swap some of the chili powder for commercial taco seasoning, but adjust for salt content.

Chicken Broth (or Vegetable Broth): This forms the liquid base of our soup. I prefer low-sodium broths so I can season to taste, a habit I picked up from watching my French chefs. Good quality broth, either homemade or store-bought, makes a big difference. Vegetable broth is an excellent choice if you’re making this a vegetarian black bean soup, and it won’t compromise flavor one bit.

Lime Juice: The fresh lime juice swirled in at the end is a revelation. It brightens all the rich, earthy flavors and cuts through the spice with a delicate tang. A trick I learned in France is that a touch of acid can really elevate a dish! Always use fresh lime juice; bottled just doesn’t offer the same vibrant taste. If you don’t have lime, a splash of apple cider vinegar can work in a pinch for acidity, but the citrus notes will be missing.

Original IngredientBest SubstitutionFlavor / Texture Impact
Canned Black BeansDried Black Beans (cooked)Richer, earthier flavor, slight texture difference, requires more prep.
Jalapeño PeppersSerrano pepper (more heat), Green Chile (less heat)Serrano adds sharper, more intense heat. Green chile offers milder warmth, different vegetal notes.
Chicken BrothVegetable BrothKeeps it vegetarian. Flavor profile remains very similar, perhaps slightly less richness.
Lime JuiceApple Cider Vinegar (splash)Provides acidity, but lacks the bright, citrusy notes of fresh lime.

Spicy Black Bean Soup

How to Make Spicy Black Bean Soup — Step-by-Step

Making this easy black bean soup is incredibly straightforward, and I’ll walk you through each step to ensure you get that perfect creamy and spicy result.

Step 1: Sauté the Aromatics

Heat the olive oil in a large pot or Dutch oven over medium heat. Add the chopped bell pepper, onion, celery, and carrot. Cook for about 10 minutes, stirring occasionally, until the vegetables soften and become slightly translucent. This step is crucial for building a flavorful base, a technique I often used in Paris to develop ‘mirepoix’ for soups and sauces.

💡 mia’s Pro Tip: Don’t rush this step! Allowing the vegetables to properly soften and slightly caramelize brings out their natural sweetness and forms the fundamental flavor layer of your soup. Patience here is rewarded with depth.

Step 2: Bloom the Spices

Add the chopped garlic, chili powder, cayenne, paprika, oregano, cumin, and spicy red pepper flakes to the softened vegetables with a pinch of salt and pepper. Stir well and cook for just 30 seconds. The heat will toast the spices, releasing their fragrant oils and intensifying their flavor. The garlic should be fragrant but not browned, as this can make it bitter.

⚠️ Common Mistake to Avoid: Overcooking the garlic and spices. Garlic can burn quickly, turning bitter and ruining the flavor profile. Keep it to a quick sauté, just long enough for the aromas to develop beautifully.

Step 3: Simmer the Soup

Add the drained and rinsed black beans and chicken (or vegetable) stock to the pot. Stir everything together. Bring the mixture to a quick boil, then immediately reduce the heat to low, cover, and let it simmer gently for at least 20 minutes. Simmering allows all the flavors to meld and deepen. You can even simmer for an hour or more for an even richer taste, if time permits.

Step 4: Create a Creamy Texture

For that signature creamy finish, carefully transfer about half of the soup to a food processor or blender. Blend until completely smooth. Alternatively, use an immersion blender directly in the pot, blending about half of the soup. Then, return the blended portion to the pot and stir to combine. This uses the beans’ natural starch to create a velvety texture without any added cream.

💡 mia’s Pro Tip: When blending hot liquids, always be cautious. If using a standard blender, fill it only halfway, place a kitchen towel over the lid, and hold it down firmly. The steam can build pressure quickly! An immersion blender is safest and easiest for this step.

Step 5: Finish and Serve

Taste the soup and adjust the seasoning with additional salt and pepper if needed. Ladle the hot soup into bowls and swirl in a generous squeeze of fresh lime juice just before serving. Garnish with your choice of toppings like fresh chopped parsley, a sprinkle of crumbly white cheese, or extra sliced peppers. Enjoy your delicious and warming homemade spicy black bean soup!

StepActionDurationKey Visual Cue
1Sauté Aromatics10 minutesVegetables softened, slightly translucent
2Bloom Spices30 secondsGarlic fragrant, spices aromatic
3Simmer Soup20+ minutesFlavors melded, soup slightly thickened
4Create Creamy Texture2-3 minutesSoup smooth and velvety
5Finish & ServeImmediateLime juice swirled in, garnished

Serving & Presentation

Serving this spicy black bean soup is where you can truly make it your own! I love to present it in a rustic, deep bowl, letting the rich color speak for itself. The vibrant green of fresh chopped parsley or cilantro provides a beautiful contrast against the dark soup, reminiscent of the fresh herbs often found in Moroccan dishes. A dollop of sour cream or crema adds a cool, tangy counterpoint to the spice, and for a touch of salty crunch, a sprinkle of crumbled feta or cotija cheese is perfect. Don’t forget that final squeeze of fresh lime juice – it’s like a bright burst of sunshine that awakens all the flavors.

In my NYC kitchen, I often pair this vegetarian black bean soup with a simple side. A warm, crusty baguette or homemade cornbread is ideal for soaking up every last bit of that creamy, flavorful broth. For something a little lighter, a crisp green salad with a bright vinaigrette offers a refreshing balance. Sometimes, if I’m feeling particularly indulgent, I’ll even make some quick cheese quesadillas to serve alongside, perfect for dipping into the robust soup.

From my training in Paris, I learned that presentation truly enhances the dining experience, even for a humble bowl of soup. Think about texture and color. Consider adding thinly sliced red onion or a few avocado cubes for an extra layer of creaminess and visual appeal. For those who love extra heat, a few more spicy red pepper flakes or a drizzle of a spicy chili oil can be a fantastic garnish. Make it a feast for the eyes as well as the palate!

Pairing TypeSuggestionsWhy It Works
Side DishCrusty bread, cornbread, simple green saladAbsorbs rich broth; adds texture; light salad balances richness.
Sauce / DipSour cream, crema, avocado creamAdds cool, tangy counterpoint to spice and richness.
BeverageCrisp lager, sparkling water with lime, dry white wineRefreshes the palate and complements the spice without overpowering.
GarnishFresh cilantro/parsley, crumbled feta/cotija, avocado, corn chipsAdds freshness, salty crunch, contrasting texture, and visual appeal.

Make-Ahead, Storage & Reheating

Living in NYC with a busy schedule, learning to make things ahead and store them properly is an absolute lifesaver. This spicy black bean soup is one of those magical recipes that tastes even better the next day, making it perfect for meal prep. I often make a big batch on a Sunday, then portion it out for quick, delicious lunches and dinners throughout the week.

MethodContainerDurationReheating Tip
RefrigeratorAirtight containerUp to 4-5 daysReheat gently on stovetop or microwave; add splash of broth if too thick.
FreezerFreezer-safe bags or containersUp to 3 monthsThaw overnight in fridge, then reheat on stovetop.
Make-AheadAirtight container (unblended)Up to 2 days priorBlend and finish with lime juice just before serving for best freshness.

When reheating this easy black bean soup, especially after it’s been refrigerated, you might find it has thickened quite a bit. Don’t worry, that’s just the natural magic of the blended black beans! Simply add a splash or two of chicken or vegetable broth, or even just water, while you’re warming it on the stovetop or in the microwave. Stir it constantly until it reaches your desired consistency. Freezing is also a fantastic option for longer-term storage. I like to freeze individual portions in freezer-safe containers or even large freezer bags laid flat to save space – a trick I learned from a clever NYC chef friend.

Just remember that if you plan to freeze, it’s best to add any fresh garnishes like lime juice, chopped cilantro, or sour cream after reheating. This ensures they retain their fresh flavor and texture. This makes a healthy, hearty, and convenient meal that truly gets better with time, embodying the best of a vegetarian black bean soup that delivers on flavor and ease.

Variations & Easy Swaps

VariationKey ChangeBest ForDifficulty Impact
Smoky ChipotleAdd chipotle powder or adobo sauceDeep, complex smoky flavor loversMinor (add spice)
Hearty VegetableAdd corn, zucchini, diced tomatoesMaking it more substantial and veggie-packedMinor (additional chopping/simmering)
Moroccan SpicedAdd ras el hanout, swap bell pepper for sweet potatoA unique, aromatic, sweeter twistMinor (spice swap)

Smoky Chipotle Black Bean Soup

For those who appreciate a deep, smoky undertone with their spice, consider adding a teaspoon of chipotle powder along with your other spices, or a tablespoon of minced chipotle in adobo sauce. This will transform your spicy black bean soup with a rich, earthy smokiness that’s absolutely divine. The chipotle in adobo also adds a subtle tangy-sweetness that complements the black beans beautifully. This smoky flavor reminds me a bit of the slow-cooked tagines from my childhood, where flavors meld over time.

Hearty Vegetable Black Bean Soup

If you want to make this easy black bean soup even more substantial and packed with veggies, you can easily add more to the mix. Try stirring in a cup of frozen corn, diced zucchini, or a can of fire-roasted diced tomatoes when you add the broth. These additions will boost the nutritional value and add extra texture and flavor, making it an even more robust vegetarian black bean soup. From my time in Paris, I learned how versatile a good soup base can be, allowing for endless variations.

Moroccan Spiced Black Bean Soup

To truly infuse a taste of my heritage, you could swap some of the chili powder for a teaspoon of ras el hanout, a complex Moroccan spice blend. You might also consider swapping the bell pepper for a diced sweet potato, which will add a lovely sweetness and a different textural element that is quite common in North African stews. This will create a warm, aromatic black bean soup with a unique global spin, showcasing the versatility of simple ingredients.

How can I make spicy black bean soup less spicy?

To reduce the heat in your spicy black bean soup, the easiest method is to remove the seeds and white ribs from the jalapeño peppers entirely before chopping them. This is where most of the capsaicin, the compound responsible for heat, is concentrated. You can also reduce or omit the cayenne pepper and spicy red pepper flakes. If you find the soup is still too spicy after cooking, you can temper the heat by adding a dollop of sour cream or crema to each serving, or by stirring in a little full-fat coconut milk or even a touch of sugar to balance the flavors. A fresh squeeze of lime juice at the end also helps to cut through the heat.

What can I use instead of canned black beans for this soup?

If you prefer to use dried black beans instead of canned, you absolutely can, and it will lend an even deeper, more nuanced flavor to your vegetarian black bean soup! You’ll need about 1 cup of dried black beans, which will yield roughly 2.5-3 cups cooked – roughly equivalent to two 15-ounce cans. Soak them overnight, then rinse and cook them according to package directions or until they are very tender. This typically takes about 1.5-2 hours. Once cooked, just proceed with the recipe as written, adding the cooked beans at the same step you would the canned ones. It’s a bit more effort, but the result is wonderfully fresh and earthy.

How long does it take to cook spicy black bean soup from scratch?

This easy black bean soup recipe is designed to be quite quick! From start to finish, you can expect to have a delicious bowl of spicy black bean soup on your table in about 45 minutes to an hour. The prep work, including chopping the vegetables, takes roughly 15 minutes. The actual cooking time involves about 10 minutes for sautéing the aromatics and blooming the spices, followed by a 20-minute simmer. The optional blending step adds just a couple of minutes. While you can extend the simmering time to develop even more flavor, the soup is perfectly delicious and ready to enjoy after 20 minutes of simmering, making it ideal for a weeknight meal.

What are good toppings to serve with spicy black bean soup?

The right toppings can truly elevate your spicy black bean soup! My favorites include a generous sprinkle of fresh cilantro or parsley for a burst of color and freshness. For a creamy contrast, a dollop of sour cream, Greek yogurt, or Mexican crema works wonders, and if you want to keep it dairy-free, a drizzle of avocado cream or even plain mashed avocado is fantastic. Crumbled cotija or feta cheese adds a salty, tangy bite. For crunch, don’t forget crushed tortilla chips or homemade croutons. And for those who crave even more heat, a few extra slices of fresh jalapeño or a dash of your favorite hot sauce can take it to the next level. I particularly love the pop of color and flavor that a little diced red onion or some avocado brings to the bowl.

Can I make this black bean soup in an Instant Pot or slow cooker?

Absolutely! This spicy black bean soup adapts beautifully to both an Instant Pot and a slow cooker. For the Instant Pot, use the sauté function for the aromatics and spices, then add the beans and broth, seal, and cook on high pressure for about 10-15 minutes (for canned beans) or 25-30 minutes (for pre-soaked dried beans), followed by a natural release. For a slow cooker, sauté the aromatics and spices on the stovetop first (this step is really worth it for flavor), then transfer everything to the slow cooker and cook on low for 6-8 hours or high for 3-4 hours. You can blend a portion of the soup at the end in both methods—just be sure to release pressure for the Instant Pot before blending!

Is this black bean soup suitable for vegans?

Yes, this recipe can easily be made vegan! The primary adjustment is to ensure you use vegetable broth instead of chicken broth. All the other ingredients – olive oil, vegetables, spices, black beans, and lime juice – are naturally plant-based. For garnishes, simply opt for plant-based alternatives like fresh herbs (cilantro, parsley), avocado slices, crushed tortilla chips, or a dairy-free sour cream or crema. The creamy finish of this vegetarian black bean soup comes from blending the beans themselves, not from any dairy, making it a naturally rich and satisfying vegan option. The flavors are so robust, you won’t miss a thing!

What’s the best way to get a perfectly creamy texture without dairy?

The secret to achieving that luscious, creamy texture in this black bean soup without any dairy lies in blending a portion of the soup itself. By taking about half of the cooked soup – including some of the softened vegetables and black beans – and pureeing it until silky smooth, and then stirring it back into the remaining chunky soup, you create a beautiful thick and velvety consistency. The starches from the black beans naturally thicken the broth. An immersion blender is ideal for this, allowing you to blend directly in the pot. If using a standard blender, work in batches and exercise extreme caution when blending hot liquids, only filling the blender halfway to prevent pressure buildup.

Can I add meat to this spicy black bean soup?

While this recipe excels as a vegetarian black bean soup, you can certainly add meat if you wish! Cooked and shredded chicken (perhaps leftover rotisserie chicken) or even browned ground turkey or chorizo would make excellent additions. If adding ground meat, brown it in the pot before sautéing the vegetables, then drain any excess fat. If adding cooked chicken, stir it in during the last few minutes of simmering, just long enough to warm through. Consider the seasonings of any added meat; for example, chorizo will bring its own spices and fat, so you might adjust the added chili powder or oil accordingly. The versatility makes this soup a fantastic base for various dietary preferences!

Why is rinsing canned black beans important for this recipe?

Rinsing canned black beans thoroughly before adding them to your easy black bean soup is a simple but crucial step. Canned beans are typically packed in a liquid solution that contains a significant amount of sodium, as well as starches and sometimes preservatives. Rinsing them under cold running water removes this excess sodium, allowing you, the cook, to control the seasoning of your soup more precisely. It also washes away any starchy film, which can otherwise make your soup cloudy or give it an unpleasant texture. This simple act ensures your soup tastes clean, fresh, and is seasoned exactly to your liking, something I’ve learned is key to any great dish from my French culinary training.

How can I increase the protein content of this vegetarian black bean soup?

If you’re looking to boost the protein in this already nutritious vegetarian black bean soup, there are several excellent options. For a plant-based boost, add some cooked quinoa or farro directly into the soup; they blend well with the existing textures and flavors. You could also stir in some crumbled firm or extra-firm tofu that’s been pressed and lightly pan-fried for extra texture and protein. For a non-vegan option, adding a sprinkle of shredded cheese or a dollop of Greek yogurt or protein-rich sour cream on top of each serving will significantly increase the protein content and add a creamy richness that complements the spice.

Share Your Version!

I absolutely adore hearing from you and seeing your creations! If you’ve tried my spicy black bean soup recipe, please leave a star rating and a comment below to let me know how it turned out. Did you try a new garnish, or perhaps put your own spin on the spice level? I’m always curious to see how you make my recipes your own.

And please, if you snap a photo of your beautiful bowl of black bean soup, share it on Instagram or Pinterest and tag @exorecipes! I love re-sharing your culinary masterpieces. What was your favorite part of making this easy black bean soup – that creamy texture, or the perfectly balanced spice?

From my NYC kitchen to yours — I hope this recipe brings as much warmth to your table as it does to mine. — mia 🧡

📌

Love This Recipe? Save It to Pinterest!

If you enjoyed this Spicy Black Bean Soup recipe, don’t let it get lost in your browser tabs! 😄 Pin it now so you can find it again anytime — and explore hundreds more tried-and-tested recipes waiting for you on my Pinterest boards.

👉 Follow mia on Pinterest @chefrecipes2

📌 Pin this recipe · 🔁 Re-pin your favorites · 💬 Tag me when you make it — I love seeing your creations!

Print

clock clock iconcutlery cutlery iconflag flag iconfolder folder iconinstagram instagram iconpinterest pinterest iconfacebook facebook iconprint print iconsquares squares iconheart heart iconheart solid heart solid icon

Spicy Black Bean Soup Recipe

  • Author: Chef Mia

Description

This spicy black bean soup recipe is easy, creamy and huge on flavor with loads black beans and just the right amount of spice. It’s the perfect weeknight meal.


Ingredients

Scale
  • 1 tablespoon olive oil
  • 1 onion (chopped (I use a yellow onion))
  • 1 bell pepper (chopped)
  • 2 jalapeno peppers (chopped)
  • 1 celery rib (chopped)
  • 1 medium carrot (peeled and chopped)
  • 4 garlic cloves (chopped)
  • 1 tablespoon chili powder
  • 1 teaspoon cayenne
  • 1 teaspoon paprika
  • 1 teaspoon oregano
  • 1/2 teaspoon cumin
  • 1/2 teaspoon spicy red pepper flakes (or more to taste!)
  • Salt and pepper to taste
  • 2 cans (15 ounces each black beans, drained and rinsed)
  • 2 cups chicken broth (vegetable broth is good, too)
  • Juice from 1 small lime
  • FOR GARNISH: Sliced peppers (spicy chili flakes, fresh chopped parsley, crumbly white cheese, or whatever else you prefer)

Instructions

  1. Heat the olive oil in a large pot or Dutch oven to medium heat. Add the peppers, onion, celery and carrot. Cook for 10 minutes, stirring a bit, or until the vegetables soften up.
  2. Add the garlic, chili powder, cayenne, paprika, oregano, cumin, red pepper flakes and a bit of salt and pepper. Stir and cook 30 seconds, until the garlic becomes fragrant.
  3. Add the black beans and chicken (or vegetable) stock and stir. Bring to a quick boil, then reduce the heat and simmer for 20 minutes. You can simmer longer to develop more flavor if you'd like.
  4. Optional, for a Creamier Soup: Transfer about half of the soup to a food processor or blender and blend until smooth. Add back to the soup. You can also use an immersion blender for this. Use caution handling hot soup.
  5. Adjust with salt and pepper. Serve into bowls and swirl in some fresh lime juice. Garnish. Enjoy!


Nutrition

  • Calories: 287 kcal
  • Sugar: 4 g
  • Fat: 6 g
  • Carbohydrates: 46 g
  • Protein: 17 g


Spicy Black Bean Soup