Delightful Vegan Strawberry Horchata Cupcakes: A Perfect Vegan Treat
Embarking on a culinary adventure with vegan desserts opens up a world of flavor and creativity, and these Vegan Strawberry Horchata Cupcakes are no exception. These delightful cupcakes combine the refreshing essence of horchata with the natural sweetness of strawberries, creating a treat that’s both light and satisfying. The hint of cinnamon and vanilla adds a warm undertone, making every bite an explosion of taste and comfort.
These cupcakes are more than just a sweet indulgence; they are a celebration of plant-based ingredients that ensure everyone can enjoy a delicious dessert. The soft, moist texture compliments the fresh strawberry frosting, which is made without dairy, allowing for a guilt-free treat that satisfies your sweet tooth. Whether you’re hosting a gathering or treating yourself, these Vegan Strawberry Horchata Cupcakes will undoubtedly impress.
Quick Recipe Highlights
- Flavor Profile: The flavors of horchata and fresh strawberries blend harmoniously, creating a delightful sweetness with a refreshing finish.
- Texture: Expect fluffy and moist cupcakes that melt in your mouth, topped with creamy strawberry frosting for the perfect indulgence.
- Aroma: The warm notes of cinnamon combined with the fruity fragrance of strawberries will fill your kitchen, inviting everyone to the table.
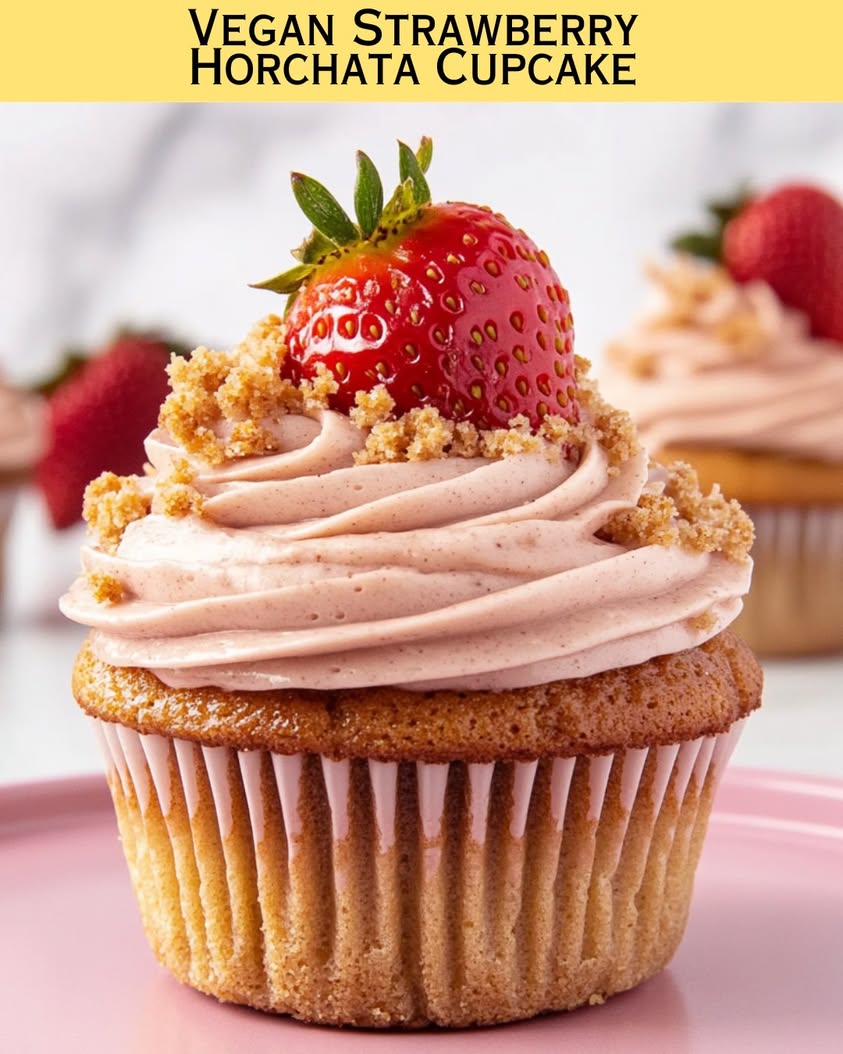
- Visual Appeal: Bright pink strawberry frosting sits atop golden-brown cupcakes, aesthetically pleasing and a feast for the eyes.
- Skill Level Needed: This recipe is accessible for home bakers of all levels, making it perfect for those new to vegan baking.
- Special Equipment: A muffin tin, electric mixer, and piping bags will facilitate the preparation and decoration of these cupcakes.
Recipe Overview
- Difficulty Level: This recipe is rated as medium difficulty due to the simple baking techniques involved, making it suitable for both novice and experienced bakers.
- Category: These cupcakes are a delightful addition to the dessert category, perfect for any occasion like birthdays, potlucks, or as a sweet snack.
- Cuisine: The inspiration stems from traditional Mexican horchata, giving these cupcakes a unique twist that reflects rich cultural flavors.
- Cost: The ingredients are budget-friendly, with most items being staples in the vegan pantry.
- Season: Ideal for fresh strawberries in the summer months, enhancing the flavor and natural sweetness of the cupcakes.
- Occasion: Perfect for summer gatherings, picnics, and any festival celebrating plant-based eating.
Why You’ll Love This Recipe
Vegan Strawberry Horchata Cupcakes offer a heavenly combination of taste and texture that will tantalize your taste buds. The tender crumb of the cupcake paired with light and fluffy strawberry frosting creates a delightful mouthfeel. They’re a joy to bite into, providing a sweet and refreshing experience perfect for warm days.
The convenience of this recipe comes from its simple instructions and quick preparation. Being able to whip up a batch of these enticing cupcakes in less than an hour makes them an excellent choice for last-minute gatherings or spontaneous cravings.
Packed with nutrients, these vegan cupcakes utilize strawberry and almond-based horchata, providing essential vitamins and minerals. Unlike traditional cupcakes filled with butter and cream, this recipe highlights healthy ingredients, making your dessert indulgence a bit more wholesome.
Hosting a gathering is always easier with inviting treats like these cupcakes. They not only look impressive but also cater to a wider audience, making them a go-to choice for vegan and non-vegan guests alike. Expect compliments and requests for the recipe once these beauties are served.
Cost-effective and accessible, preparing these Vegan Strawberry Horchata Cupcakes won’t break the bank. Most of the ingredients are affordable and available year-round, making it easy to include this recipe in your rotation of delightful vegan desserts.
Historical Background and Cultural Significance
The origin of horchata can be traced back to ancient Mesoamerican cultures, where it was traditionally made with ground nuts or grains. Over the centuries, this refreshing drink evolved, with variations spread throughout Latin America. The introduction of horchata into the cupcake genre allows us to celebrate this classic flavor in a modern dessert form.
Culturally, horchata holds a special place, often enjoyed during celebrations, family gatherings, or as a soothing refreshment on hot summer days. By incorporating horchata into Vegan Strawberry Cupcakes, one effectively brings a beloved cultural element into contemporary vegan baking.
As culinary traditions evolve and remix, the fusion of strawberry frosting with horchata-infused cupcakes represents a growing attitude toward inclusive and innovative recipes within the vegan community. This adaptation not only increases accessibility but also highlights the versatility of traditional flavors.
Various regional variations of horchata exist, each unique to its culture and ingredients. This recipe pays homage to its roots while encouraging creativity in the kitchen, inviting bakers to experiment with other flavors and toppings in their own versions.
Ingredient Deep Dive
Strawberries: Strawberries are beloved for their vibrant color and sweet flavor. These berries are rich in antioxidants and vitamin C, making them a nutritious addition to desserts. When selecting strawberries, look for bright red berries with a fresh green cap; store them in the refrigerator for the best taste, and consume them within 3-5 days for peak freshness. They can be substituted with raspberries or blueberries for different flavor profiles.
Almond Milk: Almond milk, as a key component of horchata, provides a creamy, nutty flavor while being dairy-free. This milk is lower in calories compared to regular milk and is fortified with various vitamins. When choosing almond milk, opt for unsweetened varieties to control sweetness in recipes, and store it in the refrigerator once opened. If you’re looking for alternatives, oat milk or soy milk can also work well in this cupcake recipe.
Common Mistakes to Avoid
- Not using room temperature ingredients: Cold ingredients like almond milk or coconut oil can affect the rise and texture of your cupcakes, resulting in denser baked goods.
- Overmixing the batter: Overmixing can lead to tough cupcakes. Mix just until the dry ingredients are incorporated for a fluffy texture.
- Skipping the cooling step: Allowing your cupcakes to cool completely before frosting prevents the frosting from melting; this is a crucial step for a lovely presentation.
- Using stale baking powder: Always check the expiration of your baking powder before use, as stale leavening agents can lead to flat cupcakes.
- Ignoring oven temperature: Ovens can vary in temperature, so always preheat and use an oven thermometer for accuracy to ensure proper baking.
- Filling cupcake liners too full: Filling liners more than two-thirds full can cause overflow and messy results. Aim for a consistent fill level for perfect cupcakes.
- Not adjusting for high altitude: If you live in a high-altitude area, be ready to adjust baking times and ingredients, as leavening can behave differently.
- Choosing the wrong types of strawberries: When available, opt for ripe, sweet strawberries as their flavor significantly enhances the frosting and final outcome.
Essential Techniques
Creaming Butter and Sugar: This technique is crucial when baking for creating a light and fluffy texture in your cupcakes. Beat the vegan butter and sugar until pale and fluffy to incorporate air into the mixture. Master it by using room temperature ingredients and a mixer on medium speed, avoiding common pitfalls like over-mixing, which can lead to dense results. Look for a pale, creamy texture as a visual cue for success.
Folding in Ingredients: This technique helps maintain the airy structure of your batter. Gently add in ingredients like flour or whipped aquafaba by cutting through the batter and turning it over instead of stirring vigorously. Perfect your technique with a spatula and be mindful of maintaining the mixture’s volume. You know it’s correct when your batter appears smooth and consistent without deflating.
Pro Tips for Perfect Vegan Strawberry Horchata Cupcakes
1. Use high-quality fresh strawberries for the frosting; they provide better flavor than frozen berries.
2. Adjust the amount of cinnamon in the batter to taste if you’re a fan of a stronger spice profile.
3. Experiment with flavors by adding a splash of vanilla extract to both the batter and frosting for enhanced taste.
4. For an extra touch, finding dairy-free cream cheese for frosting adds a richer layer of flavor.
5. Consider using a food processor to purée the strawberries for the frosting; this offers a smoother consistency.
6. Chill the frosting for a little while before piping to achieve more defined shaping that holds well.
7. Always use vegan baking paper or liners for the best results in ensuring easy removal from the muffin tin.
8. Double the recipe for more servings at larger gatherings without much additional effort.
Variations and Adaptations
Regional Variations: You may try adding a splash of coconut milk for a tropical twist or incorporating nuts into the batter, reminiscent of certain regional horchata recipes. Each adaptation brings the cultural essence alive in new ways.
Seasonal Adaptations: During fall, consider adding pumpkin spice to the batter and using pumpkin puree instead of strawberries for a festive flavor profile. Switching fruits based on seasonal availability can enhance the recipe’s diversity.
Dietary Modifications: For gluten-free cupcakes, replace all-purpose flour with a gluten-free blend that measures one-to-one. This allows those with gluten sensitivities to enjoy the treat while keeping the cupcake moist.
Flavor Variations: Blend flavors by incorporating matcha powder into the frosting for a vibrant green contrast and unique taste, or infuse coconut flakes in the batter for a hint of chewiness.
Texture Modifications: For those seeking added crunch, feel free to fold in finely chopped nuts like pecans or almonds directly into the batter before baking for an exciting texture contrast.
Presentation Alternatives: Top with edible flower petals or serve the cupcakes in brightly colored liners to elevate visual appeal for special occasions or themed events.
Serving and Presentation Guide
When plating these delightful Vegan Strawberry Horchata Cupcakes, consider using a two-tier stand for an elegant display at gatherings. Garnish with a sprig of mint or a slice of fresh strawberry on top for an inviting presentation.
Another suggestion is to dust the frosted cupcakes with powdered sugar immediately before serving to give a classic bakery feel. Pair these cupcakes with refreshing beverages like iced tea or lemonade for a delightful café-style experience.
For temperature considerations, serve these cupcakes at room temperature; the flavors will be more pronounced, especially in the rich and creamy frosting. Be mindful of portion control, as these cupcakes are rich; half servings can be delightful for guests who wish to savor multiple desserts in one sitting.
Wine and Beverage Pairing
When it comes to pairing beverages with Vegan Strawberry Horchata Cupcakes, consider a refreshing white wine like Prosecco. Its bubbles and sweetness complement the cupcakes beautifully without overpowering their flavors.
Non-alcoholic alternatives like hibiscus iced tea can enhance the berry notes of the cupcakes and present a visually stunning pairing with its vibrant color. If indulging in coffee or tea, serve these cupcakes alongside a smooth cold brew or lightly spiced chai matching its flavors well.
Temperature matters; both wines and teas should be chilled to highlight the refreshing aspects of the cupcakes. Offer small, delicate drinks to keep the focus on the lovely vegan dessert instead of larger servings that might overshadow it.
Storage and Shelf Life
To keep your Vegan Strawberry Horchata Cupcakes fresh, store them in an airtight container at room temperature for up to three days. If you need to extend their shelf life, consider refrigerating them, which can allow them to last up to a week.
Make sure the frosting seals properly in the container; this will help preserve both texture and flavor. For longer storage, wrapping each cupcake in plastic wrap and placing them in the freezer allows them to stay fresh for up to three months.
When reheating, let them thaw in the refrigerator and serve at room temperature. If the frosting appears too soft after refrigeration, a quick re-whip should fix it right up, keeping your presentation immaculate.
Make Ahead Strategies
To make your preparation easier, consider baking the cupcakes one day in advance and keeping them in an airtight container. Frosting them the next day maintains the fluffiness of the frosting while ensuring freshness.
For added efficiency, prepare the almond horchata mixture and refrigerate it up to two days beforehand. Store ingredients in separate containers to maintain freshness until you’re ready for assembly.
If your guests love fresh strawberries, make them shine by slicing them just before serving. This will ensure maximum flavor and visual appeal. For quality assessment, taste the batter before approving for baking to ensure hints of sweetness and proper texture.
Scaling Instructions
If you want to halve this recipe, it’s as simple as cutting each ingredient’s quantity in half. This can be ideal for small gatherings or a trial batch to explore the flavor profile.
On the other hand, if you wish to double or triple the recipe for larger crowds, ensure your mixing bowl is large enough to accommodate increased ingredients. Adjust baking time and monitor cupcakes carefully for doneness using a toothpick for best results.
Make necessary equipment adjustments by utilizing multiple muffin tins or batches in the oven. When scaling recipes, keep an eye on oven temperature and rack placements, ensuring even baking without overcrowding the oven.
Nutritional Deep Dive
With an emphasis on plant-based ingredients, these Vegan Strawberry Horchata Cupcakes provide a well-rounded nutritional profile. Each cupcake is a source of essential vitamins and minerals from strawberries, almond milk, and whole-wheat flour, contributing to a wholesome treat.
A macro breakdown reveals a balance of carbohydrates and healthy fats derived from almond milk and coconut oil. This balance provides energy without overly indulging in refined sugars, making the dessert more suitable for daily enjoyment.
Not only are these vegan cupcakes enjoyable, but they’re also a great choice for weight management. Featuring lower calories than traditional options, they make healthy snacking accessible while still satisfying your sweet cravings with flavor and nourishment.
Dietary Adaptations
For a gluten-free adaptation, replace all-purpose flour with a certified gluten-free baking mix, ensuring delicious results without compromising texture or flavor. This guarantees accessibility for those with gluten sensitivities while maintaining taste.
For dairy-free needs, this cupcake recipe is inherently suitable as it already incorporates plant-based ingredients. Opt for vegan butter and creamy alternatives for the frosting to ensure that every bite is 100% dairy-free.
Should you require a low-carb option, consider using almond flour and erythritol instead of traditional flour and sugar. This modification is perfect for those on keto diets while allowing them to enjoy a delightful dessert without increasing carbohydrates.
Troubleshooting Guide
If your cupcakes appear flat, it could be due to either overmixing or expired baking powder—check both to ensure proper leavening. For overly dry cupcakes, try reducing baking time and ensure you’re not using too much flour when measuring.
Should your frosting turn out too runny, chilling it briefly can help it set better. Alternatively, adding more powdered sugar can help achieve the desired consistency without sacrificing flavor.
If you encounter a burnt bottom, it may be due to uneven heat distribution in the oven; consider rotating your muffin tin halfway through baking or adjusting oven temperatures accordingly.
Recipe Success Stories
Many home bakers have reported rave reviews on the delightful combination of flavors in these cupcakes. Community feedback highlights the nostalgic resemblance to classic horchata while providing a modern twist that appeals to new tastes.
Adaptation stories show how variations like adding a hint of lime or using different fruits sparked joy among families, making their baking experiences more fun and engaging. This flexibility has encouraged people to explore their culinary creativity while still bonding over a beloved recipe.
Photography suggestions have included using natural light for capturing the vibrant colors of these cupcakes, which can help draw attention to their beautiful presentation for social media sharing.
Frequently Asked Questions
Can I make these cupcakes gluten-free? Absolutely! Replace regular flour with a gluten-free flour blend that is appropriate for baking, and your cupcakes will still taste deliciously moist.
How should I store leftover cupcakes? Keep your cupcakes in an airtight container at room temperature for up to three days or refrigerate them for additional shelf life.
What can I do if my frosting is too sweet? Adding a teaspoon of lemon juice or vanilla extract can help balance the sweetness without compromising flavor.
Can I freeze the cupcakes? Yes, these cupcakes can be frozen for up to three months. Just ensure they are wrapped tightly to prevent freezer burn.
Is it necessary to let the cupcakes cool before frosting? Yes, frosting warm cupcakes will result in melting; for best results, allow them to cool completely before applying frosting.
Can I make this recipe in advance? Definitely! You can bake the cupcakes a day ahead and frost them just before serving for maximum freshness.
What type of vegan butter should I use? Look for a high-quality vegan butter that has a comparable texture to dairy butter, ensuring good performance in both baking and frosting.
How can I make a mini version of these cupcakes? Use a mini muffin tin, reducing baking time by about 5-7 minutes; snack-sized portions are a hit at gatherings!
Is there an alternative to frosting? You can dust these cupcakes with powdered sugar for a simpler presentation or serve with a dollop of coconut whipped cream for added flair.
Additional Resources
For those looking to experiment further, check out related recipes such as chocolate avocado cupcakes or pumpkin spice muffins. There are also technique guides focused on mastering cupcake baking, ensuring you create treats like a pro.
Explore ingredient information, focusing on how versatile almond milk is in various baking applications or how to select fresh strawberries at the market. For equipment recommendations, we suggest investing in quality baking sheets and muffin tins for optimal results.
Seasonal variations, such as using eggnog flavorings during winter holidays or incorporating spring flavors with lemon zest, provide additional culinary inspiration and fun themes for special occasions.
Join the Conversation
We encourage readers to share their baking experiences and photos on social media. Tagging with relevant hashtags can help connect with the baking community and inspire others to create their versions of these Vegan Strawberry Horchata Cupcakes.
Consider writing reviews or commenting on your successes; this engagement fosters a supportive atmosphere where all skills are welcomed. Additionally, sharing ideas for recipe variations encourages continuous innovation, helping everyone enjoy plant-based baking even more.
When you embrace the importance of community and creativity in your baking journey, the joy of cooking becomes a shared experience, enriching our connections with both friends and food.
The Recipe
Vegan Strawberry Horchata Cupcakes
Serves: 12 servings
Prep Time: 20 mins
Cook Time: 25 mins
Total Time: 45 mins
Kitchen Equipment Needed
- Muffin tin
- Mixing bowls
- Electric mixer
- Piping bags
- Measuring cups and spoons
Ingredients
- 1 cup almond milk
- 1 cup all-purpose flour
- 1/2 cup coconut oil, melted
- 1 cup sugar
- 1 cup finely chopped strawberries
- 1/2 cup horchata (preferably homemade)
- 1 tsp baking powder
- 1 tsp vanilla extract
- 1 tsp cinnamon
- Pinch of salt
Directions
- Preheat your oven to 350°F (175°C) and line the muffin tin with cupcake liners.
- In a mixing bowl, combine the almond milk and horchata, then add the melted coconut oil and vanilla extract.
- In another bowl, whisk together the flour, sugar, baking powder, cinnamon, and salt.
- Slowly combine the wet and dry ingredients, mixing until just combined.
- Fold in the chopped strawberries gently.
- Spoon the batter into prepared muffin tins, filling them about two-thirds full.
- Bake in the preheated oven for 20-25 minutes, or until a toothpick inserted into the center comes out clean.
- Allow the cupcakes to cool completely before frosting.
- For the frosting, mix strawberry puree with vegan butter and powdered sugar until desired consistency and sweetness is achieved.
- Pipe or spread the frosting onto cooled cupcakes and enjoy!
Recipe Notes
- Feel free to switch out strawberries for other berries or seasonal fruits for different flavor profiles.
- This recipe can easily be doubled for larger gatherings or events.
- Storing extra cupcakes in an airtight container will preserve freshness for several days.