“`html
Table of Contents
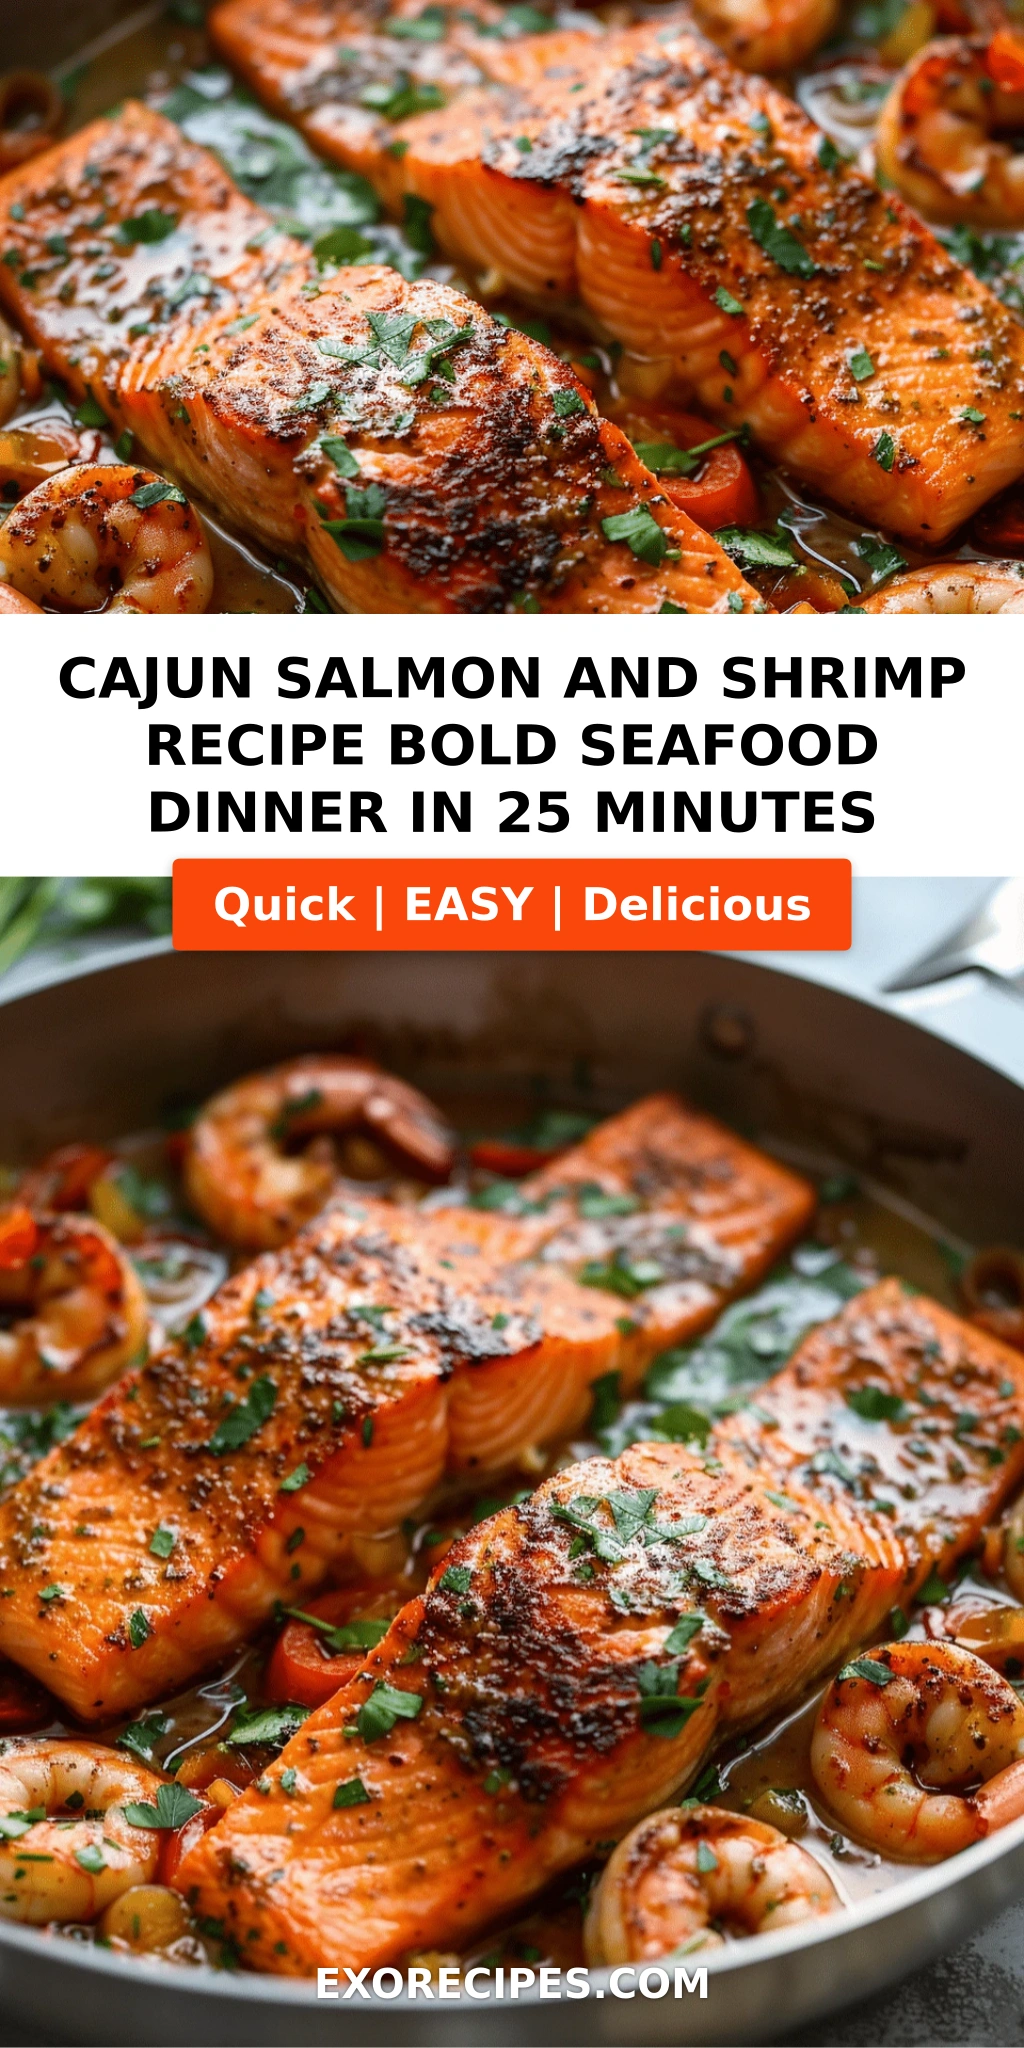
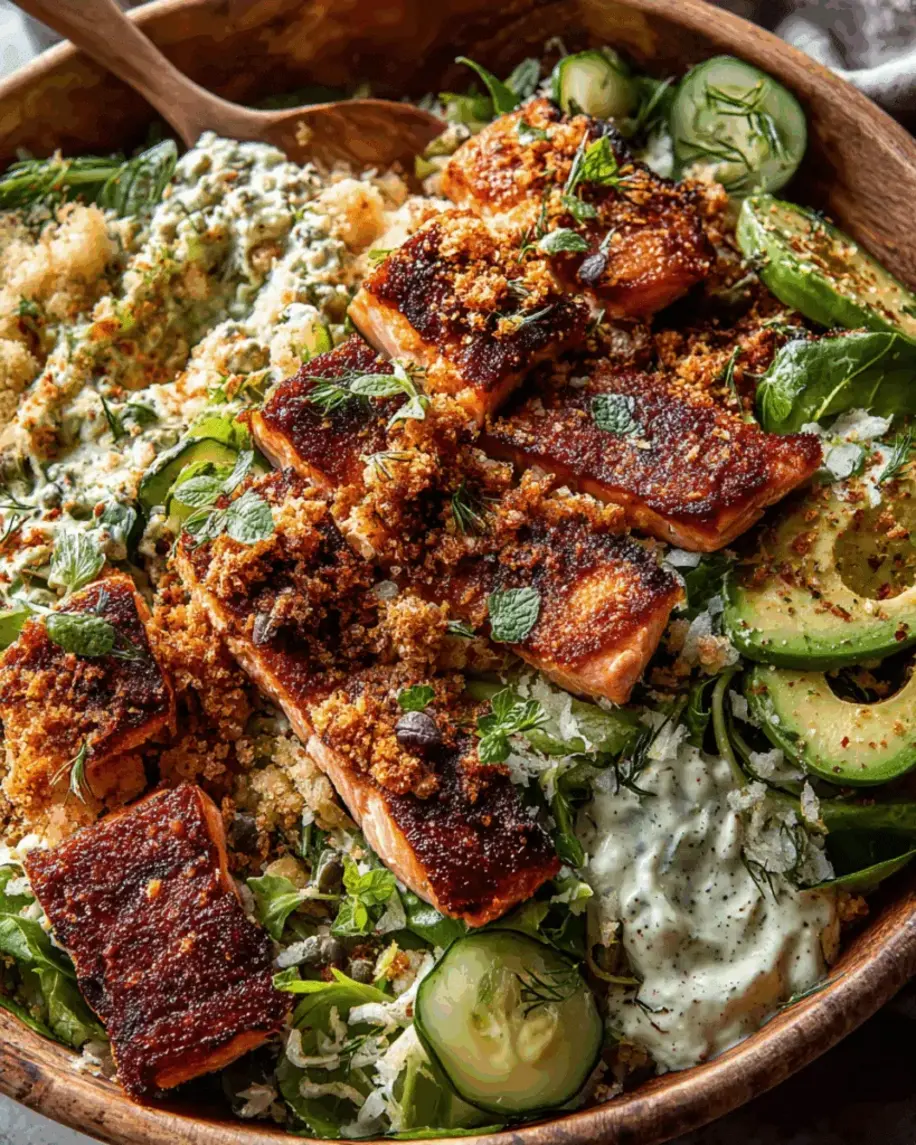
Cajun Salmon Crunch Salad with Tahini Dressing, Capers & Avocado – A Bold, Creamy, Crunchy Weeknight Dinner
I still remember the first time I made this Cajun salmon crunch salad recipe. It was a sweltering summer evening in my tiny NYC kitchen, and I was craving something that packed the bold, smoky heat of the Louisiana bayou but also reminded me of the creamy, nutty dressings my mother used to make back in Morocco. That night, this Cajun salmon with tahini dressing was born — and it has been a staple in my home ever since. The combination of blackened salmon, creamy avocado, briny capers, and a rich tahini dressing is nothing short of magic. It’s a healthy Cajun salmon salad that feels indulgent, comes together in under 30 minutes, and never fails to impress.
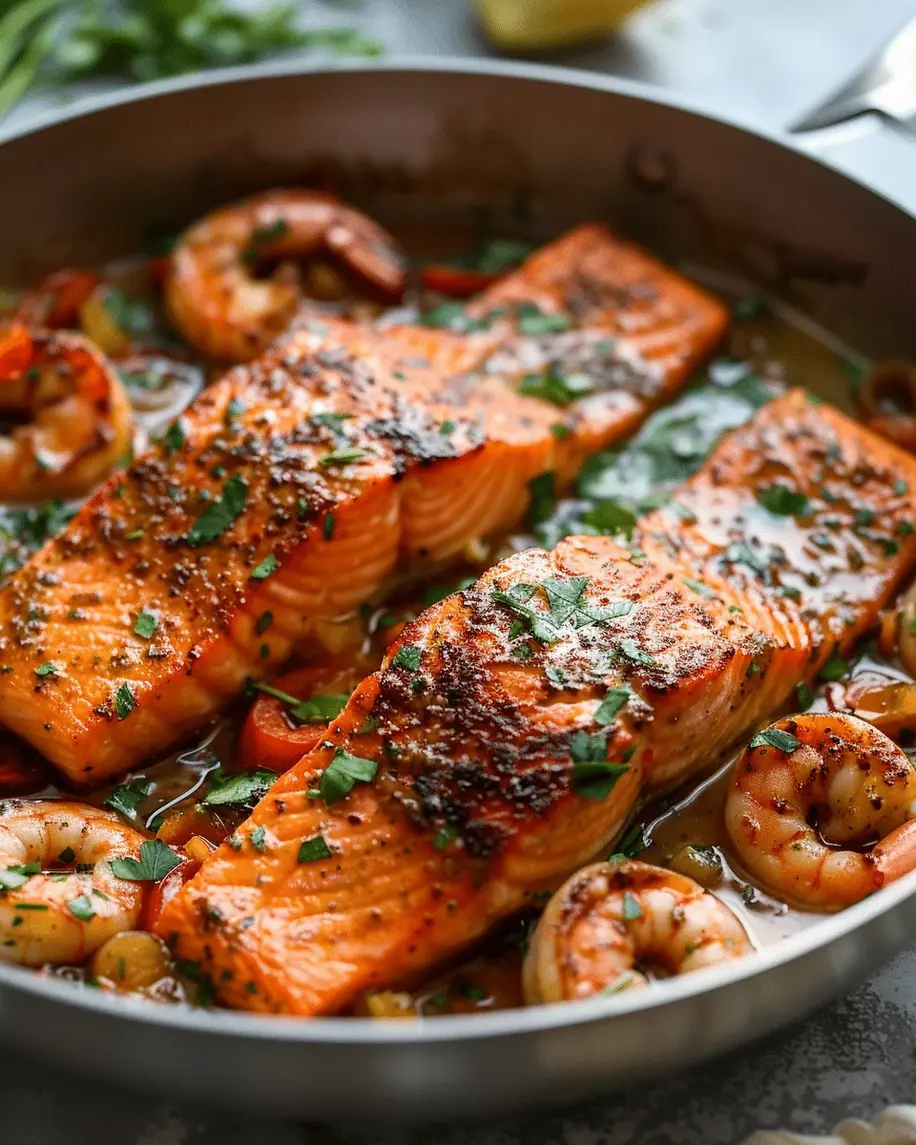
Imagine this: a bed of crisp mixed greens, each leaf coated in a silky tahini dressing that whispers of lemon and garlic. Slices of ripe, buttery avocado melt into the greens, while cherry tomatoes pop with sweetness and red onion adds a sharp bite. Then come the capers — those little bursts of briny sunshine — and the toasted pumpkin seeds that crunch with every forkful. On top rests a salmon fillet with a deep mahogany crust from the Cajun seasoning, the skin crackling like the best kind of secret. The first bite hits you with heat, then creaminess, then brightness, then crunch. It’s a symphony of textures and flavors that I spent years perfecting in Parisian kitchens and New York test runs.
What sets my spicy salmon crunch salad apart is the tahini dressing. Most people pair Cajun salmon with ranch or a simple lemon vinaigrette, but tahini brings a nutty depth that tames the spice and ties everything together in a way that feels both exotic and familiar. I learned the art of balanced sauces at Le Cordon Bleu in Paris, and this dressing is one of my proudest creations. One pro tip I always share: pat your salmon fillets completely dry before seasoning — it’s the secret to that restaurant-quality crust. And the most common mistake home cooks make? Overcooking the salmon. I’ll show you exactly how to keep it perfectly moist. This Cajun salmon crunch salad is proof that healthy eating doesn’t have to be boring.
Why This Cajun Salmon Crunch Salad Recipe Is the Best
The flavor secret here is the marriage of two worlds: the bold, smoky heat of Cajun seasoning and the creamy, nutty richness of tahini. Growing up in Morocco, my mother would make dressings with sesame paste, lemon, and garlic for simple vegetable salads. Years later, training in Paris, I learned how to build emulsions that are both stable and luxurious. This dressing is that training in action — it’s silky, pourable, and clings to every leaf without being heavy. The Cajun seasoning I use has a touch of cayenne, paprika, garlic powder, and oregano, and when it hits the hot skillet, it creates a crust that locks in moisture and delivers a kick that lingers beautifully.
Texture is everything in a good salad, and I’ve engineered every component for contrast. The salmon skin gets seared until it shatters like glass, thanks to a technique I picked up from a fishmonger at the Union Square Greenmarket in NYC: score the skin lightly before seasoning, and always start cooking skin-side down in a hot pan without moving it. The greens stay crisp because I dress them lightly and serve immediately. The avocado adds creaminess, the pumpkin seeds add crunch, and the capers add little bursts of brine that cut through the richness. Every bite is different, and every bite is satisfying.
This salmon salad with avocado and capers is foolproof and fast, which is exactly what I need after a long day of recipe testing. From start to finish, it takes 25 minutes — and most of that is hands-off while the salmon cooks. The ingredients are easy to find at any US grocery store, and the technique is simple enough for a weeknight but impressive enough for company. Whether you’re a seasoned cook or just starting out, this recipe delivers restaurant-quality results with minimal fuss. And because it’s packed with protein, healthy fats, and vibrant vegetables, it’s a complete meal in a bowl that will keep you full and energized.
Cajun Salmon Crunch Salad Recipe Ingredients
I source my salmon from the wild-caught Alaskan fillets at my local Whole Foods in Chelsea, and I grab my tahini from a little Middle Eastern market on Atlantic Avenue in Brooklyn — the stuff is so much creamier than the big-brand jars. Every ingredient in this spicy salmon crunch salad has a purpose, and I want you to know exactly what to look for. Here’s everything you’ll need to make this healthy Cajun salmon salad shine.
Ingredients List
- For the Salmon: 4 (6 oz) skin-on salmon fillets
- 1 tablespoon Cajun seasoning
- 1 tablespoon olive oil
- Salt and black pepper to taste
- For the Salad: 6 cups mixed greens (romaine, arugula, and spinach)
- 1 large avocado, sliced
- 1/2 cup cherry tomatoes, halved
- 1/4 cup sliced red onion
- 2 tablespoons capers, drained
- 1/4 cup toasted pumpkin seeds
- For the Tahini Dressing: 1/4 cup tahini
- 2 tablespoons lemon juice
- 2 tablespoons water (more as needed)
- 1 tablespoon maple syrup or honey
- 1 small garlic clove, minced
- Salt to taste
Ingredient Spotlight
Salmon: The star of this Cajun salmon crunch salad recipe. Look for fillets that are about 1 inch thick at the thickest part so they cook evenly. Wild-caught salmon has a firmer texture and richer flavor than farmed, but either works. If using frozen, thaw overnight in the fridge and pat very dry before seasoning.
Tahini: This is what makes my Cajun salmon with tahini dressing so special. Good tahini should be pourable, not thick and pasty. Give it a stir in the jar (the oil always separates) and look for brands from Lebanon or Israel. If your tahini is too thick, the dressing will be pasty — just add an extra tablespoon of water.
Capers: These little brined flower buds are the unsung heroes of this salmon salad with avocado and capers. They add a punch of saltiness and acidity that cuts through the rich salmon and avocado. I prefer salt-packed capers (rinsed well) because they have a firmer texture, but brined capers in a jar work perfectly too.
Cajun Seasoning: The backbone of this spicy salmon crunch salad. You can use store-bought (I like Tony Chachere’s or Slap Ya Mama) or make your own with paprika, cayenne, garlic powder, onion powder, oregano, thyme, salt, and pepper. Go easy on the salt if your blend already contains it.
Pumpkin Seeds: Toasted pumpkin seeds (pepitas) add that essential crunch. Buy them raw and toast them in a dry skillet over medium heat for 2-3 minutes until they pop and smell nutty. They keep for weeks in a sealed jar, so toast a big batch.
| Original Ingredient | Best Substitution | Flavor / Texture Impact |
|---|---|---|
| Skin-on salmon fillet | Skinless salmon, arctic char, or trout | Less crispy skin; arctic char is milder and more delicate |
| Tahini | Sunflower seed butter or Greek yogurt (thinned with water) | Sunflower butter is nuttier; yogurt is tangier and less rich |
| Capers | Chopped green olives or pickled okra | Olives are milder and fruitier; okra adds a different texture |
| Pumpkin seeds | Sunflower seeds, sliced almonds, or crushed tortilla chips | Similar crunch; chips add a salty, corn flavor |
How to Make Cajun Salmon Crunch Salad — Step-by-Step
Trust me, if you can whisk a dressing and sear a piece of fish, you can make this Cajun salmon crunch salad recipe like a pro. I’ve broken it down into five simple steps with all the visual cues and timing you need. Let’s cook.
Step 1: Prepare the Tahini Dressing
In a small bowl, whisk together 1/4 cup tahini, 2 tablespoons lemon juice, 2 tablespoons water, 1 tablespoon maple syrup or honey, 1 small minced garlic clove, and a pinch of salt. Whisk vigorously until the mixture transforms from a thick paste into a smooth, pourable dressing. If it’s too thick, add water 1 teaspoon at a time until it ribbons off the whisk. Taste and adjust salt or lemon — it should be balanced, not overwhelmingly tangy.
💡 mia’s Pro Tip: If your tahini dressing seizes up or looks grainy, don’t panic — that’s normal when tahini first hits acid. Just keep whisking and add water gradually. A tablespoon of ice-cold water can rescue even the stubbornest dressing.
Step 2: Season the Salmon
Pat the salmon fillets completely dry with paper towels. This is non-negotiable for that crispy skin. Season both sides generously with Cajun seasoning (about 1 teaspoon per fillet), plus a little salt and pepper if your blend doesn’t already include salt. Let the fillets sit at room temperature for 10 minutes while you prep the vegetables — this helps them cook more evenly.
⚠️ Common Mistake to Avoid: Don’t season the salmon more than 30 minutes ahead of cooking. The salt will draw out moisture and make the skin soggy instead of crispy. Season right before it hits the pan.
Step 3: Cook the Salmon
Heat 1 tablespoon olive oil in a large non-stick skillet over medium-high heat until the oil shimmers. Place the salmon fillets skin-side down. Press gently with a spatula for 5 seconds to ensure even contact. Cook for 4-5 minutes without moving them — you’ll see the edges turning opaque and the skin turning golden brown. Carefully flip with a fish spatula and cook for another 3-4 minutes for medium, or until the internal temperature reaches 125°F for medium, 130°F for medium-well. Transfer to a plate and let rest for 3 minutes.
💡 mia’s Pro Tip: For the most perfectly cooked salmon, use an instant-read thermometer. The fish will continue cooking from residual heat while it rests, so pull it off the pan when it’s 5°F below your target temperature. That extra minute of rest is pure magic.
Step 4: Assemble the Salad
Divide the 6 cups of mixed greens among four large plates or bowls. Top each with sliced avocado (about 1/4 of a large avocado per serving), halved cherry tomatoes, sliced red onion, drained capers, and toasted pumpkin seeds. I like to fan the avocado slices out for a pretty presentation, but just scattering them works too. Drizzle about 2 tablespoons of the tahini dressing over each salad.
⚠️ Common Mistake to Avoid: Don’t dress the greens before adding the toppings — the avocado and tomatoes can get slippery and slide off. Drizzle the dressing over everything at the end so each component stays in place and gets its own coating.
Step 5: Finish and Serve
Place one rested salmon fillet on top of each salad, skin-side up so it stays crispy. Drizzle a little extra tahini dressing over the salmon itself — I love the contrast of the warm fish and the cool dressing. Serve immediately while the salmon is still warm and the greens are crisp. If you want an extra pop of color, sprinkle a pinch of flaky sea salt and a few fresh herbs like cilantro or parsley over the top.
💡 mia’s Pro Tip: For the ultimate crunch factor, crush a handful of tortilla chips or fried shallots over the salad just before serving. It adds that extra layer of texture that makes this Cajun salmon crunch salad truly unforgettable.
| Step | Action | Duration | Key Visual Cue |
|---|---|---|---|
| 1 | Whisk tahini dressing | 2 minutes | Smooth, pourable, ribbons off whisk |
| 2 | Season salmon | 2 minutes + 10 min rest | Evenly coated, no pooling seasoning |
| 3 | Cook salmon skin-side down | 4-5 min first side, 3-4 min second | Skin is deep golden, edges opaque; fish flakes easily |
| 4 | Assemble salad | 3 minutes | Greens layered with toppings, dressing drizzled |
| 5 | Top with salmon and serve | 1 minute | Crisp skin visible, warm fish over cool greens |
Serving & Presentation
This Cajun salmon crunch salad is a complete meal on its own, but how you serve it can elevate the experience. I love to plate it on large, wide bowls so the colors really pop — the deep orange of the salmon, the green of the avocado and herbs, the bright red tomatoes, and the white tahini drizzle. For a dinner party, I sometimes serve the components family-style on a large platter with the salmon fillets arranged on top and the dressing on the side so guests can help themselves.
For a touch of my Moroccan heritage, I’ll often sprinkle a pinch of za’atar or sumac over the finished salad — the tangy, herbal notes are a beautiful counterpoint to the smoky Cajun spice. And if I’m feeling particularly Parisian, I’ll add a small handful of fresh dill or chervil for that fine-dining finish. In my NYC kitchen, I keep it casual but polished: a generous drizzle of dressing, a crack of black pepper, and a lemon wedge on the side. It’s the kind of meal that feels special enough for a Friday night but easy enough for a Tuesday.
Pair this spicy salmon crunch salad with a side of warm crusty bread or roasted sweet potato wedges for a heartier meal. A crisp white wine like Sauvignon Blanc or a light Pinot Noir works beautifully with the Cajun spice and tahini. For a non-alcoholic option, I love a sparkling water with fresh mint and lime — it cleanses the palate between bites.
| Pairing Type | Suggestions | Why It Works |
|---|---|---|
| Side Dish | Crusty sourdough, roasted sweet potatoes, grilled corn on the cob | Adds heartiness and soaks up extra dressing |
| Sauce / Dip | Extra tahini dressing, harissa yogurt, lemon-garlic aioli | Enhances the creamy-spicy profile |
| Beverage | Sauvignon Blanc, light Pinot Noir, sparkling water with mint | Acidity cuts richness; bubbles refresh the palate |
| Garnish | Fresh dill, cilantro, za’atar, sumac, flaky sea salt | Adds freshness, color, and complexity |
Make-Ahead, Storage & Reheating
Living in New York City means my schedule is always packed, so I’m a huge fan of make-ahead meals that don’t sacrifice quality. This Cajun salmon crunch salad recipe is perfect for meal prep — you just need to store components separately and assemble at the last minute. I often make the tahini dressing on Sunday and cook the salmon fillets the night before for a quick lunch that feels fresh and vibrant.
| Method | Container | Duration | Reheating Tip |
|---|---|---|---|
| Refrigerator | Airtight containers, dressing separate | Salmon: 3 days / Dressing: 5 days | Reheat salmon in a skillet over medium heat for 2 min per side |
| Freezer | Freezer-safe bag or container for salmon only | Salmon: 1 month | Thaw in fridge overnight, then reheat in a low oven at 300°F for 8 min |
| Make-Ahead | Dressing in jar, greens in bowl with paper towel | Up to 1 day in advance | Assemble just before serving; add avocado and nuts at the end |
For the best texture, I always recommend storing the dressing separately from the greens and adding the avocado and pumpkin seeds just before serving. If you have leftover dressed greens, they’ll be soggy the next day — so only dress what you’ll eat. The salmon reheats beautifully in a hot skillet (skin-side down again for 2 minutes) or in a 300°F oven for about 8 minutes if you’re reheating multiple fillets. The tahini dressing might thicken in the fridge, so let it sit at room temperature for 15 minutes or whisk in a teaspoon of warm water to bring it back to life.
Variations & Easy Swaps
One of the things I love most about this Cajun salmon crunch salad recipe is how adaptable it is. I’ve tested dozens of variations over the years in my own kitchen, and I’m sharing the best ones below. Whether you’re cooking for dietary restrictions, seasonal cravings, or just a change of pace, there’s a version here for you.
| Variation | Key Change | Best For | Difficulty Impact |
|---|---|---|---|
| 🌿 Moroccan-Spiced Version | Swap Cajun seasoning for ras el hanout, add preserved lemon | A taste of North Africa | No change |
| 🥑 Vegetarian / Vegan | Replace salmon with crispy tofu or roasted chickpeas | Plant-based weeknights | Easy |
| 🍋 Summer Citrus Twist | Add segments of blood orange or grapefruit, use lime in dressing | Bright, refreshing summer meals | Easy |
🌿 Moroccan-Spiced Version
This variation is deeply personal to me. Swap the Cajun seasoning for 1 tablespoon of ras el hanout — a warm, fragrant Moroccan spice blend with cinnamon, cumin, coriander, and ginger. Add 2 tablespoons of chopped preserved lemon to the salad (rind only, flesh discarded). The floral, citrusy notes of the preserved lemon pair beautifully with the tahini dressing and take this salad back to my mother’s kitchen in Marrakech. Finish with a sprinkle of fresh mint instead of parsley.
🥑 Vegan Crispy Tofu Version
For a plant-based take on this healthy Cajun salmon salad, replace the salmon with extra-firm tofu that’s been pressed, cubed, and tossed in Cajun seasoning plus a tablespoon of cornstarch. Pan-fry in olive oil for 5-7 minutes until golden and crispy on all sides. The tofu takes on the Cajun flavors beautifully and the cornstarch gives it a light crunch that mimics the salmon crust. Use maple syrup instead of honey in the dressing to keep it fully vegan.
🍋 Summer Citrus Twist
In the peak of summer, I love to add segments of blood orange or grapefruit to this spicy salmon crunch salad. The juicy, tart-sweet citrus cuts through the richness of the avocado and tahini in the most refreshing way. Swap the lemon juice in the dressing for lime juice, and add a pinch of Aleppo pepper for a milder, fruitier heat. I found the most incredible blood oranges at the Union Square Farmers Market last July and knew they had to go into this salad.
What can I substitute for tahini in the dressing for a Cajun salmon crunch salad?
If you don’t have tahini on hand, the best substitute for this Cajun salmon crunch salad dressing is sunflower seed butter. It has a similar creamy, nutty profile and the same pale color, so your dressing will look and taste close to the original. Use a 1:1 ratio — 1/4 cup sunflower butter for 1/4 cup tahini. You may need to add an extra tablespoon of water since sunflower butter is often thicker. Another great option is Greek yogurt thinned with a little milk or water — it gives a tangier, lighter dressing that still coats the greens beautifully. For a nut-free version, well-stirred natural peanut butter works in a pinch, though it will add a distinct peanut flavor. Just avoid using only oil as a substitute — you’ll lose the creamy body that makes this Cajun salmon with tahini dressing so special.
How long should I cook the Cajun salmon to keep it moist for the salad?
The key to moist Cajun salmon for this salad is a hot skillet and precise timing. For a 6-ounce fillet that’s about 1 inch thick, cook it skin-side down over medium-high heat for 4 to 5 minutes — don’t move it during this time so the skin gets deeply golden and crispy. Then flip and cook for another 3 to 4 minutes for medium doneness, which is perfect for a salmon salad with avocado and capers. The internal temperature should reach 125°F when you pull it off the heat, and it will rise to about 130°F while resting. If you prefer your salmon more well-done, cook for 5 to 6 minutes on the second side, but check the temperature at 4 minutes to avoid drying it out. The most common mistake home cooks make is overcooking because they’re afraid of undercooked fish — trust the thermometer and the resting time, and your Cajun salmon crunch salad will be perfectly moist every time.
Can I make the Cajun salmon crunch salad ahead of time without the avocado?
Yes, you can definitely prep this healthy Cajun salmon salad in advance, but you’ll want to keep the components separate and add the avocado at the last minute. Here’s my tested meal-prep strategy: cook the salmon fillets up to 3 days ahead and store them in an airtight container in the fridge. Make the tahini dressing up to 5 days ahead and keep it in a jar. Wash and dry the greens, and store them in a large bowl with a paper towel on top to absorb moisture. Slice the red onion and halve the cherry tomatoes, and store them together. Toast the pumpkin seeds and keep them in a sealed bag. When you’re ready to serve, reheat the salmon in a skillet for 2 minutes per side, assemble the greens and toppings, add freshly sliced avocado, and drizzle with dressing. The avocado will brown if sliced ahead, so always slice it fresh. This make-ahead method works beautifully for busy weeknights.
What are the best crunchy toppings to add to a Cajun salmon salad with tahini dressing?
The best crunchy toppings for a spicy salmon crunch salad are all about texture contrast, and I have several favorites that I rotate depending on my mood. Toasted pumpkin seeds are my go-to — they’re nutty, light, and don’t overwhelm the other flavors. Crushed tortilla chips add a salty, corn-based crunch that’s absolutely addictive with the Cajun seasoning and creamy avocado. Fried shallots (you can buy them at most grocery stores or make your own) bring a sweet, oniony crispness that elevates this Cajun salmon crunch salad to restaurant level. For a more Moroccan-inspired touch, I love crushed toasted almonds or a sprinkle of dukkah — an Egyptian nut and spice blend that pairs beautifully with the tahini dressing. Whatever you choose, add the crunchy element just before serving so it stays crisp. I also like to layer crunch in the salad itself by adding thinly sliced fennel or jicama for a fresh, vegetable-based crunch.
Is this Cajun salmon crunch salad recipe gluten-free?
Yes, this Cajun salmon crunch salad recipe is naturally gluten-free as written. All the ingredients — salmon, mixed greens, avocado, cherry tomatoes, red onion, capers, pumpkin seeds, and the tahini dressing — are free from gluten. The only thing to watch out for is your Cajun seasoning: some commercial blends may contain anti-caking agents or fillers that include gluten, so I recommend checking the label or making your own gluten-free Cajun seasoning at home with paprika, cayenne, garlic powder, onion powder, dried oregano, dried thyme, salt, and pepper. If you’re serving this healthy Cajun salmon salad to guests with celiac disease or severe gluten sensitivity, also make sure your capers are packed in brine without any additives, and that your tahini is labeled gluten-free. This recipe is naturally wheat-free, so it’s a wonderful option for anyone following a gluten-free diet.
Can I use frozen salmon for this salmon salad with avocado and capers?
Absolutely, frozen salmon works very well for this Cajun salmon crunch salad recipe, but there’s one crucial step: you must thaw it completely and pat it bone-dry before seasoning. Thaw the fillets in the refrigerator overnight — never at room temperature — to maintain the best texture. Once thawed, remove them from the package, rinse quickly under cold water, and lay them on a paper-towel-lined plate. Cover with more paper towels and press gently to absorb every drop of moisture. Wet salmon will steam instead of sear, and you’ll lose that beautiful crispy skin that makes this spicy salmon crunch salad so special. Frozen salmon can sometimes be a bit more watery than fresh, so consider letting the thawed fillets rest uncovered in the fridge for 15-20 minutes to air-dry. Cook times will be similar to fresh salmon, but start checking for doneness at the lower end of the time range since thawed fish can cook slightly faster.
What type of greens work best for a healthy Cajun salmon salad?
For the best texture and flavor in this Cajun salmon crunch salad, I recommend a mix of sturdy and tender greens. My favorite combination is equal parts romaine lettuce (for crunch), arugula (for peppery bite), and baby spinach (for tenderness). Romaine holds up well to the warm salmon and doesn’t wilt too quickly, while arugula adds a sharpness that cuts through the creamy tahini dressing. Spinach brings a mild, slightly sweet earthiness that balances the heat. You can also use spring mix, butter lettuce, or even chopped kale — if using kale, massage it with a teaspoon of olive oil and a pinch of salt for 2 minutes to soften it. Avoid delicate greens like mesclun or microgreens as the main base, since they can become soggy under the weight of the toppings and warm fish. Whichever greens you choose for this salmon salad with avocado and capers, make sure they’re thoroughly washed and dried — wet greens will make the dressing slide off.
How can I make the tahini dressing thicker or thinner for this Cajun salmon crunch salad?
Adjusting the consistency of the tahini dressing for this Cajun salmon with tahini dressing is very simple. If your dressing is too thick (it should flow off a spoon like heavy cream, not sit in a stiff mound), add water 1 teaspoon at a time and whisk vigorously. I often need 2 to 4 tablespoons of water total, depending on the brand of tahini. If it’s too thin, whisk in an extra tablespoon of tahini or let it rest in the fridge for 15 minutes — tahini naturally thickens as it sits. The ideal consistency for this spicy salmon crunch salad is thin enough to drizzle in a steady stream but thick enough to cling to the greens and salmon. If you accidentally make it too thin, you can also add a teaspoon of Greek yogurt or a small pinch of xanthan gum (about 1/8 teaspoon) to bring back some body without changing the flavor. Remember that the dressing will thicken as it cools, so if you’re making it ahead, leave it slightly thinner than your target consistency.
Share Your Version!
I absolutely love hearing how this Cajun salmon crunch salad recipe turns out in your kitchen. Did you add extra crunch with fried shallots? Did you swap the tahini for Greek yogurt and discover a new favorite? Or maybe you went all-in with my Moroccan-spiced version and added preserved lemon and ras el hanout? Leave a star rating and a comment below — your feedback helps me create better recipes for you, and I read every single one. If you share a photo on Instagram or Pinterest, tag me @exorecipes so I can see your beautiful creations and feature them in my stories.
And here’s my question for you: what’s the one crunchy topping you can’t live without on this spicy salmon crunch salad? I’m always looking for new ideas to test in my NYC kitchen, and your suggestion might just become the next variation I feature on the blog. From my NYC kitchen to yours — I hope this recipe brings as much warmth to your table as it does to mine. — mia 🧡
Love This Recipe? Save It to Pinterest!
If you enjoyed this Cajun Salmon Crunch Salad with Tahini Dressing recipe, don’t let it get lost in your browser tabs! 😄 Pin it now so you can find it again anytime — and explore hundreds more tried-and-tested recipes waiting for you on my Pinterest boards.
👉 Follow mia on Pinterest @exorecipe
📌 Pin this recipe · 🔁 Re-pin your favorites · 💬 Tag me when you make it — I love seeing your creations!
⭐️ ⭐️ ⭐️ ⭐️ ⭐️
Loved this Cajun Salmon Crunch Salad? Pin the recipe above and share your version with me — I can’t wait to see your twist! 🧡
📸 Tag @exorecipes on Instagram or Pinterest for a chance to be featured.
“`
Print
Cajun Salmon Crunch Salad with Tahini Dressing, Capers & Avocado
- Prep Time: 10 minutes
- Cook Time: 15 minutes
- Total Time: 25 minutes
- Yield: 4 servings 1x
- Method: Main Course
- Cuisine: Cajun-inspired
Description
A vibrant, crunchy salad featuring blackened Cajun salmon, creamy avocado, briny capers, and a rich tahini dressing.
Ingredients
- For the Salmon:
- 4 (6 oz) skin-on salmon fillets
- 1 tablespoon Cajun seasoning
- 1 tablespoon olive oil
- Salt and black pepper to taste
- For the Salad:
- 6 cups mixed greens (such as romaine, arugula, and spinach)
- 1 large avocado, sliced
- 1/2 cup cherry tomatoes, halved
- 1/4 cup sliced red onion
- 2 tablespoons capers, drained
- 1/4 cup toasted pumpkin seeds
- For the Tahini Dressing:
- 1/4 cup tahini
- 2 tablespoons lemon juice
- 2 tablespoons water (more as needed for consistency)
- 1 tablespoon maple syrup or honey
- 1 small garlic clove, minced
- Salt to taste
Instructions
- Prepare the dressing: In a small bowl, whisk together tahini, lemon juice, water, maple syrup, garlic, and salt until smooth. Add more water if needed to reach a pourable consistency. Set aside.
- Season the salmon: Pat salmon fillets dry. Season both sides with Cajun seasoning, salt, and pepper.
- Cook the salmon: Heat olive oil in a large non-stick skillet over medium-high heat. Place salmon skin-side down and cook for 4-5 minutes until the skin is crispy. Flip and cook for another 3-4 minutes for medium, or until desired doneness. Remove from heat and let rest.
- Assemble the salad: Divide mixed greens among plates. Top with avocado slices, cherry tomatoes, red onion, capers, and pumpkin seeds.
- Finish: Place a salmon fillet on each salad. Drizzle generously with tahini dressing. Serve immediately.
Notes
For extra crunch, add crumbled tortilla chips or fried shallots. The dressing can be made ahead and refrigerated for up to 3 days.
Nutrition
- Calories: 520 kcal
- Sugar: 6 g
- Fat: 32 g
- Carbohydrates: 18 g
- Protein: 38 g

k">
Tried This Recipe? Leave a Comment!
Did you make this recipe? I’d love to hear how it turned out! Please leave a comment and a rating below. Your feedback helps other home cooks and supports cheerychop.com!
For more delicious inspiration, follow me on Pinterest!