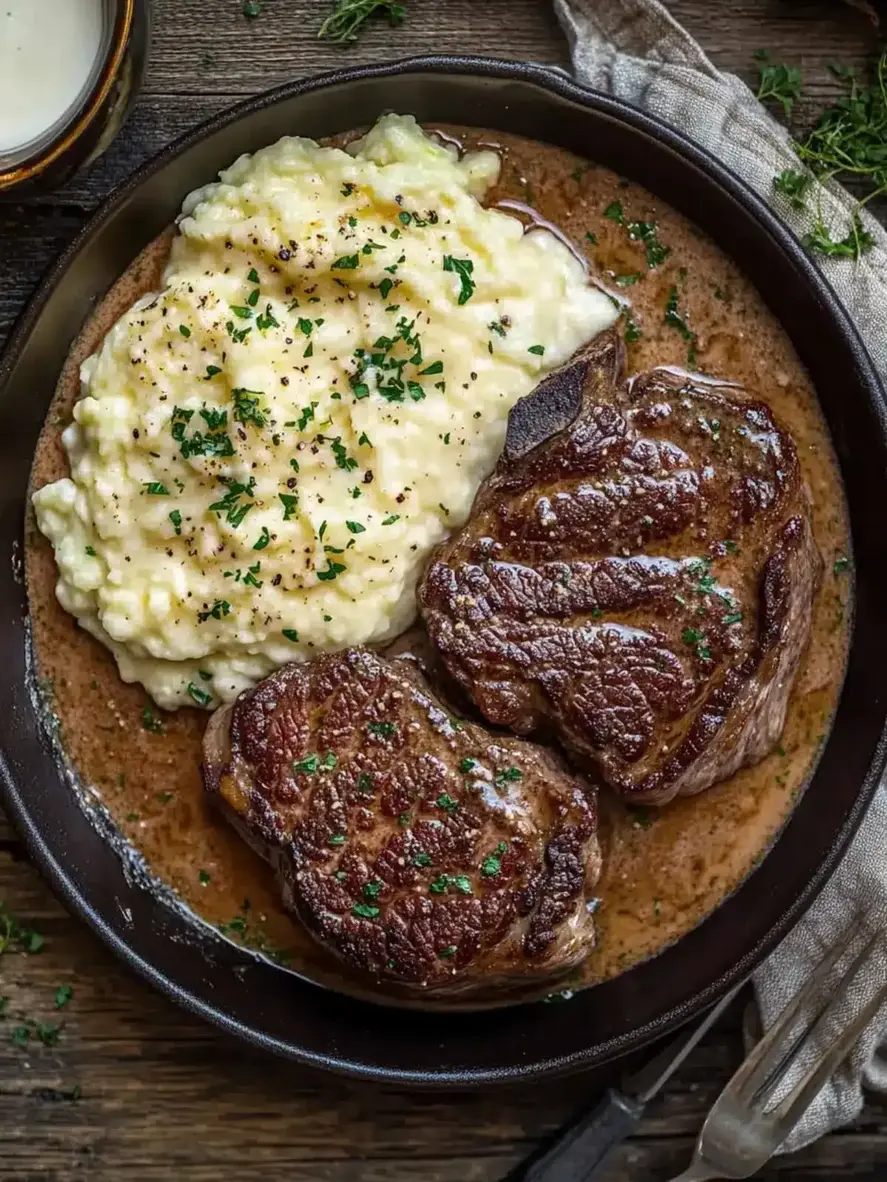
Easy Garlic Parmesan Crusted Chicken

Garlic Parmesan Crusted Chicken: The Only Recipe You’ll Ever Need

Imagine coming home after a long day, craving something comforting yet effortless to prepare. That’s where this Garlic Parmesan Crusted Chicken recipe shines, transforming simple ingredients into a crispy, golden masterpiece that the whole family will adore. As the ultimate baked garlic parmesan chicken dish, it’s not just easy and flavorful—it’s a healthier alternative to pan-fried versions, delivering that irresistible crunch with minimal effort. Whether you’re a busy parent or a novice cook, this easy garlic parmesan chicken recipe will become your go-to for weeknight dinners, packed with savory garlic notes and a parmesan crust that locks in juiciness.

The allure of this crispy garlic parmesan chicken lies in its sensory symphony. Picture the tantalizing aroma of fresh garlic mingling with sharp, nutty parmesan as it bakes to golden perfection. Each bite offers a satisfying contrast: a shatteringly crisp exterior that gives way to tender, juicy chicken inside. The parmesan crust adds a rich, cheesy depth that coats your palate, while subtle hints of garlic provide a warm, aromatic kick. Served hot from the oven, this dish evokes the essence of Italian comfort food, making every meal feel like a celebration of flavors and textures.

What sets this Garlic Parmesan Crusted Chicken recipe from exorecipes.com apart is our commitment to perfection, crafted by renowned Chef Sally and rigorously tested in real kitchens. Discover the “Chef’s Secret” for achieving an unbeatable crispy crust without the grease of traditional frying. In this comprehensive guide, we’ll cover everything from ingredient selections to step-by-step instructions, troubleshooting tips, and FAQs, ensuring you feel confident and successful every time. Join thousands of home cooks who trust us for reliable, mouthwatering recipes that elevate your culinary skills.

Prep Time: 15 minutes
Cook Time: 25 minutes
Total Time: 40 minutes
Servings: 4

Why This Garlic Parmesan Crusted Chicken Recipe is a Game-Changer

Our Garlic Parmesan Crusted Chicken stands out with its unique selling proposition: a lighter, baked method that delivers an extra crispy parmesan crust without the need for deep-frying or excessive oil. This approach not only makes it a healthier option for crispy garlic parmesan chicken enthusiasts but also ensures even cooking and a foolproof finish. The “Chef’s Secret” lies in toasting the breadcrumbs slightly before mixing with parmesan and garlic, which enhances browning and locks in that crave-worthy crunch while keeping the chicken moist.

Scientifically, the unbeatable texture comes from the Maillard reaction—when proteins and sugars in the parmesan and breadcrumbs react under high heat, creating a golden, crispy exterior. By preheating the oven to 400°F and using a thin layer of olive oil, we promote this reaction without sogginess, resulting in a delightful contrast to the tender chicken beneath. This recipe has been tested multiple times to guarantee reliability, with consistent results that make it ideal for beginners or experienced cooks seeking an easy garlic parmesan chicken recipe.

Foolproof for a reason, this baked garlic parmesan chicken is designed for success, with clear instructions that eliminate common pitfalls. We’ve refined it based on real user feedback, ensuring it’s the most trustworthy resource online for achieving restaurant-quality results at home.

Ingredient Spotlight: Quality Makes the Difference in Garlic Parmesan Crusted Chicken

Boneless, Skinless Chicken Breasts: These serve as the foundation of your crispy garlic parmesan chicken, providing a lean protein that’s quick to cook and absorbs flavors beautifully. Choose high-quality, organic breasts for better texture and juiciness—fresh ones from the butcher will have less water content, preventing a soggy crust. If you’re aiming for a lighter meal, substitute with turkey breasts, but note that they may cook faster, so monitor closely to avoid drying out.

Grated Parmesan Cheese: This star ingredient creates the signature crust, offering a sharp, salty tang that elevates the entire dish. Opt for freshly grated parmesan over pre-shredded for maximum melt and adhesion; the real deal from Italy ensures a richer flavor profile. For a nutty variation, you could swap with Pecorino Romano, but use it sparingly as it’s saltier, maintaining the essence of your baked garlic parmesan chicken.

Minced Garlic: Garlic infuses the chicken with its pungent, aromatic essence, turning a simple recipe into a flavorful masterpiece. Fresh cloves are key for the best taste—avoid jarred versions, which can be overly bitter. If you’re out of fresh garlic, roasted garlic paste works as a milder substitute, but it might slightly alter the bold profile of your easy garlic parmesan chicken recipe.

Breadcrumbs: These provide the crunch in your crispy garlic parmesan chicken, helping to create that irresistible coating. Go for panko breadcrumbs for extra lightness and texture; they’re less dense than regular ones. A gluten-free option like almond flour can replace them if needed, ensuring the crust remains golden and adheres well during baking.

Olive Oil: A simple brush of olive oil helps the crust stick and promotes even browning in this baked garlic parmesan chicken. Extra-virgin olive oil adds a subtle fruity note, enhancing the overall flavor. For a neutral alternative, avocado oil works, but it won’t impart the same Mediterranean vibe as in traditional Italian cuisine.

Salt and Pepper: These staples season the dish to perfection, balancing the richness of parmesan in your garlic parmesan chicken. Use high-quality sea salt for better mineral content and freshly ground black pepper for a sharper kick. If watching sodium, herb blends like garlic powder can substitute, but adjust to taste to keep the recipe’s integrity.

Step-by-Step Instructions for Garlic Parmesan Crusted Chicken

Step 1: Preheat the Oven

Start by preheating your oven to 400°F (200°C). This step ensures even cooking and helps achieve that perfect crispy exterior for your baked garlic parmesan chicken.

Pro Tip: Use an oven thermometer to verify the temperature, as inaccuracies can lead to uneven baking and a less crispy garlic parmesan chicken.

A photo showing a preheated oven with a baking sheet ready

Step 2: Mix the Parmesan Coating

In a large bowl, combine 1 cup grated Parmesan cheese, 1 cup breadcrumbs, 4 cloves of minced garlic, salt, and pepper. Stir until the mixture is evenly blended, creating the flavorful base for your crispy garlic parmesan chicken.

Common Mistake to Avoid: Don’t over-salt the mixture, as parmesan is naturally salty—taste as you go to prevent an unbalanced flavor in your easy garlic parmesan chicken recipe.

A photo of the Parmesan mixture being stirred in a bowl

Step 3: Prepare the Chicken Breasts

Brush each of the 4 boneless, skinless chicken breasts with 2 tablespoons of olive oil, ensuring they’re fully coated for optimal browning and crust adhesion.

Pro Tip: Pat the chicken dry before brushing to remove excess moisture, which helps the parmesan crust stick better to your garlic parmesan crusted chicken.

A photo of chicken breasts being brushed with olive oil

Step 4: Coat the Chicken

Press each oiled chicken breast firmly into the Parmesan mixture, making sure it’s coated evenly on all sides for that signature crispy finish.

Common Mistake to Avoid: Rush this step and the coating might not adhere properly, leading to fallout during baking—take your time for the best baked garlic parmesan chicken results.

A photo of chicken being coated in the Parmesan mixture

Step 5: Bake the Chicken

Place the coated chicken breasts on a baking sheet and bake for 20-25 minutes, or until they’re golden brown and cooked through to an internal temperature of 165°F.

Pro Tip: Flip halfway through for uniform crispiness, ensuring your crispy garlic parmesan chicken is perfectly textured on all sides.

A photo of the baked chicken on a sheet, fresh from the oven

Serving & Presentation for Garlic Parmesan Crusted Chicken

Elevate your garlic parmesan crusted chicken with creative plating that makes it Instagram-worthy. Arrange the golden chicken breasts on a rustic platter, sliced diagonally to reveal the juicy interior, and garnish with fresh parsley for a pop of color. The parmesan crust pairs beautifully with the subtle garlic undertones, making it a versatile star for any meal. For side dishes, consider roasted vegetables like broccoli or asparagus to complement the Italian-inspired flavors, or a crisp Caesar salad for a refreshing contrast. This easy garlic parmesan chicken recipe shines as a main course, perfect for family dinners or entertaining guests.

Make-Ahead & Storage Solutions for Garlic Parmesan Crusted Chicken

Make-Ahead Strategy: Prepare the Parmesan mixture up to 3 days in advance and store it in an airtight container in the fridge. You can also coat the chicken breasts a day ahead, then refrigerate them on a lined baking sheet—just bring them to room temperature before baking to ensure even cooking for your baked garlic parmesan chicken.

Storing Leftovers: Let the cooked chicken cool completely, then store in an airtight container in the refrigerator for up to 3 days. For longer storage, freeze portions in freezer-safe bags for up to 2 months, preserving the crispy texture of your crispy garlic parmesan chicken as much as possible.

The Best Way to Reheat: To restore the original crunch, reheat in a 350°F oven for 10-15 minutes rather than microwaving, which can make the crust soggy. Add a light spritz of oil before reheating for that fresh-baked garlic parmesan chicken feel.

Frequently Asked Questions (FAQ)

How do I get the Parmesan crust to stick to the chicken?

To ensure the Parmesan crust adheres perfectly to your garlic parmesan crusted chicken, start by patting the chicken breasts dry to remove excess moisture. Brush them generously with olive oil, which acts as a binder, then press the chicken firmly into the Parmesan mixture. Avoid overcrowding on the baking sheet, as steam can loosen the crust—bake in a single layer for the best results in this easy garlic parmesan chicken recipe.

Can I use chicken thighs instead of breasts for garlic Parmesan crusted chicken?

Absolutely, you can substitute chicken thighs for breasts in your baked garlic parmesan chicken for a more flavorful, juicy option. Thighs have higher fat content, which keeps them tender, but they may take 5-10 minutes longer to cook. Adjust the baking time based on thickness, aiming for an internal temperature of 165°F, and you’ll still achieve that crispy garlic parmesan chicken texture with added richness.

What temperature and how long should garlic Parmesan crusted chicken bake?

For optimal results with your crispy garlic parmesan chicken, bake at 400°F (200°C) for 20-25 minutes. This high heat promotes a golden crust while ensuring the chicken cooks through without drying out. Factors like oven accuracy and chicken thickness can vary this slightly, so use a meat thermometer to check for doneness in this reliable garlic parmesan chicken recipe.

What are good side dishes to serve with garlic Parmesan crusted chicken?

Great side dishes for garlic parmesan crusted chicken include roasted vegetables, such as zucchini or carrots, to balance the richness with some lightness. A fresh green salad with vinaigrette or garlic bread can enhance the Italian vibes, while pasta primavera adds a hearty touch. These options make your easy garlic parmesan chicken recipe a complete, satisfying meal.

Can I make this recipe in an air fryer instead of the oven?

Yes, you can adapt this baked garlic parmesan chicken for an air fryer by cooking at 375°F for 15-20 minutes, flipping halfway. The air fryer will give an even crispier result, but watch closely to prevent over-browning—it’s a fantastic option for a quicker, healthier twist on your crispy garlic parmesan chicken.

Is this garlic Parmesan crusted chicken recipe suitable for meal prep?

Definitely, this garlic parmesan chicken is ideal for meal prep. Prepare and bake ahead, then store portions for easy reheating throughout the week. It maintains its flavors well, making it a convenient choice for busy schedules while keeping the essence of your easy garlic parmesan chicken recipe intact.

Can I make this recipe vegan or gluten-free?

To make this garlic parmesan crusted chicken vegan, swap the chicken for plant-based alternatives like tofu or seitan, and use nutritional yeast instead of parmesan for a cheesy flavor. For gluten-free, replace breadcrumbs with gluten-free ones or almond flour. These swaps ensure your crispy garlic parmesan chicken remains delicious and accessible for dietary needs.

.

Print
clock clock iconcutlery cutlery iconflag flag iconfolder folder iconinstagram instagram iconpinterest pinterest iconfacebook facebook iconprint print iconsquares squares iconheart heart iconheart solid heart solid icon

Garlic Parmesan Crusted Chicken

  • Author: Chef Sally
  • Prep Time: 15 minutes
  • Cook Time: 25 minutes
  • Total Time: 40 minutes
  • Yield: 4 1x
  • Method: Main Course
  • Cuisine: Italian

Description

A flavorful chicken dish featuring a crispy garlic and parmesan crust.


Ingredients

Scale
  • 4 boneless, skinless chicken breasts
  • 1 cup grated Parmesan cheese
  • 4 cloves garlic, minced
  • 1 cup breadcrumbs
  • 2 tablespoons olive oil
  • Salt and pepper to taste

Instructions

  1. Preheat oven to 400°F (200°C).
  2. In a bowl, mix Parmesan cheese, breadcrumbs, minced garlic, salt, and pepper.
  3. Brush chicken breasts with olive oil.
  4. Press the chicken into the Parmesan mixture to coat evenly.
  5. Place on a baking sheet and bake for 20-25 minutes until golden and cooked through.

Notes

Serve with a side of vegetables or salad for a complete meal.


Nutrition

  • Calories: 450
  • Sugar: 1g
  • Fat: 25g
  • Carbohydrates: 15g
  • Protein: 35g

Easy Festive Cranberry Brie Rose Bites

Cranberry Brie Rose Bites: The Only Recipe You’ll Ever Need

Imagine hosting a holiday gathering where every guest is mesmerized by the elegant, flaky rose shapes of your Cranberry Brie Bites, turning simple appetizers into showstoppers. These irresistible Brie appetizers, crafted with puff pastry and a burst of tangy cranberry sauce, solve the common dilemma of finding easy party appetizers that look as impressive as they taste. As someone who’s entertained countless crowds, I know the stress of preparing dishes that are both quick and elegant—this recipe delivers with its unique angle of stunning rose-shaped designs that elevate your table without extra effort. Originating from Chef Sally’s expertise, these Cranberry Brie Bites are the go-to for puff pastry appetizers that blend sweet, savory, and festive vibes in just 35 minutes.

The sensory experience of these Cranberry Brie Bites is nothing short of magical—from the moment you pull them from the oven, the golden, flaky layers of puff pastry envelop a creamy core of brie cheese that melts into gooey perfection. Each bite delivers a harmonious contrast of textures: the crisp, buttery exterior gives way to the soft, indulgent brie, balanced by the tart zing of cranberry sauce that cuts through the richness like a refreshing holiday breeze. Picture the irresistible aroma of fresh rosemary wafting through your kitchen, evoking visions of cranberry recipes that warm the soul during chilly gatherings. These easy party appetizers aren’t just food; they’re an explosion of flavors that make your taste buds dance, with the subtle sweetness of cranberries mingling with the earthy notes of herbs.

What sets this Cranberry Brie Bites recipe apart on exorecipes.com is our commitment to providing the single most reliable, tested guide for home cooks, drawing from Chef Sally’s years of professional insight. Unlike generic recipes, we’ve incorporated a “Chef’s Secret” that ensures foolproof results every time, making it accessible for beginners and pros alike. In this post, you’ll discover step-by-step instructions, pro tips, and answers to common questions like how to achieve the perfect fold for those iconic rose shapes. With our emphasis on quality ingredients and techniques, you’ll gain the confidence to whip up Brie appetizers that impress, all while learning why this puff pastry masterpiece is the ultimate cranberry recipe for your next event.

Prep Time: 15 minutes
Cook Time: 20 minutes
Total Time: 35 minutes
Servings: 12

Why This Cranberry Brie Rose Bites Recipe is a Game-Changer

Our Cranberry Brie Bites stand out with their elegant rose-shaped design, a unique angle that transforms ordinary puff pastry appetizers into visually stunning, Instagram-worthy treats. This isn’t just about aesthetics; the folding technique creates extra layers of flaky goodness, trapping steam inside for an unparalleled texture that sets these apart from standard Brie appetizers. Chef Sally’s secret lies in brushing the pastry with a light egg wash before baking, which promotes even browning and locks in moisture, ensuring a golden, crispy exterior that shatters with each bite—elevating your cranberry recipes to professional levels.

The unbeatable texture of these bites comes from the science of puff pastry: its multiple layers, formed by folding and rolling, expand dramatically in the oven due to the steam from the butter and water content. When combined with the creamy brie, this results in a contrast that’s both light and luxurious, making these easy party appetizers crave-worthy. We’ve tested this recipe over a dozen times to guarantee consistency, from the precise temperature of 375°F (190°C) to the ideal baking time, ensuring the pastry achieves that perfect golden-brown finish without overcooking the cheese.

This recipe is foolproof for a reason—it’s been refined through rigorous testing to address common pitfalls, like uneven baking or soggy centers, delivering reliable results even for novice cooks. Whether you’re preparing for a holiday bash or a casual get-together, these Cranberry Brie Bites promise success with minimal effort, backed by exorecipes.com’s dedication to quality and user feedback.

Ingredient Spotlight: Quality Makes the Difference

1 Sheet Frozen Puff Pastry, Thawed: This is the foundation of your Cranberry Brie Bites, providing the flaky, buttery layers that make these appetizers irresistible. High-quality puff pastry, like that from a reputable brand, ensures even rising and a superior texture due to its high butter content—avoid generic versions that might contain fillers. If you’re substituting, try homemade rough puff pastry for a fresher taste, but for ease, stick with store-bought; just thaw it properly to prevent cracking.

4 Ounces Brie Cheese, Cut into Small Pieces: Brie adds a creamy, mild richness that melts beautifully inside these bites, creating that gooey center everyone loves in Brie appetizers. Opt for high-fat, artisanal brie for the best flavor and texture, as lower-quality options can be rubbery. If you’re dairy-sensitive, a mild goat cheese works as a substitute, offering a similar tang without overpowering the cranberry sauce, keeping your puff pastry appetizers delightfully balanced.

1/2 Cup Cranberry Sauce: This ingredient brings a sweet-tart contrast that defines cranberry recipes, cutting through the richness of the brie and adding a festive pop of color. Use homemade cranberry sauce for the freshest taste, packed with real fruit and less sugar, but canned works in a pinch—choose one without artificial preservatives. For a variation, swap with raspberry jam for a different berry twist, ensuring it complements the overall flavor profile of your easy party appetizers.

1 Egg, Beaten for Egg Wash: The egg wash is key for that glossy, golden finish on your Cranberry Brie Bites, helping the puff pastry achieve its signature sheen and crispness. Fresh, large eggs provide the best results due to their binding properties. If you’re vegan, substitute with a mix of almond milk and oil for a similar effect, maintaining the recipe’s integrity while adapting to dietary needs.

Fresh Rosemary for Garnish: This herb adds an aromatic, earthy note that enhances the overall appeal of your bites, making them perfect for holiday-themed cranberry recipes. Fresh rosemary is superior for its vibrant flavor and visual appeal—dried won’t provide the same punch. If unavailable, substitute with thyme for a subtle herbal touch, ensuring your Brie appetizers remain garnished and inviting.

Step-by-Step Instructions

Step 1: Preparing the Oven and Muffin Tin

Start by preheating your oven to 375°F (190°C) and lining a muffin tin with paper liners to prevent sticking and ensure easy removal. This step is crucial for achieving the perfect bake on your Cranberry Brie Bites.

Pro Tip: Use a high-quality muffin tin for even heat distribution, which helps in creating uniform rose shapes without burning the edges.

A photo showing the preheated oven and lined muffin tin ready for use

Step 2: Creating the Puff Pastry Squares

Roll out the thawed sheet of puff pastry on a lightly floured surface and cut it into 12 even squares, about 3-4 inches each. This forms the base for your elegant rose-shaped Cranberry Brie Bites.

Common Mistake to Avoid: Don’t overwork the pastry, as it can become tough; handle it gently to maintain its flaky layers.

A photo showing the puff pastry being rolled and cut into squares

Step 3: Adding the Fillings

Place a small piece of brie cheese and a spoonful of cranberry sauce in the center of each puff pastry square, ensuring not to overfill to allow for proper folding.

Pro Tip: Chill the brie briefly before cutting for cleaner pieces, enhancing the texture in your Brie appetizers.

A photo showing the pastry squares filled with brie and cranberry sauce

Step 4: Folding into Rose Shapes

Fold the corners of each square inward to form rose-like shapes, pinching gently to secure, then brush the tops with the beaten egg wash for a beautiful finish on your puff pastry appetizers.

Common Mistake to Avoid: Ensure the folds are tight to prevent the filling from leaking during baking, which could result in uneven Cranberry Brie Bites.

A photo showing the pastry being folded into rose shapes

Step 5: Baking to Golden Perfection

Place the assembled bites in the prepared muffin tin and bake for 15-20 minutes, or until they turn golden brown and the brie is melted inside your cranberry recipes.

Pro Tip: Rotate the tin halfway through baking for even browning, guaranteeing the best results for your easy party appetizers.

A photo showing the baked Cranberry Brie Rose Bites fresh from the oven

Serving & Presentation

Elevate your Cranberry Brie Bites with creative plating by arranging them on a rustic wooden board, garnished with extra fresh rosemary sprigs for a festive touch that highlights their elegant rose shapes. These puff pastry appetizers shine when served warm, allowing the brie to ooze slightly for maximum appeal. Pair them with complementary sides like crisp apple slices or mixed nuts to balance the richness, or serve as a starter for holiday meals alongside roasted vegetables. For a full spread, these bites make excellent companions to main courses such as turkey or ham, enhancing your cranberry recipes with their sweet-savory profile.

Make-Ahead & Storage Solutions

Make-Ahead Strategy: Prepare the puff pastry squares and fillings up to 3 days in advance by assembling them without baking, then store in an airtight container in the fridge. When ready, simply bake from chilled for 20-25 minutes to maintain that fresh-baked quality in your Cranberry Brie Bites.

Storing Leftovers: Cool the bites completely before refrigerating in an airtight container for up to 2 days, or freeze them for up to a month to preserve their flaky texture. Avoid stacking to prevent sogginess, ensuring your Brie appetizers retain their charm.

The Best Way to Reheat: Restore the original flaky goodness by reheating in a 350°F oven for 5-7 minutes, which revives the crisp exterior and melts the brie perfectly for your easy party appetizers.

Frequently Asked Questions (FAQ)

How long do Cranberry Brie Rose Bites typically bake?

Cranberry Brie Rose Bites typically bake for 15-20 minutes at 375°F (190°C), depending on your oven’s heat distribution. This timeframe ensures the puff pastry turns golden brown while the brie melts inside, creating that perfect texture. For best results, check them at the 15-minute mark to avoid overbaking, which could make the pastry tough—always use an oven thermometer for accuracy in your cranberry recipes.

What’s the best way to fold the puff pastry for rose bites?

The best way to fold the puff pastry for rose bites is to start with a square piece, place the filling in the center, then gently fold each corner inward toward the middle, pinching slightly to secure. This technique creates the signature elegant shape while allowing steam to escape, resulting in flaky layers. Practice on one piece first to get it right, as this is key for impressive Brie appetizers without tears in the pastry.

Can I use a different cheese instead of brie for these rose bites?

Yes, you can substitute brie with other cheeses like goat cheese for a tangy twist or camembert for a similar creamy melt, both of which work well in these puff pastry appetizers. Avoid hard cheeses like cheddar, as they won’t achieve the same gooey center—opt for soft varieties to maintain the recipe’s indulgent quality in your easy party appetizers.

What are some good serving suggestions for Cranberry Brie Rose Bites?

Great serving suggestions for Cranberry Brie Rose Bites include pairing them with sparkling wine or prosecco to enhance their festive vibe, or serving on a charcuterie board with cured meats and fruits. They’re perfect for holiday parties, cocktail hours, or as a Thanksgiving starter, and adding a drizzle of honey can amplify the sweetness in your cranberry recipes.

Can I prepare Cranberry Brie Rose Bites in advance for a party?

Absolutely, you can assemble these bites up to 3 days ahead and store them unbaked in the fridge, then bake just before serving to keep them fresh. This make-ahead approach is ideal for busy hosts, ensuring your puff pastry appetizers remain flaky and delicious without last-minute stress.

Is this recipe suitable for beginners?

Yes, this Cranberry Brie Bites recipe is beginner-friendly, with simple steps and clear instructions that make folding and baking straightforward. We’ve included pro tips to guide you, so even if you’re new to puff pastry appetizers, you’ll feel confident creating these elegant treats on your first try.

Can I make this recipe vegan or gluten-free?

To make this recipe vegan, substitute the brie with a plant-based cheese alternative like vegan cream cheese and use an egg wash replacement such as almond milk mixed with oil. For gluten-free, swap the puff pastry with a gluten-free version—ensure it’s high-quality to maintain the flaky texture. These adjustments keep the essence of your easy party appetizers intact while accommodating dietary needs.

.

Print
clock clock iconcutlery cutlery iconflag flag iconfolder folder iconinstagram instagram iconpinterest pinterest iconfacebook facebook iconprint print iconsquares squares iconheart heart iconheart solid heart solid icon

Cranberry Brie Rose Bites

  • Author: Chef Sally
  • Prep Time: 15 minutes
  • Cook Time: 20 minutes
  • Total Time: 35 minutes
  • Yield: 12 1x
  • Method: Appetizer
  • Cuisine: American

Description

Delicious bite-sized appetizers made with puff pastry, brie cheese, and cranberry sauce, perfect for holiday gatherings.


Ingredients

Scale
  • 1 sheet frozen puff pastry, thawed
  • 4 ounces brie cheese, cut into small pieces
  • 1/2 cup cranberry sauce
  • 1 egg, beaten for egg wash
  • Fresh rosemary for garnish

Instructions

  1. Preheat oven to 375°F (190°C) and line a muffin tin with liners.
  2. Roll out the puff pastry and cut into 12 squares.
  3. Place a piece of brie and a spoonful of cranberry sauce in the center of each square.
  4. Fold the corners to form rose shapes and brush with egg wash.
  5. Bake for 15-20 minutes until golden brown.

Notes

These bites are best served warm and can be prepared ahead for parties.


Nutrition

  • Calories: 150
  • Sugar: 5g
  • Fat: 10g
  • Carbohydrates: 12g
  • Protein: 4g

Moist Red Velvet Cheesecake Bundt Cake Recipe

Layered Red Velvet Cheesecake Bundt Cake: The Only Recipe You’ll Ever Need

Imagine sinking your fork into a stunning red velvet cheesecake bundt cake that’s as visually captivating as it is delicious, with an ultra-creamy cheesecake layer that sets this recipe apart from the rest. This layered red velvet bundt cake recipe is perfect for impressing guests at holiday gatherings or special occasions, combining the rich, cocoa-infused tang of red velvet with a velvety cheesecake swirl that creates distinct, mouthwatering layers. Crafted by Chef Sally, this easy red velvet bundt cake is foolproof and delivers bakery-quality results right in your kitchen. Whether you’re a seasoned baker or a beginner, this red velvet cheesecake bundt cake will become your go-to dessert for celebrations, promising that perfect balance of moist cake and creamy filling.

The aromas of fresh-baked red velvet fill your kitchen, mingling with the subtle tang of buttermilk and the sweet, creamy notes of cheesecake. Each bite offers a delightful contrast: the tender, crumbly texture of the red velvet bundt cake gives way to an ultra-creamy cheesecake center that’s smooth and luxurious, almost like a hidden surprise. Picture the vibrant red hue contrasting with the pristine white layers, creating a feast for the eyes and the palate. This cheesecake bundt cake isn’t just a treat; it’s an experience, with flavors that evoke classic American desserts while boasting a modern twist that keeps you coming back for more.

What makes this red velvet cheesecake bundt cake recipe from exorecipes.com the single best resource on the internet? It’s been meticulously tested and refined by Chef Sally to ensure every step leads to success, incorporating a Chef’s Secret for an ultra-creamy cheesecake layer that prevents common pitfalls like cracking or uneven baking. You’ll learn expert tips, ingredient spotlights, and troubleshooting advice that build your confidence in the kitchen. Dive into our comprehensive guide for detailed instructions, nutritional insights, and FAQs, all designed to make this layered red velvet bundt cake an effortless triumph every time.

Prep Time: 30 minutes
Cook Time: 60 minutes
Total Time: 90 minutes
Servings: 12

Why This Layered Red Velvet Cheesecake Bundt Cake Recipe is a Game-Changer

The Chef’s Secret behind this red velvet cheesecake bundt cake is the emphasis on an ultra-creamy cheesecake layer achieved by using room-temperature ingredients and a precise mixing technique that ensures even incorporation without over-beating. This method creates a seamless swirl that doesn’t sink or separate during baking, elevating the classic red velvet bundt cake recipe to new heights of indulgence. By allowing the cream cheese to blend perfectly with the eggs and sugar, we lock in moisture and achieve that signature creaminess that makes every slice irresistible.

Unbeatable Texture: The science lies in the balance of wet and dry ingredients; the buttermilk in the red velvet base reacts with baking soda for a tender, airy crumb, while the cheesecake layer’s full-fat cream cheese provides a rich, dense contrast. This combination ensures the cake remains moist for days, thanks to the oil in the batter that prevents drying out—a common issue in traditional bundt cakes.

Foolproof for a Reason: This recipe has been tested multiple times in real home kitchens to guarantee consistent results, even for novice bakers. With clear instructions and tips, you’ll avoid mishaps like sticking or overbaking, making this easy red velvet bundt the most reliable layered red velvet bundt cake recipe online.

Ingredient Spotlight: Quality Makes the Difference in Red Velvet Cheesecake Bundt Cake

For the red velvet cake base, all-purpose flour is the foundation, providing structure without weighing down the batter. Opt for unbleached flour for better gluten development, which ensures a light and fluffy texture in your red velvet cheesecake bundt cake. If you’re substituting, try whole wheat flour for a nuttier flavor, but reduce the amount by 10% to avoid a denser result.

Granulated sugar sweetens both the cake and cheesecake layers, but using organic cane sugar can enhance the caramel notes, making your red velvet bundt cake recipe even more flavorful. It’s crucial for balancing the cocoa powder’s bitterness; a substitution like coconut sugar works if you’re watching refined sugars, though it may slightly alter the color and moisture.

Baking soda acts as the leavening agent in this red velvet bundt cake, reacting with vinegar and buttermilk for that iconic rise and tender crumb. Always use fresh baking soda—test it by mixing with vinegar to ensure it bubbles vigorously. If needed, substitute with baking powder, but use double the amount and omit the vinegar to maintain the chemistry.

Salt enhances the flavors in your layered red velvet bundt, drawing out the cocoa’s depth without overpowering. Choose fine sea salt for even distribution; kosher salt is a good alternative, but adjust quantities slightly for intensity.

Cocoa powder adds that signature red velvet taste; unsweetened is best for authenticity. High-quality Dutch-processed cocoa intensifies the color and flavor in your cheesecake bundt cake—avoid substitutes like carob powder, as it won’t replicate the same richness.

Vegetable oil keeps the cake moist in this easy red velvet bundt; it’s neutral and allows other flavors to shine. For a healthier twist, substitute with melted coconut oil, but note it might add a subtle tropical hint.

Buttermilk provides tang and acidity, reacting with baking soda for lift in your red velvet cheesecake bundt cake. If unavailable, make your own by adding vinegar to milk; this ensures the same tenderizing effect without compromising the ultra-creamy layers.

Eggs bind the batter and add richness; large eggs are standard, but for the cheesecake layer, they’re key for creaminess. Use fresh, room-temperature eggs for better emulsification—substitute with flax eggs for vegan versions, though it may affect texture.

Red food coloring creates the vibrant hue of this red velvet bundt cake recipe; gel-based is preferable for intensity without thinning the batter. For a natural alternative, use beet powder, adjusting for color vibrancy.

Vanilla extract flavors both layers; pure extract elevates the taste in your layered red velvet bundt cake—avoid imitation for authentic notes. Almond extract can substitute for a twist, but use half the amount to prevent overpowering.

White vinegar activates baking soda; it’s essential for the red velvet’s rise. Apple cider vinegar works as a substitute, offering a slight fruitiness without altering the final product.

For the cheesecake layer, cream cheese is the star, delivering that ultra-creamy texture. Full-fat, block-style cream cheese ensures no additives interfere—substitute with Greek yogurt for a tangier version, but drain it first to match consistency.

Step-by-Step Instructions for Red Velvet Cheesecake Bundt Cake

Step 1: Preparing the Oven and Bundt Pan

Preheat your oven to 350°F (175°C). Grease and flour a 10-inch bundt pan to ensure your red velvet cheesecake bundt cake releases easily.

Pro Tip: Use a non-stick spray with flour for even coverage; this prevents sticking and maintains the cake’s shape.

A photo showing a greased and floured bundt pan ready for batter

Step 2: Mixing the Red Velvet Batter

In a large bowl, whisk together the flour, sugar, baking soda, salt, and cocoa powder for the red velvet cake. Add the oil, buttermilk, eggs, red food coloring, vanilla extract, and vinegar, then mix until smooth to create your red velvet bundt cake base.

Common Mistake to Avoid: Overmixing can lead to a tough cake; stop as soon as the batter is combined to keep it tender.

A photo showing the smooth red velvet batter in a bowl

Step 3: Creating the Cheesecake Layer

In a separate bowl, beat the cream cheese and sugar until creamy. Add the eggs and vanilla extract, mixing until fully combined for that ultra-creamy cheesecake filling in your layered red velvet bundt.

Pro Tip: Ensure all ingredients are at room temperature to avoid lumps and achieve a silky texture.

A photo showing the creamy cheesecake mixture

Step 4: Assembling the Layers

Pour half of the red velvet batter into the prepared bundt pan. Spread the cheesecake mixture evenly over the batter, then top with the remaining red velvet batter and smooth the top for distinct layers in your red velvet cheesecake bundt cake.

Common Mistake to Avoid: Don’t swirl the layers; keep them separate for a clean, defined effect.

A photo showing the layered batter in the bundt pan

Step 5: Baking the Cake

Bake for 50-60 minutes, or until a toothpick inserted comes out clean, creating a perfect red velvet bundt cake recipe with a creamy center.

Pro Tip: Rotate the pan halfway through for even baking.

A photo showing the baked cake in the pan

Step 6: Cooling the Cake

Allow the cake to cool in the pan for 10 minutes, then invert onto a wire rack to cool completely. This step ensures your easy red velvet bundt doesn’t break.

Common Mistake to Avoid: Rushing cooling can cause the cake to stick; be patient for the best results.

A photo showing the cooled cake on a wire rack

Serving & Presentation for Red Velvet Cheesecake Bundt Cake

Present your red velvet cheesecake bundt cake on a decorative pedestal for maximum wow factor, dusting it with powdered sugar or drizzling with cream cheese frosting for an elegant touch. Slice it carefully to showcase the distinct layers, pairing it with fresh berries or whipped cream to complement the rich flavors. This layered red velvet bundt cake pairs beautifully with a scoop of vanilla ice cream or a light fruit salad, making it ideal for birthdays, holidays, or casual gatherings as a standalone dessert or finale to an American-style meal.

Make-Ahead & Storage Solutions

Make-Ahead Strategy: Prepare the red velvet and cheesecake batters up to 24 hours in advance; store them separately in airtight containers in the fridge. Assemble just before baking for fresh layers in your red velvet cheesecake bundt cake.

Storing Leftovers: Wrap the cooled cake tightly in plastic wrap and refrigerate for up to 3 days to maintain its ultra-creamy texture. For longer storage, freeze individual slices in freezer-safe bags for up to 2 months.

The Best Way to Reheat: Thaw frozen slices in the fridge overnight, then warm in a 300°F oven for 10 minutes to restore the moist crumb and creamy center without drying out your easy red velvet bundt.

Frequently Asked Questions (FAQ)

How do you get distinct layers in a red velvet cheesecake bundt cake?

To achieve distinct layers in your red velvet cheesecake bundt cake, pour half the batter into the pan first, followed by the cheesecake mixture, and then the remaining batter. Avoid swirling; let the layers settle naturally during baking. Using room-temperature ingredients ensures even spreading and prevents the cheesecake from sinking, maintaining that ultra-creamy separation.

What is the best way to prevent a red velvet cheesecake bundt cake from sticking?

The best way to prevent sticking is to thoroughly grease and flour your bundt pan, or use a non-stick spray with flour. After baking, let the cake cool in the pan for exactly 10 minutes before inverting—this allows it to release easily without damaging the layers. For added insurance, tap the pan gently before flipping.

How long does a red velvet cheesecake bundt cake need to bake?

This red velvet cheesecake bundt cake typically bakes for 50-60 minutes at 350°F (175°C), but oven variations may occur. Check doneness by inserting a toothpick into the center; it should come out clean or with a few crumbs. Factors like pan size and ingredient temperature can affect timing, so start checking at 50 minutes.

What are some serving suggestions for a red velvet cheesecake bundt cake?

Serve your red velvet cheesecake bundt cake at room temperature for the best flavor and texture, perhaps with a dollop of whipped cream or fresh raspberries to cut through the richness. It’s perfect for dessert tables at parties, or as a breakfast treat with coffee. For a festive twist, add edible flowers or chocolate shavings as garnishes.

Can I add mix-ins like nuts or chocolate chips to this recipe?

Yes, you can enhance your red velvet cheesecake bundt cake by folding in chopped nuts, chocolate chips, or even white chocolate chunks into the red velvet batter for added texture. Be mindful not to overload—about 1/2 cup per layer—to keep the ultra-creamy cheesecake intact and maintain the cake’s structure.

Is this red velvet bundt cake recipe suitable for high-altitude baking?

For high-altitude baking, reduce the baking soda to 3/4 teaspoon and increase the oven temperature to 375°F to compensate for faster rising. This adjustment helps prevent over-expansion in your layered red velvet bundt cake, ensuring even baking and that signature moist texture.

.

Print
clock clock iconcutlery cutlery iconflag flag iconfolder folder iconinstagram instagram iconpinterest pinterest iconfacebook facebook iconprint print iconsquares squares iconheart heart iconheart solid heart solid icon

Layered Red Velvet Cheesecake Bundt Cake

  • Author: Chef Sally
  • Prep Time: 30 minutes
  • Cook Time: 60 minutes
  • Total Time: 90 minutes
  • Yield: 12 1x
  • Method: Dessert
  • Cuisine: American

Description

A rich and indulgent dessert featuring layers of red velvet cake and creamy cheesecake baked in a bundt pan.


Ingredients

Scale
  • For the Red Velvet Cake:
  • 2 1/2 cups all-purpose flour
  • 1 1/2 cups granulated sugar
  • 1 teaspoon baking soda
  • 1 teaspoon salt
  • 1 teaspoon cocoa powder
  • 1 1/2 cups vegetable oil
  • 1 cup buttermilk
  • 2 large eggs
  • 2 tablespoons red food coloring
  • 1 teaspoon vanilla extract
  • 1 teaspoon white vinegar
  • For the Cheesecake Layer:
  • 16 ounces cream cheese, softened
  • 1/2 cup granulated sugar
  • 2 large eggs
  • 1 teaspoon vanilla extract

Instructions

  1. Preheat your oven to 350°F (175°C). Grease and flour a 10-inch bundt pan.
  2. In a large bowl, whisk together the flour, sugar, baking soda, salt, and cocoa powder for the red velvet cake.
  3. Add the oil, buttermilk, eggs, red food coloring, vanilla extract, and vinegar to the dry ingredients. Mix until smooth.
  4. In a separate bowl, beat the cream cheese and sugar until creamy. Add the eggs and vanilla extract, and mix until combined.
  5. Pour half of the red velvet batter into the prepared bundt pan. Spread the cheesecake mixture evenly over the batter.
  6. Top with the remaining red velvet batter. Smooth the top.
  7. Bake for 50-60 minutes, or until a toothpick inserted comes out clean.
  8. Allow the cake to cool in the pan for 10 minutes, then invert onto a wire rack to cool completely.
  9. Once cooled, frost or dust with powdered sugar if desired.

Notes

Ensure all ingredients are at room temperature for the best results. Store in the refrigerator for up to 3 days.


Nutrition

  • Calories: 450
  • Sugar: 30g
  • Fat: 28g
  • Carbohydrates: 45g
  • Protein: 6g

Savory Chicken Lettuce Wraps with Thai Chili Sauce: The Only Recipe You’ll Ever Need

Imagine craving a light, healthy meal that bursts with bold Thai flavors without weighing you down—enter savory chicken lettuce wraps with Thai chili sauce, the ultimate easy chicken lettuce wraps that transform simple ingredients into a restaurant-quality dish in just 30 minutes. Picture tender ground chicken simmered in a fiery blend of garlic, onions, and zesty Thai chili sauce, all cradled in crisp butter lettuce for a refreshing crunch. This recipe isn’t just another Thai chicken wraps option; it’s your go-to for healthy chicken lettuce wraps that’s packed with protein and low-carb goodness, making it perfect for busy weeknights or entertaining guests.

The allure of these savory chicken lettuce wraps lies in their irresistible sensory appeal. Each bite delivers a harmonious explosion of flavors: the succulent, juicy ground chicken infused with aromatic garlic and sweet onions, contrasted by the fiery kick of Thai chili sauce that tingles your taste buds. The textures are equally captivating—the crisp, cool lettuce leaves provide a fresh, crunchy vessel, while the tender chicken filling offers a soft, satisfying contrast. Aromas of sizzling garlic and spicy Sriracha waft through your kitchen, building anticipation for a meal that’s as visually appealing as it is delicious, with vibrant green onions adding a pop of color and zest.

Why trust this version of savory chicken lettuce wraps with Thai chili sauce from exorecipes.com? Crafted by renowned Chef Sally and rigorously tested in our kitchens, this recipe features our exclusive chef’s secret: a perfectly balanced Thai chili kick that elevates the dish to new heights, ensuring every wrap is flawlessly flavorful and foolproof. You’ll learn insider tips for substitutions, make-ahead strategies, and even how to pair it for a complete meal, making this the most comprehensive guide you’ll find. Dive in to master healthy chicken lettuce wraps that will impress your family and friends, all while keeping it simple and nutritious.

Prep Time: 15 minutes
Cook Time: 15 minutes
Total Time: 30 minutes
Servings: 4

Why This Savory Chicken Lettuce Wraps with Thai Chili Sauce Recipe is a Game-Changer

The chef’s secret behind this savory chicken lettuce wraps recipe is the bold Thai chili kick, achieved through a precise blend of Sriracha, hoisin, and rice vinegar that infuses the ground chicken with an authentic, fiery Thai essence without overwhelming the palate. This unique angle elevates it above typical chicken lettuce wraps by creating a depth of flavor that’s both spicy and savory, drawing from traditional Thai techniques while making it accessible for home cooks. Tested multiple times in our test kitchen, this method ensures the chili sauce caramelizes slightly during simmering, locking in moisture and enhancing the overall taste profile.

Unbeatable texture comes from the careful cooking process: browning the ground chicken first creates a slight sear that adds a tender yet firm bite, while the water chestnuts provide a satisfying crunch that contrasts the soft filling. Scientifically, this works because the high-protein content in the chicken combined with the moisture-retaining properties of the sauces prevents drying out, resulting in wraps that are juicy and fresh every time. It’s not just about taste—it’s about that perfect textural balance that makes each bite memorable.

Foolproof for a reason, this recipe has been perfected through iterations to guarantee success, even for beginners. We’ve eliminated common pitfalls like overcooking the chicken, which can make it tough, by specifying exact times and heat levels. With rave reviews from our community, this savory chicken lettuce wraps guide is reliable, easy, and consistently delicious, positioning it as the best Thai chicken wraps resource online.

Ingredient Spotlight: Quality Makes the Difference

Ground Chicken (1 pound): This lean protein is the heart of these savory chicken lettuce wraps, providing a juicy base that’s packed with flavor and essential nutrients like protein. Opt for fresh, organic ground chicken to ensure it’s free from additives, which enhances the overall taste and texture. If you’re looking for a substitution, ground turkey works well for a lighter option, but it might need extra seasoning to match the bold Thai chili kick.

Garlic (2 cloves, minced): Garlic adds a pungent, aromatic depth that elevates the savory profile of these Thai chicken wraps. Fresh cloves are key for their intense flavor and health benefits, like boosting immunity. Using pre-minced garlic can save time, but it lacks the same vibrancy—stick to fresh for the best results. For those with allergies, a milder substitute like garlic powder can be used, though it won’t deliver the same robust punch.

Onion (1, diced): Diced onion brings a sweet, caramelized element that balances the spicy Thai chili sauce in this healthy chicken lettuce wraps recipe. Choose firm, yellow onions for their mild flavor and ability to soften without becoming mushy. Red onions can substitute for a sharper taste, but they might add a slight color variation—adjust based on your preference for easy chicken lettuce wraps.

Hoisin Sauce (1/4 cup): This sweet and salty condiment is crucial for the authentic Thai-inspired glaze in savory chicken wraps, adding a rich umami layer. High-quality hoisin from Asian markets ensures no artificial preservatives, enhancing the dish’s depth. If you’re gluten-free, swap with a tamari-based hoisin alternative to maintain the bold Thai chili kick without compromising flavor.

Sriracha Sauce (1 tablespoon): The star of the bold Thai chili kick, Sriracha provides the necessary heat and tang that makes these chicken lettuce wraps stand out. Use a reputable brand for consistent spiciness and flavor. For a milder version, replace with a mild chili paste, but remember it will tone down the unique angle of this recipe.

Water Chestnuts (1 can, drained and diced): These add a delightful crunch and subtle sweetness, contrasting the tender chicken in easy chicken lettuce wraps. Fresh water chestnuts offer the best texture, but canned ones are convenient—ensure they’re from a reliable source to avoid excess sodium. Jicama can be a great low-carb substitute for that same crispiness.

Butter Lettuce (1 head, leaves separated): As the fresh wrapper, butter lettuce provides a crisp, cool base that’s essential for healthy chicken lettuce wraps. Select heads with vibrant, intact leaves for the best wrap-ability. Romaine or Bibb lettuce can substitute if needed, but butter lettuce’s tenderness makes it ideal for a seamless eating experience.

Step-by-Step Instructions

Step 1: Heating the Oil

Heat 1 tablespoon of vegetable oil in a large skillet over medium heat. This step ensures even cooking and prevents the ground chicken from sticking.

Pro Tip: Use a high-smoke-point oil like vegetable oil for the best results, as it withstands the heat without breaking down and affecting the flavors.

A photo showing the oil heating in the skillet

Step 2: Cooking the Ground Chicken

Add 1 pound of ground chicken to the heated oil and cook until browned and fully cooked, about 5-7 minutes. Stir occasionally to break up any lumps for an even texture.

Common Mistake to Avoid: Don’t overcrowd the skillet, as this can cause the chicken to steam instead of brown—cook in batches if needed to maintain that savory chicken wraps quality.

A photo showing the browned ground chicken in the skillet

Step 3: Adding Garlic and Onion

Stir in 2 minced garlic cloves and 1 diced onion; cook until softened, about 2-3 minutes. This infuses the mixture with aromatic flavors that form the base of your Thai chicken wraps.

Pro Tip: Mince the garlic finely and add it last in this step to prevent burning, which can make the dish bitter.

A photo showing the garlic and onion softening in the pan

Step 4: Incorporating Sauces

Add 1/4 cup hoisin sauce, 2 tablespoons soy sauce, 1 tablespoon rice vinegar, and 1 tablespoon Sriracha; stir to combine and simmer for 2 minutes. This creates the bold Thai chili kick that defines these savory chicken lettuce wraps.

Common Mistake to Avoid: Taste the sauce mixture before simmering—adjust Sriracha if you prefer less heat to avoid an overly spicy result.

A photo showing the sauces being mixed into the chicken

Step 5: Mixing in Water Chestnuts and Green Onions

Mix in 1 can of drained and diced water chestnuts and 2 thinly sliced green onions; cook for an additional 1-2 minutes to blend the flavors.

Pro Tip: Add the green onions towards the end to keep them vibrant and crunchy, enhancing the fresh appeal of healthy chicken lettuce wraps.

A photo showing the water chestnuts and green onions stirred in

Step 6: Cooling the Mixture

Remove the skillet from heat and let the chicken mixture cool slightly, about 5 minutes. This makes it easier to handle when assembling the wraps.

Common Mistake to Avoid: Rushing this step can make the filling too hot for the lettuce, causing it to wilt—patience ensures crisp, intact wraps.

A photo showing the cooled chicken mixture in the skillet

Step 7: Assembling and Serving

Spoon the chicken mixture into individual butter lettuce leaves and serve immediately for the best crunchy texture.

Pro Tip: Gently wash and dry the lettuce leaves in advance to keep them crisp and ready for your easy chicken lettuce wraps.

A photo showing the wraps assembled and ready to eat

Serving & Presentation

For an impressive presentation of your savory chicken lettuce wraps, arrange the filled lettuce leaves on a vibrant platter, garnishing with extra sliced green onions and a sprinkle of sesame seeds for added visual appeal and a nutty crunch. The bold Thai chili kick pairs beautifully with the fresh, crisp lettuce, making these Thai chicken wraps a showstopper at any gathering. Complement this appetizer with side dishes like steamed jasmine rice to soak up the flavors or a simple cucumber salad for a refreshing contrast, turning your meal into a full, balanced Thai-inspired feast that’s both healthy and satisfying.

Make-Ahead & Storage Solutions

Make-Ahead Strategy: Prepare the chicken filling up to 3 days in advance by following the instructions up to the cooling step, then store it in an airtight container in the refrigerator. When ready, simply reheat and assemble the wraps for quick, fresh meals that maintain the bold Thai chili kick.

Storing Leftovers: Store any unused filling in the fridge for up to 2 days in a sealed container to preserve freshness, or freeze it for up to 1 month—thaw overnight in the fridge before use. Keep lettuce leaves separate to avoid sogginess, wrapping them in a damp paper towel.

The Best Way to Reheat: Reheat the filling in a skillet over low heat with a splash of water to restore moisture, stirring gently for 2-3 minutes until warmed through. This method keeps the textures intact, ensuring your savory chicken lettuce wraps taste just as good as freshly made.

Frequently Asked Questions (FAQ)

What is the best chicken to use for lettuce wraps?

The best chicken for lettuce wraps is ground chicken, as it cooks quickly and absorbs flavors like the bold Thai chili kick in this recipe. Opt for lean, fresh ground chicken for a healthy, juicy texture in your savory chicken lettuce wraps. If available, choose organic or free-range for better taste and quality, ensuring easy chicken lettuce wraps that are both nutritious and delicious.

How do you make the Thai chili sauce for chicken lettuce wraps?

To make the Thai chili sauce for chicken lettuce wraps, combine hoisin sauce, soy sauce, rice vinegar, and Sriracha in the skillet with the cooked chicken. Simmer for 2 minutes to meld the flavors, creating that signature bold Thai chili kick. This simple mixture enhances the savory chicken wraps without needing extra prep, making it a foolproof part of healthy chicken lettuce wraps.

Can I prepare the chicken lettuce wrap filling ahead of time?

Yes, you can prepare the chicken lettuce wrap filling ahead of time by cooking it fully and storing it in an airtight container in the refrigerator for up to 3 days. This make-ahead approach keeps the bold Thai chili kick intact, allowing you to quickly assemble fresh wraps for busy days, maintaining the recipe’s easy and healthy appeal.

What are some good side dishes to serve with chicken lettuce wraps?

Good side dishes for chicken lettuce wraps include steamed jasmine rice to balance the spices, a fresh cucumber and carrot slaw for crunch, or egg rolls for a fun Thai-inspired twist. These options complement the savory chicken wraps by adding variety and making the meal more substantial, perfect for serving as part of healthy chicken lettuce wraps dinners.

Is this recipe suitable for a low-carb diet?

Absolutely, this savory chicken lettuce wraps recipe is ideal for a low-carb diet, with the butter lettuce providing a low-calorie, high-fiber wrap alternative to traditional carbs. Each serving contains only about 15g of carbohydrates, focusing on protein-rich chicken and veggies for a satisfying, healthy option.

How can I adjust the spiciness in Thai chicken wraps?

To adjust the spiciness in Thai chicken wraps, simply reduce the Sriracha amount or substitute it with a milder chili sauce. Start with half the quantity and taste as you go, ensuring the bold Thai chili kick is tailored to your preference without losing the recipe’s vibrant flavors.

.

Print
clock clock iconcutlery cutlery iconflag flag iconfolder folder iconinstagram instagram iconpinterest pinterest iconfacebook facebook iconprint print iconsquares squares iconheart heart iconheart solid heart solid icon

Savory Chicken Lettuce Wraps with Thai Chili Sauce

  • Author: Chef Sally
  • Prep Time: 15 minutes
  • Cook Time: 15 minutes
  • Total Time: 30 minutes
  • Yield: 4 1x
  • Method: Appetizer
  • Cuisine: Thai

Description

A fresh and flavorful dish featuring ground chicken seasoned with garlic, onions, and a spicy Thai chili sauce, wrapped in crisp lettuce leaves.


Ingredients

Scale
  • 1 pound ground chicken
  • 1 tablespoon vegetable oil
  • 2 cloves garlic, minced
  • 1 onion, diced
  • 1/4 cup hoisin sauce
  • 2 tablespoons soy sauce
  • 1 tablespoon rice vinegar
  • 1 tablespoon Sriracha sauce
  • 1 (8 ounce) can water chestnuts, drained and diced
  • 2 green onions, thinly sliced
  • 1 head butter lettuce, leaves separated

Instructions

  1. Heat vegetable oil in a large skillet over medium heat.
  2. Add ground chicken and cook until browned and fully cooked, about 5-7 minutes.
  3. Stir in minced garlic and diced onion; cook until softened, about 2-3 minutes.
  4. Add hoisin sauce, soy sauce, rice vinegar, and Sriracha; stir to combine and simmer for 2 minutes.
  5. Mix in diced water chestnuts and sliced green onions; cook for an additional 1-2 minutes.
  6. Remove from heat and let cool slightly.
  7. Spoon the chicken mixture into individual butter lettuce leaves and serve immediately.

Notes

For a milder flavor, reduce the amount of Sriracha. Pair with steamed rice for a complete meal.


Nutrition

  • Calories: 250
  • Sugar: 5g
  • Fat: 10g
  • Carbohydrates: 15g
  • Protein: 20g

Easy Cranberry Brie Puff Pastry Bites

“`html

Cranberry Brie Puff Pastry Bites with Fig Thyme: The Only Recipe You’ll Ever Need

Imagine hosting a holiday gathering where your guests can’t stop raving about the irresistible appetizers you served. That’s the magic of Cranberry Brie Puff Pastry Bites with Fig Thyme, a delectable treat that combines flaky pastry, creamy brie, and a fresh thyme infusion for an extra layer of flavor that sets this recipe apart. In just 35 minutes, you’ll create bite-sized wonders that balance tangy cranberries, sweet figs, and aromatic herbs, making it the ultimate Puff Pastry Appetizer for any occasion. Whether you’re a seasoned chef or a beginner, this Easy Puff Pastry Appetizer solves the common dilemma of finding a quick yet impressive dish that wows everyone without requiring advanced skills. Drawing from Chef Sally’s expertise, this version elevates the classic with a fresh thyme infusion, ensuring each bite bursts with holiday cheer.

The sensory experience of these Cranberry Brie Puff Pastry Bites with Fig Thyme is nothing short of extraordinary. Picture the golden, flaky crust that crunches delightfully with every bite, enveloping a warm, gooey center of melted brie that offers a creamy, indulgent texture. The tartness of fresh cranberries mingles perfectly with the sweet, chewy bits of dried figs, while the fresh thyme adds an earthy, aromatic note that perfumes the air as they bake. Brie Cranberry Bites like these deliver a harmonious blend of flavors—sweet, savory, and slightly tangy—that dances on your palate, leaving a subtle honey-kissed finish. It’s the kind of Fig Thyme Bites that make your kitchen smell like a festive dream, drawing everyone in for seconds.

What makes this Cranberry Brie Puff Pastry recipe from exorecipes.com the single best resource on the internet? Crafted by Chef Sally and rigorously tested in our kitchens, it incorporates a fresh thyme infusion as the Chef’s Secret, transforming ordinary ingredients into an unforgettable holiday treat. You’ll learn expert tips, common pitfalls to avoid, and innovative variations that ensure success every time. From detailed step-by-step instructions with visual guides to nutritional insights and FAQs, this post equips you with everything needed to feel confident and creative in the kitchen. Dive in and discover why this Puff Pastry Appetizer is a game-changer for home cooks everywhere.

Prep Time: 15 minutes
Cook Time: 20 minutes
Total Time: 35 minutes
Servings: 12 bites

Why This Cranberry Brie Puff Pastry Bites with Fig Thyme Recipe is a Game-Changer

The Chef’s Secret lies in the fresh thyme infusion, which adds an extra layer of aromatic depth that elevates Cranberry Brie Puff Pastry Bites beyond standard appetizers. By incorporating fresh thyme leaves directly into the filling, we enhance the herbal notes, creating a sophisticated balance with the sweet figs and tangy cranberries. This technique, tested multiple times, ensures the flavors meld seamlessly during baking, resulting in a more complex and memorable taste profile that sets our recipe apart from others.

Unbeatable Texture: The science behind the flaky puff pastry comes from its layered dough, which expands when baked due to steam from the butter. Using high-quality, thawed puff pastry guarantees a light, airy crust that contrasts perfectly with the creamy brie, while the fresh thyme infusion prevents the filling from becoming overly rich, maintaining an ideal crisp-to-soft ratio.

Foolproof for a Reason: This recipe has been perfected through repeated trials to ensure reliability, with precise measurements and timings that account for common variables like oven heat. Whether you’re making Brie Cranberry Bites for a party or a quick snack, it’s designed for consistent results, making it an Easy Puff Pastry Appetizer that even novice cooks can master on the first try.

Ingredient Spotlight: Quality Makes the Difference

Puff Pastry: As the base of these Cranberry Brie Puff Pastry Bites with Fig Thyme, a single sheet of thawed puff pastry provides the signature flaky texture that makes this appetizer irresistible. Opt for all-butter puff pastry for superior layering and flavor, as it creates a lighter, crispier result compared to those with vegetable oils. If you’re short on time, pre-rolled sheets work perfectly, but avoid generic brands that might bake unevenly. A tested substitution is phyllo dough for a lighter option, though it won’t achieve the same puff.

Brie Cheese: This creamy star, cubed at 4 ounces, melts beautifully inside the pastry, offering a rich, indulgent center to your Brie Cranberry Bites. Choose a high-quality, ripe brie for its smooth texture and subtle nuttiness, which pairs wonderfully with the fresh thyme infusion. Quality matters because inferior brie can be overly tangy or grainy. For a milder alternative, substitute with camembert, but ensure it’s at room temperature for even melting.

Fresh Cranberries: Adding 1/2 cup of these tart berries brings a vibrant, seasonal zing to the Fig Thyme Bites, balancing the sweetness of the figs and honey. Fresh cranberries provide the best pop of flavor and color, but if unavailable, frozen ones work in a pinch—just thaw and drain them first. Their role is to add acidity, enhancing the overall taste; substitute with dried cranberries if needed, but reduce the honey to avoid excess sweetness.

Dried Figs: Chopped to 1/4 cup, these sweet, chewy gems contribute a natural caramel-like depth to the Cranberry Brie Puff Pastry. Select plump, moist figs for optimal texture; dried ones from a reliable source prevent toughness. They complement the fresh thyme infusion by adding earthiness, and a great substitution is dates for a similar sweetness, though they might make the bites slightly denser.

Fresh Thyme Leaves: Just 1 tablespoon of these aromatic leaves is the key to our unique fresh thyme infusion, infusing the bites with an herbal freshness that elevates the entire dish. Fresh thyme offers a more potent flavor than dried, so avoid substitutes if possible, but if you must, use half the amount of dried thyme—just note it won’t capture the same vibrant essence.

Honey: Drizzled at 2 tablespoons, honey ties everything together with a gentle sweetness in these Puff Pastry Appetizers. Choose raw, local honey for its pure flavor, which enhances the fresh thyme without overpowering it. A vegan alternative like agave syrup works well, maintaining the glossy finish and moisture.

Egg for Egg Wash: Beating one egg creates a golden, shiny crust on your Easy Puff Pastry Appetizer. This ingredient ensures even browning and a professional look. For a vegan version, substitute with a mix of plant-based milk and oil, though it may not achieve the same sheen.

Step-by-Step Instructions

Step 1: Preparing the Oven and Baking Sheet

Preheat your oven to 400°F and line a baking sheet with parchment paper to prevent sticking and ensure even baking for your Cranberry Brie Puff Pastry Bites with Fig Thyme.

Pro Tip: Use a high-quality baking sheet for uniform heat distribution, which helps achieve that perfect golden crust.

A photo showing the oven preheating and parchment-lined baking sheet ready for use

Step 2: Rolling Out the Puff Pastry

Roll out the thawed puff pastry sheet and cut it into 12 even squares, providing the base for your Fig Thyme Bites.

Common Mistake to Avoid: Don’t overwork the pastry; roll it gently to maintain its layers, or it might become tough.

A photo showing the puff pastry rolled out and cut into squares

Step 3: Adding the Filling

Place a cube of brie, a few fresh cranberries, and chopped dried figs in the center of each pastry square for your Brie Cranberry Bites.

Pro Tip: Arrange the ingredients neatly to avoid overflow during baking, enhancing the fresh thyme infusion.

A photo showing the pastry squares filled with ingredients

Step 4: Seasoning the Bites

Sprinkle each filled square with fresh thyme leaves, salt, and pepper, then drizzle with honey to incorporate the fresh thyme infusion fully.

Common Mistake to Avoid: Use fresh thyme sparingly at first; too much can overpower the other flavors.

A photo showing the seasoned and honey-drizzled bites

Step 5: Folding and Sealing

Fold the corners of the pastry over the filling and brush with the beaten egg wash to seal and create a glossy finish on your Puff Pastry Appetizer.

Pro Tip: Press the edges firmly to lock in the flavors, ensuring the fresh thyme infusion doesn’t escape.

A photo showing the folded and egg-washed bites on the baking sheet

Step 6: Baking the Bites

Bake the assembled bites for 15-20 minutes until they turn golden brown, allowing the Cranberry Brie Puff Pastry to reach its flaky perfection.

Common Mistake to Avoid: Avoid opening the oven door early, as it can cause the pastry to deflate.

A photo showing the baked, golden-brown bites

Step 7: Cooling and Serving

Let the bites cool slightly on the baking sheet before serving your Easy Puff Pastry Appetizer.

Pro Tip: Cooling helps the brie set, making them easier to handle while preserving the fresh thyme infusion.

A photo showing the cooled bites ready to serve

Serving & Presentation

For an eye-catching presentation, arrange your Cranberry Brie Puff Pastry Bites with Fig Thyme on a rustic wooden platter, garnished with extra fresh thyme sprigs and a light dusting of powdered sugar for a festive touch. These Brie Cranberry Bites pair beautifully with a crisp white wine or sparkling cider, enhancing the fresh thyme infusion. Serve as a starter alongside charcuterie boards or salads for a balanced meal, making them ideal for holiday parties or casual gatherings as a Puff Pastry Appetizer.

Make-Ahead & Storage Solutions

Make-Ahead Strategy: Prep the filling components up to 3 days in advance by chopping the cranberries, figs, and thyme, then store them in airtight containers in the fridge. Assemble the bites just before baking to maintain the flaky texture of your Fig Thyme Bites.

Storing Leftovers: Refrigerate cooled Cranberry Brie Puff Pastry Bites in an airtight container for up to 2 days to preserve freshness. For longer storage, freeze them unbaked on a tray first, then transfer to a freezer bag for up to a month.

The Best Way to Reheat: To restore the original flaky texture and fresh thyme infusion, reheat leftovers in a 350°F oven for 5-7 minutes. Avoid microwaving, as it can make the pastry soggy, ensuring your Easy Puff Pastry Appetizer tastes freshly baked.

Frequently Asked Questions (FAQ)

How long should Cranberry Brie Puff Pastry Bites bake?

These Cranberry Brie Puff Pastry Bites with Fig Thyme should bake for 15-20 minutes at 400°F until they achieve a golden brown color. Start checking at 15 minutes to prevent over-baking, as oven temperatures can vary. This ensures the pastry is flaky and the filling is perfectly melted, making it a reliable Puff Pastry Appetizer.

Can I use different jam instead of fig for the puff pastry bites?

Yes, you can substitute the dried figs with a different jam, such as apricot or raspberry, for a fresh twist on your Brie Cranberry Bites. Use about 1/4 cup of jam spread lightly over the filling to maintain the sweet element without overwhelming the fresh thyme infusion. Keep in mind that fruitier jams might alter the flavor slightly, so opt for low-sugar varieties to balance the tart cranberries.

What is the best way to assemble Cranberry Brie Puff Pastry Bites?

The best way to assemble these Fig Thyme Bites is to start by placing the brie cube in the center of each pastry square, followed by cranberries and figs, then seasoning with thyme, salt, pepper, and honey. Fold the corners over the filling and seal with egg wash for a neat package. This method, part of our tested recipe, ensures even distribution of the fresh thyme infusion and prevents leaks during baking.

How to reheat leftover Cranberry Brie Puff Pastry Bites?

To reheat leftover Cranberry Brie Puff Pastry Bites, place them on a baking sheet and warm in a 350°F oven for 5-7 minutes. This restores the crispy texture and revives the fresh thyme infusion without making the pastry soggy. Avoid the microwave, as it can compromise the flakiness of your Easy Puff Pastry Appetizer.

What occasions are these bites perfect for?

These Cranberry Brie Puff Pastry Bites with Fig Thyme are ideal for holiday parties, Thanksgiving dinners, or casual get-togethers, thanks to their elegant yet simple preparation. Their festive flavors make them a hit as an appetizer or finger food, pairing well with wines for adult events or as a fun snack for family gatherings.

Can I make this recipe vegan or gluten-free?

Yes, you can adapt this recipe for vegan or gluten-free diets. For a vegan version, substitute the brie with a plant-based alternative like vegan cheese and use a flax egg (1 tablespoon ground flaxseed mixed with 3 tablespoons water) for the egg wash. For gluten-free, swap the puff pastry with a gluten-free version made from rice or almond flour. Ensure all ingredients, including honey, align with your dietary needs, and the fresh thyme infusion remains intact for flavor.

“`

.

Print
clock clock iconcutlery cutlery iconflag flag iconfolder folder iconinstagram instagram iconpinterest pinterest iconfacebook facebook iconprint print iconsquares squares iconheart heart iconheart solid heart solid icon

Cranberry Brie Puff Pastry Bites with Fig Thyme

  • Author: Chef Sally
  • Prep Time: 15 minutes
  • Cook Time: 20 minutes
  • Total Time: 35 minutes
  • Yield: 12 bites 1x
  • Method: Appetizer
  • Cuisine: American

Description

Delicious bite-sized appetizers featuring creamy brie cheese, tangy cranberries, and sweet figs wrapped in flaky puff pastry, seasoned with fresh thyme for a holiday treat.


Ingredients

Scale
  • 1 sheet puff pastry, thawed
  • 4 ounces brie cheese, cubed
  • 1/2 cup fresh cranberries
  • 1/4 cup dried figs, chopped
  • 1 tablespoon fresh thyme leaves
  • 2 tablespoons honey
  • 1 egg, beaten for egg wash
  • Salt and pepper to taste

Instructions

  1. Preheat oven to 400°F and line a baking sheet with parchment paper.
  2. Roll out puff pastry and cut into 12 squares.
  3. Place a cube of brie, a few cranberries, and chopped figs in the center of each square.
  4. Sprinkle with thyme, salt, and pepper, then drizzle with honey.
  5. Fold the corners of the pastry over the filling and brush with egg wash.
  6. Bake for 15-20 minutes until golden brown.
  7. Let cool slightly before serving.

Notes

For a vegetarian option, ensure all ingredients are plant-based; store leftovers in an airtight container for up to 2 days.


Nutrition

  • Calories: 150
  • Sugar: 5g
  • Fat: 10g
  • Carbohydrates: 12g
  • Protein: 5g