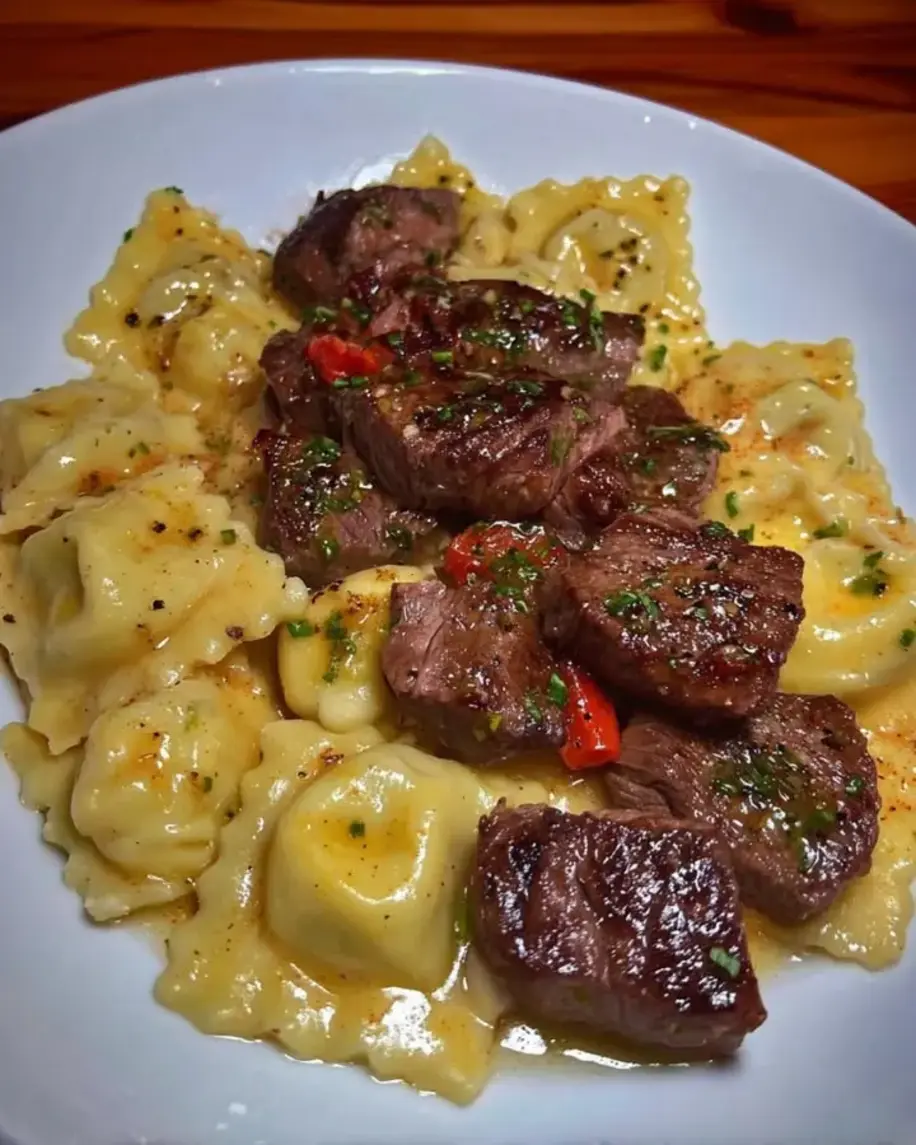
Honey Garlic Butter Roasted Carrots: A Delicious and Easy Side Dish

Discover how to make delicious honey garlic butter roasted carrots with this simple recipe, perfect for any meal or occasion.

Honey Garlic Butter Roasted Carrots: A Perfect Side Dish for Any Occasion

Introduction

Honey garlic butter roasted carrots are a delightful side dish that perfectly balances sweet, savory, and buttery flavors. This simple yet elegant recipe elevates the humble carrot into a dish that can complement a wide variety of main courses. Whether you’re preparing a holiday feast or a weeknight dinner, these roasted carrots are sure to impress.

For those interested in discovering other comforting side dishes, consider trying this Crockpot Potato Soup with Hashbrowns, which pairs wonderfully with roasted vegetables.

Why Honey Garlic Butter Roasted Carrots?

This dish is special because it transforms basic ingredients into something extraordinary. The combination of honey and garlic with butter creates a glaze that caramelizes as the carrots roast, adding depth and richness to their natural sweetness. Additionally, carrots are packed with nutrients like beta-carotene and fiber, making this dish not only delicious but also healthy.

When preparing this dish, it’s essential to use fresh, high-quality carrots and real butter for the best results. For tips on roasting vegetables to perfection, you can explore this guide on how to roast vegetables perfectly.

Ingredients and Nutritional Information

To make honey garlic butter roasted carrots, you’ll need the following ingredients:

  • Carrots: Whole or baby carrots work best.
  • Honey: Adds a natural sweetness that complements the carrots.
  • Garlic: Provides a savory contrast to the sweetness.
  • Butter: Enhances the flavor and helps the carrots caramelize.
  • Optional Herbs: Thyme or parsley for garnish and added flavor.

Nutritionally, this dish is rich in vitamins and minerals, particularly vitamin A from the carrots. The use of butter adds some fat, but it also contributes to the dish’s rich flavor. For those looking to make a lighter version, consider using less butter or substituting with olive oil.

For more information on the nutritional benefits of carrots, check out this article on the nutritional benefits of carrots.

How to Make Honey Garlic Butter Roasted Carrots

1. Preparing the Carrots
Start by washing, peeling, and trimming the carrots. If using whole carrots, you may want to cut them into uniform sizes to ensure even cooking.

2. Making the Honey Garlic Butter Sauce
In a small saucepan, melt the butter over low heat. Add the honey and minced garlic, stirring until fully combined. This sauce will serve as the glaze for the carrots, giving them their signature flavor.

3. Roasting the Carrots
Preheat your oven to 400°F (200°C). Toss the carrots in the honey garlic butter sauce, ensuring they are evenly coated. Spread them out on a baking sheet lined with parchment paper and roast for 25-30 minutes, or until the carrots are tender and caramelized.

4. Serving and Garnishing
Once roasted, transfer the carrots to a serving dish and garnish with fresh herbs like thyme or parsley. Serve immediately and enjoy!

For more ideas on how to use honey in savory dishes, you might find inspiration in these creative glazes for roasted vegetables.

Store-Bought vs. Homemade Honey Garlic Butter Roasted Carrots

While making honey garlic butter roasted carrots at home allows for customization and freshness, some might wonder if pre-packaged or pre-cooked options are worth considering. Although convenient, store-bought versions often lack the depth of flavor and freshness that comes from roasting your own carrots with a homemade glaze. Homemade versions allow you to adjust the sweetness, garlic intensity, and cooking time to suit your preferences.

Creative Variations of Honey Garlic Butter Roasted Carrots

There are several ways to customize your honey garlic butter roasted carrots to create a dish that suits your taste:

  • Spicy Kick: Add a pinch of cayenne pepper or smoked paprika to the glaze for a spicy twist.
  • Alternative Sweeteners: Use maple syrup or brown sugar instead of honey for a different flavor profile.
  • Vegan Option: Substitute butter with olive oil or a vegan butter alternative to make the dish vegan-friendly.

Serving Suggestions and Pairings

Honey garlic butter roasted carrots are a versatile side dish that pairs well with a variety of main courses and sides:

  • Pairing with Proteins: Serve alongside roasted chicken, beef, or fish for a balanced meal.
  • Complementary Sides: Mashed potatoes, quinoa, or a fresh salad are excellent companions.
  • As a Holiday Side: These carrots make a beautiful addition to any holiday table, adding color and flavor.

For more side dish inspiration, consider pairing these carrots with No Peek Beef Tips, which adds a rich, savory element to your meal.

Tips for Perfect Honey Garlic Butter Roasted Carrots

To ensure your honey garlic butter roasted carrots turn out perfectly every time, keep these tips in mind:

  • Even Roasting: Cut the carrots into uniform sizes to ensure they roast evenly.
  • Don’t Overcrowd the Pan: Spread the carrots out on the baking sheet so they caramelize properly instead of steaming.
  • Adjust the Sweetness: Depending on your taste, you can adjust the amount of honey to make the dish sweeter or more savory.

Frequently Asked Questions (FAQs)

  1. Can I make this dish ahead of time?
    Yes, you can prepare the dish in advance and reheat it before serving. However, it’s best enjoyed fresh to maintain the caramelized texture.
  2. What type of carrots work best for roasting?
    Whole or baby carrots are ideal for roasting, as they hold their shape well and offer a satisfying texture.
  3. How do I prevent the carrots from becoming too soft?
    Roast the carrots at a high temperature (around 400°F) and keep an eye on them to prevent overcooking.
  4. Can I use a different type of sweetener?
    Absolutely! Maple syrup or brown sugar can be used as alternatives to honey, depending on your preference.
  5. What are some low-carb variations of this dish?
    The dish is naturally low in carbs, but you can reduce the amount of honey or use a sugar-free sweetener to lower the carb content further.

Nutritional Benefits and Health Considerations

Carrots are a nutritious vegetable rich in vitamins A and K, fiber, and antioxidants. Honey, while adding sweetness, also offers some health benefits due to its antioxidants and antibacterial properties. To make the dish lighter, consider using a smaller amount of butter or replacing it with a heart-healthy oil like olive oil.

Conclusion

Honey garlic butter roasted carrots are a delicious, healthy side dish that’s easy to prepare and full of flavor. Whether you’re serving them for a holiday feast or a simple weeknight dinner, these roasted carrots are sure to impress. With their beautiful caramelization and the balance of sweet and savory flavors, this dish is a must-try for any home cook.

Perfect Fried Cabbage with Onions and Bacon: A Southern Classic

Learn how to make delicious fried cabbage with onions and bacon, a Southern classic, with easy steps and creative variations

Fried Cabbage with Onions and Bacon: A Flavorful Southern Classic

Introduction

Fried cabbage with onions and bacon is a beloved dish that showcases the perfect blend of savory, smoky, and sweet flavors. This Southern classic is not only easy to prepare but also incredibly versatile, making it an ideal side dish or even a main course. The combination of tender cabbage, caramelized onions, and crispy bacon creates a comforting and satisfying meal that will quickly become a staple in your kitchen.

If you’re looking to add more comforting dishes to your repertoire, you might also enjoy this Crockpot Potato Soup with Hashbrowns, which pairs wonderfully with fried cabbage.

What Makes Fried Cabbage with Onions and Bacon Special?

This dish stands out for its simplicity and rich flavor profile. The smokiness of the bacon complements the natural sweetness of the onions and cabbage, while the tender texture of the sautéed vegetables provides a perfect contrast to the crispy bacon. It’s a dish that celebrates the humble cabbage, transforming it into a delicious and comforting meal.

When preparing this dish, the quality of your ingredients matters. Using fresh, high-quality bacon and cabbage will make a noticeable difference in the flavor and texture of your final dish. For tips on selecting the best bacon, check out this guide on choosing the best bacon for cooking.

Ingredients and Nutritional Information

To make fried cabbage with onions and bacon, you’ll need the following ingredients:

  • Cabbage: Green or Savoy cabbage works best for this dish.
  • Bacon: Thick-cut bacon is preferred for its robust flavor and crispy texture.
  • Onions: Yellow or sweet onions add a touch of sweetness to balance the smokiness of the bacon.
  • Garlic (optional): Adds an extra layer of flavor.
  • Seasonings: Salt, pepper, and red pepper flakes to taste.

Nutritionally, fried cabbage with onions and bacon is a low-carb, high-flavor dish. Cabbage is packed with vitamins and fiber, while bacon provides protein and a rich, smoky flavor. For those looking to make the dish a bit lighter, consider using turkey bacon or reducing the amount of bacon used.

For a deep dive into the nutritional benefits of cabbage, take a look at this article on the nutritional benefits of cabbage.

How to Make Fried Cabbage with Onions and Bacon

1. Preparing the Ingredients
Start by slicing the cabbage into thin strips and dicing the onions. If you’re using garlic, mince it finely.

2. Cooking the Bacon
In a large skillet, cook the bacon over medium heat until crispy. Once cooked, remove the bacon and set it aside, leaving the rendered fat in the skillet. This bacon fat will serve as the base for sautéing the onions and cabbage, infusing the dish with smoky flavor.

3. Sautéing the Onions and Cabbage
Add the onions to the skillet and sauté until they begin to caramelize. Next, add the cabbage to the skillet, stirring to coat it in the bacon fat. Cook until the cabbage is tender but still has a slight crunch. Season with salt, pepper, and red pepper flakes to taste.

4. Combining and Serving
Once the cabbage is cooked, crumble the bacon and mix it back into the skillet. Toss everything together until well combined. Serve immediately, and enjoy this comforting dish on its own or as a side to your favorite Southern entrée.

If you’re interested in mastering the art of caramelizing onions, which is a key step in this recipe, consider reading these tips for perfectly caramelized onions.

Store-Bought vs. Homemade Fried Cabbage with Onions and Bacon

While making fried cabbage with onions and bacon at home allows for customization and freshness, some might wonder if pre-packaged options are worth considering. Although convenient, store-bought versions often lack the depth of flavor that comes from using fresh ingredients and cooking with care. Homemade versions, on the other hand, allow you to adjust the seasoning, bacon-to-cabbage ratio, and overall flavor to suit your preferences.

Creative Variations of Fried Cabbage with Onions and Bacon

There are several ways to customize your fried cabbage with onions and bacon to create a dish that suits your taste:

  • Vegetable Additions: Add bell peppers, carrots, or even Brussels sprouts for extra color and flavor.
  • Meat Substitutions: Use turkey bacon, pancetta, or even smoked sausage for a different twist on the classic recipe.
  • Vegetarian Option: Substitute the bacon with smoked tofu or tempeh for a vegetarian version that still packs plenty of flavor.

Serving Suggestions and Pairings

Fried cabbage with onions and bacon is a versatile dish that pairs well with a variety of main courses and sides:

  • Pairing with Proteins: Serve alongside grilled chicken, pork chops, or a hearty beef roast.
  • Complementary Sides: Mashed potatoes, cornbread, or roasted root vegetables are excellent companions.
  • As a Main Course: Enjoy this dish on its own with a side of crusty bread for a light, satisfying meal.

For more comfort food ideas, consider pairing this dish with No Peek Beef Tips, which adds a rich, savory element to your meal.

Tips for Perfect Fried Cabbage with Onions and Bacon

To ensure your fried cabbage with onions and bacon turns out perfectly every time, keep these tips in mind:

  • Avoid Overcooking the Cabbage: Cook the cabbage until it’s tender but still slightly crisp to maintain its texture and flavor.
  • Use Fresh Ingredients: Fresh cabbage and onions will make a significant difference in the taste and quality of your dish.
  • Don’t Skimp on the Bacon: The bacon is a key component of this dish, providing both flavor and fat. Use a high-quality, thick-cut bacon for the best results.

Frequently Asked Questions (FAQs)

  1. Can I make this dish ahead of time?
    Yes, you can prepare the dish in advance and reheat it before serving. However, it’s best enjoyed fresh to maintain the crispness of the cabbage.
  2. What type of cabbage works best for this recipe?
    Green cabbage is the most common choice, but Savoy cabbage also works well, offering a slightly different texture and flavor.
  3. How do I prevent the cabbage from becoming too soft?
    Cook the cabbage over medium heat and avoid covering the skillet, which can trap steam and make the cabbage soggy.
  4. Can I use a different type of meat instead of bacon?
    Absolutely! Smoked sausage, pancetta, or turkey bacon are great alternatives that can bring their own unique flavors to the dish.
  5. What are some low-carb variations of this dish?
    This dish is naturally low-carb, but you can make it even lighter by reducing the amount of bacon or using a leaner meat option.

Nutritional Benefits and Health Considerations

Cabbage is a nutrient-dense vegetable that’s high in fiber, vitamins C and K, and low in calories, making it a great addition to a balanced diet. Bacon, while flavorful, is higher in fat and sodium, so consider using it in moderation if you’re watching your intake. For a healthier option, turkey bacon or reduced-sodium bacon can be used without sacrificing too much flavor.

Conclusion

Fried cabbage with onions and bacon is a delicious, comforting dish that’s easy to prepare and full of flavor. Whether you’re serving it as a side dish or enjoying it as a main course, this Southern classic is sure to become a favorite in your home. With its versatility and rich, savory taste, it’s the perfect dish to add to your recipe rotation.

Delicious White Cheddar Popcorn: A Savory Snack

Learn how to make delicious white cheddar popcorn at home, plus explore variations and serving ideas for this savory snack.

White Cheddar Popcorn: The Perfect Savory Snack for Any Occasion

Introduction

White cheddar popcorn is a crowd-pleasing snack that’s perfect for any occasion. This delicious and easy-to-make treat combines the light crunch of popcorn with the savory taste of cheddar cheese, creating an irresistible flavor combination. Whether you’re hosting a movie night or just looking for a tasty snack, cheddar cheese popcorn is a must-try recipe that will satisfy your cravings.

What Makes White Cheddar Popcorn Special?

What sets white cheddar popcorn apart from other flavors is its unique blend of sharp and tangy cheese with the lightness of popcorn. Unlike traditional cheddar, white cheddar has a more refined taste that appeals to a broader audience. It’s the perfect balance of savory and satisfying, making it an ideal snack for any occasion.

When comparing store-bought and homemade options, it’s important to consider factors like freshness, customization, and convenience. If you’re someone who enjoys having control over your ingredients, making your own popcorn at home can be a fun and rewarding experience. For a step-by-step guide on how to make delicious popcorn at home, you can explore this Slow Cooker Magic: Unveiling the Ease of Crock-Pot Baked Ziti.

Ingredients and Nutritional Information

To make white cheddar popcorn, you’ll need the following ingredients:

  • Popcorn Kernels: The base of the snack.
  • White Cheddar Cheese Powder: Provides that signature cheesy flavor.
  • Butter or Oil: Helps the cheese powder stick to the popcorn.
  • Optional Seasonings: Garlic powder, salt, or smoked paprika for added flavor.

Nutritionally, white cheddar popcorn is a fairly low-calorie snack when consumed in moderation. However, it’s important to note that adding too much butter or cheese powder can increase the calorie and fat content. For those looking to keep things lighter, air-popping your popcorn and using a minimal amount of seasoning can be a healthier option.

If you’re interested in learning more about making healthier popcorn choices, check out this guide on choosing the healthiest popcorn.

How to Make White Cheddar Popcorn at Home

1. Popping the Popcorn
Choose your preferred method: stovetop, air popper, or microwave. For the healthiest option, air-popping is recommended as it doesn’t require any oil.

2. Preparing the Cheese Mixture
In a small bowl, mix the white cheddar cheese powder with any additional seasonings you prefer, such as garlic powder or smoked paprika.

3. Mixing and Serving
Once the popcorn is popped, drizzle with melted butter or a light spray of oil. Then, toss the popcorn in the cheese mixture until evenly coated. Serve immediately for the best taste and texture.

Store-Bought vs. Homemade White Cheddar Popcorn

Both store-bought and homemade versions of cheddar popcorn have their advantages. Store-bought options are convenient and come in a variety of flavors, but homemade popcorn allows for more customization. You can control the amount of cheese, adjust the seasoning, and even experiment with different types of cheddar.

Some popular brands that offer cheddar popcorn include Smartfood, Cousin Willie’s, and Wise Snacks. These brands are known for their quality and flavor, making them great choices if you’re looking to grab a bag from the store.

Creative Variations of White Cheddar Popcorn

There are endless ways to customize your white cheddar popcorn to suit your taste:

  • Spicy Kick: Add a dash of cayenne pepper or hot sauce to your popcorn for a spicy twist.
  • Sweet and Savory: Combine white cheddar popcorn with caramel popcorn for a delicious contrast of flavors.
  • Herbed Popcorn: Mix in dried herbs like thyme or rosemary for a more sophisticated flavor profile.
  • Vegan Option: Use nutritional yeast instead of cheese powder to create a dairy-free version that still offers a cheesy flavor.

Serving Suggestions and Pairings

White cheddar popcorn is a versatile snack that pairs well with a variety of beverages and side dishes:

  • Pairing with Drinks: Serve with a cold soft drink, iced tea, or even a glass of wine.
  • Party Presentation: Serve in large bowls with small cups or bags for easy individual servings.
  • Complementary Snacks: Pair with other finger foods like pretzels, nuts, or cheese sticks for a satisfying snack spread.

For more ideas on how to serve white popcorn alongside other comfort foods, consider these No Peek Beef Tips for a hearty and delicious meal.

Tips for Perfect White Cheddar Popcorn

To ensure your cheddar popcorn turns out perfectly every time, keep these tips in mind:

  • Use Fresh Popcorn Kernels: Fresh kernels pop more consistently and result in fluffier popcorn.
  • Evenly Coat the Popcorn: Toss the popcorn thoroughly with the cheese mixture to ensure every piece is coated.
  • Store Properly: If you have leftovers, store them in an airtight container to maintain freshness. Avoid storing in the fridge as this can make the popcorn stale.

Frequently Asked Questions (FAQs)

  1. What is the best type of popcorn for making white cheddar popcorn?
    Air-popped popcorn is the healthiest option, but stovetop popcorn can offer a richer flavor.
  2. How can I make a healthier version of white cheddar popcorn?
    Use less butter and opt for air-popping your kernels. You can also use a light spray of oil instead of butter to help the cheese powder stick.
  3. What is the difference between white cheddar and regular cheddar popcorn?
    White cheddar has a milder, more tangy flavor compared to the sharper taste of regular cheddar. It’s also less likely to have artificial coloring.
  4. How do I store white cheddar popcorn to keep it fresh?
    Store the popcorn in an airtight container at room temperature. Avoid refrigeration as it can affect the texture.
  5. Can I make white cheddar popcorn without butter?
    Yes, you can use a light spray of oil or simply toss the popcorn with the cheese powder directly after popping to help it stick.

Conclusion

cheddar popcorn is a delicious and versatile snack that’s perfect for any occasion. Whether you prefer to make it at home or enjoy it from your favorite brand, this cheesy treat is sure to satisfy. With the tips and variations provided in this article, you can customize your popcorn to suit your taste and impress your guests. So, grab a bowl, pop some kernels, and enjoy the irresistible flavor of cheddar popcorn.

Homemade Banana Pudding Ice Cream

Discover how to make rich and creamy Banana Pudding Ice Cream at home with this easy recipe and customizable variations.

Banana Pudding Ice Cream: A Creamy and Delicious Treat

Introduction

Banana pudding ice cream is the perfect dessert for those who love the classic flavor of banana pudding and the creamy texture of homemade ice cream. This recipe combines the best elements of both treats, offering a rich, flavorful, and refreshing dessert that’s ideal for any occasion. Whether you’re a fan of traditional banana pudding or simply enjoy experimenting with frozen desserts, pudding ice cream is sure to satisfy your sweet cravings and become a favorite in your home.

If you’re interested in perfecting your homemade ice cream-making skills, be sure to check out these tips for making homemade ice cream from Serious Eats.

Why Banana Pudding Ice Cream?

This ice cream combines the nostalgic flavors of banana pudding with the indulgent creaminess of ice cream. It’s a versatile dessert that works well on hot summer days or as a comforting treat year-round. Moreover, pudding ice cream offers endless customization options, allowing you to add your favorite mix-ins or adjust the sweetness to suit your preferences.

To ensure your bananas are at their peak flavor, refer to The Kitchn’s guide on perfectly ripe bananas for tips on selecting the best fruit for your ice cream.

Ingredients for Banana Pudding Ice Cream

To make this delightful banana pudding ice cream at home, you’ll need the following ingredients:

  • Ripe Bananas: The star ingredient, adding natural sweetness and a rich banana flavor.
  • Heavy Cream and Half-and-Half: These dairy products create the creamy base of the ice cream.
  • Sweetened Condensed Milk: Adds a rich sweetness and helps with the smooth texture.
  • Vanilla Extract: A classic flavor enhancer that complements the bananas.
  • Instant Banana Pudding Mix: Thickens the mixture and intensifies the banana flavor.
  • Crushed Vanilla Wafers: For that authentic banana pudding texture and taste.

If you enjoy comfort food desserts, consider trying this Crockpot Potato Soup with Hashbrowns for a savory dish to pair with your sweet treat.

Step-by-Step Recipe for Banana Pudding Ice Cream

1. Prepare the Base
In a large mixing bowl, combine the heavy cream, half-and-half, and sweetened condensed milk. Stir in the instant banana pudding mix and vanilla extract until fully incorporated. Make sure the mixture is smooth, with no lumps.

2. Mash the Bananas
In a separate bowl, mash the ripe bananas until they reach a creamy consistency, but leave a few small chunks for texture. Add the mashed bananas to the cream mixture and gently stir until well mixed.

3. Fold in the Vanilla Wafers
Gently fold in the crushed vanilla wafers to the mixture. This step adds that signature banana pudding texture and flavor to the ice cream.

4. Chill and Churn
If you have an ice cream maker, pour the mixture into the machine and churn according to the manufacturer’s instructions. If you don’t have an ice cream maker, you can use a no-churn method by pouring the mixture into a freezer-safe container and freezing it. Stir every 30 minutes until it reaches the desired consistency.

5. Serve and Enjoy
Once the ice cream has set, scoop it into bowls or cones and enjoy. For added flair, top it with whipped cream, more crushed wafers, or a drizzle of caramel sauce.

For more creamy dessert ideas, you might also want to try this Slow Cooker Magic: Unveiling the Ease of Crock-Pot Baked Ziti, which is another comforting dish perfect for pairing with ice cream.

No-Churn Banana Pudding Ice Cream Variation

If you don’t have an ice cream maker, the no-churn method is a great alternative. Simply prepare the mixture as described above, then pour it into a loaf pan or another freezer-safe container. Cover with plastic wrap and freeze for 4-6 hours, stirring occasionally. This method results in a rich, creamy ice cream without the need for special equipment.

Serving Suggestions and Toppings

Banana pudding ice cream is delicious on its own, but you can take it to the next level with these serving suggestions and toppings:

  • Whipped Cream: Adds a light, airy contrast to the creamy ice cream.
  • Extra Crushed Vanilla Wafers: For added crunch and texture.
  • Caramel or Chocolate Sauce: Drizzle on top for a touch of sweetness.
  • Fresh Banana Slices: Enhance the banana flavor with a fresh touch.

If you’re hosting a dinner party or simply want to enjoy a comforting meal before dessert, check out this No Peek Beef Tips, another comforting dish perfect for pairing with this ice cream.

Variations of Banana Pudding Ice Cream

This versatile recipe can be customized in many ways to suit your preferences:

  • Add Chocolate Chips or Peanut Butter Swirls: Introduce new flavors and textures to your ice cream.
  • Swap Vanilla Wafers for Different Cookies: Try graham crackers or shortbread cookies for a different twist.
  • Vegan and Dairy-Free Options: Substitute coconut cream and almond milk for the dairy products, and use a vegan-friendly pudding mix.

Tips for Perfect Banana Pudding Ice Cream

Follow these tips to ensure your banana ice cream turns out perfectly every time:

  • Use Very Ripe Bananas: The riper the bananas, the sweeter and more flavorful your ice cream will be.
  • Chill the Mixture: Before churning or freezing, make sure your ice cream base is well chilled. This helps achieve a smoother texture.
  • Fold Gently: When adding the wafers, be gentle to avoid breaking them up too much and to maintain their texture.

Storing and Serving

Banana pudding ice cream can be stored in an airtight container in the freezer for up to two weeks. To serve, let it sit at room temperature for a few minutes to soften slightly before scooping. Avoid letting it sit out too long, as it can become icy if refrozen.

Frequently Asked Questions (FAQs)

  1. Can I use overripe bananas?
    Yes, overripe bananas are perfect for this recipe as they add extra sweetness and flavor.
  2. How can I prevent ice crystals in homemade ice cream?
    Ensure your mixture is well chilled before freezing, and store the ice cream in an airtight container.
  3. How long does banana pudding ice cream last in the freezer?
    It’s best enjoyed within the first week but can last up to two weeks if properly stored.
  4. Can I make this recipe dairy-free?
    Absolutely! Use coconut cream and almond milk in place of dairy, and choose a dairy-free pudding mix.
  5. What are some alternatives to vanilla wafers?
    You can use graham crackers, shortbread cookies, or even chocolate wafers for a different flavor.

Nutritional Information and Healthier Options

Banana ice cream is a treat, but you can make it a bit healthier by reducing the sugar content or using low-fat dairy products. Alternatively, try a vegan version with coconut cream for a lighter, plant-based option.

Conclusion

Banana pudding ice cream is a delicious and nostalgic dessert that combines the best of two classic treats. Whether you’re enjoying it on a hot summer day or as a comforting dessert after dinner, this recipe is sure to become a favorite in your home. With its rich flavor, creamy texture, and endless customization options, you’ll want to make this ice cream again and again.

Ultimate Guide to Mississippi Pot Roast Tacos: A Flavorful Twist

Discover how to make delicious Mississippi Pot Roast Tacos with this easy-to-follow recipe and tips for the perfect meal.

Mississippi Pot Roast Tacos: A Delicious Twist on a Classic Recipe

Introduction to Mississippi Pot Roast Tacos

Mississippi Pot Roast Tacos offer a flavorful twist on traditional tacos by combining the rich, savory flavors of pot roast with the convenience of tacos. This dish is perfect for weeknight dinners, family gatherings, or anytime you’re craving something different.

Why Mississippi Pot Roast Tacos?

If you’re a fan of both pot roast and tacos, this recipe is a match made in heaven. The rich, buttery flavors of Mississippi Pot Roast pair perfectly with the simplicity of taco shells, creating a hearty and satisfying meal. Moreover, these tacos are incredibly versatile, allowing you to customize them with your favorite toppings and sauces.

Ingredients and Preparation

Essential Ingredients for Mississippi Pot Roast Tacos

To create the perfect Mississippi Pot Roast Tacos, you’ll need a few key ingredients:

  • Chuck Roast: Choose a high-quality cut for the best results.
  • Ranch Seasoning Mix: Adds a tangy flavor to the meat.
  • Au Jus Gravy Mix: Enhances the savory taste.
  • Pepperoncini Peppers: Provide a slight kick and tanginess.
  • Butter: Adds richness to the dish.
  • Taco Shells: Hard or soft, depending on your preference.
  • Toppings: Cheese, lettuce, sour cream, and more.

Step-by-Step Cooking Instructions

  1. Prepare the Roast
    In a slow cooker, place the chuck roast and season it with the ranch seasoning mix and au jus gravy mix. Then, add a few pepperoncini peppers and a stick of butter on top.
  2. Cook the Roast
    Set the slow cooker on low and let the roast cook for 8 hours. The slow cooking process ensures that the meat becomes tender and flavorful.
  3. Shred the Meat
    Once the roast is fully cooked, remove it from the slow cooker and use two forks to shred the meat. Additionally, mix the shredded meat with the remaining juices in the slow cooker for extra flavor.
  4. Assemble the Tacos
    Warm your taco shells and fill them with the shredded pot roast. For an added layer of flavor, top with your favorite toppings like cheese, lettuce, and sour cream.
  5. Serve and Enjoy
    Serve the tacos with your favorite sides like rice, beans, or a fresh salad. With each bite, you’ll enjoy the rich and savory flavors of the pot roast combined with the freshness of the toppings.

Serving and Variations

Serving Suggestions and Presentation Tips

Presentation is key when serving Mississippi Pot Roast Tacos. Therefore, consider these tips to make your tacos visually appealing:

  • Garnish with Fresh Herbs: Add a sprinkle of fresh cilantro or a dollop of guacamole for color and flavor.
  • Pair with Sides: Serve with a side of Mexican rice or refried beans for a complete meal.
  • Set Up a Taco Bar: Create a DIY taco bar where guests can customize their tacos with various toppings and sauces.

Variations of Mississippi Pot Roast Tacos

The beauty of Mississippi Pot Roast Tacos lies in their versatility. Consequently, you can try different variations to suit your taste:

  • Different Cuts of Meat: While chuck roast is the traditional choice, you can experiment with brisket or pork shoulder.
  • Add Some Heat: For a spicier version, add diced jalapeños or hot sauce.
  • Health-Conscious Options: Swap out regular taco shells for whole wheat or lettuce wraps, and load up on veggies for a healthier twist.

Tips and Storage

Tips for Perfect Mississippi Pot Roast Tacos

To ensure your tacos turn out perfectly, follow these helpful tips:

  • Choose the Right Cut of Meat: Opt for a cut with good marbling, like chuck roast, to achieve tender, flavorful meat.
  • Don’t Rush the Cooking Process: Slow cooking is essential to achieving the right texture and flavor. Therefore, be patient.
  • Adjust Seasoning: Feel free to add more or less seasoning based on your preferences, ensuring the flavors are just right.

Leftover Ideas and Storage

Got leftovers? Fortunately, there are plenty of ways to make the most of them:

  • Store Properly: Store leftover pot roast in an airtight container in the refrigerator for up to 3 days.
  • Reheat Gently: Reheat the meat gently in a skillet or microwave to avoid drying it out.
  • Creative Leftover Uses: Turn leftover pot roast into burritos, nachos, or even a sandwich for a new meal.

Frequently Asked Questions (FAQs)

  1. Can I make Mississippi Pot Roast Tacos with a different type of meat?
    Yes, you can substitute chuck roast with brisket, pork shoulder, or even chicken for a different flavor profile.
  2. How spicy are Mississippi Pot Roast Tacos?
    The spice level is moderate due to the pepperoncini peppers, but you can adjust the heat by adding more or less.
  3. What toppings go best with these tacos?
    Popular toppings include shredded cheese, lettuce, sour cream, salsa, and guacamole.
  4. Can I make this recipe in an Instant Pot?
    Absolutely! Use the sauté function to brown the meat, then cook on high pressure for about 60 minutes for tender results.
  5. How do I store leftovers, and how long will they last?
    Store leftovers in the refrigerator for up to 3 days. Reheat gently to retain moisture and flavor.

Conclusion

Mississippi Pot Roast Tacos are a delicious and innovative way to enjoy a classic comfort food in a new format. Whether you’re a fan of traditional tacos or looking to try something different, these tacos are sure to satisfy. With endless customization options and the convenience of slow cooking, this recipe is perfect for any occasion.