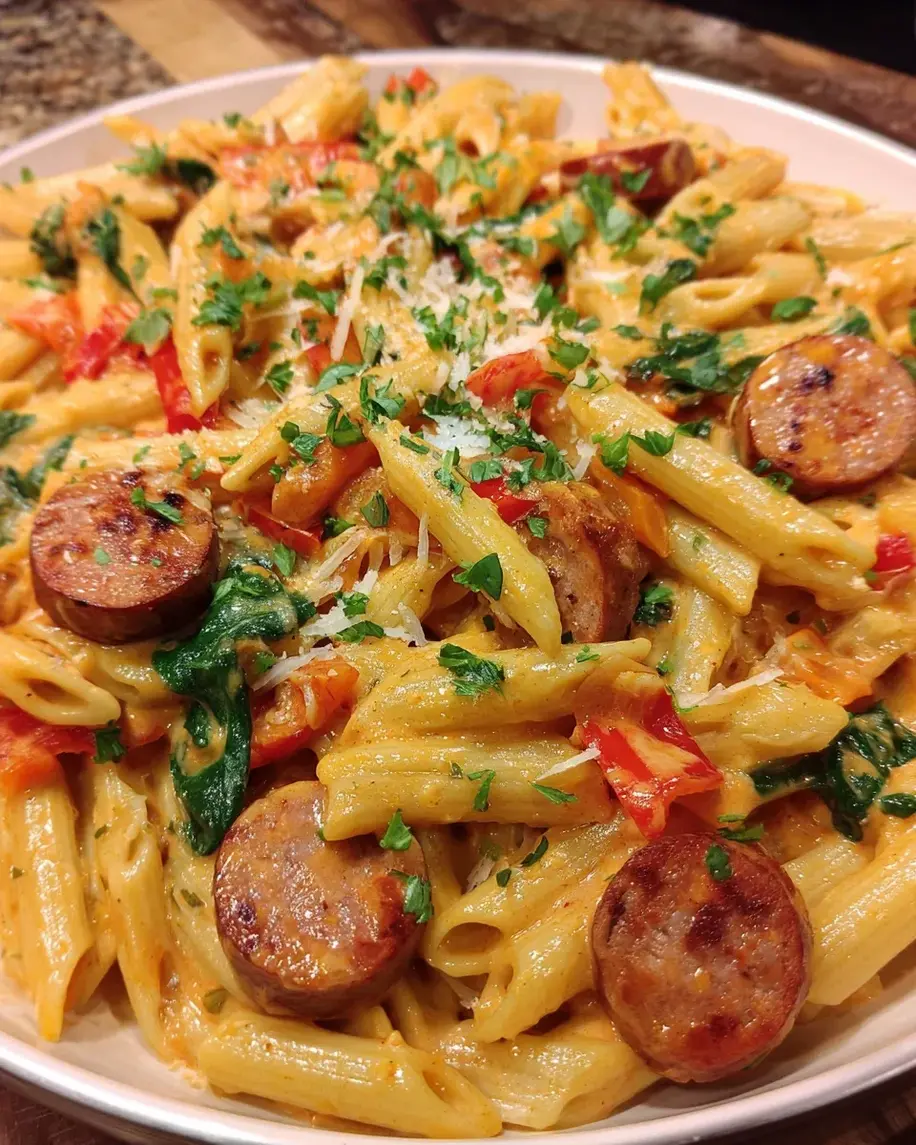
Best Crockpot Chocolate Lava Cake – Rich & Decadent

best-crockpot-chocolate-lava-cake

Introduction

Imagine coming home to the rich, inviting aroma of warm chocolate wafting through your kitchen. No need to hover over the oven or fuss with complicated techniques—this Decadent Crockpot Chocolate Lava Cake does all the work for you. Whether you’re craving a cozy dessert for two or planning a stress-free dinner party finale, this recipe delivers gooey, molten perfection every time. Best of all, your slow cooker handles the heavy lifting, leaving you free to savor the moment (and the chocolate).

Decadent Crockpot Chocolate Lava Cake is exactly what it sounds like: a luscious, fudgy dessert with a molten center, cooked low and slow for maximum indulgence. Unlike traditional lava cakes that demand precise baking times, this version forgives overmixing and uneven oven temperatures, making it a foolproof crowd-pleaser. For busy home cooks, it’s a game-changer—just mix the batter, set your crockpot, and let magic happen. Plus, it pairs beautifully with our Homemade Vanilla Bean Ice Cream or a drizzle of Salted Caramel Sauce. This recipe fits our blog’s mission to deliver approachable, decadent dishes that prioritize flavor over fuss. After all, dessert should feel like a celebration, not a chemistry experiment.

Why I Love This Recipe

This Decadent Crockpot Chocolate Lava Cake holds a special place in my heart because it saved more than one date night. Years ago, I attempted a fancy lava cake for an anniversary dinner—only to serve charcoal-like pucks. When I discovered this slow-cooker method, it became my secret weapon for effortless elegance. Now, I make it for birthdays, potlucks, and even “just because” weeknights. The way the spoon cracks through the tender cake to reveal that molten core never gets old. It’s the kind of dessert that turns ordinary evenings into something memorable, and that’s exactly why I keep coming back to it.

Health and Nutrition

Why it’s good for your body

Decadent Crockpot Chocolate Lava Cake delivers more than just rich flavor. First, dark chocolate, a key ingredient, packs antioxidants that support heart health and reduce inflammation. Additionally, this dessert contains moderate amounts of iron and magnesium, which help maintain energy levels and muscle function. While it’s indulgent, you can enjoy it guilt-free knowing it offers some nutritional perks.

Moreover, Decadent Crockpot Chocolate Lava Cake uses simple, wholesome ingredients like eggs and cocoa powder, avoiding artificial additives. For example, eggs provide high-quality protein, while cocoa boosts mood-enhancing compounds like serotonin. Furthermore, slow cooking in a crockpot preserves moisture without excess oil, making it lighter than many traditional desserts.

Finally, this treat satisfies cravings in smaller portions, helping you avoid overindulgence. Because it’s so rich, a little goes a long way. Decadent Crockpot Chocolate Lava Cake balances pleasure and nourishment, proving that desserts can be both delicious and mindful.

How it fits in a healthy lifestyle

Decadent Crockpot Chocolate Lava Cake fits perfectly into a balanced diet when enjoyed in moderation. For those watching sugar intake, you can easily swap refined sugar for natural sweeteners like maple syrup or coconut sugar. Pair it with fresh berries for added fiber and vitamins, turning it into a more rounded treat.

If you follow a gluten-free diet, this recipe naturally avoids flour, making it a safe choice. For heart-healthy eaters, dark chocolate’s flavonoids support circulation and blood pressure. Craving more wholesome dessert ideas? Explore our gluten-free dessert collection for lighter options. Alternatively, if you’re meal prepping, try pairing it with our high-protein snacks to balance your day. With smart choices, you can savor every bite without compromising your goals.

Print
clock clock iconcutlery cutlery iconflag flag iconfolder folder iconinstagram instagram iconpinterest pinterest iconfacebook facebook iconprint print iconsquares squares iconheart heart iconheart solid heart solid icon

Decadent Crockpot Chocolate Lava Cake

  • Author: Chef Mia

Description

A rich and gooey chocolate cake with a molten center, made effortlessly in a crockpot.


Ingredients

Scale

For the Crust:

  • 1 box chocolate cake mix
  • 1 cup water
  • 1/2 cup vegetable oil
  • 3 eggs
  • 1 box instant chocolate pudding mix
  • 2 cups milk
  • 1 cup semi-sweet chocolate chips

Instructions

1. Prepare the Crust:

  1. Grease the inside of your crockpot with non-stick cooking spray.
  2. In a large bowl, mix the cake mix, water, oil, and eggs until smooth. Pour into the crockpot.
  3. In another bowl, whisk the pudding mix and milk until thickened. Pour over the cake batter.
  4. Sprinkle chocolate chips evenly over the top.
  5. Cover and cook on low for 3-4 hours or until the edges are set but the center is still slightly gooey.
  6. Serve warm with vanilla ice cream or whipped cream.

Notes

You can customize the seasonings to taste.

How to Prepare This Dish

Steps and time-saving tips

Start by greasing your crockpot with butter or non-stick spray to ensure your Decadent Crockpot Chocolate Lava Cake releases easily. In a large bowl, whisk together flour, sugar, cocoa powder, baking powder, and a pinch of salt. Next, mix in melted butter, milk, vanilla extract, and eggs until the batter is smooth and glossy. Meanwhile, heat water and brown sugar in a saucepan until dissolved, then pour this syrup into the bottom of the crockpot. Carefully spoon the cake batter over the syrup, spreading it evenly. Cover and cook on high for about 2 hours, or until the edges are set but the center remains slightly gooey. To save time, prep your dry ingredients the night before and store them in an airtight container. If you’re short on time, use a store-bought chocolate sauce instead of making the syrup from scratch. Serve warm with a scoop of vanilla ice cream for the ultimate indulgence.

Mistakes I’ve made and learned from

Early on, I made the mistake of overcooking my Decadent Crockpot Chocolate Lava Cake, which turned it into a dry chocolate brick instead of a molten masterpiece. Now, I set a timer for 1 hour and 45 minutes and check it every 10 minutes after that. Another blunder was skipping the greasing step—trust me, scraping stuck cake out of a crockpot is no fun. If you’re new to slow cooker desserts, my crockpot baking basics guide has more tips to avoid common pitfalls. I also learned the hard way that using cold ingredients can throw off the texture, so I always bring eggs and milk to room temperature first. For more troubleshooting, check out my how to fix a dry cake post—because even mistakes can taste good with a little creativity!

rc="https://exorecipes.com/wp-content/uploads/2025/07/best-crockpot-chocolate-lava-cake-recipe.webp" />

Cultural Connection and Variations

Where this recipe comes from

Decadent Crockpot Chocolate Lava Cake feels like a warm hug from dessert heaven, but its roots stretch back to classic French molten chocolate cake. Chefs like Jean-Georges Vongerichten popularized the gooey-centered treat in the 1980s, yet home cooks quickly embraced easier versions. Meanwhile, slow cooker adaptations let busy bakers achieve the same rich, velvety texture with minimal effort. Some families even tweak the recipe by adding espresso for depth or swapping in peanut butter for a nutty twist.

Around the world, similar desserts take on local flair. In Japan, they might pair it with matcha ice cream, while Mexicans often sprinkle cinnamon or chili powder for a kick. My grandma, however, insisted on serving Decadent Crockpot Chocolate Lava Cake with a scoop of vanilla bean ice cream—no exceptions. Whether you dress it up or keep it simple, this dessert bridges cultures through shared love of chocolate.

ays-cooking">How it fits in today’s cooking

Today, Decadent Crockpot Chocolate Lava Cake thrives as a fuss-free crowd-pleaser. Busy hosts adore it for holidays because the slow cooker does the work while they entertain. Meanwhile, meal preppers stash leftovers (if there are any!) for midweek indulgence. Modern twists, like using dairy-free chocolate or adding a dash of sea salt, keep it fresh for today’s diets.

It also pairs perfectly with other easy desserts, like no-bake cheesecake, for a stress-free dinner party spread. And if you’re craving more slow cooker magic, try crockpot apple crisp for a seasonal twist. Whether you’re celebrating or just treating yourself, this cake proves comfort food never goes out of style.

Taste and Texture

What makes it delicious

Decadent Crockpot Chocolate Lava Cake delivers an irresistible sensory experience that chocolate lovers crave. The first bite reveals a velvety, molten center that oozes rich, dark chocolate, while the outer edges offer a tender, cake-like crumb. Warm vanilla and deep cocoa aromas fill the air as it cooks, making your kitchen smell like a bakery. Meanwhile, a hint of espresso powder enhances the chocolate’s intensity without overpowering it. Every spoonful feels luxuriously smooth, with just a touch of gooeyness that melts on your tongue. Decadent Crockpot Chocolate Lava Cake strikes the perfect balance between indulgent and comforting, making it impossible to resist a second serving.

r">Boosting the flavor

Elevate your Decadent Crockpot Chocolate Lava Cake with a few creative tweaks. For a nutty twist, swirl in a spoonful of almond butter or top with toasted hazelnuts. A pinch of cinnamon or cayenne pepper adds warmth and complexity, while a drizzle of salted caramel sauce balances the cake’s richness. Prefer fruit? Fresh raspberries or a scoop of vanilla bean ice cream cut through the chocolate for a refreshing contrast. Experimenting with these simple additions lets you customize each bite while keeping the dessert’s soul-satisfying essence.

Tips for Success

Best practices for results

Always grease your crockpot thoroughly to prevent the Decadent Crockpot Chocolate Lava Cake from sticking. Meanwhile, use high-quality chocolate for a richer flavor, and check the cake at the 2-hour mark to avoid overbaking. Additionally, let the cake rest for 10 minutes before serving so the molten center sets slightly. For best results, serve warm with a scoop of vanilla ice cream to balance the richness.

>Mistakes to avoid

Avoid overmixing the batter, as this can make the cake dense instead of light and gooey. Instead, gently fold the ingredients until just combined. Furthermore, don’t skip preheating the crockpot, as uneven heat may cause the edges to burn. If you’re unsure about timing, refer to our crockpot dessert timing guide for precise adjustments. Finally, resist opening the lid too often, since heat escapes and disrupts cooking. For more troubleshooting tips, check out our guide to fixing soggy cakes.

Serving and Pairing Suggestions

How to serve this dish

For a show-stopping dessert, serve Decadent Crockpot Chocolate Lava Cake warm straight from the slow cooker. Scoop individual portions into elegant ramekins or shallow bowls to highlight the rich, molten center. Meanwhile, dust the top with powdered sugar or cocoa powder for a touch of sophistication. Alternatively, garnish with fresh berries or a sprig of mint to add color and freshness. Perfect for dinner parties or cozy nights in, this dessert shines during holidays like Valentine’s Day or Christmas. Finally, pair it with a scoop of vanilla ice cream for an irresistible contrast of temperatures and textures.

What goes well with it

Elevate your Decadent Crockpot Chocolate Lava Cake by pairing it with a velvety homemade whipped cream that balances the intense chocolate flavor. For a refreshing twist, serve it alongside a glass of cold milk or a bold espresso to cut through the richness. If you love contrasting flavors, try our salted caramel sauce drizzled over the top for a sweet-and-salty finish. Each pairing enhances the dessert while keeping the focus on its indulgent, gooey center.

rc="https://s3-placid.s3.eu-central-1.amazonaws.com/production/rest-images/rawp1noeia0hh/int-4b1d4b23c75cfdf3766f4b50e53f3ee2-64oydp3r.jpg" />

Can you make Decadent Crockpot Chocolate Lava Cake with a cake mix?

Yes! You can simplify the recipe by using a boxed chocolate cake mix for the base. Just follow the same slow-cooker method, layering the batter and chocolate chips to create that gooey lava center. Decadent Crockpot Chocolate Lava Cake works beautifully with both homemade and store-bought mixes.

How long does Decadent Crockpot Chocolate Lava Cake take to cook?

Typically, Decadent Crockpot Chocolate Lava Cake needs 1.5–2.5 hours on high heat or 3–4 hours on low, depending on your slow cooker. Check for a set outer edge with a molten center—the signature texture of this dessert. Overcooking can reduce the lava effect, so monitor it closely.

ank-math-faq-item"> What’s the best way to serve Decadent Crockpot Chocolate Lava Cake?

Scoop warm portions directly from the crockpot and top with vanilla ice cream, whipped cream, or fresh berries. The contrast of cold toppings with the rich, molten Decadent Crockpot Chocolate Lava Cake enhances the experience. For presentation, dust with powdered sugar or cocoa powder.

Can you make Decadent Crockpot Chocolate Lava Cake ahead of time?

While best served fresh, you can prep dry ingredients in advance and refrigerate the batter (without cooking) for up to 24 hours. Reheat leftovers gently in the microwave, but note that Decadent Crockpot Chocolate Lava Cake loses some lava texture when stored.

Best Homemade Raising Cane’s Chicken Finger Sauce

best-homemade-raising-canes-sauce

Introduction

If you’ve ever dipped crispy chicken fingers into Raising Cane’s iconic sauce, you know the magic it brings to every bite. That tangy, creamy, slightly spicy flavor is downright addictive—and now, you can recreate it at home. This Homemade Raising Cane’s Chicken Finger Sauce recipe lets you capture that restaurant-quality taste without leaving your kitchen. Whether you’re hosting game day, craving a nostalgic snack, or just love a good copycat recipe, this sauce will become your new go-to. Plus, it pairs perfectly with everything from tenders to fries, making it a versatile staple for any meal.

Homemade Raising Cane’s Chicken Finger Sauce is more than just a condiment—it’s a game-changer for home cooks. Unlike store-bought versions, this recipe uses simple, wholesome ingredients you likely already have, like mayonnaise, ketchup, and a hint of garlic powder. The result? A smooth, balanced sauce that rivals the original. For fans of the chain, this copycat offers a way to enjoy the signature flavor anytime, even if you don’t live near a Raising Cane’s. Meanwhile, if you’re new to the sauce, prepare to fall in love. It’s the kind of recipe that turns ordinary meals into something special, whether you’re serving it with crispy baked chicken tenders or drizzling it over a fresh batch of garlic parmesan fries. Best of all, it takes just minutes to whip up, so you can satisfy cravings instantly.

Why I Love This Recipe

I’ll never forget the first time I tried Raising Cane’s sauce—it was love at first dip. Since then, I’ve been obsessed with recreating that flavor at home, and this recipe nails it. What I adore most is how effortlessly it elevates even the simplest meals. Whether I’m making a quick weeknight dinner or impressing friends at a cookout, Homemade Raising Cane’s Chicken Finger Sauce always steals the show. It’s also a nostalgic reminder of late-night drives through college towns and shared meals with friends. Every time I make it, I’m transported back to those moments, and that’s the real magic of cooking.

Health and Nutrition

Why it’s good for your body

Homemade Raising Cane’s Chicken Finger Sauce packs flavor while offering surprising health perks. First, it contains simple ingredients like mayonnaise, ketchup, and garlic powder, which means you avoid artificial additives. Additionally, garlic powder provides antioxidants that support immune health, making this sauce more than just a tasty dip.

Since you control the ingredients, Homemade Raising Cane’s Chicken Finger Sauce can also be lower in sugar than store-bought versions. For example, you can adjust the ketchup amount or use a sugar-free alternative. Furthermore, the healthy fats from mayonnaise help your body absorb fat-soluble vitamins from meals, enhancing overall nutrition.

Another benefit is its versatility. You can pair Homemade Raising Cane’s Chicken Finger Sauce with lean proteins like grilled chicken or baked fish for a balanced meal. Plus, the bold flavor means you’ll use less salt, supporting heart health without sacrificing taste. Whether as a dip or a marinade, this sauce adds both convenience and nutrition to your plate.

How it fits in a healthy lifestyle

Homemade Raising Cane’s Chicken Finger Sauce fits effortlessly into a balanced diet. If you’re watching carbs, it’s naturally low-carb and pairs well with grilled meats or roasted veggies. For those focusing on heart health, swapping regular mayonnaise for an avocado-oil-based version boosts healthy fats.

This sauce also complements high-protein meals, like air-fried chicken tenders or a quinoa bowl. Since it’s gluten-free, it’s a great option for those with dietary restrictions. For more gluten-free meal ideas, check out our guide to gluten-free dinner recipes.

Even better, Homemade Raising Cane’s Chicken Finger Sauce encourages mindful eating. Its rich flavor satisfies cravings, so you’re less likely to overindulge in heavier options. If you’re meal prepping, try pairing it with our healthy meal prep tips for a streamlined week. Small tweaks make it a smart, flavorful addition to any diet.

Print
clock clock iconcutlery cutlery iconflag flag iconfolder folder iconinstagram instagram iconpinterest pinterest iconfacebook facebook iconprint print iconsquares squares iconheart heart iconheart solid heart solid icon

Homemade Raising Cane’s Chicken Finger Sauce

  • Author: Chef Mia

Description

A creamy, tangy, and slightly spicy dipping sauce perfect for chicken fingers, fries, or any fried food.


Ingredients

Scale

For the Crust:

  • 1/2 cup mayonnaise
  • 1/4 cup ketchup
  • 1/2 teaspoon garlic powder
  • 1/2 teaspoon Worcestershire sauce
  • 1/4 teaspoon black pepper
  • 1/4 teaspoon salt
  • 1/4 teaspoon paprika
  • 1/8 teaspoon cayenne pepper (optional)

Instructions

1. Prepare the Crust:

  1. In a medium bowl, combine mayonnaise and ketchup.
  2. Add garlic powder, Worcestershire sauce, black pepper, salt, paprika, and cayenne pepper (if using).
  3. Whisk all ingredients together until smooth and well blended.
  4. Cover and refrigerate for at least 30 minutes before serving to allow flavors to meld.

Notes

You can customize the seasonings to taste.

How to Prepare This Dish

Steps and time-saving tips

Making Homemade Raising Cane’s Chicken Finger Sauce is quicker than you think. First, grab a medium-sized mixing bowl and whisk together mayonnaise, ketchup, and Worcestershire sauce until smooth. Next, add garlic powder, black pepper, and a pinch of salt for that signature tangy kick. Stir everything vigorously for about a minute to ensure no lumps remain. If you prefer a smoother texture, let the sauce sit for 10 minutes before serving—this helps the flavors meld. For a time-saving hack, double the batch and store half in an airtight container; it keeps well in the fridge for up to a week. If you’re in a rush, skip the chilling step and serve immediately, though the taste deepens with a little patience. Always taste as you go and adjust seasoning if needed. A squeeze of lemon juice can brighten the flavors if the sauce feels too heavy. Pair it with crispy chicken fingers, fries, or even drizzle it over a sandwich for extra zing.

Mistakes I’ve made and learned from

When I first tried making Homemade Raising Cane’s Chicken Finger Sauce, I accidentally used too much Worcestershire sauce, overpowering the other flavors. Now, I measure carefully and add it gradually until the balance feels right. Another blunder? Skipping the resting time—I served it right away and missed out on the rich, blended taste. Letting it chill for at least 30 minutes makes a huge difference. If your sauce turns out too thick, thin it with a teaspoon of water or milk, like I learned from my frosting mishaps. And if you’re out of ketchup, try substituting tomato paste thinned with vinegar, a trick I picked up from this pantry swaps guide. Trust me, small tweaks save the day!

rc="https://exorecipes.com/wp-content/uploads/2025/07/best-homemade-raising-canes-sauce-recipe.webp" />

Cultural Connection and Variations

Where this recipe comes from

Homemade Raising Cane’s Chicken Finger Sauce carries a cult-like following, much like the fast-food chain that inspired it. Originating in Baton Rouge, Louisiana, the sauce blends tangy, creamy, and slightly spicy flavors into a dip that elevates simple chicken fingers. While Raising Cane’s keeps their recipe under lock and key, home cooks have perfected versions that capture its magic. Interestingly, similar sauces pop up globally—think Japanese tonkatsu sauce or British Marie Rose sauce—but none quite match the bold simplicity of Homemade Raising Cane’s Chicken Finger Sauce.

In the South, families often tweak the recipe with regional twists. Some add a dash of hot sauce for extra kick, while others swap mayo for buttermilk for a tangier bite. My grandma, for instance, sneaks in a pinch of smoked paprika, claiming it “wakes up the flavors.” Meanwhile, in other parts of the U.S., you might find versions with horseradish or even a hint of maple syrup. No matter the variation, the goal stays the same: a sauce that turns crispy chicken into something unforgettable.

ays-cooking">How it fits in today’s cooking

Today, Homemade Raising Cane’s Chicken Finger Sauce thrives as a versatile staple. Busy parents whip it up for quick weeknight dinners, while foodies use it to jazz up everything from fries to salads. Its simplicity makes it a favorite for meal preppers, too—just like these easy meal prep ideas that save time without sacrificing flavor. Plus, with the rise of homemade copycat recipes, it’s easier than ever to skip the drive-thru and recreate the magic at home.

Modern cooks also adapt the sauce for dietary needs, using vegan mayo or Greek yogurt for lighter versions. It’s even found a place in party spreads, pairing perfectly with crowd-pleasing appetizers. Whether you’re dipping chicken, drizzling it over a sandwich, or sneaking a spoonful straight from the jar, this sauce proves some flavors never go out of style.

Taste and Texture

What makes it delicious

Homemade Raising Cane’s Chicken Finger Sauce delivers a bold, tangy kick with a velvety smooth texture that clings perfectly to crispy chicken. The sauce balances creamy mayonnaise with a zesty punch of garlic and Worcestershire sauce, while a hint of black pepper adds subtle warmth. Each bite bursts with savory, slightly sweet notes, thanks to the ketchup’s natural sweetness. Meanwhile, the sauce’s rich, silky consistency makes it irresistible for dipping or drizzling. Whether you slather it on tenders or pair it with fries, Homemade Raising Cane’s Chicken Finger Sauce elevates every bite with its addictive flavor and luxurious mouthfeel.

r">Boosting the flavor

For a smoky twist, swap ketchup with fire-roasted tomato sauce or add a dash of smoked paprika. If you love heat, stir in minced jalapeños or a splash of hot honey glaze for sweet-spicy depth. Crumbled bacon or grated Parmesan can also add a salty, umami boost. For a brighter finish, try mixing in fresh lemon juice or a spoonful of garlic aioli for extra richness. Experiment with these tweaks to make your Homemade Raising Cane’s Chicken Finger Sauce uniquely yours.

Tips for Success

Best practices for results

Always use fresh mayonnaise as the base for your Homemade Raising Cane’s Chicken Finger Sauce, as it creates the creamiest texture. Meanwhile, whisk the ingredients thoroughly to fully incorporate the spices and avoid clumps. For the best flavor, let the sauce chill in the fridge for at least 30 minutes before serving. Additionally, taste and adjust the seasoning after mixing, since ingredient brands can vary in intensity. Finally, store any leftovers in an airtight container to keep the sauce fresh for days.

>Mistakes to avoid

Avoid over-measuring the hot sauce, as too much can overpower the other flavors in your Homemade Raising Cane’s Chicken Finger Sauce. Instead, start with a small amount and gradually add more to taste. Also, never skip the chilling step—serving the sauce too soon won’t allow the flavors to meld properly. If you’re unsure about consistency, check out our guide on how to thicken sauces for troubleshooting tips. For more seasoning tricks, explore our tips on balancing spices to perfect your recipe.

Serving and Pairing Suggestions

How to serve this dish

Serve Homemade Raising Cane’s Chicken Finger Sauce in a small dipping bowl alongside crispy chicken tenders for a classic combo. For a fun twist, drizzle it over waffle fries or use it as a zesty spread for sliders. Meanwhile, garnish the plate with fresh parsley or a lemon wedge to add a pop of color. This sauce also shines at gatherings, whether you’re hosting game day or a casual backyard BBQ. Just keep it chilled until serving for the best texture and flavor.

What goes well with it

Pair Homemade Raising Cane’s Chicken Finger Sauce with golden, crunchy chicken tenders or drizzle it over a fresh garden salad for a tangy kick. If you love bold flavors, try it with our Spicy Honey Glazed Wings—the sweetness balances the sauce’s creamy zest. For drinks, a chilled lemonade or an ice-cold beer cuts through the richness perfectly. Alternatively, serve it with our Loaded Potato Wedges for a hearty, crowd-pleasing appetizer.

rc="https://s3-placid.s3.eu-central-1.amazonaws.com/production/rest-images/rawp1noeia0hh/int-b998a1c1af922600d827bd47e0abd9a9-ttjtmlh0.jpg" />

What ingredients are in Homemade Raising Cane’s Chicken Finger Sauce?

The Homemade Raising Cane’s Chicken Finger Sauce typically includes mayonnaise, ketchup, garlic powder, Worcestershire sauce, black pepper, and a pinch of salt. This combination creates the tangy, slightly smoky flavor that pairs perfectly with crispy chicken fingers. You can adjust the ratios to match your preferred taste.

How do I make Raising Cane’s sauce taste like the real thing?

To mimic the authentic taste of Raising Cane’s sauce, focus on balancing the tanginess of ketchup with the creaminess of mayonnaise. Adding a dash of Worcestershire sauce and garlic powder is key for depth. Let the Homemade Raising Cane’s Chicken Finger Sauce chill for at least 30 minutes before serving to let the flavors meld.

ank-math-faq-item"> Can I make a healthier version of Homemade Raising Cane’s Chicken Finger Sauce?

Yes! Swap regular mayonnaise for light mayo or Greek yogurt to reduce calories. Use low-sodium ketchup and cut back on salt while keeping the other spices the same. This lighter version of Homemade Raising Cane’s Chicken Finger Sauce still delivers great flavor without the guilt.

How long does Homemade Raising Cane’s Chicken Finger Sauce last in the fridge?

Store the sauce in an airtight container, and it will stay fresh for up to 1 week in the refrigerator. The mayonnaise base means it shouldn’t be left at room temperature for long. Always give your Homemade Raising Cane’s Chicken Finger Sauce a quick stir before serving if it separates.

Best Buttery Cinnamon Cake – Irresistible Homemade Recipe

best-buttery-cinnamon-cake-recipe

Introduction

There’s something magical about the warm, comforting aroma of cinnamon and butter wafting through your kitchen. Whether you’re craving a cozy treat for yourself or planning to impress guests, this Irresistible Buttery Cinnamon Cake Recipe delivers pure indulgence in every bite. Imagine tender, moist cake layers swirled with a rich cinnamon-sugar ribbon—each slice melts in your mouth, leaving you utterly satisfied. Trust me, once you try it, this cake will become your go-to dessert for every occasion.

The Irresistible Buttery Cinnamon Cake Recipe isn’t just another dessert; it’s a celebration of simple, high-quality ingredients transforming into something extraordinary. Unlike overly complicated cakes, this recipe keeps things approachable while delivering bakery-level results. The buttery base creates a delicate crumb, while the cinnamon swirl adds a bold, spiced contrast that elevates the flavor. Plus, it pairs perfectly with a cup of coffee or a scoop of vanilla ice cream, making it versatile for breakfast, brunch, or dessert. If you love easy yet impressive recipes, you’ll adore our Decadent Chocolate Croissants or Homemade Apple Pie—both share the same foolproof, crowd-pleasing spirit.

What makes this recipe stand out is its balance of simplicity and decadence. You don’t need fancy techniques or hard-to-find ingredients, yet the final product feels luxurious. The cinnamon-sugar layer not only adds flavor but also creates a beautiful marbled effect when sliced. Whether you’re a beginner or a seasoned baker, this cake fits seamlessly into your repertoire. It’s the kind of dessert that sparks joy, whether you’re baking it for a holiday gathering or just treating yourself on a lazy Sunday afternoon.

Why I Love This Recipe

This Irresistible Buttery Cinnamon Cake Recipe holds a special place in my heart because it reminds me of my grandmother’s kitchen. She used to bake a similar version every fall, and the scent alone would bring our whole family together. Now, whenever I make it, I feel that same warmth and connection. The recipe is forgiving enough for experimentation—sometimes I add a dash of nutmeg or drizzle it with caramel—but it’s always delicious. More than just a dessert, it’s a little piece of nostalgia I love sharing with others.

Health and Nutrition

Why it’s good for your body

The Irresistible Buttery Cinnamon Cake Recipe isn’t just a treat for your taste buds—it also offers several health perks. First, cinnamon, a star ingredient, packs powerful antioxidants that fight inflammation and may help regulate blood sugar. Additionally, the recipe uses butter, which provides healthy fats to support brain function and energy levels. While moderation is key, this cake delivers a satisfying balance of flavor and nourishment.

Moreover, the Irresistible Buttery Cinnamon Cake Recipe includes eggs, a fantastic source of protein and essential vitamins like B12. These nutrients help maintain muscle health and boost energy. Furthermore, the warm spices in the cake, such as cinnamon, may even aid digestion and improve circulation. Even better, the recipe’s simple ingredients mean fewer processed additives, making it a smarter choice than store-bought desserts.

Finally, enjoying the Irresistible Buttery Cinnamon Cake Recipe in moderation can uplift your mood and satisfy cravings without derailing your wellness goals. The combination of wholesome ingredients and indulgent flavor makes it a guilt-free pleasure. Whether you serve it as a dessert or a sweet snack, this cake brings both comfort and nutrition to your table.

How it fits in a healthy lifestyle

The Irresistible Buttery Cinnamon Cake Recipe fits seamlessly into a balanced diet when enjoyed mindfully. Pair a small slice with a protein-rich snack, like Greek yogurt, to keep energy levels steady. For those watching sugar intake, reducing the sweetener slightly still delivers the same cozy cinnamon flavor without excess sugar.

If you’re exploring gluten-free options, consider swapping all-purpose flour for a blend like almond or oat flour. Many of our readers love adapting recipes, and our gluten-free baking guide offers easy tweaks. For heart-healthy choices, opt for grass-fed butter or a plant-based alternative to maintain richness while prioritizing cardiovascular wellness.

Planning ahead helps too. Bake the Irresistible Buttery Cinnamon Cake Recipe for special occasions or portion it into single servings to avoid overindulgence. For more ideas on balancing treats with nutrition, check out our healthy dessert swaps. With a little creativity, this cake becomes a delightful part of your wellness journey.

Print
clock clock iconcutlery cutlery iconflag flag iconfolder folder iconinstagram instagram iconpinterest pinterest iconfacebook facebook iconprint print iconsquares squares iconheart heart iconheart solid heart solid icon

Irresistible Buttery Cinnamon Cake

  • Author: Chef Mia

Description

A moist and flavorful cake with a rich buttery taste and warm cinnamon swirls.


Ingredients

Scale

For the Crust:

  • 2 cups all-purpose flour
  • 1 1/2 cups granulated sugar
  • 1/2 cup unsalted butter, softened
  • 1 cup milk
  • 2 large eggs
  • 2 tsp baking powder
  • 1 tsp vanilla extract
  • 1/2 tsp salt
  • 2 tbsp ground cinnamon
  • 1/4 cup brown sugar

Instructions

1. Prepare the Crust:

  1. Preheat oven to 350°F (175°C). Grease a 9-inch round cake pan.
  2. In a large bowl, cream together butter and granulated sugar until light and fluffy.
  3. Add eggs one at a time, mixing well after each addition. Stir in vanilla extract.
  4. In a separate bowl, whisk together flour, baking powder, and salt.
  5. Alternately add the flour mixture and milk to the butter mixture, beginning and ending with the flour.
  6. In a small bowl, mix cinnamon and brown sugar for the swirl.
  7. Pour half the batter into the prepared pan. Sprinkle half the cinnamon-sugar mixture over the batter. Repeat with remaining batter and cinnamon-sugar.
  8. Bake for 30-35 minutes or until a toothpick inserted in the center comes out clean.
  9. Let cool in the pan for 10 minutes before transferring to a wire rack.

Notes

You can customize the seasonings to taste.

s-dish">How to Prepare This Dish

Steps and time-saving tips

Start by preheating your oven to 350°F and greasing a 9-inch cake pan. Meanwhile, whisk together the flour, baking powder, and salt in a large bowl. In another bowl, cream the butter and sugar until light and fluffy, then beat in the eggs one at a time. Gradually mix in the dry ingredients, alternating with milk, until the batter is smooth. Stir in a generous amount of cinnamon for that warm, cozy flavor. Pour the batter into the pan and bake for 30-35 minutes, or until a toothpick comes out clean. While the cake cools, prepare a simple glaze by mixing powdered sugar with a splash of milk and vanilla. Drizzle it over the top for an extra touch of sweetness. For a time-saving tip, measure all your ingredients before starting—this keeps the process smooth and avoids mid-recipe scrambles. If you’re short on time, use a hand mixer to speed up creaming the butter and sugar. Let the cake cool slightly before slicing to ensure clean cuts and perfect layers.

Mistakes I’ve made and learned from

I once rushed the creaming process for this Irresistible Buttery Cinnamon Cake Recipe, and the texture turned out dense instead of light. Now I take my time to beat the butter and sugar until it’s pale and fluffy—it makes all the difference. Another lesson? Overmixing the batter. I used to stir vigorously, which led to a tough cake. Now I gently fold in the dry ingredients just until combined. If you’ve struggled with dry cakes, check out my guide on moist cake secrets for foolproof tips. Also, don’t skip the glaze—it adds moisture and ties the flavors together. For more troubleshooting, my post on common baking fixes covers how to salvage underbaked or overmixed batters. Trust me, even small adjustments can turn a good cake into an irresistible one.

n-and-variations">Cultural Connection and Variations

Where this recipe comes from

The Irresistible Buttery Cinnamon Cake Recipe carries the cozy warmth of home kitchens across generations. Originally inspired by European spice cakes, this dessert evolved as cinnamon became a global favorite, weaving its way into family traditions. In Sweden, for example, bakers might add cardamom for a floral twist, while in Mexico, a dash of cayenne pepper brings subtle heat. Meanwhile, my grandma always doubled the butter, claiming it made the cake “sing.”

Seasonally, the Irresistible Buttery Cinnamon Cake Recipe shines in fall and winter, when cinnamon’s aroma feels like a hug. Yet, some cultures enjoy it year-round—like in the Middle East, where bakers often drizzle it with syrup or top it with nuts. Whether served at holidays or as a simple weekend treat, this cake bridges cultures through shared love of spice and sweetness.

How it fits in today’s cooking

Today, the Irresistible Buttery Cinnamon Cake Recipe stays relevant as both comfort food and a versatile crowd-pleaser. Busy bakers adapt it with shortcuts like pre-mixed spices, while health-conscious versions swap in almond flour or coconut sugar. It’s a star at holiday gatherings, yet simple enough for Sunday brunch alongside coffee.

Modern twists keep it f

resh, too. Some add espresso powder for depth, while others layer it with fruit compote. No matter how you tweak it, this cake’s timeless appeal lies in its buttery richness and cinnamon’s nostalgic kick. After all, few desserts feel as universally comforting—or as easy to make your own.

Taste and Texture

What makes it delicious

The Irresistible Buttery Cinnamon Cake Recipe delivers a warm, comforting experience with every bite. Imagine a tender, moist crumb that melts in your mouth, infused with rich buttery notes and a sweet, spicy cinnamon swirl. The aroma alone is heavenly—fragrant cinnamon mingling with caramelized sugar and toasted butter. Meanwhile, the texture strikes the perfect balance between fluffy and dense, thanks to the careful blend of high-quality ingredients like real butter and fresh cinnamon. Whether served warm or at room temperature, the Irresistible Buttery Cinnamon Cake Recipe leaves a lingering sweetness with just the right hint of warmth.

Boosting the flavor

For an extra flavor kick, try drizzling a simple vanilla glaze over the cake while it’s still warm. Alternatively, fold in a handful of toasted walnuts or pecans for a crunchy contrast to the soft crumb. If you love deeper spice notes, a pinch of nutmeg or cardamom pairs beautifully with the cinnamon. For more inspiration, check out our guide to perfect spice blends or explore creative ways to use brown butter magic in baking. Small tweaks can elevate this already irresistible cake to new heights.

rc="https://exorecipes.com/wp-content/uploads/2025/07/best-buttery-cinnamon-cake-recipe.webp" />

Tips for Success

Best practices for results

First, always use room-temperature butter for your Irresistible Buttery Cinnamon Cake Recipe to ensure a smooth, even batter. Meanwhile, measure your flour correctly by spooning it into the cup and leveling it off—this prevents a dry texture. Additionally, mix the cinnamon and sugar thoroughly before sprinkling it over the batter for the perfect swirl. Finally, check for doneness a few minutes early since oven temperatures vary, and let the cake cool slightly before slicing.

Mistakes to avoid

Avoid overmixing the batter, as this can make your Irresistible Buttery Cinnamon Cake Recipe dense instead of tender. Instead, gently fold ingredients until just combined. Another common mistake is skipping the parchment paper, which helps with easy removal and even baking. For more baking essentials, check out our guide on must-have baking tools. Also, don’t forget to properly preheat your oven—an inconsistent temperature can lead to uneven results. Learn more about oven temperature tips to avoid this issue.

g-suggestions">Serving and Pairing Suggestions

How to serve this dish

Slice the Irresistible Buttery Cinnamon Cake Recipe while it’s still warm to highlight its melt-in-your-mouth texture. For a stunning presentation, dust the top with powdered sugar or drizzle with a simple vanilla glaze. Meanwhile, arrange each piece on a vintage cake stand for brunch gatherings or holiday parties. To elevate the experience, serve it alongside a scoop of vanilla ice cream that slowly melts into the cake’s buttery layers. Whether you’re hosting a cozy afternoon tea or celebrating a special occasion, this cake always steals the show.

What goes well with it

Pair the Irresistible Buttery Cinnamon Cake Recipe with a steaming cup of spiced chai latte for a comforting flavor combination. The warm spices in the drink mirror the cake’s cinnamon notes perfectly. Alternatively, try it with our creamy Homemade Vanilla Whipped Cream for an extra indulgent treat. For a refreshing contrast, serve it with a side of fresh berries or our tangy Lemon Curd, which balances the cake’s richness beautifully.

math-faq-block">
What makes this Irresistible Buttery Cinnamon Cake Recipe so moist?

The secret to the moist texture in this Irresistible Buttery Cinnamon Cake Recipe is the perfect balance of butter, sour cream, and a touch of oil. These ingredients create a tender crumb while the cinnamon-sugar swirl locks in moisture during baking.

Can I make Irresistible Buttery Cinnamon Cake Recipe without a mixer?

Absolutely! This Irresistible Buttery Cinnamon Cake Recipe works well with hand mixing—just ensure your butter is properly softened. Use a sturdy whisk or wooden spoon to cream the butter and sugar, then fold in dry ingredients gently to avoid overmixing.

How do I prevent the cinnamon sugar from sinking in my cake?

For perfect layers in your Irresistible Buttery Cinnamon Cake Recipe, dust the cinnamon-sugar mixture over only half the batter first, then swirl lightly with a knife. The cake’s thick batter and proper layering technique will keep the swirl suspended.

ank-math-faq-item"> What’s the best way to store leftover buttery cinnamon cake?

Keep your Irresistible Buttery Cinnamon Cake Recipe fresh by storing it in an airtight container at room temperature for 3 days. For longer storage, wrap slices tightly in plastic and freeze for up to 3 months—thaw at room temperature when ready to enjoy.

Best Tangy Lemon Lavender Cookies Delight Recipe

best-tangy-lemon-lavender-cookies

Introduction

There’s something magical about the first bite of a cookie that balances bright citrus with floral sweetness. If you’ve ever craved a treat that feels both refreshing and indulgent, you’ll adore these Tangy Lemon Lavender Cookies Delight. They’re the perfect harmony of zesty lemon and soothing lavender, creating a flavor that lingers like a sunny afternoon. Whether you’re baking for a special occasion or simply treating yourself, these cookies promise to elevate your day with every crumbly, fragrant bite.

Tangy Lemon Lavender Cookies Delight isn’t just another cookie recipe—it’s a little masterpiece of contrasts. The sharp tang of lemon zest cuts through the delicate floral notes of lavender, while a buttery shortbread base ties it all together. What makes these cookies stand out is their versatility. They pair beautifully with tea, make elegant gifts, or even serve as a sophisticated dessert at brunch. Plus, they fit right into our blog’s mission of sharing unique, approachable recipes that inspire creativity in the kitchen. If you love experimenting with flavors, you’ll appreciate how this recipe takes familiar ingredients and transforms them into something extraordinary. For more inspiration, check out our guide to baking with herbs or explore our collection of citrus desserts to discover new favorites.

Why I Love This Recipe

These cookies hold a special place in my heart because they remind me of lazy summer days in my grandmother’s garden. She grew lavender by the fence, and the scent would drift through the kitchen window while we baked together. The first time I tried adding lemon to her shortbread recipe, it felt like a revelation—the flavors just clicked. Now, every time I make Tangy Lemon Lavender Cookies Delight, I’m transported back to those moments of warmth and discovery. It’s a recipe that feels like both a tribute and an adventure, and I hope it becomes just as meaningful for you.

Health and Nutrition

Why it’s good for your body

Tangy Lemon Lavender Cookies Delight packs a flavorful punch while offering surprising health perks. First, the lemon zest delivers a burst of vitamin C, which boosts immunity and supports glowing skin. Additionally, lavender adds a calming touch, helping to reduce stress and promote relaxation. Meanwhile, the cookies’ whole-grain or almond flour base provides fiber, keeping digestion smooth and energy levels steady.

Moreover, Tangy Lemon Lavender Cookies Delight skips excessive refined sugars, relying instead on natural sweetness like honey or maple syrup. This choice helps balance blood sugar levels, making them a smarter treat. The recipe also incorporates healthy fats, such as coconut oil or butter, which nourish the brain and keep you satisfied longer. Finally, the aromatic lavender not only enhances flavor but also offers mild anti-inflammatory benefits.

Whether you enjoy them with tea or as an afternoon pick-me-up, Tangy Lemon Lavender Cookies Delight satisfies cravings without guilt. Their bright citrus notes and herbal undertones make them a refreshing alternative to heavy desserts. Best of all, they prove that wholesome ingredients can create irresistible flavors.

How it fits in a healthy lifestyle

Tangy Lemon Lavender Cookies Delight fits seamlessly into a balanced diet. For gluten-free eaters, swapping traditional flour for almond or oat flour keeps them celiac-friendly. If you follow a heart-healthy approach, the recipe’s minimal processed sugars and wholesome fats align perfectly with your goals. Even better, the cookies pair wonderfully with a cup of herbal tea for a mindful snack moment.

Including treats like Tangy Lemon Lavender Cookies Delight in moderation helps maintain a sustainable healthy lifestyle. They’re ideal for portion-controlled indulgence, whether packed in lunchboxes or enjoyed post-workout. For more gluten-free baking inspiration, explore our gluten-free dessert recipes. If you’re curious about other stress-relieving foods, check out our guide to calming ingredients for baking. With smart choices, you can savor every bite while staying on track.

Print
clock clock iconcutlery cutlery iconflag flag iconfolder folder iconinstagram instagram iconpinterest pinterest iconfacebook facebook iconprint print iconsquares squares iconheart heart iconheart solid heart solid icon

Tangy Lemon Lavender Cookies Delight

  • Author: Chef Mia

Description

A delightful blend of tangy lemon and floral lavender in a soft, chewy cookie.


Ingredients

Scale

For the Crust:

  • 1 cup all-purpose flour
  • 1/2 cup granulated sugar
  • 1/4 cup unsalted butter, softened
  • 1 large egg
  • 1 tbsp lemon zest
  • 1 tbsp fresh lemon juice
  • 1 tsp dried culinary lavender
  • 1/2 tsp baking powder
  • 1/4 tsp salt

Instructions

1. Prepare the Crust:

  1. Preheat oven to 350°F (175°C) and line a baking sheet with parchment paper.
  2. In a bowl, cream together butter and sugar until light and fluffy.
  3. Beat in the egg, lemon zest, and lemon juice until well combined.
  4. In a separate bowl, whisk together flour, baking powder, salt, and lavender.
  5. Gradually mix the dry ingredients into the wet ingredients until a dough forms.
  6. Drop tablespoon-sized portions of dough onto the prepared baking sheet, spacing them 2 inches apart.
  7. Bake for 10-12 minutes or until edges are lightly golden.
  8. Let cookies cool on the baking sheet for 5 minutes before transferring to a wire rack.

Notes

You can customize the seasonings to taste.

How to Prepare This Dish

Steps and time-saving tips

Start by preheating your oven to 350°F and lining a baking sheet with parchment paper for easy cleanup. In a large bowl, whisk together the flour, baking powder, and a pinch of salt until well combined. Next, cream the softened butter and sugar in a separate bowl until light and fluffy, then mix in the egg and vanilla extract for richness. Gradually fold the dry ingredients into the wet mixture, but avoid overmixing to keep the Tangy Lemon Lavender Cookies Delight tender. Gently stir in the lemon zest and culinary lavender for that bright, floral flavor. Scoop tablespoon-sized portions of dough onto the baking sheet, spacing them about two inches apart. Bake for 10-12 minutes until the edges turn golden, then let them cool slightly before transferring to a wire rack. For an extra tangy finish, drizzle the cookies with a simple lemon glaze while they’re still warm. If you’re short on time, chill the dough for 15 minutes beforehand to prevent spreading and ensure thicker, chewier cookies.

and-learned-from">Mistakes I’ve made and learned from

When I first made Tangy Lemon Lavender Cookies Delight, I used too much lavender, and the floral notes overpowered the lemon. Now, I measure the lavender carefully—a little goes a long way! Another mishap? Skipping the parchment paper, which led to stubbornly stuck cookies. Trust me, it’s worth the extra step. If your dough feels too sticky, check out my cookie dough consistency guide for troubleshooting tips. And if you’re new to baking with lavender, my cooking with lavender post breaks down how to balance flavors like a pro. Learning these tricks saved my batches, and they’ll save yours too!

Cultural Connection and Variations

Where this recipe comes from

Tangy Lemon Lavender Cookies Delight traces its roots to the sunny hills of Provence, where lavender fields stretch for miles and citrus trees thrive. Locals there have long paired these two flavors in desserts, creating delicate treats that capture the essence of summer. Over time, bakers adapted the recipe, adding a tangy lemon glaze to balance lavender’s floral notes. Today, you’ll find variations from French patisseries to American farmhouse kitchens, each with its own twist.

In some regions, cooks

swap lavender for rosemary or thyme, offering an earthier take on Tangy Lemon Lavender Cookies Delight. Others fold in poppy seeds for crunch or drizzle honey instead of glaze. My grandmother, for instance, always added a pinch of cardamom, claiming it “woke up” the flavors. Meanwhile, modern vegan versions use aquafaba or coconut oil, proving this treat evolves with the times. Whether served at tea parties or packed in picnic baskets, these cookies carry a little piece of Provencal sunshine wherever they go.

How it fits in today’s cooking

Tangy Lemon Lavender Cookies Delight still shines in contemporary kitchens, especially during spring and summer when fresh herbs and citrus peak. Many home cooks now feature them at bridal showers or garden parties, pairing them with floral teas or sparkling lemonade. Others bake them year-round as a comforting pick-me-up, much like these Classic Vanilla Cupcakes that never go out of style.

Health-conscious bakers tweak the recipe too, using almond flour or reducing sugar without sacrificing flavor. Some even crumble the cookies over yogurt parfaits for a gourmet breakfast twist. And just as Easy Chocolate Chip Cookies became a staple, Tangy Lemon Lavender Cookies Delight earns its spot as a versatile, crowd-pleasing treat. Whether you stick to tradition or experiment, these cookies remind us that simple ingredients can create something extraordinary.

>Taste and Texture

What makes it delicious

Tangy Lemon Lavender Cookies Delight bursts with bright, zesty lemon and delicate floral notes that dance on your tongue. The cookies strike a perfect balance between crisp edges and a soft, chewy center, making each bite irresistibly satisfying. Fresh lemon zest adds a vibrant tang, while culinary lavender lends a subtle, fragrant sweetness that lingers pleasantly. Meanwhile, a buttery base ties everything together, creating a melt-in-your-mouth texture. Whether you savor them warm or at room temperature, Tangy Lemon Lavender Cookies Delight delivers a refreshing yet comforting treat that awakens the senses.

Boosting the flavor

For an extra flavor boost, try drizzling Tangy Lemon Lavender Cookies Delight with a light honey glaze to enhance the floral undertones. Alternatively, a sprinkle of finely chopped pistachios adds a nutty crunch that contrasts beautifully with the soft texture. If you love citrus, fold in a teaspoon of lemon extract for a more intense tang. Pair these cookies with a cup of Earl Grey tea to highlight the lavender’s aromatic depth. Small tweaks like these elevate the experience while keeping the recipe approachable and fun.

Tips for Success

Best practices for results

Always chill the dough for at least 30 minutes before baking to prevent spreading and ensure perfect texture in your Tangy Lemon Lavender Cookies Delight. Meanwhile, use fresh lemon zest for the brightest flavor, and measure lavender carefully—too much can overpower the cookies. For even baking, rotate the sheet halfway through, and let the cookies cool completely on the pan so they firm up properly. Finally, store them in an airtight container to keep them crisp and fragrant for days.

Mistakes to avoid

One common error is overmixing the dough, which makes the cookies tough instead of tender. Instead, mix just until the ingredients combine for the best texture in your Tangy Lemon Lavender Cookies Delight. Another mistake is skipping the parchment paper, which can lead to sticking or uneven browning. For more baking tips, check out our guide on perfect cookie texture. Also, avoid substituting dried lavender for culinary lavender—the flavor intensity differs. Learn more about baking with herbs to nail the balance every time.

Serving and Pairing Suggestions

How to serve this dish

Elevate your presentation by arranging Tangy Lemon Lavender Cookies Delight on a vintage cake stand or a rustic wooden board for a charming touch. Meanwhile, garnish each cookie with a sprinkle of edible lavender buds or a light dusting of powdered sugar to highlight their delicate flavor. These cookies shine at afternoon tea parties, bridal showers, or even as a sweet finale to a spring brunch. For a cozy vibe, serve them warm with a side of whipped cream or a dollop of lemon curd to amplify their tangy notes.

h-it">What goes well with it

Pair Tangy Lemon Lavender Cookies Delight with a floral Earl Grey tea to enhance their lavender undertones, creating a harmonious blend of flavors. Alternatively, try them alongside a glass of chilled Prosecco for a refreshing contrast that balances the cookies’ zest. If you’re hosting a dessert spread, consider adding our Honey Fig Ricotta Tart for a complementary mix of textures, or our Vanilla Bean Panna Cotta to round out the menu with creamy sophistication.

What makes Tangy Lemon Lavender Cookies Delight unique?

Tangy Lemon Lavender Cookies Delight stands out with its perfect balance of zesty lemon and floral lavender flavors. The cookies have a soft, chewy texture with a subtle tanginess, making them a refreshing twist on traditional lemon cookies. The lavender adds an elegant touch that elevates the treat.

ank-math-faq-item"> Can I use dried lavender instead of fresh in Tangy Lemon Lavender Cookies Delight?

Yes, dried lavender works perfectly for Tangy Lemon Lavender Cookies Delight. Use culinary-grade dried lavender and reduce the quantity by half compared to fresh, as the flavor is more concentrated. This ensures the floral notes don’t overpower the tangy lemon.

How do I store Tangy Lemon Lavender Cookies Delight to keep them fresh?

Store Tangy Lemon Lavender Cookies Delight in an airtight container at room temperature for up to 5 days. For longer freshness, freeze the cookies in a sealed bag for up to 3 months. The lavender aroma will remain vibrant if stored properly.

Can I make Tangy Lemon Lavender Cookies Delight gluten-free?

Absolutely! Substitute all-purpose flour with a 1:1 gluten-free baking blend for Tangy Lemon Lavender Cookies Delight. Ensure your blend contains xanthan gum for proper texture. The lemon and lavender flavors will shine just as brightly in the gluten-free version.

div>

Best Fluffernutter Rice Krispie Treats – Sweet & Salty Delight

best-fluffernutter-rice-krispie-treats

Introduction

Remember the joy of biting into a gooey, marshmallow-packed treat as a kid? Now imagine that nostalgia combined with the irresistible sweet and salty magic of peanut butter and marshmallow fluff. That’s exactly what you get with Fluffernutter Rice Krispie Treats – Irresistible Sweet & Salty Delight. Whether you’re craving a quick dessert, need a crowd-pleasing snack, or simply want to indulge in a childhood favorite with a twist, this recipe delivers. Best of all, it comes together in minutes with just a handful of ingredients, making it perfect for busy days or last-minute cravings.

Fluffernutter Rice Krispie Treats – Irresistible Sweet & Salty Delight takes the classic Rice Krispie treat to new heights by blending creamy peanut butter and marshmallow fluff into the mix. The result? A chewy, crispy, and delightfully sticky treat with layers of flavor that balance sweetness and saltiness perfectly. This recipe matters because it’s more than just a dessert—it’s a nostalgic experience with a modern twist. It fits our blog’s tone by offering easy, fun, and family-friendly recipes that anyone can master. Plus, it’s versatile enough for parties, lunchboxes, or a late-night snack. If you love no-bake desserts, you’ll also adore our Easy No-Bake Cookies or our Homemade Peanut Butter Cups for more sweet and salty inspiration.

Why I Love This Recipe

Fluffernutter Rice Krispie Treats – Irresistible Sweet & Salty Delight holds a special place in my heart because it reminds me of after-school snacks with my siblings. We’d slather peanut butter and marshmallow fluff on everything, but when we discovered this recipe, it became an instant favorite. The combination of textures and flavors feels like a hug in every bite. Even now, whipping up a batch brings back those carefree moments, and sharing them with my own kids keeps the tradition alive. It’s the kind of recipe that never gets old—simple, satisfying, and packed with love.

Health and Nutrition

Why it’s good for your body

Fluffernutter Rice Krispie Treats – Irresistible Sweet & Salty Delight pack more nutritional benefits than you might expect. First, peanut butter delivers plant-based protein and healthy fats, which help keep you full and energized. Meanwhile, marshmallow fluff adds a light sweetness without the heaviness of butter or oil. Together, these ingredients create a satisfying treat that balances indulgence with better-for-you qualities.

Additionally, Rice Krispies provide whole grain goodness, offering a small boost of fiber. While Fluffernutter Rice Krispie Treats – Irresistible Sweet & Salty Delight are undeniably a dessert, they avoid excessive saturated fats found in many alternatives. Plus, the salty-sweet combo satisfies cravings faster, so you’re less likely to overindulge. For a fun snack, they’re surprisingly light on guilt.

Finally, the recipe skips artificial additives common in store-bought treats. When you make Fluffernutter Rice Krispie Treats – Irresistible Sweet & Salty Delight at home, you control the ingredients. This means no hidden preservatives or unnecessary sugars. Whether as an occasional dessert or a lunchbox surprise, they’re a smarter choice than processed sweets.

How it fits in a healthy lifestyle

Enjoying Fluffernutter Rice Krispie Treats – Irresistible Sweet & Salty Delight fits perfectly into a balanced diet when eaten mindfully. Pair a small square with protein-rich snacks like Greek yogurt or nuts to stabilize blood sugar. Since they’re naturally gluten-free, they’re a great option for those avoiding wheat. For more gluten-free ideas, explore our gluten-free desserts roundup.

Moderation is key, but these treats can even support active lifestyles. The carbs from Rice Krispies offer quick energy before a workout, while peanut butter provides sustained fuel. If you’re meal prepping, try pairing them with our healthy snack recipes for variety. Life’s about balance, and Fluffernutter Rice Krispie Treats – Irresistible Sweet & Salty Delight make that balance delicious.

Print
clock clock iconcutlery cutlery iconflag flag iconfolder folder iconinstagram instagram iconpinterest pinterest iconfacebook facebook iconprint print iconsquares squares iconheart heart iconheart solid heart solid icon

Fluffernutter Rice Krispie Treats – Irresistible Sweet & Salty Delight

  • Author: Chef Mia

Description

A delicious twist on classic Rice Krispie treats with the irresistible combination of peanut butter and marshmallow fluff.


Ingredients

Scale

For the Crust:

  • 3 tablespoons unsalted butter
  • 1 (10 oz) bag mini marshmallows
  • 1/2 cup creamy peanut butter
  • 1/2 cup marshmallow fluff
  • 6 cups Rice Krispies cereal
  • 1/4 teaspoon sea salt
  • 1/2 cup mini chocolate chips (optional)

Instructions

1. Prepare the Crust:

  1. Grease a 9×13-inch baking dish and set aside.
  2. In a large pot, melt the butter over low heat. Add the mini marshmallows and stir until completely melted.
  3. Remove from heat and stir in the peanut butter and marshmallow fluff until smooth.
  4. Fold in the Rice Krispies cereal and sea salt until evenly coated.
  5. Press the mixture firmly into the prepared baking dish. Sprinkle with mini chocolate chips if desired.
  6. Let cool completely before cutting into squares.

Notes

You can customize the seasonings to taste.

How to Prepare This Dish

Steps and time-saving tips

First, gather all your ingredients for Fluffernutter Rice Krispie Treats – Irresistible Sweet & Salty Delight so everything is within reach. Lightly grease a baking dish with butter or cooking spray to prevent sticking later. Melt the butter in a large pot over low heat, then stir in the marshmallows until they turn smooth and creamy. Remove the pot from heat immediately to avoid overcooking. Quickly fold in the peanut butter, ensuring it blends evenly for that rich, nutty flavor. Next, add the Rice Krispies cereal and gently mix until every piece is coated. Press the mixture firmly into the prepared dish using a spatula or your hands—just grease them lightly to avoid mess. For an extra layer of indulgence, drizzle melted chocolate over the top and sprinkle with a pinch of sea salt. Let the treats cool completely before cutting into squares. To speed up the process, pop them in the fridge for 20 minutes. Trust me, the wait is worth it for that perfect chewy texture.

Mistakes I’ve made and learned from

Early on, I rushed the marshmallow melting step and ended up with a grainy texture. Now, I melt them slowly over low heat while stirring constantly for a silky consistency. Another blunder? Skipping the peanut butter mix-in step too fast, which left uneven pockets of flavor. Take your time to fold it in thoroughly. If you’re new to no-bake desserts, my guide to no-bake desserts has handy tricks to avoid common pitfalls. Also, don’t skimp on the chilling time—I once cut the treats too soon, and they fell apart. For more foolproof tips, check out my Rice Krispie Treats troubleshooting post. Learning these lessons the hard way means you won’t have to!

rc="https://exorecipes.com/wp-content/uploads/2025/07/best-fluffernutter-rice-krispie-treats-recipe.webp" />

Cultural Connection and Variations

Where this recipe comes from

Fluffernutter Rice Krispie Treats – Irresistible Sweet & Salty Delight might sound like a modern twist, but its roots dig deep into American comfort food traditions. The classic Fluffernutter sandwich, a staple in New England since the early 1900s, inspired this playful upgrade. Marshmallow fluff and peanut butter, the dynamic duo of childhood lunches, found a crunchy new home in Rice Krispie treats. Meanwhile, families across the South often add a sprinkle of sea salt or a drizzle of caramel, turning it into a sweet-and-salty masterpiece.

Around the world, similar treats take on local flavors. In Japan, for example, cooks might swap peanut butter for red bean paste, while in Australia, Vegemite adds a bold twist. Even within the U.S., regional variations pop up. Some Midwest bakers mix in mini chocolate chips, and on the West Coast, almond butter often stands in for peanut butter. No matter where you go, Fluffernutter Rice Krispie Treats – Irresistible Sweet & Salty Delight adapts while keeping its nostalgic charm.

ays-cooking">How it fits in today’s cooking

Today, this treat bridges generations. Busy parents love it for after-school snacks, while food bloggers reinvent it with gourmet touches like dark chocolate or Himalayan salt. It’s also a star at bake sales and holiday gatherings, especially when paired with festive sprinkles or shaped into seasonal themes. For a healthier spin, some opt for brown rice cereal or natural nut butter, proving how versatile the recipe remains.

Modern cooks also weave it into meal prep routines, pairing it with easy breakfast ideas for a sweet start to the day. Others serve it as a playful dessert alongside classic comfort foods, blending nostalgia with creativity. Whether you stick to the original or experiment with new twists, Fluffernutter Rice Krispie Treats – Irresistible Sweet & Salty Delight keeps winning hearts—one sticky bite at a time.

Taste and Texture

What makes it delicious

Fluffernutter Rice Krispie Treats – Irresistible Sweet & Salty Delight delivers a mouthwatering balance of flavors and textures that make every bite unforgettable. The creamy peanut butter melts into the marshmallow fluff, creating a rich, velvety sweetness with a subtle nutty depth. Meanwhile, the crispy Rice Krispies add a satisfying crunch that contrasts perfectly with the chewy, gooey center. A hint of salt enhances the overall profile, making each bite a harmonious blend of sweet and savory. The aroma alone—warm vanilla from the marshmallows and toasted peanuts—will have you reaching for seconds before you finish your first piece. Fluffernutter Rice Krispie Treats – Irresistible Sweet & Salty Delight is pure comfort in every square, with a texture that’s soft yet substantial, and a flavor that lingers delightfully.

r">Boosting the flavor

For an extra flavor kick, try drizzling melted dark chocolate over the top—it adds a bittersweet contrast that elevates the peanut butter and marshmallow duo. Alternatively, sprinkle crushed pretzels on top before the treats set for an added salty crunch. If you love bold flavors, swap the regular peanut butter for a honey-roasted variety to introduce a caramelized sweetness. For a fun twist, serve them warm with a scoop of salted caramel ice cream, letting the cold creaminess melt into the chewy bars. Small tweaks can transform these treats into an even more irresistible dessert.

Tips for Success

Best practices for results

Always use fresh marshmallows for the best texture in your Fluffernutter Rice Krispie Treats – Irresistible Sweet & Salty Delight. Additionally, lightly grease your hands with butter before pressing the mixture into the pan to prevent sticking. For even layers, spread the peanut butter while the marshmallow base is still warm so it melts slightly. Finally, chill the treats for at least 30 minutes before cutting to ensure clean, neat squares.

>Mistakes to avoid

Avoid overheating the marshmallows, as this can make your Fluffernutter Rice Krispie Treats – Irresistible Sweet & Salty Delight too hard. Instead, melt them slowly over low heat while stirring constantly. Another common mistake is skipping the parchment paper lining, which can cause the treats to stick and break. For more troubleshooting tips, check out our guide on fixing sticky Rice Krispie treats. Also, if your peanut butter layer feels too thick, try warming it slightly or using our perfect peanut butter swirl technique for even distribution.

Serving and Pairing Suggestions

How to serve this dish

Fluffernutter Rice Krispie Treats – Irresistible Sweet & Salty Delight shine when you serve them with flair. For a fun twist, cut them into bite-sized squares and stack them on a tiered dessert stand. Alternatively, drizzle melted chocolate over the top and sprinkle crushed peanuts for extra texture. These treats make a perfect addition to holiday parties, especially when arranged on a festive platter with seasonal sprinkles. Meanwhile, for casual gatherings, serve them alongside other finger foods so guests can enjoy the sweet and salty contrast. No matter the occasion, these treats always steal the show.

What goes well with it

Pair Fluffernutter Rice Krispie Treats – Irresistible Sweet & Salty Delight with a cold glass of milk for a classic combo that balances the richness. If you prefer something bolder, try a creamy salted caramel milkshake to enhance the salty notes. For a lighter option, serve them with fresh berries or a scoop of vanilla ice cream. If you love variety, these treats also pair wonderfully with our chocolate peanut butter cups, creating a dreamy dessert spread. Each pairing brings out the best in these irresistible treats.

rc="https://s3-placid.s3.eu-central-1.amazonaws.com/production/rest-images/rawp1noeia0hh/int-43f9169511c242a1f77ec4c63277fadc-9vwp42s2.jpg" />

What makes Fluffernutter Rice Krispie Treats different from regular ones?

Fluffernutter Rice Krispie Treats – Irresistible Sweet & Salty Delight combines the classic crunch of Rice Krispies with creamy peanut butter and marshmallow fluff for a richer, more indulgent flavor. The addition of salty peanut butter balances the sweetness, creating a perfect contrast that regular treats lack.

Can I use homemade marshmallow fluff for Fluffernutter Rice Krispie Treats?

Yes! Homemade marshmallow fluff works great for Fluffernutter Rice Krispie Treats – Irresistible Sweet & Salty Delight, but ensure it has a similar consistency to store-bought fluff. If it’s too thick, gently warm it to make mixing easier.

ank-math-faq-item"> How do I store Fluffernutter Rice Krispie Treats to keep them fresh?

Store Fluffernutter Rice Krispie Treats – Irresistible Sweet & Salty Delight in an airtight container at room temperature for up to 3 days. For longer freshness, refrigerate them, but let them sit at room temperature before serving for the best texture.

Can I add chocolate to Fluffernutter Rice Krispie Treats?

Absolutely! Drizzling melted chocolate or adding chocolate chips enhances Fluffernutter Rice Krispie Treats – Irresistible Sweet & Salty Delight. The chocolate pairs perfectly with the peanut butter and marshmallow flavors for an extra decadent twist.