“`html
Table of Contents
- Why Porcupine Meatballs?
- The Heartwarming Ingredients
- Timing is Everything
- Crafting Your Porcupine Meatball Masterpiece
- Nutritional Snapshot
- Healthier Twists on a Classic
- Serving Suggestions
- Avoiding Common Kitchen Calamities
- Storing Your Savory Successes
- The Enduring Appeal of Porcupine Meatballs
- Frequently Asked Questions
Porcupine Meatballs: A Heartwarming Family Favorite
Why Porcupine Meatballs?
Are you searching for a comforting, nostalgic meal that brings the whole family to the table, evoking memories of shared laughter and delicious dinners? If so, you’re not alone! Many home cooks are on the hunt for recipes that not only taste incredible but also carry a sense of tradition. Porcupine Meatballs, with their unique texture and rich, savory sauce, fit the bill perfectly. This delightful dish, often found gracing dinner tables in Midwestern homes, gets its name not from any actual porcupines, but from the way the rice grains poke out of the meatballs, resembling quills. It’s a simple yet ingenious way to make a ground meat dish more tender and absorbent.
The Heartwarming Ingredients
The magic of porcupine meatballs lies in its humble yet flavorful ingredients. Each component plays its part in creating a symphony of taste and texture.
- Ground Meat: 1.5 lbs. A blend of 80/20 ground beef and pork offers the best flavor and moisture. For a leaner option, use all ground beef, but consider adding a touch more liquid to prevent dryness.
- Rice: 1 cup uncooked white rice, such as long-grain or basmati. The rice typically cooks within the meatball, absorbing juices and creating that signature “porcupine” texture. Substitution: You can use par-boiled rice, but it may not absorb as much liquid, affecting the texture. For a gluten-free option, try finely diced vegetables like zucchini or carrots, though this will alter the classic porcupine effect.
- Onion: 1 medium onion, finely chopped. This adds a sweet, pungent base note. Ensure it’s chopped finely so it integrates seamlessly.
- Egg: 1 large egg, lightly beaten. This acts as a binder to hold our flavorful mixture together.
- Seasonings:
- 1 teaspoon salt
- 1/2 teaspoon black pepper
- 1/2 teaspoon garlic powder (or 1 clove fresh garlic, minced)
- 1/4 teaspoon Worcestershire sauce (optional, for added umami)
Sensory Description: The aroma of fresh onion, the pungent kick of pepper, and the subtle complexity of garlic powder all mingle, promising a robust flavor profile even before cooking.
For the Sauce:
- 1 (15 ounce) can tomato sauce
- 1 cup beef broth (or water)
- 1 tablespoon brown sugar (optional, to balance acidity)
- 1/2 teaspoon onion powder
- Pinch of salt and pepper
Sensory Description: The tomato sauce provides a vibrant, tangy base, while the beef broth adds savory depth. A touch of brown sugar can round out the flavors, creating a luscious, comforting sauce that perfectly coats the meatballs.
Timing is Everything
Porcupine meatballs are relatively quick to prepare, making them ideal for busy weeknights. The real time investment is in the simmering, allowing the flavors to meld beautifully.
This is generally faster than many slow-cooked meatball recipes, offering a similar depth of flavor in a more manageable timeframe.

Crafting Your Porcupine Meatball Masterpiece
Step 1: Prep the Base
Start by rinsing your uncooked rice under cold water until the water runs clear. This removes excess starch and helps prevent the rice from clumping. In a large mixing bowl, combine the ground meat, rinsed rice, finely chopped onion, lightly beaten egg, salt, pepper, garlic powder, and Worcestershire sauce (if using). Gently mix everything together with your hands until just combined. Be careful not to overmix, as this can result in tough meatballs. Imagine you’re gently folding clouds – that’s the level of tenderness you’re aiming for!
Step 2: Form the Meatballs
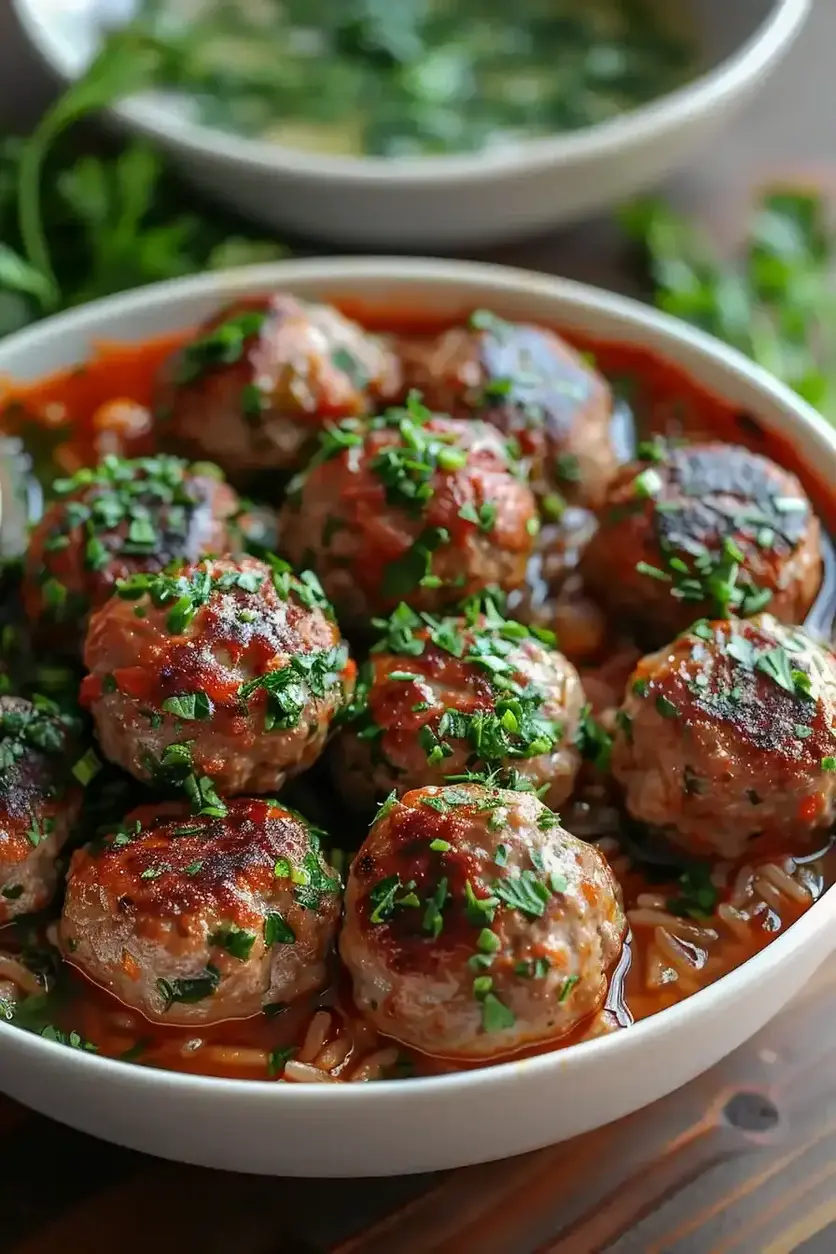
Lightly wet your hands to prevent sticking. Roll the meat mixture into slightly smaller than golf-ball-sized meatballs. They will expand slightly as they cook and the rice absorbs liquid. As you roll, you should start to see those tell-tale rice grains peeking out – the beginnings of their “porcupine” charm!
Step 3: Simmer to Perfection
In a large skillet or Dutch oven, whisk together the tomato sauce, beef broth (or water), brown sugar (if using), onion powder, salt, and pepper for the sauce. Bring the sauce to a gentle simmer over medium heat. Once simmering, carefully add the formed meatballs to the sauce, ensuring they are mostly submerged. Reduce the heat to low, cover the skillet, and let the meatballs simmer for 45-60 minutes, or until the meatballs are cooked through and the rice is tender and has expanded. Stir occasionally to prevent sticking and to ensure even cooking.
Nutritional Snapshot
While exact nutritional values can vary based on the specific ingredients and portion sizes used, a typical serving of porcupine meatballs (approximately 3-4 meatballs with sauce) provides:
- Calories: 250-350 kcal
- Protein: 18-25g
- Fat: 12-20g
- Carbohydrates: 15-25g (largely from rice)
These figures are estimates and can be adjusted by modifying the meat-to-rice ratio or fat content of the meat.
Healthier Twists on a Classic
Keeping the flavor while making it healthier is totally achievable! Here are a few swaps:
- Leaner Meat: Opt for 90% lean ground turkey or chicken, or 93% lean ground beef. You might want to add a splash more broth to the sauce to compensate for the reduced fat.
- Whole Grains: Substitute white rice with cooked brown rice (you’ll need to cook it beforehand and cool it) or quinoa for added fiber and nutrients. Ensure they are cooked *al dente* so they don’t turn mushy.
- More Veggies: Finely grate zucchini or carrots into the meat mixture for added moisture and vitamins. Sautéing the onions before adding them can also mellow their flavor and bring out their natural sweetness.
Serving Suggestions
Porcupine meatballs are incredibly versatile. They are traditionally served over mashed potatoes, soaking up that glorious sauce. Other fantastic pairings include:
- Egg noodles
- Rice (a simple white or brown rice pilaf)
- Spaghetti or other pasta
- With a side of crusty bread for dipping
- A simple green salad to balance the richness.
Avoiding Common Kitchen Calamities
Don’t let these little pitfalls trip you up on your porcupine meatball adventure:
- Tough Meatballs: Overmixing the meat is the primary culprit. Mix only until ingredients are just combined.
- Dry Meatballs: Ensure you use a meat blend with enough fat (like 80/20), or add a bit more liquid to your sauce if using very lean meat. Don’t overcook them after they’ve reached the appropriate internal temperature.
- Mushy Rice: Using uncooked rice is key. If you opt for pre-cooked grains for a healthier twist, ensure they are firm and not overcooked.
- Sauce Too Thin/Thick: Adjust the amount of beef broth or water to achieve your desired sauce consistency. For a thicker sauce, simmer uncovered for the last 10-15 minutes.
Storing Your Savory Successes
Leftover porcupine meatballs are a treasure! Store them in an airtight container in the refrigerator for up to 3-4 days. They often taste even better the next day as the flavors meld further.
To reheat, gently warm them on the stovetop over low heat or in the microwave. You may need to add a splash of water or broth to refresh the sauce.
The Enduring Appeal of Porcupine Meatballs
Porcupine meatballs are more than just a meal; they’re a hug in a bowl, a taste of comfort, and a dish that sparks joy and togetherness. Their unique texture and satisfying flavor make them a beloved classic for a reason. Whether you’re introducing them to a new generation or reliving cherished memories, this recipe is sure to become a staple in your culinary repertoire.
Did you try this Porcupine Meatball recipe? Share your experience in the comments below! We love hearing how you adapted it or what your family thought!
Frequently Asked Questions
What makes them “porcupine” meatballs?
The name comes from the uncooked rice grains that poke out of the meatballs as they cook, resembling the quills of a porcupine.
Can I make porcupine meatballs with different types of meat?
Absolutely! While a beef and pork blend is classic, you can use all ground beef, ground turkey, or even a vegetarian meat substitute. Just be mindful of fat content and adjust liquids accordingly for drier meats.
Do I need to pre-cook the rice?
No, the rice is added uncooked to the meat mixture. It cooks inside the meatball as it simmers in the sauce, absorbing juices and creating that characteristic texture.
Can I freeze porcupine meatballs?
Yes! You can freeze the uncooked meatballs before simmering, or freeze the cooked meatballs in their sauce. Ensure they are properly cooled and stored in airtight containers for best results. Thaw overnight in the refrigerator and reheat thoroughly.

Porcupine Meatballs: A Heartwarming Family Favorite
Description
Embrace the heartwarming simplicity and delightful taste of Porcupine Meatballs. This traditional dish combines tender meatballs with hidden grains of rice that pop out just enough to resemble tiny quills, creating a visually appealing and deliciously satisfying meal. Perfect for family dinners, these meatballs are sure to comfort and please everyone around the table.
Ingredients
- 1pound ground beef (85% lean)
- 1/2 cupuncooked long grain white rice
- 1/2 cupwater
- 1/3 cupchopped onion
- 1 teaspoonsalt
- 1/4 teaspoongarlic powder
- 1/4 teaspoonblack pepper
- 1large egg
- 1 tablespoonWorcestershire sauce
- 1can (15 ounces) tomato sauce
- 1can (28 ounces) diced tomatoes, undrained
Instructions
- Preheat yourovento 350°F (175°C).
- In a large bowl, combine the ground beef, rice, water, onion, salt, garlic powder, pepper, egg, and Worcestershire sauce. Mix thoroughly.
- Shape the mixture into golf ball-sized meatballs and place them in a baking dish.
- In a separate bowl, mix the tomato sauce and diced tomatoes. Pour this sauce over the meatballs in the dish.
- Cover the dish with aluminum foil and bake for 45 minutes. Remove the foil and continue baking for another 15 minutes, or until the meatballs are cooked through and the rice is tender.
Notes
Ensure the rice is fully cooked by testing a meatball before serving. If the rice feels crunchy, bake for an additional 10-15 minutes.
For a gluten-free version, substitute regular Worcestershire sauce with a gluten-free alternative.
Nutrition
- Calories: Approx. 350
- Sugar: 5g
- Fat: 15g
- Carbohydrates: 30g
- Protein: 20g
“`