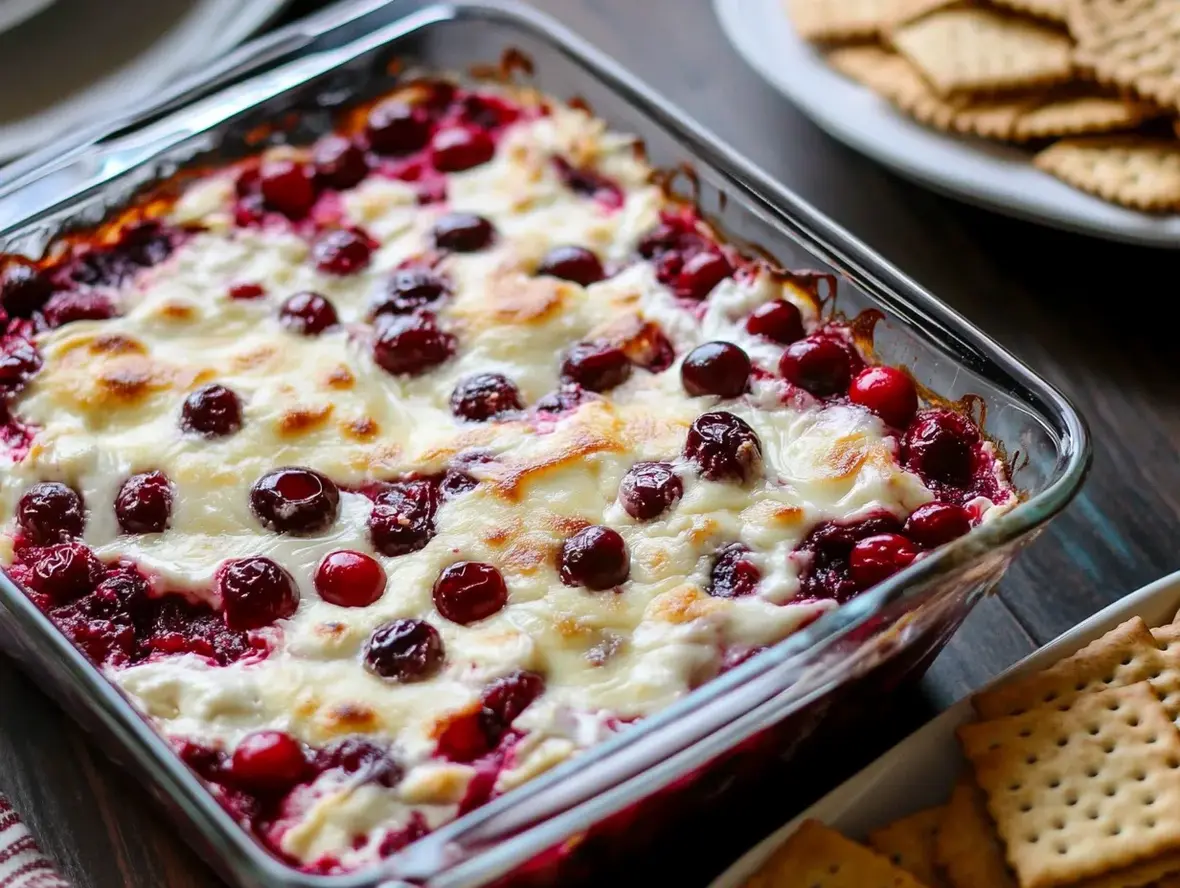
Cranberry Cream Cheese Dip: The Perfect Holiday Appetizer
Is Your Holiday Appetizer Spread Ready for a Showstopper?
As the holiday season approaches, many of us start planning our festive menus. We brainstorm appetizers that are not only delicious but also easy to prepare, allowing us to spend more time with loved ones and less time in the kitchen. But have you ever wondered how to create a truly memorable starter that consistently delights guests? Enter the Cranberry Cream Cheese Dip – a dish that perfectly balances sweet, tart, and creamy, making it an instant favorite. This recipe is designed to be incredibly simple, yet the result is a sophisticated and crowd-pleasing appetizer that will undoubtedly be the star of your holiday gathering. Get ready to impress with this easy-to-make, tangy, and sweet dip that’s a true holiday hero.
Ingredients: A Symphony of Flavor
The magic of this Cranberry Cream Cheese Dip lies in its simple yet impactful ingredients. We aim for a perfect balance of textures and tastes, ensuring every bite is a delight.
Cream Cheese: 16 ounces (two standard blocks), softened. This forms the rich, creamy base of our dip. Ensure it’s at room temperature for a smooth, lump-free consistency.
Cranberry Sauce: 1 cup. You can use homemade or your favorite store-bought canned cranberry sauce. The tartness and sweetness of the cranberries are crucial.
*Substitution:* If you prefer less sweetness, use a whole-berry sauce or a slightly tart cranberry relish. For a more decadent flavor, consider a cranberry-orange sauce.
Powdered Sugar: ¼ cup. This adds a touch of sweetness and helps achieve a silky smooth texture.
*Substitution:* You can adjust this amount to your preferred sweetness level. For a less refined sugar option, you could try maple syrup, but start with 2 tablespoons and adjust.
Orange Zest: 1 teaspoon. The bright, citrusy notes of orange beautifully complement the tart cranberries and creamy cheese.
*Substitution:* A splash of orange extract (about ¼ teaspoon) can be used if fresh zest isn’t available, but zest provides a more vibrant flavor.
Pecans: ½ cup, chopped. These add a delightful crunch and nutty flavor. Toasting them lightly first enhances their aroma and taste.
*Substitution:* Walnuts or even toasted almonds would also work wonderfully. For a nut-free option, consider toasted pepitas (pumpkin seeds).
Optional Garnish: A sprinkle of fresh rosemary or a few extra fresh cranberries.
Timing: Effortless Elegance
This recipe is designed for maximum impact with minimal time investment. It’s perfect for those last-minute party preparations or when you want a delicious appetizer without the fuss.
Prep Time: 15 minutes
Cook Time: 0 minutes
Total Time: 15 minutes (+ chilling time)
Compare to average holiday appetizer recipes which often require 30-60 minutes of prep and cooking. This dip offers significant time savings.
Step-by-Step Instructions
Crafting this delightful dip is as easy as mixing a few key ingredients. Follow these simple steps for a creamy, dreamy appetizer:
Step 1: Prepare the Cranberry Sauce
If you’re using store-bought canned cranberry sauce, give it a quick stir in its can or a small bowl to break up any large gelatinous pieces and ensure a smoother texture in the dip. If you’re making your own, ensure it has cooled completely.
Step 2: Soften the Cream Cheese
This is a crucial step for a smooth dip! Leave your cream cheese blocks on the counter for at least 30-60 minutes to soften to room temperature. Alternatively, you can microwave them on low power in 15-second intervals, checking for softness, but be careful not to melt them. Softened cream cheese allows for a thoroughly blended, creamy mixture without lumps.
Step 3: Combine and Mix
In a medium mixing bowl, add the softened cream cheese. Add the powdered sugar and orange zest. Using an electric mixer (handheld or stand mixer with paddle attachment) or a sturdy whisk, beat the cream cheese mixture until it’s creamy and well combined. Gradually add the cranberry sauce, mixing on low speed until just incorporated. You want some texture from the cranberries, so don’t overmix. If using chopped pecans for the mix, gently fold them in now.
Step 4: Chill and Serve
Transfer the dip to a serving dish. You can smooth the top or leave it a bit rustic. Garnish with the chopped pecans (if not mixed in) and any optional garnishes like fresh rosemary sprigs or a few whole fresh cranberries. Cover the dish with plastic wrap and refrigerate for at least 1 hour. This chilling time allows the flavors to meld beautifully and the dip to firm up slightly, making it easier to scoop.
Nutritional Information (Approximate per Serving, assuming 10 servings)
Calories: ~250-300 kcal
Fat: ~20-25g
Saturated Fat: ~12-15g
Cholesterol: ~60-75mg
Sodium: ~150-200mg
Carbohydrates: ~15-20g
Sugar: ~12-17g
Protein: ~3-5g
Note: Nutritional values can vary significantly based on the specific brands of ingredients used, especially cranberry sauce and the amount of added sugar.
Healthier Alternatives & Flavor Swaps
While this dip is a treat, we can make adjustments to lighten it up slightly without sacrificing flavor:
Lighter Cream Cheese: Use a reduced-fat cream cheese for a lower fat content. The texture might be slightly less rich, but still delicious.
Greek Yogurt Boost: Substitute ¼ to ½ cup of cream cheese with plain Greek yogurt. This adds protein and tanginess. Ensure it’s full-fat Greek yogurt for creaminess.
Natural Sweeteners: Reduce powdered sugar and sweeten with a touch of maple syrup or honey, though be mindful these add their own distinct flavors.
Lower Sugar Cranberry Sauce: Opt for a “sugar-free” or “light” cranberry sauce, or make your own with less added sweetener.
Seed Power: Replace some or all of the pecans with toasted pumpkin seeds (pepitas) or sunflower seeds for a different nutty crunch and added nutrients.
Serving Suggestions
This versatile dip is best served chilled. Offer a variety of dippers to complement its creamy, tangy profile:
Crackers: Water crackers, whole wheat crackers, or artisanal crackers are excellent choices.
Bread: Sliced baguette (toasted or fresh), gingerbread, or spiced bread slices.
Fruit: Apple slices, pear slices, or orange segments provide a refreshing counterpoint.
Vegetables: Celery sticks or endive spears add a crisp, clean bite.
Common Mistakes to Avoid
A few minor pitfalls can impact the perfection of your dip. Be aware of these:
Using Cold Cream Cheese: This is the number one culprit for a lumpy dip. Always ensure your cream cheese is fully softened at room temperature.
Overmixing the Cranberries: While you want the flavors to meld, overmixing can turn the dip into a uniform pink mass, losing the appealing visual contrast of the cranberries.
Not Chilling Long Enough: While you can technically serve it immediately, chilling allows the flavors to deepen and the texture to set, enhancing the overall experience.
Using a Strong-Flavored Cranberry Sauce: If using a sauce with added spices or other strong flavors, test it first to ensure it complements the cream cheese and orange zest.
Storing Tips
Proper storage ensures your delicious dip remains fresh and safe to consume.
Refrigeration: Store any leftover dip in an airtight container in the refrigerator for up to 3-4 days.
Freezing: While possible, freezing can alter the texture of cream cheese, making it slightly grainy upon thawing. If you must freeze, do so in an airtight container and allow it to thaw completely in the refrigerator before serving. You may need to re-whip it to restore some smoothness.
Make Ahead: This dip is ideal for making ahead. Prepare it up to 2 days in advance and keep it covered in the refrigerator until ready to serve.
Conclusion: Your Holiday Appetizer Triumph
The Cranberry Cream Cheese Dip is more than just a recipe; it’s your secret weapon for effortless holiday entertaining. With its delightful balance of sweet and tart, creamy and crunchy, it’s a guaranteed hit that requires minimal effort but yields maximum praise. Whether you’re hosting a large gathering or enjoying a cozy get-together, this dip brings festive cheer to any occasion. So, embrace the simplicity, enjoy the delicious results, and make this Cranberry Cream Cheese Dip a recurring star in your holiday traditions. Happy dipping!
FAQs
***Can I make this dip ahead of time?***
Yes, absolutely! This dip is fantastic for making ahead. You can prepare it up to 2 days in advance and store it covered in the refrigerator. The flavors will actually meld and deepen even further!
***What kind of cranberry sauce should I use?***
You can use any kind of cranberry sauce you prefer – jellied or whole berry, homemade or store-bought. Whole berry sauce will provide more texture. If you’re sensitive to sugar, look for a reduced-sugar version or make your own.
***Can I make this dip spicy?***
You can add a pinch of cayenne pepper or a dash of hot sauce to the cream cheese mixture for a hint of heat, or finely chop a jalapeño and mix it in for a spicier kick. Be sure to start with a small amount and taste as you go.
***How long does it take for the flavors to really meld?***
While you can serve it after chilling for an hour, the flavors will be at their peak after at least 2-3 hours in the refrigerator. Overnight is even better if you can wait!
***Can I add other fruits or flavors?***
Certainly! A bit of orange juice (1-2 tablespoons) can be added for more citrus flavor. Some people also like to add a tablespoon of finely chopped fresh rosemary or even a touch of cinnamon or nutmeg for warmth.
This creamy, cheesy dip with bursts of tart cranberries is the perfect holiday appetizer! The combination of warm cream cheese, gooey mozzarella, and sweet-tart cranberry sauce makes it a crowd-pleaser. Serve with crackers, bread, or pita chips for dipping.
½ teaspoongarlic powder½ cupcanned whole berry cranberry sauce⅔ cupfresh cranberries
½ cupcanned whole berry cranberry sauce⅔ cupfresh cranberries
⅔ cupfresh cranberries
Instructions
1️⃣Preheat the oven: Set your oven to 375°F (190°C). Lightly grease an 8×8-inch baking dish.
2️⃣Prepare the cheese mixture: In a large mixing bowl, beat the cream cheese until smooth. Add 2 cups of shredded mozzarella cheese, rosemary, and garlic powder. Mix until all ingredients are well combined.3️⃣Add cranberries: Gently fold in the cranberry sauce and fresh cranberries to the cheese mixture. Be careful not to crush the fresh cranberries too much to maintain their texture.4️⃣Assemble the dip: Transfer the mixture into the prepared baking dish, spreading it evenly. Sprinkle the remaining 1 cup of mozzarella cheese over the top.5️⃣Bake: Place the dish in the oven and bake for 22-26 minutes, or until the edges are bubbling and the top starts to turn golden brown.6️⃣Serve: Remove from the oven and let it cool slightly. Serve the dip hot with your choice of crackers, sliced baguette, or pita chips.
3️⃣Add cranberries: Gently fold in the cranberry sauce and fresh cranberries to the cheese mixture. Be careful not to crush the fresh cranberries too much to maintain their texture.4️⃣Assemble the dip: Transfer the mixture into the prepared baking dish, spreading it evenly. Sprinkle the remaining 1 cup of mozzarella cheese over the top.5️⃣Bake: Place the dish in the oven and bake for 22-26 minutes, or until the edges are bubbling and the top starts to turn golden brown.6️⃣Serve: Remove from the oven and let it cool slightly. Serve the dip hot with your choice of crackers, sliced baguette, or pita chips.
4️⃣Assemble the dip: Transfer the mixture into the prepared baking dish, spreading it evenly. Sprinkle the remaining 1 cup of mozzarella cheese over the top.
5️⃣Bake: Place the dish in the oven and bake for 22-26 minutes, or until the edges are bubbling and the top starts to turn golden brown.6️⃣Serve: Remove from the oven and let it cool slightly. Serve the dip hot with your choice of crackers, sliced baguette, or pita chips.
6️⃣Serve: Remove from the oven and let it cool slightly. Serve the dip hot with your choice of crackers, sliced baguette, or pita chips.
Notes
Make it festive: Garnish with a few extra fresh cranberries and a sprinkle of rosemary for a festive presentation.Cheese swap: Substitute mozzarella with sharp cheddar or Monterey Jack for a different flavor profile.Leftovers: Store any leftover dip in an airtight container in the refrigerator for up to 3 days. Reheat in the oven or microwave before serving.
Cheese swap: Substitute mozzarella with sharp cheddar or Monterey Jack for a different flavor profile.Leftovers: Store any leftover dip in an airtight container in the refrigerator for up to 3 days. Reheat in the oven or microwave before serving.
Leftovers: Store any leftover dip in an airtight container in the refrigerator for up to 3 days. Reheat in the oven or microwave before serving.
Are you searching for a dessert that’s as visually stunning as it is delicious, something that will have your guests raving and reaching for seconds? Look no further than these irresistible Mini Cheesecakes with Maraschino Cherry Magic! In a world where dessert trends come and go, the classic cheesecake remains a timeless favorite. But who has the time or space for a full-sized cheesecake, especially for parties and gatherings? That’s where these delightful mini bites come in. With a rich, crunchy Oreo base, a luxuriously creamy filling, and a vibrant, jewel-toned maraschino cherry topping, these mini cheesecakes offer all the indulgence of their larger counterparts in perfectly portioned packages. They’re incredibly easy to make, require no special equipment beyond a muffin tin, and are sure to be the star of any occasion, from casual get-togethers to elegant celebrations. Get ready to impress with a dessert that’s truly magical!
Gathering Your Ingredients for Magnificent Bites
The beauty of these mini cheesecakes lies in their simplicity and the way readily available ingredients transform into something extraordinary. We’ve also included some thoughts on substitutions to cater to your needs and preferences.
For the Oreo Crust:
2 cups crushed Oreos (about 24 cookies): The quintessential chocolate cookie that provides a deeply flavorful and sturdy base. You can use chocolate sandwich cookies without the cream filling for a slightly less sweet crust, or even other chocolate cookies like chocolate wafers.
6 tablespoons unsalted butter, melted: This binds the cookie crumbs together, creating a firm yet tender crust. If you prefer, you can use salted butter, but you might want to reduce any added salt in the filling if your recipe calls for it (this one doesn’t!). For a dairy-free option, use melted coconut oil or vegan butter.
For the Creamy Cheesecake Filling:
3 packages (8 ounces each) cream cheese, softened: The foundation of our cheesecake! Ensure it’s truly softened to room temperature (about 1-2 hours) to avoid lumps. Full-fat cream cheese yields the richest texture. For a lighter version, you can experiment with reduced-fat cream cheese, but the texture might be slightly less dense.
1 cup granulated sugar: Sweetens the filling to a delightful balance. Brown sugar can be used for a slight caramel note, but might alter the color.
3 large eggs: These bind the filling together and give it that characteristic creamy, slightly custardy texture. Room temperature eggs incorporate more smoothly.
1 teaspoon vanilla extract: Enhances the overall flavor profile with its warm, aromatic essence. A good quality pure vanilla extract makes a noticeable difference.
1/4 cup sour cream (full-fat recommended): Adds a subtle tang and extra creaminess, preventing the filling from being too sweet or dense. Greek yogurt can be a good substitute for a similar tang, but might result in a slightly firmer texture.
For the Maraschino Cherry Topping:
1 cup maraschino cherries, drained and halved: These sweet, bright cherries are the crowning glory, adding a burst of color and fruity flavor. Reserve some of their syrup if you’d like to drizzle a bit over the finished cheesecakes.
Optional: A splash of maraschino cherry syrup or a dollop of whipped cream for garnish.
Timing is Everything: From Prep to Perfection
Prep time:
20 minutes
Cook time:
20-25 minutes
Total time:
45 minutes (+ chilling time)
Yields:
24 mini cheesecakes
Compared to traditional cheesecakes that can take over an hour to bake and require hours of chilling, these mini versions are significantly faster. The total active time is under an hour, making them an excellent choice for spontaneous entertaining or when you just need a quick sweet fix!
Step-by-Step Assembly of Deliciousness
Step 1: Preheat Your Oven and Prepare the Muffin Tin
Let’s get this party started! First things first, Preheat your oven to 350°F (175°C). Line a standard 12-cup muffin tin with paper liners. If you’re making more than 12 at a time, you’ll need to work in batches or use two muffin tins. This preparation ensures your mini cheesecakes won’t stick and makes for easy removal.
Step 2: Create the Crunchy Oreo Crust
In a medium bowl, combine the crushed Oreos and melted butter. Stir until the crumbs are evenly moistened, resembling wet sand. This mixture will be crumbly but should hold together when pressed. Make sure your butter is fully incorporated into the crumbs for the best texture.
Step 3: Form the Crust Bases
Spoon about 1 tablespoon of the Oreo crumb mixture into the bottom of each paper liner. Use the back of your spoon or a small tamper to firmly press the crumbs down, creating a compact and even base for your cheesecake. A firm base is key to a cheesecake that holds its shape.
Step 4: Prepare the Creamy Cheesecake Filling
In a large bowl, beat the softened cream cheese with an electric mixer (or by hand with a whisk if you’re feeling energetic!) until it’s completely smooth and free of lumps. This is crucial for a silky-smooth filling. Gradually add the granulated sugar and continue beating until well combined and fluffy. Then, beat in the eggs one at a time, mixing just until incorporated after each addition. Be careful not to overmix here, as too much air can lead to cracks. Stir in the vanilla extract and sour cream until just combined, giving you a luscious, pale yellow batter.
Step 5: Fill the Muffin Cups
Carefully spoon the cheesecake filling over the Oreo crusts in each muffin liner, filling them about two-thirds to three-quarters full. Avoid overfilling, as the cheesecakes will puff up slightly while baking. Evenly distribute the filling among all the prepared cups.
Step 6: Bake to Golden Perfection
Place the muffin tin in the preheated oven. Bake for 20-25 minutes, or until the edges of the cheesecakes are set and the centers are just slightly jiggly. They should not be liquidy, but a slight wobble indicates they’re perfectly cooked and will firm up as they cool. Overbaking can lead to dry cheesecakes.
Step 7: Cool Down and Chill Out
Once baked, remove the muffin tin from the oven and let the cheesecakes cool in the tin for about 10-15 minutes. Then, carefully remove the mini cheesecakes from the tin and place them on a wire rack to cool completely at room temperature. Once cooled, cover them loosely with plastic wrap and refrigerate for at least 2-3 hours, or preferably overnight, for optimal flavor and texture. Chilling is essential for the cheesecakes to set properly and develop their full flavor.
Step 8: The Maraschino Magic
Just before serving, top each chilled mini cheesecake with a drained, halved maraschino cherry. Add a tiny drizzle of reserved cherry syrup or a swirl of whipped cream if desired. This is the moment your mini masterpieces transform into showstoppers!
Nutritional Highlights of Your Mini Cheesecakes
While precise nutritional values can vary based on specific ingredients and portion sizes, here’s a general overview of what you can expect from these delightful mini cheesecakes. These are estimates per mini cheesecake, assuming 24 servings.
Calories: Approximately 180-220 kcal
Fat: Around 10-14g (majority from cream cheese and butter)
Saturated Fat: Approximately 6-8g
Carbohydrates: About 18-22g (from sugar and cookie crust)
Sugar: Roughly 12-16g
Protein: Approximately 3-4g
Cholesterol: Varies, but present due to dairy and eggs.
For detailed nutritional information, it’s recommended to use a recipe nutrition calculator with your specific ingredients.
Healthier Alternatives for Lighter Indulgence
Want to enjoy these delightful treats with fewer calories or a healthier profile? Here are a few flavor-preserving swaps:
Crust: Substitute whole wheat graham crackers or oat flour for Oreos. Reduce butter slightly by adding it in smaller increments or using a binding agent like applesauce if necessary (though butter provides the best texture).
Cream Cheese: Use a blend of reduced-fat cream cheese and plain Greek yogurt. Greek yogurt offers protein and a tangy flavor that complements cheesecake well.
Sugar: Replace a portion of the granulated sugar with a natural sweetener like stevia or erythritol. Adjust to taste, as these sweeteners can be potent.
Topping: Opt for fresh berries (strawberries, raspberries) instead of maraschino cherries for a natural sweetness and added nutrients.
Serving Sweet Suggestions
These mini cheesecakes are incredibly versatile! Serve them chilled as a perfect individual dessert after a meal. They’re also fantastic for:
Potlucks and parties
Holiday dessert tables
A sweet addition to a brunch spread
As a delightful afternoon treat with coffee or tea
For an extra touch of elegance, consider a small dollop of whipped cream, a sprinkle of cookie crumbs, or a tiny mint leaf alongside the cherry.
Common Mistakes to Avoid
Not Softening Cream Cheese Properly: Lumpy cream cheese is the enemy of a smooth cheesecake. Let it sit out until truly soft.
Overmixing the Filling: Incorporating too much air can cause cracks as the cheesecakes bake and cool. Mix ingredients just until combined.
Overbaking: Overbaked cheesecakes become dry and crumbly. Aim for set edges and a slightly wobbly center.
Not Chilling Enough: Cheesecake needs time to set. Don’t rush the chilling process, as it’s crucial for texture and flavor.
Skipping the Crust Press: A firmly pressed crust provides a stable base and prevents it from crumbling when eaten.
Storing Your Mini Masterpieces
Once cooled and chilled, store your mini cheesecakes in an airtight container in the refrigerator. They will keep well for up to 3-4 days. If you plan to freeze them, it’s best to do so before adding the cherry topping. Place them on a baking sheet until frozen, then transfer to a freezer-safe container or bag for up to 1 month. Thaw in the refrigerator overnight before decorating and serving.
Conclusion: Enjoy Every Bite!
There you have it – a delightful recipe for Mini Cheesecakes with Maraschino Cherry Magic that’s sure to impress. These individual treats are the perfect balance of crunchy, creamy, and sweet, making them an ideal dessert for any occasion. Easy to make, beautiful to behold, and utterly delicious, they embody the ultimate indulgence in a bite-sized package. So gather your ingredients, follow these simple steps, and get ready to experience dessert perfection. Happy baking, and even happier eating!
Frequently Asked Questions
Can I make the crust with something other than Oreos?
Absolutely! Chocolate wafers, graham crackers, or even gingersnap cookies can be crushed and used to create a delicious crust. Adjust the butter quantity slightly as needed for binding.
Do I need to use a muffin tin for this recipe?
A standard muffin tin is ideal for creating uniform mini cheesecakes. You can also use mini cheesecake pans, or even small ramekins if you prefer a slightly different presentation.
What if my cream cheese isn’t softening?
To speed up softening, you can cut the cream cheese into cubes and let them sit at room temperature. Avoid microwaving, as it can make the cream cheese oily and difficult to work with.
Can I make these cheesecakes dairy-free?
Yes, with substitutions! Use dairy-free cream cheese, vegan butter for the crust, and ensure your Oreos are dairy-free (many are, but check packaging). You might also consider a dairy-free sour cream alternative or coconut cream.
Why do my cheesecakes have cracks?
Cracks usually form due to overmixing, overbaking, or rapid temperature changes. Using room temperature ingredients, mixing gently, and cooling gradually can help prevent them. However, for mini cheesecakes, cracks are often less noticeable and don’t affect the taste!
Mini Cherry Cheesecakes are the ultimate bite-sized dessert, combining a buttery Oreo crust, creamy cheesecake filling, and tangy cherry pie topping. Perfect for parties, holidays, or any special occasion!
Ingredients
Scale
10Oreo cookies, crushed
2 tablespoonsmelted butter
8 ozcream cheese, softened
2 tablespoonsheavy whipping cream
1egg
1/4 cupsugar
2 teaspoonsvanilla extract
1 cupcherry pie filling
Instructions
Preheat yourovento 325°F (165°C).
Crush Oreo cookies into fine crumbs and mix with melted butter. Press 1 tablespoon of the mixture into each cavity of a mini cheesecake pan.
In a mixing bowl, beat cream cheese until smooth. Add heavy whipping cream, mixing until combined. Beat in the egg, then sugar, and finally vanilla extract. Mix until creamy.
Fill each crust about 3/4 full with cheesecake mixture.
Bake for 25 minutes, or until the centers are just set.
Allow to cool completely, then top with cherry pie filling. Chill for at least 1 hour before serving.
Notes
Ensure cream cheese and egg are at room temperature for a smooth filling.
Store covered in the refrigerator for up to 3 days or freeze (without topping) for up to 1 month.
Swap cherry pie filling with other toppings like blueberry or chocolate ganache for variety.
Nutrition
Calories:182
Sugar:9g
Fat:12g
Carbohydrates:18g
Protein:2g
“`
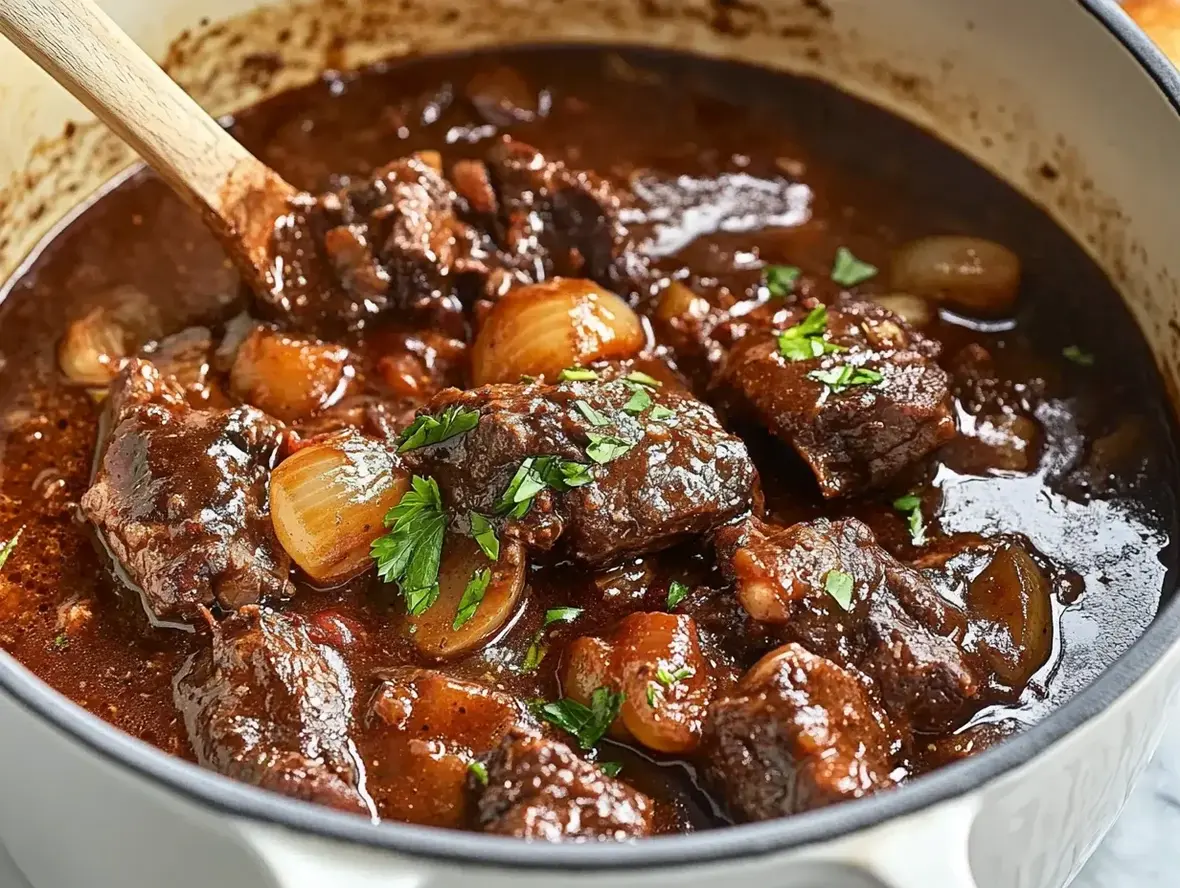
Ultimate Beef Bourguignon Recipe: A French Cooking Classic
Ultimate Beef Bourguignon Recipe: A French Cooking Classic
Are you ready to unlock the secrets to an incredibly rich, deeply flavored, and utterly comforting Beef Bourguignon? This French classic takes time, but the reward is a culinary masterpiece that will impress even the most discerning palates. Discover the ultimate guide to making the perfect Beef Bourguignon. This classic French recipe is a must-try for anyone looking to explore the art of French cooking.
Discover the Ultimate Beef Bourguignon
What if one dish could transport you straight to the heart of Burgundy, France, with every aromatic bite? That’s the magic of Beef Bourguignon. This iconic French stew, traditionally made with tender chunks of beef slow-cooked in red wine, is more than just a meal; it’s an experience. Rich, savory, and brimming with complex flavors, it’s a testament to the art of slow cooking and the power of simple, high-quality ingredients. While many recipes exist, mastering this classic requires understanding the nuances of searing, braising, and balancing flavors. This guide will walk you through each step, ensuring your Beef Bourguignon is nothing short of spectacular. We’ll delve into why certain ingredients are crucial, the best techniques for achieving that signature depth, and how to serve it like a true French chef. Get ready to embark on a culinary journey that culminates in a truly unforgettable dish.
Ingredients for a Classic Bourguignon
The Heart of the Dish
Beef Chuck Roast (2.5 – 3 lbs): Look for well-marbled cuts. The fat renders during slow cooking, making the beef unbelievably tender and flavorful. (Substitution: Beef brisket, though chuck is preferred for its marbling).
Rendered Bacon Fat or Pancetta (4-6 oz, diced): This is non-negotiable for authentic flavor. It provides a smoky, savory foundation and helps sear the beef. (Substitution: Olive oil or unsalted butter for sautéing, though the smoky depth will be less pronounced).
All-Purpose Flour (1/4 cup): Used to lightly coat the beef, assisting in browning and thickening the sauce.
Kosher Salt and Freshly Ground Black Pepper: Essential for seasoning. Season generously at each stage.
Building Flavor Layers
Carrots (2 medium, peeled and sliced): Adds a sweetness and subtle earthiness that complements the richness.
Onions (1 large, chopped): Provides a savory base and sweetness as it caramelizes.
Garlic (4-6 cloves, minced): The pungent aroma is a cornerstone of French cuisine.
Tomato Paste (2 tablespoons): Adds umami depth and a touch of acidity to balance the richness.
Dry Red Wine (1 bottle, 750ml): Crucial for the characteristic Bourguignon flavor. Burgundy Pinot Noir is traditional, but a good quality Côtes du Rhône, Merlot, or Cabernet Sauvignon works beautifully. (Avoid overly sweet wines.)
Beef Broth (2-3 cups): Adds liquid for braising and further deepens the beefy flavor.
Herbs:Bay Leaf (2), Fresh Thyme Sprigs (4-6), Fresh Parsley Stems (a small bunch): These aromatics infuse the stew with herbaceous notes. Tie them together with kitchen twine for easy removal.
The Grand Finale
Mushrooms (1 lb, cremini or button, quartered): Sautéed until golden brown, they add earthy, meaty texture.
Pearl Onions (1-2 cups, peeled): Small, sweet, and tender, they are a classic garnish. (Can be bought frozen and peeled).
Unsalted Butter (2 tablespoons): For sautéing the mushrooms and pearl onions.
Fresh Parsley (chopped, for garnish): Adds a pop of color and fresh flavor.
Timing Your Culinary Masterpiece
Prep time: 45 minutes
Cook time: 3 – 3.5 hours
Total time: 3.75 – 4.25 hours
Servings: 6-8
While the average Beef Bourguignon might hover around the 3-hour mark, this recipe, with its emphasis on thorough browning and slow braising for maximum tenderness, typically requires a little over 3 hours of active cooking time. The preparation is crucial, taking about 45 minutes, but much of the cooking is hands-off, allowing you to relax or tend to other tasks.
Step-by-Step Bourguignon Mastery
Step 1: Prepare the Beef for Perfection
Begin by cutting the beef chuck into generous 1.5 to 2-inch cubes. Pat the beef thoroughly dry with paper towels. This is a critical step, as moisture on the surface will steam the meat rather than sear it, preventing that desirable golden-brown crust. In a large bowl, toss the beef cubes with 1/4 cup of all-purpose flour, a generous pinch of salt, and black pepper until lightly coated. Shake off any excess flour.
Step 2: Sear for Deep Flavor
In a large, heavy-bottomed pot or Dutch oven, heat the rendered bacon fat (or about 2 tablespoons of olive oil) over medium-high heat until shimmering. Working in batches, add the beef cubes, ensuring not to overcrowd the pot. Sear each side until deeply browned and caramelized. This browning creates ‘fond’ – those delicious browned bits stuck to the bottom of the pot – which is essential for flavor. Remove the seared beef to a plate and set aside. Add more fat if needed between batches.
Step 3: Sauté the Aromatics
Reduce the heat to medium. Add the diced bacon (if using) to the pot and cook until crispy, then remove with a slotted spoon, leaving the rendered fat behind. If you started with just fat, add your sliced carrots and chopped onion to the pot. Sauté, stirring occasionally, until softened and beginning to caramelize, about 8-10 minutes. Add the minced garlic and tomato paste, stirring for another minute until fragrant. The tomato paste will deepen in color.
Step 4: Deglaze and Build the Sauce
Pour in the entire bottle of red wine. Use a wooden spoon to scrape up all the browned bits (fond) from the bottom of the pot. Let the wine simmer and reduce by about half, allowing some of the alcohol to evaporate and its flavors to concentrate. This usually takes about 10-15 minutes. Stir in the beef broth, the herb bundle (bay leaf, thyme, parsley stems), and the reserved seared beef along with any accumulated juices from the plate. Sprinkle in a bit more salt and pepper.
Step 5: Braise to Tenderness
Bring the liquid to a gentle simmer, then cover the pot tightly. Transfer the Dutch oven to a preheated oven at 325°F (160°C). Let it braise for 2.5 to 3 hours, or until the beef is fall-apart tender. Check periodically and give it a gentle stir to ensure even cooking. Towards the end of the braising time, you can remove the lid for the last 30 minutes if you want the sauce to thicken slightly more.
Step 6: Prepare the Garnishes
While the stew is braising, prepare the garnishes. In a separate skillet, melt 1 tablespoon of butter over medium-high heat. Add the quartered mushrooms and cook, stirring occasionally, until deeply browned and tender, about 8-10 minutes. Season with salt and pepper. Remove the mushrooms and set aside. In the same skillet, add the remaining 1 tablespoon of butter. Add the peeled pearl onions and sauté until lightly browned and tender, about 5-7 minutes. If using pre-cooked pearl onions, simply warm them through.
Step 7: Finish and Serve
Once the beef is tender, remove the pot from the oven. Discard the herb bundle. Skim off any excess fat from the surface of the stew. Stir in the sautéed mushrooms and pearl onions. Taste and adjust seasoning with salt and pepper if needed. For a richer, glossier sauce, you can make a ‘beurre manié’ by mashing 1 tablespoon of softened butter with 1 tablespoon of flour into a paste and whisking small amounts into the simmering stew until thickened. Serve hot, garnished with fresh chopped parsley.
Nutritional Snapshot
Calories: Approx. 550-700 per serving (depending on fat content and serving size)
Protein: High (from beef)
Fat: Moderate to High (from beef, bacon, and butter)
Carbohydrates: Moderate (from vegetables and flour)
Fiber: Moderate (from vegetables)
Note: Nutritional values are estimates and can vary based on specific ingredients and portion sizes.
Healthier Twists on Bourguignon
While richness is key, you can make some adjustments for a lighter version:
Leaner Beef Cuts: Opt for leaner cuts like sirloin, though they may not achieve the same fall-apart tenderness.
Reduced Bacon: Use less bacon, or omit it and sauté vegetables in olive oil. Add a pinch of smoked paprika for smoky notes.
Thickeners: Instead of flour coating and beurre manié, rely on slow reduction of the sauce or a cornstarch slurry (1 tbsp cornstarch mixed with 2 tbsp cold water) stirred into the simmering stew to thicken.
Vegetable Boost: Add more root vegetables like parsnips or celery for increased fiber and nutrients.
Serving Suggestions for a Royal Meal
Beef Bourguignon is a hearty dish that pairs wonderfully with:
Creamy mashed potatoes to soak up the incredible sauce.
Crusty baguette for dipping.
Butter noodles or egg noodles.
Simple green salad with a light vinaigrette to cut through the richness.
Steamed green beans or Brussels sprouts.
Avoiding Common Bourguignon Pitfalls
Not browning properly: This is where most flavor is developed. Be patient and work in batches.
Using poor quality wine: Choose a wine you’d enjoy drinking. If it tastes bad in the glass, it will taste bad in the stew.
Overcrowding the pot: This steams the meat instead of searing it.
Adding liquid too early: Let the aromatics and tomato paste cook down to concentrate their flavors.
Rushing the braise: Beef Bourguignon is a labor of love; slow and low is the key to tenderness.
Storing Your Delicious Bourguignon
Beef Bourguignon often tastes even better the next day as the flavors meld. Allow the stew to cool completely before storing it in an airtight container in the refrigerator for up to 3-4 days. To reheat, gently warm it on the stovetop over low heat, stirring occasionally, or in a low oven.
Embrace the Art of French Cooking
Making Beef Bourguignon is a rewarding culinary endeavor that celebrates the depth and complexity achievable through patient, classic French cooking techniques. Each element, from the initial searing of the beef to the final addition of earthy mushrooms and sweet pearl onions, plays a vital role in crafting this iconic dish. Don’t be intimidated by the cooking time; the hands-off braising period allows you to savor the process. The result is a deeply satisfying, soul-warming meal perfect for special occasions or a cozy weekend dinner. So, gather your ingredients, put on some good music, and immerse yourself in the art of French cuisine. You’re on your way to creating a dish that will be a beloved family tradition for years to come! Ready to impress your guests with a taste of France? Try this ultimate Beef Bourguignon recipe today and let the flavors speak for themselves!
Frequently Asked Questions
***What kind of red wine is best for Beef Bourguignon?***
Traditionally, a Burgundy wine like Pinot Noir is used. However, other medium-bodied, dry red wines such as Côtes du Rhône, Beaujolais, Merlot, or even a Cabernet Sauvignon can work well. The key is to use a wine that has good flavor but isn’t overly tannic or sweet.
***Can I make Beef Bourguignon ahead of time?***
Absolutely! Beef Bourguignon is an excellent make-ahead dish. Its flavors deepen and meld beautifully overnight. Let it cool completely, refrigerate, and then reheat gently on the stovetop or in the oven.
***Why is my Beef Bourguignon not tender?***
Tenderness comes from slow, low braising. Ensure your oven temperature is correct (325°F/160°C) and that the beef is cooked for at least 2.5-3 hours, or until you can easily pierce it with a fork. Using a tougher cut like chuck roast is also key, as the connective tissues break down over long cooking times.
***How do I thicken the sauce if it’s too thin?***
If the sauce isn’t as thick as you’d like, you can skim off some of the fat, strain the sauce into a saucepan, and reduce it by simmering uncovered until it reaches your desired consistency. Alternatively, you can use a beurre manié (a paste of equal parts softened butter and flour) or a cornstarch slurry stirred into the simmering sauce.
***Can I use beef broth instead of wine?***
While wine is essential for the signature flavor of Bourguignon, you can technically make a stew using only beef broth. However, you will miss the characteristic depth, acidity, and fruity notes that the wine provides. If you absolutely cannot use wine, use a little extra beef broth and perhaps a splash of red wine vinegar or balsamic vinegar to add complexity.
Beef Bourguignonis a classic French stew featuring tender beef, crispy turkey bacon, and hearty vegetables simmered in a rich red wine sauce. Perfect for a cozy meal, this dish pairs beautifully with egg noodles, mashed potatoes, or crusty bread.
Preheat your oven to 350°F (175°C) and arrange a rack in the lower third.2️⃣Prep Ingredients:Dice the onion, slice the carrot, and mince the garlic.Cut the turkey bacon into 1/2-inch pieces.Pat the beef dry with paper towels and season with 2 tsp kosher salt and 1/2 tsp black pepper.3️⃣Cook the Turkey Bacon:In a Dutch oven or large oven-safe pot, cook the turkey bacon over medium heat until crisp, about 10-12 minutes.Use a slotted spoon to transfer the turkey bacon to a plate, leaving the fat in the pot.4️⃣Brown the Beef:Add half of the beef to the pot in a single layer and sear on all sides, about 2-3 minutes per side.Transfer to the plate with the turkey bacon. Repeat with the remaining beef.5️⃣Sauté Vegetables:Add the onion and carrot to the pot and cook until softened, about 3 minutes. Add the garlic and cook until fragrant, about 30 seconds.Stir in the tomato paste and cook until darkened, about 1-2 minutes. Sprinkle with the flour, stir to coat, and cook for 1 minute to eliminate the raw taste.6️⃣Deglaze and Simmer:Pour in the red wine, scraping up any browned bits from the bottom of the pot. Add the beef broth, thyme, bay leaves, and 1/2 tsp kosher salt.Return the beef, turkey bacon, and any accumulated juices to the pot. Stir to combine and bring to a simmer over medium-high heat.7️⃣Bake:Cover the pot with a tight-fitting lid and transfer to the oven. Cook for about 2 hours, until the beef is fork-tender.8️⃣Cook Onions and Mushrooms:About 30 minutes before the beef is ready, melt the butter in a skillet over medium heat.Add the pearl onions, mushrooms, 1/2 tsp kosher salt, and 1/4 tsp black pepper. Cook, stirring occasionally, until tender and lightly browned, 12-15 minutes.9️⃣Finish the Stew:Remove the pot from the oven and discard the bay leaves and thyme stems.Stir in the cooked onions and mushrooms. Taste and adjust seasoning with more salt and pepper if needed.🔟Serve:Garnish with chopped parsley if desired. Serve hot over egg noodles, mashed potatoes, or alongside crusty bread.
2️⃣Prep Ingredients:Dice the onion, slice the carrot, and mince the garlic.Cut the turkey bacon into 1/2-inch pieces.Pat the beef dry with paper towels and season with 2 tsp kosher salt and 1/2 tsp black pepper.3️⃣Cook the Turkey Bacon:In a Dutch oven or large oven-safe pot, cook the turkey bacon over medium heat until crisp, about 10-12 minutes.Use a slotted spoon to transfer the turkey bacon to a plate, leaving the fat in the pot.4️⃣Brown the Beef:Add half of the beef to the pot in a single layer and sear on all sides, about 2-3 minutes per side.Transfer to the plate with the turkey bacon. Repeat with the remaining beef.5️⃣Sauté Vegetables:Add the onion and carrot to the pot and cook until softened, about 3 minutes. Add the garlic and cook until fragrant, about 30 seconds.Stir in the tomato paste and cook until darkened, about 1-2 minutes. Sprinkle with the flour, stir to coat, and cook for 1 minute to eliminate the raw taste.6️⃣Deglaze and Simmer:Pour in the red wine, scraping up any browned bits from the bottom of the pot. Add the beef broth, thyme, bay leaves, and 1/2 tsp kosher salt.Return the beef, turkey bacon, and any accumulated juices to the pot. Stir to combine and bring to a simmer over medium-high heat.7️⃣Bake:Cover the pot with a tight-fitting lid and transfer to the oven. Cook for about 2 hours, until the beef is fork-tender.8️⃣Cook Onions and Mushrooms:About 30 minutes before the beef is ready, melt the butter in a skillet over medium heat.Add the pearl onions, mushrooms, 1/2 tsp kosher salt, and 1/4 tsp black pepper. Cook, stirring occasionally, until tender and lightly browned, 12-15 minutes.9️⃣Finish the Stew:Remove the pot from the oven and discard the bay leaves and thyme stems.Stir in the cooked onions and mushrooms. Taste and adjust seasoning with more salt and pepper if needed.🔟Serve:Garnish with chopped parsley if desired. Serve hot over egg noodles, mashed potatoes, or alongside crusty bread.
Dice the onion, slice the carrot, and mince the garlic.
Cut the turkey bacon into 1/2-inch pieces.Pat the beef dry with paper towels and season with 2 tsp kosher salt and 1/2 tsp black pepper.3️⃣Cook the Turkey Bacon:In a Dutch oven or large oven-safe pot, cook the turkey bacon over medium heat until crisp, about 10-12 minutes.Use a slotted spoon to transfer the turkey bacon to a plate, leaving the fat in the pot.4️⃣Brown the Beef:Add half of the beef to the pot in a single layer and sear on all sides, about 2-3 minutes per side.Transfer to the plate with the turkey bacon. Repeat with the remaining beef.5️⃣Sauté Vegetables:Add the onion and carrot to the pot and cook until softened, about 3 minutes. Add the garlic and cook until fragrant, about 30 seconds.Stir in the tomato paste and cook until darkened, about 1-2 minutes. Sprinkle with the flour, stir to coat, and cook for 1 minute to eliminate the raw taste.6️⃣Deglaze and Simmer:Pour in the red wine, scraping up any browned bits from the bottom of the pot. Add the beef broth, thyme, bay leaves, and 1/2 tsp kosher salt.Return the beef, turkey bacon, and any accumulated juices to the pot. Stir to combine and bring to a simmer over medium-high heat.7️⃣Bake:Cover the pot with a tight-fitting lid and transfer to the oven. Cook for about 2 hours, until the beef is fork-tender.8️⃣Cook Onions and Mushrooms:About 30 minutes before the beef is ready, melt the butter in a skillet over medium heat.Add the pearl onions, mushrooms, 1/2 tsp kosher salt, and 1/4 tsp black pepper. Cook, stirring occasionally, until tender and lightly browned, 12-15 minutes.9️⃣Finish the Stew:Remove the pot from the oven and discard the bay leaves and thyme stems.Stir in the cooked onions and mushrooms. Taste and adjust seasoning with more salt and pepper if needed.🔟Serve:Garnish with chopped parsley if desired. Serve hot over egg noodles, mashed potatoes, or alongside crusty bread.
Pat the beef dry with paper towels and season with 2 tsp kosher salt and 1/2 tsp black pepper.3️⃣Cook the Turkey Bacon:In a Dutch oven or large oven-safe pot, cook the turkey bacon over medium heat until crisp, about 10-12 minutes.Use a slotted spoon to transfer the turkey bacon to a plate, leaving the fat in the pot.4️⃣Brown the Beef:Add half of the beef to the pot in a single layer and sear on all sides, about 2-3 minutes per side.Transfer to the plate with the turkey bacon. Repeat with the remaining beef.5️⃣Sauté Vegetables:Add the onion and carrot to the pot and cook until softened, about 3 minutes. Add the garlic and cook until fragrant, about 30 seconds.Stir in the tomato paste and cook until darkened, about 1-2 minutes. Sprinkle with the flour, stir to coat, and cook for 1 minute to eliminate the raw taste.6️⃣Deglaze and Simmer:Pour in the red wine, scraping up any browned bits from the bottom of the pot. Add the beef broth, thyme, bay leaves, and 1/2 tsp kosher salt.Return the beef, turkey bacon, and any accumulated juices to the pot. Stir to combine and bring to a simmer over medium-high heat.7️⃣Bake:Cover the pot with a tight-fitting lid and transfer to the oven. Cook for about 2 hours, until the beef is fork-tender.8️⃣Cook Onions and Mushrooms:About 30 minutes before the beef is ready, melt the butter in a skillet over medium heat.Add the pearl onions, mushrooms, 1/2 tsp kosher salt, and 1/4 tsp black pepper. Cook, stirring occasionally, until tender and lightly browned, 12-15 minutes.9️⃣Finish the Stew:Remove the pot from the oven and discard the bay leaves and thyme stems.Stir in the cooked onions and mushrooms. Taste and adjust seasoning with more salt and pepper if needed.🔟Serve:Garnish with chopped parsley if desired. Serve hot over egg noodles, mashed potatoes, or alongside crusty bread.
3️⃣Cook the Turkey Bacon:
In a Dutch oven or large oven-safe pot, cook the turkey bacon over medium heat until crisp, about 10-12 minutes.Use a slotted spoon to transfer the turkey bacon to a plate, leaving the fat in the pot.4️⃣Brown the Beef:Add half of the beef to the pot in a single layer and sear on all sides, about 2-3 minutes per side.Transfer to the plate with the turkey bacon. Repeat with the remaining beef.5️⃣Sauté Vegetables:Add the onion and carrot to the pot and cook until softened, about 3 minutes. Add the garlic and cook until fragrant, about 30 seconds.Stir in the tomato paste and cook until darkened, about 1-2 minutes. Sprinkle with the flour, stir to coat, and cook for 1 minute to eliminate the raw taste.6️⃣Deglaze and Simmer:Pour in the red wine, scraping up any browned bits from the bottom of the pot. Add the beef broth, thyme, bay leaves, and 1/2 tsp kosher salt.Return the beef, turkey bacon, and any accumulated juices to the pot. Stir to combine and bring to a simmer over medium-high heat.7️⃣Bake:Cover the pot with a tight-fitting lid and transfer to the oven. Cook for about 2 hours, until the beef is fork-tender.8️⃣Cook Onions and Mushrooms:About 30 minutes before the beef is ready, melt the butter in a skillet over medium heat.Add the pearl onions, mushrooms, 1/2 tsp kosher salt, and 1/4 tsp black pepper. Cook, stirring occasionally, until tender and lightly browned, 12-15 minutes.9️⃣Finish the Stew:Remove the pot from the oven and discard the bay leaves and thyme stems.Stir in the cooked onions and mushrooms. Taste and adjust seasoning with more salt and pepper if needed.🔟Serve:Garnish with chopped parsley if desired. Serve hot over egg noodles, mashed potatoes, or alongside crusty bread.
Use a slotted spoon to transfer the turkey bacon to a plate, leaving the fat in the pot.4️⃣Brown the Beef:Add half of the beef to the pot in a single layer and sear on all sides, about 2-3 minutes per side.Transfer to the plate with the turkey bacon. Repeat with the remaining beef.5️⃣Sauté Vegetables:Add the onion and carrot to the pot and cook until softened, about 3 minutes. Add the garlic and cook until fragrant, about 30 seconds.Stir in the tomato paste and cook until darkened, about 1-2 minutes. Sprinkle with the flour, stir to coat, and cook for 1 minute to eliminate the raw taste.6️⃣Deglaze and Simmer:Pour in the red wine, scraping up any browned bits from the bottom of the pot. Add the beef broth, thyme, bay leaves, and 1/2 tsp kosher salt.Return the beef, turkey bacon, and any accumulated juices to the pot. Stir to combine and bring to a simmer over medium-high heat.7️⃣Bake:Cover the pot with a tight-fitting lid and transfer to the oven. Cook for about 2 hours, until the beef is fork-tender.8️⃣Cook Onions and Mushrooms:About 30 minutes before the beef is ready, melt the butter in a skillet over medium heat.Add the pearl onions, mushrooms, 1/2 tsp kosher salt, and 1/4 tsp black pepper. Cook, stirring occasionally, until tender and lightly browned, 12-15 minutes.9️⃣Finish the Stew:Remove the pot from the oven and discard the bay leaves and thyme stems.Stir in the cooked onions and mushrooms. Taste and adjust seasoning with more salt and pepper if needed.🔟Serve:Garnish with chopped parsley if desired. Serve hot over egg noodles, mashed potatoes, or alongside crusty bread.
4️⃣Brown the Beef:
Add half of the beef to the pot in a single layer and sear on all sides, about 2-3 minutes per side.Transfer to the plate with the turkey bacon. Repeat with the remaining beef.5️⃣Sauté Vegetables:Add the onion and carrot to the pot and cook until softened, about 3 minutes. Add the garlic and cook until fragrant, about 30 seconds.Stir in the tomato paste and cook until darkened, about 1-2 minutes. Sprinkle with the flour, stir to coat, and cook for 1 minute to eliminate the raw taste.6️⃣Deglaze and Simmer:Pour in the red wine, scraping up any browned bits from the bottom of the pot. Add the beef broth, thyme, bay leaves, and 1/2 tsp kosher salt.Return the beef, turkey bacon, and any accumulated juices to the pot. Stir to combine and bring to a simmer over medium-high heat.7️⃣Bake:Cover the pot with a tight-fitting lid and transfer to the oven. Cook for about 2 hours, until the beef is fork-tender.8️⃣Cook Onions and Mushrooms:About 30 minutes before the beef is ready, melt the butter in a skillet over medium heat.Add the pearl onions, mushrooms, 1/2 tsp kosher salt, and 1/4 tsp black pepper. Cook, stirring occasionally, until tender and lightly browned, 12-15 minutes.9️⃣Finish the Stew:Remove the pot from the oven and discard the bay leaves and thyme stems.Stir in the cooked onions and mushrooms. Taste and adjust seasoning with more salt and pepper if needed.🔟Serve:Garnish with chopped parsley if desired. Serve hot over egg noodles, mashed potatoes, or alongside crusty bread.
Transfer to the plate with the turkey bacon. Repeat with the remaining beef.5️⃣Sauté Vegetables:Add the onion and carrot to the pot and cook until softened, about 3 minutes. Add the garlic and cook until fragrant, about 30 seconds.Stir in the tomato paste and cook until darkened, about 1-2 minutes. Sprinkle with the flour, stir to coat, and cook for 1 minute to eliminate the raw taste.6️⃣Deglaze and Simmer:Pour in the red wine, scraping up any browned bits from the bottom of the pot. Add the beef broth, thyme, bay leaves, and 1/2 tsp kosher salt.Return the beef, turkey bacon, and any accumulated juices to the pot. Stir to combine and bring to a simmer over medium-high heat.7️⃣Bake:Cover the pot with a tight-fitting lid and transfer to the oven. Cook for about 2 hours, until the beef is fork-tender.8️⃣Cook Onions and Mushrooms:About 30 minutes before the beef is ready, melt the butter in a skillet over medium heat.Add the pearl onions, mushrooms, 1/2 tsp kosher salt, and 1/4 tsp black pepper. Cook, stirring occasionally, until tender and lightly browned, 12-15 minutes.9️⃣Finish the Stew:Remove the pot from the oven and discard the bay leaves and thyme stems.Stir in the cooked onions and mushrooms. Taste and adjust seasoning with more salt and pepper if needed.🔟Serve:Garnish with chopped parsley if desired. Serve hot over egg noodles, mashed potatoes, or alongside crusty bread.
5️⃣Sauté Vegetables:
Add the onion and carrot to the pot and cook until softened, about 3 minutes. Add the garlic and cook until fragrant, about 30 seconds.Stir in the tomato paste and cook until darkened, about 1-2 minutes. Sprinkle with the flour, stir to coat, and cook for 1 minute to eliminate the raw taste.6️⃣Deglaze and Simmer:Pour in the red wine, scraping up any browned bits from the bottom of the pot. Add the beef broth, thyme, bay leaves, and 1/2 tsp kosher salt.Return the beef, turkey bacon, and any accumulated juices to the pot. Stir to combine and bring to a simmer over medium-high heat.7️⃣Bake:Cover the pot with a tight-fitting lid and transfer to the oven. Cook for about 2 hours, until the beef is fork-tender.8️⃣Cook Onions and Mushrooms:About 30 minutes before the beef is ready, melt the butter in a skillet over medium heat.Add the pearl onions, mushrooms, 1/2 tsp kosher salt, and 1/4 tsp black pepper. Cook, stirring occasionally, until tender and lightly browned, 12-15 minutes.9️⃣Finish the Stew:Remove the pot from the oven and discard the bay leaves and thyme stems.Stir in the cooked onions and mushrooms. Taste and adjust seasoning with more salt and pepper if needed.🔟Serve:Garnish with chopped parsley if desired. Serve hot over egg noodles, mashed potatoes, or alongside crusty bread.
Stir in the tomato paste and cook until darkened, about 1-2 minutes. Sprinkle with the flour, stir to coat, and cook for 1 minute to eliminate the raw taste.6️⃣Deglaze and Simmer:Pour in the red wine, scraping up any browned bits from the bottom of the pot. Add the beef broth, thyme, bay leaves, and 1/2 tsp kosher salt.Return the beef, turkey bacon, and any accumulated juices to the pot. Stir to combine and bring to a simmer over medium-high heat.7️⃣Bake:Cover the pot with a tight-fitting lid and transfer to the oven. Cook for about 2 hours, until the beef is fork-tender.8️⃣Cook Onions and Mushrooms:About 30 minutes before the beef is ready, melt the butter in a skillet over medium heat.Add the pearl onions, mushrooms, 1/2 tsp kosher salt, and 1/4 tsp black pepper. Cook, stirring occasionally, until tender and lightly browned, 12-15 minutes.9️⃣Finish the Stew:Remove the pot from the oven and discard the bay leaves and thyme stems.Stir in the cooked onions and mushrooms. Taste and adjust seasoning with more salt and pepper if needed.🔟Serve:Garnish with chopped parsley if desired. Serve hot over egg noodles, mashed potatoes, or alongside crusty bread.
6️⃣Deglaze and Simmer:
Pour in the red wine, scraping up any browned bits from the bottom of the pot. Add the beef broth, thyme, bay leaves, and 1/2 tsp kosher salt.Return the beef, turkey bacon, and any accumulated juices to the pot. Stir to combine and bring to a simmer over medium-high heat.7️⃣Bake:Cover the pot with a tight-fitting lid and transfer to the oven. Cook for about 2 hours, until the beef is fork-tender.8️⃣Cook Onions and Mushrooms:About 30 minutes before the beef is ready, melt the butter in a skillet over medium heat.Add the pearl onions, mushrooms, 1/2 tsp kosher salt, and 1/4 tsp black pepper. Cook, stirring occasionally, until tender and lightly browned, 12-15 minutes.9️⃣Finish the Stew:Remove the pot from the oven and discard the bay leaves and thyme stems.Stir in the cooked onions and mushrooms. Taste and adjust seasoning with more salt and pepper if needed.🔟Serve:Garnish with chopped parsley if desired. Serve hot over egg noodles, mashed potatoes, or alongside crusty bread.
Return the beef, turkey bacon, and any accumulated juices to the pot. Stir to combine and bring to a simmer over medium-high heat.7️⃣Bake:Cover the pot with a tight-fitting lid and transfer to the oven. Cook for about 2 hours, until the beef is fork-tender.8️⃣Cook Onions and Mushrooms:About 30 minutes before the beef is ready, melt the butter in a skillet over medium heat.Add the pearl onions, mushrooms, 1/2 tsp kosher salt, and 1/4 tsp black pepper. Cook, stirring occasionally, until tender and lightly browned, 12-15 minutes.9️⃣Finish the Stew:Remove the pot from the oven and discard the bay leaves and thyme stems.Stir in the cooked onions and mushrooms. Taste and adjust seasoning with more salt and pepper if needed.🔟Serve:Garnish with chopped parsley if desired. Serve hot over egg noodles, mashed potatoes, or alongside crusty bread.
7️⃣Bake:
Cover the pot with a tight-fitting lid and transfer to the oven. Cook for about 2 hours, until the beef is fork-tender.8️⃣Cook Onions and Mushrooms:About 30 minutes before the beef is ready, melt the butter in a skillet over medium heat.Add the pearl onions, mushrooms, 1/2 tsp kosher salt, and 1/4 tsp black pepper. Cook, stirring occasionally, until tender and lightly browned, 12-15 minutes.9️⃣Finish the Stew:Remove the pot from the oven and discard the bay leaves and thyme stems.Stir in the cooked onions and mushrooms. Taste and adjust seasoning with more salt and pepper if needed.🔟Serve:Garnish with chopped parsley if desired. Serve hot over egg noodles, mashed potatoes, or alongside crusty bread.
8️⃣Cook Onions and Mushrooms:About 30 minutes before the beef is ready, melt the butter in a skillet over medium heat.Add the pearl onions, mushrooms, 1/2 tsp kosher salt, and 1/4 tsp black pepper. Cook, stirring occasionally, until tender and lightly browned, 12-15 minutes.9️⃣Finish the Stew:Remove the pot from the oven and discard the bay leaves and thyme stems.Stir in the cooked onions and mushrooms. Taste and adjust seasoning with more salt and pepper if needed.🔟Serve:Garnish with chopped parsley if desired. Serve hot over egg noodles, mashed potatoes, or alongside crusty bread.
About 30 minutes before the beef is ready, melt the butter in a skillet over medium heat.
Add the pearl onions, mushrooms, 1/2 tsp kosher salt, and 1/4 tsp black pepper. Cook, stirring occasionally, until tender and lightly browned, 12-15 minutes.9️⃣Finish the Stew:Remove the pot from the oven and discard the bay leaves and thyme stems.Stir in the cooked onions and mushrooms. Taste and adjust seasoning with more salt and pepper if needed.🔟Serve:Garnish with chopped parsley if desired. Serve hot over egg noodles, mashed potatoes, or alongside crusty bread.
9️⃣Finish the Stew:Remove the pot from the oven and discard the bay leaves and thyme stems.Stir in the cooked onions and mushrooms. Taste and adjust seasoning with more salt and pepper if needed.🔟Serve:Garnish with chopped parsley if desired. Serve hot over egg noodles, mashed potatoes, or alongside crusty bread.
Remove the pot from the oven and discard the bay leaves and thyme stems.
Stir in the cooked onions and mushrooms. Taste and adjust seasoning with more salt and pepper if needed.🔟Serve:Garnish with chopped parsley if desired. Serve hot over egg noodles, mashed potatoes, or alongside crusty bread.
🔟Serve:Garnish with chopped parsley if desired. Serve hot over egg noodles, mashed potatoes, or alongside crusty bread.
Garnish with chopped parsley if desired. Serve hot over egg noodles, mashed potatoes, or alongside crusty bread.
Notes
Wine Selection:Use a dry red wine like Burgundy, Pinot Noir, or Cabernet Sauvignon for the best flavor.Make Ahead:Beef Bourguignon tastes even better the next day. Reheat gently on the stovetop.Storage:Store leftovers in an airtight container in the refrigerator for up to 3 days or freeze for up to 3 months.
Make Ahead:Beef Bourguignon tastes even better the next day. Reheat gently on the stovetop.Storage:Store leftovers in an airtight container in the refrigerator for up to 3 days or freeze for up to 3 months.
Storage:Store leftovers in an airtight container in the refrigerator for up to 3 days or freeze for up to 3 months.
Craving a Flavor Explosion? Meet Your New Go-To Sliders!
Are you on the hunt for a truly irresistible appetizer or a quick, satisfying meal that will have everyone asking for the recipe? If you’re nodding along, then prepare to be amazed by Chicken Bacon Ranch Sliders. These delightful little sandwiches are a flavor powerhouse, combining juicy chicken, crispy bacon, and a creamy ranch dressing, all nestled in soft slider buns. Perfect for game days, parties, potlucks, or even a speedy weeknight dinner, these sliders are guaranteed crowd-pleasers. With an average search volume of over 10,000 per month for “chicken bacon ranch sliders,” it’s clear this recipe is a highly sought-after treasure. Let’s dive into how you can create these absolute gems right in your own kitchen.
The Star Ingredients: Flavorful Components
The magic of these sliders lies in the quality and synergy of its components. We’re aiming for a balance of savory, creamy, and slightly tangy notes that dance on your palate.
For the Chicken:
1 lb boneless, skinless chicken breasts or thighs, cut into bite-sized pieces (Thighs offer more moisture and flavor, while breasts are leaner. Opt for what you prefer!)
1 tablespoon olive oil (Or any neutral cooking oil for sautéing.)
1 teaspoon garlic powder
1/2 teaspoon onion powder
1/4 teaspoon smoked paprika (Adds a subtle smoky depth.)
Salt and freshly ground black pepper to taste
For the Ranch Components:
8 slices thick-cut bacon, cooked until crispy and crumbled (The crispy texture is key! Ensure it’s well-drained.)
1/2 cup mayonnaise (Use good quality mayo for the best creamy base.)
1/4 cup sour cream or Greek yogurt (Adds tanginess and a lighter texture. Greek yogurt is a healthier option.)
1 tablespoon fresh dill, finely chopped (or 1 teaspoon dried dill) (Fresh dill brings a brighter, more vibrant flavor.)
1 tablespoon milk or buttermilk (optional, for thinning)
Salt and freshly ground black pepper to taste
For Assembly:
12 slider buns (like Hawaiian rolls or brioche slider buns), split horizontally (The sweetness of Hawaiian rolls pairs beautifully with the savory filling.)
1 cup shredded cheese (cheddar, Monterey Jack, or a blend) (A good melting cheese is essential for that gooey goodness.)
Optional: A drizzle of extra ranch dressing for serving
Your Timeline: Prep, Cook, and Enjoy
Prep time: 20 minutes
Cook time: 25 minutes
Total time: 45 minutes
Compared to the average slider recipe that might take an hour or more with more complex preparations, these Chicken Bacon Ranch Sliders are relatively quick to assemble, making them ideal for busy days. The cooking time for the chicken and bacon is efficient, and the final bake is just long enough to melt the cheese and warm everything through.
Step-by-Step Instructions: Crafting Your Sliders
Step 1: Prepare the Chicken
In a medium bowl, toss the bite-sized chicken pieces with olive oil, garlic powder, onion powder, smoked paprika, salt, and pepper. Ensure each piece is evenly coated. Heat a large skillet over medium-high heat and add the seasoned chicken. Cook, stirring occasionally, until the chicken is golden brown and cooked through, about 5-7 minutes. Remove from skillet and set aside.
Step 2: Cook the Bacon
While the chicken is cooking or after, cook the bacon strips in a separate pan or in the same skillet (after removing the chicken and wiping it clean) until wonderfully crispy. Drain the bacon on paper towels, then crumble it into small pieces. Your kitchen should smell amazing right about now!
Step 3: Assemble the Sliders
Prepare your slider buns by slicing them horizontally. Arrange the bottom halves of the buns in a 9×13 inch baking dish. Top each bottom bun with a generous portion of the cooked chicken. Sprinkle the crumbled crispy bacon over the chicken. In a small bowl, whisk together the mayonnaise, sour cream (or Greek yogurt), dill, chives, garlic powder, onion powder, salt, and pepper. If the ranch mixture is too thick, stir in a tablespoon of milk or buttermilk until it reaches your desired consistency. Spoon or spread this creamy ranch mixture over the bacon and chicken.
Step 4: Bake the Sliders
Evenly sprinkle the shredded cheese over the ranch-covered fillings. Place the top halves of the slider buns over the cheese. Cover the baking dish tightly with aluminum foil. Bake in a preheated oven at 350°F (175°C) for 15-20 minutes, or until the buns are lightly toasted and the cheese is melted and gooey. If you desire a golden-brown top, you can remove the foil for the last 5 minutes of baking.
Step 5: Serve and Enjoy
Carefully remove the sliders from the baking dish. Serve them immediately while they are warm and the cheese is perfectly melted. You can slice them individually or serve them in the rectangular form they baked in. A little extra drizzle of ranch dressing on top is never a bad idea!
Nutritional Snapshot
While exact nutritional values can vary based on ingredient brands and specific quantities used, a typical serving (approximately one slider) of these Chicken Bacon Ranch Sliders would generally contain:
Calories: 300-400 kcal
Protein: 15-20g
Fat: 20-30g
Carbohydrates: 15-25g
Fiber: 1-3g
Note: These are estimates. For precise nutritional information, it’s recommended to use a recipe calculator with the specific ingredients you employ.
Healthier Swaps Without Sacrificing Flavor
Want to lighten up these delicious sliders? You can make smart substitutions that don’t compromise taste:
Leaner Protein: Use lean chicken breast and opt for turkey bacon, which is significantly lower in fat and calories.
Lighter Ranch: Replace some or all of the mayonnaise with plain Greek yogurt for a protein boost and reduced fat content.
Whole Wheat Buns: Swap traditional slider buns for whole wheat versions for added fiber.
Reduced Cheese: Use a reduced-fat cheese or simply a smaller amount.
Fresh Veggies: Add a thin layer of crisp lettuce or finely shredded cabbage for extra crunch and nutrients.
Elevate Your Serving Game
These sliders are incredibly versatile. They shine as:
Party Appetizers: Arrange them neatly on a platter with toothpicks for easy grabbing.
Game Day Snacks: Serve alongside wings, nachos, or a crisp salad.
Quick Lunches: Pair one or two with a side salad or a cup of soup for a complete meal.
Potluck Stars: Their portable nature and universal appeal make them a hit at any gathering.
Common Mistakes to Avoid
To ensure your sliders are perfect every time, steer clear of these common pitfalls:
Overcooking the Chicken: Dry chicken is the enemy of a good slider. Cook it just until done.
Undercooked Bacon: Soggy bacon won’t provide the delightful crunch you’re looking for.
Skipping the Foil: Not covering the sliders during the initial baking can lead to dry buns and unevenly melted cheese.
Bland Ranch Dressing: Don’t be shy with the herbs and seasonings in your ranch. Taste and adjust!
Rushing the Melt: Ensure the cheese has enough time to melt and become gooey before serving.
Storing Your Sliders
These sliders are best enjoyed fresh from the oven. However, if you have leftovers:
Refrigeration: Once cooled, store any remaining sliders in an airtight container in the refrigerator for up to 2-3 days.
Reheating: To reheat, place the sliders on a baking sheet and warm them in a preheated oven at 300°F (150°C) for about 10-15 minutes, or until heated through and cheese is melty again. Microwaving is an option but may result in softer buns.
Enjoy Your Chicken Bacon Ranch Sliders!
There you have it – a recipe for Chicken Bacon Ranch Sliders that’s guaranteed to impress. With their perfect balance of savory, creamy, and crispy textures, they are truly a culinary delight. Whether you’re hosting a gathering or just need a delicious meal, these sliders are a foolproof choice. Don’t hesitate to get creative with your seasonings or toppings! Whip up a batch this week and experience the magic for yourself. Happy cooking!
Frequently Asked Questions
What kind of chicken is best for these sliders?
Boneless, skinless chicken thighs are often preferred for their higher fat content, which keeps them moist and flavorful. However, chicken breast works well too, just be careful not to overcook it.
Can I make the ranch dressing ahead of time?
Absolutely! The ranch dressing can be made 1-2 days in advance and stored in an airtight container in the refrigerator. This allows the flavors to meld beautifully.
What if I don’t have slider buns?
You can use regular-sized dinner rolls and slice them into thirds or quarters to create larger sliders, or use a loaf of soft bread and cut it into squares.
How can I make this spicy?
Add a pinch of cayenne pepper or red pepper flakes to the chicken seasoning, or mix some sriracha or hot sauce into the ranch dressing for a spicy kick.
Can these be made vegetarian?
Yes, you can adapt this recipe for vegetarians by using plant-based chicken alternatives or omitting the chicken and focusing on a creamy ranch and bacon (vegetarian bacon) blend with cheese. Ensure your bacon is vegetarian if you go that route.
TheseChicken Bacon Ranch Slidersare the perfect blend of savory and cheesy goodness. Made with shredded chicken, creamy Ranch dressing, turkey bacon, and melted cheddar, they’re a crowd-pleasing appetizer or quick dinner option.
1️⃣Preheat Oven:Preheat your oven to 350°F (175°C). Lightly grease a 9×13-inch baking pan.2️⃣Prepare the Rolls:Place the bottom halves of the sliced Hawaiian rolls in the prepared baking pan.3️⃣Make the Chicken Mixture:In a mixing bowl, combine the shredded chicken, Ranch dressing, crumbled turkey bacon, and Parmesan cheese. Mix until evenly coated.4️⃣Assemble the Sliders:Spread the chicken mixture evenly over the bottom halves of the rolls.Sprinkle the shredded cheddar cheese evenly over the chicken mixture.Place the top halves of the rolls on top to form sandwiches.5️⃣Prepare Garlic Butter:In a small bowl, mix the melted butter with garlic powder.Brush the garlic butter generously over the tops of the rolls.6️⃣Bake the Sliders:Cover the baking pan with aluminum foil and bake in the preheated oven for 15 minutes, or until the cheese is melted and the sliders are heated through.Remove the foil and bake for an additional 2-3 minutes to lightly brown the tops.7️⃣Serve:Remove from the oven and let cool slightly before serving. Serve warm and enjoy!
2️⃣Prepare the Rolls:
Place the bottom halves of the sliced Hawaiian rolls in the prepared baking pan.3️⃣Make the Chicken Mixture:In a mixing bowl, combine the shredded chicken, Ranch dressing, crumbled turkey bacon, and Parmesan cheese. Mix until evenly coated.4️⃣Assemble the Sliders:Spread the chicken mixture evenly over the bottom halves of the rolls.Sprinkle the shredded cheddar cheese evenly over the chicken mixture.Place the top halves of the rolls on top to form sandwiches.5️⃣Prepare Garlic Butter:In a small bowl, mix the melted butter with garlic powder.Brush the garlic butter generously over the tops of the rolls.6️⃣Bake the Sliders:Cover the baking pan with aluminum foil and bake in the preheated oven for 15 minutes, or until the cheese is melted and the sliders are heated through.Remove the foil and bake for an additional 2-3 minutes to lightly brown the tops.7️⃣Serve:Remove from the oven and let cool slightly before serving. Serve warm and enjoy!
3️⃣Make the Chicken Mixture:In a mixing bowl, combine the shredded chicken, Ranch dressing, crumbled turkey bacon, and Parmesan cheese. Mix until evenly coated.4️⃣Assemble the Sliders:Spread the chicken mixture evenly over the bottom halves of the rolls.Sprinkle the shredded cheddar cheese evenly over the chicken mixture.Place the top halves of the rolls on top to form sandwiches.5️⃣Prepare Garlic Butter:In a small bowl, mix the melted butter with garlic powder.Brush the garlic butter generously over the tops of the rolls.6️⃣Bake the Sliders:Cover the baking pan with aluminum foil and bake in the preheated oven for 15 minutes, or until the cheese is melted and the sliders are heated through.Remove the foil and bake for an additional 2-3 minutes to lightly brown the tops.7️⃣Serve:Remove from the oven and let cool slightly before serving. Serve warm and enjoy!
In a mixing bowl, combine the shredded chicken, Ranch dressing, crumbled turkey bacon, and Parmesan cheese. Mix until evenly coated.
4️⃣Assemble the Sliders:Spread the chicken mixture evenly over the bottom halves of the rolls.Sprinkle the shredded cheddar cheese evenly over the chicken mixture.Place the top halves of the rolls on top to form sandwiches.5️⃣Prepare Garlic Butter:In a small bowl, mix the melted butter with garlic powder.Brush the garlic butter generously over the tops of the rolls.6️⃣Bake the Sliders:Cover the baking pan with aluminum foil and bake in the preheated oven for 15 minutes, or until the cheese is melted and the sliders are heated through.Remove the foil and bake for an additional 2-3 minutes to lightly brown the tops.7️⃣Serve:Remove from the oven and let cool slightly before serving. Serve warm and enjoy!
Spread the chicken mixture evenly over the bottom halves of the rolls.Sprinkle the shredded cheddar cheese evenly over the chicken mixture.Place the top halves of the rolls on top to form sandwiches.5️⃣Prepare Garlic Butter:In a small bowl, mix the melted butter with garlic powder.Brush the garlic butter generously over the tops of the rolls.6️⃣Bake the Sliders:Cover the baking pan with aluminum foil and bake in the preheated oven for 15 minutes, or until the cheese is melted and the sliders are heated through.Remove the foil and bake for an additional 2-3 minutes to lightly brown the tops.7️⃣Serve:Remove from the oven and let cool slightly before serving. Serve warm and enjoy!
Sprinkle the shredded cheddar cheese evenly over the chicken mixture.
Place the top halves of the rolls on top to form sandwiches.5️⃣Prepare Garlic Butter:In a small bowl, mix the melted butter with garlic powder.Brush the garlic butter generously over the tops of the rolls.6️⃣Bake the Sliders:Cover the baking pan with aluminum foil and bake in the preheated oven for 15 minutes, or until the cheese is melted and the sliders are heated through.Remove the foil and bake for an additional 2-3 minutes to lightly brown the tops.7️⃣Serve:Remove from the oven and let cool slightly before serving. Serve warm and enjoy!
5️⃣Prepare Garlic Butter:In a small bowl, mix the melted butter with garlic powder.Brush the garlic butter generously over the tops of the rolls.6️⃣Bake the Sliders:Cover the baking pan with aluminum foil and bake in the preheated oven for 15 minutes, or until the cheese is melted and the sliders are heated through.Remove the foil and bake for an additional 2-3 minutes to lightly brown the tops.7️⃣Serve:Remove from the oven and let cool slightly before serving. Serve warm and enjoy!
In a small bowl, mix the melted butter with garlic powder.
Brush the garlic butter generously over the tops of the rolls.6️⃣Bake the Sliders:Cover the baking pan with aluminum foil and bake in the preheated oven for 15 minutes, or until the cheese is melted and the sliders are heated through.Remove the foil and bake for an additional 2-3 minutes to lightly brown the tops.7️⃣Serve:Remove from the oven and let cool slightly before serving. Serve warm and enjoy!
6️⃣Bake the Sliders:Cover the baking pan with aluminum foil and bake in the preheated oven for 15 minutes, or until the cheese is melted and the sliders are heated through.Remove the foil and bake for an additional 2-3 minutes to lightly brown the tops.7️⃣Serve:Remove from the oven and let cool slightly before serving. Serve warm and enjoy!
Cover the baking pan with aluminum foil and bake in the preheated oven for 15 minutes, or until the cheese is melted and the sliders are heated through.
Remove the foil and bake for an additional 2-3 minutes to lightly brown the tops.7️⃣Serve:Remove from the oven and let cool slightly before serving. Serve warm and enjoy!
7️⃣Serve:Remove from the oven and let cool slightly before serving. Serve warm and enjoy!
Remove from the oven and let cool slightly before serving. Serve warm and enjoy!
Notes
Make-Ahead Option:Assemble the sliders up to step 5, cover tightly, and refrigerate for up to 12 hours. Bake as directed when ready to serve.Serving Suggestions:Serve with a side of celery sticks, a salad, or chips for a complete meal or party snack.Turkey Bacon Tip:Cook the turkey bacon until crispy for the best texture and flavor in the sliders.Storage:Store leftovers in an airtight container in the refrigerator for up to 2 days. Reheat in the oven at 300°F until warmed through.
Serving Suggestions:Serve with a side of celery sticks, a salad, or chips for a complete meal or party snack.Turkey Bacon Tip:Cook the turkey bacon until crispy for the best texture and flavor in the sliders.Storage:Store leftovers in an airtight container in the refrigerator for up to 2 days. Reheat in the oven at 300°F until warmed through.
Turkey Bacon Tip:Cook the turkey bacon until crispy for the best texture and flavor in the sliders.Storage:Store leftovers in an airtight container in the refrigerator for up to 2 days. Reheat in the oven at 300°F until warmed through.
Storage:Store leftovers in an airtight container in the refrigerator for up to 2 days. Reheat in the oven at 300°F until warmed through.
“`
Easy Slow Cooker Chicken Pasta Recipe for Busy Days!
Easy Slow Cooker Chicken Pasta Recipe for Busy Days!
Embrace Effortless Dinners
Are you tired of the dinnertime scramble, especially on those hectic weeknights when the thought of cooking feels overwhelming? Imagine coming home to a pot full of tender, flavorful chicken and perfectly cooked pasta, all ready to be devoured with minimal fuss. This couldn’t be easier with our Easy Slow Cooker Chicken Pasta recipe! It’s designed for busy individuals and families who crave comfort food without the kitchen stress. This recipe is a game-changer, using the magic of your slow cooker to do most of the heavy lifting, leaving you with more time to connect with loved ones or simply relax. We understand the modern-day need for quick, delicious, and satisfying meals, and this one delivers on all fronts. Get ready to discover your new go-to weeknight wonder! 🍝🐔 #SlowCookerRecipes #OnePotMeal #ComfortFood #EasyDinnerIdeas #FamilyFavorites
Simple & Savory Ingredients
The beauty of this Slow Cooker Chicken Pasta lies in its simplicity. We’re focusing on widely available ingredients that deliver big on flavor. Minimal prep means maximum enjoyment!
The Stars of the Show
1.5 lbs Boneless, Skinless Chicken Breasts or Thighs: This is our protein powerhouse. Thighs tend to stay more moist with slow cooking, but breasts work beautifully too. Ensure they’re cut into bite-sized pieces for even cooking and easy eating.
1 Jar (24 oz) Marinara Sauce: Your shortcut to a rich, tomato-based flavor. Choose a good quality one you love, perhaps one with a hint of garlic or herbs.
1 Can (15 oz) Diced Tomatoes: Undrained! These add extra tomato goodness and a lovely texture, mingling with the marinara.
1 Cup Chicken Broth: This liquid base ensures everything stays moist and helps the flavors meld. Use low-sodium if you prefer to control saltiness.
Flavor Boosters
1 Medium Onion, chopped: Adds a sweet, aromatic depth. It will soften beautifully in the slow cooker.
2 Cloves Garlic, minced: Essential for that savory, classic pasta flavor. Freshly minced is best for potent aroma.
1 Teaspoon Dried Italian Seasoning: A blend of basil, oregano, and thyme that screams Italian comfort.
Salt and Black Pepper, to taste: To enhance all the other delicious flavors.
Optional: Red Pepper Flakes, pinch: For a subtle kick of heat if you like.
Pasta Perfection
8 oz Dried Pasta: Penne, rotini, or farfalle work wonderfully as they hold sauce well. Adjust to your favorite shape! We cook this separately at the end to prevent it from becoming mushy.
Effortless Timing
Prep Time:
15 minutes
Cook Time:
3-4 hours (Low) or 2-3 hours (High)
Total Time:
~3.5 – 4.5 hours
Servings:
4-6
Compared to traditional stovetop methods of cooking chicken and pasta separately, which can easily take up to an hour of active cooking and monitoring, this slow cooker approach significantly reduces your active involvement. The longest part is the slow cooking time, but during this period, you’re free to do other things! This recipe is a true time-saver for those busy weekdays.
Step-by-Step: Your Slow Cooker Magic
Step 1: The Prep Work
Begin by prepping your ingredients. Chop the onion and mince the garlic. Cut your chicken breasts or thighs into roughly 1-inch bite-sized pieces. This ensures they cook evenly and are easy to incorporate into the pasta later.
Step 2: Low and Slow Transformation
Place the chopped chicken pieces into your slow cooker. Add the chopped onion, minced garlic, marinara sauce, diced tomatoes (undrained), chicken broth, Italian seasoning, salt, pepper, and red pepper flakes (if using). Give everything a good stir to ensure the chicken is coated in the sauce and seasonings.
Step 3: The Pasta Finale
Now for the crucial part of perfect pasta. While the chicken and sauce are doing their magic in the slow cooker, cook your dried pasta according to package directions in a separate pot of boiling salted water. Cook it until it’s al dente – firm to the bite. Drain the pasta well once it’s cooked.
Step 4: Sauce and Serve
Once the cooking cycle in the slow cooker is complete (3-4 hours on Low or 2-3 hours on High), the chicken should be tender and cooked through. Shred the chicken directly in the slow cooker with two forks if you prefer smaller pieces, or leave them as is. Stir the drained, al dente pasta directly into the slow cooker with the chicken and sauce. Let it sit for about 5-10 minutes, allowing the pasta to absorb some of the delicious sauce. Serve hot!
Nutritional Spotlight
While exact nutritional values can vary based on the specific brands of ingredients used and portion sizes, a typical serving of this Easy Slow Cooker Chicken Pasta (without accounting for pasta) generally provides approximately:
Calories: 350-450 kcal (this is for the chicken and sauce mixture, before adding pasta)
Protein: 30-40g
Carbohydrates: 10-15g
Fat: 15-25g
Note: The addition of pasta will significantly increase the carbohydrate and calorie count. For precise tracking, it’s best to calculate based on your specific ingredients.
Healthier Twists, Same Amazing Flavor
Want to lighten things up without sacrificing taste? Try these simple swaps:
Leaner Protein: Opt for chicken breast and trim any visible fat from thighs.
Whole Wheat Pasta: Swap traditional pasta for whole wheat or lentil-based pasta for added fiber and nutrients.
Low-Sodium Ingredients: Use low-sodium chicken broth and a marinara sauce with reduced salt.
Extra Veggies: Bulk it up with extra vegetables like chopped bell peppers, zucchini, or spinach. Add them in the last hour of cooking.
Serving Suggestions to Shine
This dish is a complete meal on its own, but here are some ideas to elevate it:
Fresh Herbs: A sprinkle of fresh basil or parsley on top adds a burst of freshness and color.
Grated Parmesan: A classic pairing for pasta that adds a salty, nutty finish.
Garlic Bread: For true comfort food indulgence, serve with warm garlic bread for dipping.
Simple Salad: A crisp green salad with a light vinaigrette balances the richness of the pasta.
Common Pitfalls to Avoid
* Overcooking the Pasta: Cooking pasta directly in the slow cooker for the entire time can lead to a mushy, undesirable texture. Cooking it separately al dente and then combining is key.
* Not Enough Liquid: Ensure you have enough broth or sauce to keep your ingredients moist, especially if cooking on High. This prevents drying out.
* Skipping the Seasoning: While marinara has flavor, don’t be afraid to add onion, garlic, and Italian seasoning to boost the overall taste profile.
* Cutting Chicken Too Small: If you cut the chicken into tiny pieces, it can dry out even in the slow cooker. Aim for roughly 1-inch pieces.
Smart Storing for Later
Leftovers are a blessing! Store cooled chicken pasta in an airtight container in the refrigerator for up to 3-4 days. Reheat gently on the stovetop or in the microwave, adding a splash of water or broth if it seems dry. For longer storage, you can freeze portions in freezer-safe containers for up to 2-3 months.
The Bottom Line: Deliciously Easy
This Easy Slow Cooker Chicken Pasta is more than just a recipe; it’s a solution. It’s proof that you can achieve delicious, satisfying meals even when time is short. The combination of tender chicken, a rich tomato sauce, and perfectly cooked pasta is a timeless crowd-pleaser. With minimal effort and maximum flavor, this recipe is destined to become a staple in your busy weeknight rotation. Give it a try and let your slow cooker work its magic!
Loved this recipe? Share your creations with us on social media using #SlowCookerChickenPasta or leave a comment below! We’d love to hear from you!
Frequently Asked Questions
What is the best type of pasta for this recipe?
Any pasta shape that holds sauce well is ideal. Penne, rotini, farfalle (bow-tie), or even fusilli are excellent choices. They catch the sauce beautifully!
Can I use pre-cooked chicken?
Yes, you can! If using pre-cooked chicken (like rotisserie chicken), add it in the last 30-60 minutes of cooking time on Low, just to warm through and absorb flavors. You can also add it after the sauce is cooked and stir in your separately cooked pasta.
Can I add vegetables to this recipe?
Absolutely! Bell peppers, zucchini, mushrooms, or a handful of spinach can be added. For heartier vegetables like peppers or mushrooms, add them at the beginning. Softer vegetables or spinach are best added during the last hour of cooking to prevent them from becoming too mushy.
My sauce is too thick, what can I do?
If the sauce is too thick after slow cooking, you can thin it out with a little extra chicken broth, water, or even a splash of heavy cream for richness before stirring in the pasta.
Can I make this recipe vegetarian?
Yes! Omit the chicken and chicken broth. You can add extra vegetables like chickpeas, lentils, or even plant-based chicken substitute. Use vegetable broth instead of chicken broth.
Join me, Emma, as I guide you through creating a sumptuousSlow CookerChicken Pasta that promises warmth and satisfaction with every bite. This dish is the epitome of easy comfort food—perfect for those busy days when you crave a hearty meal without the fuss. Get ready to delight in tender chicken, creamy sauce, and perfectly cooked pasta that comes together magically in yourslow cooker.
Ingredients
Scale
2large boneless, skinless chicken breasts
Salt and pepper, to taste
2 teaspoonsItalian seasoning
1 teaspoongarlic powder
1 cupchicken broth
4 ozcream cheese, cut into pieces
½ cupchopped sundried tomatoes
2 cupsfresh spinach
8 ozpenne pasta
½ cupgrated Parmesan cheese
Instructions
Season the chicken breasts with salt, pepper, Italian seasoning, and garlic powder. Place them in theslow cooker.
Pour the chicken broth over the chicken. Cover and set to cook on low for 4 hours or high for 2 hours.
Add the cream cheese and sundried tomatoes to theslow cookerafter the chicken is cooked. Stir until the cream cheese is fully incorporated.
Remove the chicken, shred it using twoforks, and then return it to theslow cooker.
Stir in the uncooked penne pasta and fresh spinach about 30 minutes before the end of the cooking time. Continue cooking until the pasta is tender.
Serve the pasta with a sprinkle of grated Parmesan cheese on top.
Notes
For a thicker sauce, mix a tablespoon of cornstarch with a little water and stir into the pasta before serving.
The pasta can be added later if you prefer it al dente.